5.Redis 实现点赞 优化登陆(验证码 token..)
Redis
(1)简介
Redis 是一个高性能的 key-value 数据库
原子 – Redis的所有操作都是原子性的。多个操作也支持事务,即原子性,通过MULTI和EXEC指令包起来。
非关系形数据库
数据全部存在内存中,性能高。
(2)数据类型
Redis支持五种数据类型:string(字符串),hash(哈希),list(列表),set(集合)及zset(sorted set:有序集合)。
string 是 redis 最基本的类型,你可以理解成与 Memcached 一模一样的类型,一个 key 对应一个 value。
Redis hash 是一个键值(key=>value)对集合。Redis hash 是一个 string 类型的 field 和 value 的映射表,hash 特别适合用于存储对象。
Redis 列表是简单的字符串列表,按照插入顺序排序。你可以添加一个元素到列表的头部(左边)或者尾部(右边)。
Redis 的 Set 是 string 类型的无序集合,集合是通过hash实现的
Redis zset 和 set 一样也是string类型元素的集合,且不允许重复的成员。不同的是每个元素都会关联一个double类型的分数。redis正是通过分数来为集合中的成员进行从小到大的排序。
(3)基本操作
@Test
public void testStrings() {String redisKey = "test:count";redisTemplate.opsForValue().set(redisKey, 1);System.out.println(redisTemplate.opsForValue().get(redisKey));System.out.println(redisTemplate.opsForValue().increment(redisKey));System.out.println(redisTemplate.opsForValue().decrement(redisKey));
}@Test
public void testHashes() {String redisKey = "test:user";redisTemplate.opsForHash().put(redisKey, "id", 1);redisTemplate.opsForHash().put(redisKey, "username", "zhangsan");System.out.println(redisTemplate.opsForHash().get(redisKey, "id"));System.out.println(redisTemplate.opsForHash().get(redisKey, "username"));
}@Test
public void testLists() {String redisKey = "test:ids";redisTemplate.opsForList().leftPush(redisKey, 101);redisTemplate.opsForList().leftPush(redisKey, 102);redisTemplate.opsForList().leftPush(redisKey, 103);System.out.println(redisTemplate.opsForList().size(redisKey));System.out.println(redisTemplate.opsForList().index(redisKey, 0));System.out.println(redisTemplate.opsForList().range(redisKey, 0, 2));System.out.println(redisTemplate.opsForList().leftPop(redisKey));System.out.println(redisTemplate.opsForList().leftPop(redisKey));System.out.println(redisTemplate.opsForList().leftPop(redisKey));
}@Test
public void testSets() {String redisKey = "test:teachers";redisTemplate.opsForSet().add(redisKey, "刘备", "关羽", "张飞", "赵云", "诸葛亮");System.out.println(redisTemplate.opsForSet().size(redisKey));System.out.println(redisTemplate.opsForSet().pop(redisKey));System.out.println(redisTemplate.opsForSet().members(redisKey));
}@Test
public void testSortedSets() {String redisKey = "test:students";redisTemplate.opsForZSet().add(redisKey, "唐僧", 80);redisTemplate.opsForZSet().add(redisKey, "悟空", 90);redisTemplate.opsForZSet().add(redisKey, "八戒", 50);redisTemplate.opsForZSet().add(redisKey, "沙僧", 70);redisTemplate.opsForZSet().add(redisKey, "白龙马", 60);System.out.println(redisTemplate.opsForZSet().zCard(redisKey));System.out.println(redisTemplate.opsForZSet().score(redisKey, "八戒"));System.out.println(redisTemplate.opsForZSet().reverseRank(redisKey, "八戒"));System.out.println(redisTemplate.opsForZSet().reverseRange(redisKey, 0, 2));
}多次访问同一个key
@Test
public void testBoundOperations() {String redisKey = "test:count";BoundValueOperations operations = redisTemplate.boundValueOps(redisKey);operations.increment();operations.increment();operations.increment();operations.increment();operations.increment();System.out.println(operations.get());
}
(4)spring 配置 redis
引入依赖
<dependency><groupId>org.springframework.boot</groupId><artifactId>spring-boot-starter-data-redis</artifactId>
</dependency>
在 application.properties 中声明:访问哪个库,host地址,端口号
# RedisProperties
spring.redis.database=11
spring.redis.host=localhost
spring.redis.port=6379
在 config 下实现 RedisConfig 类
注入连接工厂才能访问数据库 RedisConnectionFactory factory
实例化 bean new RedisTemplate<>();
设置工厂后有访问数据库能力 template.setConnectionFactory(factory);
指定序列化方式(数据转化方式)
//定义自定义的redis对象@Beanpublic RedisTemplate<String, Object> redisTemplate(RedisConnectionFactory factory){RedisTemplate<String,Object> redisTemplate = new RedisTemplate<>();redisTemplate.setConnectionFactory(factory);//主要配置 序列化的方式//设置key 的 序列化方式redisTemplate.setKeySerializer(RedisSerializer.string());//设置value的序列化方式redisTemplate.setValueSerializer(RedisSerializer.json());//设置hash 的 key序列化redisTemplate.setHashKeySerializer(RedisSerializer.string());//设置 hash 的 value 序列化redisTemplate.setHashValueSerializer(RedisSerializer.json());//出发 使其生效redisTemplate.afterPropertiesSet();return redisTemplate;}(5)Redis 事务 管理
事务内命令不会立即执行,提交后统一执行
使用编程式事务进行管理,声明式事务用的少
调用 redisTemplate ,方法内部做匿名实现
SessionCallback() 里方法execute重写,内部实现事务逻辑
启用事务 operations.multi();
提交事务 operations.exec();
// 编程式事务
@Test
public void testTransactional() {Object obj = redisTemplate.execute(new SessionCallback() {@Overridepublic Object execute(RedisOperations operations) throws DataAccessException {String redisKey = "test:tx";operations.multi();operations.opsForSet().add(redisKey, "zhangsan");operations.opsForSet().add(redisKey, "lisi");operations.opsForSet().add(redisKey, "wangwu");System.out.println(operations.opsForSet().members(redisKey));return operations.exec();}});System.out.println(obj);
}
2.点赞
(1)业务层
生成redis key的工具 在 util 下实现 RedisKeyUtil,集合set存储谁给某个实体点的赞
public class RedisKeyUtil {private static final String SPLIT = ":";private static final String PREFIX_ENTITY_LIKE = "like:entity";private static final String PREFIX_USER_LIKE = "like:user";// 某个实体的赞// like:entity:entityType:entityId -> set(userId)public static String getEntityLikeKey(int entityType, int entityId) { //实体类型 实体IDreturn PREFIX_ENTITY_LIKE + SPLIT + entityType + SPLIT + entityId;}}Service 下实现 LikeService
@Service
public class LikeService {@Autowiredprivate RedisTemplate redisTemplate;// 点赞public void like(int userId, int entityType, int entityId) {//获取keyString entityLikeKey = RedisKeyUtil.getEntityLikeKey(entityType,entityId);//判断当前用户是否点过赞   即userid 是否在set中if(redisTemplate.opsForSet().isMember(entityLikeKey,userId)){redisTemplate.opsForSet().remove(entityLikeKey,userId);}else {redisTemplate.opsForSet().add(entityLikeKey,userId);}}// 查询某实体点赞的数量public long findEntityLikeCount(int entityType, int entityId){String entityLikeKey = RedisKeyUtil.getEntityLikeKey(entityType,entityId);return redisTemplate.opsForSet().size(entityLikeKey);}// 查询某人对某实体的点赞状态public int findEntityLikeStatus(int userId, int entityType, int entityId) {String entityLikeKey = RedisKeyUtil.getEntityLikeKey(entityType,entityId);return redisTemplate.opsForSet().isMember(entityLikeKey,userId)? 1:0 ;}
}
(2)表现层
Controller 下实现 LikeController
获取当前用户
调用service点赞方法
获取数量和状态
放入map
返回json格式数据
@Controller
public class LikeController {@Autowiredprivate LikeService likeService;@Autowiredprivate HostHolder hostHolder;@RequestMapping(path = "/like", method = RequestMethod.POST)@ResponseBodypublic String like(int entityType, int entityId){User user = hostHolder.getUser();//点赞likeService.like(user.getId(), entityType,entityId);//更新点赞数量long likeCount = likeService.findEntityLikeCount(entityType,entityId);//查询状态int likeStatus = likeService.findEntityLikeStatus(user.getId(),entityType,entityId);Map<String,Object> map = new HashMap<>();map.put("likeCount", likeCount);map.put("likeStatus", likeStatus);return CommunityUtil.getJSONString(0, null, map);}
}
帖子详情页面赞的数量的显示
修改 DiscussPostController 下的 getDiscussPost
//根据 帖子id 查询帖子内容 评论 评论的回复@RequestMapping(path = "/detail/{discussPostId}",method = RequestMethod.GET)public String getDiscussPost(@PathVariable("discussPostId") int discussPostId, Model model, Page page){//根据帖子id查询帖子DiscussPost post = discussPostService.findDiscussPostById(discussPostId);model.addAttribute("post",post);//根据userid查询userUser user =userService.findUserById(post.getUserId());model.addAttribute("user",user);// 点赞数量long likeCount = likeService.findEntityLikeCount(ENTITY_TYPE_POST, discussPostId);model.addAttribute("likeCount", likeCount);// 点赞状态int likeStatus = hostHolder.getUser() == null ? 0 :likeService.findEntityLikeStatus(hostHolder.getUser().getId(), ENTITY_TYPE_POST, discussPostId);model.addAttribute("likeStatus", likeStatus);//查评论的分页信息page.setLimit(5);page.setPath("/discuss/detail/" + discussPostId);page.setRows(post.getCommentCount());//评论:给帖子的评论//回复:给评论的评论//获取所有评论List<Comment> commentList = commentService.findCommentsByEntity(ENTITY_TYPE_POST,post.getId(), page.getOffset(),page.getLimit());//用于封装 每条评论及每条评论的回复。。。List<Map<String,Object>> commentVoList = new ArrayList<>();//每一条评论 找到评论的作者。找到该评论的回复,回复的作者,回复的用户for (Comment comment:commentList) {Map<String,Object> commentVo = new HashMap<>();//存入评论内容commentVo.put("comment",comment);//放入 作者commentVo.put("user",userService.findUserById(comment.getUserId()));// 点赞数量likeCount = likeService.findEntityLikeCount(ENTITY_TYPE_COMMENT, comment.getId());commentVo.put("likeCount", likeCount);// 点赞状态likeStatus = hostHolder.getUser() == null ? 0 :likeService.findEntityLikeStatus(hostHolder.getUser().getId(), ENTITY_TYPE_COMMENT, comment.getId());commentVo.put("likeStatus", likeStatus);//获取该评论的所有回复List<Comment> replyList = commentService.findCommentsByEntity(ENTITY_TYPE_COMMENT, comment.getId(), 0, Integer.MAX_VALUE);//用于封装 每一条回复的 作者 回复咪表List<Map<String, Object>> replyVoList = new ArrayList<>();if(replyVoList != null){for (Comment reply: replyList) {Map<String,Object> replyVo = new HashMap<>();//回复replyVo.put("reply", reply);// 放入 回复的作者replyVo.put("user", userService.findUserById(reply.getUserId()));//回复目标User target = reply.getTargetId() == 0 ? null : userService.findUserById(reply.getTargetId());replyVo.put("target", target);// 点赞数量likeCount = likeService.findEntityLikeCount(ENTITY_TYPE_COMMENT, reply.getId());replyVo.put("likeCount", likeCount);// 点赞状态likeStatus = hostHolder.getUser() == null ? 0 :likeService.findEntityLikeStatus(hostHolder.getUser().getId(), ENTITY_TYPE_COMMENT, reply.getId());replyVo.put("likeStatus", likeStatus);//将 单条回复放入 此 评论 总的 回复表replyVoList.add(replyVo);}}//将回复总表 嵌入 单条评论commentVo.put("replys", replyVoList);//回复数量int replyCount = commentService.findCommentCount(ENTITY_TYPE_COMMENT, comment.getId());commentVo.put("replyCount", replyCount);commentVoList.add(commentVo);}model.addAttribute("comments", commentVoList);return "/site/discuss-detail";}3.使用Redis存储验证码
LoginController.getKaptcha
// 老方法 验证码 存入session//session.setAttribute("kaptcha", text);// 验证码的归属 一个验证码 绑定 一个 kaptchaOwnerString kaptchaOwner = CommunityUtil.generateUUID();Cookie cookie = new Cookie("kaptchaOwner", kaptchaOwner);cookie.setMaxAge(60);cookie.setPath(contextPath);response.addCookie(cookie);//存入redisString redisKey = RedisKeyUtil.getKaptchaKey(kaptchaOwner);redisTemplate.opsForValue().set(redisKey, text, 60, TimeUnit.SECONDS);LoginController.login
// 检查验证码 String kaptcha = (String) session.getAttribute("kaptcha");//获取验证码String kaptcha =null;if(StringUtils.isNotBlank(kaptchaOwner)){//是否存在String redisKey = RedisKeyUtil.getKaptchaKey(kaptchaOwner);kaptcha = (String) redisTemplate.opsForValue().get(redisKey);}//比对验证码if(StringUtils.isBlank(kaptcha) || StringUtils.isBlank(code) || !kaptcha.equals(code)){model.addAttribute("codeMsg", "验证码不正确!");return "/site/login";}4. 使用Redis存储登录凭证
UserService
login 生成登录凭证
// 生成登录凭证LoginTicket loginTicket = new LoginTicket();loginTicket.setUserId(user.getId());loginTicket.setTicket(CommunityUtil.generateUUID());loginTicket.setStatus(0);loginTicket.setExpired(new Date(System.currentTimeMillis() + expiredSeconds * 1000));//loginTicketMapper.insertLoginTicket(loginTicket);String redisKey = RedisKeyUtil.getTicketKey(loginTicket.getTicket());redisTemplate.opsForValue().set(redisKey, loginTicket);logout 退出登录,ticket取出来再存进去
public void logout(String ticket) {//loginTicketMapper.updateStatus(ticket, 1);String redisKey = RedisKeyUtil.getTicketKey(ticket);LoginTicket loginTicket = (LoginTicket) redisTemplate.opsForValue().get(redisKey);loginTicket.setStatus(1);redisTemplate.opsForValue().set(redisKey,loginTicket);}LoginTicket 查询凭证
public LoginTicket findLoginTicket(String ticket) {// return loginTicketMapper.selectByTicket(ticket);String redisKey = RedisKeyUtil.getTicketKey(ticket);LoginTicket loginTicket = (LoginTicket) redisTemplate.opsForValue().get(redisKey);return loginTicket;}5.使用Redis缓存用户数据
查用户时: 先查缓存 在查mysql
UserService
// 1.优先从缓存中取值
private User getCache(int userId) {String redisKey = RedisKeyUtil.getUserKey(userId);return (User) redisTemplate.opsForValue().get(redisKey);
}// 2.取不到时初始化缓存数据
private User initCache(int userId) {User user = userMapper.selectById(userId);String redisKey = RedisKeyUtil.getUserKey(userId);redisTemplate.opsForValue().set(redisKey, user, 3600, TimeUnit.SECONDS);return user;
}// 3.数据变更时清除缓存数据
private void clearCache(int userId) {String redisKey = RedisKeyUtil.getUserKey(userId);redisTemplate.delete(redisKey);
}public User findUserById(int id) {
//        return userMapper.selectById(id);User user = getCache(id);if (user == null) {user = initCache(id);}return user;
}public int activation(int userId, String code) {User user = userMapper.selectById(userId);if (user.getStatus() == 1) {return ACTIVATION_REPEAT;} else if (user.getActivationCode().equals(code)) {userMapper.updateStatus(userId, 1);clearCache(userId);return ACTIVATION_SUCCESS;} else {return ACTIVATION_FAILURE;}
}public int updateHeader(int userId, String headerUrl) {
//        return userMapper.updateHeader(userId, headerUrl);int rows = userMapper.updateHeader(userId, headerUrl);clearCache(userId);return rows;
}
相关文章:
5.Redis 实现点赞 优化登陆(验证码 token..)
Redis(1)简介Redis 是一个高性能的 key-value 数据库原子 – Redis的所有操作都是原子性的。多个操作也支持事务,即原子性,通过MULTI和EXEC指令包起来。非关系形数据库数据全部存在内存中,性能高。(2&#…...

scscanner:一款功能强大的大规模状态码扫描工具
关于scscanner scscanner是一款功能强大的大规模状态码扫描工具,该工具可以帮助广大研究人员从一个URL列表文件中批量读取目标网站的状态码响应信息。除此之外,该工具还可以过滤出指定的状态码,并将结果存储到一个文件中以供后续深入分析使用…...

Word 和 LaTeX 文档相互转换
Word 和 LaTeX 文档相互转换 目前可以找到两种工具完成将 LaTeX\LaTeXLATEX 文档向 Word 文档的转换, 分别为 Tex2Word和LaTeX-to-Word。 Tex2Word 安装Tex2Word后, 启动 Word, 打开你要转换的 LaTeX\LaTeXLATEX 源文件 (注意,如果没有成功安装 Tex2Word,那么你无法读取…...
python自动发送邮件实现
目录1 前言2 准备工作2.1 电子邮件的基础知识。2.2 python邮件库2.3 邮箱设置3 python实现邮件自动发送3.1 SMTP()和send()方法介绍3.2 python实现实例参考信息1 前言 python功能强大,可以实现我们日常办公的很多任务。诸如批量处理word,excel,pdf等等文件…...

ccc-Classification-李宏毅(4)
文章目录Classification 概念Example ApplicationHow to do ClassificationWhy not RegesssionProbability from Class - FeatureProbability from ClassHow’s the results?Modifying ModelThree StepsProbability DistributionClassification 概念 本质是找一个函数&#x…...
Kubernetes + Docker 部署一个yolov5检测服务(基于FastDeploy)
Kubernetes Docker 从零部署一个yolov5检测服务,服务基于PaddlePaddle/FastDeploy的服务化部署;所有软件从零安装。 文章目录1.说明2.环境3.安装过程 3.1安装 Docker 3.2安装 minikube 3.3安装 Kubectl4.部署过程 4.1 Docker相关 4.2 k8s相关 4.3 启动服…...
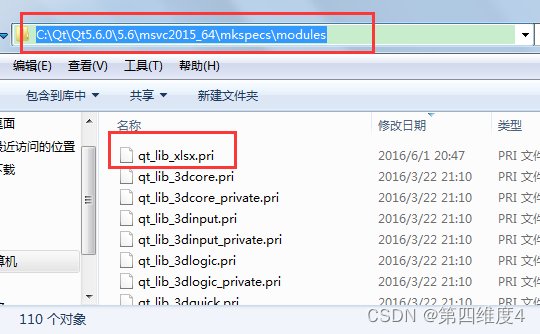
【C++/QT】QT5.6解析Excel教程(qtxlsx)
这里写目录标题【背景】【下载qtxlsx】【安装perl】【编译qtxlsx】【添加模块】【使用qtxlsx】【背景】 新接触QT,很多东西都不会,刚接触一个解析Excel的demo,记录一下安装、编译、解析Excel的过程 【下载qtxlsx】 在解析之前,…...

C++之智能指针
前言普通指针的不足new和new门的内存需要用delete和delete[释放。程序员的主观失误,忘了或漏了释放程序员也不确定何时释放(例如多个线程共享同一个对象,没办法确定什么时候释放)普通指针的释放类内的指针,在析构函数中…...
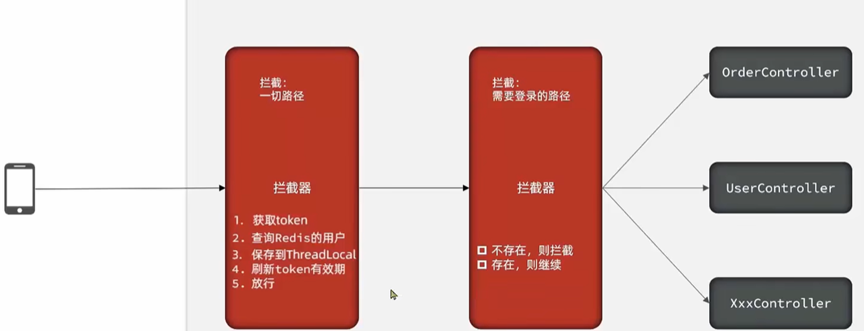
Redis实战-session共享之修改登录拦截器
在上一篇中Redis实战之session共享,我们知道了通过Redis实现session共享了,那么token怎么续命呢?怎么刷新用户呢?本来咱们就通过拦截器来实现这两个功能。 登录拦截器优化: 先来看看现在拦截器情况: 拦截…...
数据可视化,流程化处理pycharts-
本文直接进入可视化,输入讲解输入列表生成图片,关于pandas操作看这篇pandas matplotlib 导包后使用 import matplotlib.pyplot as plt饼图 使用 plt.figure 函数设置图片的大小为 15x15 使用 plt.pie 函数绘制饼图,并设置相关的参数&…...
1626_MIT 6.828 lab1课程大纲学习过程整理
全部学习汇总: GreyZhang/g_unix: some basic learning about unix operating system. (github.com) 现在lab1的内容全都学习完了,该做的练习也都做了。接下来,整理一下自己看这一部分课程讲义的一些笔记。 整理之前,先把自己完成…...

12月无情被辞:想给还不会自动化测试的技术人提个醒
公司前段时间缺人,也面了不少测试,结果竟没有一个合适的。一开始瞄准的就是中级的水准,也没指望来大牛,提供的薪资在10-20k,面试的人很多,但是平均水平很让人失望。基本能用一句话概括就是:3年测…...
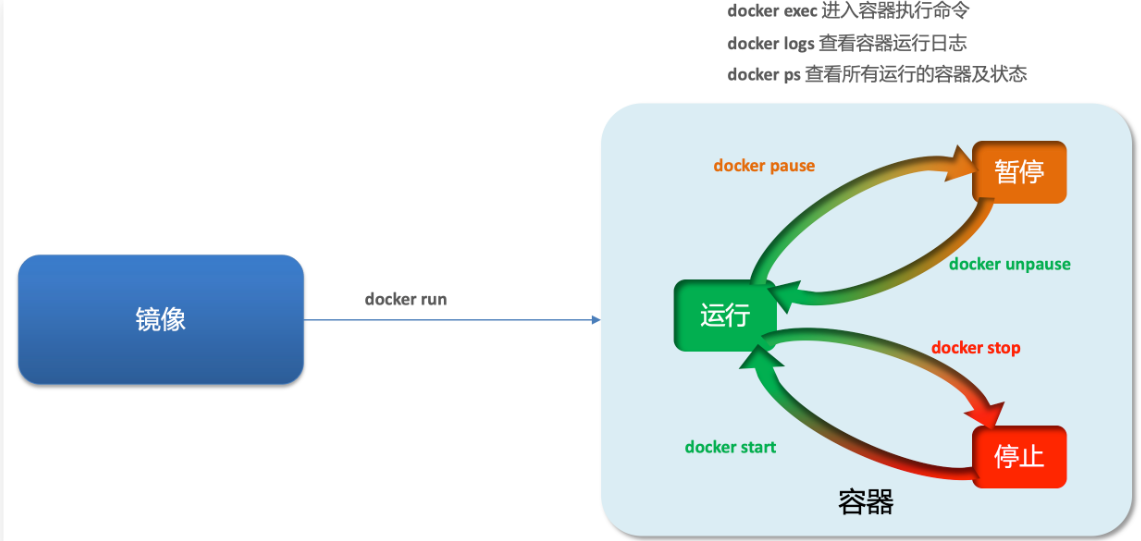
开发必备技术--docker(使用篇)
文章目录前言Docker的基本概念概念数据卷虚拟网络镜像操作镜像名称镜像命令容器操作基本操作容器创建数据卷操作创建和查看数据卷其他指令实战前言 续接上一篇博文: 开发必备技术–docker(一) 这也是开学了,假期的最后一篇博文&a…...
)
2023备战金三银四,Python自动化软件测试面试宝典合集(三)
马上就又到了程序员们躁动不安,蠢蠢欲动的季节~这不,金三银四已然到了家门口,元宵节一过后台就有不少人问我:现在外边大厂面试都问啥想去大厂又怕面试挂面试应该怎么准备测试开发前景如何面试,一个程序员成长之路永恒绕…...
TortoiseGit 使用教程
一、下载工具 这里给大家准备了所有安装包自取 链接:https://pan.baidu.com/s/1xrxxgyNXNQEGD_RjwKnPMg 提取码:qwer 也可在官网自行下载最新版 1.下载git,直接去官网下载Git - Downloads,根据自己的系统合理下载,…...

Linux项目自动化构建工具make/Makefile
本文已收录至《Linux知识与编程》专栏! 作者:ARMCSKGT 演示环境:CentOS 7 目录 前言 正文 makefile文件与语法规则 make指令与执行逻辑 makefile任务刷新策略 .PHONY修饰为伪目标 最后 前言 会不会写makefile,从一个侧面…...
M100嵌入式自动吞吐式读写器|电动读卡机如何通过C#程序读取社保卡号
M100嵌入式自动吞吐式读写器|电动读卡机是一款双保护门功能读卡器,第一层防尘防异物机械门,第二层电动门。 M100嵌入式自动吞吐式读写器|电动读卡机采用耐高温、耐磨擦、高强度、抗老化的复合型塑胶为主体,在走卡通道两侧镶有不锈钢金属&…...
STM32----搭建Arduino开发环境
搭建Arduino开发环境前言一、Arduino软件1.软件下载2.软件安装3.软件操作二、Cortex官方内核三、烧录下载四、其他第三方内核1.Libmaple内核2.Steve改进的LibMaple 内核3.STMicroelectronics(ST)公司编写的内核总结前言 本章介绍搭建STM32搭建Arduino开发环境,包括…...
,真机试题)
华为OD机试 - 事件推送(Python),真机试题
事件推送 题目 同一个数轴 X 上有两个点的集合 A={A1, A2, …, Am} 和 B={B1, B2, …, Bn}, Ai 和 Bj 均为正整数,A、B 已经按照从小到大排好序,A、B 均不为空, 给定一个距离 R (正整数), 列出同时满足如下条件的所有(Ai, Bj)数对: Ai <= BjAi, Bj 之间的距离小于…...

论如何获取CSDN原力
0x00 前言 因为个人需求,所以需要增长原力值,故对原力值的增长方式进行探索和总结。 0x01 正文 参考:https://blog.csdn.net/SoftwareTeacher/article/details/114499372 1.举报了劣质内容(博客,下载的资源&#x…...

AI编码助手配置框架:六层缰绳架构实现团队规范与上下文持久化
1. 项目概述:为什么你的AI编码助手总像个“健忘的实习生”? 如果你和我一样,已经深度使用Claude Code、Cursor这类AI编码助手超过半年,那你一定经历过这种“血压升高”的时刻:明明昨天刚跟它详细解释过项目的架构规范…...

利用Taotoken模型广场为内容生成应用挑选合适模型
🚀 告别海外账号与网络限制!稳定直连全球优质大模型,限时半价接入中。 👉 点击领取海量免费额度 利用Taotoken模型广场为内容生成应用挑选合适模型 对于开发内容生成类应用的团队而言,选择合适的模型是项目成功的关键…...
)
人工智能-现代方法(一)
2026.05.12 这几天开始看《人工智能-现代方法》,做一些知识记录。 1、学习的概念:归纳和演绎。(19章) 演绎靠逻辑推理,归纳靠经验总结。所以在前提正确的情况下,演绎的结论必然正确。归纳的结论则有可能出现…...

【Arcgis实战技巧】巧用DOM目视解译,从DSM中精准“挖”出地面高程点
1. 为什么需要从DSM中提取地面高程点? 在测绘和地理信息领域,数字表面模型(DSM)记录了地表所有物体的顶部高程信息,包括建筑物、树木、电线杆等。但很多时候我们需要的是数字高程模型(DEM)&…...

物联网超低功耗设计:从睡眠优先到能量自治的十年续航之道
1. 项目概述:让物联网节点运行数十年的设计哲学如果你正在部署一个大规模的物联网网络,无论是智慧城市的数千个路灯传感器,还是遍布数公里农田的环境监测节点,最让你头疼的问题恐怕不是通信协议,也不是数据处理&#x…...

FcμR识别IgM复杂机制的揭示:解锁人体免疫早期应答之谜
一、引言免疫系统是机体抵御病原体入侵、维持内环境稳定的关键防线。在免疫应答过程中,不同类型的免疫球蛋白发挥着独特的作用。其中,IgM作为人体五类免疫球蛋白之一,在免疫应答早期起着至关重要的作用。而Fc受体作为免疫系统中的重要组成部分…...

华为MateBook D 2018 BIOS隐藏选项实战:手动解锁TPM2.0迎战Win11
1. 为什么需要手动解锁TPM2.0 去年Windows 11正式发布时,很多华为MateBook D 2018用户都遇到了一个尴尬问题:明明硬件配置完全达标,却因为BIOS里找不到TPM2.0开关而无法升级。我当时也卡在这个环节整整两天,直到发现原来TPM功能被…...
暨十三届第四期“麓峰”交叉科学论坛)
【湖南师范大学主办 | ACM出版,检索快且稳定 | 往届均已见刊并完成EI、Scopus检索】第三届智慧教育与计算机技术国际学术会议 (IECT 2026)暨十三届第四期“麓峰”交叉科学论坛
已通过ACM出版,ISBN号:979-8-4007-2365-0 教育方向结合:计算机、信息技术、人工智能、多媒体技术、大数据等主题均可投递 第三届智慧教育与计算机技术国际学术会议 (IECT 2026)暨十三届第四期“麓峰”交叉科学论坛 2026 3rd International…...

ARM GICv3虚拟中断控制器与ICH_LR寄存器详解
1. ARM GICv3虚拟中断控制器架构概述 在现代计算机系统中,中断控制器是管理硬件中断的核心组件。ARM架构的通用中断控制器(Generic Interrupt Controller,GIC)经过多代演进,GICv3版本引入了对虚拟化的全面支持。虚拟化…...

终极KMS激活指南:如何永久免费激活Windows和Office系统
终极KMS激活指南:如何永久免费激活Windows和Office系统 【免费下载链接】KMS_VL_ALL_AIO Smart Activation Script 项目地址: https://gitcode.com/gh_mirrors/km/KMS_VL_ALL_AIO 还在为Windows激活弹窗而烦恼吗?是否遇到过Office突然变成只读模式…...