第一个 Angular 项目 - 静态页面
第一个 Angular 项目 - 静态页面
之前的笔记:
-
[Angular 基础] - Angular 渲染过程 & 组件的创建
-
[Angular 基础] - 数据绑定(databinding)
-
[Angular 基础] - 指令(directives)
这是在学完了上面这三个内容后能够完成的项目,目前因为还没有学到数据在不同组件之前的传输,因此只会有一个 UI 的渲染,而不会涉及到事件的实现
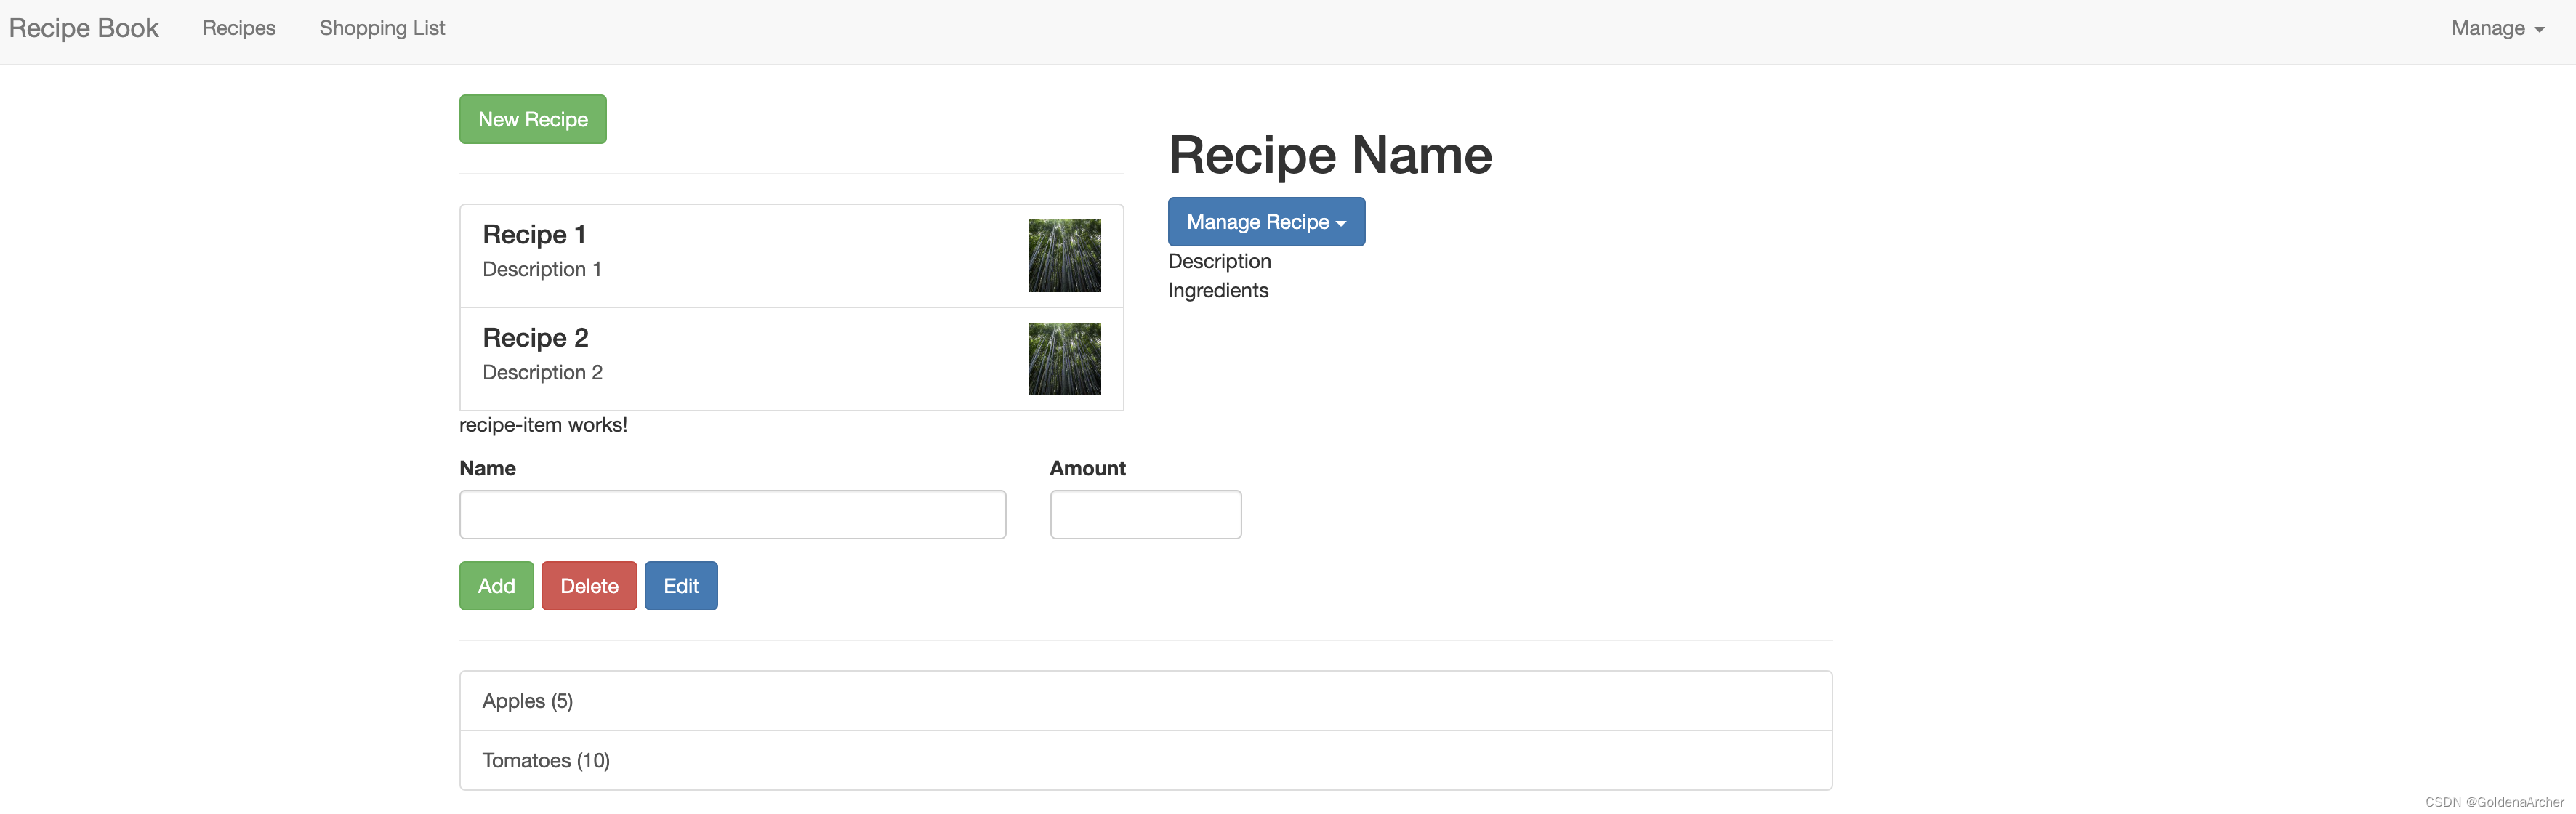
业务需求
wireframe 如下:
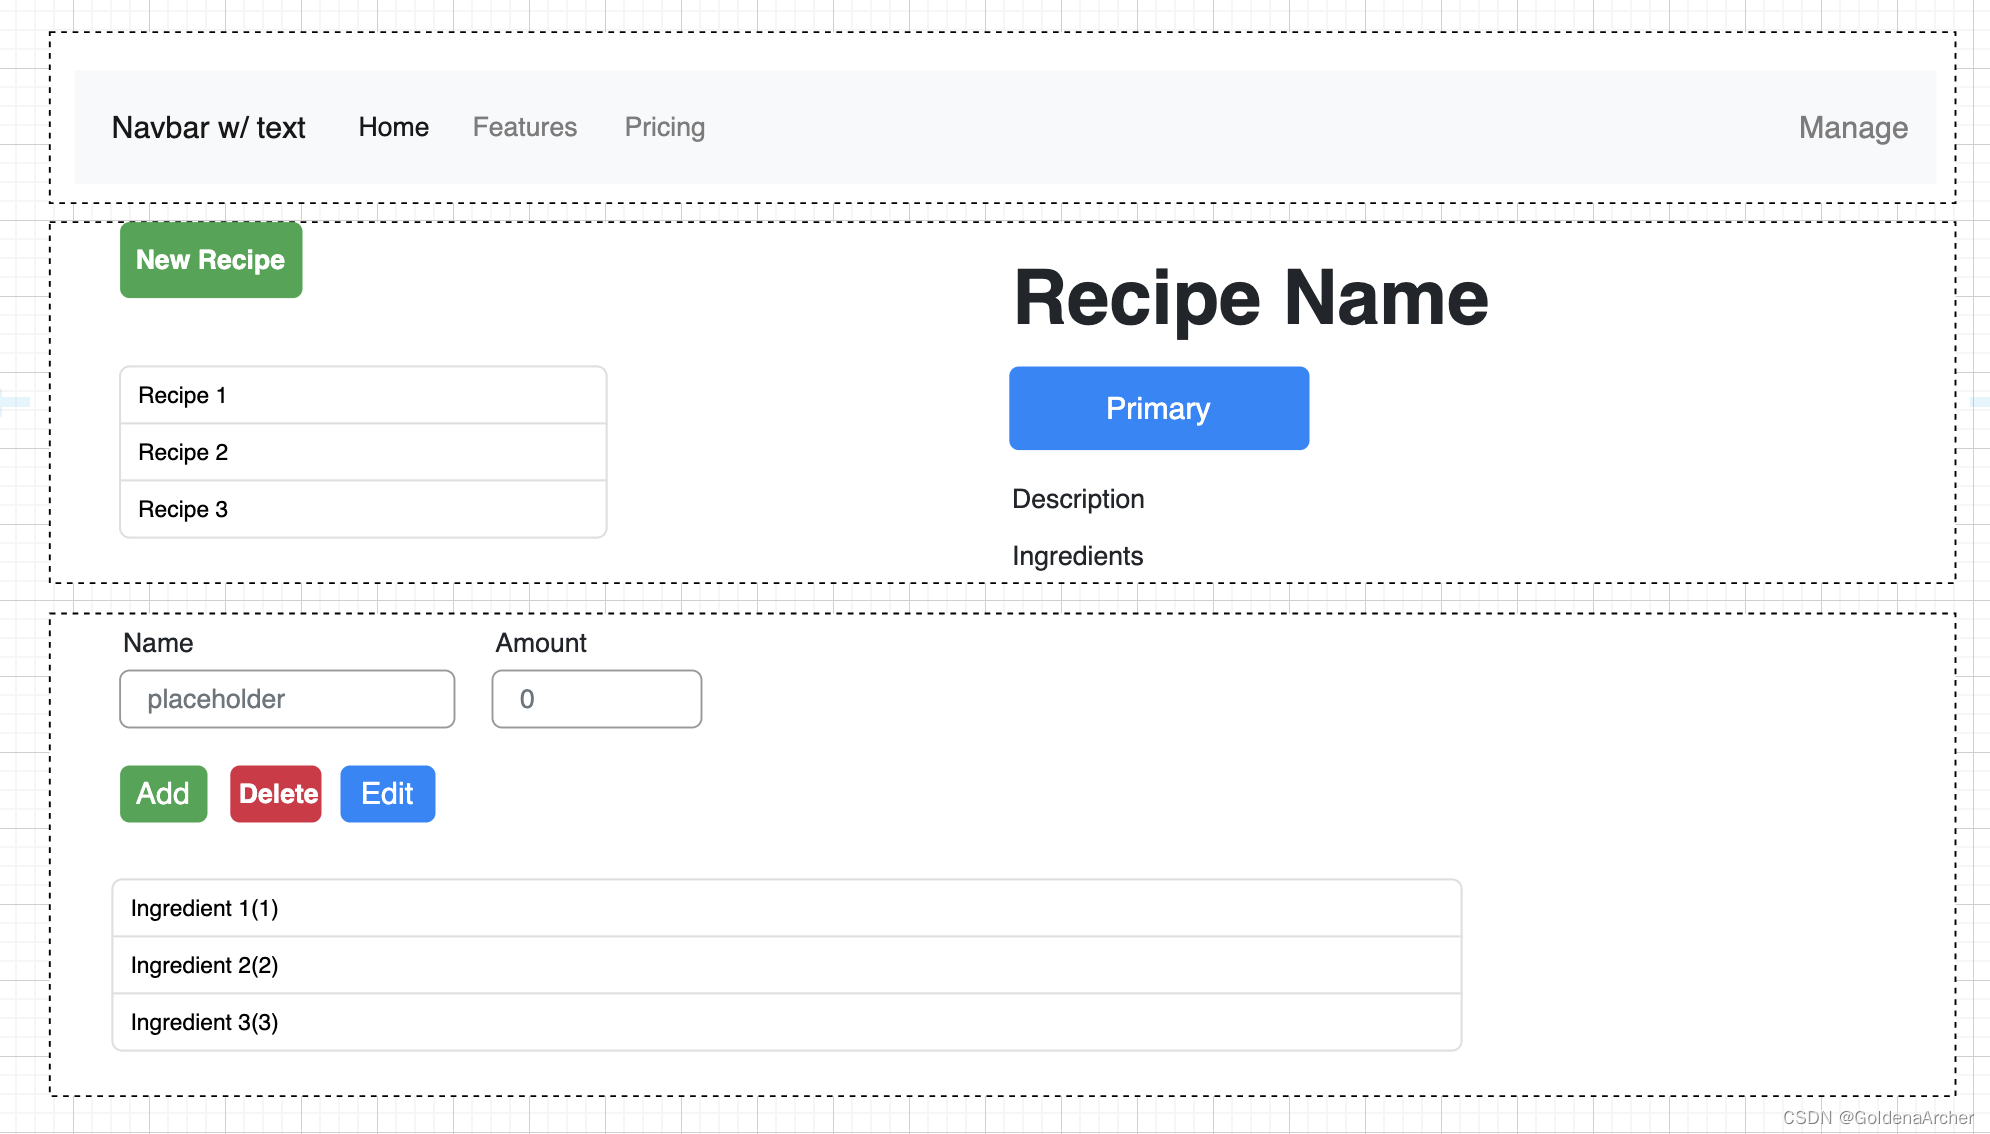
简单的说起来就是当前页面需要包含一个 Header,一个部分列举出所有的食谱(recipe),另外一个部分则列举出对应食谱的购物清单(shopping list)
虚线边框框起来的则是我认为的组件构成,将其转化成 Venn Diagram 则如下:
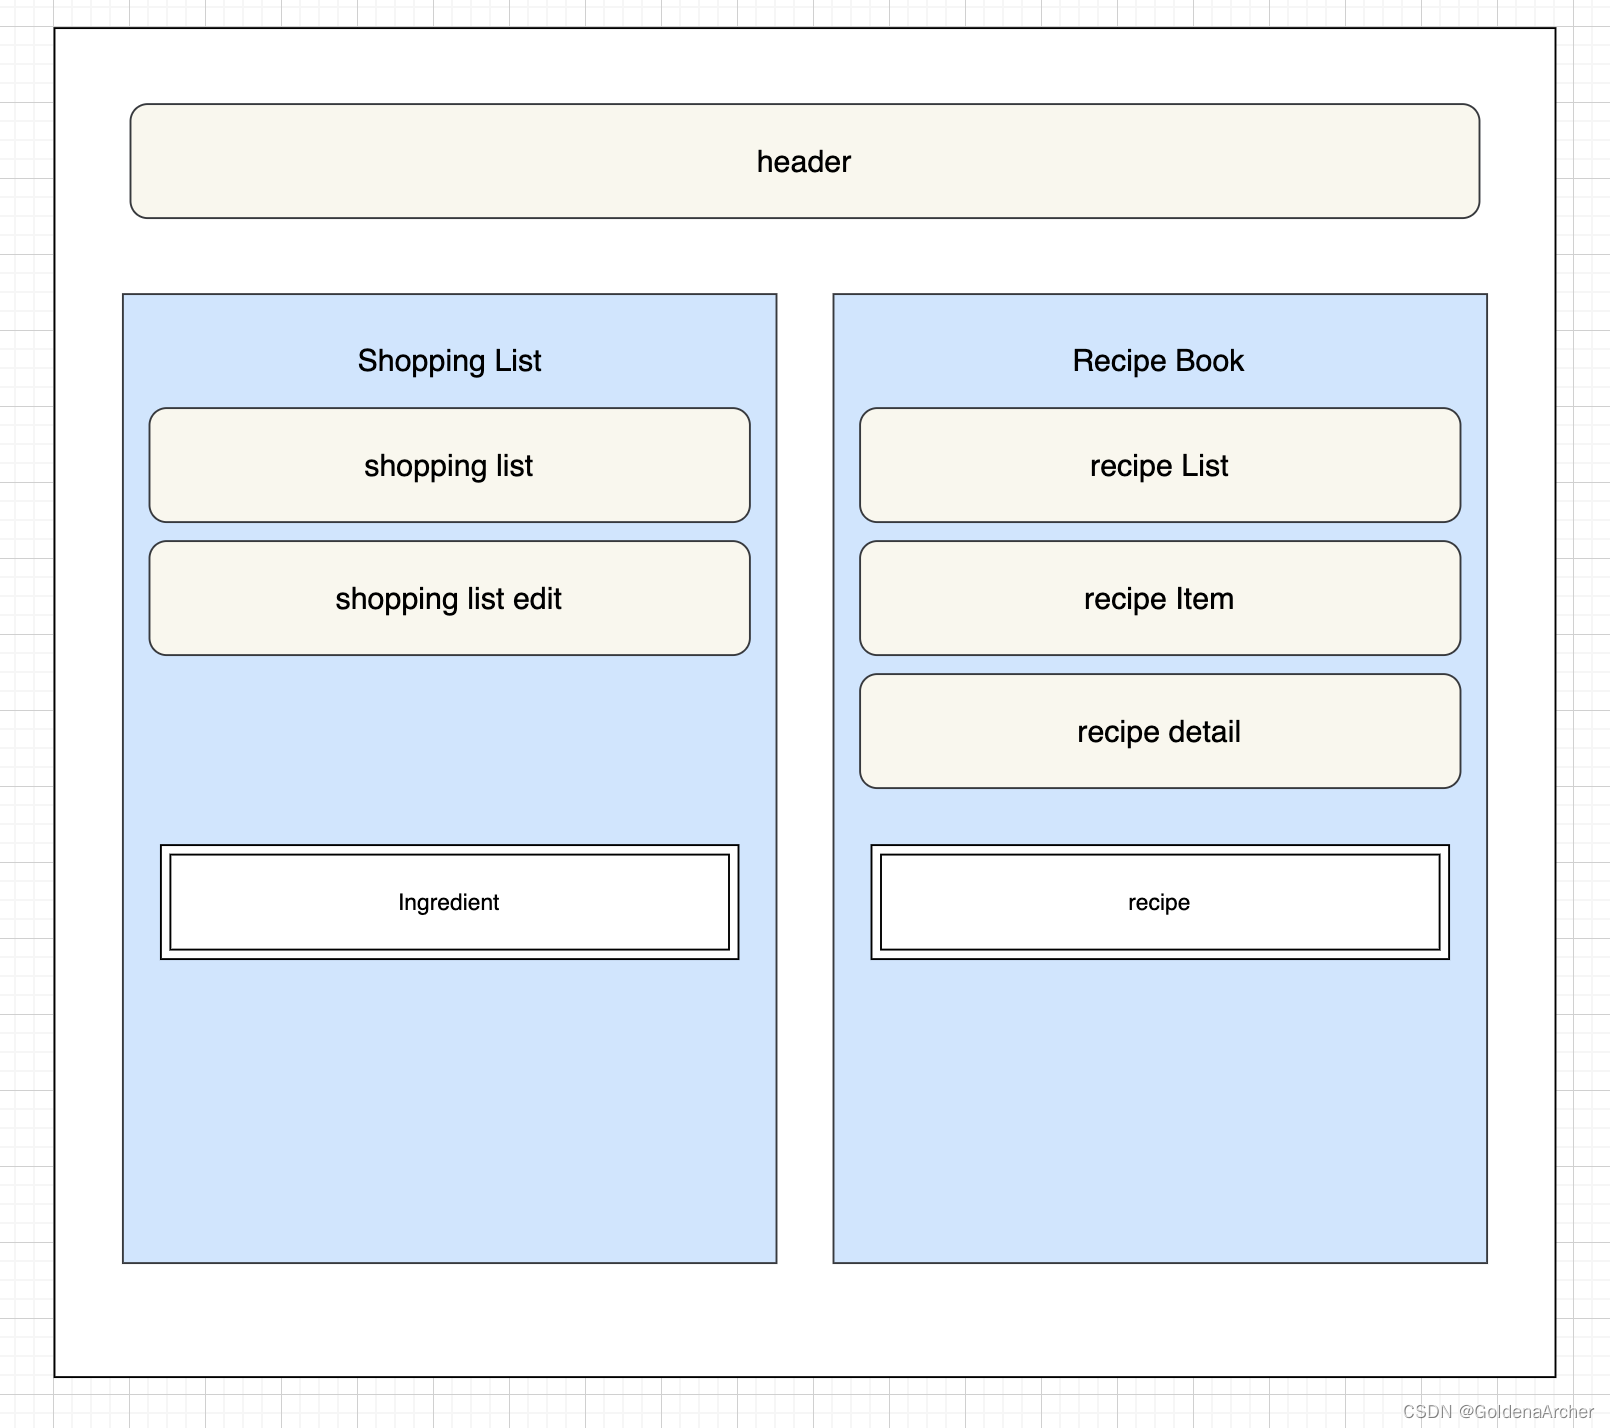
ingrident 和 recipe 为 Model,也就是 MVVM 中一直没讨论的部分(之前一直讨论的都是 VM 层和 V 层之间的互动)
根据需求也就可以开始下一步的实现了
创建项目
主要通过 bash 实现:
❯ ng new recipe-book --no-strict --standalone false --routing false
❯ cd recipe-book
# 在 angular.json 中配置对应的 bootstrap CSS 文件,第一篇笔记中有提
❯ npm i bootstrap@3
❯ ng g c header --skip-tests
❯ ng g c recipes --skip-tests
❯ ng g c recipes/recipe-list --skip-tests
❯ ng g c recipes/recipe-list/recipe-item --skip-tests
❯ ng g c shopping-list --skip-tests
❯ ng g c shopping-list/shopping-edit --skip-tests# 这是当前目录的结构
❯ tree src/app/
src/app/
├── app.component.css
├── app.component.html
├── app.component.spec.ts
├── app.component.ts
├── app.module.ts
├── header
│   ├── header.component.css
│   ├── header.component.html
│   └── header.component.ts
├── recipes
│   ├── recipe-detail
│   │   ├── recipe-detail.component.css
│   │   ├── recipe-detail.component.html
│   │   └── recipe-detail.component.ts
│   ├── recipe-list
│   │   ├── recipe-item
│   │   │   ├── recipe-item.component.css
│   │   │   ├── recipe-item.component.html
│   │   │   └── recipe-item.component.ts
│   │   ├── recipe-list.component.css
│   │   ├── recipe-list.component.html
│   │   └── recipe-list.component.ts
│   ├── recipes.component.css
│   ├── recipes.component.html
│   └── recipes.component.ts
└── shopping-list├── shopping-edit│   ├── shopping-edit.component.css│   ├── shopping-edit.component.html│   └── shopping-edit.component.ts├── shopping-list.component.css├── shopping-list.component.html└── shopping-list.component.ts8 directories, 26 files
component 的创建主要则是根据上面提到的业务需求进行实现,目前还没有创建对应 Model 对应的文件
实现功能
这里会用 bootstrap 内置的 class 实施不少功能,而 bootstrap 的部分不会细谈,主要还是针对 Angular 的学习
添加骨架
修改的部分为这里的 V 层:
src/app/
├── app.component.html
修改内容如下:
<app-header></app-header>
<div class="container"><div class="row"><div class="col-md-12"><app-recipes></app-recipes><app-shopping-list></app-shopping-list></div></div>
</div>
这里主要提供的是一个结构,并且展示三大组件:header, recipe 和 shopping list
header
修改的部分为这里的 V 层:
src/app/
├── header
│   ├── header.component.html
实现如下:
<nav class="navbar navbar-default"><div class="container-fluid"><div class="navbar-header"><a href="#" class="navbar-brand">Recipe Book</a></div><div class="collapse navbar-collapse"><ul class="nav navbar-nav"><li><a href="#">Recipes</a></li><li><a href="#">Shopping List</a></li></ul><ul class="nav navbar-nav navbar-right"><li class="dropdown"><ahref="#"class="dropdown-toggle"data-toggle="dropdown"role="button"aria-haspopup="true"aria-expanded="false">Manage <span class="caret"></span></a><ul class="dropdown-menu"><li><a href="#">Save Data</a></li><li><a href="#">Fetch Data</a></li></ul></li></ul></div></div>
</nav>
这里全都是 bootstrap 就不多赘述了,实现后效果如下:

recipe
recipe 部分的结构通过上面的文件结构也能看出来了,简化一下如下:
├── recipes
│   ├── recipe-detail
│   ├── recipe-list
│   │   ├── recipe-item
│   ├── recipe.model.ts # 即将创建的 model
recipes V 层
这个文件就是 recipes.component.html 这个文件,实现比较简单,只是导入 recipe-list 和当前选中的 recipe-detail:
<div class="row"><div class="col-md-5"><app-recipe-list></app-recipe-list></div><div class="col-md-7"><app-recipe-detail></app-recipe-detail></div>
</div>
这个会让 recipe-list 和 recipe-detail 出现在同一行
接下来就可以处理细节了
recipe model
这里主要就是定义了 recipe 应该有的数据,实现如下:
export class Recipe {constructor(public name: string,public description: string,public imagePath: string) {}
}
这代表着 Recipe 对象会有名字、描述和图片三个属性
recipe list VM 层
VM 层目前的逻辑也比较简单,它只需要存储一个 recipes 的数组,让 V 层可以渲染即可,代码如下:
import { Component } from '@angular/core';
import { Recipe } from '../recipe.model';@Component({selector: 'app-recipe-list',templateUrl: './recipe-list.component.html',styleUrl: './recipe-list.component.css',
})
export class RecipeListComponent {recipes: Recipe[] = [{name: 'Recipe 1',description: 'Description 1',imagePath: 'http://picsum.photos/200/200',},{name: 'Recipe 2',description: 'Description 2',imagePath: 'http://picsum.photos/200/200',},];
}
这里没用 new Recipe() 创建也不会报错,本质上来说 TS 的类型检查是检查数据是否对的上,而不是真的会检查 a instanceof A,而是做 a 有 name, a 有 description, a 有 imagePath -> a 是 A ✅ 这样一个检查
⚠️:picsum.photos 是我在 placeimg.com 上找到的代替网站。placeimg.com 于去年年中正式关站了(🕯️)
recipe list V 层
这一层要做的也比较简单,主要就是跑一个 ngFor 去渲染当前 list 中包含的数据,并且正确的渲染 recipe.name, recipe.description 和 recipe.imagePath 即可,这里主要用到的还是 string interpolation 和 property binding
实现代码如下:
<div class="row"><div class="col-xs-12"><button class="btn btn-success">New Recipe</button></div>
</div>
<div class="row"><div class="col-xs-12"><a href="#" class="list-group-item clearfix" *ngFor="let recipe of recipes"><div class="pull-left"><h4 class="list-group-item-heading">{{ recipe.name }}</h4><p class="list-group-item-text">{{ recipe.description }}</p></div><span class="pull-right"><img[src]="recipe.imagePath"[alt]="recipe.name"class="image-responsive"style="max-height: 50px"/></span></a></div><app-recipe-item></app-recipe-item>
</div>
完成后的效果:
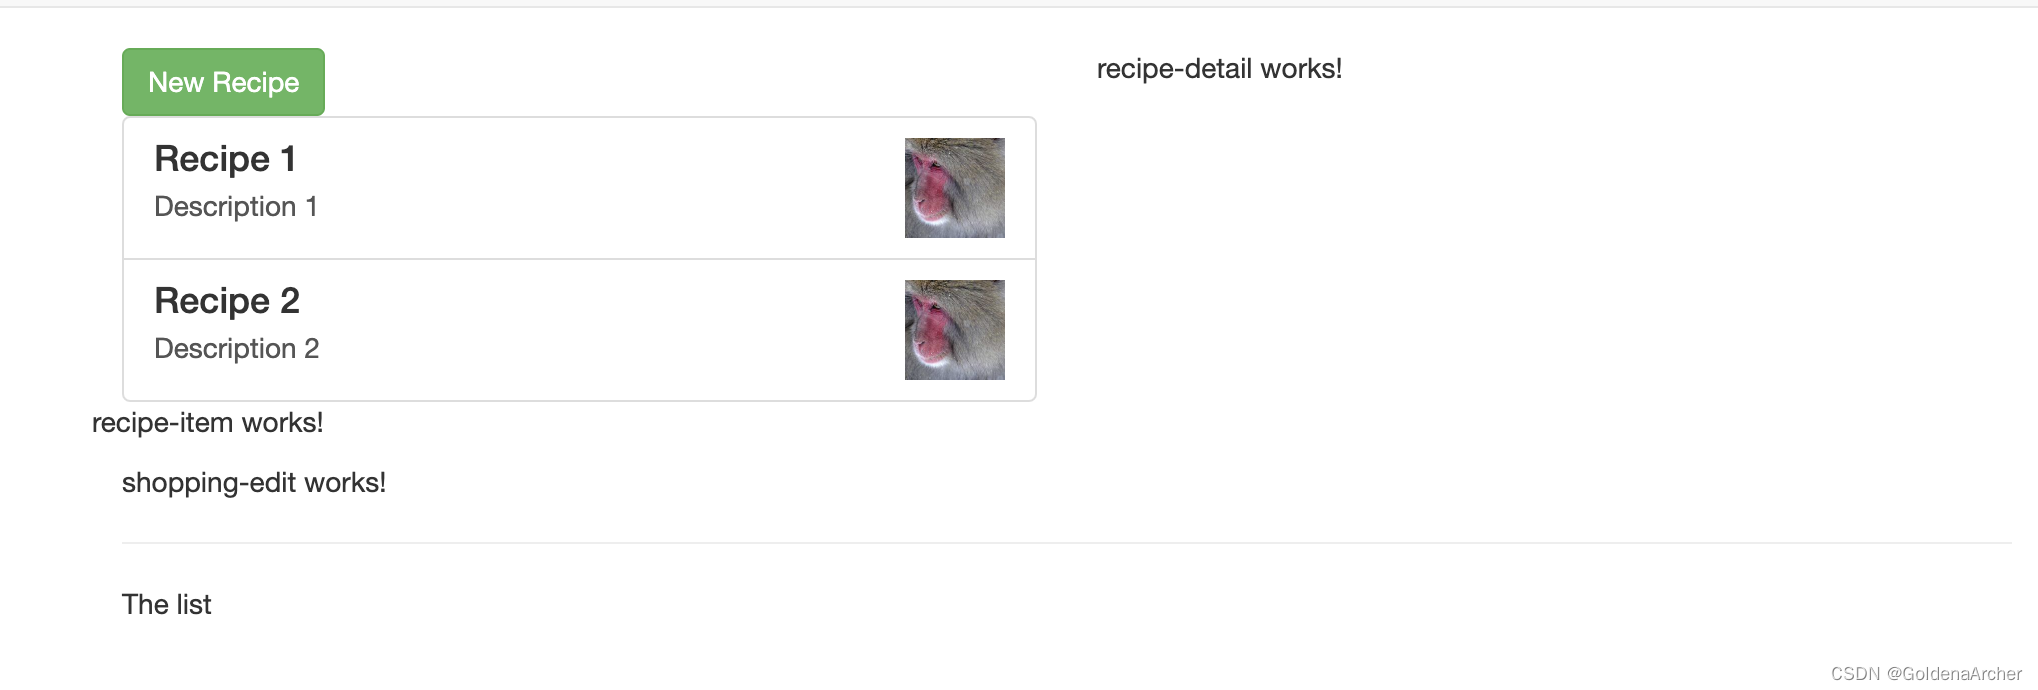
⚠️:这里的 ngFor + 输出所有的数据在 ngFor 是因为还没有实现跨组件交流,否则直接在 ngFor 中渲染 app-recipe-item,并传递对应对象即可
recipe detail V 层
同样因为跨组件交流还没实现,目前只会渲染一个静态且不会动的 V 层:
<div class="row"><div class="col-sx-12"><img [src]="" [alt]="" class="img-responsive" style="max-height: 300px" /></div>
</div>
<div class="row"><div class="col-xs-12"><h1>Recipe Name</h1></div>
</div>
<div class="row"><div class="col-xs-12"><div class="btn-group"><button type="button" class="btn btn-primary dropdown-toggle">Manage Recipe <span class="caret"></span></button><ul class="dropdown-menu"><li><a href="#">To Shopping List</a></li><li><a href="#">Edit Recipe</a></li><li><a href="#">Delete Recipe</a></li></ul></div></div>
</div><div class="row"><div class="col-sx-12">Description</div>
</div><div class="row"><div class="col-sx-12">Ingredients</div>
</div>
完成后效果:
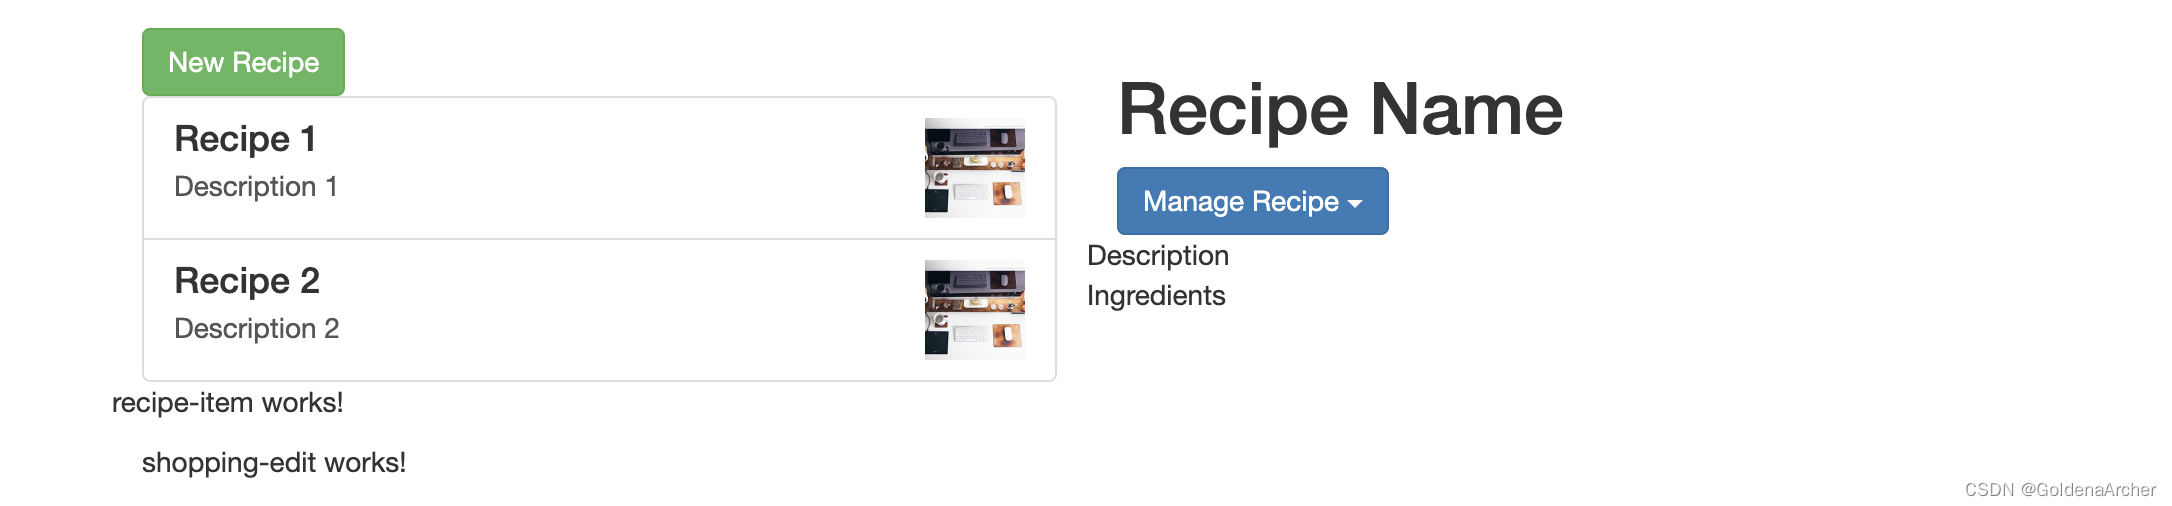
至此 recipe 部分结束
shopping-list
shopping-list 的实现和 recipe 差不多,也是创建 model,随后填充 VM 层
ingredient model
这个 model 在的目录不太一样:
src/app/
├── shared
│   └── ingredient.model.ts
个人的话,大概便好创建一个新的 src/app/model 用来存放所有的 model 吧,不过这种有点看个人便好/项目规定了。实现如下:
export class Ingredient {constructor(public name: string, public amount: number) {}
}
shopping-list VM 层
这个和 recipe VM 层差不多,添加 Ingredient[] 即可
import { Component } from '@angular/core';
import { Ingredient } from '../shared/ingredient.model';@Component({selector: 'app-shopping-list',templateUrl: './shopping-list.component.html',styleUrl: './shopping-list.component.css',
})
export class ShoppingListComponent {ingredients: Ingredient[] = [new Ingredient('Apples', 5),new Ingredient('Tomatoes', 10),];
}
shopping-list V 层
这里的实现也和上面 recipe list 的实现对应:
<div class="row"><div class="col-xs-10"><app-shopping-edit></app-shopping-edit><hr /><ul class="list-group"><aclass="list-group-item"style="cursor: pointer"*ngFor="let ingredient of ingredients">{{ ingredient.name }} ({{ ingredient.amount }})</a></ul></div>
</div>
实现后效果如下:

shopping-list edit V 层
出于同样的原因,这里只有 V 层,实现如下:
<div class="row"><div class="col-xs-12"><form><div class="row"><div class="col-sm-5 form-group"><label for="name">Name</label><input type="text" id="name" class="form-control" /></div><div class="col-sm-2 form-group"><label for="amount">Amount</label><input type="number" id="amount" class="form-control" /></div></div><div class="row"><div class="col-xs-12"><div class="btn-toolbar"><button class="btn btn-success mr-2" type="submit">Add</button><button class="btn btn-danger mr-2" type="button">Delete</button><button class="btn btn-primary" type="button">Edit</button></div></div></div></form></div>
</div>
最终结果:
下个章节开始数据传输之类的,也就是让页面动起来的部分
相关文章:
第一个 Angular 项目 - 静态页面
第一个 Angular 项目 - 静态页面 之前的笔记: [Angular 基础] - Angular 渲染过程 & 组件的创建 [Angular 基础] - 数据绑定(databinding) [Angular 基础] - 指令(directives) 这是在学完了上面这三个内容后能够完成的项目,目前因为还没有学到数…...
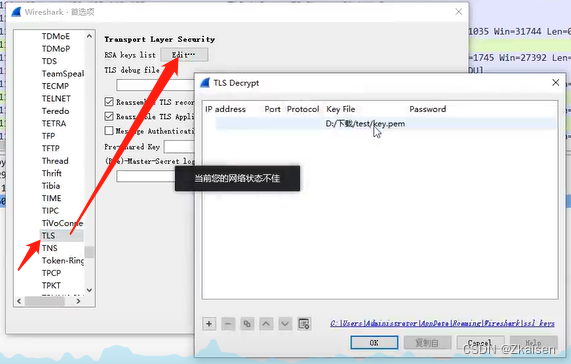
网络协议与攻击模拟_17HTTPS 协议
HTTPShttpssl/tls 1、加密算法 2、PKI(公钥基础设施) 3、证书 4、部署HTTPS服务器 部署CA证书服务器 5、分析HTTPS流量 分析TLS的交互过程 一、HTTPS协议 在http的通道上增加了安全性,传输过程通过加密和身份认证来确保传输安全性 1、TLS …...

【linux系统体验】-ubuntu简易折腾
ubuntu 一、终端美化二、桌面美化2.1 插件安装2.2 主题和图标2.3 美化配置 三、常用命令 以后看不看不重要,咱就是想记点儿东西。一、终端美化 安装oh my posh,参考链接:Linux 终端美化 1、安装字体 oh my posh美化工具可以使用合适的字体&a…...

Android 判断通知是进度条通知
1.需求: 应用监听安卓系统中的通知,需要区分出带进度条的通知. 当使用NotificationCompat.Builder构建一个通知时,可以通过调用setProgress(max, progress, indeterminate)方法来添加一个进度条。这里的max参数表示最大进度值,progress表示当前进度值&a…...

学习数据结构和算法的第8天
顺序表的实现 顺序表 本质就是数组 概念及结构 顺序表是用一段物理地址连续的储存单元依次储存数据元素的线性结构,一般情况下采用数组储存,在数组上完成数据的增删。 顺序表就是数组,但是在数组的基础上,它还要求数据…...
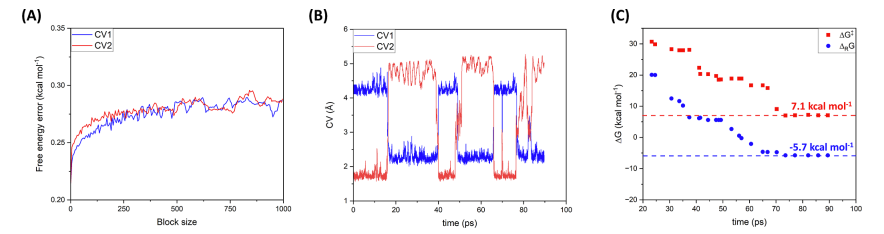
JCIM | MD揭示PTP1B磷酸酶激活RtcB连接酶的机制
Background 内质网应激反应(UPR) 中的一个重要过程。UPR是由内质网中的三种跨膜传感器(IRE1、PERK和ATF6)控制的细胞应激反应,当内质网中的蛋白质折叠能力受到压力时,UPR通过减少蛋白质合成和增加未折叠或错…...

基于Java (spring-boot)的音乐管理系统
一、项目介绍 播放器的前端: 1.首页:点击歌单中的音乐播放列表中的歌曲进行播放,播放时跳转播放界面,并显示歌手信息,同时会匹配歌词,把相应的歌词显示在歌词面板中。 2.暂停:当歌曲正在播放时…...

在 MacOS M系列处理器上使用 Anaconda 开发 Oralce 的Python程序
在 MacOS M系列处理器上使用 Anaconda 开发 Oralce 的Python程序 因oracle官方驱动暂无 苹果 M 系列处理器版本,所以使用Arm的python解释器报驱动错误: cx_Oracle.DatabaseError: DPI-1047: Cannot locate a 64-bit Oracle Client library: "dlop…...

四、OpenAI之文本生成模型
文本生成模型 OpenAI的文本生成模型(也叫做生成预训练的转换器(Generative pre-trained transformers)或大语言模型)已经被训练成可以理解自然语言、代码和图片的模型。模型提供文本的输出作为输入的响应。对这些模型的输入内容也被称作“提示词”。设计提示词的本质是你如何对…...

CSS之flex布局
flex布局 CSS的Flex布局(Flexible Box Layout)是一种用于在页面上布置元素的高效方法,特别适合于响应式设计。Flex布局使得元素能够伸缩以适应可用空间,可以简化很多原本需要复杂CSS和HTML结构才能实现的布局设计。 flex布局包括…...

UnityShader——02三大主流编程语言
三大主流编程语言 Shader Language Shader language的发展方向是设计出在便携性方面可以与C/JAVA相比的高级语言,“赋予程序员灵活而方便的编程方式”,并“利用图形硬件的并行性,提高算法的效率” Shader language目前主要有 3 种语言&…...
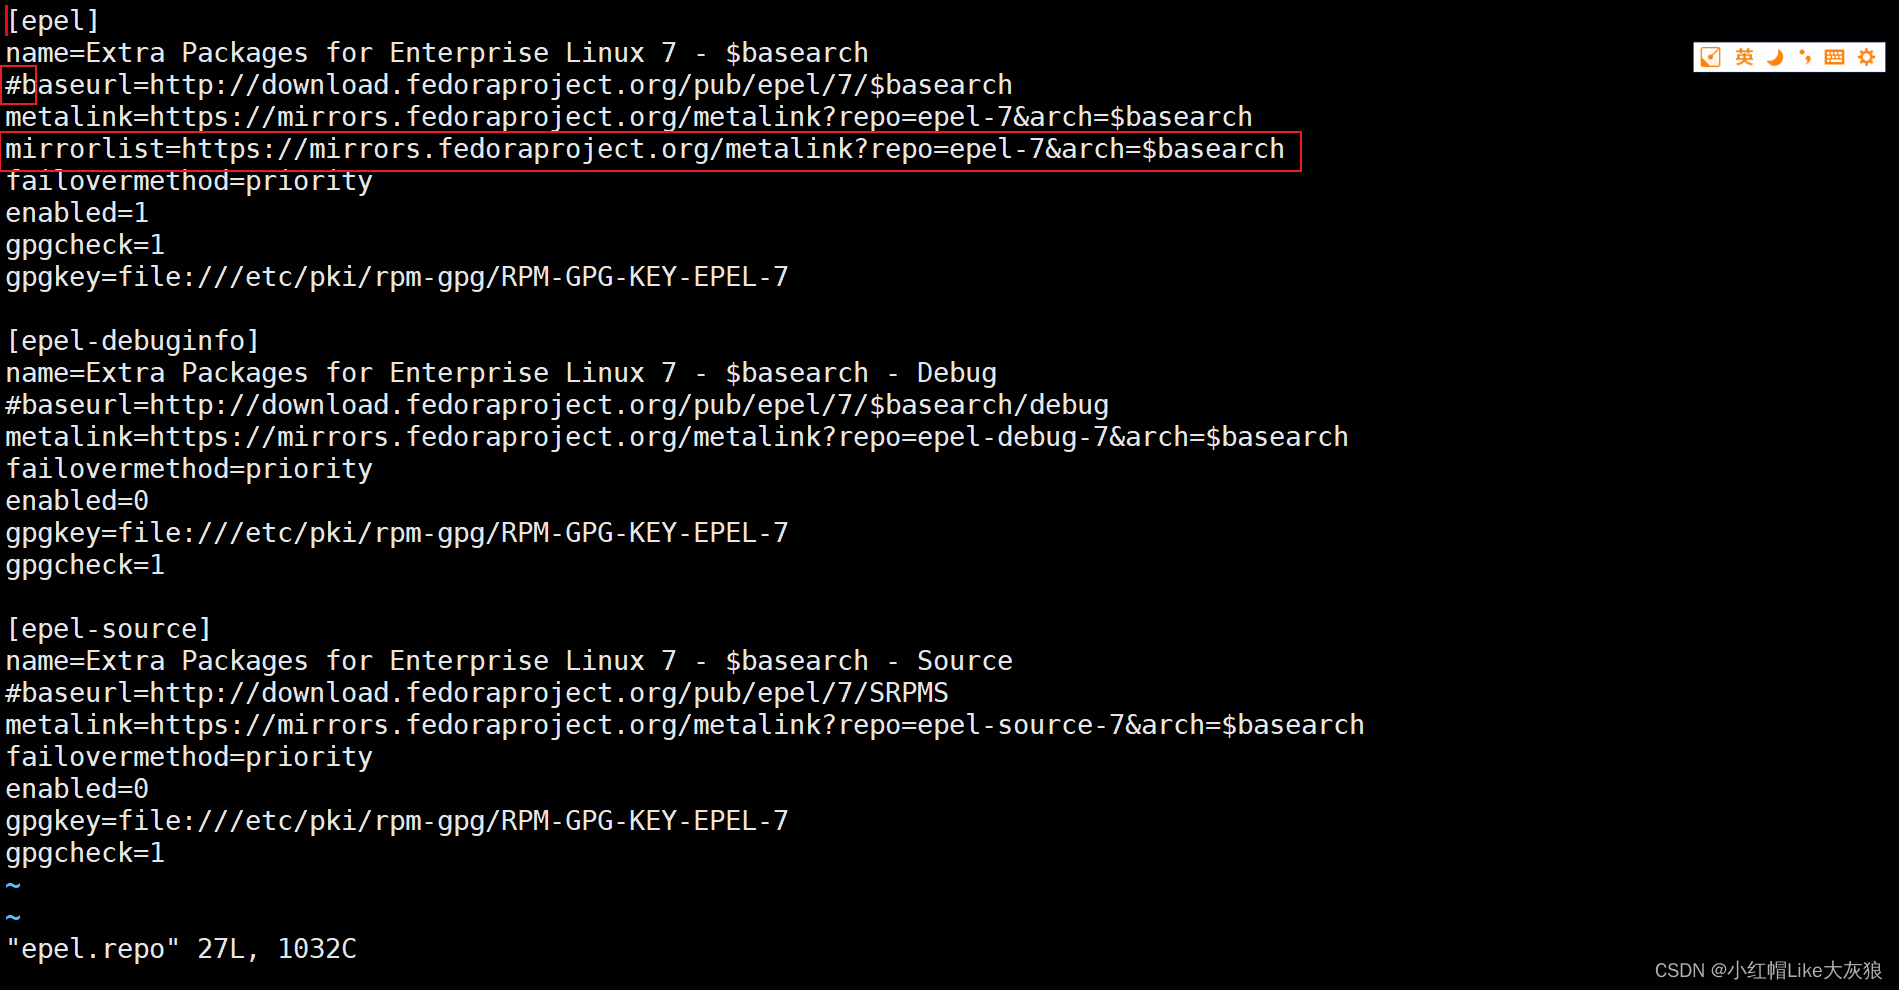
Centos7安装nginx yum报错
Centos7安装nginx yum报错,yum源报错解决办法: 1、更新epel源后,出现yum报错 [roothacker117 ~]# yum install epel-release(安装成功) [roothacker117 ~]# yum install nginx(安装失败,提示如…...

【机组】基于FPGA的32位算术逻辑运算单元的设计(EP2C5扩充选配类)
🌈个人主页:Sarapines Programmer🔥 系列专栏:《机组 | 模块单元实验》⏰诗赋清音:云生高巅梦远游, 星光点缀碧海愁。 山川深邃情难晤, 剑气凌云志自修。 目录 一、实验目的 二、实验要求 …...

Asp .Net Core 系列:Asp .Net Core 集成 NLog
简介 NLog是一个基于.NET平台编写的日志记录类库,它可以在应用程序中添加跟踪调试代码,以便在开发、测试和生产环境中对程序进行监控和故障排除。NLog具有简单、灵活和易于配置的特点,支持在任何一种.NET语言中输出带有上下文的调试诊断信息…...
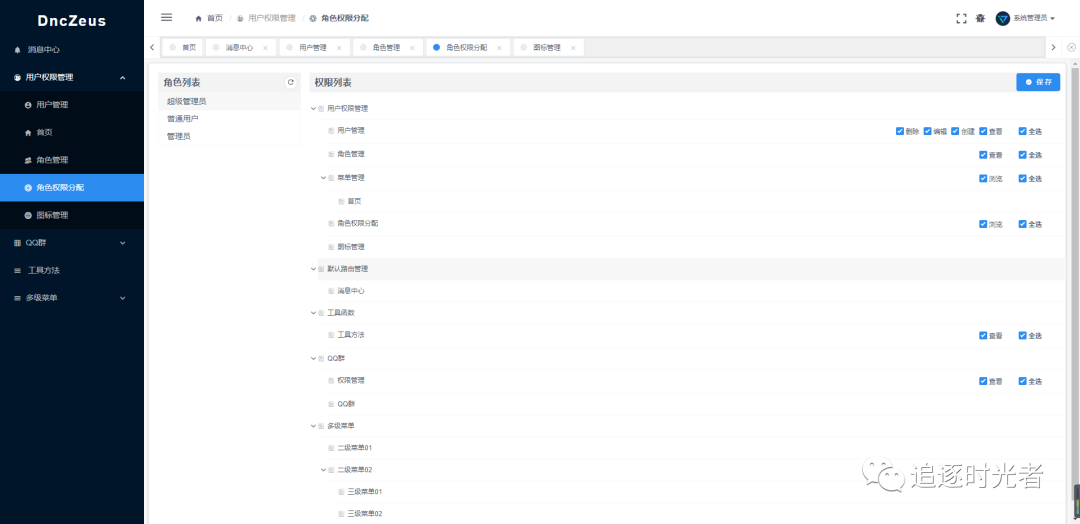
一个基于 .NET 7 + Vue.js 的前后端分离的通用后台管理系统框架 - DncZeus
前言 今天给大家推荐一个基于.NET 7 Vue.js(iview-admin) 的前后端分离的通用后台权限(页面访问、操作按钮控制)管理系统框架:DncZeus。 官方项目简介 DncZeus是一个基于 .NET 7 Vue.js 的前后端分离的通用后台管理系统框架。后端使用.NET 7 Entity Framework…...

更换商品图片日期JSON格式报错 - 序列化与反序列化日期格式设置
报错信息 msg: “服务端异常,请联系管理员JSON parse error: Cannot deserialize value of type java.util.Date from String “2023-11-13 13:13:35”: not a valid representation (error: Failed to parse Date value ‘2023-11-13 13:13:35’: Cannot parse da…...

FastJson、Jackson使用AOP切面进行日志打印异常
FastJson、Jackson使用AOP切面进行日志打印异常 一、概述 1、问题详情 使用FastJson、Jackson进行日志打印时分别包如下错误: 源码: //fastjon log.info("\nRequest Info :{} \n", JSON.toJSONString(requestInfo)); //jackson …...
—— 富士康)
嵌入式大厂面试题(2)—— 富士康
从本篇开始将会更新历年来各个公司的面试题与面经,题目来自于网上各个平台以及博主自己遇到的,如果大家有所帮助,帮忙点点赞和关注吧! 岗位:嵌入式软件工程师。 面试时间:30分钟。 岗位职责:官网…...

力扣_字符串4—编辑距离
题目 给你两个单词 w o r d 1 word1 word1 和 w o r d 2 word2 word2, 请返回将 w o r d 1 word1 word1 转换成 w o r d 2 word2 word2 所使用的最少操作数 。 你可以对一个单词进行如下三种操作: 插入一个字符删除一个字符替换一个字符 方法—动…...

MySQL篇----第二十篇
系列文章目录 文章目录 系列文章目录前言一、NULL 是什么意思二、主键、外键和索引的区别?三、你可以用什么来确保表格里的字段只接受特定范围里的值?四、说说对 SQL 语句优化有哪些方法?(选择几条)前言 前些天发现了一个巨牛的人工智能学习网站,通俗易懂,风趣幽默,忍…...

[Android] 文案设计助手_24.06.25
[Android] 文案设计助手_24.06.25 链接:https://pan.xunlei.com/s/VOszMVvm4BmG5za6Ib11nfGrA1?pwdsg9f# 文案设计助手,助您文案生成、自动写作,模拟手写生成器。免登陆,下载即用,无需会员。...

记一次 mac openClaw gateway 启动未正常关闭导致的问题
openclaw 目前是一个比较火的 AI 工具,因为其高权限带来了一系列的风险和安全隐患按照官方步骤删除后,因open claw 的 gateway 没有正常关闭,导致端口一直在后台运行如果您也遇到类似的问题,可在 mac 终端执行如下命令进行关闭1.先…...

初次使用 Taotoken 控制台的快速浏览与核心功能导引
🚀 告别海外账号与网络限制!稳定直连全球优质大模型,限时半价接入中。 👉 点击领取海量免费额度 初次使用 Taotoken 控制台的快速浏览与核心功能导引 当你注册并登录 Taotoken 平台后,首先进入的就是用户控制台。这个…...

NoFences:如何用免费开源方案革命性管理你的Windows桌面分区
NoFences:如何用免费开源方案革命性管理你的Windows桌面分区 【免费下载链接】NoFences 🚧 Open Source Stardock Fences alternative 项目地址: https://gitcode.com/gh_mirrors/no/NoFences 你是否厌倦了在杂乱无章的Windows桌面上寻找文件&…...

如何快速掌握Switch文件管理神器:NSC_BUILDER完整新手指南
如何快速掌握Switch文件管理神器:NSC_BUILDER完整新手指南 【免费下载链接】NSC_BUILDER Nintendo Switch Cleaner and Builder. A batchfile, python and html script based in hacbuild and Nuts python libraries. Designed initially to erase titlerights encr…...

GD32C103RBT6 I2C 驱动全解析
一、I2C 通信基础概述 1. I2C 硬件接口 GD32C10x 提供 I2C0、I2C1 两组硬件 I2C: SCL:串行时钟线(由主机产生) SDA:串行数据线 需外接 上拉电阻(4.7kΩ 经典值) 支持 多主机、多从机 2. 通信模式 主机模式:MCU 主动发起通信(最常用) 从机模式:MCU 被其他主机访问 …...

2026年热门抠图软件怎么选?好用的抠图工具实测对比与推荐指南
抠图的需求无处不在——做小红书封面、制作电商商品图、处理证件照、视频背景分离——但市面上的抠图工具繁杂多样,究竟哪个才是真正好用的?我们在2026年对市场上主流的抠图软件进行了全面实测,从操作体验、AI识别精度、输出质量、使用成本等…...

CSDN博客批量下载器重构实战:MVC架构下的智能爬虫解决方案
CSDN博客批量下载器重构实战:MVC架构下的智能爬虫解决方案 【免费下载链接】CSDNBlogDownloader 项目地址: https://gitcode.com/gh_mirrors/cs/CSDNBlogDownloader 在技术博客内容日益成为开发者知识体系核心的时代,网络内容的不稳定性与知识管…...

Spring Boot 面试题详解:Spring Boot 核心原理、自动配置、启动流程、IoC 容器、Web 请求链路、事务、Actuator 与 JVM 线上排障全攻略
1. Spring Boot 到底是什么?为什么 Java 后端几乎绕不开它?1.1 它不是新语言,也不是替代 Spring,而是 Spring 应用的工程化脚手架Spring Boot 的出现,本质上是为了解决传统 Spring 项目启动慢、配置多、依赖难配、上线…...

基于FreeRTOS的STM32智能环境监测系统设计与实现
1. 项目概述:从裸机到RTOS的思维跃迁在嵌入式开发领域,从简单的裸机轮询或前后台系统,迈入使用实时操作系统(RTOS)进行设计,是一个标志性的能力跃迁。这个项目标题——“利用RTOS的MCU设计嵌入式系统案例”…...