gem5 garnet 合成流量: packet注入流程
代码流程
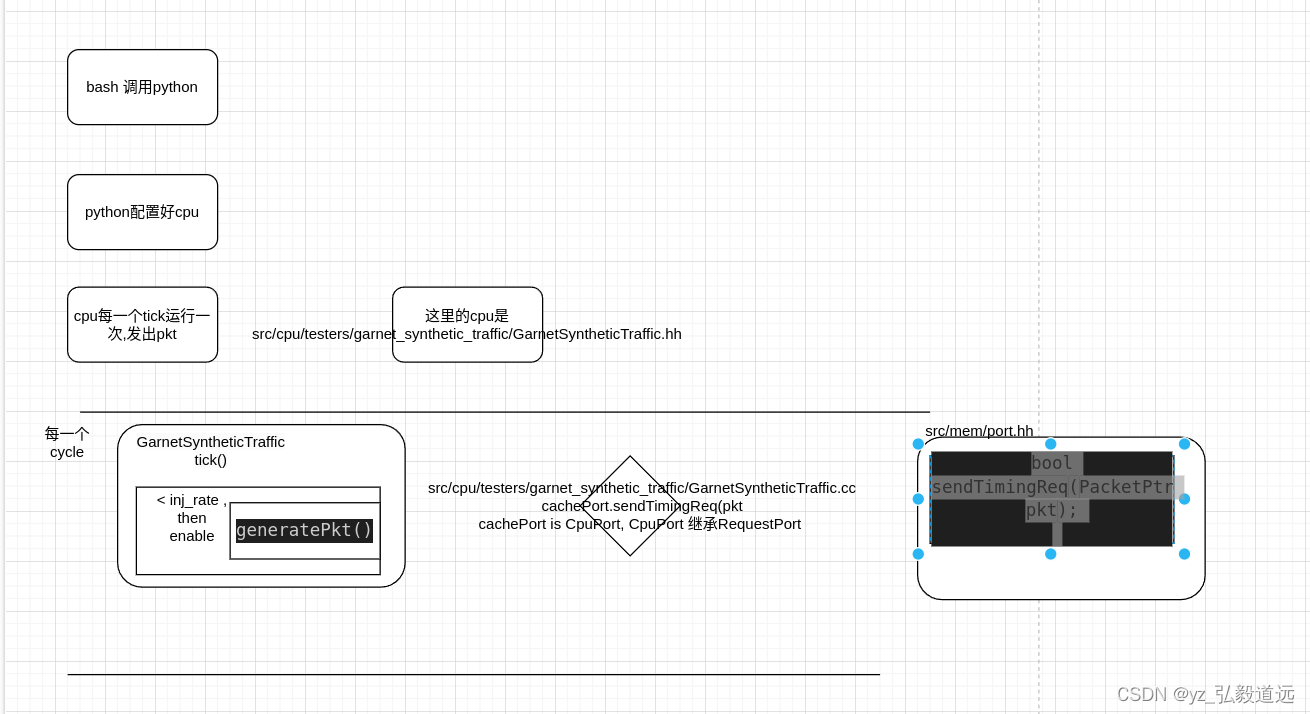
下图就是全部. 剩下文字部分是细节补充,但是内容不变: bash调用python,用python配置好configuration, 一个cpu每个tick运行一次,requestport发出pkt.
bash 启动 python文件并配置
./build/NULL/gem5.debug configs/example/garnet_synth_traffic.py \--num-cpus=16 \--num-dirs=16 \--network=garnet \--topology=Mesh_XY \--mesh-rows=4 \--sim-cycles=1000000 --inj-vnet=0 \--synthetic=uniform_random \--injectionrate=1 \--single-sender-id=0
代码启动 garnet_synth_traffic.py
代码直接用了 GarnetSyntheticTraffic()函数.
cpus = [GarnetSyntheticTraffic(num_packets_max=args.num_packets_max,single_sender=args.single_sender_id,single_dest=args.single_dest_id,sim_cycles=args.sim_cycles,traffic_type=args.synthetic,inj_rate=args.injectionrate,inj_vnet=args.inj_vnet,precision=args.precision,num_dest=args.num_dirs,)for i in range(args.num_cpus)
]
打印看看cpu类型
for cpu in cpus:print("yzzzzdebugcpus ", cpu.type, m5.curTick(),cpu.inj_rate,cpu.inj_vnet,cpu.num_dest)
可以看到cpu.type是 GarnetSyntheticTraffic.

GarnetSyntheticTraffic()函数来自 src/cpu/testers/garnet_synthetic_traffic/GarnetSyntheticTraffic.py
GarnetSyntheticTraffic.py 代码定义了很多 python 里可以 cpu.num_dest 之类调用的子类.
class GarnetSyntheticTraffic(ClockedObject):type = "GarnetSyntheticTraffic"cxx_header = ("cpu/testers/garnet_synthetic_traffic/GarnetSyntheticTraffic.hh")cxx_class = "gem5::GarnetSyntheticTraffic"block_offset = Param.Int(6, "block offset in bits")num_dest = Param.Int(1, "Number of Destinations")memory_size = Param.Int(65536, "memory size")sim_cycles = Param.Int(1000, "Number of simulation cycles")num_packets_max = Param.Int(-1,"Max number of packets to send. \Default is to keep sending till simulation ends",)single_sender = Param.Int(-1,"Send only from this node. \By default every node sends",)single_dest = Param.Int(-1,"Send only to this dest. \Default depends on traffic_type",)traffic_type = Param.String("uniform_random", "Traffic type")inj_rate = Param.Float(0.1, "Packet injection rate")inj_vnet = Param.Int(-1,"Vnet to inject in. \0 and 1 are 1-flit, 2 is 5-flit. \Default is to inject in all three vnets",)precision = Param.Int(3,"Number of digits of precision \after decimal point",)response_limit = Param.Cycles(5000000,"Cycles before exiting \due to lack of progress",)test = RequestPort("Port to the memory system to test")system = Param.System(Parent.any, "System we belong to")然后cpu变成了system的一部分,system = System(cpu=cpus, mem_ranges=[AddrRange(args.mem_size)])
注意,这里print("\nyzzzzdebugsystem ",system.mem_mode )还是atomic.
system变成了root的一部分 root = Root(full_system=False, system=system)
root.system.mem_mode = “timing” 这里额外设置为timing.
cpp代码 , cpu每一个tick执行一次 tick()
src/cpu/testers/garnet_synthetic_traffic/GarnetSyntheticTraffic.hh // main simulation loop (one cycle)void tick();void
GarnetSyntheticTraffic::tick(){...if (senderEnable)generatePkt();
}void
GarnetSyntheticTraffic::generatePkt()
{...sendPkt(pkt);
}
void
GarnetSyntheticTraffic::sendPkt(PacketPtr pkt)
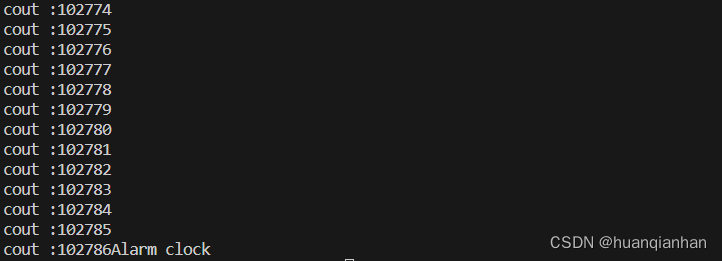
{if (!cachePort.sendTimingReq(pkt)) {retryPkt = pkt; // RubyPort will retry sending}std::cout<<"coutyzzzzzdebug "<<cachePort<<" "<<simCycles<<" "<<curTick()<< std::endl;numPacketsSent++;
}
tick()变成了 cachePort.sendTimingReq(pkt).
cachePort.sendTimingReq(pkt) 到底是什么
RequestPort发送一次pkt
通过 cacheport->CpuPort->RequestPort, tick()函数调用 generatePkt() 函数,再调用sendTimingReq.
inline bool
RequestPort::sendTimingReq(PacketPtr pkt)
{try {addTrace(pkt);bool succ = TimingRequestProtocol::sendReq(_responsePort, pkt);//下面是我自己加的//std::cout<<"coutdebugyzzzzRequestPort::sendTimingReq "<< succ<<" "<<curTick()<<std::endl;if (!succ)removeTrace(pkt);return succ;} catch (UnboundPortException) {reportUnbound();}
}
我加了一行输出,把这行代码解除注释后,运行的命令行如下:
./build/NULL/gem5.debug configs/example/garnet_synth_traffic.py \--num-cpus=16 \--num-dirs=16 \--network=garnet \--topology=Mesh_XY \--mesh-rows=4 \--sim-cycles=1000000 --inj-vnet=0 \--synthetic=uniform_random \--injectionrate=1 \--single-sender-id=0
跑出来的结果是:
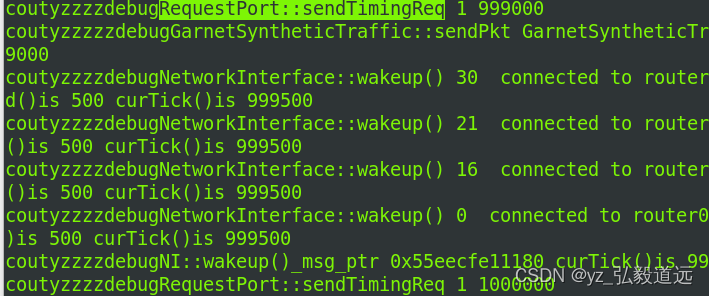
可以看到,每1000 个tick,这个requestport都会发送一个pkt,而且返回的succ是1.
纯虚函数 virtual bool recvTimingReq
下一步, sendReq变成了peer>recvTimingReq(pkt);

我们发现peer->recvTimingReq是一个复杂的部分,因为他是timing.hh里的纯虚函数,是不固定的,除非我们知道派生类是什么.
纯虚函数:
/*** Receive a timing request from the peer.*/virtual bool recvTimingReq(PacketPtr pkt) = 0;
src/mem/ruby/system/RubyPort.cc 的 RubyPort::MemResponsePort::recvTimingReq(PacketPtr pkt)
找到了! 在下方代码加入打印代码,输出的结果验证了,调用的是 RubyPort::MemResponsePort::recvTimingReq(PacketPtr pkt).


其实用vscode搜 recvTimingReq(会有很多cc文件里有例化,大概二三十个吧,给每一个都加上,编译,运行,就可以知道了.
缺点就是这个方法有点笨.
RubyPort::MemResponsePort::recvTimingReq 其实是 submit rubyrequest
bool
RubyPort::MemResponsePort::recvTimingReq(PacketPtr pkt)
{ std::cout<<"debugyzzzwhichrecvTimingReq?src/mem/ruby/system/rubyport.cc/memresponseport"<<std::endl;DPRINTF(RubyPort, "Timing request for address %#x on port %d\n",pkt->getAddr(), id);if (pkt->cacheResponding())panic("RubyPort should never see request with the ""cacheResponding flag set\n");// ruby doesn't support cache maintenance operations at the// moment, as a workaround, we respond right awayif (pkt->req->isCacheMaintenance()) {warn_once("Cache maintenance operations are not supported in Ruby.\n");pkt->makeResponse();schedTimingResp(pkt, curTick());std::cout<<"debugyzzzthisReqIs pkt->req->isCacheMaintenance()"<<std::endl;return true;}// Check for pio requests and directly send them to the dedicated// pio port.if (pkt->cmd != MemCmd::MemSyncReq) {if (!pkt->req->isMemMgmt() && !isPhysMemAddress(pkt)) {assert(owner.memRequestPort.isConnected());DPRINTF(RubyPort, "Request address %#x assumed to be a ""pio address\n", pkt->getAddr());// Save the port in the sender state object to be used later to// route the responsepkt->pushSenderState(new SenderState(this));// send next cycleRubySystem *rs = owner.m_ruby_system;owner.memRequestPort.schedTimingReq(pkt,curTick() + rs->clockPeriod());std::cout<<"debugyzzzthisReqIs pkt->cmd != MemCmd::MemSyncReq"<<std::endl;return true;}}// Save the port in the sender state object to be used later to// route the responsepkt->pushSenderState(new SenderState(this));// Submit the ruby requestRequestStatus requestStatus = owner.makeRequest(pkt);// If the request successfully issued then we should return true.// Otherwise, we need to tell the port to retry at a later point// and return false.if (requestStatus == RequestStatus_Issued) {DPRINTF(RubyPort, "Request %s 0x%x issued\n", pkt->cmdString(),pkt->getAddr());std::cout<<"debugyzzzthisReqIs submit the ruby request"<<std::endl;return true;}// pop off sender state as this request failed to issueSenderState *ss = safe_cast<SenderState *>(pkt->popSenderState());delete ss;if (pkt->cmd != MemCmd::MemSyncReq) {DPRINTF(RubyPort,"Request %s for address %#x did not issue because %s\n",pkt->cmdString(), pkt->getAddr(),RequestStatus_to_string(requestStatus));}addToRetryList();return false;
}

submit rubyrequest 的owener是 rubyport
这里的owener是 RubyPort.

注意下图左边的两个竖线,仔细看,他是在RubyPort的public下面的. 也就是说,rubyPort下定义了class MemResponsePort,还定义了每个RubyPort都有 的makeRequest(). 这里给的虚函数,需要派生类来定义.

直觉告诉我们,sequencer 会有 makeRequest
src/mem/ruby/system/Sequencer.hh
RequestStatus makeRequest(PacketPtr pkt) override;
src/mem/ruby/system/Sequencer.cc
RequestStatus
Sequencer::makeRequest(PacketPtr pkt)
{std::cout<<"debugyzzzz Sequencer::makeRequest "<<endl;// HTM abort signals must be allowed to reach the Sequencer// the same cycle they are issued. They cannot be retried.if ((m_outstanding_count >= m_max_outstanding_requests) &&!pkt->req->isHTMAbort()) {return RequestStatus_BufferFull;}RubyRequestType primary_type = RubyRequestType_NULL;RubyRequestType secondary_type = RubyRequestType_NULL;if (pkt->isLLSC()) {// LL/SC instructions need to be handled carefully by the cache// coherence protocol to ensure they follow the proper semantics. In// particular, by identifying the operations as atomic, the protocol// should understand that migratory sharing optimizations should not// be performed (i.e. a load between the LL and SC should not steal// away exclusive permission).//// The following logic works correctly with the semantics// of armV8 LDEX/STEX instructions.if (pkt->isWrite()) {DPRINTF(RubySequencer, "Issuing SC\n");primary_type = RubyRequestType_Store_Conditional;
#if defined (PROTOCOL_MESI_Three_Level) || defined (PROTOCOL_MESI_Three_Level_HTM)secondary_type = RubyRequestType_Store_Conditional;
#elsesecondary_type = RubyRequestType_ST;
#endif} else {DPRINTF(RubySequencer, "Issuing LL\n");assert(pkt->isRead());primary_type = RubyRequestType_Load_Linked;secondary_type = RubyRequestType_LD;}} else if (pkt->req->isLockedRMW()) {//// x86 locked instructions are translated to store cache coherence// requests because these requests should always be treated as read// exclusive operations and should leverage any migratory sharing// optimization built into the protocol.//if (pkt->isWrite()) {DPRINTF(RubySequencer, "Issuing Locked RMW Write\n");primary_type = RubyRequestType_Locked_RMW_Write;} else {DPRINTF(RubySequencer, "Issuing Locked RMW Read\n");assert(pkt->isRead());primary_type = RubyRequestType_Locked_RMW_Read;}secondary_type = RubyRequestType_ST;} else if (pkt->req->isTlbiCmd()) {primary_type = secondary_type = tlbiCmdToRubyRequestType(pkt);DPRINTF(RubySequencer, "Issuing TLBI\n");} else {//// To support SwapReq, we need to check isWrite() first: a SwapReq// should always be treated like a write, but since a SwapReq implies// both isWrite() and isRead() are true, check isWrite() first here.//if (pkt->isWrite()) {//// Note: M5 packets do not differentiate ST from RMW_Write//primary_type = secondary_type = RubyRequestType_ST;} else if (pkt->isRead()) {// hardware transactional memory commandsif (pkt->req->isHTMCmd()) {primary_type = secondary_type = htmCmdToRubyRequestType(pkt);} else if (pkt->req->isInstFetch()) {primary_type = secondary_type = RubyRequestType_IFETCH;} else {if (pkt->req->isReadModifyWrite()) {primary_type = RubyRequestType_RMW_Read;secondary_type = RubyRequestType_ST;} else {primary_type = secondary_type = RubyRequestType_LD;}}} else if (pkt->isFlush()) {primary_type = secondary_type = RubyRequestType_FLUSH;} else {panic("Unsupported ruby packet type\n");}}// Check if the line is blocked for a Locked_RMWif (!pkt->req->isMemMgmt() &&m_controller->isBlocked(makeLineAddress(pkt->getAddr())) &&(primary_type != RubyRequestType_Locked_RMW_Write)) {// Return that this request's cache line address aliases with// a prior request that locked the cache line. The request cannot// proceed until the cache line is unlocked by a Locked_RMW_Writereturn RequestStatus_Aliased;}RequestStatus status = insertRequest(pkt, primary_type, secondary_type);// It is OK to receive RequestStatus_Aliased, it can be considered Issuedif (status != RequestStatus_Ready && status != RequestStatus_Aliased)return status;// non-aliased with any existing request in the request table, just issue// to the cacheif (status != RequestStatus_Aliased)issueRequest(pkt, secondary_type);// TODO: issue hardware prefetches herereturn RequestStatus_Issued;
}
打印验证了是sequencer发出的makerequest.

核心代码是 insertRequest 把request放入requsttable 和issueRequest 发出一个msg
RequestStatus status = insertRequest(pkt, primary_type, secondary_type);
// Insert the request in the request table. Return RequestStatus_Aliased
// if the entry was already present.
RequestStatus
Sequencer::insertRequest(PacketPtr pkt, RubyRequestType primary_type,RubyRequestType secondary_type)
...
//下面是核心代码,把这个request插入到m_RequestTable里.
Addr line_addr = makeLineAddress(pkt->getAddr());// Check if there is any outstanding request for the same cache line.auto &seq_req_list = m_RequestTable[line_addr];// Create a default entryseq_req_list.emplace_back(pkt, primary_type,secondary_type, curCycle());
...
src/mem/ruby/system/Sequencer.cc issueRequest
void
Sequencer::issueRequest(PacketPtr pkt, RubyRequestType secondary_type)
{assert(pkt != NULL);ContextID proc_id = pkt->req->hasContextId() ?pkt->req->contextId() : InvalidContextID;ContextID core_id = coreId();// If valid, copy the pc to the ruby requestAddr pc = 0;if (pkt->req->hasPC()) {pc = pkt->req->getPC();}// check if the packet has data as for example prefetch and flush// requests do notstd::shared_ptr<RubyRequest> msg;if (pkt->req->isMemMgmt()) {msg = std::make_shared<RubyRequest>(clockEdge(),pc, secondary_type,RubyAccessMode_Supervisor, pkt,proc_id, core_id);DPRINTFR(ProtocolTrace, "%15s %3s %10s%20s %6s>%-6s %s\n",curTick(), m_version, "Seq", "Begin", "", "",RubyRequestType_to_string(secondary_type));if (pkt->req->isTlbiCmd()) {msg->m_isTlbi = true;switch (secondary_type) {case RubyRequestType_TLBI_EXT_SYNC_COMP:msg->m_tlbiTransactionUid = pkt->req->getExtraData();break;case RubyRequestType_TLBI:case RubyRequestType_TLBI_SYNC:msg->m_tlbiTransactionUid = \getCurrentUnaddressedTransactionID();break;default:panic("Unexpected TLBI RubyRequestType");}DPRINTF(RubySequencer, "Issuing TLBI %016x\n",msg->m_tlbiTransactionUid);}} else {msg = std::make_shared<RubyRequest>(clockEdge(), pkt->getAddr(),pkt->getSize(), pc, secondary_type,RubyAccessMode_Supervisor, pkt,PrefetchBit_No, proc_id, core_id);DPRINTFR(ProtocolTrace, "%15s %3s %10s%20s %6s>%-6s %#x %s\n",curTick(), m_version, "Seq", "Begin", "", "",printAddress(msg->getPhysicalAddress()),RubyRequestType_to_string(secondary_type));}// hardware transactional memory// If the request originates in a transaction,// then mark the Ruby message as such.if (pkt->isHtmTransactional()) {msg->m_htmFromTransaction = true;msg->m_htmTransactionUid = pkt->getHtmTransactionUid();}Tick latency = cyclesToTicks(m_controller->mandatoryQueueLatency(secondary_type));assert(latency > 0);assert(m_mandatory_q_ptr != NULL);m_mandatory_q_ptr->enqueue(msg, clockEdge(), latency);
}
issueRequst的关键是 m_mandatory_q_ptr->enqueue(msg, clockEdge(), latency);.
m_mandatory_q_ptr 是在父类 src/mem/ruby/system/RubyPort.hh 中定义的 MessageBuffer* m_mandatory_q_ptr;
父类 src/mem/ruby/system/RubyPort.cc 中 RubyPort::init()
m_mandatory_q_ptr = m_controller->getMandatoryQueue();
就这样,自己的sequencer的request pkt,变成msg进入了rubyport 自己的 m_mandatory_q_ptr, 并且与m_controller->getMandatoryQueue()画上了等号.
因为我们查看 m_mandatory_q_ptr的操作很少,我们下面看怎么对msg操作的时候,需要看 getMandatoryQueue()
msg 如何从mandatoryq进入NetworkInterface暂定.
这两个代码也许是线索. src/mem/slicc/symbols/StateMachine.py 中
MessageBuffer*
$c_ident::getMandatoryQueue() const
{return $mq_ident;
}
mq_ident = "NULL"for port in self.in_ports:if port.code.find("mandatoryQueue_ptr") >= 0:mq_ident = "m_mandatoryQueue_ptr"
NI将msg变成flit
核心是 if (flitisizeMessage(msg_ptr, vnet)) ,会把msg变成flit,然后在NoC了里传递.
void
NetworkInterface::wakeup()
{std::ostringstream oss;for (auto &oPort: outPorts) {oss << oPort->routerID() << "[" << oPort->printVnets() << "] ";}DPRINTF(RubyNetwork, "Network Interface %d connected to router:%s ""woke up. Period: %ld\n", m_id, oss.str(), clockPeriod());std::cout<<"coutdebugyzzzz "<<"NetworkInterface::wakeup() "<<m_id<<"  connected to router" <<oss.str() <<" clockPeriod()is "<<clockPeriod()<<" curTick()is "<<curTick()<<std::endl;assert(curTick() == clockEdge());MsgPtr msg_ptr;Tick curTime = clockEdge();// Checking for messages coming from the protocol// can pick up a message/cycle for each virtual netfor (int vnet = 0; vnet < inNode_ptr.size(); ++vnet) {MessageBuffer *b = inNode_ptr[vnet];if (b == nullptr) {continue;}if (b->isReady(curTime)) { // Is there a message waitingmsg_ptr = b->peekMsgPtr();std::cout<<"coutdebugyzzzz"<<"NI::wakeup()_msg_ptr "<<msg_ptr.get()<<" curTick()is "<<curTick()<<std::endl;if (flitisizeMessage(msg_ptr, vnet)) {b->dequeue(curTime);}}}
小结
这个博客总结了GEM5里,一个PYTHON文件如何生成pkt,这个pkt如何变成msg的. 以及一个msg如何变成flit的. msg如何从sequencer生成,到被Networkinterface操作有待下一篇完善细节…
下面别看,只是草稿
下面别看,只是草稿
下面别看,只是草稿
下面别看,只是草稿
附录
TimingRequestProtocol 和 TimingResponseProtocol的相应
RequestPort::sendTimingReq 方法尝试通过 TimingRequestProtocol 发送数据包,并处理可能出现的异常。TimingRequestProtocol::sendReq 方法则负责确保请求的有效性,并将请求转发给相应的响应协议(TimingResponseProtocol)进行处理。
流程和继承关系:
consumer.hh 定义了 virtual void wakeup() = 0;
src/mem/ruby/network/garnet/Router.hh 定义了 class Router : public BasicRouter, public Consumer继承了 父类 BasicRouter和 Consumer.
src/mem/ruby/network/garnet/GarnetNetwork.cc (注意,不是.hh) 引用了router.hh #include “mem/ruby/network/garnet/Router.hh”.
consumer.hh
表明 wakeup 是一个必须在派生类中实现的接口函数。
= 0 语法: 这个部分将 wakeup 函数声明为纯虚拟(pure virtual)函数。在 C++ 中,纯虚拟函数是一种特殊类型的虚拟函数,它在基类中没有具体的实现,并且要求任何非抽象的派生类必须提供该函数的实现。
flitize msg
分配vc
首先是要找空闲的vc,有一个封装好的函数会返回:
// Looking for a free output vc
int
NetworkInterface::calculateVC(int vnet)
{for (int i = 0; i < m_vc_per_vnet; i++) {int delta = m_vc_allocator[vnet];m_vc_allocator[vnet]++;if (m_vc_allocator[vnet] == m_vc_per_vnet)m_vc_allocator[vnet] = 0;if (outVcState[(vnet*m_vc_per_vnet) + delta].isInState(IDLE_, curTick())) {vc_busy_counter[vnet] = 0;return ((vnet*m_vc_per_vnet) + delta);}}vc_busy_counter[vnet] += 1;panic_if(vc_busy_counter[vnet] > m_deadlock_threshold,"%s: Possible network deadlock in vnet: %d at time: %llu \n",name(), vnet, curTick());return -1;
}
下面是解读:
函数签名:
int NetworkInterface::calculateVC(int vnet): 这个函数属于 NetworkInterface 类,并返回一个整型值。它接受一个整型参数 vnet,通常代表虚拟网络的标识。
遍历虚拟通道:
for 循环遍历与给定虚拟网络 (vnet) 相关的所有虚拟通道。m_vc_per_vnet 是每个虚拟网络的虚拟通道数。
虚拟通道分配:
循环中的 delta 变量根据 m_vc_allocator[vnet] 的值设置,表示当前虚拟通道的索引偏移。
m_vc_allocator[vnet]++ 更新虚拟通道分配器的值,用于下一次调用此函数时选择不同的虚拟通道。
如果 m_vc_allocator[vnet] 达到 m_vc_per_vnet 的值,它会重置为 0,以循环方式遍历所有虚拟通道。
检查虚拟通道状态:
使用 outVcState[(vnet*m_vc_per_vnet) + delta].isInState(IDLE_, curTick()) 检查当前虚拟通道是否处于空闲(IDLE)状态。如果是空闲状态,函数返回该虚拟通道的索引。
虚拟通道忙碌计数器:
如果所有虚拟通道都不处于空闲状态,vc_busy_counter[vnet] 加一,表示此次调用没有找到空闲的虚拟通道。
如果 vc_busy_counter[vnet] 超过 m_deadlock_threshold 阈值,函数会触发 panic(意味着可能出现网络死锁),并输出错误信息。
返回值:
如果找到空闲的虚拟通道,则返回该通道的索引。
如果没有找到空闲的虚拟通道,则返回 -1,表示当前没有可用的虚拟通道。
相关文章:
gem5 garnet 合成流量: packet注入流程
代码流程 下图就是全部. 剩下文字部分是细节补充,但是内容不变: bash调用python,用python配置好configuration, 一个cpu每个tick运行一次,requestport发出pkt. bash 启动 python文件并配置 ./build/NULL/gem5.debug configs/example/garnet_synth_traffic.py \--num-cpus…...
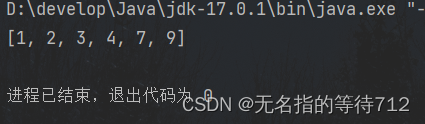
java实现排序算法(上)
排序算法 冒泡排序 时间和空间复杂度 要点 每轮冒泡不断地比较比较相邻的两个元素,如果它们是逆序的,则需要交换它们的位置下一轮冒泡,可以调整未排序的右边界,减少不必要比较 代码 public static int[] test(int[] array) {// 外层循环控制遍历次数for (int i 0; i <…...
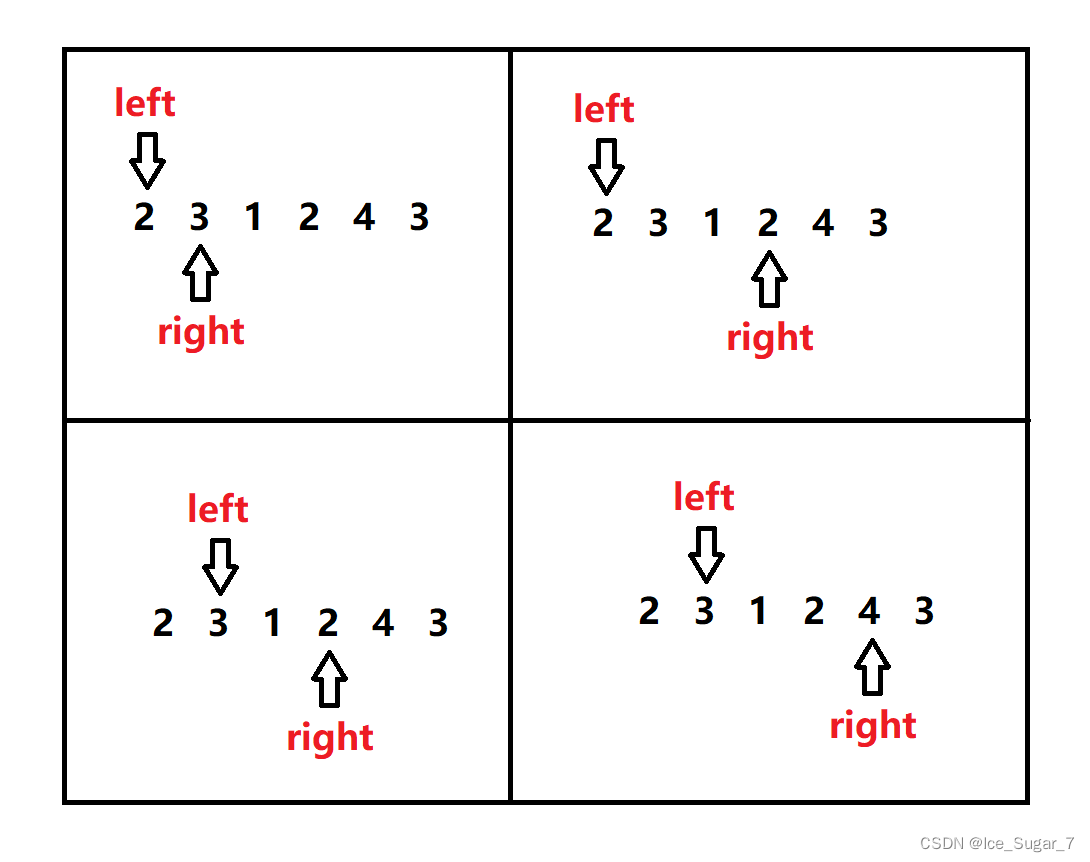
「算法」滑动窗口
前言 算法需要多刷题积累经验,所以我行文重心在于分析解题思路,理论知识部分会相对简略一些 正文 滑动窗口属于双指针,这两个指针是同向前行,它们所夹的区间就称为“窗口” 啥时候用滑动窗口? 题目涉及到“子序列…...

Windows11(非WSL)安装Installing llama-cpp-python with GPU Support
直接安装,只支持CPU。想支持GPU,麻烦一些。 1. 安装CUDA Toolkit (NVIDIA CUDA Toolkit (available at https://developer.nvidia.com/cuda-downloads) 2. 安装如下物件: gitpythoncmakeVisual Studio Community (make sure you install t…...

rtt设备io框架面向对象学习-脉冲编码器设备
目录 1.脉冲编码器设备基类2.脉冲编码器设备基类的子类3.初始化/构造流程3.1设备驱动层3.2 设备驱动框架层3.3 设备io管理层 4.总结5.使用 1.脉冲编码器设备基类 此层处于设备驱动框架层。也是抽象类。 在/ components / drivers / include / drivers 下的pulse_encoder.h定义…...
)
华为OD机试真题- 攀登者2-2024年OD统一考试(C卷)
题目描述: 攀登者喜欢寻找各种地图,并且尝试攀登到最高的山峰。地图表示为一维数组,数组的索引代表水平位置,数组的高度代表相对海拔高度。其中数组元素0代表地面。例如[0,1,4,3,1,0,0,1,2,3,1,2,1,0], 代表如下图所示的地图,地图中有两个山脉位置分别为 1,2,3,4,5和8,9,1…...
19.Qt 组合框的实现和应用
目录 前言: 技能: 内容: 1. 界面 2.槽 3.样式表 参考: 前言: 学习QCombox控件的使用 技能: 简单实现组合框效果 内容: 1. 界面 在ui编辑界面找到input widget里面的comboBoxÿ…...
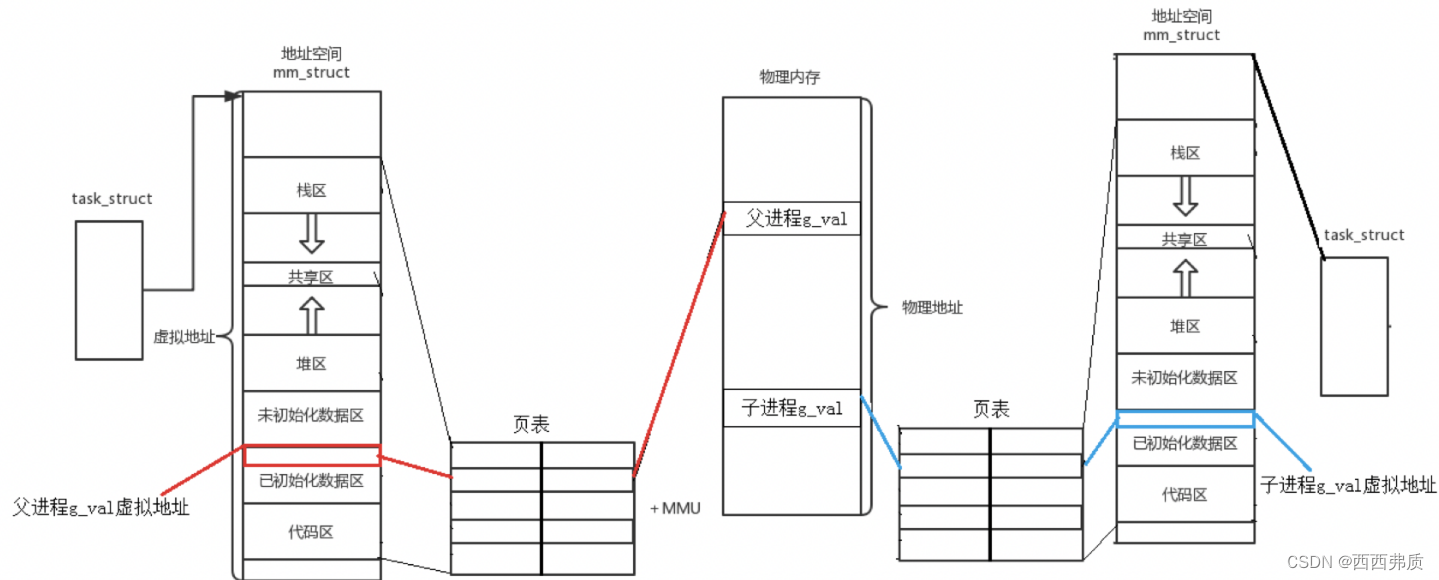
【Linux】进程地址空间的理解
进程地址空间的理解 一,什么是程序地址空间二,页表和虚拟地址空间三,为什么要有进程地址空间 一,什么是程序地址空间 在我们写程序时,都会有这样下面的内存结构,来存放变量和代码等数据。 一个进程要执行…...
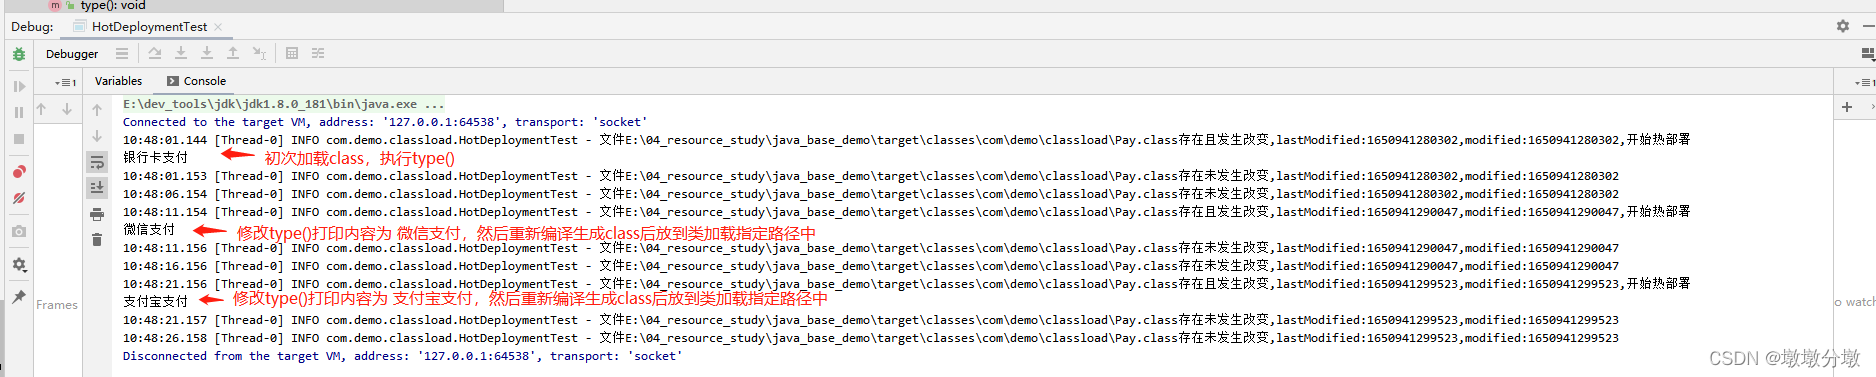
【Jvm】类加载机制(Class Loading Mechanism)原理及应用场景
文章目录 Jvm基本组成一.什么是JVM类的加载二.类的生命周期阶段1:加载阶段2:验证阶段3:准备阶段4:解析阶段5:初始化 三.类初始化时机四.类加载器1.引导类加载器(Bootstrap Class Loader)2.拓展类…...
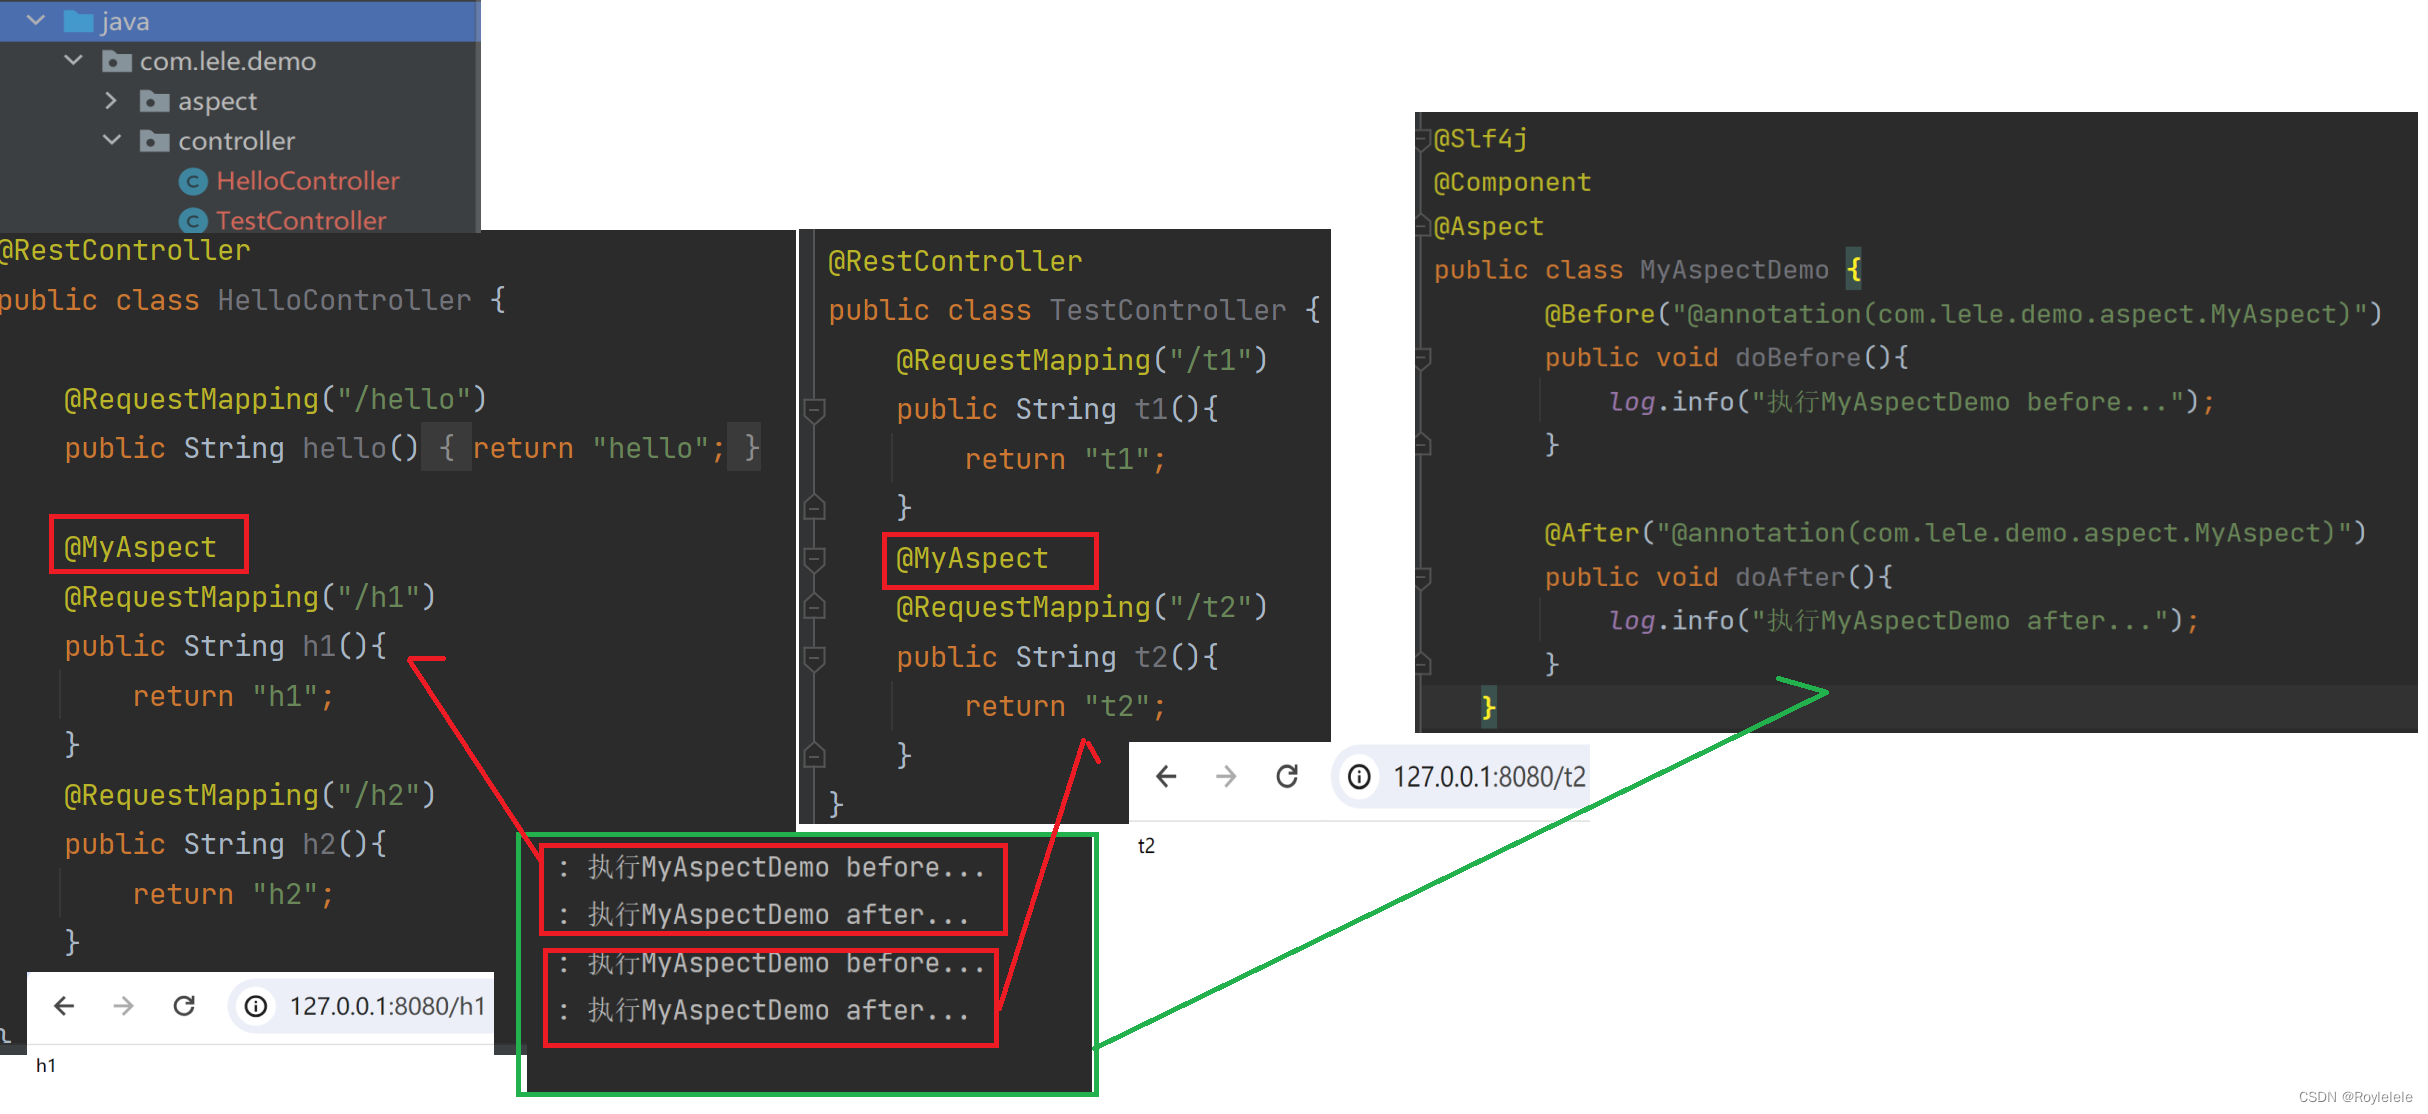
Spring AOP的实现方式
AOP基本概念 Spring框架的两大核心:IoC和AOP AOP:Aspect Oriented Programming(面向切面编程) AOP是一种思想,是对某一类事情的集中处理 面向切面编程:切面就是指某一类特定的问题,所以AOP可…...
Linux------环境变量
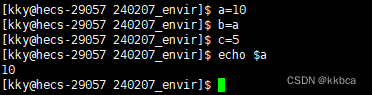
目录 前言 一、环境变量 二、添加PATH环境变量 三、HOME环境变量 四、查看所有环境变量 1.指令获取 2.代码获取 2.1 getenv 2.2main函数的第三个参数 2.3 全局变量environ 五、环境变量存放地点 六、添加自命名环境变量 七、系统环境变量具有全局属性 八、环境变…...

计算机视觉所需要的数学基础
计算机视觉领域中使用的数学知识广泛而深入,以下是一些关键知识点及其在计算机视觉中的应用: 线性代数: - 矩阵运算:用于图像的表示和处理,如图像旋转、缩放、裁剪等。 - 向量空间:用于描述图像中的…...
ChatGPT魔法1: 背后的原理
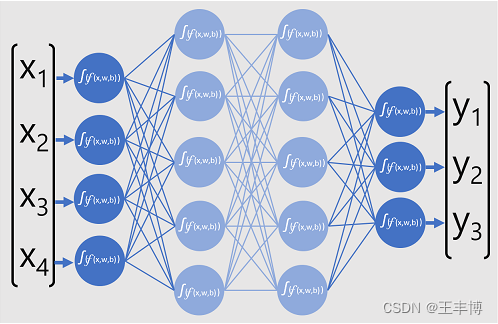
1. AI的三个阶段 1) 上世纪50~60年代,计算机刚刚产生 2) Machine learning 3) Deep learning, 有神经网络, 最有代表性的是ChatGPT, GPT(Generative Pre-Trained Transformer) 2. 深度神经网络 llya Suts…...

【c/c++】获取时间
在一些应用的编写中我们有时候需要用到时间,或者需要一个“锚点”来确定一些数的值。在c/c中有两个用来确定时间的函数:time/gettimeofday 一、time time_t time(time_t *timer);time 函数返回当前时间的时间戳(自 1970 年 1 月 1 日以来经…...

uniapp富文本文字长按选中(用于复制,兼容H5、APP、小程序三端)
方案:使用u-parse的selectable属性 <u-parse :selectable"true" :html"content"></u-parse> 注意:u-parse直接使用是不兼容小程序的,需要对u-parse进行改造: 1. 查看u-parse源码发现小程序走到以…...

常见的几种Web安全问题测试简介
Web项目比较常见的安全问题 1.XSS(CrossSite Script)跨站脚本攻击 XSS(CrossSite Script)跨站脚本攻击。它指的是恶意攻击者往Web 页面里插入恶意html代码,当用户浏览该页之时,嵌入其中Web 里面的html 代码会被执行,从而达到恶意用户的特殊…...
linux信号机制[一]
目录 信号量 时序问题 原子性 什么是信号 信号如何产生 引入 信号的处理方法 常见信号 如何理解组合键变成信号呢? 如何理解信号被进程保存以及信号发送的本质? 为什么要有信号 信号怎么用? 样例代码 core文件有什么用呢&#…...
elementui 中el-date-picker 选择年后输出的是Wed Jan 01 2025 00:00:00 GMT+0800 (中国标准时间)
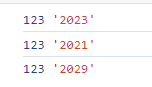
文章目录 问题分析 问题 在使用 el-date-picker 做只选择年份的控制器时,出现如下问题:el-date-picker选择年后输出的是Wed Jan 01 2025 00:00:00 GMT0800 (中国标准时间),输出了两次如下 分析 在 el-date-picker 中,我们使用…...

Redis 集群(Cluster)
集群概念 Redis 的哨兵模式,提高了系统的可用性,但是正在用来存储数据的还是 master 和 slave 节点,所有的数据都需要存储在单个 master 和 salve 节点中。 如果数据量很大,接近超出了 master / slave 所在机器的物理内存&#…...
)
260.【华为OD机试真题】信道分配(贪心算法-JavaPythonC++JS实现)
🚀点击这里可直接跳转到本专栏,可查阅顶置最新的华为OD机试宝典~ 本专栏所有题目均包含优质解题思路,高质量解题代码(Java&Python&C++&JS分别实现),详细代码讲解,助你深入学习,深度掌握! 文章目录 一. 题目-信道分配二.解题思路三.题解代码Python题解代码…...

5分钟快速上手NewGAN-Manager:为足球经理打造个性化脸型包
5分钟快速上手NewGAN-Manager:为足球经理打造个性化脸型包 【免费下载链接】NewGAN-Manager A tool to generate and manage xml configs for the Newgen Facepack. 项目地址: https://gitcode.com/gh_mirrors/ne/NewGAN-Manager NewGAN-Manager 是一款专门为…...
)
【中科院研究所主办、高录用、往届会后4个月检索】第二届人工智能与基础模型国际学术会议(AIFM 2026)
第二届人工智能与基础模型国际学术会议(AIFM 2026)将于2026 年 6 月 26-28 日在中国乌鲁木齐举办。会议旨在汇聚来自世界各地学术界、产业界及政府机构的专家学者,围绕人工智能与基础模型技术的核心议题展开深度研讨,共同探索领域…...

ThinkPad终极散热指南:TPFanCtrl2风扇控制完全教程
ThinkPad终极散热指南:TPFanCtrl2风扇控制完全教程 【免费下载链接】TPFanCtrl2 ThinkPad Fan Control 2 (Dual Fan) for Windows 10 and 11 项目地址: https://gitcode.com/gh_mirrors/tp/TPFanCtrl2 你是否曾被ThinkPad风扇的突然加速打扰工作专注…...

【免费下载】 新魔百和M301H-CW代工系列强刷固件:当贝桌面纯净版安卓系统
新魔百和M301H-CW代工系列强刷固件:当贝桌面纯净版安卓系统 【下载地址】16-001-T-新魔百和M301H-CW代工-Hi3798MV300-MV310通用强刷固件当贝桌面纯净版安卓系统 本资源包专为新魔百和M301H-CW代工系列设备设计,适用于Hi3798MV300和MV310芯片组的智能电视…...

IDA逆向分析实战:破解函数限制、修复栈平衡与Switch识别
1. 破解IDA函数大小限制的实战技巧 第一次用IDA反编译大型函数时,看到"function is too big"的提示真是让人头疼。这个限制其实是IDA为了防止资源耗尽设置的保险机制,但现代计算机的性能早已今非昔比。我去年分析一个游戏引擎时,核…...

完全掌握JetBrains IDE试用期重置:从原理到实战的终极解决方案
完全掌握JetBrains IDE试用期重置:从原理到实战的终极解决方案 【免费下载链接】ide-eval-resetter 项目地址: https://gitcode.com/gh_mirrors/id/ide-eval-resetter 还在为JetBrains系列开发工具的试用期限制而困扰吗?IDE Eval Resetter为您提…...
Trae日志占用、Trae logs删除、Trae缓存清理、Trae占用C盘、Trae AppData 清理)
Trae日志占用很大解决方法(Windows)Trae日志占用、Trae logs删除、Trae缓存清理、Trae占用C盘、Trae AppData 清理
Trae日志占用很大解决方法(Windows) 关键词:Trae日志占用、Trae logs删除、Trae缓存清理、Trae占用C盘、Trae AppData 清理最近清理电脑磁盘时,发现 C 盘莫名其妙少了十几个 G。作为长期写代码的人,我第一反应就是&…...

新手教程使用curl命令一分钟测试Taotoken的OpenAI兼容API
🚀 告别海外账号与网络限制!稳定直连全球优质大模型,限时半价接入中。 👉 点击领取海量免费额度 新手教程:使用curl命令一分钟测试Taotoken的OpenAI兼容API 本文面向刚获取Taotoken API Key的开发者,目标是…...
)
【独家首发】NotebookLM语义搜索底层架构图谱(基于2024 Q2最新API逆向分析,含7层向量映射逻辑)
更多请点击: https://intelliparadigm.com 第一章:NotebookLM语义搜索功能全景概览 核心能力定位 NotebookLM 的语义搜索并非传统关键词匹配,而是基于用户上传文档(PDF、TXT、Google Docs)构建的私有知识图谱进行上下…...

RocketMQ 源码解析——Controller 高可用切换架构
延伸阅读:🔍「RocketMQ 中文社区」 持续更新源码解析/最佳实践,提供 RocketMQ 专家 AI 答疑服务 一、原理及核心概念浅述 1.1 核心架构 1.2 核心概念 controller:负责管理broker间的主备关系,可以挂在namesrv中&…...