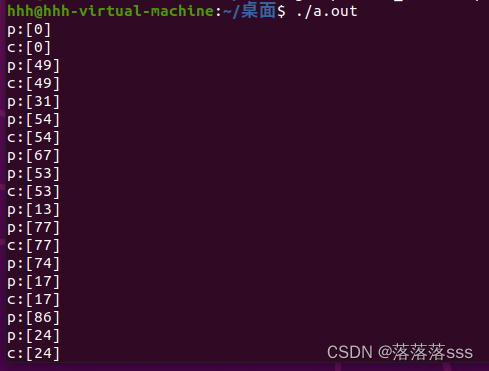
C# OpenVINO Crack Seg 裂缝分割 裂缝检测
目录
效果
模型信息
项目
代码
数据集
下载
C# OpenVINO Crack Seg 裂缝分割 裂缝检测
效果
模型信息
Model Properties
-------------------------
date:2024-02-29T16:35:48.364242
author:Ultralytics
task:segment
version:8.1.18
stride:32
batch:1
imgsz:[640, 640]
names:{0: 'crack'}
---------------------------------------------------------------
Inputs
-------------------------
name:images
tensor:Float[1, 3, 640, 640]
---------------------------------------------------------------
Outputs
-------------------------
name:output0
tensor:Float[1, 37, 8400]
name:output1
tensor:Float[1, 32, 160, 160]
---------------------------------------------------------------
项目
代码
using OpenCvSharp;
using Sdcb.OpenVINO;
using Sdcb.OpenVINO.Natives;
using System;
using System.Collections.Generic;
using System.Diagnostics;
using System.Drawing;
using System.IO;
using System.Text;
using System.Windows.Forms;
namespace OpenVINO_Seg
{
public partial class Form1 : Form
{
public Form1()
{
InitializeComponent();
}
string fileFilter = "*.*|*.bmp;*.jpg;*.jpeg;*.tiff;*.tiff;*.png";
string image_path = "";
string startupPath;
string model_path;
string classer_path;
Mat src;
SegmentationResult result_pro;
Mat result_image;
Result seg_result;
StringBuilder sb = new StringBuilder();
float[] det_result_array = new float[8400 * 37];
float[] proto_result_array = new float[32 * 160 * 160];
// 识别结果类型
public string[] class_names;
private void button1_Click(object sender, EventArgs e)
{
OpenFileDialog ofd = new OpenFileDialog();
ofd.Filter = fileFilter;
if (ofd.ShowDialog() != DialogResult.OK) return;
pictureBox1.Image = null;
image_path = ofd.FileName;
pictureBox1.Image = new Bitmap(image_path);
textBox1.Text = "";
src = new Mat(image_path);
pictureBox2.Image = null;
}
unsafe private void button2_Click(object sender, EventArgs e)
{
if (pictureBox1.Image == null)
{
return;
}
pictureBox2.Image = null;
textBox1.Text = "";
sb.Clear();
src = new Mat(image_path);
Model rawModel = OVCore.Shared.ReadModel(model_path);
PrePostProcessor pp = rawModel.CreatePrePostProcessor();
PreProcessInputInfo inputInfo = pp.Inputs.Primary;
inputInfo.TensorInfo.Layout = Sdcb.OpenVINO.Layout.NHWC;
inputInfo.ModelInfo.Layout = Sdcb.OpenVINO.Layout.NCHW;
Model m = pp.BuildModel();
CompiledModel cm = OVCore.Shared.CompileModel(m, "CPU");
InferRequest ir = cm.CreateInferRequest();
Shape inputShape = m.Inputs[0].Shape;
float[] factors = new float[4];
factors[0] = 1f * src.Width / inputShape[2];
factors[1] = 1f * src.Height / inputShape[1];
factors[2] = src.Rows;
factors[3] = src.Cols;
result_pro = new SegmentationResult(class_names, factors,0.3f,0.5f);
Stopwatch stopwatch = new Stopwatch();
Mat resized = src.Resize(new OpenCvSharp.Size(inputShape[2], inputShape[1]));
Mat f32 = new Mat();
resized.ConvertTo(f32, MatType.CV_32FC3, 1.0 / 255);
using (Tensor input = Tensor.FromRaw(
new ReadOnlySpan<byte>((void*)f32.Data, (int)((long)f32.DataEnd - (long)f32.DataStart)),
new Shape(1, f32.Rows, f32.Cols, 3),
ov_element_type_e.F32))
{
ir.Inputs.Primary = input;
}
double preprocessTime = stopwatch.Elapsed.TotalMilliseconds;
stopwatch.Restart();
ir.Run();
double inferTime = stopwatch.Elapsed.TotalMilliseconds;
stopwatch.Restart();
using (Tensor output_det = ir.Outputs[0])
using (Tensor output_proto = ir.Outputs[1])
{
det_result_array = output_det.GetData<float>().ToArray();
proto_result_array = output_proto.GetData<float>().ToArray();
seg_result = result_pro.process_result(det_result_array, proto_result_array);
double postprocessTime = stopwatch.Elapsed.TotalMilliseconds;
stopwatch.Stop();
double totalTime = preprocessTime + inferTime + postprocessTime;
result_image = src.Clone();
Mat masked_img = new Mat();
// 将识别结果绘制到图片上
for (int i = 0; i < seg_result.length; i++)
{
Cv2.Rectangle(result_image, seg_result.rects[i], new Scalar(0, 0, 255), 2, LineTypes.Link8);
Cv2.Rectangle(result_image, new OpenCvSharp.Point(seg_result.rects[i].TopLeft.X, seg_result.rects[i].TopLeft.Y - 20),
new OpenCvSharp.Point(seg_result.rects[i].BottomRight.X, seg_result.rects[i].TopLeft.Y), new Scalar(0, 255, 255), -1);
Cv2.PutText(result_image, seg_result.classes[i] + "-" + seg_result.scores[i].ToString("0.00"),
new OpenCvSharp.Point(seg_result.rects[i].X, seg_result.rects[i].Y - 5),
HersheyFonts.HersheySimplex, 0.6, new Scalar(0, 0, 0), 1);
Cv2.AddWeighted(result_image, 0.5, seg_result.masks[i], 0.5, 0, masked_img);
sb.AppendLine($"{seg_result.classes[i]}:{seg_result.scores[i]:P0}");
}
if (seg_result.length > 0)
{
if (pictureBox2.Image != null)
{
pictureBox2.Image.Dispose();
}
pictureBox2.Image = new Bitmap(masked_img.ToMemoryStream());
sb.AppendLine($"Preprocess: {preprocessTime:F2}ms");
sb.AppendLine($"Infer: {inferTime:F2}ms");
sb.AppendLine($"Postprocess: {postprocessTime:F2}ms");
sb.AppendLine($"Total: {totalTime:F2}ms");
textBox1.Text = sb.ToString();
}
else
{
textBox1.Text = "无信息";
}
masked_img.Dispose();
result_image.Dispose();
}
}
private void Form1_Load(object sender, EventArgs e)
{
image_path = "1.jpg";
pictureBox1.Image = new Bitmap(image_path);
startupPath = Application.StartupPath;
model_path = startupPath + "\\crack_m_best.onnx";
classer_path = startupPath + "\\lable.txt";
List<string> str = new List<string>();
StreamReader sr = new StreamReader(classer_path);
string line;
while ((line = sr.ReadLine()) != null)
{
str.Add(line);
}
class_names = str.ToArray();
}
}
}
using OpenCvSharp;
using Sdcb.OpenVINO;
using Sdcb.OpenVINO.Natives;
using System;
using System.Collections.Generic;
using System.Diagnostics;
using System.Drawing;
using System.IO;
using System.Text;
using System.Windows.Forms;namespace OpenVINO_Seg
{public partial class Form1 : Form{public Form1(){InitializeComponent();}string fileFilter = "*.*|*.bmp;*.jpg;*.jpeg;*.tiff;*.tiff;*.png";string image_path = "";string startupPath;string model_path;string classer_path;Mat src;SegmentationResult result_pro;Mat result_image;Result seg_result;StringBuilder sb = new StringBuilder();float[] det_result_array = new float[8400 * 37];float[] proto_result_array = new float[32 * 160 * 160];// 识别结果类型public string[] class_names;private void button1_Click(object sender, EventArgs e){OpenFileDialog ofd = new OpenFileDialog();ofd.Filter = fileFilter;if (ofd.ShowDialog() != DialogResult.OK) return;pictureBox1.Image = null;image_path = ofd.FileName;pictureBox1.Image = new Bitmap(image_path);textBox1.Text = "";src = new Mat(image_path);pictureBox2.Image = null;}unsafe private void button2_Click(object sender, EventArgs e){if (pictureBox1.Image == null){return;}pictureBox2.Image = null;textBox1.Text = "";sb.Clear();src = new Mat(image_path);Model rawModel = OVCore.Shared.ReadModel(model_path);PrePostProcessor pp = rawModel.CreatePrePostProcessor();PreProcessInputInfo inputInfo = pp.Inputs.Primary;inputInfo.TensorInfo.Layout = Sdcb.OpenVINO.Layout.NHWC;inputInfo.ModelInfo.Layout = Sdcb.OpenVINO.Layout.NCHW;Model m = pp.BuildModel();CompiledModel cm = OVCore.Shared.CompileModel(m, "CPU");InferRequest ir = cm.CreateInferRequest();Shape inputShape = m.Inputs[0].Shape;float[] factors = new float[4];factors[0] = 1f * src.Width / inputShape[2];factors[1] = 1f * src.Height / inputShape[1];factors[2] = src.Rows;factors[3] = src.Cols;result_pro = new SegmentationResult(class_names, factors,0.3f,0.5f);Stopwatch stopwatch = new Stopwatch();Mat resized = src.Resize(new OpenCvSharp.Size(inputShape[2], inputShape[1]));Mat f32 = new Mat();resized.ConvertTo(f32, MatType.CV_32FC3, 1.0 / 255);using (Tensor input = Tensor.FromRaw(new ReadOnlySpan<byte>((void*)f32.Data, (int)((long)f32.DataEnd - (long)f32.DataStart)),new Shape(1, f32.Rows, f32.Cols, 3),ov_element_type_e.F32)){ir.Inputs.Primary = input;}double preprocessTime = stopwatch.Elapsed.TotalMilliseconds;stopwatch.Restart();ir.Run();double inferTime = stopwatch.Elapsed.TotalMilliseconds;stopwatch.Restart();using (Tensor output_det = ir.Outputs[0])using (Tensor output_proto = ir.Outputs[1]){det_result_array = output_det.GetData<float>().ToArray();proto_result_array = output_proto.GetData<float>().ToArray();seg_result = result_pro.process_result(det_result_array, proto_result_array);double postprocessTime = stopwatch.Elapsed.TotalMilliseconds;stopwatch.Stop();double totalTime = preprocessTime + inferTime + postprocessTime;result_image = src.Clone();Mat masked_img = new Mat();// 将识别结果绘制到图片上for (int i = 0; i < seg_result.length; i++){Cv2.Rectangle(result_image, seg_result.rects[i], new Scalar(0, 0, 255), 2, LineTypes.Link8);Cv2.Rectangle(result_image, new OpenCvSharp.Point(seg_result.rects[i].TopLeft.X, seg_result.rects[i].TopLeft.Y - 20),new OpenCvSharp.Point(seg_result.rects[i].BottomRight.X, seg_result.rects[i].TopLeft.Y), new Scalar(0, 255, 255), -1);Cv2.PutText(result_image, seg_result.classes[i] + "-" + seg_result.scores[i].ToString("0.00"),new OpenCvSharp.Point(seg_result.rects[i].X, seg_result.rects[i].Y - 5),HersheyFonts.HersheySimplex, 0.6, new Scalar(0, 0, 0), 1);Cv2.AddWeighted(result_image, 0.5, seg_result.masks[i], 0.5, 0, masked_img);sb.AppendLine($"{seg_result.classes[i]}:{seg_result.scores[i]:P0}");}if (seg_result.length > 0){if (pictureBox2.Image != null){pictureBox2.Image.Dispose();}pictureBox2.Image = new Bitmap(masked_img.ToMemoryStream());sb.AppendLine($"Preprocess: {preprocessTime:F2}ms");sb.AppendLine($"Infer: {inferTime:F2}ms");sb.AppendLine($"Postprocess: {postprocessTime:F2}ms");sb.AppendLine($"Total: {totalTime:F2}ms");textBox1.Text = sb.ToString();}else{textBox1.Text = "无信息";}masked_img.Dispose();result_image.Dispose();}}private void Form1_Load(object sender, EventArgs e){image_path = "1.jpg";pictureBox1.Image = new Bitmap(image_path);startupPath = Application.StartupPath;model_path = startupPath + "\\crack_m_best.onnx";classer_path = startupPath + "\\lable.txt";List<string> str = new List<string>();StreamReader sr = new StreamReader(classer_path);string line;while ((line = sr.ReadLine()) != null){str.Add(line);}class_names = str.ToArray();}}
}
数据集
下载
裂纹数据集带标注信息下载
源码下载
相关文章:
C# OpenVINO Crack Seg 裂缝分割 裂缝检测
目录 效果 模型信息 项目 代码 数据集 下载 C# OpenVINO Crack Seg 裂缝分割 裂缝检测 效果 模型信息 Model Properties ------------------------- date:2024-02-29T16:35:48.364242 author:Ultralytics task:segment version&…...
前后端项目-part03
文章目录 5.4.4 机构名称5.4.4.1 创建实体类Company5.4.4.2 创建实体类CompanyMapper5.4.4.3 创建实体类CompanyService5.4.4.4 创建实体类CompanyController5.4.4.5 后端测试5.4.4.6 修改basic.js5.4.4.7 修改course.vue5.4.4.8 测试5.4.5 课程标签5.4.5.1 效果5.4.5.2 修改co…...

Java 1.8 docker 镜像制作
文章目录 一、下载文件二、精简JRE三、Dockerfile四、构建镜像五、容器测试 一、下载文件 glibc 下载地址 glibc-2.33-r0.apk glibc-bin-2.33-r0.apk glibc-i18n-2.33-r0.apk rsa sgerrand.rsa.pub jre 1.8 jre-8u201-linux-x64.tar.gz 二、精简JRE 解压 tar -zxvf jre-8…...
python中自定义报错
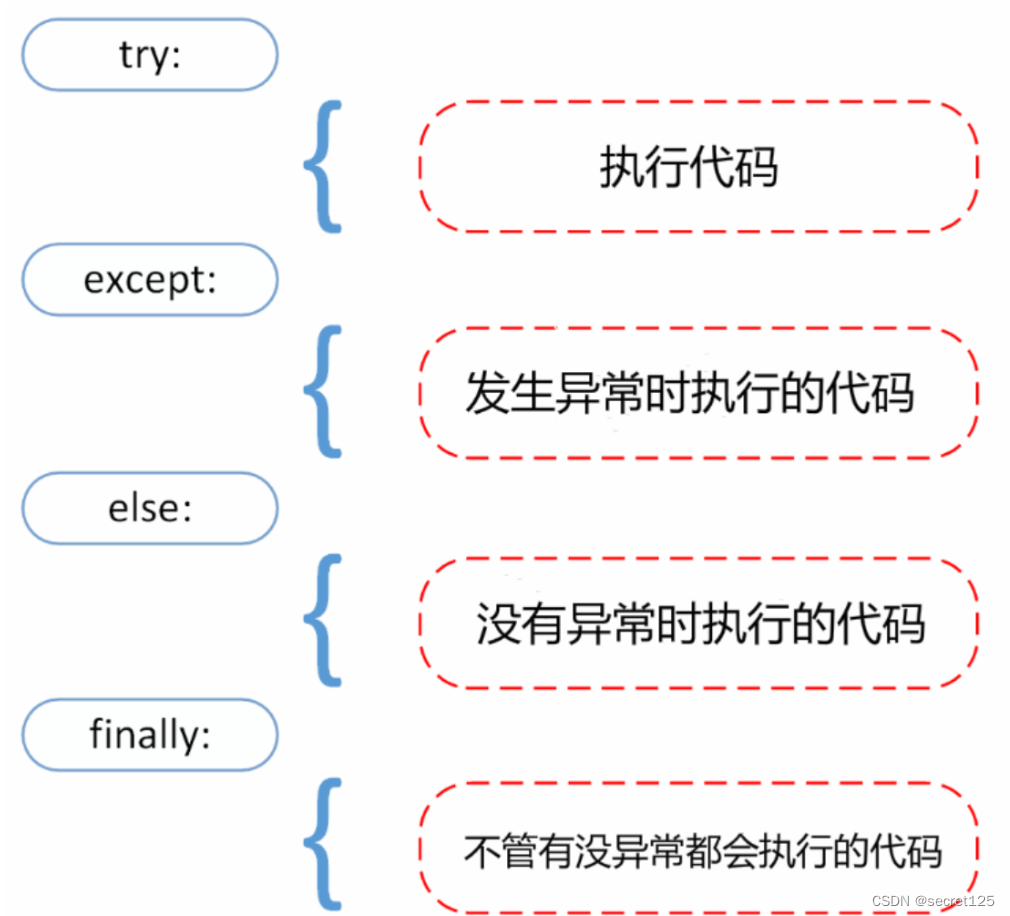
class MyError(Exception):def __init__(self,num):#录入的数Exception.__init__(self)self.numnumdef __str__(self):return 这是我定义的第%d个异常 %(self.num)使用 try:raise MyError(4) except MyError as e:print(e)raise 其作用是指定抛出的异常名称,以及异常…...

part1:sora技术
1.Sora能力边界探索 从sora的视频合集里看到了多段视频,假如我不知道这是sora视频合计,估计我第一反应并不是AI生成了这些视频,可以说在我这里通过了图灵测试😊。 在视频合集里还有同一场景的多角度/镜头的生成能力,让…...
RK3568平台开发系列讲解(基础篇)文件私有数据
🚀返回专栏总目录 文章目录 一、文件私有数据二、文件私有数据实验沉淀、分享、成长,让自己和他人都能有所收获!😄 一、文件私有数据 Linux 中并没有明确规定要使用文件私有数据,但是在 linux 驱动源码中,广泛使用了文件私有数据,这是 Linux 驱动遵循的“潜规则”,实…...
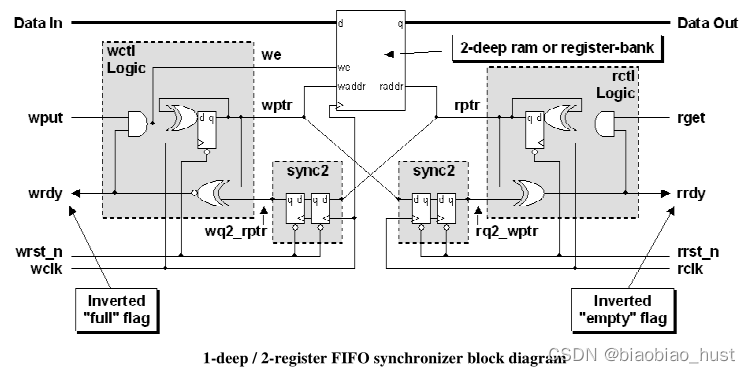
跨时钟信号处理方法
1. 背景 现在的芯片(比如SOC,片上系统)集成度和复杂度越来越高,通常一颗芯片上会有许多不同的信号工作在不同的时钟频率下。比如SOC芯片中的CPU通常会工作在一个频率上,总线信号(比如DRAM BUS)会…...

OD(13)之Mermaid饼图和象限图
OD(13)之Mermaid饼图和象限图使用详解 Author: Once Day Date: 2024年2月29日 漫漫长路才刚刚开始… 全系列文章可参考专栏: Mermaid使用指南_Once_day的博客-CSDN博客 参考文章: 关于 Mermaid | Mermaid 中文网 (nodejs.cn)Mermaid | Diagramming and charting tool…...

基于springboot+vue的智能无人仓库管理系统
博主主页:猫头鹰源码 博主简介:Java领域优质创作者、CSDN博客专家、阿里云专家博主、公司架构师、全网粉丝5万、专注Java技术领域和毕业设计项目实战,欢迎高校老师\讲师\同行交流合作 主要内容:毕业设计(Javaweb项目|小程序|Pyt…...

图神经网络实战——图论
图神经网络实战——图论 0. 前言1. 图属性1.1 有向图和无向图1.2 加权图与非加权图1.3 连通图非连通图1.4 其它图类型 2. 图概念2.1 基本对象2.2 图的度量指标2.2 邻接矩阵表示法 3. 图算法3.1 广度优先搜索3.2 深度优先搜索 小结系列链接 0. 前言 图论 (Graph theory) 是数学…...

【PHP进阶】Rabbitmq的实际使用
RabbitMQ是一个流行的消息队列中间件,它提供了可靠的消息传递机制。在使用RabbitMQ时,有几个重要的概念需要了解: 消息队列(Message Queue):RabbitMQ中的核心概念之一。它是消息的缓冲区,用于存…...
如何解决机器视觉高速图像处理软件的加密需求?
高速图像处理在机器视觉中的应用重要性 在机器视觉行业中,高速图像处理软件的作用至关重要,它使得机器能够迅速分析和处理成千上万的图像数据。这种能力在制造业、安防系统、交通监控等多个领域发挥着核心作用,如在制造业中,高速…...
Linux的条件变量
条件变量 条件变量本身不是锁,但是它可以造成线程阻塞。通常于互斥锁配合使用。给多线程提供一个会和的场合。 使用互斥量保护共享数据使用条件变量可以造成线程阻塞,等待某个条件的发生,当条件满足的时候解除阻塞。 条件变量的两个动作&a…...
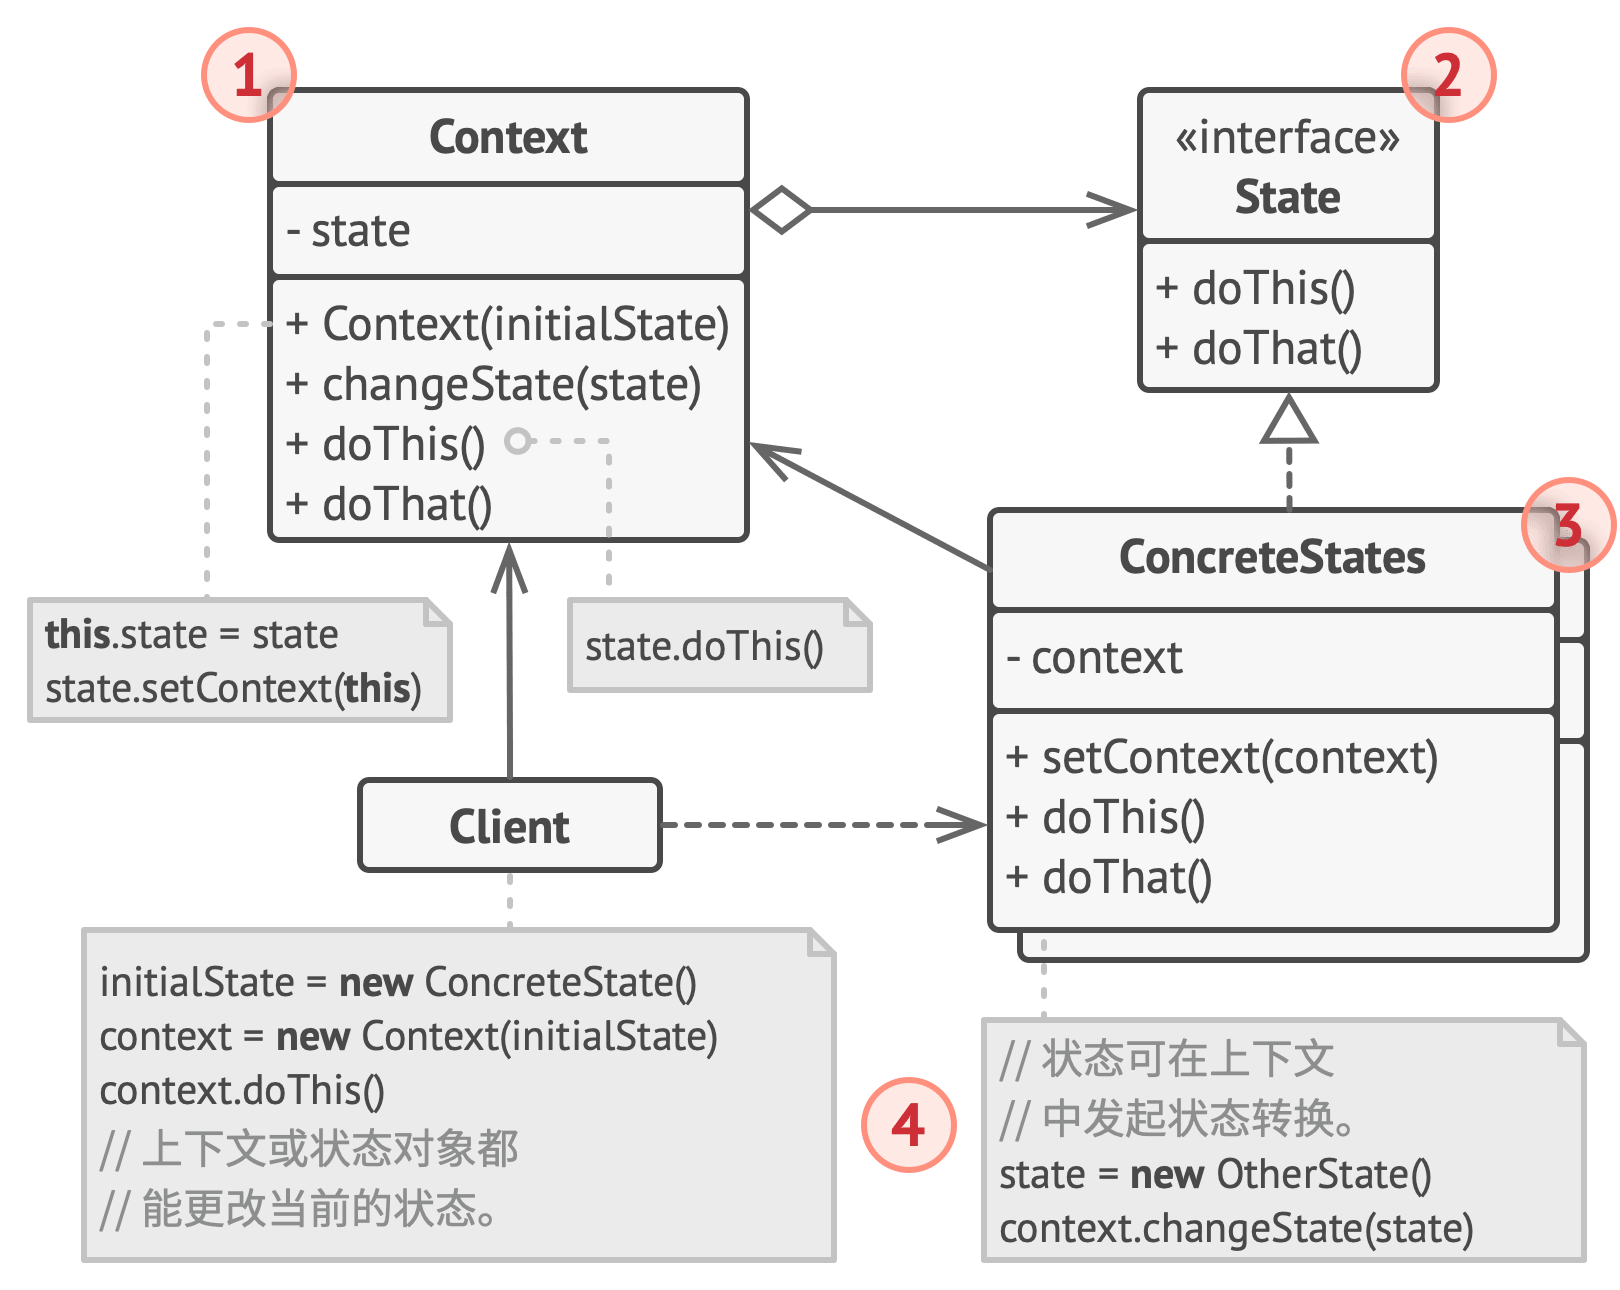
【Python笔记-设计模式】状态模式
一、说明 状态模式是一种行为设计模式,用于解决对象在不同状态下具有不同行为 (一) 解决问题 在对象行为根据对象状态而改变时,规避使用大量的条件语句来判断对象的状态,提高系统可维护性 (二) 使用场景 当对象的行为取决于其状态&#…...

Pytorch 复习总结 5
Pytorch 复习总结,仅供笔者使用,参考教材: 《动手学深度学习》Stanford University: Practical Machine Learning 本文主要内容为:Pytorch 卷积神经网络。 本文先介绍了 Pytorch 语法汇总: Pytorch 张量的常见运算、…...

Codeforces Round 930 (Div. 2)
Codeforces Round 930 (Div. 2) Codeforces Round 930 (Div. 2) A. Shuffle Party 题意: 给出长度为n的整数数组a, a i a_i ai i,对于k>2的下标进行运算,设d为k除本身外最大的除数, 操作为交换( a k a_k ak…...

c语言求平方与倒数序列的部分和
本题要求对两个正整数m和n(m≤n)编写程序,计算序列和m21/m(m1)21/(m1)⋯n21/n。 输入格式: 输入在一行中给出两个正整数m和n(m≤n),其间以空格分开。 输出格式: 在一行中按照“sum S”的格式输出部分和…...
Vue-4
自定义创建项目 目标:基于 VueCli 自定义创建项目架子 大致步骤: 安装脚手架创建项目 vue create 项目名称选择自定义 选择 Manually select features 这一项 step-1:按下空格 : 选择/取消--勾选请选择:Babel、Router、CSS、Linterstep-2…...
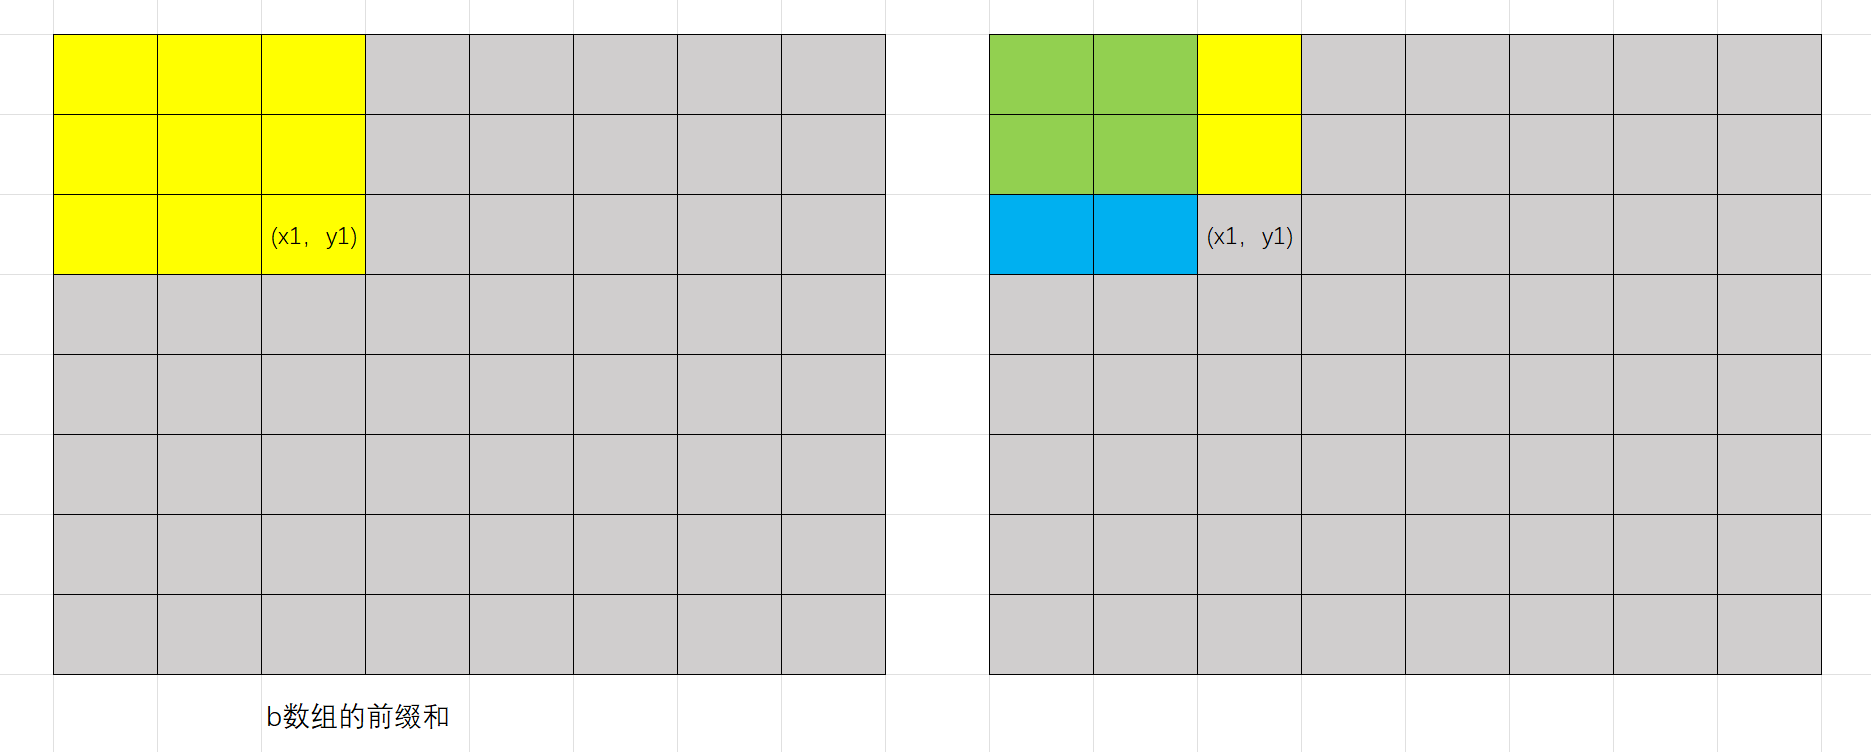
【Acwing】差分矩阵
图1:a和b数组映射表 由于a是b的前缀和数组,因此改变b[ x1][ y1]之后,受到影响的a中元素如右半图所示 图2:求b数组的前缀和 #include<bits/stdc.h> using namespace std;int n,m,q; int a[1010][1010]; int b[1010][1010]…...

Linux系统加固:如何有效管理系统账号
Linux系统加固:如何有效管理系统账号 1.1 口令重复次数限制1.2 避免系统存在uid相同的账号1.3 空密码的帐户1.4 口令复杂度1.5 口令生存期1.6 登录失败次数锁定策略 💖The Begin💖点点关注,收藏不迷路💖 在Linux系统中…...

智慧树自动刷课插件:5分钟快速安装的完整指南
智慧树自动刷课插件:5分钟快速安装的完整指南 【免费下载链接】zhihuishu 智慧树刷课插件,自动播放下一集、1.5倍速度、无声 项目地址: https://gitcode.com/gh_mirrors/zh/zhihuishu 还在为智慧树平台繁琐的手动操作而烦恼吗?智慧树自…...

YuukiPS Launcher终极指南:10分钟掌握动漫游戏启动器的完整使用技巧
YuukiPS Launcher终极指南:10分钟掌握动漫游戏启动器的完整使用技巧 【免费下载链接】Launcher-PC 项目地址: https://gitcode.com/gh_mirrors/la/Launcher-PC YuukiPS Launcher是一款专为动漫游戏玩家设计的智能启动工具,能够自动识别游戏客户端…...

Joy-Con Toolkit技术架构深度解析:开源手柄控制与传感器校准实现
Joy-Con Toolkit技术架构深度解析:开源手柄控制与传感器校准实现 【免费下载链接】jc_toolkit Joy-Con Toolkit 项目地址: https://gitcode.com/gh_mirrors/jc/jc_toolkit Joy-Con Toolkit是一款专为任天堂Joy-Con和Pro手柄设计的开源控制工具,通…...
)
丹青幻境实战教程:如何用‘避讳’精准剔除AI常见畸变(手指/结构错误)
丹青幻境实战教程:如何用‘避讳’精准剔除AI常见畸变(手指/结构错误) “见微知著,凝光成影。执笔入画,神游万象。” 丹青幻境 是一款基于 Z-Image 架构与 Cosplay LoRA 历练卷轴打造的数字艺术终端。它告别了冷硬的科技…...

图片信息隐藏工具 | 图片隐写术 v1.1 LSB 算法实现
图片隐写术 v1.1是一款专为电脑端打造的实用图片加密解密工具,依托 LSB 最低有效位算法实现图片信息隐藏功能,全程搭载适配国内用户的中文操作界面,还针对性修复了 PNG 格式图片透明区域显示异常的问题,暂不支持 JPEG/JPG 格式&am…...
视觉Transformer的「近视眼」手术——LaSt-ViT如何让机器真正「看懂」图像
一、先从一个奇怪的实验说起 想象一下这个场景:你正在训练一个视觉模型来识别图片里的猫。你给它看一张猫坐在沙发上的照片,模型说:「这是猫。」准确无误。 但当你问它:「你『看』到了什么?」 它指着沙发、指着地毯、指着墙上的挂饰——唯独没有指着那只猫。 这听起来…...

Ubuntu20.04下基于cephadm的Ceph集群高效部署指南
1. 环境准备:打造Ceph集群的基石 在Ubuntu 20.04上部署Ceph集群前,需要像搭积木一样先打好地基。我遇到过不少初学者因为环境配置不当导致后续步骤失败的情况,所以这里会详细说明每个环节的避坑要点。 硬件配置方面,建议每台节点至…...

避坑指南:STM32F103多通道捕获中断冲突的5种解决方案
STM32F103多通道捕获中断冲突的实战解决方案 在嵌入式开发中,定时器的多通道捕获功能常用于测量脉冲宽度、频率等信号特征。STM32F103系列作为经典微控制器,其TIM5定时器支持四个独立通道的输入捕获。然而,当同时使用多个通道时,开…...

C语言条件编译三种方式及第一种方式的格式、作用与示例
预处理程序具备支持条件编译的特性,借着该特性能够依据不一样的条件,对程序当中不同的部分实施编译操作,由此去生成与之相对应的目标代码,而此情况对程序的移植以及调试是有着帮助作用的。条件编译总共存在着三种方式,…...
)
示波器抓I2C波形总是一团乱麻?手把手教你用泰克MSO系列示波器设置I2C解码(附时序参数测量技巧)
示波器抓I2C波形总是一团乱麻?手把手教你用泰克MSO系列示波器设置I2C解码(附时序参数测量技巧) 当你在调试I2C总线时,是否经常遇到这样的情况:示波器屏幕上SDA和SCL两条信号线交织在一起,像一团理不清的毛线…...