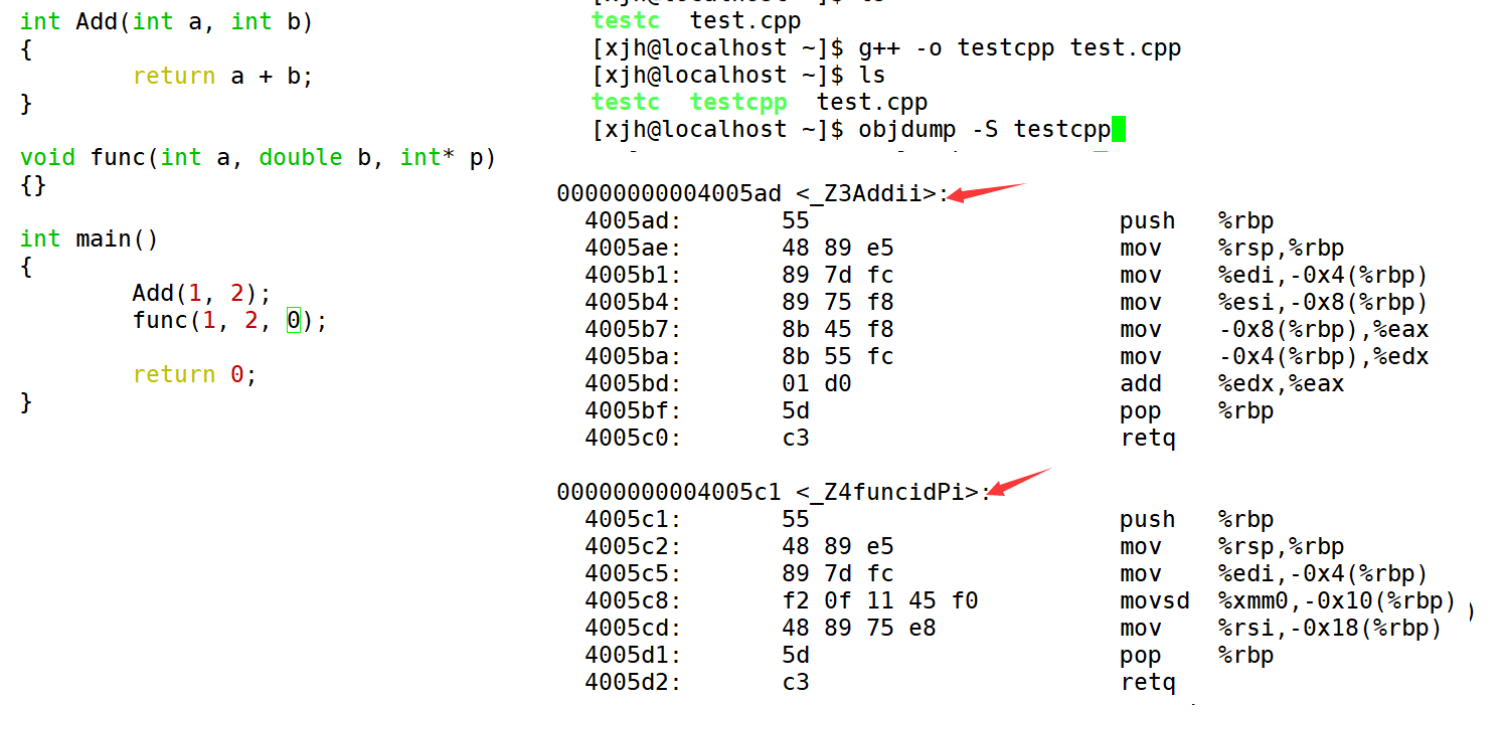
react-navigation:
我的仓库地址:https://gitee.com/ruanjianbianjing/bj-hybrid
react-navigation:
学习文档:https://reactnavigation.org
安装核心包:
npm install @react-navigation/native安装@react-navigation/native本身依赖的相关包:
- react-native-screens:使用原生代码实现screen容器可以提高性能流畅度
- react-native-safe-area-context:可以让我们的组件渲染在一个安全的区域(比如有些移动设备是异性的,刘海屏、挖孔屏等)
npx expo install react-native-screens react-native-safe-area-contextnpm install @react-navigation/native @react-navigation/native-stack @react-navigation/bottom-tabs入口文件(我的是App.js)引入NavigationContainer
import * as React from 'react';
import { NavigationContainer } from '@react-navigation/native';export default function App() {return (<NavigationContainer>{/* Rest of your app code */}</NavigationContainer>);
}
小图标:
网址:https://icons.expo.fyi/Index
引入方式:
@expo/vector-icons
//举个例子
 import { Ionicons } from "@expo/vector-icons";
如何使用堆栈导航器:
安装核心库:npm install @react-navigation/stack
目录结构:(创建Home和Detail)
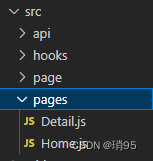
home组件:
import { useState } from 'react';
import { StyleSheet, Text, View, Button } from 'react-native';const Home = ({navigation}) => {const goDetail = () => {navigation.navigate('detail', { data: 'pass data' })}return (<View style={{flex: 1}}><Button title='to detail'onPress={goDetail('detail')}/></View>)
}
const styles = StyleSheet.create({});
export default Home
Getail组件:
import React from "react";
import { Text } from "react-native";const Detail = () => {return (<div><Text>详情eee</Text></div>);
};export default Detail;
App.js
import { StatusBar, Text, StyleSheet, View } from "react-native";
import "./global";
import { NavigationContainer } from "@react-navigation/native";
import { createNativeStackNavigator } from "@react-navigation/native-stack"; //堆栈导航器
import { createBottomTabNavigator } from "@react-navigation/bottom-tabs";
//page下的组件
import Home from "./src/page/Home";
import Detail from "./src/page/Detail";
//两个小图标
import { AntDesign } from "@expo/vector-icons";
import { Ionicons } from "@expo/vector-icons";const Stack = createNativeStackNavigator();
const Tab = createBottomTabNavigator();
//Screen路由,也是页面
//Navigator导航器export default function App() {return (<NavigationContainer><Tab.Navigator>{/* 首页 */}<Tab.Screen name="homeScreen" component={HomeScreen} />{/* 个人中心页 */}<Tab.Screen name="setting" component={Setting} /></Tab.Navigator><StatusBar /></NavigationContainer>);
}const styles = StyleSheet.create({
});
页面之间实现跳转:
在`Home`组件中,您可以添加一个按钮或者其他交互元素,然后在点击事件中使用`navigation.navigate`方法来进行页面跳转:
import { Button } from 'react-native';const Home = ({ navigation }) => {
return (
<View>
<Button
title="Go to Detail Page"
onPress={() => navigation.navigate('detail')}
/>
</View>
);
};
在上面的示例中,当点击按钮时,会调用`navigation.navigate('detail')`来跳转到`Detail`页面。
下面是代码展示:
import { StatusBar, Text, StyleSheet, View } from "react-native";
// import Home from './src/page/Home';
import "./global";
import { getFocusedRouteNameFromRoute } from "@react-navigation/native";
import { NavigationContainer } from "@react-navigation/native";
import { createNativeStackNavigator } from "@react-navigation/native-stack"; //堆栈导航器
import { createBottomTabNavigator } from "@react-navigation/bottom-tabs";
import Home from "./src/page/Home";
import Detail from "./src/page/Detail";
import { AntDesign } from "@expo/vector-icons";
import { Ionicons } from "@expo/vector-icons";const Stack = createNativeStackNavigator();
const Tab = createBottomTabNavigator();const HomeScreen = () => {return (<Stack.Navigator><Stack.Screenname="home"component={Home}options={{title: "首页",tarBarIcon: ({ color, size }) => (<AntDesign name="home" size={size} color={color} />),}}/><Stack.Screen name="detail" component={Detail} /></Stack.Navigator>);
};export default function App() {return (<NavigationContainer><Tab.NavigatorscreenOptions={{headerShown: false,}}><Tab.Screenname="homeScreen"component={HomeScreen}options={{title: "首页",tabBarIcon: ({ color, size }) => (<Ionicons name="home" size={size} color={color} />),}}/><Tab.Screen name="setting" component={Setting} /></Tab.Navigator><StatusBar /></NavigationContainer>);
}const styles = StyleSheet.create({});
tips:
headerMode="none"没有标题栏
headerMode="screen"每个页面都有一个标题栏(Android的默认)
使用headerStyle
import { StatusBar, Text, StyleSheet, View } from "react-native";
// import Home from './src/page/Home';
import "./global";
import { getFocusedRouteNameFromRoute } from "@react-navigation/native";
import { NavigationContainer } from "@react-navigation/native";
import { createNativeStackNavigator } from "@react-navigation/native-stack"; //堆栈导航器
import { createBottomTabNavigator } from "@react-navigation/bottom-tabs";
import Home from "./src/page/Home";
import Detail from "./src/page/Detail";
import { AntDesign } from "@expo/vector-icons";
import { Ionicons } from "@expo/vector-icons";const Stack = createNativeStackNavigator();
const Tab = createBottomTabNavigator();const HomeScreen = () => {return (<Stack.NavigatorscreenOptions={{headerStyle: {backgroundColor: "#f4511e",},headerTitleAlign: "center",headerTintColor: "#fff",headerTitleStyle: {fontWeight: "bold",},}}><Stack.Screenname="home"component={Home}options={{title: "首页",tarBarIcon: ({ color, size }) => (<AntDesign name="home" size={size} color={color} />),}}/><Stack.Screen name="detail" component={Detail} /></Stack.Navigator>);
};const Setting = () => <Text>设置页面</Text>;export default function App() {return (<NavigationContainer><Tab.NavigatorscreenOptions={{headerShown: false,}}><Tab.Screenname="homeScreen"component={HomeScreen}options={{title: "首页",tabBarIcon: ({ color, size }) => (<Ionicons name="home" size={size} color={color} />),}}/><Tab.Screen name="setting" component={Setting} /></Tab.Navigator><StatusBar /></NavigationContainer>);
}const styles = StyleSheet.create({});
页面跳转之间传参,还有隐藏下方的小图标:
import { StatusBar, Text, StyleSheet, View } from "react-native";
// import Home from './src/page/Home';
import "./global";
import { getFocusedRouteNameFromRoute } from "@react-navigation/native";
import { NavigationContainer } from "@react-navigation/native";
import { createNativeStackNavigator } from "@react-navigation/native-stack"; //堆栈导航器
import { createBottomTabNavigator } from "@react-navigation/bottom-tabs";
import Home from "./src/page/Home";
import Detail from "./src/page/Detail";
import { AntDesign } from "@expo/vector-icons";
import { Ionicons } from "@expo/vector-icons";const Stack = createNativeStackNavigator();
const Tab = createBottomTabNavigator();const HomeScreen = () => {return (<Stack.NavigatorscreenOptions={{headerStyle: {backgroundColor: "#f4511e",},headerTitleAlign: "center",headerTintColor: "#fff",headerTitleStyle: {fontWeight: "bold",},}}><Stack.Screenname="home"component={Home}options={{title: "首页",tarBarIcon: ({ color, size }) => (<AntDesign name="home" size={size} color={color} />),}}/><Stack.Screen name="detail" component={Detail} /></Stack.Navigator>);
};const Setting = () => <Text>设置页面</Text>;
// 变量
const screens = ["home", "set", "useinfo"];// tabbar是否要显示
const tabbarIsVisible = (route) => {const routeName = getFocusedRouteNameFromRoute(route);// console.log(routeName);return screens.includes(routeName);
};
export default function App() {return (<NavigationContainer><Tab.NavigatorscreenOptions={{headerShown: false,}}><Tab.Screenname="homeScreen"component={HomeScreen}options={// 让options返回函数({ route }) => {//   console.log(route);// 这是一个函数,需要引入,把它移动到上面的tabbarIsVisible函数里面// const routeName = getFocusedRouteNameFromRoute(route);return {// 这行以下是非函数的title: "首页",tabBarIcon: ({ color, size }) => (<Ionicons name="home" size={size} color={color} />),// 每个tab项有一个自己的属性tabBarStyle: {//   display: routeName !== "home" ? "none" : "block",// 换成函数调用display: tabbarIsVisible(route) ? "block" : "none",},};}}/><Tab.Screen name="setting" component={Setting} /></Tab.Navigator><StatusBar /></NavigationContainer>);
}const styles = StyleSheet.create({});
最终效果展示:(视频地址)
https://www.bilibili.com/video/BV1ZJ4m1L7ED/?vd_source=49ac986e62578cbc7593a58345567513
相关文章:
react-navigation:
我的仓库地址:https://gitee.com/ruanjianbianjing/bj-hybrid react-navigation: 学习文档:https://reactnavigation.org 安装核心包: npm install react-navigation/native 安装react-navigation/native本身依赖的相关包: react-nativ…...

nginx负载均衡模式
轮询 (Round Robin) 用法:这是Nginx默认的负载均衡策略。每个请求会按顺序分配给upstream中的后端服务器,即按照配置的服务器列表顺序依次分配。 upstream backend {server backend1.example.com;server backend2.example.com;server backend3.example.…...
手写简易操作系统(十七)--编写键盘驱动
前情提要 上一节我们实现了锁与信号量,这一节我们就可以实现键盘驱动了,访问键盘输入的数据也属于临界区资源,所以需要锁的存在。 一、键盘简介 之前的 ps/2 键盘使用的是中断驱动的,在当时,按下键盘就会触发中断&a…...

springboot中基于RestTemplate 类 实现调用第三方API接口【POST版本】
https://blog.csdn.net/Drug_/article/details/135111675 这一篇的升级版 还是先配置文件 package com.init.config;import org.apache.http.conn.ssl.NoopHostnameVerifier; import org.apache.http.conn.ssl.SSLConnectionSocketFactory; import org.apache.http.impl.clie…...

编程器固件修改教程
首发csdn,转载请说明出处,保留一切权益。 关于编程器固件 所谓编程器固件是用编程器读取嵌入式设备的FLASH存储数据生成的文件,类似于直接用工具复制整个硬盘 编程器固件与普通固件的差异 编程器固件是用特定的结构(按顺序、大小)将一些文件系…...
)
Python从原Excel表中抽出数据存入同一文件的新的Sheet(附源码)
python读取excel数据。Python在从原Excel表中抽出数据并存储到同一文件的新的Sheet中的功能,充分展示了其在数据处理和自动化操作方面的强大能力。这一功能不仅简化了数据迁移的过程,还提高了数据处理的效率,为数据分析和管理工作带来了极大的…...

计算机网络实验六:路由信息协议RIP
目录 6 实验六:路由信息协议RIP 6.1 实验目的 6.2 实验步骤 6.2.1 构建网络拓扑、配置各网络设备 6.2.2 网络功能验证测试 6.3 实验总结 6 实验六:路由信息协议RIP 6.1 实验目的 (1)学习RIP协议的工作原理和特点 (2)学习如何选择最短路径路由。 (3)进一步掌握…...
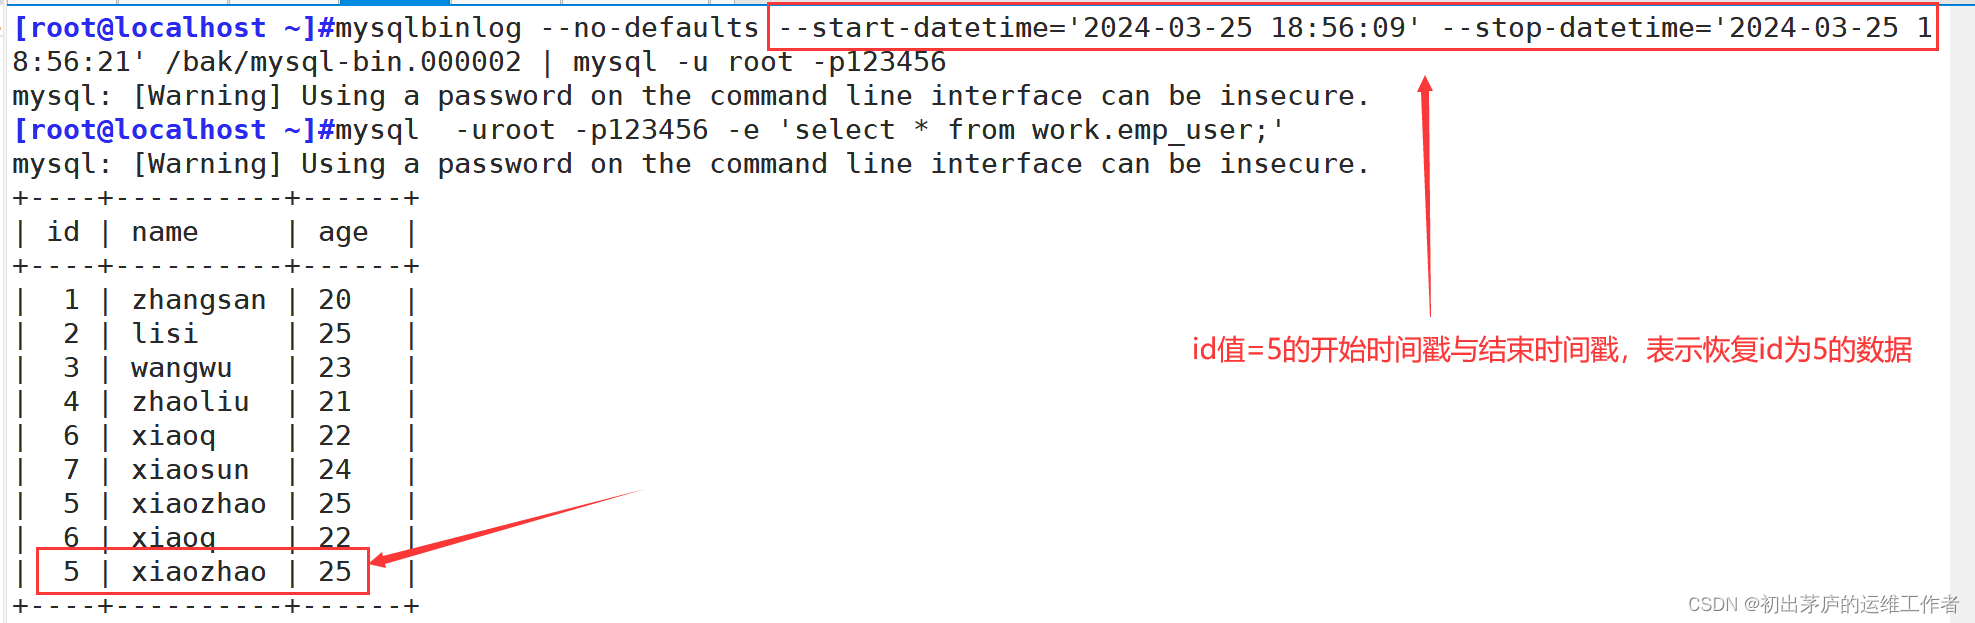
MySQL数据库备份策略与实践详解
目录 引言 一、MySQL数据库备份的重要性 (一)数据丢失的原因 (二)数据丢失的后果 二、MySQL备份类型 (一)根据数据库状态 (二)根据数据的完整性 (三)…...

String类相关oj练习
前言: 此处练习对应博客文章:公主,王子,请点击 1.第一次只出现一次的字符 做题首先看清要求和提示: 给定一个字符串 s ,找到 它的第一个不重复的字符,并返回它的索引 。如果不…...
【Linux】进程实践项目 —— 自主shell编写
送给大家一句话: 不管前方的路有多苦,只要走的方向正确,不管多么崎岖不平,都比站在原地更接近幸福。 —— 宫崎骏《千与千寻》 自主shell命令编写 1 前言2 项目实现2.1 创建命令行2.2 获取命令2.3 分割命令2.4 运行命令 3 源代码…...

基于SpringBoot和Vue的学生笔记共享平台的设计与实现
今天要和大家聊的是一款基于SpringBoot和Vue的学生笔记共享平台的设计与实现 !!! 有需要的小伙伴可以通过文章末尾名片咨询我哦!!! 💕💕作者:李同学 💕&…...
C++心决之命名空间、重载函数和引用
目录 1. C关键字(C98) 2. 命名空间 2.1 命名空间定义 2.2 命名空间使用 3. C输入&输出 4. 缺省参数 4.1 缺省参数概念 4.2 缺省参数分类 5. 函数重载 5.1 函数重载概念 5.2 C支持函数重载的原理--名字修饰(name Mangling) 6. 引用 6.1 引用概念 6.2 引用特性…...

higress使用了解
higress使用了解 了解下 http-echo、httpbin 镜像使用 未按文档实际搭建,但大致是这样 官方文档:https://higress.io/zh-cn/docs/overview/what-is-higress 了解:利用sealos快速安装kubernetes集群:https://note.youdao.com/s…...
Swagger3探索之游龙入海
引言 后端开发中常用的接口调用工具一般使用Postman、ApiPost工具,但后期需要与前端联调,要补充接口文档花费大量时间,此时Swagger3应运而生,大大提高沟通交流的效率。 引用依赖 <!-- Swagger3 调用方式 http://ip:port/swa…...
javaWeb项目-学生考勤管理系统功能介绍
项目关键技术 开发工具:IDEA 、Eclipse 编程语言: Java 数据库: MySQL5.7 框架:ssm、Springboot 前端:Vue、ElementUI 关键技术:springboot、SSM、vue、MYSQL、MAVEN 数据库工具:Navicat、SQLyog 1、JAVA技术 JavaSc…...
云备份项目认识、环境搭建以及所使用的库的介绍
一、云备份认识 将本地计算机一个受监管的文件夹的文件上传到服务器中,有服务器组织,客户端可以通过网页将文件查看并且下载下来,下载过程支持断点续传功能,并且服务器会对上传的文件进行热点管理,长时间没人访问的文…...

汇编语言第四版-王爽第2章 寄存器
二进制左移四位,相当于四进制左移一位。 debug命令实操,win11不能启动,需要配置文件 Windows64位系统进入debug模式_window10系统64位怎么使用debugger-CSDN博客...

MoonBit MeetUp回顾——张正、宗喆:编程语言在云原生与区块链领域的技术探索
宗喆和张正分别给我们带了 KCL 相关的最新进展,由蚂蚁集团开发的 Rust 编写的开源 DSL,目标是优化云原生策略配置和用户体验。它通过引入动态配置管理、配置校验和基础设施抽象等核心概念,解决开发者认知负担、配置膨胀和标准化工具缺乏的问题…...
云原生靶场kebernetesGoat、Metarget
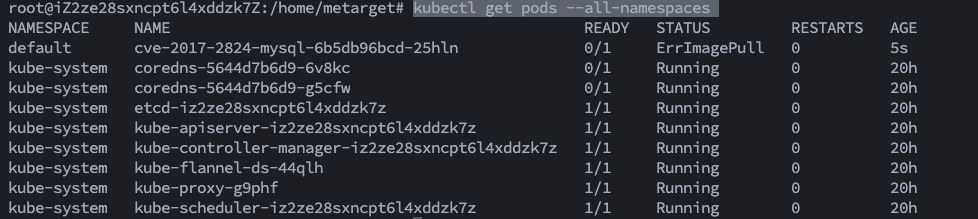
靶场 文章目录 靶场kebernetesGoat靶场安装Docker in DockerSSRF漏洞容器逃逸到主系统Docker CIS 基线分析Kubernetes CIS 安全基线分析分析被部署挖矿软件的容器镜像获取环境信息Hidden in layersRBAC最低权限配置错误使用 Sysdig Falco 进行运行时安全监控和检测 Metarget ke…...

【3D目标检测】Det3d—SE-SSD模型训练(前篇):KITTI数据集训练
SE-SSD模型训练 1 基于Det3d搭建SE-SSD环境2 自定义数据准备2.1 自定义数据集标注2.2 训练数据生成2.3 数据集分割 3 训练KITTI数据集3.1 数据准备3.2 配置修改3.3 模型训练 1 基于Det3d搭建SE-SSD环境 Det3D环境搭建参考:【3D目标检测】环境搭建(OpenP…...

Windows本地AI开发环境搭建:OpenClaw与Ollama集成指南
1. 项目概述:一个为Windows开发者量身打造的本地AI开发环境如果你是一名在Windows 11上工作,同时又对本地运行大语言模型(LLM)和AI助手感兴趣的开发者,那么你很可能已经体验过那种“配置地狱”:WSL2、Docke…...

构筑数字韧性:从零信任到内生安全,打造面向未来的数字基础设施
1. 从一篇行业评论引发的深度思考:我们该如何构筑数字时代的“安全地基”?前几天,行业媒体EE Times上的一篇旧文被重新翻了出来,标题挺抓人眼球,大致是在讨论某个国家在关键技术领域的主导地位是否面临挑战。抛开其中地…...
)
从ENVI SARscape到SNAP:手把手教你迁移哨兵1 GRD数据预处理流程(含避坑指南)
从ENVI SARscape到SNAP:哨兵1 GRD数据预处理全流程迁移实战 当雷达遥感领域的工具生态逐渐向开源化倾斜,许多长期依赖ENVI SARscape的研究者开始面临工具迁移的挑战。本文将聚焦哨兵1号GRD数据的预处理流程,为需要从商业软件转向开源工具的用…...

GPU加速网络爬虫:OpenCL异构计算在数据采集中的实践
1. 项目概述:一个面向硬件加速的开源抓取工具包最近在折腾一些数据采集和自动化任务时,我常常遇到一个瓶颈:当需要处理海量网页、进行高频次请求或者解析复杂的动态内容时,传统的基于CPU的抓取框架(比如Scrapy、Reques…...

别再只把JWT当登录凭证了!从CTFHub靶场看JWT在API安全与数据交换中的‘双刃剑’效应
JWT安全实战:从CTFHub靶场到企业级API防护的深度解析 在数字化身份认证领域,JSON Web Token(JWT)早已超越简单的登录凭证角色,成为现代分布式系统的核心组件。当开发者仅将其视为"带签名的Cookie"时…...
在硬件选型中的实际应用)
从手机闪光灯到汽车大灯:聊聊‘发光强度’(坎德拉)在硬件选型中的实际应用
从手机闪光灯到汽车大灯:发光强度(坎德拉)的硬件实战指南 当你在昏暗的停车场用手机闪光灯寻找钥匙时,是否想过为什么有些手机的补光能照亮整个车位,而有些却只能勉强看清手掌?这个差异背后,隐藏…...

AI应用着陆页模板:快速构建专业产品门户的实战指南
1. 项目概述:一个面向AI应用落地的着陆页模板 最近在折腾AI应用开发的朋友,估计都遇到过同一个问题:模型和算法好不容易调好了,后端API也搭起来了,但一到“怎么让用户用起来”这一步,就卡壳了。尤其是那个…...

网安信息收集
声明:任何个人和组织不得从事非法侵入他人网络、干扰他人网络正常功能、窃取网络数据等危害网络安全 的活动;不得提供专门用于从事侵入网络、干扰网络正常功能及防护措施、窃取网络数据等危害网络安全活动的程序、工具;明知他人从事危害网络安…...

实验记录-农药种衣剂
1.显色度取决于种子颗粒大小,种子越大,则显色越差;2.需加入增稠剂...

Jentic Mini:为AI智能体构建安全的API执行层与凭据管理方案
1. 项目概述:为AI智能体构建安全的API执行层 如果你正在开发AI智能体,并且希望它能帮你操作Notion、Slack、GitHub这些真实世界的服务,那你一定遇到过这个核心难题:怎么把API密钥安全地交给它?直接把密钥塞进提示词里&…...