Centos7 elasticsearch-7.7.0 集群搭建,启用x-pack验证 Kibana7.4用户管理
前言
Elasticsearch 是一个分布式、RESTful 风格的搜索和数据分析引擎,能够解决不断涌现出的各种用例。 作为 Elastic Stack 的核心,它集中存储您的数据,帮助您发现意料之中以及意料之外的情况。
环境准备
软件 OS系统 IP 节点
Elasticsearch7.7.0 centos 7 10.16.101.27 node-1
Elasticsearch7.7.0 centos 7 10.16.101.28 node-2
Elasticsearch7.7.0 centos 7 10.16.101.29 node-3
1.JDK环境安装以及配置
Elasticsearch7.7.0需要jdk11的允许环境,所有我们安装Jdk11
# 已经JDK保存在OSS,所有从OSS下载
cd root
wget https://starshop.obs.cn-south-1.myhuaweicloud.com/other/jdk-11.0.14_linux-x64_bin.tar.gz# 解压 jdk-11.0.14_linux-x64_bin.tar.gz 移动到/usr/java/jdk11目录下
tar xf jdk-11.0.14_linux-x64_bin.tar.gz
mv jdk-11.0.14_linux-x64_bin /usr/java/jdk11# 赋予java 执行权限
chmod 777 /usr/java/jdk11/bin/java
chmod 777 /usr/java/jdk11/jre/bin/java
配置jdk环境变量
配置环境变量
vi /etc/profile
在文本末添加以下内容
---------------------------------------------------------------
#java环境变量
export JAVA_HOME=/usr/java/jdk1.8
export PATH=$JAVA_HOME/bin:$PATH
export CLASSPATH=.:$JAVA_HOME/lib/dt.jar:$JAVA_HOME/lib/tools.jar
----------------------------------------------------------------
执行一下命令 立即生效
source  /etc/profile查看java版本
java -version
2.开端口
# Elasticsearch7.7.0 需要开启9200 9300 9100端口进行通信
firewall-cmd --zone=public --add-port=9100/tcp --permanent && firewall-cmd --zone=public --add-port=9200/tcp --permanent && firewall-cmd --zone=public --add-port=9300/tcp --permanent && firewall-cmd --reload
3.创建新用户,用户启动Elasticsearch
# 因为Elasticsearch不能使用root用户启动,所有必须新建用户
# 新建用户
adduser es
# 给新用户添加密码
passwd es
安装 Elasticsearch7.7.0
https://www.elastic.co/cn/downloads/past-releases#elasticsearch
# 下载es
cd /root
wget https://artifacts.elastic.co/downloads/elasticsearch/elasticsearch-7.7.0-linux-x86_64.tar.gz
# 解压文件到,移动到/usr/local/elastic/elasticsearch7
tar xf elasticsearch-7.7.0-linux-x86_64.tar.gz
mv elasticsearch-7.7.0-linux-x86_64 /usr/local/elastic/elasticsearch7
# 将elasticsearch7目录及路径下所有文件所有者均设为es用户
chown es:es -R /usr/local/elastic/elasticsearch7
1.修改系统配置文件
# 打开sysctl.conf文件。Linux默认不允许任何用户和应用程序直接开辟这么大的虚拟内存
vi /etc/sysctl.conf
# 文件sysctl.conf末尾加入
vm.max_map_count=655360
# 保存退出后,为了让系统控制权限配置生效
sysctl -p
2.修改limits.conf文件
vi /etc/security/limits.conf
# 在文件内结束符前加上下面给出的几行代码,保存即可
* soft nofile 65536
* hard nofile 131072
* soft nproc 4096
* hard nproc 4096
* soft memlock unlimited
* hard memlock unlimited
3.修改elasticsearch.yml(在27,28,29 编辑elasticsearch.yml)
# 切换到es用户
su es
# 编辑elasticsearch.yml
cd /usr/local/elastic/elasticsearch7/config
vi /usr/local/elastic/elasticsearch7/config/elasticsearch.yml
########################下面是文件内容########################################
# 集群名称,同一集群下每台服务器的名称要一致否则会报错
cluster.name: my-elasticsearch
# 节点名称,集群下每台机的节点名称唯一(举例的机器节点名称设为node-1,其他分别为node-2,node-3)
node.name: node-1
# ES数据储存路径(保证该目录存在不存在则报错)
path.data: /usr/local/elastic/elasticsearch7/data
# ES运行日志文件路径(保证该目录存在不存在则报错)
path.logs: /usr/local/elastic/elasticsearch7/logs
# 需求锁住物理内存,避免操作系统的内存Swaping
bootstrap.memory_lock: true
# 外界访问ES ip地址(设置0.0.0.0表示可以通过该机器的任何ip访问)
network.host: 0.0.0.0
# 加入此配置可以解决集群的警告
network.publish_host: 10.16.101.27
# ES的访问端口号(不设置则默认为9200)
http.port: 9200
# 集群下所有机器的访问ES的url集合
discovery.seed_hosts: ["10.16.101.27:9300", "10.16.101.28:9300", "10.16.101.29:9300"]
# 集群下所有节点集合
cluster.initial_master_nodes: ["node-1", "node-2", "node-3"]
4 . 修改elasticsearch的VM配置
vi /usr/local/elastic/elasticsearch7/config/jvm.options
修改VM为机器内存的一半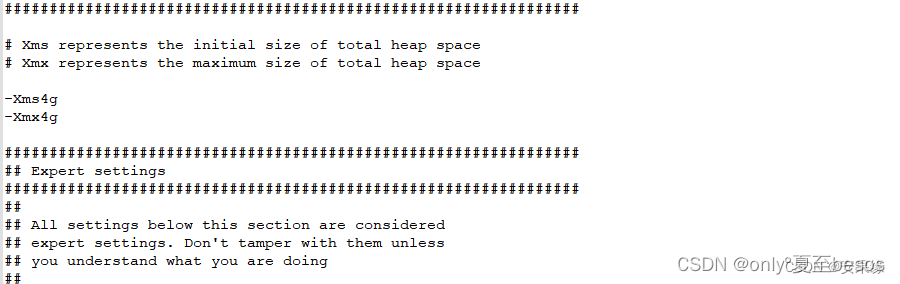
启动elasticsearch
1.设置elasticsearch开机启动
# 切换到root用户
su  root
# 切换到/etc/rc.d/init.d目录
cd /etc/rc.d/init.d
# 编辑elasticsearch启动文件
vi elasticsearch
####################### 贴入下面的文本保存即可 ###############################
#!/bin/sh
#chkconfig: 2345 80 05
#description: elasticsearch 6.2.2
export JAVA_HOME=/usr/java/jdk11
export ES_PATH=/usr/local/elastic/elasticsearch7
case "$1" in
start)su es<<!cd $ES_PATH./bin/elasticsearch -d -p pid
!echo "elasticsearch startup";;
stop)es_pid=`ps aux|grep elasticsearch | grep -v 'grep elasticsearch' | awk '{print $2}'`kill -9 $es_pidecho "elasticsearch stopped";;
restart)es_pid=`ps aux|grep elasticsearch | grep -v 'grep elasticsearch' | awk '{print $2}'`kill -9 $es_pidecho "elasticsearch stopped"su es<<!cd $ES_PATH./bin/elasticsearch -d -p pid
!echo "elasticsearch startup";;
*)echo "start|stop|restart";;
esac
exit $?# 刚编辑的文件需要赋予权限
chmod -X elasticsearch
# 添加到系统服务
chkconfig --add elasticsearch# 开启服务
service elasticsearch start
# 停止服务
service elasticsearch stop
# 重启服务
service elasticsearch restart
# 设置开机启动
chkconfig elasticsearch on
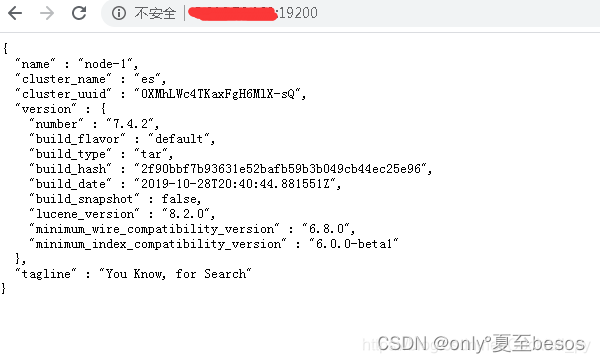
在浏览器中输入 http://10.16.101.27:9200 代表安装成功 查看集群是否成功 在浏览器输出入 http://10.16.101.27:9200/_cat/health?v 显示3节点代表成功
中文分词和拼音分词器安装
中文ik下载:https://github.com/medcl/elasticsearch-analysis-ik/releases
拼音分词器下载:https://github.com/medcl/elasticsearch-analysis-pinyin/releases
根据elasticsearch版本下载对应的分词器版本,必须版本对应
# 文件下载在root目录下
cd /root
#下载ik
wget https://github.com/medcl/elasticsearch-analysis-ik/releases/download/v7.7.0/elasticsearch-analysis-ik-7.7.0.zip
# 下载pinyin
wget https://github.com/medcl/elasticsearch-analysis-pinyin/releases/download/v7.7.0/elasticsearch-analysis-pinyin-7.7.0.zip# 在elasticsearch 的plugins目录下新疆ik和pinyin文件夹
mkdir /usr/local/elastic/elasticsearch7/plugins/ik
mkdir /usr/local/elastic/elasticsearch7/plugins/pinyin
# unzip 将上面的2个zip直接解压到对应ik和pinyin目录下
unzip elasticsearch-analysis-ik-7.7.0.zip -d /usr/local/elastic/elasticsearch7/plugins/ik
unzip elasticsearch-analysis-pinyin-7.7.0.zip -d /usr/local/elastic/elasticsearch7/plugins/pinyin
# 赋予权限,重启elasticsearch
chown es:es -R /usr/local/elastic/elasticsearch7
service elasticsearch restart
使用crul命令,输入下面的URL地址,验证分词器是否成功
curl -X GET -H "Content-Type: application/json" "http://localhost:9200/_analyze?pretty=true" -d'{"text":"中华五千年华夏"}';若elasticsearch无法关闭,可使用kill -9 pid 强制关闭在重启
# 查看pid
ps aux|grep elasticsearch
# 强制关闭
kill -9 xx
# 启动elasticsearch
service elasticsearch start
安装浏览器ealsticsearch-head插件
ealsticsearch只是后端提供各种api,那么怎么直观的使用它呢?elasticsearch-head将是一款专门针对于elasticsearch的客户端工具
elasticsearch-head 需要nodejs的支持
1.下载安装nodejs
# 文件下载在root下
cd /root
# 下载最新稳定版nodejs
wget https://nodejs.org/dist/v16.15.1/node-v16.15.1-linux-x64.tar.xz
# 解压文件
tar xf node-v16.15.1-linux-x64.tar.xz
# 移动解压后目录到软件目录,并将目录重命名nodejs
mv node-v16.15.1-linux-x64 /usr/local/nodejs
# 查看node的版本
/usr/local/nodejs/bin/node -v
# 配置环境变量
vim /etc/profile#################################将下面文本贴入profile文件中保存###################
# 添加node_home变量
export NODE_HOME=/usr/local/nodejs
# 把node_home变量添加到环境变量中
export PATH=$PATH:$NODE_HOME/bin# 重新加载一下配置文件使新的配置生效
source /etc/profile
# 查看nodejs版本
node -version

至此,centos7上的nodejs运行环境安装成功,下面我们安装elasticsearch-head
2.安装grunt构建工具
可以进行打包压缩、测试、执行等等的工作,head插件就是通过grunt启动的。因此需要安装grunt
# 切换到nodejs安装目录
cd /usr/local/nodejs
# 配置阿里镜像
npm config set registry https://registry.npm.taobao.org
# 安装grunt
npm install -g grunt-cli
# 查看是否安装成功
grunt -version
2.下载安装elasticsearch-head插件 GitHub - mobz/elasticsearch-head: A web front end for an elastic search cluster下载elasticsearch-head-master.zip,将文件拷贝到/root目录下
cd /root
# 解压elasticsearch-head-master
unzip elasticsearch-head-master.zip
# 将文件移动到/usr/local/elastic/elasticsearch-head目录
mv elasticsearch-head-master /usr/local/elastic/elasticsearch-head
# 切换到/usr/local/elastic/elasticsearch-head目录下
cd /usr/local/elastic/elasticsearch-head
# 编译elasticsearch-head
npm install
# 运行 elasticsearch-head 后台运行
nohup npm run start &
浏览器中输入上面的地址http://localhost:9100,如图说明head插件已经安装成功了。

上图不能显示集群健康值,需要在配置一下elasticsearch.yml
cd /usr/local/elastic/elasticsearch7/config
vi elasticsearch.yml
# 在elasticsearch.yml文件中加入下面配置,保存即可
http.cors.enabled: true
http.cors.allow-origin: "*"
# 重启 elasticsearch
service elasticsearch restart

3.ealsticsearch-head 开机启动
上面的配置ealsticsearch-head Xshell客户端关闭,后导致9100端口也关闭,所有必须配置开机自启动
cd /etc/init.d
# 新建elasticsearch-head启动脚本
vi elasticsearch-head
################## 写入下面的文本,根据自己时间安装情况配置#####################
#!/bin/sh
#chkconfig: 2345 80 05
#description: elasticsearch-head
# nodejs 安装的路径
export NODE_PATH=/usr/local/nodejs
export PATH=$PATH:$NODE_PATH/bin
# elasticsearch-head 的路径
cd /usr/local/elastic/elasticsearch-head
nohup npm run start >/usr/local/elastic/elasticsearch-head/nohup.out 2>&1 &
# 赋予 elasticsearch-head 权限
chmod +x elasticsearch-head
# 设置开机执行sh
chkconfig --add elasticsearch-head
# 也可手动启动
service elasticsearch-head start
启用x-pack验证
第一种
切换到es的用户下,使用下面命令生成证书
bin/elasticsearch-certutil cert -out config/elastic-certificates.p12 -pass ""启动elasticsearch
./elasticsearch -d自动生成默认用户和密码
bin/elasticsearch-setup-passwords auto
# 手动设置
# bin/elasticsearch-setup-passwords interactive
修改elastic超级用户密码
#  假设elastic 默认密码为 xxxxxxx
# curl -XPUT -u elastic:xxxxxxx 'http://localhost:9200/_xpack/security/user/elastic/_password' -d '{ "password" : "your_passwd" }'
浏览器验证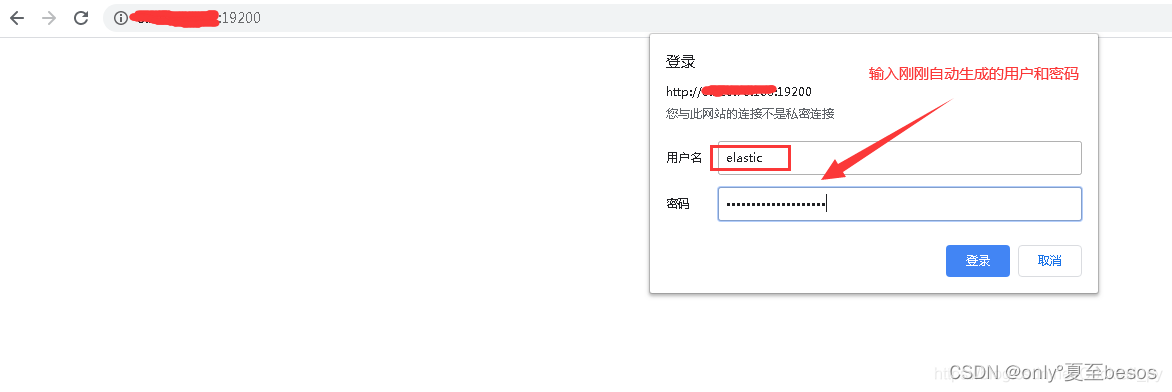
第二种
启动 Elasticsearch 程序
[elastic@console bin]$ ./elasticsearch -dfuture versions of Elasticsearch will require Java 11; your Java version from [/usr/java/jdk1.8.0_181/jre] does not meet this requirement创建密码
[elastic@console bin]$ ./elasticsearch-setup-passwords interactive
future versions of Elasticsearch will require Java 11; your Java version from [/usr/java/jdk1.8.0_181/jre] does not meet this requirementUnexpected response code [500] from calling GET http://192.168.108.126:9200/_security/_authenticate?pretty
It doesn't look like the X-Pack security feature is enabled on this Elasticsearch node.
Please check if you have enabled X-Pack security in your elasticsearch.yml configuration file.ERROR: X-Pack Security is disabled by configuration.
需要设置 X-Pack
[elastic@console bin]$ vim ../config/elasticsearch.ymlhttp.cors.enabled: truehttp.cors.allow-origin: "*"http.cors.allow-headers: Authorizationxpack.security.enabled: truexpack.security.transport.ssl.enabled: true添加密码
[elastic@console bin]$ ./elasticsearch-setup-passwords interactive
future versions of Elasticsearch will require Java 11; your Java version from [/usr/java/jdk1.8.0_181/jre] does not meet this requirement
Initiating the setup of passwords for reserved users elastic,apm_system,kibana,logstash_system,beats_system,remote_monitoring_user.
You will be prompted to enter passwords as the process progresses.
Please confirm that you would like to continue [y/N]yEnter password for [elastic]:
Reenter password for [elastic]:
Passwords do not match.
Try again.
Enter password for [elastic]:
Reenter password for [elastic]:
Enter password for [apm_system]:
Reenter password for [apm_system]:
Enter password for [kibana]:
Reenter password for [kibana]:
Enter password for [logstash_system]:
Reenter password for [logstash_system]:
Enter password for [beats_system]:
Reenter password for [beats_system]:
Enter password for [remote_monitoring_user]:
Reenter password for [remote_monitoring_user]:
Changed password for user [apm_system]
Changed password for user [kibana]
Changed password for user [logstash_system]
Changed password for user [beats_system]
Changed password for user [remote_monitoring_user]
Changed password for user [elastic]
修改kibana
[root@console bin]# vim ../config/kibana.ymlelasticsearch.username: "elastic"elasticsearch.password: "passwd"
修改密码
POST /_security/user/elastic/_password
{"password": "123456"
}
修改密码之后,需要重新设置kibana的配置文件,才可以重新使用kibana
java 连接认证
package elasticSearch.highLevelClient;import org.apache.http.HttpHost;
import org.apache.http.auth.AuthScope;
import org.apache.http.auth.UsernamePasswordCredentials;
import org.apache.http.client.CredentialsProvider;
import org.apache.http.impl.client.BasicCredentialsProvider;
import org.apache.http.impl.nio.client.HttpAsyncClientBuilder;
import org.elasticsearch.client.RestClient;
import org.elasticsearch.client.RestClientBuilder;
import org.elasticsearch.client.RestHighLevelClient;
import org.elasticsearch.client.XPackClient;import java.io.IOException;/*** @author [tu.tengfei]* @description* @date 2019/8/10*/
public class ESHighClient {public static RestHighLevelClient client;public static void getESClient(){//        client = new RestHighLevelClient(RestClient.builder(
//                new HttpHost("slave01", 9200, "http"),
//                new HttpHost("master01", 9200, "http")
//        ));//需要用户名和密码的认证final CredentialsProvider credentialsProvider = new BasicCredentialsProvider();credentialsProvider.setCredentials(AuthScope.ANY, new UsernamePasswordCredentials("elastic", "passwd"));RestClientBuilder restClientBuilder = RestClient.builder(new HttpHost("192.168.108.126", 9200, "http")).setHttpClientConfigCallback(new RestClientBuilder.HttpClientConfigCallback() {@Overridepublic HttpAsyncClientBuilder customizeHttpClient(HttpAsyncClientBuilder httpAsyncClientBuilder) {return httpAsyncClientBuilder.setDefaultCredentialsProvider(credentialsProvider);}});client = new RestHighLevelClient(restClientBuilder);}public static void clientClose(){if (client!=null){try {client.close();} catch (IOException e) {e.printStackTrace();}}}
}
Kibana7.4用户管理
1.下载kibana以及修改相应配置
cd /opt
wget https://artifacts.elastic.co/downloads/kibana/kibana-7.4.2-linux-x86_64.tar.gz
tar -zxvf kibana-7.4.2-linux-x86_64.tar.gz
2.修改配置
cd /opt/kibana-7.4.2-linux-x86_64/config
vim kibana.yml
# 中文
i18n.locale: "zh-CN"
server.port: 15601
server.host: "0.0.0.0"
elasticsearch.hosts: ["http://192.168.18.126:19200"]
elasticsearch.username: "kibana_system"
elasticsearch.password: "xxxxx"
kibana.index: ".kibana"
xpack.reporting.encryptionKey: "a_random_string"
xpack.security.encryptionKey: "something_at_least_32_characters"
# 是否开启安全策略
# xpack.security.enabled: false
3.kibana用户管理
/opt/kibana-7.4.2-linux-x86_64/bin/kibana --allow-root添加用户并赋予相应的权限
相关文章:
Centos7 elasticsearch-7.7.0 集群搭建,启用x-pack验证 Kibana7.4用户管理
前言 Elasticsearch 是一个分布式、RESTful 风格的搜索和数据分析引擎,能够解决不断涌现出的各种用例。 作为 Elastic Stack 的核心,它集中存储您的数据,帮助您发现意料之中以及意料之外的情况。 环境准备 软件 …...

[CSS]中子元素在父元素中居中
元素居中 对于当行文字居中,比较简单,设置text-align:center和text-height为盒子高度即可 对于父元素中子元素居中,要实现的话有以下几个方法 方法1:利用定位margin:auto <style>.father {width: 500px;heig…...

电脑突然死机怎么办?
死机是电脑常见的故障问题,尤其是对于老式电脑来说,一言不合电脑画面就静止了,最后只能强制关机重启。那么你一定想知道是什么原因造成的吧,一般散热不良最容易让电脑死机,还有系统故障,比如不小心误删了系…...

Kyligence 正式加入华为“同舟共济”行动计划,成为行业数智化“联盟级伙伴”
让“生态飞轮”旋转让“生态飞轮”旋转3月14日至15日,华为中国合作伙伴大会 2024 在深圳召开。本次大会以“因聚而生,数智有为”为主题,皆在升级“伙伴华为”数智体系,共筑解决方案竞争力,共赢数智世界新机遇。Kyligen…...

大模型推理框架——text-generation-inference
项目地址:https://github.com/huggingface/text-generation-inference 安装 安装rust curl --proto =https --tlsv1.2 -sSf https://sh.rustup.rs | sh安装 Protoc PROTOC_ZIP=protoc-21.12-linux-x86_64.zip curl -OL https://github.com/protocolbuffers/protobuf/relea…...

电梯四种事故检测YOLOV8
电梯四种事故检测,采用YOLOV8训练得到PT模型,然后转换成ONNX,OPENCV调用,支持C/PYTHON/ANDORID开发 电梯四种事故检测YOLOV8...

构建docker环境下的thunder迅雷插件
前言 从迅雷群晖套件中提取出来用于其他设备的迅雷远程下载服务程序。仅供测试,测试完请大家自觉删除。 下载保存目录 /xunlei/downloads, 对应迅雷应用内显示的下载路径是 /downloads 或者 /迅雷下载 仓库 阿里云镜像(国内访问ÿ…...

Django开发复盘
一、URL 对于一个不会写正则表达式的蒟蒻来说,在urls.py中就只能傻傻的写死名字,但是即便这样,还会有很多相对路径和绝对路径的问题(相对ip端口的路径),因为我们网页中涉及到页面跳转,涉及到发送…...
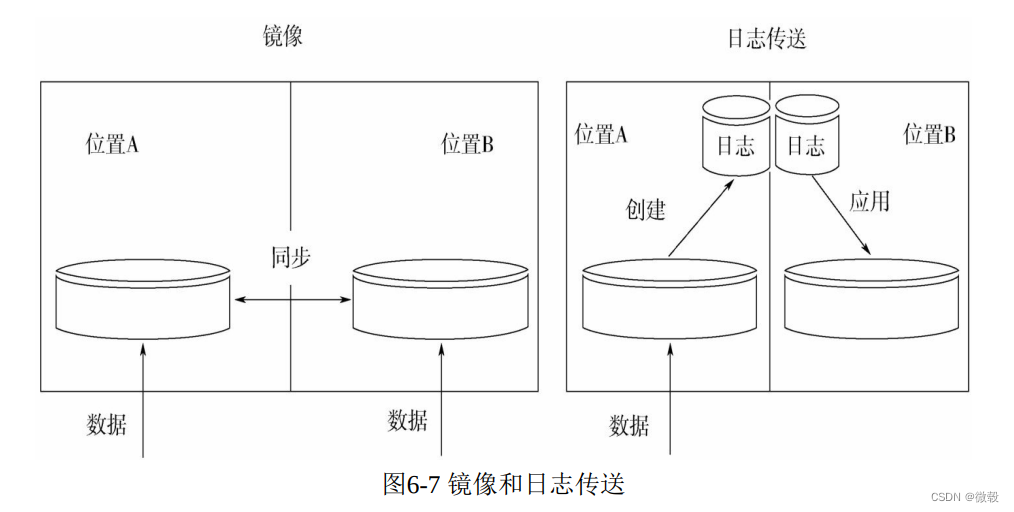
第6章 数据存储操作
思维导图 6.1 引言 数据存储与操作包括对存储数据的设计、实施和支持,最大化实现数据资源的价值,贯穿于数据创建/获取到处置的整个生命周期。 6.1.1 业务驱动因素 数据存储与操作活动对于依赖数据的企业来说非常关键,这些活动的主要驱动因素是…...

接口自动化框架搭建(八):pytest+allure+jenkins接入
1,安装allure插件 2,创建jenkins项目 怎么确定路径,可以查看工作空间,jenkins默认根目录就是工作空间 配置执行用例的命令,可以现在pycharm上试一下,然后在jenkins中配置: 把启动java服务的代…...
linux监控命令全
1.1 top 1.1.1 命令说明 Top 命令能够实时监控系统的运行状态,并且可以按照cpu、内存和执行时间进行排序 1.1.2 用法 top -hv | -bcisSHM -d delay -n iterations [-u user | -U user] -p pid [,pid ...] 1.1.3 参数说明 命令行启动参数: -b : 批次…...

【GenAI】使用GenAI堆栈构建视频分析和转录字幕聊天机器人
【GenAI】使用GenAI堆栈构建视频分析和转录字幕聊天机器人 目录 【GenAI】使用GenAI堆栈构建视频分析和转录字幕聊天机器人高层架构入门指南克隆存储库指定您的API密钥构建和运行应用程序使用yt-whisper提交视频访问Dockerbot聊天服务结论推荐超级课程: Docker快速入门到精通K…...

全国产数据采集卡定制,24位八通道以太网数据采集卡 labview 100K采样
XM702是一款以太网型高速数据采集卡,具有8通 道真差分输入,24位分辨率,单通道最高采样率100ksps八通 道同步共计800ksps、精密前置增益放大、集成IEPE/ICP硬件 支持的特点。本产品采用了多个高精度24位ADC单元及配合本 公司多年积累开发的前置…...

JavaEE初阶-线程3
文章目录 一、线程安全问题-内存可见性二、等待通知2.1 wait()方法2.2 notify()方法 一、线程安全问题-内存可见性 import java.util.Scanner;public class Demo27 {private static int count0;//下面这段代码会出现内存的可见性问题//将从内存中读取count值的操作称为load 判…...

C++递归(2)
数塔问题? 题目描述: 有如下所示的数塔,要求从底层走到顶层,若每一步只能走到相邻的结点,则经过的结点的数字之和最大是多少? 输入 输入数据首先包括一个整数整数N(1 输出 从底层走到顶层经过的数字的最大…...

算法训练营第27天|LeetCode 39.组合总和 40.组合总和2 131.分割回文串
LeetCode 39.组合总和 题目链接: LeetCode 39.组合总和 解题思路: 用回溯的方法,,注意这次回溯不是i1,而是i,是因为可用重复选取。 代码: class Solution { public:vector<vector<i…...
【Web】NSSCTF Round#20 Basic 两道0解题的赛后谈
目录 前言 baby-Codeigniter 组合拳! 前言 本想着说看看go的gin框架就睡了的,r3师傅提醒说赛题环境已经上了,那不赶紧研究下😀 主要来谈谈做题的心路历程 baby-Codeigniter 拿到题目的第一反应应该是:“什么是C…...
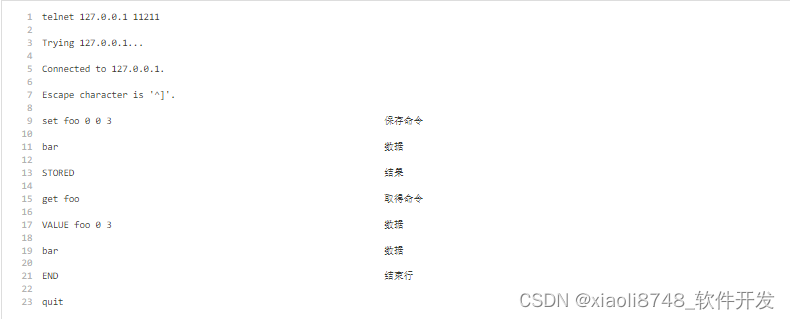
memcached缓存数据库简介
memcached是一套分布式的高速缓存系统,由LiveJournal的Brad Fitzpatrick开发,但被许多网站使用。这是一套开放源代码软件,以BSD license授权发布。 memcached缺乏认证以及安全管制,这代表应该将memcached服务器放置在防火墙后。 …...

C# WPF编程-Application类(生命周期、程序集资源、本地化)
C# WPF编程-Application类 应用程序的生命周期创建Application对象应用程序的关闭方式应用程序事件 Application类的任务显示初始界面处理命令行参数访问当前Application对象在窗口之间进行交互 程序集资源添加资源检索资源pack URI内容文件 每个运行中的WPF应用程序都由System…...

fpga_hdmi
HDMI简介: 高清晰度多媒体端接口,通常用来连接一些音视频设备,进行高质量的传输,能够同时传输音频信号和视频信号。而且在传输速度上具有较大的优势。 通过hdmi接口进行数据传输时,不需要切换模块,或者提前设置转换。…...

手机号到QQ号查询技术实现原理与TEA加密通信架构解析
手机号到QQ号查询技术实现原理与TEA加密通信架构解析 【免费下载链接】phone2qq 项目地址: https://gitcode.com/gh_mirrors/ph/phone2qq phone2qq是一个基于Python实现的逆向工程工具,通过分析腾讯QQ客户端的通信协议,实现了通过手机号查询对应…...

3个步骤让你在Windows上轻松安装安卓应用:APK安装器完全指南
3个步骤让你在Windows上轻松安装安卓应用:APK安装器完全指南 【免费下载链接】APK-Installer An Android Application Installer for Windows 项目地址: https://gitcode.com/GitHub_Trending/ap/APK-Installer 你是否曾经想过,如果能在Windows电…...
)
从NOIP真题到日常刷题:手把手教你用C++分离数字并统计(以‘数字统计’题为例)
从竞赛真题到实战技巧:C数字分离与统计的深度解析 在信息学竞赛的入门阶段,很多初学者面对"数字统计"这类题目时,往往陷入两个极端:要么死记硬背标准答案,要么被看似复杂的循环结构吓退。实际上,…...

终极音乐解锁指南:让加密音频在浏览器中重获自由
终极音乐解锁指南:让加密音频在浏览器中重获自由 【免费下载链接】unlock-music 在浏览器中解锁加密的音乐文件。原仓库: 1. https://github.com/unlock-music/unlock-music ;2. https://git.unlock-music.dev/um/web 项目地址: https://gi…...

Kali Linux更新卡住?别急,先检查DNS!手把手教你用阿里云/谷歌DNS解决网络问题
Kali Linux更新卡住?三步精准诊断DNS问题与高效解决方案 当你满心期待地在Kali Linux中执行apt update,却发现进度条像被冻住一般纹丝不动,这种体验就像在沙漠中寻找绿洲却始终看不到水源。作为安全测试人员的瑞士军刀,Kali Linux…...

TrollInstallerX终极指南:深入解析iOS 14.0-16.6.1越狱工具部署技术
TrollInstallerX终极指南:深入解析iOS 14.0-16.6.1越狱工具部署技术 【免费下载链接】TrollInstallerX A TrollStore installer for iOS 14.0 - 16.6.1 项目地址: https://gitcode.com/gh_mirrors/tr/TrollInstallerX TrollInstallerX是一款专为iOS 14.0到16…...

UML 关系详解
依赖(Dependency)含义:一个类的变化会影响到另一个类,但反之不一定。这是一种“使用”关系,通常是临时的、较弱的。典型场景:一个类作为另一个类方法的局部变量、方法参数,或调用静态方法。UML表…...

《jEasyUI 取得选中行数据》
《jEasyUI 取得选中行数据》 引言 jEasyUI 是一个基于 jQuery 的易于使用的开源 UI 库,它为网页开发者提供了丰富的 UI 组件,如表格、表单、菜单、对话框等。在 jEasyUI 的众多组件中,表格组件(Datagrid)是使用频率非常…...

131.详解YOLO损失函数+网格划分原理,附v1-v8演进脉络+YOLOv8实战代码
摘要 目标检测是计算机视觉的核心任务之一。YOLO(You Only Look Once)系列以其极致的检测速度与良好的精度平衡,成为工业界和学术界最广泛应用的检测框架。本文以理工科严谨逻辑,从YOLO的核心思想出发,覆盖从v1到v8的关键演进,并通过一个完整的可运行案例,带领读者从零…...

AI产品经理 VS 传统产品经理:不是技术升级,而是物种进化!你准备好了吗?
文章指出,AI时代的产品经理并非仅仅是懂点AI技术的传统产品经理升级版,而是完全不同的“物种”。文章从产品经理的职责、核心能力、与AI的协作模式等方面对比了传统产品经理和AI产品经理的区别,强调AI产品经理需要具备处理意图模糊性、设计失…...