OpenCV 4.9基本绘图
-
返回:OpenCV系列文章目录(持续更新中......)
上一篇:OpenCV使用通用内部函数对代码进行矢量化
下一篇:使用OpenCV4.9的随机生成器和文本

目标
在本教程中,您将学习如何:
- 使用 OpenCV 函数 line() 画一条线
- 使用 OpenCV 函数 ellipse()绘制椭圆
- 使用 OpenCV 函数 rectangle()绘制矩形
- 使用 OpenCV 函数 circle() 画一个圆
- 使用 OpenCV 函数 fillPoly()绘制填充多边形
点
它表示一个二维点,由其图像坐标 \(x\) 和 \(y\) 指定。我们可以将其定义为:
C++:
Point pt;
pt.x = 10;
pt.y = 8;
Java:
Point pt = new Point();
pt.x = 10;
pt.y = 8;
or
C++:
Point pt = Point(10, 8);Java:
Point pt = new Point(10, 8);标量
- 表示一个 4 元素向量。Scalar 类型在 OpenCV 中广泛用于传递像素值。
- 在本教程中,我们将广泛使用它来表示 BGR 颜色值(3 个参数)。如果不打算使用最后一个参数,则无需定义它。
- 让我们看一个例子,如果我们被要求一个颜色参数,我们给出:
-
我们将定义一个 BGR 颜色,例如:蓝色 = a、绿色 = b 和红色 = cScalar( a, b, c )
代码
此代码位于 OpenCV 示例文件夹中。否则你可以从这里下载
C++:
#include <opencv2/core.hpp>
#include <opencv2/imgproc.hpp>
#include <opencv2/highgui.hpp>#define w 400using namespace cv;void MyEllipse( Mat img, double angle );
void MyFilledCircle( Mat img, Point center );
void MyPolygon( Mat img );
void MyLine( Mat img, Point start, Point end );int main( void ){char atom_window[] = "Drawing 1: Atom";char rook_window[] = "Drawing 2: Rook";Mat atom_image = Mat::zeros( w, w, CV_8UC3 );Mat rook_image = Mat::zeros( w, w, CV_8UC3 );MyEllipse( atom_image, 90 );MyEllipse( atom_image, 0 );MyEllipse( atom_image, 45 );MyEllipse( atom_image, -45 );MyFilledCircle( atom_image, Point( w/2, w/2) );MyPolygon( rook_image );rectangle( rook_image,Point( 0, 7*w/8 ),Point( w, w),Scalar( 0, 255, 255 ),FILLED,LINE_8 );MyLine( rook_image, Point( 0, 15*w/16 ), Point( w, 15*w/16 ) );MyLine( rook_image, Point( w/4, 7*w/8 ), Point( w/4, w ) );MyLine( rook_image, Point( w/2, 7*w/8 ), Point( w/2, w ) );MyLine( rook_image, Point( 3*w/4, 7*w/8 ), Point( 3*w/4, w ) );imshow( atom_window, atom_image );moveWindow( atom_window, 0, 200 );imshow( rook_window, rook_image );moveWindow( rook_window, w, 200 );waitKey( 0 );return(0);
}void MyEllipse( Mat img, double angle )
{int thickness = 2;int lineType = 8;ellipse( img,Point( w/2, w/2 ),Size( w/4, w/16 ),angle,0,360,Scalar( 255, 0, 0 ),thickness,lineType );
}void MyFilledCircle( Mat img, Point center )
{circle( img,center,w/32,Scalar( 0, 0, 255 ),FILLED,LINE_8 );
}void MyPolygon( Mat img )
{int lineType = LINE_8;Point rook_points[1][20];rook_points[0][0] = Point( w/4, 7*w/8 );rook_points[0][1] = Point( 3*w/4, 7*w/8 );rook_points[0][2] = Point( 3*w/4, 13*w/16 );rook_points[0][3] = Point( 11*w/16, 13*w/16 );rook_points[0][4] = Point( 19*w/32, 3*w/8 );rook_points[0][5] = Point( 3*w/4, 3*w/8 );rook_points[0][6] = Point( 3*w/4, w/8 );rook_points[0][7] = Point( 26*w/40, w/8 );rook_points[0][8] = Point( 26*w/40, w/4 );rook_points[0][9] = Point( 22*w/40, w/4 );rook_points[0][10] = Point( 22*w/40, w/8 );rook_points[0][11] = Point( 18*w/40, w/8 );rook_points[0][12] = Point( 18*w/40, w/4 );rook_points[0][13] = Point( 14*w/40, w/4 );rook_points[0][14] = Point( 14*w/40, w/8 );rook_points[0][15] = Point( w/4, w/8 );rook_points[0][16] = Point( w/4, 3*w/8 );rook_points[0][17] = Point( 13*w/32, 3*w/8 );rook_points[0][18] = Point( 5*w/16, 13*w/16 );rook_points[0][19] = Point( w/4, 13*w/16 );const Point* ppt[1] = { rook_points[0] };int npt[] = { 20 };fillPoly( img,ppt,npt,1,Scalar( 255, 255, 255 ),lineType );
}void MyLine( Mat img, Point start, Point end )
{int thickness = 2;int lineType = LINE_8;line( img,start,end,Scalar( 0, 0, 0 ),thickness,lineType );
}
Java:
import org.opencv.core.*;
import org.opencv.core.Point;
import org.opencv.highgui.HighGui;
import org.opencv.imgproc.Imgproc;import java.util.*;
import java.util.List;class GeometricDrawingRun{private static final int W = 400;public void run(){String atom_window = "Drawing 1: Atom";String rook_window = "Drawing 2: Rook";Mat atom_image = Mat.zeros( W, W, CvType.CV_8UC3 );Mat rook_image = Mat.zeros( W, W, CvType.CV_8UC3 );MyEllipse( atom_image, 90.0 );MyEllipse( atom_image, 0.0 );MyEllipse( atom_image, 45.0 );MyEllipse( atom_image, -45.0 );MyFilledCircle( atom_image, new Point( W/2, W/2) );MyPolygon( rook_image );Imgproc.rectangle( rook_image,new Point( 0, 7*W/8 ),new Point( W, W),new Scalar( 0, 255, 255 ),-1,8,0 );MyLine( rook_image, new Point( 0, 15*W/16 ), new Point( W, 15*W/16 ) );MyLine( rook_image, new Point( W/4, 7*W/8 ), new Point( W/4, W ) );MyLine( rook_image, new Point( W/2, 7*W/8 ), new Point( W/2, W ) );MyLine( rook_image, new Point( 3*W/4, 7*W/8 ), new Point( 3*W/4, W ) );HighGui.imshow( atom_window, atom_image );HighGui.moveWindow( atom_window, 0, 200 );HighGui.imshow( rook_window, rook_image );HighGui.moveWindow( rook_window, W, 200 );HighGui.waitKey( 0 );System.exit(0);}private void MyEllipse( Mat img, double angle ) {int thickness = 2;int lineType = 8;int shift = 0;Imgproc.ellipse( img,new Point( W/2, W/2 ),new Size( W/4, W/16 ),angle,0.0,360.0,new Scalar( 255, 0, 0 ),thickness,lineType,shift );}private void MyFilledCircle( Mat img, Point center ) {int thickness = -1;int lineType = 8;int shift = 0;Imgproc.circle( img,center,W/32,new Scalar( 0, 0, 255 ),thickness,lineType,shift );}private void MyPolygon( Mat img ) {int lineType = 8;int shift = 0;Point[] rook_points = new Point[20];rook_points[0] = new Point( W/4, 7*W/8 );rook_points[1] = new Point( 3*W/4, 7*W/8 );rook_points[2] = new Point( 3*W/4, 13*W/16 );rook_points[3] = new Point( 11*W/16, 13*W/16 );rook_points[4] = new Point( 19*W/32, 3*W/8 );rook_points[5] = new Point( 3*W/4, 3*W/8 );rook_points[6] = new Point( 3*W/4, W/8 );rook_points[7] = new Point( 26*W/40, W/8 );rook_points[8] = new Point( 26*W/40, W/4 );rook_points[9] = new Point( 22*W/40, W/4 );rook_points[10] = new Point( 22*W/40, W/8 );rook_points[11] = new Point( 18*W/40, W/8 );rook_points[12] = new Point( 18*W/40, W/4 );rook_points[13] = new Point( 14*W/40, W/4 );rook_points[14] = new Point( 14*W/40, W/8 );rook_points[15] = new Point( W/4, W/8 );rook_points[16] = new Point( W/4, 3*W/8 );rook_points[17] = new Point( 13*W/32, 3*W/8 );rook_points[18] = new Point( 5*W/16, 13*W/16 );rook_points[19] = new Point( W/4, 13*W/16 );MatOfPoint matPt = new MatOfPoint();matPt.fromArray(rook_points);List<MatOfPoint> ppt = new ArrayList<MatOfPoint>();ppt.add(matPt);Imgproc.fillPoly(img,ppt,new Scalar( 255, 255, 255 ),lineType,shift,new Point(0,0) );}private void MyLine( Mat img, Point start, Point end ) {int thickness = 2;int lineType = 8;int shift = 0;Imgproc.line( img,start,end,new Scalar( 0, 0, 0 ),thickness,lineType,shift );}
}public class BasicGeometricDrawing {public static void main(String[] args) {// Load the native library.System.loadLibrary(Core.NATIVE_LIBRARY_NAME);new GeometricDrawingRun().run();}
}
Python :
import cv2 as cv
import numpy as npW = 400def my_ellipse(img, angle):thickness = 2line_type = 8cv.ellipse(img,(W // 2, W // 2),(W // 4, W // 16),angle,0,360,(255, 0, 0),thickness,line_type)def my_filled_circle(img, center):thickness = -1line_type = 8cv.circle(img,center,W // 32,(0, 0, 255),thickness,line_type)def my_polygon(img):line_type = 8# Create some pointsppt = np.array([[W / 4, 7 * W / 8], [3 * W / 4, 7 * W / 8],[3 * W / 4, 13 * W / 16], [11 * W / 16, 13 * W / 16],[19 * W / 32, 3 * W / 8], [3 * W / 4, 3 * W / 8],[3 * W / 4, W / 8], [26 * W / 40, W / 8],[26 * W / 40, W / 4], [22 * W / 40, W / 4],[22 * W / 40, W / 8], [18 * W / 40, W / 8],[18 * W / 40, W / 4], [14 * W / 40, W / 4],[14 * W / 40, W / 8], [W / 4, W / 8],[W / 4, 3 * W / 8], [13 * W / 32, 3 * W / 8],[5 * W / 16, 13 * W / 16], [W / 4, 13 * W / 16]], np.int32)ppt = ppt.reshape((-1, 1, 2))cv.fillPoly(img, [ppt], (255, 255, 255), line_type)# Only drawind the lines would be:# cv.polylines(img, [ppt], True, (255, 0, 255), line_type)def my_line(img, start, end):thickness = 2line_type = 8cv.line(img,start,end,(0, 0, 0),thickness,line_type)atom_window = "Drawing 1: Atom"
rook_window = "Drawing 2: Rook"# Create black empty images
size = W, W, 3
atom_image = np.zeros(size, dtype=np.uint8)
rook_image = np.zeros(size, dtype=np.uint8)# 1.a. Creating ellipses
my_ellipse(atom_image, 90)
my_ellipse(atom_image, 0)
my_ellipse(atom_image, 45)
my_ellipse(atom_image, -45)# 1.b. Creating circles
my_filled_circle(atom_image, (W // 2, W // 2))# 2. Draw a rook
# ------------------
# 2.a. Create a convex polygon
my_polygon(rook_image)cv.rectangle(rook_image,(0, 7 * W // 8),(W, W),(0, 255, 255),-1,8)# 2.c. Create a few lines
my_line(rook_image, (0, 15 * W // 16), (W, 15 * W // 16))
my_line(rook_image, (W // 4, 7 * W // 8), (W // 4, W))
my_line(rook_image, (W // 2, 7 * W // 8), (W // 2, W))
my_line(rook_image, (3 * W // 4, 7 * W // 8), (3 * W // 4, W))cv.imshow(atom_window, atom_image)
cv.moveWindow(atom_window, 0, 200)
cv.imshow(rook_window, rook_image)
cv.moveWindow(rook_window, W, 200)cv.waitKey(0)
cv.destroyAllWindows()
解释
由于我们计划绘制两个示例(一个原子和一个车),我们必须创建两个图像和两个窗口来显示它们。
C++:
char atom_window[] = "Drawing 1: Atom";char rook_window[] = "Drawing 2: Rook";Mat atom_image = Mat::zeros( w, w, CV_8UC3 );Mat rook_image = Mat::zeros( w, w, CV_8UC3 );Java:
String atom_window = "Drawing 1: Atom";String rook_window = "Drawing 2: Rook"; Mat atom_image = Mat.zeros( W, W, CvType.CV_8UC3 );Mat rook_image = Mat.zeros( W, W, CvType.CV_8UC3 );Python:
# Windows names
atom_window = "Drawing 1: Atom"
rook_window = "Drawing 2: Rook"# Create black empty images
size = W, W, 3
atom_image = np.zeros(size, dtype=np.uint8)
rook_image = np.zeros(size, dtype=np.uint8)
我们创建了函数来绘制不同的几何形状。例如,为了绘制原子,我们使用了 MyEllipse 和 MyFilledCircle:
MyEllipse( atom_image, 90 );MyEllipse( atom_image, 0 );MyEllipse( atom_image, 45 );MyEllipse( atom_image, -45 );MyFilledCircle( atom_image, Point( w/2, w/2) );Java:
MyEllipse( atom_image, 90.0 );MyEllipse( atom_image, 0.0 );MyEllipse( atom_image, 45.0 );MyEllipse( atom_image, -45.0 );MyFilledCircle( atom_image, new Point( W/2, W/2) );Python:
# 1. Draw a simple atom:
# -----------------------# 1.a. Creating ellipses
my_ellipse(atom_image, 90)
my_ellipse(atom_image, 0)
my_ellipse(atom_image, 45)
my_ellipse(atom_image, -45)# 1.b. Creating circles
my_filled_circle(atom_image, (W // 2, W // 2))
为了绘制车,我们使用了 MyLine、矩形和 MyPolygon:
MyPolygon( rook_image );rectangle( rook_image,Point( 0, 7*w/8 ),Point( w, w),Scalar( 0, 255, 255 ),FILLED,LINE_8 );MyLine( rook_image, Point( 0, 15*w/16 ), Point( w, 15*w/16 ) );MyLine( rook_image, Point( w/4, 7*w/8 ), Point( w/4, w ) );MyLine( rook_image, Point( w/2, 7*w/8 ), Point( w/2, w ) );MyLine( rook_image, Point( 3*w/4, 7*w/8 ), Point( 3*w/4, w ) );Java:
MyPolygon( rook_image );Imgproc.rectangle( rook_image,new Point( 0, 7*W/8 ),new Point( W, W),new Scalar( 0, 255, 255 ),-1,8,0 );MyLine( rook_image, new Point( 0, 15*W/16 ), new Point( W, 15*W/16 ) );MyLine( rook_image, new Point( W/4, 7*W/8 ), new Point( W/4, W ) );MyLine( rook_image, new Point( W/2, 7*W/8 ), new Point( W/2, W ) );MyLine( rook_image, new Point( 3*W/4, 7*W/8 ), new Point( 3*W/4, W ) );Python:
# 2. Draw a rook
# ------------------
# 2.a. Create a convex polygon
my_polygon(rook_image)cv.rectangle(rook_image,(0, 7 * W // 8),(W, W),(0, 255, 255),-1,8) # 2.c. Create a few lines
my_line(rook_image, (0, 15 * W // 16), (W, 15 * W // 16))
my_line(rook_image, (W // 4, 7 * W // 8), (W // 4, W))
my_line(rook_image, (W // 2, 7 * W // 8), (W // 2, W))
my_line(rook_image, (3 * W // 4, 7 * W // 8), (3 * W // 4, W))
让我们检查一下这些函数中的每一个都包含什么:
我的线条:
void MyLine( Mat img, Point start, Point end )
{int thickness = 2;int lineType = LINE_8;line( img,start,end,Scalar( 0, 0, 0 ),thickness,lineType );
}
Java:
private void MyLine( Mat img, Point start, Point end ) {int thickness = 2;int lineType = 8;int shift = 0;Imgproc.line( img,start,end,new Scalar( 0, 0, 0 ),thickness,lineType,shift );}
Python:
def my_line(img, start, end):thickness = 2line_type = 8cv.line(img,start,end,(0, 0, 0),thickness,line_type)- 正如我们所看到的,MyLine 只需调用函数 line() ,它执行以下操作:
- 从点起点到点终点画一条线
- 该线显示在图像 img 中
- 线条颜色由 ( 0, 0, 0 ) 定义,它是与黑色相对应的 RGB 值
- 线条粗细设置为粗细(在本例中为 2)
- 该线是 8 连接的线 (lineType = 8)
MyEllipse(椭圆)
void MyEllipse( Mat img, double angle )
{int thickness = 2;int lineType = 8;ellipse( img,Point( w/2, w/2 ),Size( w/4, w/16 ),angle,0,360,Scalar( 255, 0, 0 ),thickness,lineType );
}
Java:
private void MyEllipse( Mat img, double angle ) {int thickness = 2;int lineType = 8;int shift = 0;Imgproc.ellipse( img,new Point( W/2, W/2 ),new Size( W/4, W/16 ),angle,0.0,360.0,new Scalar( 255, 0, 0 ),thickness,lineType,shift );}Python:
def my_ellipse(img, angle):thickness = 2line_type = 8cv.ellipse(img,(W // 2, W // 2),(W // 4, W // 16),angle,0,360,(255, 0, 0),thickness,line_type)- 从上面的代码中,我们可以观察到函数 ellipse() 绘制一个椭圆,使得:
- 椭圆显示在图像 img 中
- 椭圆中心位于点 (w/2, w/2) 中,并封闭在大小为 (w/4, w/16) 的盒子中
- 椭圆是旋转角度度数
- 椭圆在 0 到 360 度之间延伸一条弧线
- 图形的颜色将是 ( 255, 0, 0 ),表示 BGR 值中的蓝色。
- 椭圆的厚度为 2。
MyFilledCircle(圆)
void MyFilledCircle( Mat img, Point center )
{circle( img,center,w/32,Scalar( 0, 0, 255 ),FILLED,LINE_8 );
}
Java:
private void MyFilledCircle( Mat img, Point center ) {int thickness = -1;int lineType = 8;int shift = 0;Imgproc.circle( img,center,W/32,new Scalar( 0, 0, 255 ),thickness,lineType,shift );}Python:
def my_filled_circle(img, center):thickness = -1line_type = 8cv.circle(img,center,W // 32,(0, 0, 255),thickness,line_type)- 与椭圆函数类似,我们可以观察到 circle 接收为参数:
- 将显示圆圈的图像(img)
- 圆的中心表示为点中心
- 圆的半径:w/32
- 圆圈的颜色:( 0, 0, 255 ) 在 BGR 中表示红色
- 由于厚度 = -1,因此圆将被绘制填充。
MyPolygon
void MyPolygon( Mat img )
{int lineType = LINE_8;Point rook_points[1][20];rook_points[0][0] = Point( w/4, 7*w/8 );rook_points[0][1] = Point( 3*w/4, 7*w/8 );rook_points[0][2] = Point( 3*w/4, 13*w/16 );rook_points[0][3] = Point( 11*w/16, 13*w/16 );rook_points[0][4] = Point( 19*w/32, 3*w/8 );rook_points[0][5] = Point( 3*w/4, 3*w/8 );rook_points[0][6] = Point( 3*w/4, w/8 );rook_points[0][7] = Point( 26*w/40, w/8 );rook_points[0][8] = Point( 26*w/40, w/4 );rook_points[0][9] = Point( 22*w/40, w/4 );rook_points[0][10] = Point( 22*w/40, w/8 );rook_points[0][11] = Point( 18*w/40, w/8 );rook_points[0][12] = Point( 18*w/40, w/4 );rook_points[0][13] = Point( 14*w/40, w/4 );rook_points[0][14] = Point( 14*w/40, w/8 );rook_points[0][15] = Point( w/4, w/8 );rook_points[0][16] = Point( w/4, 3*w/8 );rook_points[0][17] = Point( 13*w/32, 3*w/8 );rook_points[0][18] = Point( 5*w/16, 13*w/16 );rook_points[0][19] = Point( w/4, 13*w/16 );const Point* ppt[1] = { rook_points[0] };int npt[] = { 20 };fillPoly( img,ppt,npt,1,Scalar( 255, 255, 255 ),lineType );
}
Java:
private void MyPolygon( Mat img ) {int lineType = 8;int shift = 0;Point[] rook_points = new Point[20];rook_points[0] = new Point( W/4, 7*W/8 );rook_points[1] = new Point( 3*W/4, 7*W/8 );rook_points[2] = new Point( 3*W/4, 13*W/16 );rook_points[3] = new Point( 11*W/16, 13*W/16 );rook_points[4] = new Point( 19*W/32, 3*W/8 );rook_points[5] = new Point( 3*W/4, 3*W/8 );rook_points[6] = new Point( 3*W/4, W/8 );rook_points[7] = new Point( 26*W/40, W/8 );rook_points[8] = new Point( 26*W/40, W/4 );rook_points[9] = new Point( 22*W/40, W/4 );rook_points[10] = new Point( 22*W/40, W/8 );rook_points[11] = new Point( 18*W/40, W/8 );rook_points[12] = new Point( 18*W/40, W/4 );rook_points[13] = new Point( 14*W/40, W/4 );rook_points[14] = new Point( 14*W/40, W/8 );rook_points[15] = new Point( W/4, W/8 );rook_points[16] = new Point( W/4, 3*W/8 );rook_points[17] = new Point( 13*W/32, 3*W/8 );rook_points[18] = new Point( 5*W/16, 13*W/16 );rook_points[19] = new Point( W/4, 13*W/16 );MatOfPoint matPt = new MatOfPoint();matPt.fromArray(rook_points);List<MatOfPoint> ppt = new ArrayList<MatOfPoint>();ppt.add(matPt);Imgproc.fillPoly(img,ppt,new Scalar( 255, 255, 255 ),lineType,shift,new Point(0,0) );}Python:
def my_polygon(img):line_type = 8# Create some pointsppt = np.array([[W / 4, 7 * W / 8], [3 * W / 4, 7 * W / 8],[3 * W / 4, 13 * W / 16], [11 * W / 16, 13 * W / 16],[19 * W / 32, 3 * W / 8], [3 * W / 4, 3 * W / 8],[3 * W / 4, W / 8], [26 * W / 40, W / 8],[26 * W / 40, W / 4], [22 * W / 40, W / 4],[22 * W / 40, W / 8], [18 * W / 40, W / 8],[18 * W / 40, W / 4], [14 * W / 40, W / 4],[14 * W / 40, W / 8], [W / 4, W / 8],[W / 4, 3 * W / 8], [13 * W / 32, 3 * W / 8],[5 * W / 16, 13 * W / 16], [W / 4, 13 * W / 16]], np.int32)ppt = ppt.reshape((-1, 1, 2))cv.fillPoly(img, [ppt], (255, 255, 255), line_type)# Only drawind the lines would be:# cv.polylines(img, [ppt], True, (255, 0, 255), line_type)- 为了绘制一个填充的多边形,我们使用函数 fillPoly() 。我们注意到:
- 多边形将在 img 上绘制
- 多边形的顶点是 ppt 中的点集
- 多边形的颜色由 ( 255, 255, 255 ) 定义,这是白色的 BGR 值
矩形
rectangle( rook_image,Point( 0, 7*w/8 ),Point( w, w),Scalar( 0, 255, 255 ),FILLED,LINE_8 );Java:
Imgproc.rectangle( rook_image,new Point( 0, 7*W/8 ),new Point( W, W),new Scalar( 0, 255, 255 ),-1,8,0 );Python:
# 2.b. Creating rectangles
cv.rectangle(rook_image,(0, 7 * W // 8),(W, W),(0, 255, 255),-1,8)- 最后,我们有了cv::rectangle函数(我们没有为这个家伙创建一个特殊函数)。我们注意到:
- 矩形将绘制在rook_image
- 矩形的两个相对顶点由 ( 0, 7*w/8 ) 和 ( w, w ) 定义
- 矩形的颜色由 ( 0, 255, 255 ) 给出,它是黄色的 BGR 值
- 由于厚度值由 FILLED (-1) 给出,因此矩形将被填充。
结果
编译和运行程序应该会得到这样的结果:

相关文章:
OpenCV 4.9基本绘图
返回:OpenCV系列文章目录(持续更新中......) 上一篇:OpenCV使用通用内部函数对代码进行矢量化 下一篇:使用OpenCV4.9的随机生成器和文本 目标 在本教程中,您将学习如何: 使用 OpenCV 函数 line() 画一…...
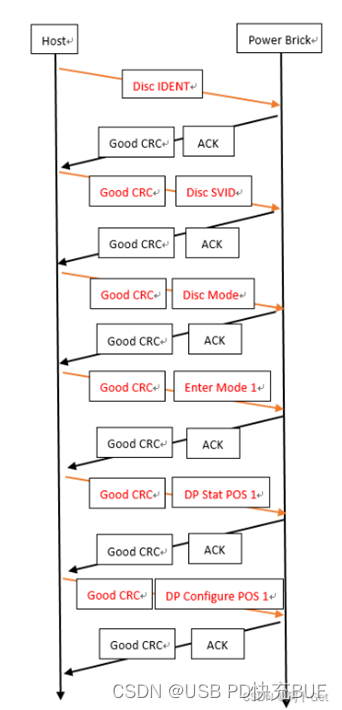
显示器and拓展坞PD底层协商
简介: PD显示器或者PD拓展坞方案中,连接显示设备的Type-C端口主要运行在DRP模式,在此模式下可以兼容Source(显卡)、Sink(信号器)、DRP(手机、电脑)模式的显示设备。 Sou…...
如何利用Flutter将应用成功上架至iOS平台:详细指南
引言 🚀 Flutter作为一种跨平台的移动应用程序开发框架,为开发者提供了便利,使他们能够通过单一的代码库构建出高性能、高保真度的应用程序,同时支持Android和iOS两个平台。然而,完成Flutter应用程序的开发只是第一步…...
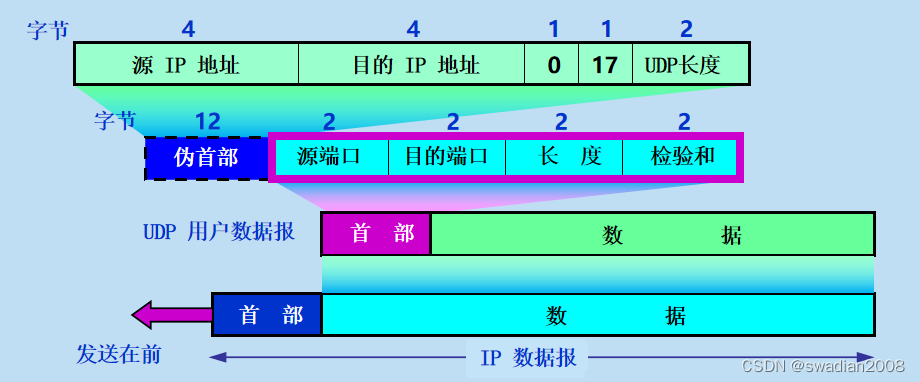
【运输层】网络数据报协议 UDP
目录 1、UDP 的特点 2、UDP 的首部格式 UDP 只在 IP 协议之上增加了很少的一些功能,比如复用、分用以及差错检测等。 1、UDP 的特点 UDP是无连接的,即发送数据之前不需要建立连接,因此减少了开销和发送数据之前的时延。 UDP使用尽最大努力…...
:顺序表实战通讯录)
数据结构(初阶):顺序表实战通讯录
前言 数据结构(初阶)第一节:数据结构概论-CSDN博客 数据结构(初阶)第二节:顺序表-CSDN博客 本文将以C语言和顺序表实现通讯录基础管理,实现功能包括增、删、改、查等,在实现相关功能…...
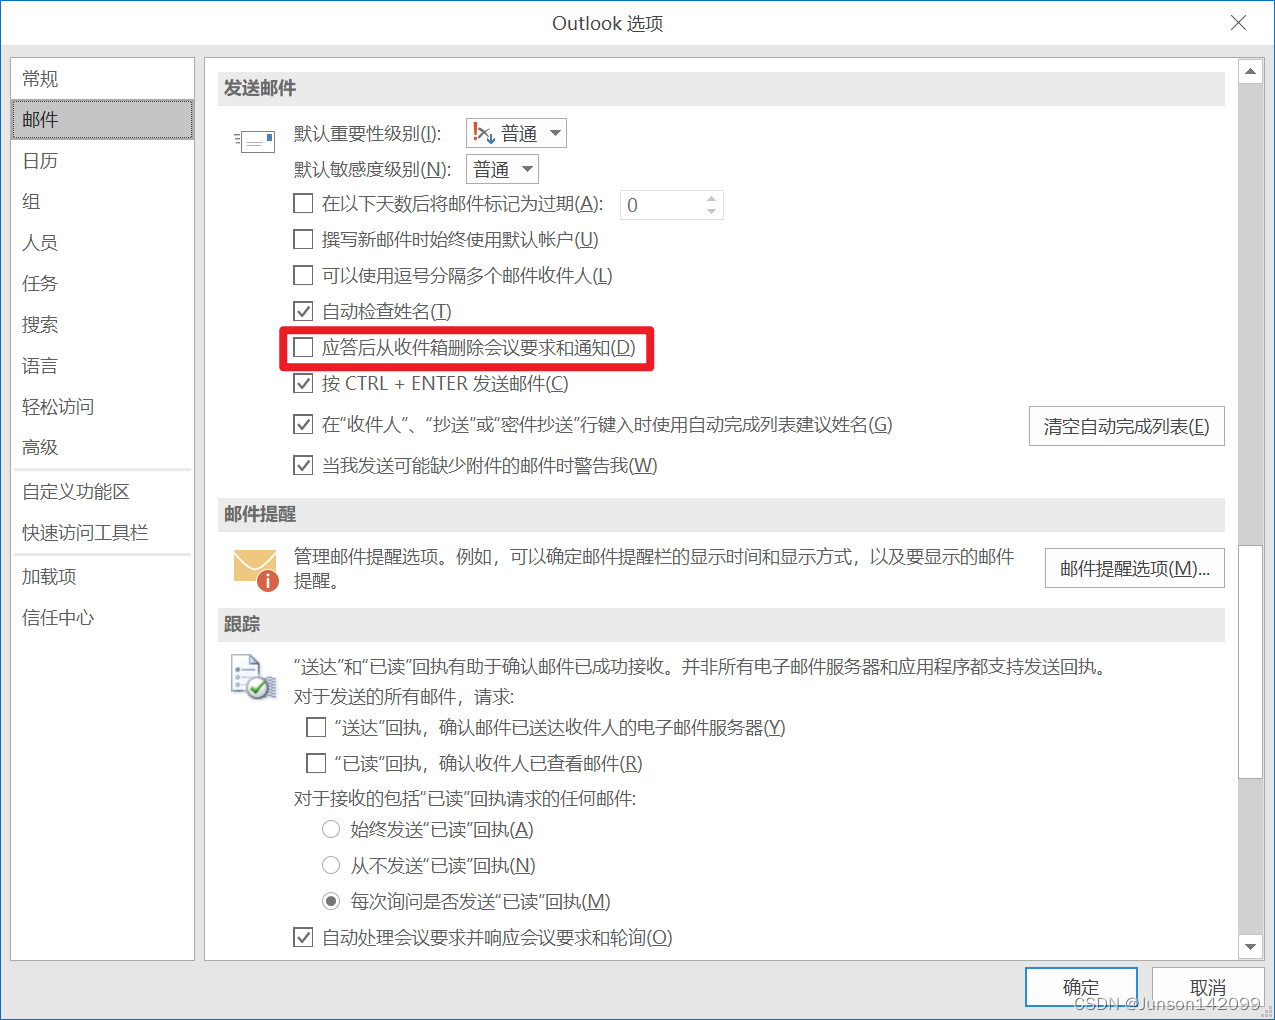
Outlook会议邀请邮件在答复后就不见了
时常会有同事找到我说,Outlook答复会议邀请邮件后收件箱就找不到会议邀请的邮件了。 这其实是Outlook的的一个机制,会把应答后的会议邀请邮件从收件箱自动删除,到已删除的邮件那里就能找到。如果不想要自动删除,改一个设置即可。…...
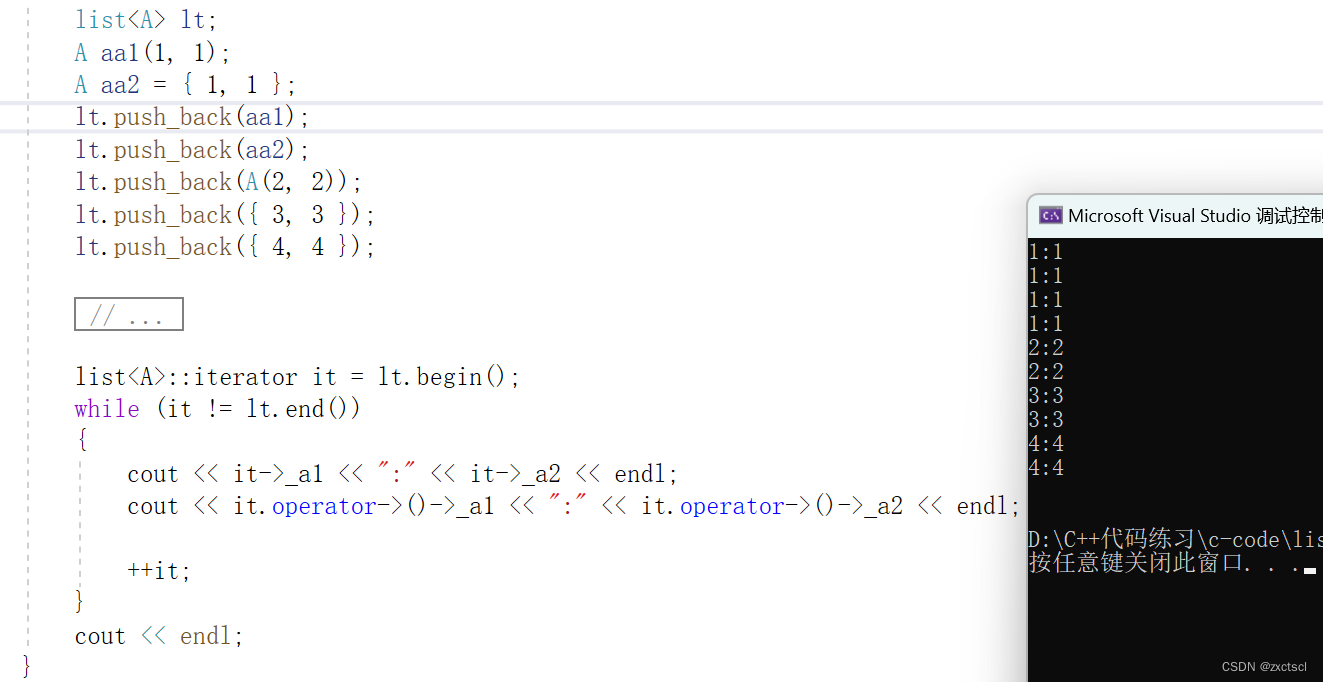
【C++】list模拟实现
个人主页 : zxctscl 如有转载请先通知 文章目录 1. 前言2. list源码3. 初始化3.1 构造3.2 拷贝构造3.3 赋值3.4 析构 4. 迭代器4.1 后置加加和前置加加4.2 后置减减和前置减减4.3 解引用4.4 !和4.5 begin 和 end4.6 const迭代器4.7 迭代器优化 5. Modifi…...

ETL工具-nifi干货系列 第八讲 处理器PutDatabaseRecord 写数据库(详细)
1、本节通过一个小例子来讲解下处理器PutDatabaseRecord,该处理器的作用是将数据写入数据库。 如下流程通过处理器GenerateFlowFile 生成数据,然后通过处理器JoltTransformJSON转换结构,最后通过处理器PutDatabaseRecord将数据写入数据库。如…...
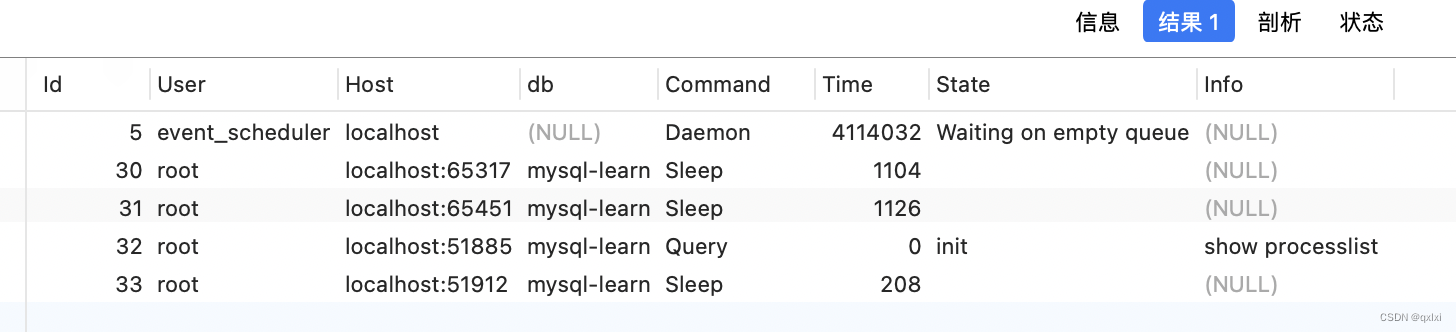
【MySQL】如何判断一个数据库是否出问题
在实际的应用中,其实大多数是主从结构。而采用主备,一般都需要一定的费用。 对于主备,如果主机故障,那么只需要直接将流量打到备机就可以,但是对于一主多从,还需要将从库连接到主库上。 对于切换的操作&a…...

SQLite数据库的性能问题并不是单纯地由数据量的大小决定的,而是受到多种因素的综合影响。以下是一些可能导致SQLite性能问题的因素
SQLite数据库的性能问题并不是单纯地由数据量的大小决定的,而是受到多种因素的综合影响。以下是一些可能导致SQLite性能问题的因素: 数据量:当SQLite数据库中的数据量增长到一定程度时,查询、插入和更新等操作可能会变得缓慢。这…...
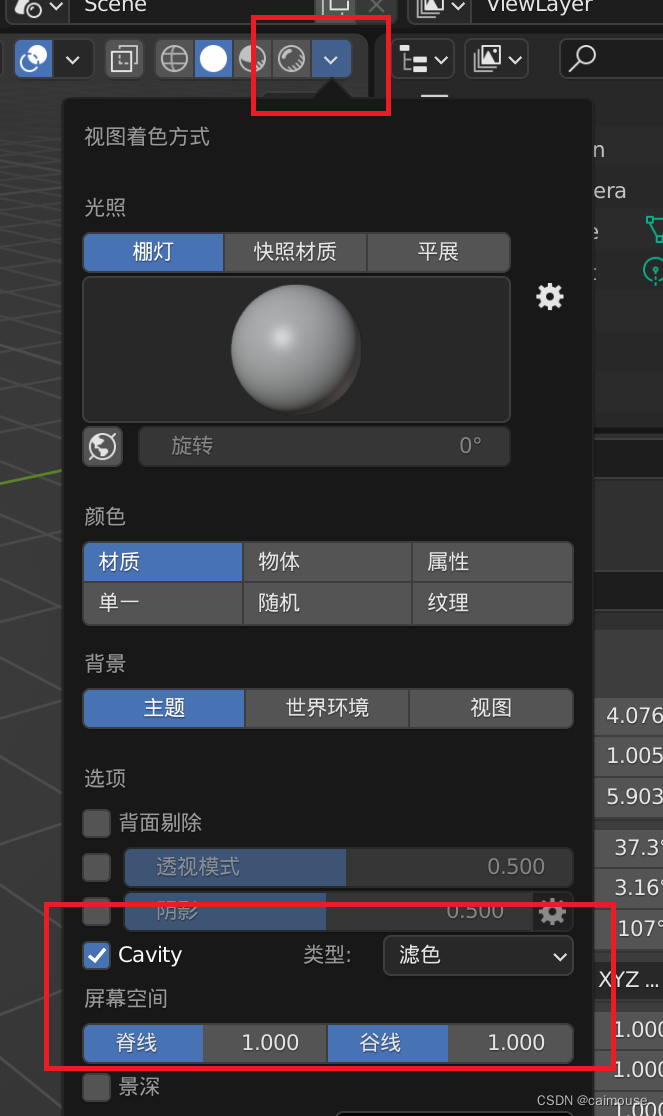
Blender怎么样启动默认移动和Cavity效果
在使用Blender的过程中,有一些特殊的技巧很重要。 比如默认地设置blender打开时,就是移动物体,这样怎么样设置的呢? 需要在界面里打开下面的菜单: 这样就找到默认设置的地方,把下面的移动勾选起来,这样点…...

Android 解决TextView多行滑动与NestedScrollView嵌套滑动冲突的问题
关键计算地方: 1.当前是上滑动还是下滑动(相对于屏幕) ,使用ev.getRawY()获得当前滑动位置在屏幕哪个地方 2. 计算文本客滑动到哪里即可停止, (行高*总文本行数)- (行高 * 最多显示行数) int sum getLineHeight() * getLineCount() - getLineHeight() * getMaxLines(); …...

Laravel 开发Api规范
一,修改时区 配置 config/app.php 文件 // 时区修改,感觉两者皆可,自己根据实际情况定义 timezone > PRC, // 大陆时间二,设置 Accept 头中间件 accept头即为客户端请求头,做成中间件来使用。Accept 决定了响应返…...

蓝色wordpress外贸建站模板
蓝色wordpress外贸建站模板 https://www.mymoban.com/wordpress/7.html...
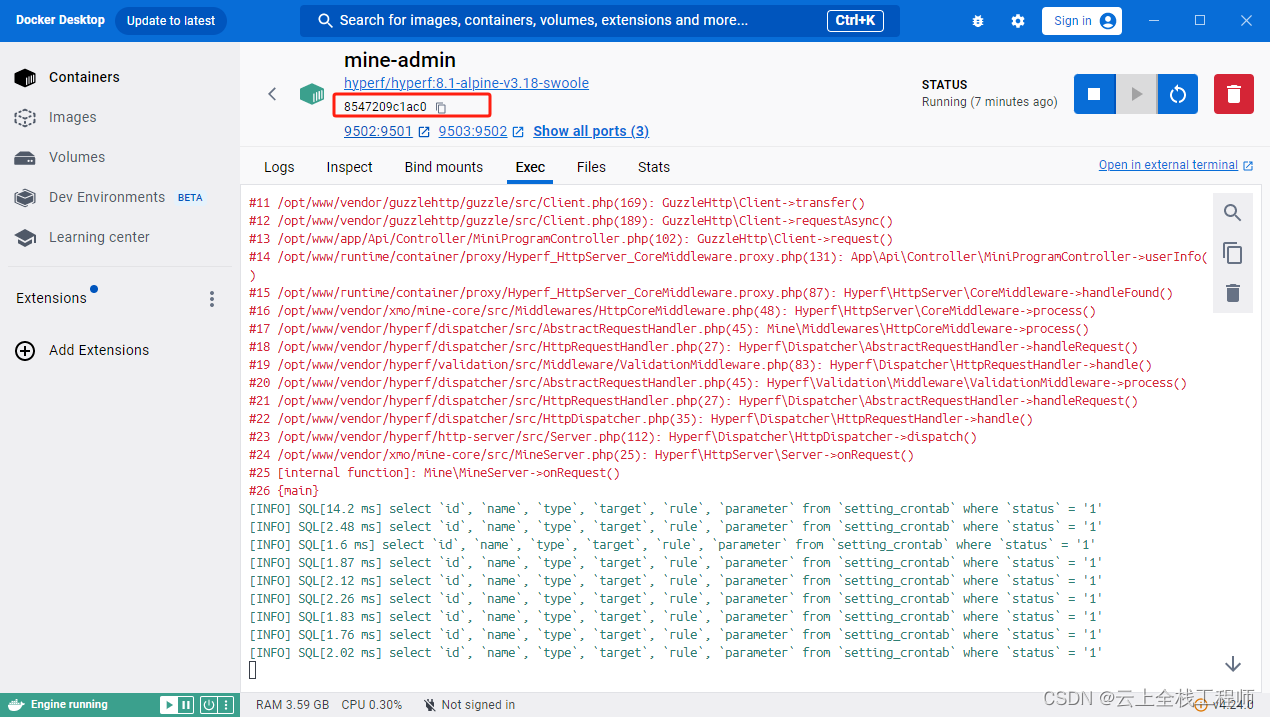
windos环境,使用docker容器运行项目的,新增外部访问地址配置
对于运行在 Docker 容器中的项目,你需要在容器内部编辑 resolv.conf 文件。以下是一种常见的方法: 进入正在运行的 Docker 容器:docker exec -it [container_id] bash其中 [container_id] 是你正在运行的 Docker 容器的 ID。 在容器内部使…...

设计模式:生活中的组合模式
想象一下,你正在组织一个大型的家庭聚会。在这个聚会中,你需要准备各种菜肴,每个菜肴又包含不同的食材。你的目标是能够以统一的方式处理整个聚会的准备工作,不论是处理单个食材还是一整道菜肴。 在这个场景中,我们可…...

WPF OnStartup
在Windows Presentation Foundation (WPF)框架中,OnStartup 是 System.Windows.Application 类的一个受保护的虚方法,它是应用程序启动过程中的一个重要环节。当一个 WPF 应用程序启动时,其入口点通常是 App.xaml 文件和对应的后台代码文件 A…...

docker-相关
打镜像 1、编写dockfile文件,请自行百度 2、docker build -t 镜像名称:版本号 dockerFile路径 3、docker save -o 镜像压缩包名称.tar 镜像名称:镜像版本号 部署镜像 1、将镜像tar包放到部署机器上 2、加载镜像:docker load -i 镜像tar包路径 3、dock…...

二十、Rust AOP 切面增强
用过 java spring 的同学,应该会对 AspectJ 的 前置、后置、环绕 增强 念念不忘,巧了 rust 也有类似能力,稍显不同的是,为了向 “零成本抽象” 靠齐,Rust 的 “增强” 是在编译期 完成的。 编译期生成,则离…...
)
掌握Go语言:Go语言精细错误,清晰、高效的错误处理实践(32)
错误处理是任何编程语言中都至关重要的一部分,Go 语言提供了一套简单而强大的错误处理机制,使得处理错误变得高效而清晰。 Go 错误类型 在 Go 中,错误是一个普通的接口类型,即 error 接口,其定义如下: t…...

从零到一:手把手教你用Cornerstone.js搭建一个基础的医学影像查看器
从零到一:手把手教你用Cornerstone.js搭建一个基础的医学影像查看器 医学影像的数字化呈现一直是医疗技术发展的重要方向。随着Web技术的进步,直接在浏览器中查看和操作DICOM等专业医学影像已成为可能。本文将带领前端开发新手一步步实现一个基础的医学影…...

Sigrity SystemSI 2023实战:LPDDR4仿真报告生成,从波形选择到阈值设置的保姆级避坑指南
Sigrity SystemSI 2023实战:LPDDR4仿真报告生成全流程解析与关键参数避坑指南 在高速数字电路设计中,LPDDR4接口的信号完整性验证已成为硬件工程师的必修课。作为Cadence旗下专业的信号完整性分析工具,Sigrity SystemSI 2023版本针对DDR仿真…...

青龙面板自动化签到终极指南:30+平台一键签到,每天节省30分钟
青龙面板自动化签到终极指南:30平台一键签到,每天节省30分钟 【免费下载链接】check 青龙面板平台签到函数 项目地址: https://gitcode.com/gh_mirrors/check5/check 还在为每天繁琐的签到任务烦恼吗?签到盒青龙版是你的完美解决方案&…...

【免费下载】 美国各州区域图-shp格式
美国各州区域图-shp格式 【下载地址】美国各州区域图-shp格式 本资源库提供了一份详尽的美国各州区域图数据,以流行的Shapefile(shp格式)进行封装。Shapefile是一种广泛应用于地理信息系统(GIS)的矢量数据格式…...
第2小节:国内外技术参数差距)
0502光刻机破局 第五卷:EUV光源系统(S级 长期死磕突破)第2小节:国内外技术参数差距
第五卷:EUV光源系统(S级 长期死磕突破) 第2小节:国内外技术参数差距(全量化对标,ASML vs 国产,死磕数据) 前置硬核声明 本节100%量化、100%对标、100%无修饰,直接把 ASML…...

百度网盘直链解析工具:告别限速,3分钟实现全速下载!
百度网盘直链解析工具:告别限速,3分钟实现全速下载! 【免费下载链接】baidu-wangpan-parse 获取百度网盘分享文件的下载地址 项目地址: https://gitcode.com/gh_mirrors/ba/baidu-wangpan-parse 还在为百度网盘那令人抓狂的下载速度而…...

DNS 泄露是什么?为什么网络环境检测时要看 DNS
很多人在检查网络环境时,第一反应通常是看 IP。比如 IP 显示在哪个地区、运营商是谁、是不是数据中心网络。 但实际上,除了 IP 之外,DNS 也是一个很容易被忽略的关键指标。如果 DNS 查询结果和当前网络出口不一致,就可能出现所谓的…...

CodeWF Toolbox:一个用 Avalonia + Prism 做出来的开发者工具箱
今天这篇文章,站长来聊聊我自己开发的 CodeWF Toolbox,CodeWF 工具箱。熟悉我的朋友一般都叫我“站长”,因为我还有一个网站:CodeWF。这个工具箱也是围绕我平时写代码、维护网站、整理资料、排查问题时反复遇到的需求做出来的。它…...

【NotebookLM知识图谱构建权威白皮书】:基于127个企业POC验证的4层语义对齐框架
更多请点击: https://intelliparadigm.com 第一章:NotebookLM知识图谱构建概览 NotebookLM 是 Google 推出的面向研究者与开发者、基于用户自有文档构建可推理知识体的 AI 工具。其核心能力并非依赖通用语料,而是围绕上传文档(PD…...
)
LabVIEW新手必看:5分钟搞定TCP连接TLINK物联网平台(附完整VI程序)
LabVIEW物联网开发实战:从零构建TCP通信系统 引言 在工业自动化和物联网应用开发领域,LabVIEW因其图形化编程特性成为工程师快速搭建原型系统的利器。TCP协议作为最可靠的网络传输方式之一,与LabVIEW结合能够为设备联网提供稳定通道。不同于传…...