RK3568笔记二十四:基于Flask的网页监控系统
若该文为原创文章,转载请注明原文出处。
此实验参考 《鲁班猫监控检测》,原代码有点BUG,已经下载不了。2. 鲁班猫监控检测 — [野火]嵌入式AI应用开发实战指南—基于LubanCat-RK系列板卡 文档 (embedfire.com)
一、简介
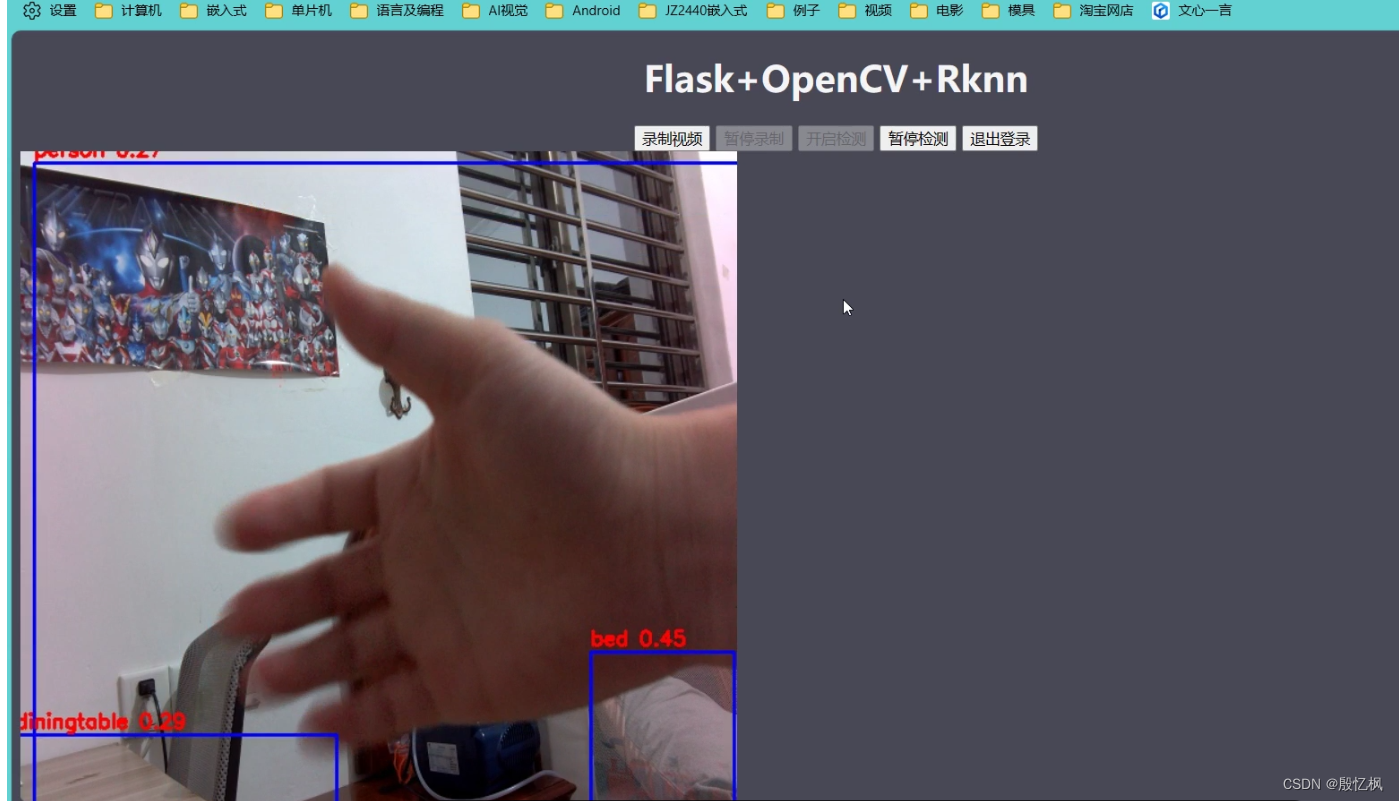
记录简单的摄像头监控检测示例,用户在浏览器上登录监控页面,登录后点击按钮可以进行视频录制和目标检测。 web程序采用的是基于python的flask框架,实现流媒体直播,图像是通过opencv调用摄像头获取,对图片检测处理使用npu。最络效果如下:
二、环境
1、测试平台:ATK-RK3568
2、系统: buildroot
3、Python版本:系统自带
4、opencv版本:系统自带
5、Toolkit Lite2:系统自带
6、Flask:1.0.2
三、Flask安装
Flask系统没有安装需要自己安装,安装需要联网
打开板子终端,插好网线,输入udhcpc自动获取网络。
安装Flask
pip install flaskflask库简单使用可以参考 Flask 官方文档。
四、框架介绍
1、Flask介绍
Flask通过 /video_viewer 路由返回一个入参为生成器的Response对象。Flask将会负责调用生成器,进入循环,持续地将摄像头中获取的帧数据作为响应块返回, 并把所有部分的结果以块的形式发送给客户端。
2、网页
网页分为两个界面,一是显示,一是登录。
登录需要输入账号和密码,账号密码内置好了,在另一个文件里。
login.html
<!DOCTYPE html>
<html>
<head><meta charset="UTF-8"><title>Login</title><meta name="viewport" content="width=device-width, initial-scale=1"><script type="application/x-javascript"> addEventListener("load", function () {setTimeout(hideURLbar, 0);}, false);function hideURLbar() {window.scrollTo(0, 1);} </script><link href="../static/css/style.css" rel='stylesheet' type='text/css'/><!--字体--><link href='http://fonts.useso.com/css?family=PT+Sans:400,700,400italic,700italic|Oswald:400,300,700'rel='stylesheet' type='text/css'><link href='http://fonts.useso.com/css?family=Exo+2' rel='stylesheet' type='text/css'><!--//js--><script src="http://ajax.useso.com/ajax/libs/jquery/1.11.0/jquery.min.js"></script>
</head>
<body>
<script>$(document).ready(function (c) {$('.close').on('click', function (c) {$('.login-form').fadeOut('slow', function (c) {$('.login-form').remove();});});
});
</script>
<!--SIGN UP-->
<h1>ATK-RK3568监控检测</h1>
<div class="login-form"><div class="close"></div><div class="head-info"><label class="lbl-1"> </label><label class="lbl-2"> </label><label class="lbl-3"> </label></div><div class="clear"></div><div class="avtar"><img src="../static/images/cat.png"/></div><form method="post" action="{{ url_for("user.login") }}"><input type="text" class="text" name="username" value="Username" onfocus="this.value = '';"onblur="if (this.value == '') {this.value = 'Username';}"><div class="key"><input type="password" name="password" value="Passowrd" onfocus="this.value = '';"onblur="if (this.value == '') {this.value = 'Password';}"></div><div class="signin"><input type="submit" value="Login">{% if errmsg %} {# 判断是否有错误信息 #}<div class="error_tip" style="display: block;color: red">{{ errmsg }}</div>{% endif %}</div></form></div>
<div class="copy-rights"><p> Copyright@2023 仅供学习参考,详细使用信息参考下 <a href="https://doc.embedfire.com/linux/rk356x/Python/zh/latest/circuit/rknn.html" target="_blank" title="Github">教程</a></p>
</div></body>
</html>
index.html
<!DOCTYPE html>
<html lang="en"><head><meta charset="UTF-8"><meta name="viewport" content="width=device-width, initial-scale=1.0"><meta http-equiv="X-UA-Compatible" content="ie=edge"><title>ATK-RK3568监控检测</title><style>body {background-color: #484856;}</style>
</head>
<body>
<h1 align="center" style="color: whitesmoke;">Flask+OpenCV+Rknn</h1>
<div class="top"><div class="recorder" id="recorder" align="center"><button id="record" class="btn">录制视频</button><button id="stop" class="btn">暂停录制</button><button id="process" class="btn">开启检测</button><button id="pause" class="btn">暂停检测</button><input type="button" class="btn" value="退出登录"onclick="javascrtpt:window.location.href='{{ url_for('user.logout') }}'"><a id="download"></a><script type="text/javascript" src="{{ url_for('static', filename='button_process.js') }}"></script></div>
</div>
<img id="video" src="{{ url_for('home.video_viewer') }}">
</body>
</html>
显示界面就几个按钮和显示区域,比较简单。
3、摄像头中获取帧
摄像头获取代码比较多, 这里只贴一部分
def get_frame(self):ret, self.frame = self.cap.read()print('---->:get_frame')if ret:if self.is_process:#self.image = cv2.cvtColor(self.frame, cv2.COLOR_BGR2RGB)self.image = cv2.cvtColor(self.frame, cv2.COLOR_BGR2RGB)self.image2 = np.expand_dims(self.image, 0)self.outputs = self.rknn_lite.inference(inputs=[self.image2], data_format=['nhwc'])print('done')self.frame = process_image(self.image, self.outputs)#self.rknn_frame = process_image(self.image, self.outputs)#cv2.imwrite('result.jpg', self.frame)print('Save results to result.jpg!')ret, image = cv2.imencode('.jpg', self.frame)return image.tobytes()if self.frame is not None:ret, image = cv2.imencode('.jpg', self.frame)print('---->:cv2.imencode')return image.tobytes()else:return None简单的説是读取摄像头数据,然后判断是识别的还是不是识别。 is_process是识别标记,通过网页上的按钮来控制。读取数据后通过tobytes上传给网页显示。
4、NPU处理图像
RKNN Toolkit Lite2安装方法,正点原子的手册写的很详细,自行安装,其他板子类似。
处理流程:
1、创建RKNN对象
self.rknn_lite = RKNNLite()
2、加载RKNN模型
def load_rknn(self):# load RKNN modelprint('--> Load RKNN model')ret = self.rknn_lite.load_rknn(RKNN_MODEL)if ret != 0:print('Load RKNN model failed')exit(ret)# Init runtime environmentprint('--> Init runtime environment')ret = self.rknn_lite.init_runtime()if ret != 0:print('Init runtime environment failed!')exit(ret)3、对摄像头获取的图片进行处理,设置图片大小
self.cap.set(cv2.CAP_PROP_FRAME_WIDTH, 640)
self.cap.set(cv2.CAP_PROP_FRAME_HEIGHT, 640)
4、转换成RGB格式
opencv输出的格式是BGR,需要转成RGB处理
self.image = cv2.cvtColor(self.frame, cv2.COLOR_BGR2RGB)5、推理
self.image2 = np.expand_dims(self.image, 0)
self.outputs = self.rknn_lite.inference(inputs=[self.image2], data_format=['nhwc'])
先给图片数据增加一个维度,在推理输出。
6、对图像进行后处理,返回处理后的图像
self.frame = process_image(self.image, self.outputs)后处理完整代码。
import urllib
import time
import sys
import numpy as np
import cv2
from rknnlite.api import RKNNLiteRKNN_MODEL = './controller/utils/yolov5s.rknn'
OBJ_THRESH = 0.25
NMS_THRESH = 0.45
IMG_SIZE = 640CLASSES = ("person", "bicycle", "car", "motorbike ", "aeroplane ", "bus ", "train", "truck ", "boat", "traffic light","fire hydrant", "stop sign ", "parking meter", "bench", "bird", "cat", "dog ", "horse ", "sheep", "cow", "elephant","bear", "zebra ", "giraffe", "backpack", "umbrella", "handbag", "tie", "suitcase", "frisbee", "skis", "snowboard", "sports ball", "kite","baseball bat", "baseball glove", "skateboard", "surfboard", "tennis racket", "bottle", "wine glass", "cup", "fork", "knife ","spoon", "bowl", "banana", "apple", "sandwich", "orange", "broccoli", "carrot", "hot dog", "pizza ", "donut", "cake", "chair", "sofa","pottedplant", "bed", "diningtable", "toilet ", "tvmonitor", "laptop	", "mouse	", "remote ", "keyboard ", "cell phone", "microwave ","oven ", "toaster", "sink", "refrigerator ", "book", "clock", "vase", "scissors ", "teddy bear ", "hair drier", "toothbrush ")def sigmoid(x):return 1 / (1 + np.exp(-x))def xywh2xyxy(x):# Convert [x, y, w, h] to [x1, y1, x2, y2]y = np.copy(x)y[:, 0] = x[:, 0] - x[:, 2] / 2  # top left xy[:, 1] = x[:, 1] - x[:, 3] / 2  # top left yy[:, 2] = x[:, 0] + x[:, 2] / 2  # bottom right xy[:, 3] = x[:, 1] + x[:, 3] / 2  # bottom right yreturn ydef process(input, mask, anchors):anchors = [anchors[i] for i in mask]grid_h, grid_w = map(int, input.shape[0:2])box_confidence = input[..., 4]box_confidence = np.expand_dims(box_confidence, axis=-1)box_class_probs = input[..., 5:]box_xy = input[..., :2]*2 - 0.5col = np.tile(np.arange(0, grid_w), grid_w).reshape(-1, grid_w)row = np.tile(np.arange(0, grid_h).reshape(-1, 1), grid_h)col = col.reshape(grid_h, grid_w, 1, 1).repeat(3, axis=-2)row = row.reshape(grid_h, grid_w, 1, 1).repeat(3, axis=-2)grid = np.concatenate((col, row), axis=-1)box_xy += gridbox_xy *= int(IMG_SIZE/grid_h)box_wh = pow(input[..., 2:4]*2, 2) * anchorsbox = np.concatenate((box_xy, box_wh), axis=-1)return box, box_confidence, box_class_probsdef filter_boxes(boxes, box_confidences, box_class_probs):"""Filter boxes with box threshold. It's a bit different with origin yolov5 post process!# Argumentsboxes: ndarray, boxes of objects.box_confidences: ndarray, confidences of objects.box_class_probs: ndarray, class_probs of objects.# Returnsboxes: ndarray, filtered boxes.classes: ndarray, classes for boxes.scores: ndarray, scores for boxes."""boxes = boxes.reshape(-1, 4)box_confidences = box_confidences.reshape(-1)box_class_probs = box_class_probs.reshape(-1, box_class_probs.shape[-1])_box_pos = np.where(box_confidences >= OBJ_THRESH)boxes = boxes[_box_pos]box_confidences = box_confidences[_box_pos]box_class_probs = box_class_probs[_box_pos]class_max_score = np.max(box_class_probs, axis=-1)classes = np.argmax(box_class_probs, axis=-1)_class_pos = np.where(class_max_score >= OBJ_THRESH)boxes = boxes[_class_pos]classes = classes[_class_pos]scores = (class_max_score* box_confidences)[_class_pos]return boxes, classes, scoresdef nms_boxes(boxes, scores):"""Suppress non-maximal boxes.# Argumentsboxes: ndarray, boxes of objects.scores: ndarray, scores of objects.# Returnskeep: ndarray, index of effective boxes."""x = boxes[:, 0]y = boxes[:, 1]w = boxes[:, 2] - boxes[:, 0]h = boxes[:, 3] - boxes[:, 1]areas = w * horder = scores.argsort()[::-1]keep = []while order.size > 0:i = order[0]keep.append(i)xx1 = np.maximum(x[i], x[order[1:]])yy1 = np.maximum(y[i], y[order[1:]])xx2 = np.minimum(x[i] + w[i], x[order[1:]] + w[order[1:]])yy2 = np.minimum(y[i] + h[i], y[order[1:]] + h[order[1:]])w1 = np.maximum(0.0, xx2 - xx1 + 0.00001)h1 = np.maximum(0.0, yy2 - yy1 + 0.00001)inter = w1 * h1ovr = inter / (areas[i] + areas[order[1:]] - inter)inds = np.where(ovr <= NMS_THRESH)[0]order = order[inds + 1]keep = np.array(keep)return keepdef yolov5_post_process(input_data):masks = [[0, 1, 2], [3, 4, 5], [6, 7, 8]]anchors = [[10, 13], [16, 30], [33, 23], [30, 61], [62, 45],[59, 119], [116, 90], [156, 198], [373, 326]]boxes, classes, scores = [], [], []for input, mask in zip(input_data, masks):b, c, s = process(input, mask, anchors)b, c, s = filter_boxes(b, c, s)boxes.append(b)classes.append(c)scores.append(s)boxes = np.concatenate(boxes)boxes = xywh2xyxy(boxes)classes = np.concatenate(classes)scores = np.concatenate(scores)# nmsnboxes, nclasses, nscores = [], [], []for c in set(classes):inds = np.where(classes == c)b = boxes[inds]c = classes[inds]s = scores[inds]keep = nms_boxes(b, s)if len(keep) != 0:nboxes.append(b[keep])nclasses.append(c[keep])nscores.append(s[keep])if not nclasses and not nscores:return None, None, Noneboxes = np.concatenate(nboxes)classes = np.concatenate(nclasses)scores = np.concatenate(nscores)return boxes, classes, scoresdef draw(image, boxes, scores, classes):"""Draw the boxes on the image.# Argument:image: original image.boxes: ndarray, boxes of objects.classes: ndarray, classes of objects.scores: ndarray, scores of objects.all_classes: all classes name."""for box, score, cl in zip(boxes, scores, classes):top, left, right, bottom = boxprint('class: {}, score: {}'.format(CLASSES[cl], score))print('box coordinate left,top,right,down: [{}, {}, {}, {}]'.format(top, left, right, bottom))top = int(top)left = int(left)right = int(right)bottom = int(bottom)cv2.rectangle(image, (top, left), (right, bottom), (255, 0, 0), 2)cv2.putText(image, '{0} {1:.2f}'.format(CLASSES[cl], score),(top, left - 6),cv2.FONT_HERSHEY_SIMPLEX,0.6, (0, 0, 255), 2)def letterbox(im, new_shape=(640, 640), color=(0, 0, 0)):# Resize and pad image while meeting stride-multiple constraintsshape = im.shape[:2]  # current shape [height, width]if isinstance(new_shape, int):new_shape = (new_shape, new_shape)# Scale ratio (new / old)r = min(new_shape[0] / shape[0], new_shape[1] / shape[1])# Compute paddingratio = r  # ratiosnew_unpad = int(round(shape[1] * r)), int(round(shape[0] * r))dw, dh = new_shape[1] - new_unpad[0], new_shape[0] - new_unpad[1]  # wh paddingdw /= 2  # divide padding into 2 sidesdh /= 2if shape[::-1] != new_unpad:  # resizeim = cv2.resize(im, new_unpad, interpolation=cv2.INTER_LINEAR)top, bottom = int(round(dh - 0.1)), int(round(dh + 0.1))left, right = int(round(dw - 0.1)), int(round(dw + 0.1))im = cv2.copyMakeBorder(im, top, bottom, left, right, cv2.BORDER_CONSTANT, value=color)  # add borderreturn im, ratio, (dw, dh)def process_image(image, outputs):# post processinput0_data = outputs[0]input1_data = outputs[1]input2_data = outputs[2]input0_data = input0_data.reshape([3, -1]+list(input0_data.shape[-2:]))input1_data = input1_data.reshape([3, -1]+list(input1_data.shape[-2:]))input2_data = input2_data.reshape([3, -1]+list(input2_data.shape[-2:]))print('process_image 1')input_data = list()input_data.append(np.transpose(input0_data, (2, 3, 0, 1)))input_data.append(np.transpose(input1_data, (2, 3, 0, 1)))input_data.append(np.transpose(input2_data, (2, 3, 0, 1)))print('process_image 2')boxes, classes, scores = yolov5_post_process(input_data)print('process_image 3')image = cv2.cvtColor(image, cv2.COLOR_RGB2BGR)if boxes is not None:draw(image, boxes, scores, classes)print('process_image 4')return image
这一部分有修改,用源码运行不起来。
五、运行测试
1、下载代码
git clone https://github.com/Yinyifeng18/flask-opencv-rknn-rk3568.git下载后,通过adb或tftp把代码上传到板子上。
在工程代码目录lubancat-flask-opencv-rknn中,执行以下命令:
python main.py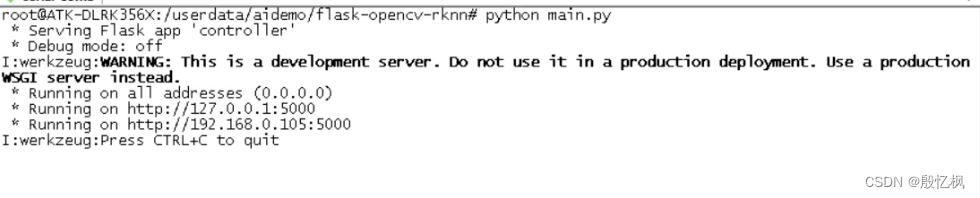
程序打印的提示信息,告诉我们服务器以及开始监听 http://0.0.0.0:5000 的地址,系统的默认网口ip。 如若想退出程序,按下 CTRL+C 。
这里通过在浏览器中输入网址: http://192.168.0.105:5000/login , 来观察一下实验现象。
实验现象如图:

登录完成后,进入到监控界面,点击 开启检测 进入到检测状态。
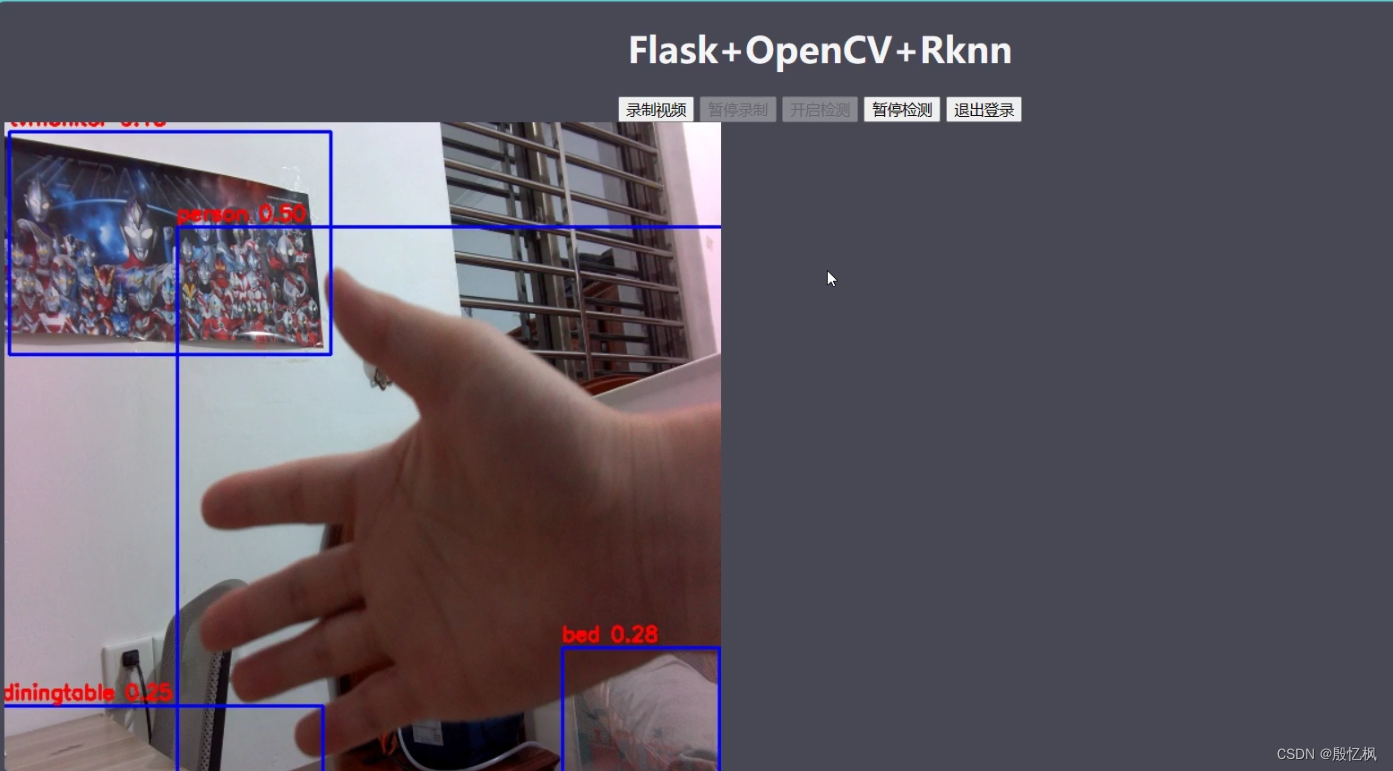
简单的监控显示和目标检测功能。
6、参考链接
https://github.com/miguelgrinberg/flask-video-streaming
Embedfire/flask-video-streaming-recorder
https://github.com/rockchip-linux/rknn-toolkit2
https://doc.embedfire.com/linux/rk356x/Ai/zh/latest/lubancat_ai/example/camera_demo.html
如有侵权,或需要完整代码,请及时联系博主。
相关文章:
RK3568笔记二十四:基于Flask的网页监控系统
若该文为原创文章,转载请注明原文出处。 此实验参考 《鲁班猫监控检测》,原代码有点BUG,已经下载不了。2. 鲁班猫监控检测 — [野火]嵌入式AI应用开发实战指南—基于LubanCat-RK系列板卡 文档 (embedfire.com) 一、简介 记录简单的摄像头监…...

[Django 0-1] Core.Serializers 模块
Core.Serializers 模块 Django 序列化模块 模块结构 . ├── __init__.py ├── base.py ├── json.py ├── jsonl.py ├── python.py ├── pyyaml.py └── xml_serializer.py1 directory, 7 files自定义序列化器 通过继承django.core.serializers.base.Serial…...
鸿蒙内核源码分析(用栈方式篇) | 程序运行场地谁提供的
精读内核源码就绕不过汇编语言,鸿蒙内核有6个汇编文件,读不懂它们就真的很难理解以下问题. 1.系统调用是如何实现的? 2.CPU是如何切换任务和进程上下文的? 3.硬件中断是如何处理的? 4.main函数到底是怎么来的? 5.开机最开始发生了什么? 6.关机…...
Linux 进程间通信之匿名管道
💓博主CSDN主页:麻辣韭菜💓 ⏩专栏分类:Linux知识分享⏪ 🚚代码仓库:Linux代码练习🚚 🌹关注我🫵带你学习更多Linux知识 🔝 目录 前言 一. 进程间通信介绍 1.进程间通…...
)
数据结构与算法学习笔记六--数组和广义表(C语言)
目录 前言 1.数组 1.定义 2.初始化 3.销毁 4.取值 5.设置值 6.完整代码 前言 这篇博客主要介绍数据结构中的数组和广义表的用法。 1.数组 在数据结构中,数组是一种线性数据结构,它由一组连续的相同类型的元素组成,每个元素都有一个唯…...

图搜索算法详解
图搜索算法详解 摘要: 图搜索算法是解决路径规划和网络分析问题的关键技术。本文将详细介绍图搜索算法的基本概念、分类以及常见的算法,如广度优先搜索(BFS)、深度优先搜索(DFS)、A*搜索等。同时ÿ…...

安卓中常见的UI控件
TextView(文本视图)EditText(编辑文本)Button(按钮)ImageView(图像视图)ImageButton(图像按钮)CheckBox(复选框)RadioButtonÿ…...
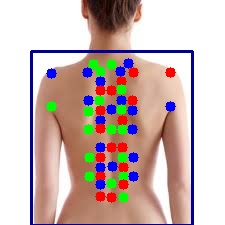
基于Labelme的背部穴位关键点制作
一、穴位定位方法 穴位定位,自春秋时期以来,通过各代医学实践的继承与发展,形成了一套较为科学的定位体系。这套体系基于经络理论,采用“寸”作为测量单位,按照人体比例来进行精确的穴位定位,主要有依据体…...
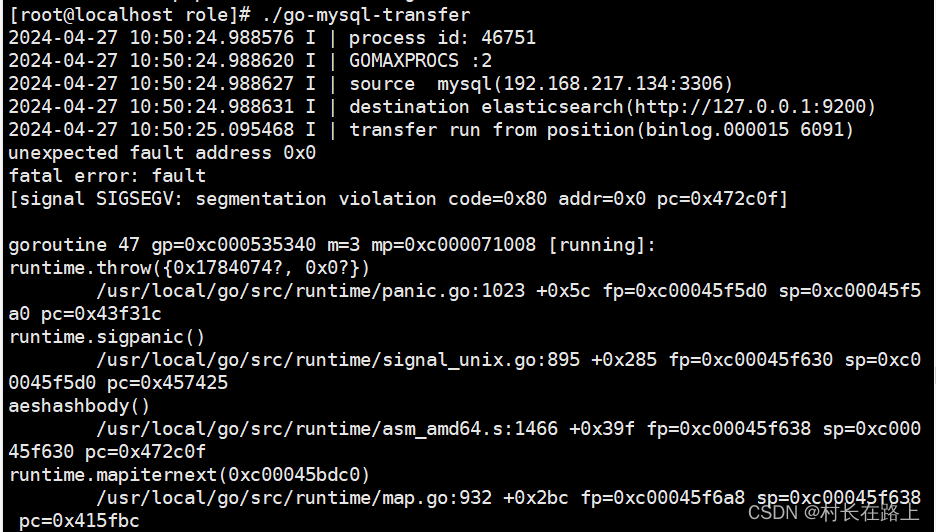
go-mysql-transfer 同步数据到es
同步数据需要注意的事项 前提条件 1 要同步的mysql 表必须包含主键 2 mysql binlog 必须是row 模式 3 不支持程序运行过程中修改表结构 4 要赋予连接mysql 账号的权限 reload, replication super 权限 如果是root 权限则不需要 安装 go-mysql-transfer git clone…...
外包干了3天,技术就明显退步了。。。。。
先说一下自己的情况,本科生,19年通过校招进入广州某软件公司,干了接近4年的功能测试,今年年初,感觉自己不能够在这样下去了,长时间呆在一个舒适的环境会让一个人堕落!而我已经在一个企业干了四年的功能测试…...

将要上市的自动驾驶新书《自动驾驶系统开发》中摘录各章片段 1
以下摘录一些章节片段: 1. 概论 自动驾驶系统的认知中有一些模糊的地方,比如自动驾驶系统如何定义的问题,自动驾驶的研发为什么会有那么多的子模块,怎么才算自动驾驶落地等等。本章想先给读者一个概括介绍,了解自动驾…...

String、StringBuilder、StringBuffer之间的区别是什么?
在Java中,String、StringBuilder 和 StringBuffer 是处理字符串的三个类,其中 String 是不可变对象,而 StringBuilder 和 StringBuffer 是可变对象。这些类在字符串操作方面具有不同的特性和用途。 String String 类表示不可变的字符序列&a…...
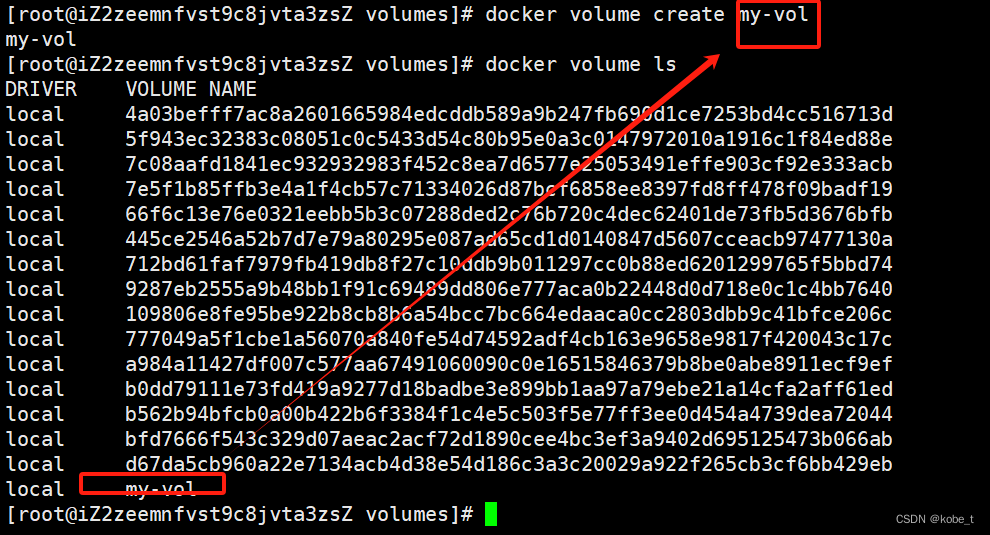
docker系列8:容器卷挂载(上)
目录 传送门 从安装redis说起 什么是容器卷挂载 操作系统的挂载 日志文件一般是"首恶元凶" 挂载命令 容器卷挂载 卷挂载命令 启动时挂载 查看挂载卷信息 容器卷管理 查看卷列表 创建容器卷 具名挂载与匿名挂载 具名挂载 传送门 docker系列1ÿ…...
痉挛性斜颈患者自己做哪些运动对脖子好?
痉挛性斜颈(Dystonia)是一种罕见的神经系统疾病,其特点是颈部肌肉痉挛,导致头部姿势异常倾斜或扭曲。而在治疗痉挛性斜颈中,运动疗法是非常重要的一部分。下面将介绍一些痉挛性斜颈患者可以自己进行的运动,…...
数据结构——二叉树链式结构的实现(上)
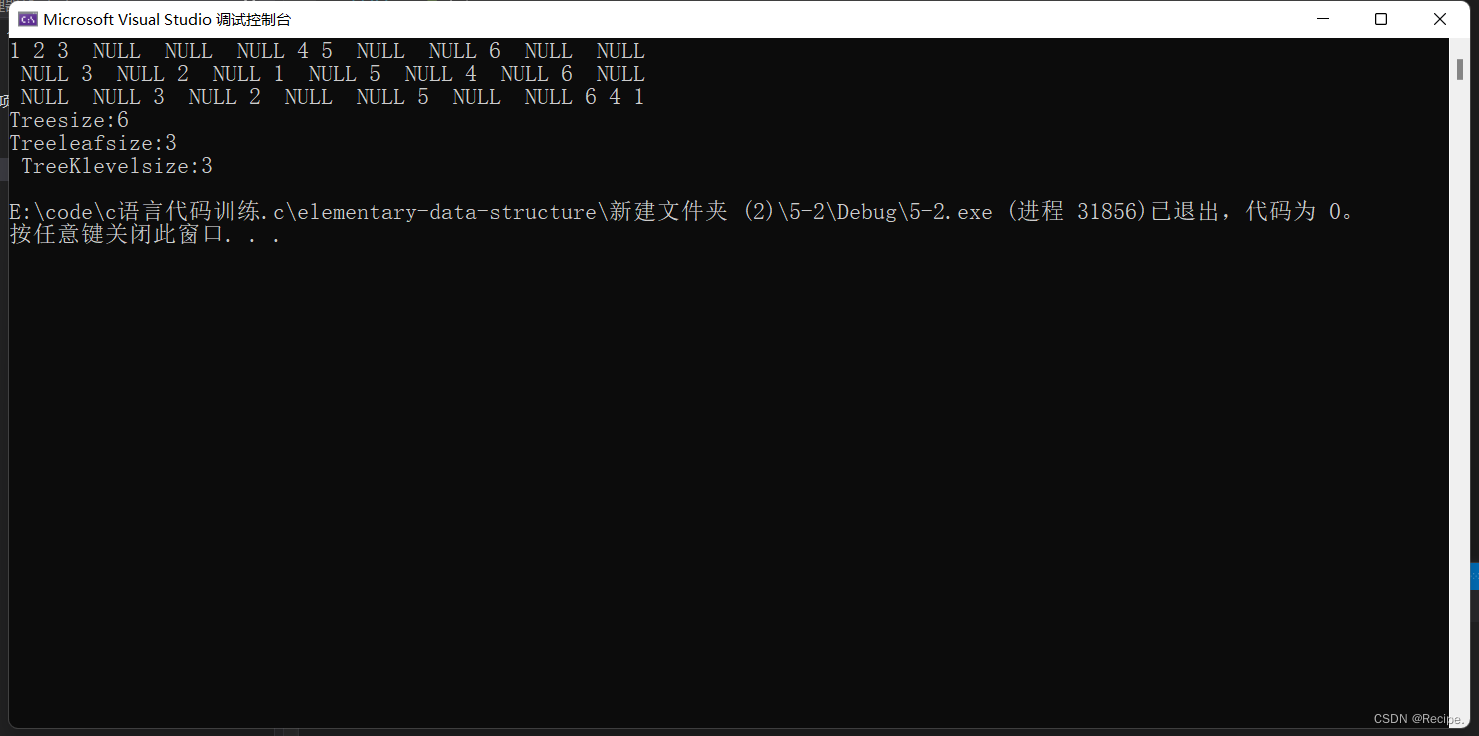
二叉树概念 再看二叉树基本操作前,再回顾下二叉树的概念, 二叉树是: 1. 空树 2. 非空:根节点,根节点的左子树、根节点的右子树组成的。 从概念中可以看出,二叉树定义是递归式的 二叉树构成࿱…...

数据结构内容概览
0. 绪论 绪论01——复杂度度量 绪论02——复杂度分析 绪论03——递归分析 绪论04——算法分析 绪论05——动态规划 算法设计与优化——前n项和计算 算法设计优化——对于任意非负整数,统计其二进制展开中数位1的总数 算法设计优化——Fibonacci数 算法设计优化——…...

当Linux系统运行时间长了之后,会出现磁盘空间不足提示,需要及时进行清理
Linux系统(CentOS 7)的磁盘空间不足时,可以采取以下步骤进行清理: 查找并删除大文件: 使用du和find命令可以找到并删除大文件。例如,要查找/目录下大于100MB的文件,可以运行: find /…...

【Flask 系统教程 4】Jinjia2模版和语法
Jinjia2 模板 模板的介绍 Jinja2 是一种现代的、设计优雅的模板引擎,它是 Python 的一部分,由 Armin Ronacher 开发。Jinja2 允许你在 HTML 文档中嵌入 Python 代码,以及使用变量、控制结构和过滤器来动态生成内容。它的语法简洁清晰&#…...
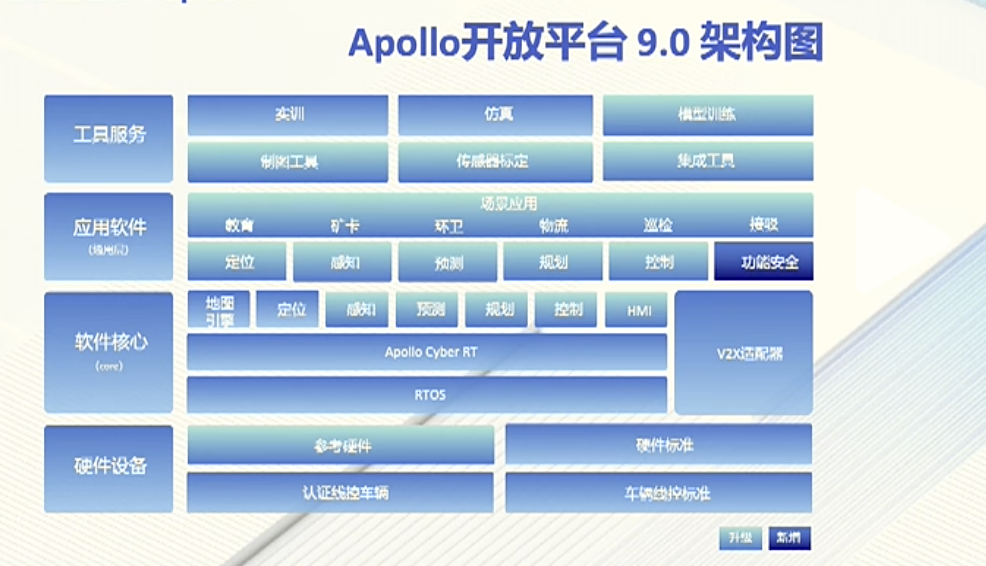
与 Apollo 共创生态:七周年大会心得
与 Apollo 共创生态:七周年大会心得 前言 4月19日,百度Apollo迎来七周年,历经七年的不懈追求与创新,Apollo开放平台已陆续推出了13个版本,汇聚了来自全球170多个国家与地区的16万名开发者及220多家合作伙伴。作为一名…...

『FPGA通信接口』DDR(4)DDR3内存条SODIMMs读写测试
文章目录 前言1.MIG IP核配置2.测试程序3.DDR应用4.传送门 前言 不论是DDR3颗粒还是DDR3内存条,xilinx都是通过MIG IP核实现FPGA与DDR的读写。本文区别于DDR颗粒,记录几个与颗粒配置不同的地方。关于DDR的原理与MIG IP的简介,请查看前面文章&…...
)
【信息科学与工程学】【产品体系】第十二篇 制造业生产加工07 精度与误差库 ——智能制造(4)
表7.100.301—表7.100.329:精度控制高级技术与应用 一、误差补偿与校正(301-305) 表7.100.301:实时误差补偿 编号 概念/技术 在精度控制中的核心价值 7.100.301.1 实时误差补偿 在系统运行过程中,动态检测误差并实时施加修正的技术。相比离线补偿,能更好地跟踪…...

Vue2项目里,如何用DHTMLX Gantt实现任务搜索、今日线定位和视图切换?这些实用功能我帮你搞定了
Vue2项目中DHTMLX Gantt三大进阶功能实战:搜索、今日线与视图切换 在项目管理工具的开发中,甘特图作为核心可视化组件,其交互体验直接决定了用户的使用效率。本文将聚焦三个高频需求场景,手把手教你如何在已有DHTMLX Gantt集成的V…...

告别硬件依赖:用Proteus玩转STM32F1,从CubeMX生成代码到仿真调试的避坑实践
零硬件玩转STM32F103:Proteus仿真全流程与LL库高效开发指南 从真实硬件到虚拟仿真的思维转换 嵌入式开发者的传统认知里,调试灯闪烁必须连接实物开发板——直到他们遇到Proteus。这款电路仿真软件让STM32F103系列芯片在虚拟环境中完美运行,配…...

避开这些坑!STC8H8K64U IAP升级中FLASH分区与Keil定位的保姆级教程
STC8H8K64U IAP升级实战:FLASH分区设计与Keil定位全解析 第一次接触STC8H8K64U的IAP功能时,我花了整整三天时间才搞明白为什么程序总是莫名其妙地崩溃。直到发现是FLASH分区地址计算错误导致用户程序覆盖了ISP引导区,才恍然大悟。本文将分享从…...

魔百盒M301H-ZN代工_HI3798MV300H芯片_8822CS无线模块-深度定制与刷机实战指南
1. 魔百盒M301H-ZN硬件拆解与芯片解析 第一次拿到魔百盒M301H-ZN时,我差点被它朴实无华的外表骗了。拆开底部四颗螺丝后,内部布局清晰地展现在眼前:HI3798MV300H主控芯片位于主板中央,右上角是8822CS无线模块,存储芯片…...

跨平台实战:Windows QGC与Linux JMAVSim模拟器的局域网联调
1. 环境准备与基础概念 在开始跨平台联调之前,我们需要先理解几个关键组件的作用。QGroundControl(QGC)是无人机领域最流行的开源地面站软件,相当于无人车的"方向盘";而PX4 JMAVSim则是基于Java开发的轻量级…...

打磨与展望:RAG 的进阶技巧与避坑指南
走过了从加载文档到完整问答链的全程,恭喜你——你已经亲手建造出了一台可以和自己文档“对话”的 RAG 引擎。但任何一个上过生产环境的开发者都知道:原型和产品之间,往往隔着一条名为“细节”的护城河。 用户开始提各种刁钻问题,…...
实时监测设备健康状态,结合TSN网络实现毫秒级数据传输)
AI驱动的工业预测性维护技术实践:AI驱动的预测性维护系统通过多传感器融合(振动、温度、电流等)实时监测设备健康状态,结合TSN网络实现毫秒级数据传输
标签:预测性维护 PHM 工业AI 振动分析 TSN 设备管理 引言:设备算命先生的时代来了 “老张,你这台风机轴承怕是撑不过两周了。” 如果有个"设备算命先生"能掐指一算就说出这句话,工厂的设备经理们大概会把他供起来。但在2024年,这个"算命先生"真的出…...

从句实战指南:从三大从句到地道英文写作
1. 从句的本质:让句子"活"起来的秘密武器 第一次接触英语从句时,我盯着课本上那句"That the earth is round is true"发呆了十分钟。主谓宾在哪?为什么that后面跟着完整句子?这种困惑持续到我发现从句就像乐高…...

回溯52-59
52. 全排列 给定一个不含重复数字的数组 nums ,返回其 所有可能的全排列 。你可以 按任意顺序 返回答案。 class Solution(object):def fun(self,nums,path):if len(path)len(nums):self.res.append(path[:])for i in range(len(nums)):if self.visit[i]0:self.vi…...