pyside6的调色板QPalette的简单应用
使用调色板需要先导入:from PySide6.QtGui import QPalette
调色板QPalette的源代码:
class QPalette(Shiboken.Object):class ColorGroup(enum.Enum):Active : QPalette.ColorGroup = ... # 0x0Normal : QPalette.ColorGroup = ... # 0x0Disabled : QPalette.ColorGroup = ... # 0x1Inactive : QPalette.ColorGroup = ... # 0x2NColorGroups : QPalette.ColorGroup = ... # 0x3Current : QPalette.ColorGroup = ... # 0x4All : QPalette.ColorGroup = ... # 0x5class ColorRole(enum.Enum):WindowText : QPalette.ColorRole = ... # 0x0Button : QPalette.ColorRole = ... # 0x1Light : QPalette.ColorRole = ... # 0x2Midlight : QPalette.ColorRole = ... # 0x3Dark : QPalette.ColorRole = ... # 0x4Mid : QPalette.ColorRole = ... # 0x5Text : QPalette.ColorRole = ... # 0x6BrightText : QPalette.ColorRole = ... # 0x7ButtonText : QPalette.ColorRole = ... # 0x8Base : QPalette.ColorRole = ... # 0x9Window : QPalette.ColorRole = ... # 0xaShadow : QPalette.ColorRole = ... # 0xbHighlight : QPalette.ColorRole = ... # 0xcHighlightedText : QPalette.ColorRole = ... # 0xdLink : QPalette.ColorRole = ... # 0xeLinkVisited : QPalette.ColorRole = ... # 0xfAlternateBase : QPalette.ColorRole = ... # 0x10NoRole : QPalette.ColorRole = ... # 0x11ToolTipBase : QPalette.ColorRole = ... # 0x12ToolTipText : QPalette.ColorRole = ... # 0x13PlaceholderText : QPalette.ColorRole = ... # 0x14Accent : QPalette.ColorRole = ... # 0x15NColorRoles : QPalette.ColorRole = ... # 0x16@overloaddef __init__(self) -> None: ...@overloaddef __init__(self, button: PySide6.QtCore.Qt.GlobalColor) -> None: ...@overloaddef __init__(self, button: Union[PySide6.QtGui.QColor, PySide6.QtGui.QRgba64, Any, PySide6.QtCore.Qt.GlobalColor, str, int]) -> None: ...@overloaddef __init__(self, button: Union[PySide6.QtGui.QColor, PySide6.QtGui.QRgba64, Any, PySide6.QtCore.Qt.GlobalColor, str, int], window: Union[PySide6.QtGui.QColor, PySide6.QtGui.QRgba64, Any, PySide6.QtCore.Qt.GlobalColor, str, int]) -> None: ...@overloaddef __init__(self, palette: Union[PySide6.QtGui.QPalette, PySide6.QtCore.Qt.GlobalColor, PySide6.QtGui.QColor]) -> None: ...@overloaddef __init__(self, windowText: Union[PySide6.QtGui.QBrush, PySide6.QtCore.Qt.BrushStyle, PySide6.QtCore.Qt.GlobalColor, PySide6.QtGui.QColor, PySide6.QtGui.QGradient, PySide6.QtGui.QImage, PySide6.QtGui.QPixmap], button: Union[PySide6.QtGui.QBrush, PySide6.QtCore.Qt.BrushStyle, PySide6.QtCore.Qt.GlobalColor, PySide6.QtGui.QColor, PySide6.QtGui.QGradient, PySide6.QtGui.QImage, PySide6.QtGui.QPixmap], light: Union[PySide6.QtGui.QBrush, PySide6.QtCore.Qt.BrushStyle, PySide6.QtCore.Qt.GlobalColor, PySide6.QtGui.QColor, PySide6.QtGui.QGradient, PySide6.QtGui.QImage, PySide6.QtGui.QPixmap], dark: Union[PySide6.QtGui.QBrush, PySide6.QtCore.Qt.BrushStyle, PySide6.QtCore.Qt.GlobalColor, PySide6.QtGui.QColor, PySide6.QtGui.QGradient, PySide6.QtGui.QImage, PySide6.QtGui.QPixmap], mid: Union[PySide6.QtGui.QBrush, PySide6.QtCore.Qt.BrushStyle, PySide6.QtCore.Qt.GlobalColor, PySide6.QtGui.QColor, PySide6.QtGui.QGradient, PySide6.QtGui.QImage, PySide6.QtGui.QPixmap], text: Union[PySide6.QtGui.QBrush, PySide6.QtCore.Qt.BrushStyle, PySide6.QtCore.Qt.GlobalColor, PySide6.QtGui.QColor, PySide6.QtGui.QGradient, PySide6.QtGui.QImage, PySide6.QtGui.QPixmap], bright_text: Union[PySide6.QtGui.QBrush, PySide6.QtCore.Qt.BrushStyle, PySide6.QtCore.Qt.GlobalColor, PySide6.QtGui.QColor, PySide6.QtGui.QGradient, PySide6.QtGui.QImage, PySide6.QtGui.QPixmap], base: Union[PySide6.QtGui.QBrush, PySide6.QtCore.Qt.BrushStyle, PySide6.QtCore.Qt.GlobalColor, PySide6.QtGui.QColor, PySide6.QtGui.QGradient, PySide6.QtGui.QImage, PySide6.QtGui.QPixmap], window: Union[PySide6.QtGui.QBrush, PySide6.QtCore.Qt.BrushStyle, PySide6.QtCore.Qt.GlobalColor, PySide6.QtGui.QColor, PySide6.QtGui.QGradient, PySide6.QtGui.QImage, PySide6.QtGui.QPixmap]) -> None: ...@overloaddef __init__(self, windowText: Union[PySide6.QtGui.QColor, PySide6.QtGui.QRgba64, Any, PySide6.QtCore.Qt.GlobalColor, str, int], window: Union[PySide6.QtGui.QColor, PySide6.QtGui.QRgba64, Any, PySide6.QtCore.Qt.GlobalColor, str, int], light: Union[PySide6.QtGui.QColor, PySide6.QtGui.QRgba64, Any, PySide6.QtCore.Qt.GlobalColor, str, int], dark: Union[PySide6.QtGui.QColor, PySide6.QtGui.QRgba64, Any, PySide6.QtCore.Qt.GlobalColor, str, int], mid: Union[PySide6.QtGui.QColor, PySide6.QtGui.QRgba64, Any, PySide6.QtCore.Qt.GlobalColor, str, int], text: Union[PySide6.QtGui.QColor, PySide6.QtGui.QRgba64, Any, PySide6.QtCore.Qt.GlobalColor, str, int], base: Union[PySide6.QtGui.QColor, PySide6.QtGui.QRgba64, Any, PySide6.QtCore.Qt.GlobalColor, str, int]) -> None: ...@staticmethoddef __copy__() -> None: ...def __lshift__(self, ds: PySide6.QtCore.QDataStream) -> PySide6.QtCore.QDataStream: ...def __rshift__(self, ds: PySide6.QtCore.QDataStream) -> PySide6.QtCore.QDataStream: ...def accent(self) -> PySide6.QtGui.QBrush: ...def alternateBase(self) -> PySide6.QtGui.QBrush: ...def base(self) -> PySide6.QtGui.QBrush: ...def brightText(self) -> PySide6.QtGui.QBrush: ...@overloaddef brush(self, cg: PySide6.QtGui.QPalette.ColorGroup, cr: PySide6.QtGui.QPalette.ColorRole) -> PySide6.QtGui.QBrush: ...@overloaddef brush(self, cr: PySide6.QtGui.QPalette.ColorRole) -> PySide6.QtGui.QBrush: ...def button(self) -> PySide6.QtGui.QBrush: ...def buttonText(self) -> PySide6.QtGui.QBrush: ...def cacheKey(self) -> int: ...@overloaddef color(self, cg: PySide6.QtGui.QPalette.ColorGroup, cr: PySide6.QtGui.QPalette.ColorRole) -> PySide6.QtGui.QColor: ...@overloaddef color(self, cr: PySide6.QtGui.QPalette.ColorRole) -> PySide6.QtGui.QColor: ...def currentColorGroup(self) -> PySide6.QtGui.QPalette.ColorGroup: ...def dark(self) -> PySide6.QtGui.QBrush: ...def highlight(self) -> PySide6.QtGui.QBrush: ...def highlightedText(self) -> PySide6.QtGui.QBrush: ...def isBrushSet(self, cg: PySide6.QtGui.QPalette.ColorGroup, cr: PySide6.QtGui.QPalette.ColorRole) -> bool: ...def isCopyOf(self, p: Union[PySide6.QtGui.QPalette, PySide6.QtCore.Qt.GlobalColor, PySide6.QtGui.QColor]) -> bool: ...def isEqual(self, cr1: PySide6.QtGui.QPalette.ColorGroup, cr2: PySide6.QtGui.QPalette.ColorGroup) -> bool: ...def light(self) -> PySide6.QtGui.QBrush: ...def link(self) -> PySide6.QtGui.QBrush: ...def linkVisited(self) -> PySide6.QtGui.QBrush: ...def mid(self) -> PySide6.QtGui.QBrush: ...def midlight(self) -> PySide6.QtGui.QBrush: ...def placeholderText(self) -> PySide6.QtGui.QBrush: ...def resolve(self, other: Union[PySide6.QtGui.QPalette, PySide6.QtCore.Qt.GlobalColor, PySide6.QtGui.QColor]) -> PySide6.QtGui.QPalette: ...def resolveMask(self) -> int: ...@overloaddef setBrush(self, cg: PySide6.QtGui.QPalette.ColorGroup, cr: PySide6.QtGui.QPalette.ColorRole, brush: Union[PySide6.QtGui.QBrush, PySide6.QtCore.Qt.BrushStyle, PySide6.QtCore.Qt.GlobalColor, PySide6.QtGui.QColor, PySide6.QtGui.QGradient, PySide6.QtGui.QImage, PySide6.QtGui.QPixmap]) -> None: ...@overloaddef setBrush(self, cr: PySide6.QtGui.QPalette.ColorRole, brush: Union[PySide6.QtGui.QBrush, PySide6.QtCore.Qt.BrushStyle, PySide6.QtCore.Qt.GlobalColor, PySide6.QtGui.QColor, PySide6.QtGui.QGradient, PySide6.QtGui.QImage, PySide6.QtGui.QPixmap]) -> None: ...@overloaddef setColor(self, cg: PySide6.QtGui.QPalette.ColorGroup, cr: PySide6.QtGui.QPalette.ColorRole, color: Union[PySide6.QtGui.QColor, PySide6.QtGui.QRgba64, Any, PySide6.QtCore.Qt.GlobalColor, str, int]) -> None: ...@overloaddef setColor(self, cr: PySide6.QtGui.QPalette.ColorRole, color: Union[PySide6.QtGui.QColor, PySide6.QtGui.QRgba64, Any, PySide6.QtCore.Qt.GlobalColor, str, int]) -> None: ...def setColorGroup(self, cr: PySide6.QtGui.QPalette.ColorGroup, windowText: Union[PySide6.QtGui.QBrush, PySide6.QtCore.Qt.BrushStyle, PySide6.QtCore.Qt.GlobalColor, PySide6.QtGui.QColor, PySide6.QtGui.QGradient, PySide6.QtGui.QImage, PySide6.QtGui.QPixmap], button: Union[PySide6.QtGui.QBrush, PySide6.QtCore.Qt.BrushStyle, PySide6.QtCore.Qt.GlobalColor, PySide6.QtGui.QColor, PySide6.QtGui.QGradient, PySide6.QtGui.QImage, PySide6.QtGui.QPixmap], light: Union[PySide6.QtGui.QBrush, PySide6.QtCore.Qt.BrushStyle, PySide6.QtCore.Qt.GlobalColor, PySide6.QtGui.QColor, PySide6.QtGui.QGradient, PySide6.QtGui.QImage, PySide6.QtGui.QPixmap], dark: Union[PySide6.QtGui.QBrush, PySide6.QtCore.Qt.BrushStyle, PySide6.QtCore.Qt.GlobalColor, PySide6.QtGui.QColor, PySide6.QtGui.QGradient, PySide6.QtGui.QImage, PySide6.QtGui.QPixmap], mid: Union[PySide6.QtGui.QBrush, PySide6.QtCore.Qt.BrushStyle, PySide6.QtCore.Qt.GlobalColor, PySide6.QtGui.QColor, PySide6.QtGui.QGradient, PySide6.QtGui.QImage, PySide6.QtGui.QPixmap], text: Union[PySide6.QtGui.QBrush, PySide6.QtCore.Qt.BrushStyle, PySide6.QtCore.Qt.GlobalColor, PySide6.QtGui.QColor, PySide6.QtGui.QGradient, PySide6.QtGui.QImage, PySide6.QtGui.QPixmap], bright_text: Union[PySide6.QtGui.QBrush, PySide6.QtCore.Qt.BrushStyle, PySide6.QtCore.Qt.GlobalColor, PySide6.QtGui.QColor, PySide6.QtGui.QGradient, PySide6.QtGui.QImage, PySide6.QtGui.QPixmap], base: Union[PySide6.QtGui.QBrush, PySide6.QtCore.Qt.BrushStyle, PySide6.QtCore.Qt.GlobalColor, PySide6.QtGui.QColor, PySide6.QtGui.QGradient, PySide6.QtGui.QImage, PySide6.QtGui.QPixmap], window: Union[PySide6.QtGui.QBrush, PySide6.QtCore.Qt.BrushStyle, PySide6.QtCore.Qt.GlobalColor, PySide6.QtGui.QColor, PySide6.QtGui.QGradient, PySide6.QtGui.QImage, PySide6.QtGui.QPixmap]) -> None: ...def setCurrentColorGroup(self, cg: PySide6.QtGui.QPalette.ColorGroup) -> None: ...def setResolveMask(self, mask: int) -> None: ...def shadow(self) -> PySide6.QtGui.QBrush: ...def swap(self, other: Union[PySide6.QtGui.QPalette, PySide6.QtCore.Qt.GlobalColor, PySide6.QtGui.QColor]) -> None: ...def text(self) -> PySide6.QtGui.QBrush: ...def toolTipBase(self) -> PySide6.QtGui.QBrush: ...def toolTipText(self) -> PySide6.QtGui.QBrush: ...def window(self) -> PySide6.QtGui.QBrush: ...def windowText(self) -> PySide6.QtGui.QBrush: ...QPalette 类有两个基本的概念,一个是颜色组ColorGroup,另一个是颜色角色ColorRole。
1、颜色角色ColorRole:
from PySide6.QtWidgets import QApplication, QLabel
from PySide6.QtGui import QColor, QPaletteapp = QApplication([])
palette = QPalette()    # 创建调色板
color_red = QColor(255, 0, 0)  # 定义红色
color_green = QColor(0, 255, 0)  # 定义绿色
color_gray = QColor(130, 130, 130)  # 定义灰色palette.setColor(QPalette.ColorRole.WindowText, color_red)    # 将调色板的窗口文字设置为红色
palette.setColor(QPalette.ColorRole.Window, color_green)    # 将调色板的窗口颜色设置为绿色label = QLabel("Hello World!")    # 创建部件
label.setPalette(palette)          # 将调色板应用到部件
label.show()                       # 显示部件app.exec()
运行结果:这里通过setColor的方法将调色板的窗口文字和背景颜色方便设置为了红色和绿色,并应用到部件。

还可使用 palette()的方法来获取一个既有的调色板,以及通过color()来获取调色板中的某一个具体颜色:
例如:
p = label.palette() # p是一个既有的部件label的调色板
color1 = p.color(p.ColorRole.WindowText) # 获取调色板中的窗口文字的颜色
demo:
import timefrom PySide6.QtWidgets import QApplication, QLabel
from PySide6.QtGui import QColor, QPaletteapp = QApplication([])
palette = QPalette()    # 创建调色板
color_red = QColor(255, 0, 0)  # 定义红色
color_green = QColor(0, 255, 0)  # 定义绿色
color_gray = QColor(130, 130, 130)  # 定义灰色palette.setColor(QPalette.ColorRole.WindowText, color_red)    # 将调色板的窗口文字设置为红色
palette.setColor(QPalette.ColorRole.Window, color_green)    # 将调色板的窗口颜色设置为绿色label = QLabel("Hello World!")    # 创建部件
label.setPalette(palette)          # 将调色板应用到部件
label.show()                       # 显示部件time.sleep(5)   # 延时5秒p = label.palette()      # 获取已有部件label的调色板
color1 = p.color(p.ColorRole.WindowText)    # 获取窗口文字的颜色
color2 = p.color(p.ColorRole.Window)        # 获取背景色palette.setColor(QPalette.ColorRole.WindowText, color2)    # 重新设置调色板的窗口文字颜色
palette.setColor(QPalette.ColorRole.Window, color1)    # 重新设置调色板的背景色
label.setPalette(palette)          # 将调色板应用到部件app.exec()
运行之后可以看到,首先显示了一个绿底红字的部件。
![]()
5秒钟后,变成如下:
![]()
2、颜色组 ColorGroup:
ColorGroup 分为3 种情况
· 激活状态(Active,获得焦点)、
· 非激活状态(Inactive,失去焦点)
· 失效状态(Disabled,不可用),例如进行多窗口操作时.单击其中的一个窗口,可以在窗口中输人数据,则这个窗口是激活状态,其他窗口是非活跃状态。 将
ColorGroup 和ColorRole 结合起来,可以为控件不同部分不同状态设置不同的颜色。
import timefrom PySide6.QtWidgets import QApplication, QLabel
from PySide6.QtGui import QColor, QPaletteapp = QApplication([])
palette = QPalette()  # 创建调色板
color_red = QColor(255, 30, 30)  # 定义红色
color_green = QColor(30, 255, 30)  # 定义绿色
color_gray = QColor(130, 130, 130)  # 定义灰色
color_black = QColor(10, 10, 10)  # 定义黑色palette.setColor(QPalette.ColorRole.WindowText, color_red)  # 将调色板的窗口文字设置为红色
palette.setColor(QPalette.ColorRole.Window, color_green)  # 将调色板的窗口颜色设置为绿色
disable_color_group = QPalette.ColorGroup(QPalette.ColorGroup.Disabled)  # 获取Disabled的颜色组
palette.setColor(disable_color_group, QPalette.ColorRole.WindowText, color_black)  # 将Disabled的颜色组的窗口文本设为灰色
palette.setColor(disable_color_group, QPalette.ColorRole.Window, color_gray)  # 将Disabled的颜色组的窗口背景设为黑色label = QLabel("Hello World!")  # 创建部件
label.setPalette(palette)  # 将调色板应用到部件
label.show()  # 显示部件time.sleep(3)  # 延时3秒
label.setDisabled(True)   # 禁用部件app.exec()
运行截图:
相关文章:
pyside6的调色板QPalette的简单应用
使用调色板需要先导入:from PySide6.QtGui import QPalette 调色板QPalette的源代码: class QPalette(Shiboken.Object):class ColorGroup(enum.Enum):Active : QPalette.ColorGroup ... # 0x0Normal : QPalette.ColorGrou…...
苍穹外卖项目
Day01 收获 补习git Git学习之路-CSDN博客 nginx 作用:反向代理和负载均衡 swagger Swagger 与 Yapi Swagger: 可以自动的帮助开发人员生成接口文档,并对接口进行测试。 项目接口文档网址: http://localhost:8080/doc.html Da…...

error: Execution was interrupted, reason: signal SIGABRT
c json解析时, error: Execution was interrupted, reason: signal SIGABRT const Json::Value points root["shapes"]; if (points.isArray()) { for (unsigned int i 0; i < points.size(); i) { std::cout << " - [" <<…...
HarmaonyOS鸿蒙应用科普课
一、什么是鸿蒙OS? 1.概念: 先给大家讲讲今天讲课的主题,鸿蒙OS是什么?鸿蒙系统大家都知道,就是一个操作系统,我们未来是为的成为鸿蒙程序员。所以我们不要将鸿蒙os完全等同于手机操作系统,太…...
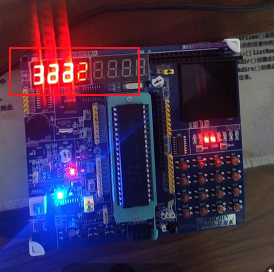
数码管的显示
静态数码管显示 数码管有两种一种的负电压促发,一种是正电压促发,上图是单数码管的引脚 上图是数码管模组的引脚,采用了引脚复用技术 咱们这个单片机由8个单数码管,所以要用上38译码器,如下图 74138使能端,单片机上电直接就默认接通了 74HC245的作用是稳定输入输出,数据缓冲作…...
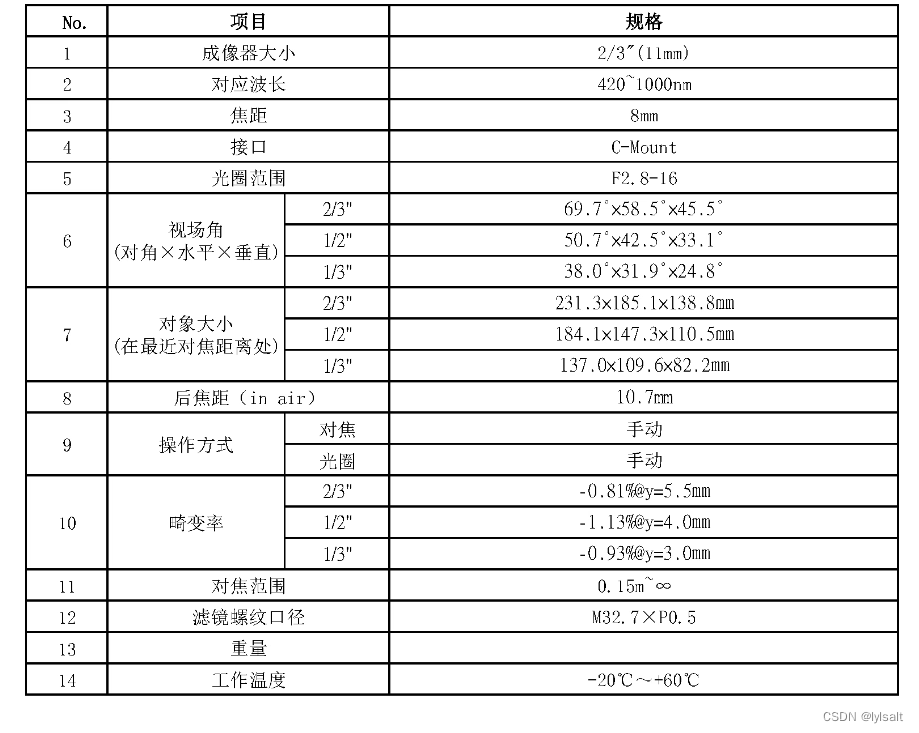
关于海康相机和镜头参数的记录
对比MV-CS020-10UC和大家用的最多的MV-CS016-10UC 其实前者适合雷达站使用,后者适合自瞄使用 一:MV-CS020-10UC的参数 二:对比 三:海康镜头选型工具...

【JavaScript】运算符
算术运算符 1. 加法运算符() 加法运算符用于将两个值相加。如果两个操作数都是数字,则它们将被加在一起。如果其中一个操作数是字符串,则另一个操作数将被转换为字符串,然后执行字符串连接。 运算子不同,…...

LabVIEW航空发动机主轴承试验器数据采集与监测
LabVIEW航空发动机主轴承试验器数据采集与监测 随着航空技术的迅速发展,对航空发动机性能的测试与监测提出了更高的要求。传统的数据采集与监测方法已难以满足当前高精度和高可靠性的需求,特别是在主轴承试验方面。基于LabVIEW的航空发动机主轴承试验器…...

CVE-2022-2602:unix_gc 错误释放 io_uring 注册的文件从而导致的 file UAF
前言 复现该漏洞只是为了学习相关知识,在这里仅仅做简单记录下 exp,关于漏洞的详细内容请参考其他文章,最后在 v5.18.19 内核版本上复现成功,v6.0.2 复现失败 漏洞利用 diff --git a/include/linux/skbuff.h b/include/linux/s…...
——更新中)
LSTM实战笔记(部署到C++上)——更新中
前几天由于自己的个人原因停止了学习 接下里继续更新一些自己项目中所用到的神经网络等 ——————————————————————————————————————————— LSTM代码介绍 建立LSTM模型时需要设置一些参数,包括输入数据的形状、LSTM层的…...
鸿蒙内核源码分析(消息队列篇) | 进程间如何异步传递大数据
基本概念 队列又称消息队列,是一种常用于任务间通信的数据结构。队列接收来自任务或中断的不固定长度消息,并根据不同的接口确定传递的消息是否存放在队列空间中。 任务能够从队列里面读取消息,当队列中的消息为空时,挂起读取任务…...
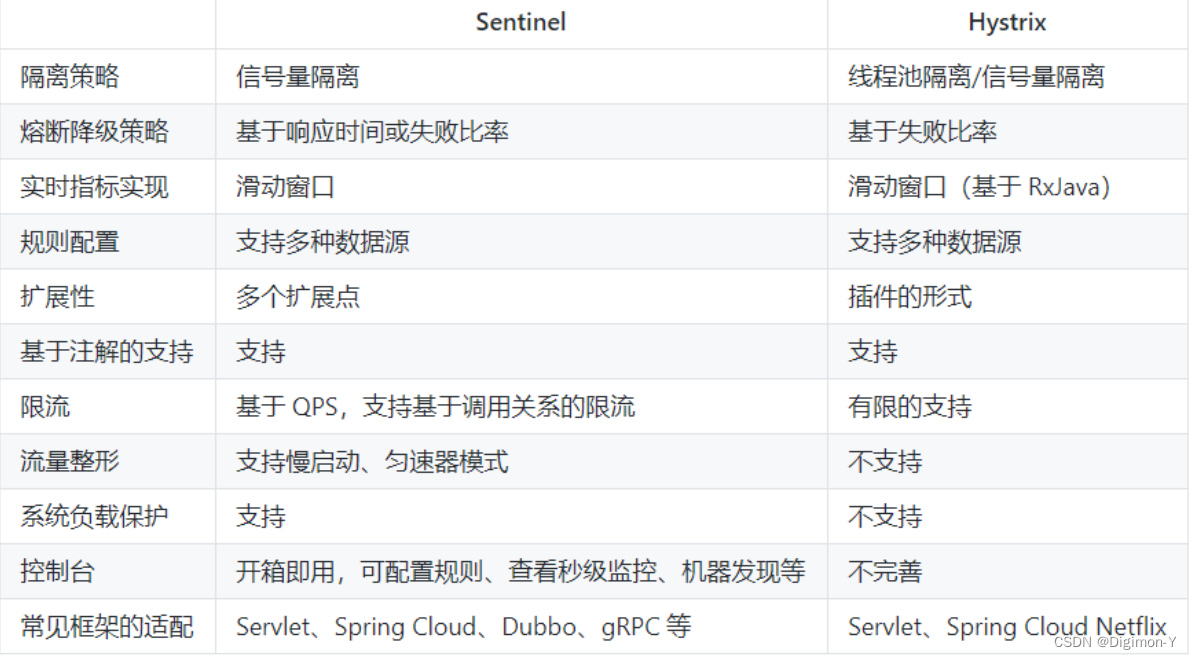
Sentinel流量防卫兵
1、分布式服务遇到的问题 服务可用性问题 服务可用性场景 服务雪崩效应 因服务提供者的不可用导致服务调用者的不可用,并将不可用逐渐放大的过程,就叫服务雪崩效应导致服务不可用的原因: 在服务提供者不可用的时候,会出现大量重试的情况&…...

微信小程序:14.什么是wxs,wxs的使用
wxs是小程序独有的一套脚本语言,结合wxml,可以构建出页面的结构 wxs的应用场景 wxml中无法调用在页面的js中定义的函数,但是wxml可以调用wxs中定义的函数。因此小程序中wxs的典型应用场景就是过滤器 wxs和js的关系 wxs有自己的数据类型 …...

Django运行不提示网址问题
问题描述:运行django项目不提示网址信息,也就是web没有起来,无法访问。 (my-venv-3.8) PS D:\Project\MyGitCode\public\it_blog\blog> python .\manage.py runserver INFO autoreload 636 Watching for file changes with StatReloader …...

web安全---xss漏洞/beef-xss基本使用
what xss漏洞----跨站脚本攻击(Cross Site Scripting),攻击者在网页中注入恶意脚本代码,使受害者在浏览器中运行该脚本,从而达到攻击目的。 分类 反射型---最常见,最广泛 用户将带有恶意代码的url打开&a…...
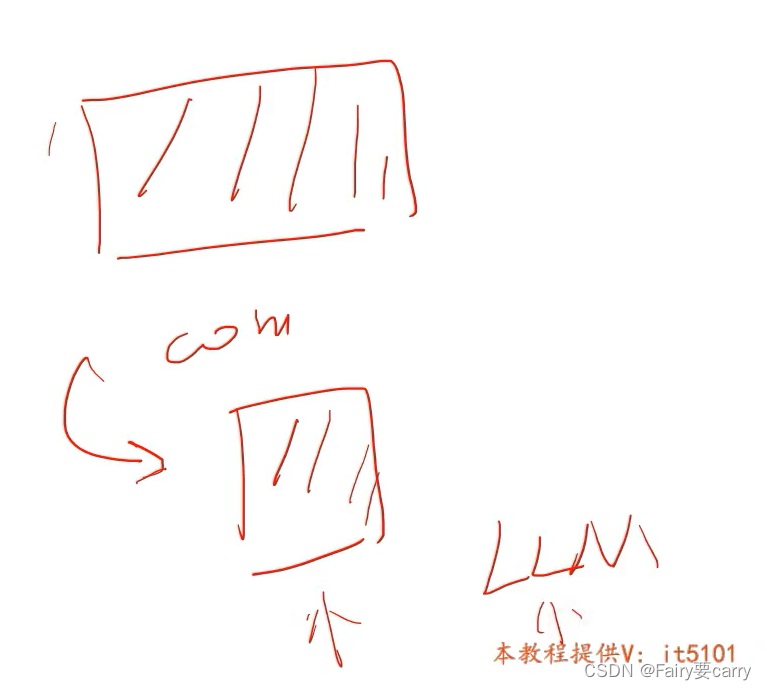
第一天学习(GPT)
1.图片和语义是如何映射的? **Dalle2:**首先会对图片和语义进行预训练,将二者向量存储起来,然后将语义的vector向量转成图片的向量,然后基于这个图片往回反向映射(Diffusion)——>根据这段描…...

【C++之AVL树旋转操作的详细图解】
C++学习笔记---022 C++之AVL树旋转操作的详细图解1、AVL树的简单介绍1.1、基本概念1.2、平衡因子1.3、AVL树的特性2、C++中pair的介绍2.1、定义和初始化2.2、访问元素2.3、作为容器的元素2.4、作为函数的返回值3、AVL树节点的定义4、AVL的插入规则探究5、AVL树的旋转操作5.1、R…...

制作Android分区镜像
1 python生成一个sector数据 def get_oem_bootmode(): # Header size SECTOR_SIZE_IN_BYTES 512 header [0 for i in \ range(SECTOR_SIZE_IN_BYTES)] # magic # The ord() built-in function in # Python converts a character # into …...

如何代码激活service——packageKit 系统更新番外
在访问packageKit服务的过程中,服务一直访问失败,PackageKit::Daemon::global()->isRunning() 一直返回false,他是一个用于检查 PackageKit 守护进程是否正在运行的函数调用。在 Qt 和 PackageKit 的集成中,isRunning 方法通常…...

音视频常用工具
VLC 播放器简介 VLC 播放器 VLC支持多种常见音视频格式,支持多种流媒体传输协议,也可当作本地流媒体服务器使用,功能十分强大。官网下载地址: https://www.videolan.org/ VLC media player VLC 是一款自由、开源的跨平台多媒体播放器及框架&…...

【实测避坑】文科/理工科怎么选论文降AI工具?5款热门工具深度评测
最近看了一些行业报告,AI工具在写作方面的普及率真的已经超乎想象了。 很多大学生在写论文时也都习惯用AI来辅助寻找灵感、提高效率。 与此同时,相关部门针对人工智能写作出台了一系列规定,各大学术检测平台也都在不断升级AIGC检测算法。 现…...

嵌入式视觉成本降至百元级:技术民主化如何重塑工业物联网应用
1. 工业物联网与嵌入式视觉:从昂贵壁垒到百元级应用的演进 提到物联网,很多人脑子里蹦出来的可能是家里的智能音箱、手腕上的健康手环,或者能远程控制的冰箱。没错,消费和医疗领域确实是物联网最显眼的舞台。但作为一名在工业自动…...

MPU6050姿态解算实战:从互补滤波到卡尔曼融合的工程实现
1. MPU6050传感器基础与姿态解算原理 MPU6050作为一款经典的6轴运动处理传感器,在平衡车、无人机等嵌入式项目中扮演着关键角色。它集成了三轴加速度计和三轴陀螺仪,能够同时测量线性加速度和角速度。但很多新手第一次拿到传感器数据时会困惑:…...

STM32H7硬件JPEG编码实战:从RGB565到JPEG文件,一个完整项目的避坑记录
STM32H7硬件JPEG编码实战:从RGB565到JPEG文件的完整避坑指南 在嵌入式图像处理领域,实时压缩摄像头采集的原始图像数据一直是个挑战。STM32H7系列凭借其内置的硬件JPEG编解码器(HJPEG),为开发者提供了高效的解决方案。…...

Pearcleaner技术深度解析:macOS应用清理的架构设计与实现原理
Pearcleaner技术深度解析:macOS应用清理的架构设计与实现原理 【免费下载链接】Pearcleaner A free, source-available and fair-code licensed mac app cleaner 项目地址: https://gitcode.com/gh_mirrors/pe/Pearcleaner Pearcleaner是一款面向技术开发者和…...

别再手动导网表了!巧用OrCAD Capture与Allegro PCB Editor联动,实现原理图变更一键同步
别再手动导网表了!巧用OrCAD Capture与Allegro PCB Editor联动,实现原理图变更一键同步 在PCB设计领域,效率与准确性往往决定着项目成败。当工程师面对频繁的原理图修改时,传统的手动导出-导入网表流程不仅耗时费力,还…...

为什么你的项目需要Remix Icon?3200+免费矢量图标的完整解决方案
为什么你的项目需要Remix Icon?3200免费矢量图标的完整解决方案 【免费下载链接】RemixIcon Open source neutral style icon system 项目地址: https://gitcode.com/gh_mirrors/re/RemixIcon 你是否曾为寻找合适的图标而烦恼?设计界面时图标风格…...

Arcgis制图进阶:比例尺参数深度解析与实战样式定制
1. 比例尺参数配置的核心逻辑 比例尺在ArcGIS中远不止是一个简单的标注工具,它直接影响地图的专业性和信息传达效率。我经手过上百个制图项目,发现90%的比例尺问题都源于对参数逻辑理解不透彻。比例尺参数系统其实是一个精密的视觉计算器,它…...

Cursor Pro破解工具:5步实现永久免费使用的完整指南
Cursor Pro破解工具:5步实现永久免费使用的完整指南 【免费下载链接】cursor-free-vip [Support 0.45](Multi Language 多语言)自动注册 Cursor Ai ,自动重置机器ID , 免费升级使用Pro 功能: Youve reached your trial…...
)
Gemini插件无法访问本地PDF/网页源码?手把手教你绕过Chrome沙箱限制(含Manifest V3兼容性补丁代码)
更多请点击: https://intelliparadigm.com 第一章:Gemini插件本地资源访问受限的本质原因 沙箱隔离机制的强制约束 Gemini 插件运行于 Chromium 扩展沙箱环境中,该环境默认禁用所有 Node.js API(如 fs、 child_process…...