【Three.js基础学习】15.scroll-based-animation
提示:文章写完后,目录可以自动生成,如何生成可参考右边的帮助文档
前言
课程要点
结合html等场景 做滚动动画
1.遇到的问题, 在向下滚动时,下方会显白(部分浏览器)
解决:alpha:true ,在WebGLRenderer 中设置alpha : true ; 同时在style.css文件中设置html 背景颜色
2.添加 圆环,锥型,圆环纠结形状
3.添加材质 卡通 由于 卡通对光 才能看见 因此 加一个定向光
4.此时 显示的颜色是两种 ,但是根据文档 可以看到有三种色, 因此可以通过 纹理实现
gradientTexture.magFilter = THREE.NearestFilter
5.设置位置,同时转动
6.向下移动网页 更改camera视角
7. 视差 :通过不同观察点看到一个物体的行为
希望能有深度 ,在鼠标移动时,相机视角能有适当的强度变化
实现: 由于滚动 和 移动鼠标都是 移动camera视角 导致 滚动不生效
1. 创建组 ,在视差时候 移动组, 而camera在组中, 滚动时 移动相机 解决
8.实现平滑 缓慢 移动 速度不要太快
9.实现在不同电脑中 不同屏幕频率相同的移动速度
let previousTime = 0
const deltaTime = elapsedTime - previousTime
previousTime = elapsedTime
10. GSAP
一、代码
import * as THREE from 'three'
import * as dat from 'lil-gui'
import gsap from 'gsap'/*** Debug*/
const gui = new dat.GUI()const parameters = {materialColor: '#ffeded'
}gui.addColor(parameters, 'materialColor').onChange(()=>{material.color.set(parameters.materialColor)particleMaterial.color.set(parameters.materialColor)})/*** Base*/
// Canvas
const canvas = document.querySelector('canvas.webgl')// Scene
const scene = new THREE.Scene()/* Objects
*/
// Texture
const textureLoad = new THREE.TextureLoader()
const gradientTexture =  textureLoad.load('/textures/gradients/3.jpg')
gradientTexture.magFilter = THREE.NearestFilter // 设置最近过滤器 牵扯到WebGL原理// Material
const material = new THREE.MeshToonMaterial({color:parameters.materialColor,gradientMap:gradientTexture,
}) // 卡通材质 有光的情况才会出现//  Meshs
const objectsDistance = 4
const mesh1 = new THREE.Mesh(new THREE.TorusGeometry(1,0.4,16,60),  // 环形material
)
const mesh2 = new THREE.Mesh(new THREE.ConeGeometry(1,2,32), // 锥material
)
const mesh3 = new THREE.Mesh(new THREE.TorusKnotGeometry(0.8, 0.35, 100, 16), // 环形缓冲material
)
// mesh1.position.y = 2
// mesh1.scale.set(0.5,0.5,0.5)// mesh2.visible = false// mesh3.position.y = -2
// mesh3.scale.set(0.5,0.5,0.5)const sectionMeshes = [mesh1,mesh2,mesh3]mesh1.position.y = - objectsDistance * 0
mesh2.position.y = - objectsDistance * 1
mesh3.position.y = - objectsDistance * 2mesh1.position.x = 2
mesh2.position.x = -2
mesh3.position.x = 2scene.add(mesh1,mesh2,mesh3)/* Particles
*/
// Geometry
const particleCount = 200
const positions = new Float32Array(particleCount * 3)
for(let i = 0; i< particleCount;i++){positions[i * 3 + 0] = (Math.random() - 0.5) * 10positions[i * 3 + 1] = objectsDistance * 0.5 - Math.random() * objectsDistance * 3positions[i * 3 + 2] = (Math.random() - 0.5) * 10
}const particleGeometry = new THREE.BufferGeometry()
particleGeometry.setAttribute('position',new THREE.BufferAttribute(positions,3))const particleMaterial = new THREE.PointsMaterial()
particleMaterial.size = 0.03
particleMaterial.color = new THREE.Color(parameters.materialColor)
particleMaterial.sizeAttenuation = trueconst particle = new THREE.Points(particleGeometry,particleMaterial
)
scene.add(particle)/* ligths
*/
const directionalLight = new THREE.DirectionalLight('#ffffff',1)
directionalLight.position.set(1,1,0)
scene.add(directionalLight)/*** Sizes*/
const sizes = {width: window.innerWidth,height: window.innerHeight
}window.addEventListener('resize', () =>
{// Update sizessizes.width = window.innerWidthsizes.height = window.innerHeight// Update cameracamera.aspect = sizes.width / sizes.heightcamera.updateProjectionMatrix()// Update rendererrenderer.setSize(sizes.width, sizes.height)renderer.setPixelRatio(Math.min(window.devicePixelRatio, 2))
})/* Group
*/
const cameraGroup = new THREE.Group()
scene.add(cameraGroup)/*** Camera*/
// Base camera
const camera = new THREE.PerspectiveCamera(35, sizes.width / sizes.height, 0.1, 100)
camera.position.z = 6
cameraGroup.add(camera)/*** Renderer*/
const renderer = new THREE.WebGLRenderer({canvas: canvas,alpha:true,
})
renderer.setSize(sizes.width, sizes.height)
renderer.setPixelRatio(Math.min(window.devicePixelRatio, 2))/* Scroll
*/
let scrollY = window.scrollY
let currentSection = 0
window.addEventListener('scroll',()=>{scrollY = window.scrollYconst newSection = Math.round(scrollY / sizes.height) // 四舍五入判断 几何体旋转的时机if(newSection != currentSection){currentSection = newSectionconsole.log(sectionMeshes[currentSection].rotation)gsap.to(sectionMeshes[currentSection].rotation, // 设置动画 0,1,2的动画效果{duration:1.5, // 时间ease:'power2.inOut', // 进出x:'+=6',y:'+=3',z:'+=1.5',})}
})/* Cursor
*/
const cursor = {}
cursor.x = 0
cursor.y = 0window.addEventListener('mousemove',(event)=>{cursor.x = event.clientX / sizes.width - 0.5cursor.y = event.clientY / sizes.height - 0.5
})/*** Animate*/
const clock = new THREE.Clock()
let previousTime = 0
const tick = () =>
{const elapsedTime = clock.getElapsedTime()const deltaTime = elapsedTime - previousTimepreviousTime = elapsedTime// Aniamte Camera   移动的距离/窗口的高度 等于一个单位, *  objectsDistance 距离camera.position.y = - scrollY / sizes.height * objectsDistanceconst parallaxX = cursor.x * 0.5const parallaxY = -cursor.y * 0.5cameraGroup.position.x += (parallaxX - cameraGroup.position.x) * 5 * deltaTimecameraGroup.position.y += (parallaxY - cameraGroup.position.y) * 5 * deltaTime// Aniamte meshesfor(const mesh of sectionMeshes){ // 每一帧变化时,应该改变mesh.rotation.x +=  deltaTime * 0.1mesh.rotation.y +=  deltaTime * 0.12}// Renderrenderer.render(scene, camera)// Call tick again on the next framewindow.requestAnimationFrame(tick)
}tick()
二、知识点
1.原始代码
html代码
<!DOCTYPE html>
<html lang="en">
<head><meta charset="UTF-8"><meta name="viewport" content="width=device-width, initial-scale=1.0"><title>20 - Scroll base animation</title><link rel="stylesheet" href="./style.css">
</head>
<body><canvas class="webgl"></canvas><section class="section"><h1>My Portfolio</h1></section><section class="section"><h2>My projects</h2></section><section class="section"><h2>Contact me</h2></section><script type="module" src="./script.js"></script>
</body>
</html>
script.js
import * as THREE from 'three'
import * as dat from 'lil-gui'/*** Debug*/
const gui = new dat.GUI()const parameters = {materialColor: '#ffeded'
}gui.addColor(parameters, 'materialColor')/*** Base*/
// Canvas
const canvas = document.querySelector('canvas.webgl')// Scene
const scene = new THREE.Scene()/* cube
*/
const cube = new THREE.Mesh(new THREE.BoxGeometry(1,1,1),new THREE.MeshBasicMaterial({color:'red'})
)
scene.add(cube)/*** Sizes*/
const sizes = {width: window.innerWidth,height: window.innerHeight
}window.addEventListener('resize', () =>
{// Update sizessizes.width = window.innerWidthsizes.height = window.innerHeight// Update cameracamera.aspect = sizes.width / sizes.heightcamera.updateProjectionMatrix()// Update rendererrenderer.setSize(sizes.width, sizes.height)renderer.setPixelRatio(Math.min(window.devicePixelRatio, 2))
})/*** Camera*/
// Base camera
const camera = new THREE.PerspectiveCamera(35, sizes.width / sizes.height, 0.1, 100)
camera.position.z = 6
// cameraGroup.add(camera)
scene.add(camera)/*** Renderer*/
const renderer = new THREE.WebGLRenderer({canvas: canvas,
})
renderer.setSize(sizes.width, sizes.height)
renderer.setPixelRatio(Math.min(window.devicePixelRatio, 2))/*** Animate*/
const clock = new THREE.Clock()
let previousTime = 0
const tick = () =>
{const elapsedTime = clock.getElapsedTime()// Renderrenderer.render(scene, camera)// Call tick again on the next framewindow.requestAnimationFrame(tick)
}tick()
css代码
*
{margin: 0;padding: 0;
}/* html,
body
{overflow: hidden;
} */html{background: #1e1a20;
}
.webgl
{position: fixed;top: 0;left: 0;outline: none;
}.section
{display: flex;align-items: center;height: 100vh;position: relative;font-family: 'Cabin', sans-serif;color: #ffeded;text-transform: uppercase;font-size: 7vmin;padding-left: 10%;padding-right: 10%;
}section:nth-child(odd)
{justify-content: flex-end;
}
2.添加圆环,锥型,圆环扭曲 几何体
// Mesh
const mesh1 = new THREE.Mesh(new THREE.TorusGeometry(1,0.4,16,60),new THREE.MeshBasicMaterial({color:'red'})
)
const mesh2 = new THREE.Mesh(new THREE.ConeGeometry(1,2,32),new THREE.MeshBasicMaterial({color:'red'})
)
const mesh3 = new THREE.Mesh(new THREE.TorusKnotGeometry(0.8, 0.35, 100, 16),new THREE.MeshBasicMaterial({color:'red'})
)
scene.add(mesh1,mesh2,mesh3)

参数可以在three.js文档中查看,挤在一起有点丑,更改位置,添加纹理和卡通材质,由于卡通材质在光下显示 所以要在添加一个定向光 ,
// material
const material = new THREE.MeshToonMaterial({color:'#ffffff'
})// Mesh
const mesh1 = new THREE.Mesh(new THREE.TorusGeometry(1,0.4,16,60),material
)
const mesh2 = new THREE.Mesh(new THREE.ConeGeometry(1,2,32),material
)
const mesh3 = new THREE.Mesh(new THREE.TorusKnotGeometry(0.8, 0.35, 100, 16),material
)
scene.add(mesh1,mesh2,mesh3)/* Lights
*/
const directionalLight = new THREE.DirectionalLight('#ffffff',1)
directionalLight.position.set(1,1,0)
scene.add(directionalLight)

可以看到明暗变化,但是对比官网中 显示的颜色有三种
如何实现 ?
通过纹理设置实现,通过设置这种贴图实现光的变化
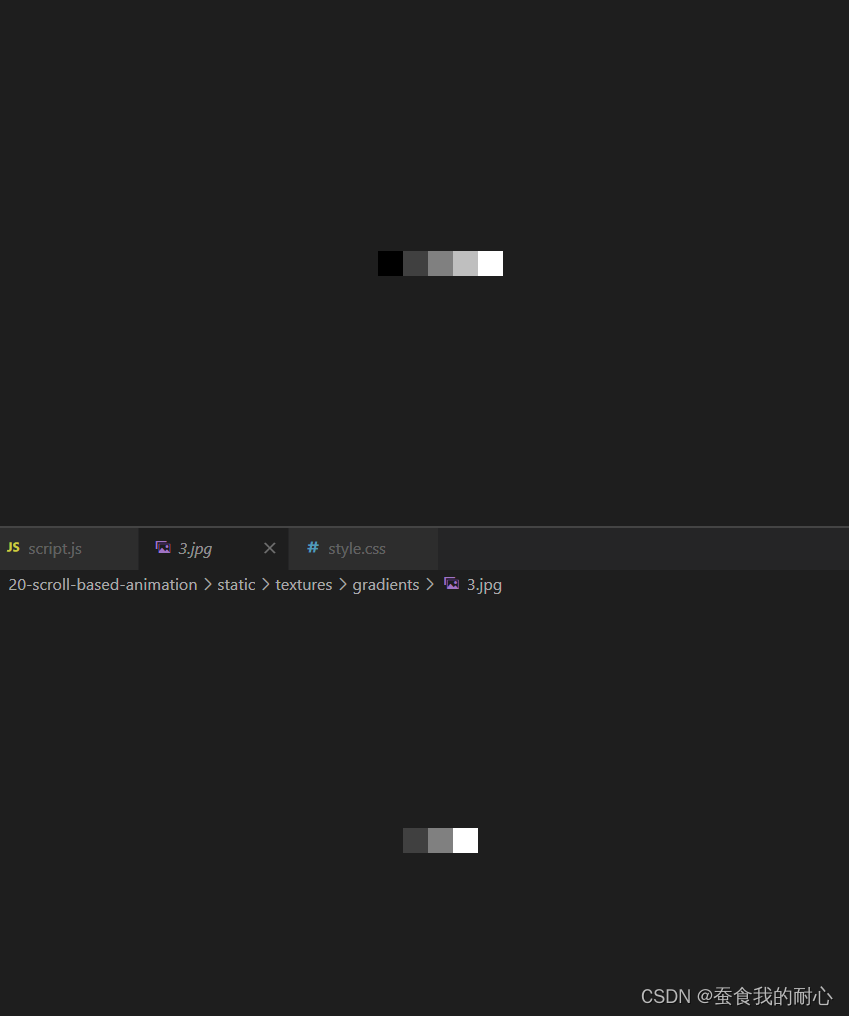
不过还需要设置最近过滤器 ,这样能有明显的渐变
对比一下设置 和没设置的图
const textureLoad = new THREE.TextureLoader()
const gradientTexture = textureLoad.load('/textures/gradients/3.jpg')
gradientTexture.magFilter = THREE.NearestFilter // 设置最近过滤器 牵扯到WebGL原理// material
const material = new THREE.MeshToonMaterial({color:parameters.materialColor,gradientMap:gradientTexture  // 卡通色渐变贴图 需要设置这个
})// Mesh
const mesh1 = new THREE.Mesh(new THREE.TorusGeometry(1,0.4,16,60),material
)
const mesh2 = new THREE.Mesh(new THREE.ConeGeometry(1,2,32),material
)
const mesh3 = new THREE.Mesh(new THREE.TorusKnotGeometry(0.8, 0.35, 100, 16),material
)
scene.add(mesh1,mesh2,mesh3)/* Lights
*/
const directionalLight = new THREE.DirectionalLight('#ffffff',1)
directionalLight.position.set(1,1,0)
scene.add(directionalLight)


设置位置,同时让几何体转动,并且 相机随滚动条视角移动,观测不同的几何体状态
import * as THREE from 'three'
import * as dat from 'lil-gui'/*** Debug*/
const gui = new dat.GUI()const parameters = {materialColor: '#ffeded'
}gui.addColor(parameters, 'materialColor')/*** Base*/
// Canvas
const canvas = document.querySelector('canvas.webgl')// Scene
const scene = new THREE.Scene()/* Objects
*/
// Texture
const textureLoad = new THREE.TextureLoader()
const gradientTexture = textureLoad.load('/textures/gradients/3.jpg')
gradientTexture.magFilter = THREE.NearestFilter // 设置最近过滤器 牵扯到WebGL原理// material
const material = new THREE.MeshToonMaterial({color:parameters.materialColor,gradientMap:gradientTexture  // 卡通色渐变贴图 需要设置这个
})// Mesh
const objectsDistance = 4
const mesh1 = new THREE.Mesh(new THREE.TorusGeometry(1,0.4,16,60),material
)
const mesh2 = new THREE.Mesh(new THREE.ConeGeometry(1,2,32),material
)
const mesh3 = new THREE.Mesh(new THREE.TorusKnotGeometry(0.8, 0.35, 100, 16),material
)const sectionMeshes = [mesh1,mesh2,mesh3]mesh1.position.y = - objectsDistance * 0
mesh2.position.y = - objectsDistance * 1
mesh3.position.y = - objectsDistance * 2mesh1.position.x = 2
mesh2.position.x = -2
mesh3.position.x = 2scene.add(mesh1,mesh2,mesh3)/* Lights
*/
const directionalLight = new THREE.DirectionalLight('#ffffff',1)
directionalLight.position.set(1,1,0)
scene.add(directionalLight)/*** Sizes*/
const sizes = {width: window.innerWidth,height: window.innerHeight
}window.addEventListener('resize', () =>
{// Update sizessizes.width = window.innerWidthsizes.height = window.innerHeight// Update cameracamera.aspect = sizes.width / sizes.heightcamera.updateProjectionMatrix()// Update rendererrenderer.setSize(sizes.width, sizes.height)renderer.setPixelRatio(Math.min(window.devicePixelRatio, 2))
})/*** Camera*/
// Base camera
const camera = new THREE.PerspectiveCamera(35, sizes.width / sizes.height, 0.1, 100)
camera.position.z = 6
// cameraGroup.add(camera)
scene.add(camera)/*** Renderer*/
const renderer = new THREE.WebGLRenderer({canvas: canvas,alpha:true,
})
renderer.setSize(sizes.width, sizes.height)
renderer.setPixelRatio(Math.min(window.devicePixelRatio, 2))/* Scroll
*/
let scrollY = window.scrollY // 获取滚动条y的数据
let currentSection = 0
window.addEventListener('scroll',()=>{scrollY = window.scrollY
})/*** Animate*/
const clock = new THREE.Clock()
let previousTime = 0
const tick = () =>
{const elapsedTime = clock.getElapsedTime()// Aniamte Camera   // 由于几何体 沿着y轴移动 objectsDistance 单位 所以 scrollY / sizes.height 是一比一的,* objectsDistance 就有了四个单位 camera.position.y = - scrollY / sizes.height * objectsDistance// Aniamte meshesfor(const mesh of sectionMeshes){ // 每一帧变化时,应该改变mesh.rotation.x =  elapsedTimemesh.rotation.y =  elapsedTime + 0.1}// Renderrenderer.render(scene, camera)// Call tick again on the next framewindow.requestAnimationFrame(tick)
}tick()
camera视角
视差 :通过不同观察点看到一个物体的行为
希望能有深度 ,在鼠标移动时,相机视角能有适当的强度变化
实现: 由于滚动 和 移动鼠标都是 移动camera视角 导致 滚动不生效
1. 创建组 ,在视差时候 移动组, 而camera在组中, 滚动时 移动相机 解决
实现平滑 缓慢 移动 速度不要太快
实现在不同电脑中 不同屏幕频率相同的移动速度
let previousTime = 0
const deltaTime = elapsedTime - previousTime
previousTime = elapsedTime
import * as THREE from 'three'
import * as dat from 'lil-gui'/*** Debug*/
const gui = new dat.GUI()const parameters = {materialColor: '#ffeded'
}gui.addColor(parameters, 'materialColor')/*** Base*/
// Canvas
const canvas = document.querySelector('canvas.webgl')// Scene
const scene = new THREE.Scene()/* Objects
*/
// Texture
const textureLoad = new THREE.TextureLoader()
const gradientTexture = textureLoad.load('/textures/gradients/3.jpg')
gradientTexture.magFilter = THREE.NearestFilter // 设置最近过滤器 牵扯到WebGL原理// material
const material = new THREE.MeshToonMaterial({color:parameters.materialColor,gradientMap:gradientTexture  // 卡通色渐变贴图 需要设置这个
})// Mesh
const objectsDistance = 4
const mesh1 = new THREE.Mesh(new THREE.TorusGeometry(1,0.4,16,60),material
)
const mesh2 = new THREE.Mesh(new THREE.ConeGeometry(1,2,32),material
)
const mesh3 = new THREE.Mesh(new THREE.TorusKnotGeometry(0.8, 0.35, 100, 16),material
)const sectionMeshes = [mesh1,mesh2,mesh3]mesh1.position.y = - objectsDistance * 0
mesh2.position.y = - objectsDistance * 1
mesh3.position.y = - objectsDistance * 2mesh1.position.x = 2
mesh2.position.x = -2
mesh3.position.x = 2scene.add(mesh1,mesh2,mesh3)/* Lights
*/
const directionalLight = new THREE.DirectionalLight('#ffffff',1)
directionalLight.position.set(1,1,0)
scene.add(directionalLight)/*** Sizes*/
const sizes = {width: window.innerWidth,height: window.innerHeight
}window.addEventListener('resize', () =>
{// Update sizessizes.width = window.innerWidthsizes.height = window.innerHeight// Update cameracamera.aspect = sizes.width / sizes.heightcamera.updateProjectionMatrix()// Update rendererrenderer.setSize(sizes.width, sizes.height)renderer.setPixelRatio(Math.min(window.devicePixelRatio, 2))
})/* Group
*/
const cameraGroup = new THREE.Group()
scene.add(cameraGroup)/*** Camera*/
// Base camera
const camera = new THREE.PerspectiveCamera(35, sizes.width / sizes.height, 0.1, 100)
camera.position.z = 6
cameraGroup.add(camera)/*** Renderer*/
const renderer = new THREE.WebGLRenderer({canvas: canvas,alpha:true,
})
renderer.setSize(sizes.width, sizes.height)
renderer.setPixelRatio(Math.min(window.devicePixelRatio, 2))/* Scroll
*/
let scrollY = window.scrollY // 获取滚动条y的数据
let currentSection = 0
window.addEventListener('scroll',()=>{scrollY = window.scrollY
})/* Cursor
*/
const cursor = {}
cursor.x = 0
cursor.y = 0window.addEventListener('mousemove',(event)=>{cursor.x = event.clientX / sizes.width - 0.5cursor.y = event.clientY / sizes.height - 0.5
})/*** Animate*/
const clock = new THREE.Clock()
let previousTime = 0
const tick = () =>
{const elapsedTime = clock.getElapsedTime()const deltaTime = elapsedTime - previousTimepreviousTime = elapsedTime// Aniamte Camera   // 由于几何体 沿着y轴移动 objectsDistance 单位 所以 scrollY / sizes.height 是一比一的,* objectsDistance 就有了四个单位 camera.position.y = - scrollY / sizes.height * objectsDistanceconst parallaxX = cursor.x * 0.5const parallaxY = -cursor.y * 0.5cameraGroup.position.x += (parallaxX - cameraGroup.position.x) * 5 * deltaTimecameraGroup.position.y += (parallaxY - cameraGroup.position.y) * 5 * deltaTime// Aniamte meshesfor(const mesh of sectionMeshes){ // 每一帧变化时,应该改变mesh.rotation.x +=  deltaTime * 0.1mesh.rotation.y +=  deltaTime * 0.12}// Renderrenderer.render(scene, camera)// Call tick again on the next framewindow.requestAnimationFrame(tick)
}tick()
camera 视角移动
添加粒子特效
/* Particles
*/
const particleCount = 200
const positions = new Float32Array(particleCount * 3)
// 设置粒子位置
for(let i = 0; i< particleCount;i++){positions[i * 3 + 0] = (Math.random() - 0.5) * 10positions[i * 3 + 1] = objectsDistance * 0.5 - Math.random() * objectsDistance * 3positions[i * 3 + 2] = (Math.random() - 0.5) * 10
}
const particleGeometry = new THREE.BufferGeometry()
particleGeometry.setAttribute('position',new THREE.BufferAttribute(positions,3))const particleMaterial = new THREE.PointsMaterial()
particleMaterial.size = 0.03
particleMaterial.color = new THREE.Color(parameters.materialColor)
particleMaterial.sizeAttenuation = true // 衰减const particle = new THREE.Points(particleGeometry,particleMaterial
)
scene.add(particle)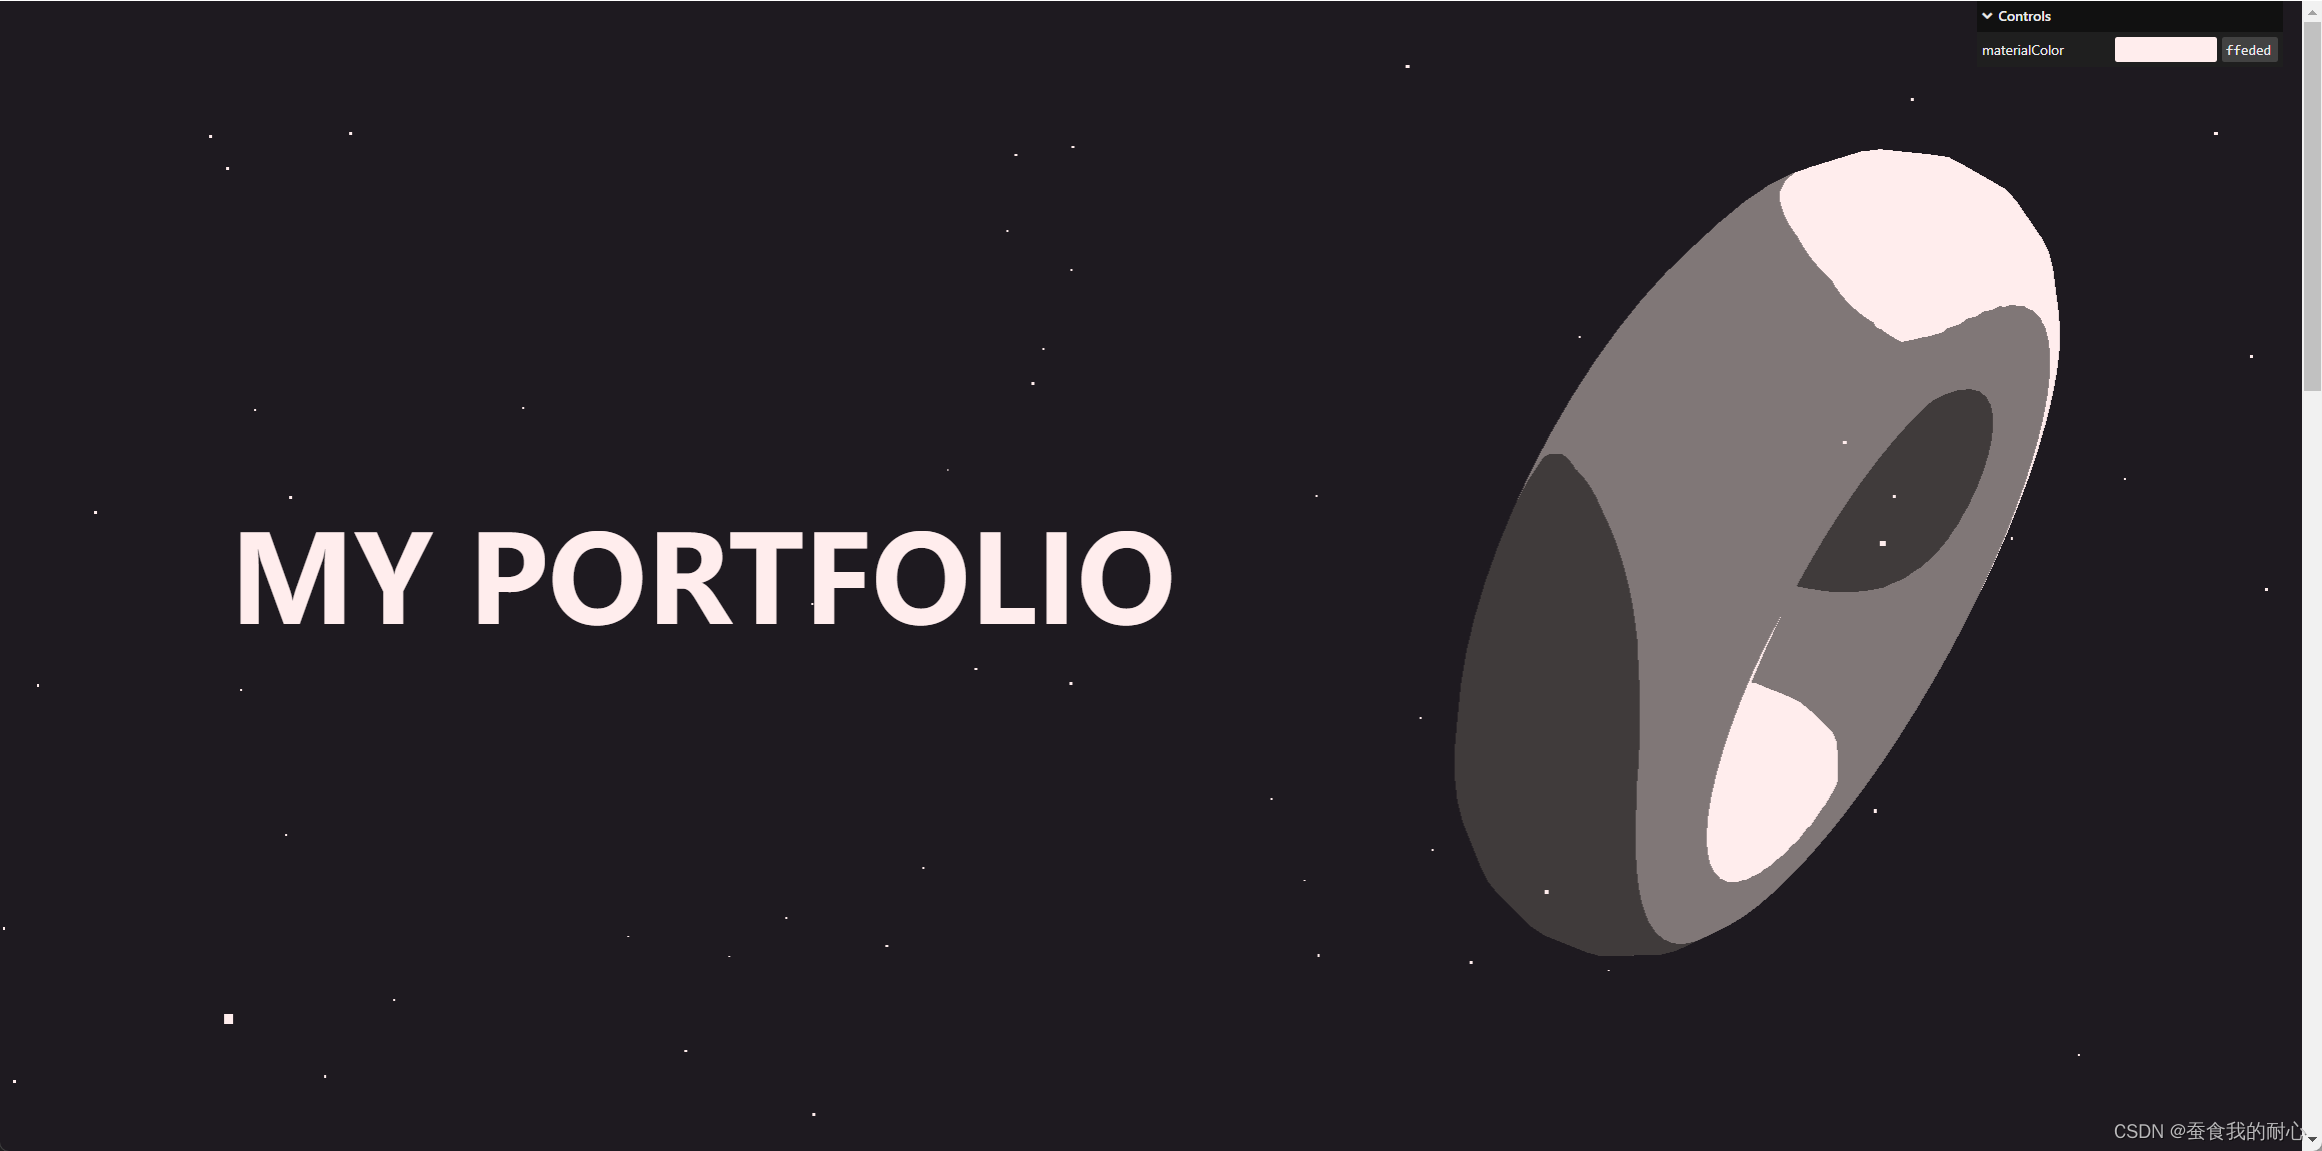
3.gsap
实现动画效果,在到达某一个几何体时 进行旋转
npm i gasp@3.5.1
import * as THREE from 'three'
import * as dat from 'lil-gui'
import gsap from 'gsap'/*** Debug*/
const gui = new dat.GUI()const parameters = {materialColor: '#ffeded'
}gui.addColor(parameters, 'materialColor').onChange(()=>{material.color.set(parameters.materialColor)particleMaterial.color.set(parameters.materialColor)})/*** Base*/
// Canvas
const canvas = document.querySelector('canvas.webgl')// Scene
const scene = new THREE.Scene()/* Objects
*/
// Texture
const textureLoad = new THREE.TextureLoader()
const gradientTexture = textureLoad.load('/textures/gradients/3.jpg')
gradientTexture.magFilter = THREE.NearestFilter // 设置最近过滤器 牵扯到WebGL原理// material
const material = new THREE.MeshToonMaterial({color:parameters.materialColor,gradientMap:gradientTexture  // 卡通色渐变贴图 需要设置这个
})// Mesh
const objectsDistance = 4
const mesh1 = new THREE.Mesh(new THREE.TorusGeometry(1,0.4,16,60),material
)
const mesh2 = new THREE.Mesh(new THREE.ConeGeometry(1,2,32),material
)
const mesh3 = new THREE.Mesh(new THREE.TorusKnotGeometry(0.8, 0.35, 100, 16),material
)const sectionMeshes = [mesh1,mesh2,mesh3]mesh1.position.y = - objectsDistance * 0
mesh2.position.y = - objectsDistance * 1
mesh3.position.y = - objectsDistance * 2mesh1.position.x = 2
mesh2.position.x = -2
mesh3.position.x = 2scene.add(mesh1,mesh2,mesh3)/* Particles
*/
const particleCount = 200
const positions = new Float32Array(particleCount * 3)
// 设置粒子位置
for(let i = 0; i< particleCount;i++){positions[i * 3 + 0] = (Math.random() - 0.5) * 10positions[i * 3 + 1] = objectsDistance * 0.5 - Math.random() * objectsDistance * 3positions[i * 3 + 2] = (Math.random() - 0.5) * 10
}
const particleGeometry = new THREE.BufferGeometry()
particleGeometry.setAttribute('position',new THREE.BufferAttribute(positions,3))const particleMaterial = new THREE.PointsMaterial()
particleMaterial.size = 0.03
particleMaterial.color = new THREE.Color(parameters.materialColor)
particleMaterial.sizeAttenuation = true // 衰减const particle = new THREE.Points(particleGeometry,particleMaterial
)
scene.add(particle)/* Lights
*/
const directionalLight = new THREE.DirectionalLight('#ffffff',1)
directionalLight.position.set(1,1,0)
scene.add(directionalLight)/*** Sizes*/
const sizes = {width: window.innerWidth,height: window.innerHeight
}window.addEventListener('resize', () =>
{// Update sizessizes.width = window.innerWidthsizes.height = window.innerHeight// Update cameracamera.aspect = sizes.width / sizes.heightcamera.updateProjectionMatrix()// Update rendererrenderer.setSize(sizes.width, sizes.height)renderer.setPixelRatio(Math.min(window.devicePixelRatio, 2))
})/* Group
*/
const cameraGroup = new THREE.Group()
scene.add(cameraGroup)/*** Camera*/
// Base camera
const camera = new THREE.PerspectiveCamera(35, sizes.width / sizes.height, 0.1, 100)
camera.position.z = 6
cameraGroup.add(camera)/*** Renderer*/
const renderer = new THREE.WebGLRenderer({canvas: canvas,alpha:true,
})
renderer.setSize(sizes.width, sizes.height)
renderer.setPixelRatio(Math.min(window.devicePixelRatio, 2))/* Scroll
*/
let scrollY = window.scrollY // 获取滚动条y的数据
let currentSection = 0
window.addEventListener('scroll',()=>{scrollY = window.scrollYconst newSection = Math.round(scrollY / sizes.height) // 四舍五入判断 几何体旋转的时机if(newSection != currentSection){currentSection = newSectionconsole.log(sectionMeshes[currentSection].rotation)gsap.to(sectionMeshes[currentSection].rotation, // 设置动画 0,1,2的动画效果{duration:1.5, // 时间ease:'power2.inOut', // 进出x:'+=6',y:'+=3',z:'+=1.5',})}
})/* Cursor
*/
const cursor = {}
cursor.x = 0
cursor.y = 0window.addEventListener('mousemove',(event)=>{cursor.x = event.clientX / sizes.width - 0.5cursor.y = event.clientY / sizes.height - 0.5
})/*** Animate*/
const clock = new THREE.Clock()
let previousTime = 0
const tick = () =>
{const elapsedTime = clock.getElapsedTime()const deltaTime = elapsedTime - previousTimepreviousTime = elapsedTime// Aniamte Camera   // 由于几何体 沿着y轴移动 objectsDistance 单位 所以 scrollY / sizes.height 是一比一的,* objectsDistance 就有了四个单位 camera.position.y = - scrollY / sizes.height * objectsDistanceconst parallaxX = cursor.x * 0.5const parallaxY = -cursor.y * 0.5cameraGroup.position.x += (parallaxX - cameraGroup.position.x) * 5 * deltaTimecameraGroup.position.y += (parallaxY - cameraGroup.position.y) * 5 * deltaTime// Aniamte meshesfor(const mesh of sectionMeshes){ // 每一帧变化时,应该改变mesh.rotation.x +=  deltaTime * 0.1mesh.rotation.y +=  deltaTime * 0.12}// Renderrenderer.render(scene, camera)// Call tick again on the next framewindow.requestAnimationFrame(tick)
}tick()
camera 视角移动 几何体动画
总结
数学不要记,主要看他怎么用, 在哪里用的!
相关文章:
【Three.js基础学习】15.scroll-based-animation
提示:文章写完后,目录可以自动生成,如何生成可参考右边的帮助文档 前言 课程要点 结合html等场景 做滚动动画 1.遇到的问题, 在向下滚动时,下方会显白(部分浏览器) 解决:alpha:true …...
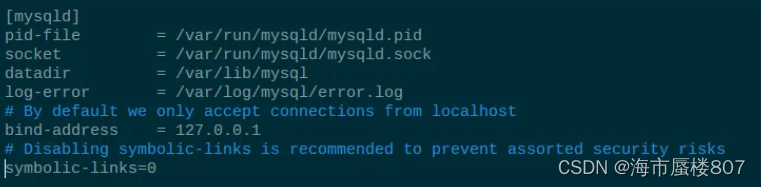
ubantu安装mysql
安装 准备:下载:版本5.1.17的MySQL并上传至Ubuntu系统 #解压 tar -xvf mysql-server_5.7.17-1ubuntu16.10_amd64.deb-bundle.tar #提前安装插件 sudo apt-get install libaio1 libmecab2 #若安装失败使用以下命令 apt --fix-broken install sudo apt-g…...

注意!华为HCIP-Datacom认证考试题有变化!
01 注意 HCIP Datacom H12-831考试变题了,最近要考试的多观望一下,821目前稳定。 华为HCIP考试以后要加难度,增加实验题,还没考完的小伙伴抓紧时间了。 02 华为HCIP认证大更新 未来将增加实验考试,拒绝背题库的Pass&a…...

你是我的荣耀 | 林先生:从酷爱数学到毕业走向数据分析岗位
人物背景: 研究生国家奖学金、本科生国家奖学金、学业奖学金一等奖、上海市优秀毕业生; 应用统计专业 CPDA优秀学员 ## 为什么选择数据分析相关专业 我是应用统计专业的一个应届毕业生,目前在一家上海市属的国企,从事数据分析相关…...

操作系统真象还原-bochs安装
今天读了《操作系统真象还原》这本书,写上比较幽默通俗。书中例子需要安装一个bochs系统,记录一下安装过程。参考了书中1.4,1.5两节,书中尽让有两处问题,也记录了下来。 1.3 操作系统的宿主环境 下载地址:…...
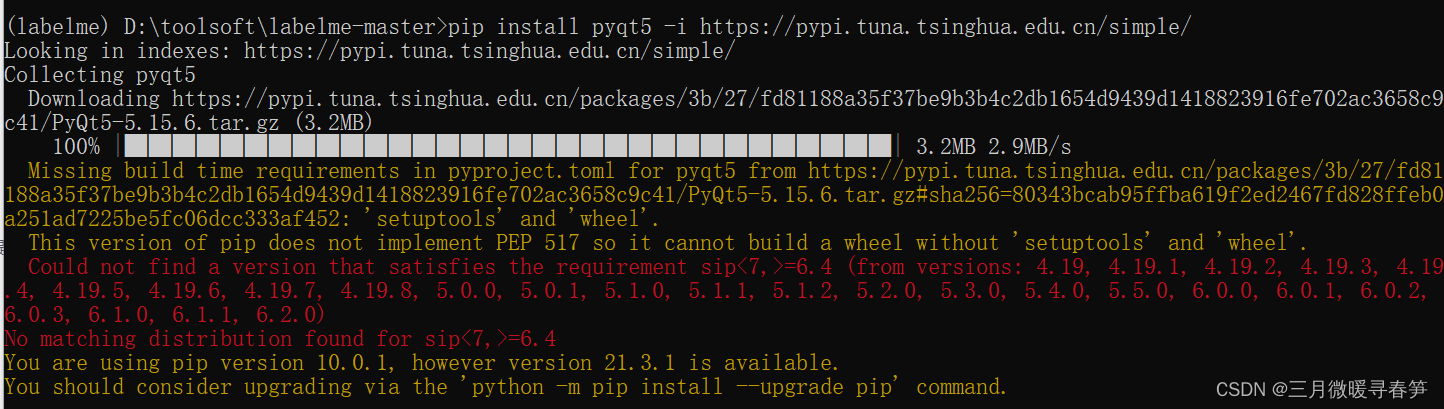
windows平台安装labelme
之前写过一篇文章也是关于在windows平台安装labelme的:《windows平台python版labelme安装与使用_labelme下载-CSDN博客》,随着软件与工具的更新换代,按照同样的方法最近在使用的时候出现了错误,出现创建虚拟环境失败,具…...
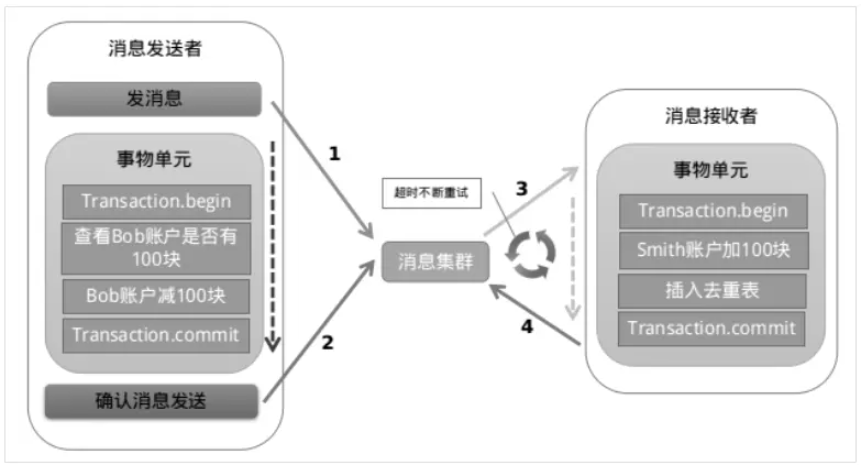
微服务之SpringCloud AlibabaSeata处理分布式事务
一、概述 1.1背景 一次业务操作需要跨多个数据源或需要跨多个系统进行远程调用,就会产生分布式事务问题 but 关系型数据库提供的能力是基于单机事务的,一旦遇到分布式事务场景,就需要通过更多其他技术手段来解决问题。 全局事务:…...
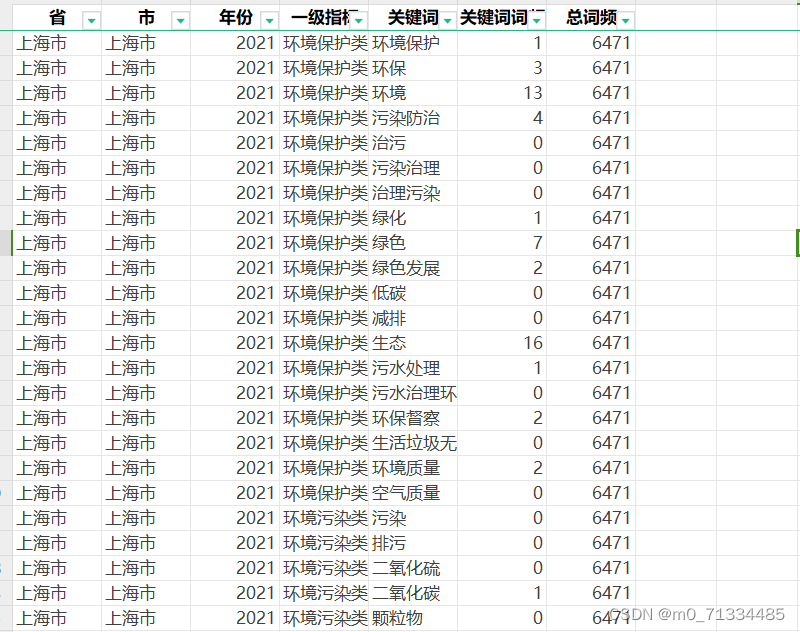
2005-2021年全国各地级市生态环境注意力/环保注意力数据(根据政府报告文本词频统计)
2005-2021年全国各地级市生态环境注意力/环保注意力数据(根据政府报告文本词频统计) 2005-2021年全国各地级市生态环境注意力/环保注意力数据(根据政府报告文本词频统计) 1、时间:2005-2021年 2、范围:2…...

熟悉这些道理可以让人更好地应对各种挑战和困难。
1. 为别人尽最大的力量,最后就是为自己尽最大的力量。——罗斯金 2. 世上有一条永恒不变的法则:当你不在乎,你就得到。当你变好,你才会遇到更好的。只有当你变强大,你才不害怕孤单。当你不害怕孤单,你才能够宁缺毋滥。…...

AI去衣技术在动画制作中的应用
随着科技的发展,人工智能(AI)已经在各个领域中发挥了重要作用,其中包括动画制作。在动画制作中,AI去衣技术是一个重要的工具,它可以帮助动画师们更加高效地完成工作。 AI去衣技术是一种基于人工智能的图像…...

卷积神经网络要点和难点实际案例和代码解析
卷积神经网络(Convolutional Neural Networks,CNN)是一类包含卷积计算且具有深度结构的前馈神经网络,是深度学习的代表算法之一。卷积神经网络仿造生物的视知觉机制构建,可以进行监督学习和非监督学习,其隐含层内的卷积核参数共享和层间连接的稀疏性使得卷积神经网络能够…...

initramfs及rpm/dracut操作
一、背景 更新bundle包后发现系统异常。 定位发现驱动升级不成功,内核启动后加载的还是更新前的旧驱动。但等内核启动完成后,卸载旧驱动手动insmod新驱动,是可以加载成功的。 驱动的安装目录在/lib/modules/$KERNELVERSION/extra目录下。 …...

Kafka 2.13-3.7.0 在 Windows 上的安装与配置指南
在本文中,我将引导您完成在Windows操作系统上安装Apache Kafka 2.13-3.7.0的全过程,包括下载Scala运行环境、Kafka软件包、配置相关设置,并最终启动Kafka服务。此外,还会简要介绍如何使用客户端工具进行查看和管理。 Kafka的命名…...

C++ 顺序线性表的功能
顺序线性表的功能 //头文件 #pragma once#define LIST_INIT_SIZE 50 #define LIST_INCREMENT 20 #define OK 1 #define ERROR 0typedef int Status;typedef char ElemType;typedef struct list_ {ElemType* elem;int length;int listize; }SqList;// 1 初始化 函数 Status…...
)
C++面经 每日一问(二)
将引用作为函数参数有什么影响? 传递引用给函数与传递指针的效果相同。这意味着被调函数中的形参变量将成为主调函数中实参的别名,从而直接对目标对象进行操作。相比于传递指针,这种方式消除了对指针的繁琐操作,提高了代码的清晰性…...
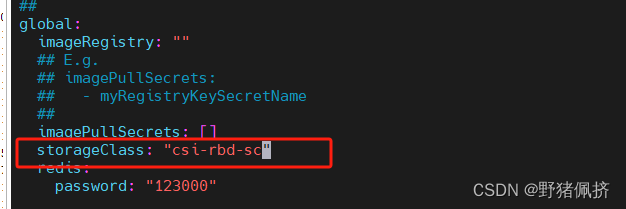
最新版Ceph( Reef版本)块存储简单对接k8s
当前ceph 你的ceph集群上执行 1.创建名为k8s-rbd 的存储池 ceph osd pool create k8s-rbd 64 642.初始化 rbd pool init k8s-rbd3 创建k8s访问块设备的认证用户 ceph auth get-or-create client.kubernetes mon profile rbd osd profile rbd poolk8s-rbd部署 ceph-rbd-csi c…...
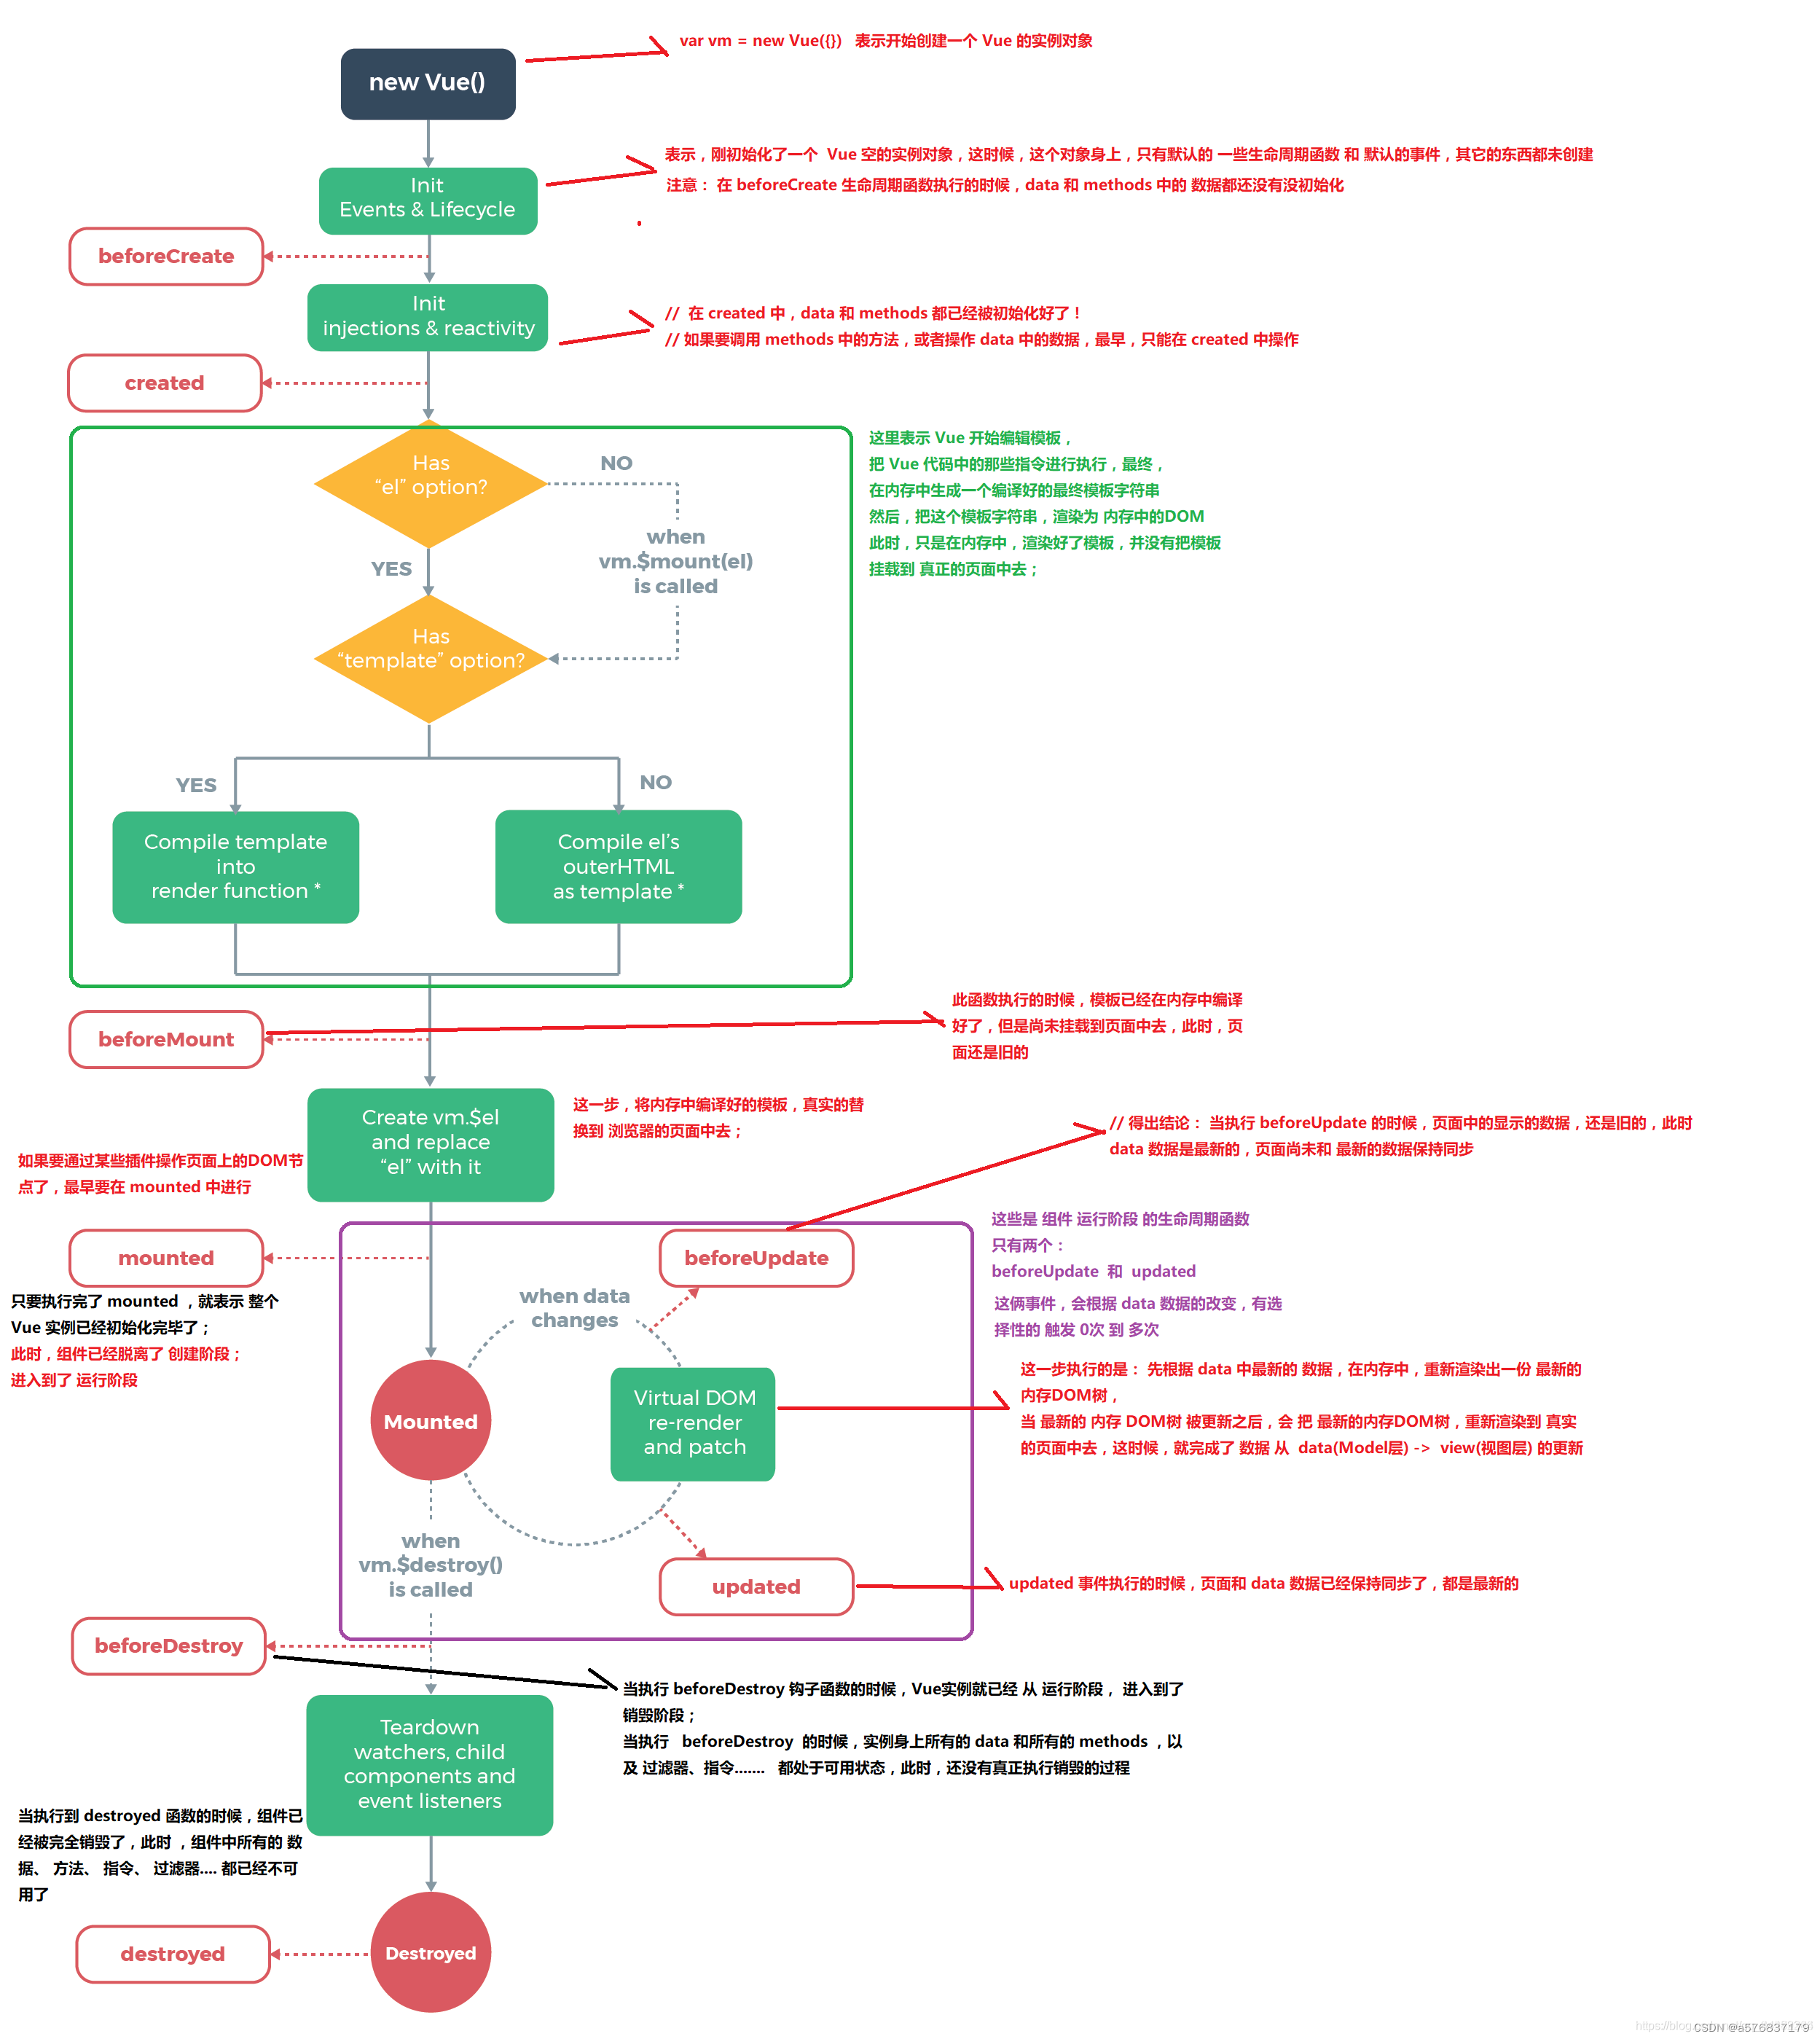
Vue生命周期都有哪些?
定义 Vue的生命周期就是实例从创建到销毁的一个过程,即从创建、初始化数据、编译模板、挂载Dom($el)->渲染、更新->渲染,卸载等一系列的过程。el是挂载点如<div id"app"></div>。 Vue的生命周期分为八个阶段 1.beforeCreate…...
景源畅信:个人抖音小店怎么开通?
在数字时代的浪潮中,个体创业已不再是遥不可及的梦想。特别是随着短视频平台的崛起,抖音不仅成为人们娱乐消遣的新宠,更是众多创业者眼中的“新大陆”。你是否也曾憧憬过在抖音上开一家属于自己的小店?那么,如何开通个人抖音小店…...
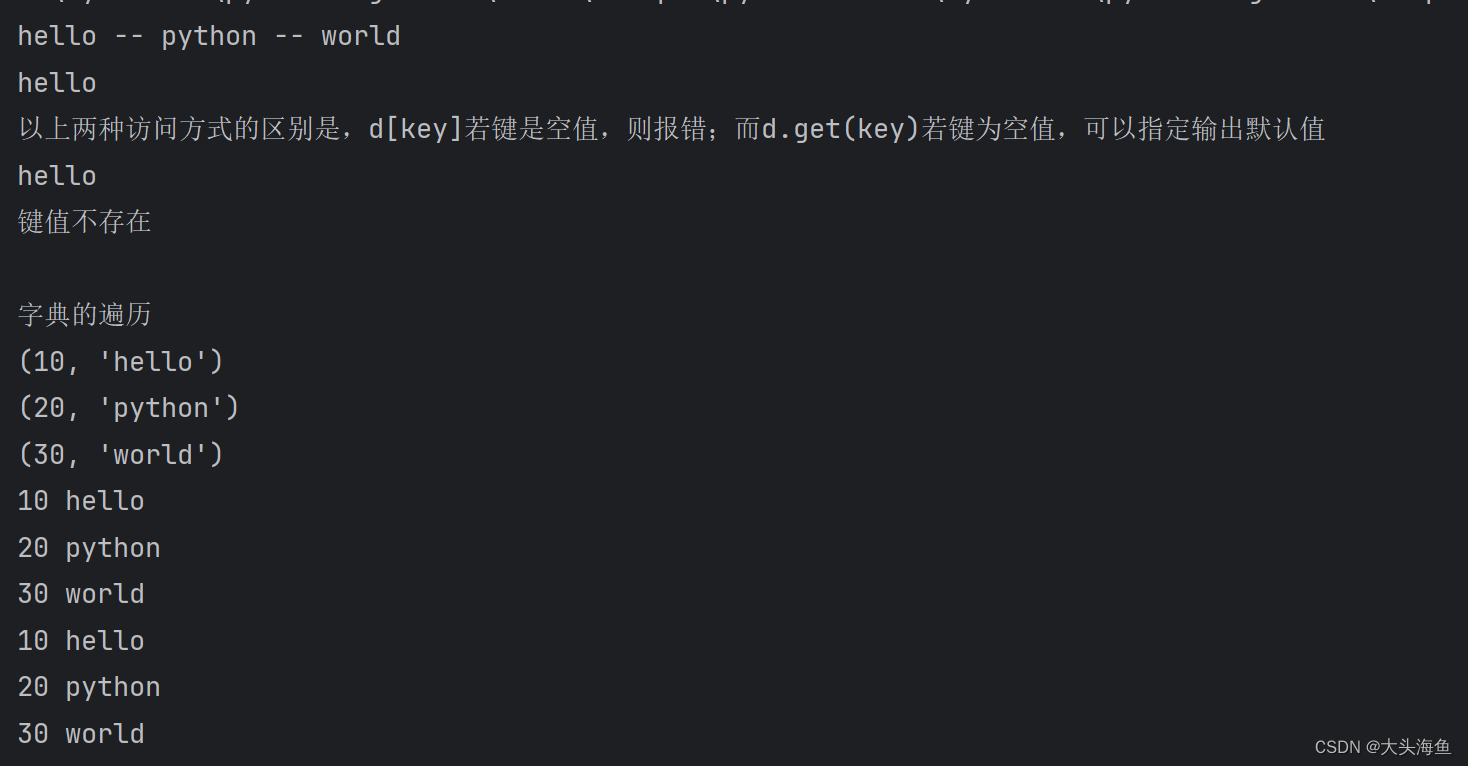
python学习笔记B-16:序列结构之字典--字典的遍历与访问
下面是字典的访问和遍历方法: d {10:"hello",20:"python",30:"world"} print(d[10],"--",d[20],"--",d[30]) print(d.get(10)) print("以上两种访问方式的区别是,d[key]若键是空值,…...
《QT实用小工具·四十八》趣味开关
1、概述 源码放在文章末尾 该项目实现了各种样式的趣味开关: 1、爱心形状的switch开关,支持手势拖动、按压效果 2、线条样式的3种开关 项目demo演示如下所示: 使用方式: 1、sapid_switch文件夹加入工程,.pro文件中…...

3分钟快速上手Inter字体:免费开源字体如何提升你的数字产品体验
3分钟快速上手Inter字体:免费开源字体如何提升你的数字产品体验 【免费下载链接】inter The Inter font family 项目地址: https://gitcode.com/gh_mirrors/in/inter Inter字体是一款专为屏幕显示设计的开源无衬线字体,凭借其出色的可读性和多语言…...

5分钟实战:用Sunshine轻松搭建你的专属游戏串流服务器
5分钟实战:用Sunshine轻松搭建你的专属游戏串流服务器 【免费下载链接】Sunshine Self-hosted game stream host for Moonlight. 项目地址: https://gitcode.com/GitHub_Trending/su/Sunshine 还在为只能在书房玩游戏而烦恼吗?想不想在客厅大电视…...

ABAP 7.40+新语法实战:5个内表处理技巧让你告别LOOP和IF
ABAP 7.40新语法实战:5个内表处理技巧让你告别LOOP和IF 在SAP开发领域,ABAP语言随着7.40版本的发布迎来了一次重大革新。对于每天需要处理大量内表操作的中级开发者来说,这些新特性不仅能显著减少代码量,更能提升程序的可读性和执…...
)
Windows管道通信踩坑记:客户端异常退出后,服务端如何优雅重建命名管道实例(附C++代码)
Windows管道通信实战:客户端异常退出时的服务端健壮性设计 命名管道(Named Pipe)是Windows平台进程间通信(IPC)的核心机制之一,但在实际工程中,客户端异常退出的场景常常成为稳定性短板。当客户…...
)
仅剩最后47份!《Midjourney概念艺术创作密钥手册》(含23个受版权保护的材质编码+动态光照参数表)
更多请点击: https://codechina.net 第一章:《Midjourney概念艺术创作密钥手册》核心价值与版权说明 核心价值定位 本手册聚焦于概念艺术创作中“意图—提示—反馈—迭代”的闭环实践,提炼出可复用的提示工程范式、风格锚定策略与跨模态语义…...

洞悉.NET 11:Blazor 与 Microsoft.Extensions.AI 的融合创新实践
洞悉.NET 11:Blazor 与 Microsoft.Extensions.AI 的融合创新实践 前言 在现代 Web 应用开发领域,提升用户体验和智能化交互至关重要。Blazor 凭借其在构建交互式 Web 界面的优势,与专注于 AI 集成的 Microsoft.Extensions.AI 相结合ÿ…...

语雀文档离线备份终极指南:3步轻松实现文档永久保存
语雀文档离线备份终极指南:3步轻松实现文档永久保存 【免费下载链接】yuque2book export yuque repo to a book 将你的语雀文档导出的工具 项目地址: https://gitcode.com/gh_mirrors/yu/yuque2book 你是不是经常担心语雀文档的安全问题?或者需要…...

为什么你的Perplexity本地服务响应慢3.7倍?:NVIDIA驱动版本、vLLM推理后端与量化精度的隐性博弈
更多请点击: https://codechina.net 第一章:Perplexity本地服务查询 Perplexity 作为一款强调实时信息检索与引用溯源的 AI 工具,其官方未提供公开的本地化部署方案。但开发者可通过构建轻量级代理服务,将本地运行的大语言模型&a…...

D1021UK,125W高功率输出的推挽式DMOS RF FET射频晶体管
简介今天我要向大家介绍的是 TT Electronics/Semelab 的金金属化多用途硅DMOS RF FET晶体管——D1021UK。这是一款专为HF/VHF/UHF通信频段(1 MHz至400 MHz)设计的推挽式(Push-Pull)射频功率场效应管,在28V工作电压下可…...

PyMol实战:从PDB下载1lEP到绘制靶点-药物相互作用图的保姆级教程
PyMol实战:从PDB下载1lEP到绘制靶点-药物相互作用图的保姆级教程 在药物研发和结构生物学领域,可视化分析靶点-药物相互作用是理解分子识别机制的关键环节。PyMol作为一款专业的分子可视化工具,能够帮助研究人员从原子层面解析蛋白质-配体复合…...