vue3 + ts实现canvas绘制的waterfall
实际运行效果(仅包含waterfall图表部分)
component.vue
<template><div ref="heatmap" :style="{ height: props.containerHeight + 'px' }" />
</template><script setup>
import ColorMap from "colormap";
import { round } from "lodash";
import { ref, reactive, watch, onMounted, watchEffect } from "vue";
const props = defineProps({height: {type: Number,default: 50, // 代表一个屏幕有多少帧},minDb: {type: Number, // 最小值default: 0,},maxDb: {type: Number, // 最大值default: 1000,},containerHeight: {type: Number,default: 210, // 容器高度},legendWidth: {// 左侧色条宽度type: Number,default: 50,},isOnline: {type: Boolean, // 判断是否在线default: false,},sdata: {type: Array,default: () => [], // 实际要显示的数据},startVal: {type: Number,default: 0, // 数据开始的位置},
});
// 图表容器 DOM 的引用
const heatmap = ref(null);
const state = reactive({canvasCtx: null,fallsCanvasCtx: null,legendCanvasCtx: null,canvasWidth: 0,colormap: [],
});
const firstRender = ref(true);
const renderNum = ref(0);
const plotData = ref([]);
let playControl = reactive({ cycleStart: props.startVal });
const requestChartsData = () => {// const data = Array.from({ length: 20000 }, () => -Math.floor(Math.random() * 100) + 1);plotData.value = props.sdata;
};const initComponent = () => {if (!heatmap.value) {return;}// 获取容器宽高const { clientWidth, clientHeight } = heatmap.value;// 初始化颜色图const colormap = initColormap();// 创建画布const { fallsCanvasCtx, canvasCtx, legendCanvasCtx, canvas } = createCanvas(clientWidth,clientHeight);// 绘制左边颜色图图例drawLegend(canvasCtx, legendCanvasCtx, colormap);state.canvasCtx = canvasCtx;state.colormap = colormap;state.fallsCanvasCtx = fallsCanvasCtx;state.legendCanvasCtx = legendCanvasCtx;state.canvasDom = canvas;
};const initColormap = () => {return ColorMap({colormap: "jet",nshades: 150,format: "rba",alpha: 1,});
};const createCanvas = (width, height) => {// 创建用来绘制的画布const fallsCanvas = document.createElement("canvas");fallsCanvas.width = 0;fallsCanvas.height = height;const fallsCanvasCtx = fallsCanvas.getContext("2d");// 创建最终展示的画布const canvas = document.createElement("canvas");canvas.className = "main_canvas";canvas.height = height - 2;canvas.width = width;heatmap.value.appendChild(canvas); // 唯一显示的canvasconst canvasCtx = canvas.getContext("2d");// 创建图例图层画布const legendCanvas = document.createElement("canvas");legendCanvas.width = 1;const legendCanvasCtx = legendCanvas.getContext("2d");return {fallsCanvasCtx,canvasCtx,legendCanvasCtx,canvas,};
};// 更新瀑布图 传入要渲染的数据
const updateChart = (start) => {let data = plotData.value.slice(start, start + 1024);console.log("start", start, data);updateWaterFallPlot(data);
};
const updateWaterFallPlot = (data) => {const len = data.length;if (len !== state.canvasWidth) {state.canvasWidth = len;state.fallsCanvasCtx.canvas.width = len;}if (len === 0) {return;}renderNum.value++;// removePrevImage()// 先在用于绘制的画布上绘制图像addWaterfallRow(data);// 再将画好的图像显示再页面中drawFallsOnCanvas(len);if (renderNum.value > props.height) {// state.canvasDom.height = renderNum.value * props.containerHeight / props.height}
};const removePrevImage = () => {const { canvas } = state.fallsCanvasCtx;state.fallsCanvasCtx.clearRect(0, 0, canvas.width, canvas.height);
};// 在用于绘制的画布上绘制图像
const addWaterfallRow = (data) => {// 先将已生成的图像向下移动一个像素if (!firstRender.value) {state.fallsCanvasCtx.drawImage(state.fallsCanvasCtx.canvas, // 当前cavas0,0,data.length,props.height,0,1,data.length,props.height);} else {firstRender.value = false;}// 再画一行的数据const imageData = rowToImageData(data);state.fallsCanvasCtx.putImageData(imageData, 0, 0);
};// 绘制单行图像
const rowToImageData = (data) => {const imageData = state.fallsCanvasCtx.createImageData(data.length, 1);for (let i = 0; i < imageData.data.length; i += 4) {const cIndex = getCurrentColorIndex(data[i / 4]);const color = state.colormap[cIndex];imageData.data[i + 0] = color[0];imageData.data[i + 1] = color[1];imageData.data[i + 2] = color[2];imageData.data[i + 3] = 255;}return imageData;
};// 将绘制好的图像显示在主页面中
const drawFallsOnCanvas = (len) => {const canvasWidth = state.canvasCtx.canvas.width;const canvasHeight = state.canvasCtx.canvas.height;if (!state.fallsCanvasCtx.canvas.width) return;state.canvasCtx.drawImage(state.fallsCanvasCtx.canvas,-1,0,len + 1,props.height,props.legendWidth + 5,0,canvasWidth - props.legendWidth,canvasHeight);
};
// 获取数据对应的颜色图索引
const getCurrentColorIndex = (data) => {const outMin = 0;const outMax = state.colormap.length - 1;if (data <= props.minDb) {return outMin;} else if (data >= props.maxDb) {return outMax;} else {return round(((data - props.minDb) / (props.maxDb - props.minDb)) * outMax);}
};// 绘制颜色图图例
const drawLegend = (canvasCtx, legendCanvasCtx, colormap) => {const imageData = legendCanvasCtx.createImageData(1, colormap.length);// 遍历颜色图集合for (let i = 0; i < colormap.length; i++) {const color = colormap[i];imageData.data[imageData.data.length - i * 4 + 0] = color[0];imageData.data[imageData.data.length - i * 4 + 1] = color[1];imageData.data[imageData.data.length - i * 4 + 2] = color[2];imageData.data[imageData.data.length - i * 4 + 3] = 255;}legendCanvasCtx.putImageData(imageData, 0, 0);canvasCtx.drawImage(legendCanvasCtx.canvas,0, // source x0, // source y1, // source widthcolormap.length, // souce height0, // d x 目标0, // d y 目标props.legendWidth / 4, // d widthcanvasCtx.canvas.height // d height);canvasCtx.font = "12px Arial";canvasCtx.textAlign = "end";canvasCtx.fillStyle = "#fff";const x = (props.legendWidth * 3) / 4 - 10;canvasCtx.fillText(props.maxDb, x, 12);canvasCtx.fillText(props.minDb, x, props.containerHeight - 6);const dur = (props.maxDb - props.minDb) / 10;for (let i = 1; i < 10; i++) {canvasCtx.fillText(props.minDb + dur * i,x,(props.containerHeight * (10 - i)) / 10 + i);}
};watch(() => props.maxDb,() => {const x = (props.legendWidth * 3) / 4 - 10;state.canvasCtx.clearRect(0, 0, x, props.containerHeight);state.canvasCtx.fillText(props.maxDb, x, 12);state.canvasCtx.fillText(props.minDb, x, props.containerHeight - 6);const dur = (props.maxDb - props.minDb) / 10;for (let i = 1; i < 10; i++) {state.canvasCtx.fillText(props.minDb + dur * i,x,(props.containerHeight * (10 - i)) / 10 + i);}},{ immediate: false, deep: true }
);
watch(() => props.sdata, // 监控数据变化(newval, oldval) => {requestChartsData();updateWaterFallPlot(props.sdata);},{ immediate: false, deep: true }
);
onMounted(() => {initComponent();if (!props.isOnline) {requestChartsData();// watchEffect(() => {updateChart(playControl.cycleStart);// });setInterval(() => {updateChart(playControl.cycleStart);}, 1000);}
});
</script>
父组件引用
<Waterfallv-if="showlargeline":sdata="probes[selectProbeIndex].series[0].data":startVal="0":isOnline="false":height="50":minDb="0":maxDb="100":containerHeight="210"></Waterfall>
相关文章:
vue3 + ts实现canvas绘制的waterfall
实际运行效果(仅包含waterfall图表部分) component.vue <template><div ref"heatmap" :style"{ height: props.containerHeight px }" /> </template><script setup> import ColorMap from "color…...

代码随想录算法训练营第四十四天
sad的一天,明天开始上班,而且娃还行,媳妇儿状态不稳定,太难了也!!! 完全背包 #include<vector> #include<iostream> using namespace::std; int main(){int N;//种类int V;//空间ci…...

【3dmax笔记】027:配置修改器集、工具栏自定义与加载
文章目录 一、配置修改器集二、自定义工具栏三、加载工具栏 一、配置修改器集 可以把自己常用的修改命令放到右边框中的部分,便于自己的操作,省去了每次都要花半天时间找命令的尴尬。新建一个二维或者三维物体,点击修改面板,点击…...
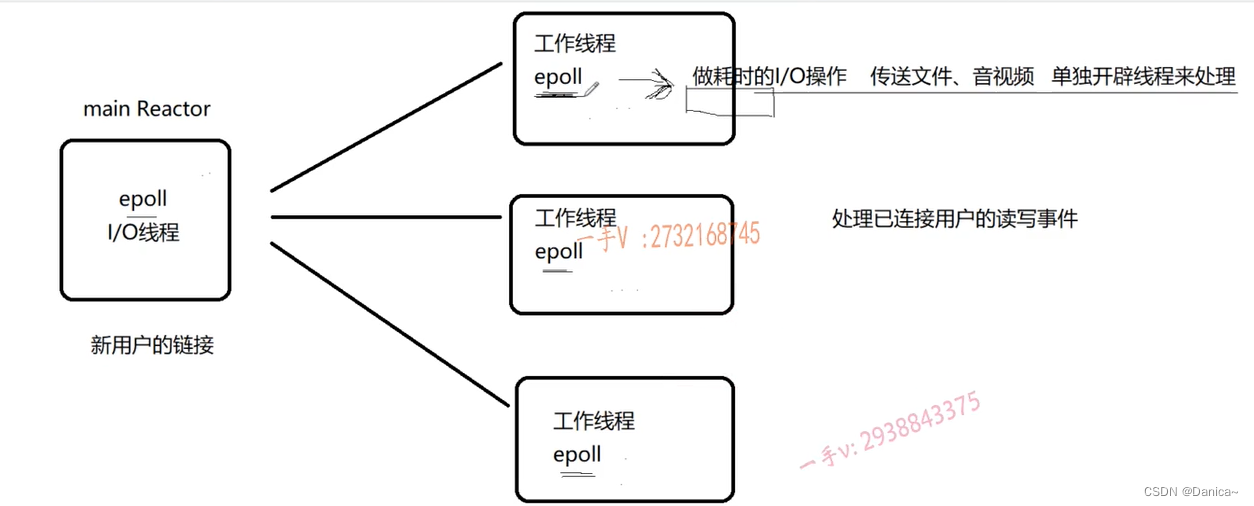
Reactor模型详解
目录 1.概述 2.Single Reactor 3.muduo库的Multiple Reactors模型如下 1.概述 维基百科对Reactor模型的解释 The reactor design pattern is an event handling pattern for handling service requests delivered concurrently to a service handler by one or more inputs.…...
内存卡罢工,数据危机?别急,有救!
在日常生活和工作中,我们越来越依赖于各种电子设备来存储重要数据。其中,内存卡因其便携性和大容量而广受欢迎。然而,当内存卡突然损坏打不开时,我们该如何应对?本文将为您详细解析这一问题,并提供有效的解…...
python爬虫实战
import requests import json yesinput(输入页数:) yesint(yes)headers {"accept": "application/json, text/plain, */*","accept-language": "zh-CN,zh;q0.9","content-type": "application/json",…...
k8s 资源文件参数介绍
Kubernetes资源文件yaml参数介绍 yaml 介绍 yaml 是一个类似 XML、JSON 的标记性语言。它强调以数据为中心,并不是以标识语言为重点例如 SpringBoot 的配置文件 application.yml 也是一个 yaml 格式的文件 语法格式 通过缩进表示层级关系不能使用tab进行缩进&am…...

mac系统安装steam报错-解决办法
今天给虚拟机装了个苹果系统,然后想装个steam,从steam的官方下载安装steam_osx.dmg时,总是报“steam_osx已损坏,无法打开,请移动到废纸篓“。搜了一下找到了解决办法,这里记录一下。 双击steam_osx.dmg时&…...

这个簇状柱形图怎么添加百分比?
这个图表是excel默认的图表配色,有的人做出来都那个百分比,一起来做一个这样的图表。 1.插入图表 选中数据区域,点击 插入选项卡,在图表那一栏,点一下柱形图右侧那个倒三角,在弹邮对话框中,选…...
Tomact安装配置及使用(超详细)
文章目录 web相关知识概述web简介(了解)软件架构模式(掌握)BS:browser server 浏览器服务器CS:client server 客户端服务器 B/S和C/S通信模式特点(重要)web资源(理解)资源分类 URL请求路径(理解)作用介绍格式浏览器通过url访问服务器的过程 服务器(掌握)…...

web后端——netbeans ide +jsp+servlet开发学习总结
目录 jsp基础 netbeans开发工具问题HTTP Status 405 - HTTP method POST is not supported......netbeans 提示无法启动GlassFish Server 4.1.1:服务器未运行时, HTTP 或 HTTPS 监听程序端口已被占用404 问题netbeans中项目中有多个html文件,如何单独运行某个文件?n…...

使用request-try-notifyState流程实现UI控制与状态反馈的完整闭环
1. 前言 在Qt编程时,我们经常会在界面上添加一些按钮,当按钮被点击时,执行某段代码,例如显示一个对话框、关闭窗口,保存文件等等。 这种由UI控件触发某种信号,通过信号槽触发目的代码执行的场景非常多。这…...

屏蔽罩材质和厚度对屏蔽效能的影响
一.屏蔽效能的影响因素 屏蔽效能的影响因素主要有两个方面:屏蔽材料的特性和厚度;如下图所示,电磁波经过不同媒介时,会在分界面形成反射,穿过界面的电磁波一部分被反射回去,这部分能量损失…...
Qt简单离线音乐播放器
有上传本地音乐文件,播放,暂停,拖拉进度条等功能的播放器。 mainwindow.cpp #include "mainwindow.h" #include "ui_mainwindow.h" #include <QMediaPlayer> #include <QFileDialog> #include <QTime&g…...

微信小程序常用的api
基础API: wx.request:用于发起网络请求,支持GET、POST等方式,是获取网络数据的主要手段。wx.showToast:显示消息提示框,通常用于向用户展示操作成功、失败或加载中等状态。wx.showModal:显示模态…...
iOS xib布局
1.多次启动发现启动图和截屏的图片不一致,设置launch storyboard 不能到顶部 https://blog.csdn.net/u011960171/article/details/104053696/ 2.multipiler是比例,需要控制顺序1.视图,2父视图,选择宽度比例,默认是1 3.Aspect R…...
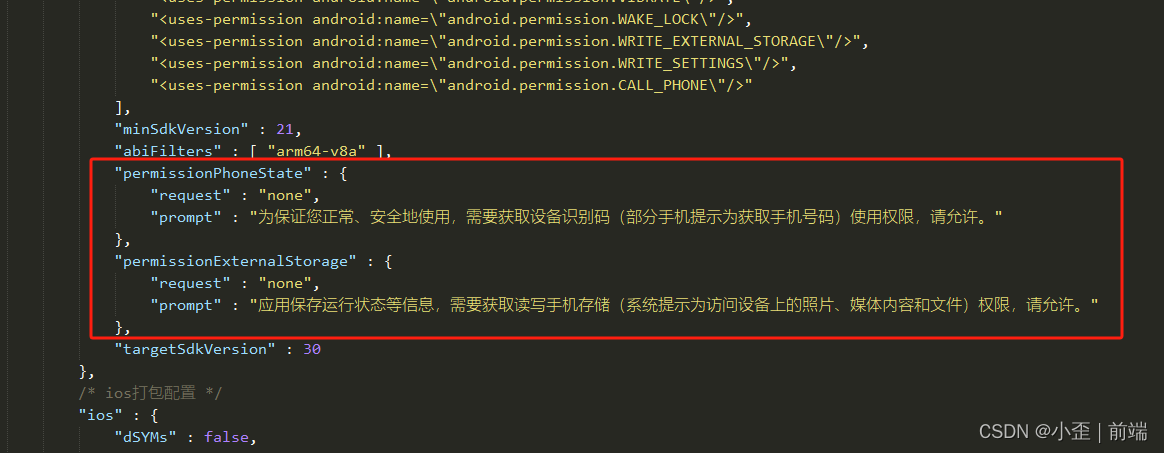
UNI-APP_拨打电话权限如何去掉,访问文件权限关闭
uniapp上架过程中一直提示:允许“app名”拨打电话和管理通话吗? uniapp配置文件:manifest.json “permissionPhoneState” : {“request” : “none”//拨打电话权限关闭 }, “permissionExternalStorage” : {“request” : “none”//访…...

Git知识点汇总表格总结
Git应该是现在各个做开发公司使用最广泛的版本管理工具了,还有一些公司可能用的SVN,不过总体来说,Git绝对是主流,SVN是集中式版本管理,使用起来相对Git更简单,不过功能相对Git也略显简略,Git的优…...

漫谈:C语言 奇葩的指针定义规则
初级代码游戏的专栏介绍与文章目录-CSDN博客 我的github:codetoys,所有代码都将会位于ctfc库中。已经放入库中我会指出在库中的位置。 这些代码大部分以Linux为目标但部分代码是纯C的,可以在任何平台上使用。 C语言的语法很麻拐。 初学者的…...

spring boot中一般如何使用线程池
在Spring Boot中,线程池作为并发编程的核心工具,对于提升应用程序性能、优化资源利用和保证系统稳定性具有重要作用。本文将详细阐述如何在Spring Boot中正确使用线程池,包括配置参数、实例化、任务提交、监控及常见问题处理等环节࿰…...

3步彻底清理Windows右键菜单:ContextMenuManager高效管理指南
3步彻底清理Windows右键菜单:ContextMenuManager高效管理指南 【免费下载链接】ContextMenuManager 🖱️ 纯粹的Windows右键菜单管理程序 项目地址: https://gitcode.com/gh_mirrors/co/ContextMenuManager 你是否曾因Windows右键菜单中堆积如山的…...

Arduino Audio Tools终极指南:从音频新手到专业开发者的完整解决方案
Arduino Audio Tools终极指南:从音频新手到专业开发者的完整解决方案 【免费下载链接】arduino-audio-tools Arduino Audio Tools (a powerful Audio library not only for Arduino) 项目地址: https://gitcode.com/gh_mirrors/ar/arduino-audio-tools 在嵌入…...

如何快速制作专业演示文稿?终极免费开源在线PPT工具PPTist完整指南
如何快速制作专业演示文稿?终极免费开源在线PPT工具PPTist完整指南 【免费下载链接】PPTist PowerPoint-ist(/pauəpɔintist/), An online presentation application that replicates most of the commonly used features of MS PowerPoint,…...

实测Taotoken多模型聚合调用的响应延迟与稳定性观感
🚀 告别海外账号与网络限制!稳定直连全球优质大模型,限时半价接入中。 👉 点击领取海量免费额度 实测Taotoken多模型聚合调用的响应延迟与稳定性观感 在项目开发中,我们常常需要接入不同的大模型来满足多样化的需求。…...

终极HiveWE魔兽地图编辑器:从新手到高手的完整指南
终极HiveWE魔兽地图编辑器:从新手到高手的完整指南 【免费下载链接】HiveWE A Warcraft III world editor. 项目地址: https://gitcode.com/gh_mirrors/hi/HiveWE 还在为魔兽争霸III原版地图编辑器缓慢的加载速度和繁琐的操作而烦恼吗?HiveWE魔兽…...

Mission Planner地面站保姆级教程:给Pixhawk刷固件、校准传感器到成功解锁起飞
Mission Planner地面站全流程实战:从固件刷写到安全起飞的终极指南 当第一次拿到Pixhawk飞控时,许多爱好者都会面临同样的困惑——如何将这块电路板变成可靠的飞行大脑?本文将用工程师视角拆解整个配置流程,分享那些官方手册没写清…...

为什么MIT化学系要求博士生必学NotebookLM?——解密其在NMR谱图关联推理与副产物预测中的3个未公开API调用逻辑
更多请点击: https://intelliparadigm.com 第一章:NotebookLM化学研究辅助 NotebookLM 是 Google 推出的基于 AI 的研究协作者,专为深度阅读、知识整合与推理设计。在化学研究场景中,它能高效解析 PDF 格式的文献(如 …...

Gerbv:专业PCB设计验证工具,开源免费的Gerber文件查看器终极方案
Gerbv:专业PCB设计验证工具,开源免费的Gerber文件查看器终极方案 【免费下载链接】gerbv Maintained fork of gerbv, carrying mostly bugfixes 项目地址: https://gitcode.com/gh_mirrors/ge/gerbv 当你面对复杂的PCB设计文件时,是否…...

从零构建私有数字保险库:硬件选型、加密策略与实战部署
1. 项目概述:从“0”开始的数字资产保险库在数字资产日益成为个人与企业核心财富的今天,如何安全、自主地保管这些资产,成为了一个绕不开的难题。无论是加密货币的私钥、重要的数字凭证、敏感的商业文档,还是家庭成员的密码本&…...

如何实现Minecraft离线畅玩?PrismLauncher-Cracked完全指南
如何实现Minecraft离线畅玩?PrismLauncher-Cracked完全指南 【免费下载链接】PrismLauncher-Cracked This project is a Fork of Prism Launcher, which aims to unblock the use of Offline Accounts, disabling the restriction of having a functional Online Ac…...