yolov5双目检测车辆识别(2023年+单目+双目+python源码+毕业设计)
行人识别yolov5和v7对比
yolo车距
源码:yolov5双目检测车辆识别(2023年+单目+双目+python源码+毕业设计)上盒岛APP,开线上盲盒商店 http://www.hedaoapp.com/yunPC/goodsDetails?pid=4132
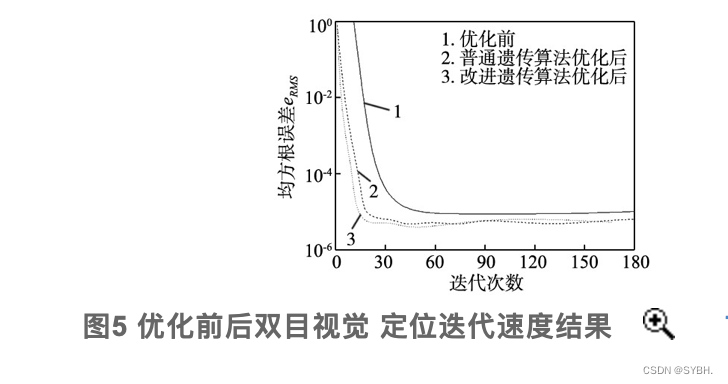
为了提高传统遗传算法(genetic algorithm, GA)IGA优化BP网络迭代时间过长以及精度偏低的缺陷,设计了一种通过改进遗传算法(improved genetic algorithm, GA)IGA优化BP网络,并进行完成双目视觉的定位计算。改进遗传算法来提升BP网络收敛能力并获得更强的全局寻优效果,显著改善BP网络处理效率与精度,最终促使相机获得更高定位精度以及运算速率。给出了IGA优化BP网络的双目视觉定位算法流程,并开展了双目视觉定位实验。研究结果表明,未优化坐标预测值误差均值为0.66 mm,优化坐标误差均值为0.08 mm。改进BP网络进行双目视觉定位精度达到0.12 mm,相对最初预测定位误差降低近0.01 mm。以BP网络来定位双目视觉精度均值是0.12 mm,以OpenCV定位的实际精度是0.10 mm。推断以神经网络双目视觉进行定位时满足双目视觉定位精度条件。
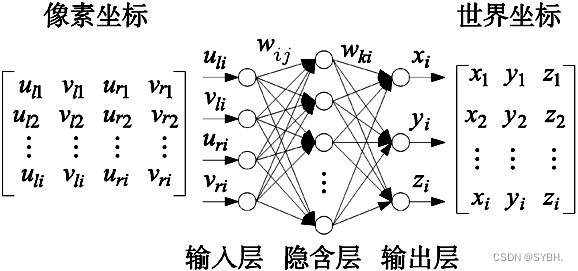
1.1 双目视觉定位BP网络结构
根据图1的方式通过BP网络进行双目视觉定位。共设定3层BP网络,依次包括输入、输出与隐含层。通过左右相机对棋盘格角点区域进行拍摄获得图像数据,再以横纵像素坐标构成输入神经元,之后利用角点实际坐标参数组成BP网络输出神经元。隐含层中共包含9个神经元,可以通过计算输入层神经元数量2倍再加1得到隐含层神经元数量。以wij、wki表示输入、输出层相对隐含层相对隐含层的权值。本研究总共包含1000个训练样本,设定目标精度为0.000 1,同时控制迭代上限10 000
。
1.2 双目视觉定位IGA优化BP结构
重点研究了采用遗传算法来实现双目视觉定位时所需要克服的问题,在此基础上设计得到更优的遗传算法来提升算法收敛能力并获得更强的全局寻优效果,显著改善BP网络处理效率与精度,最终促使相机获得更高定位精度以及运算速率。
1.2.1 改进GA选择算子
通过排序法来达到改进的目标,将第i个个体经过排序处理后被选择概率Pnew通过式(1)进行计算:
利用同名角点检测与匹配的方法,从中提取得到表2中的部分像素坐标与坐标参数。以(u,v)表示像素坐标,u、v依次对应水平与垂直方向。
3.1 精度测试
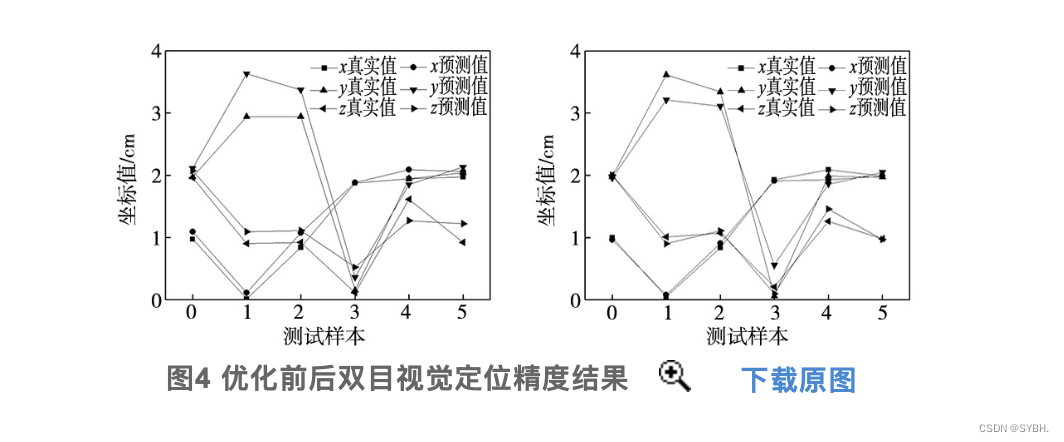
本次总共选择1000组通过相机拍摄得到的同名角点像素坐标及其对应的实际坐标数据组成训练集,之后训练BP网络以及通过IGA进行优化处理的BP网络,接着导入6组数据组成测试集再对相机实施定位。图4a是以未优化处理的BP网络计算得到的预测角点坐标与实际值,可以发现此时两条曲线形成了相近的走势规律,但也存在一定的差异性。图4b是通过IGA进行优化处理的BP网络角点坐标预测结果与实际值,经对比发现此时两条曲线形成了良好贴合的状态,可以确定精确的二维与坐标对应关系,能够确保双目视觉获得更低定位误差。
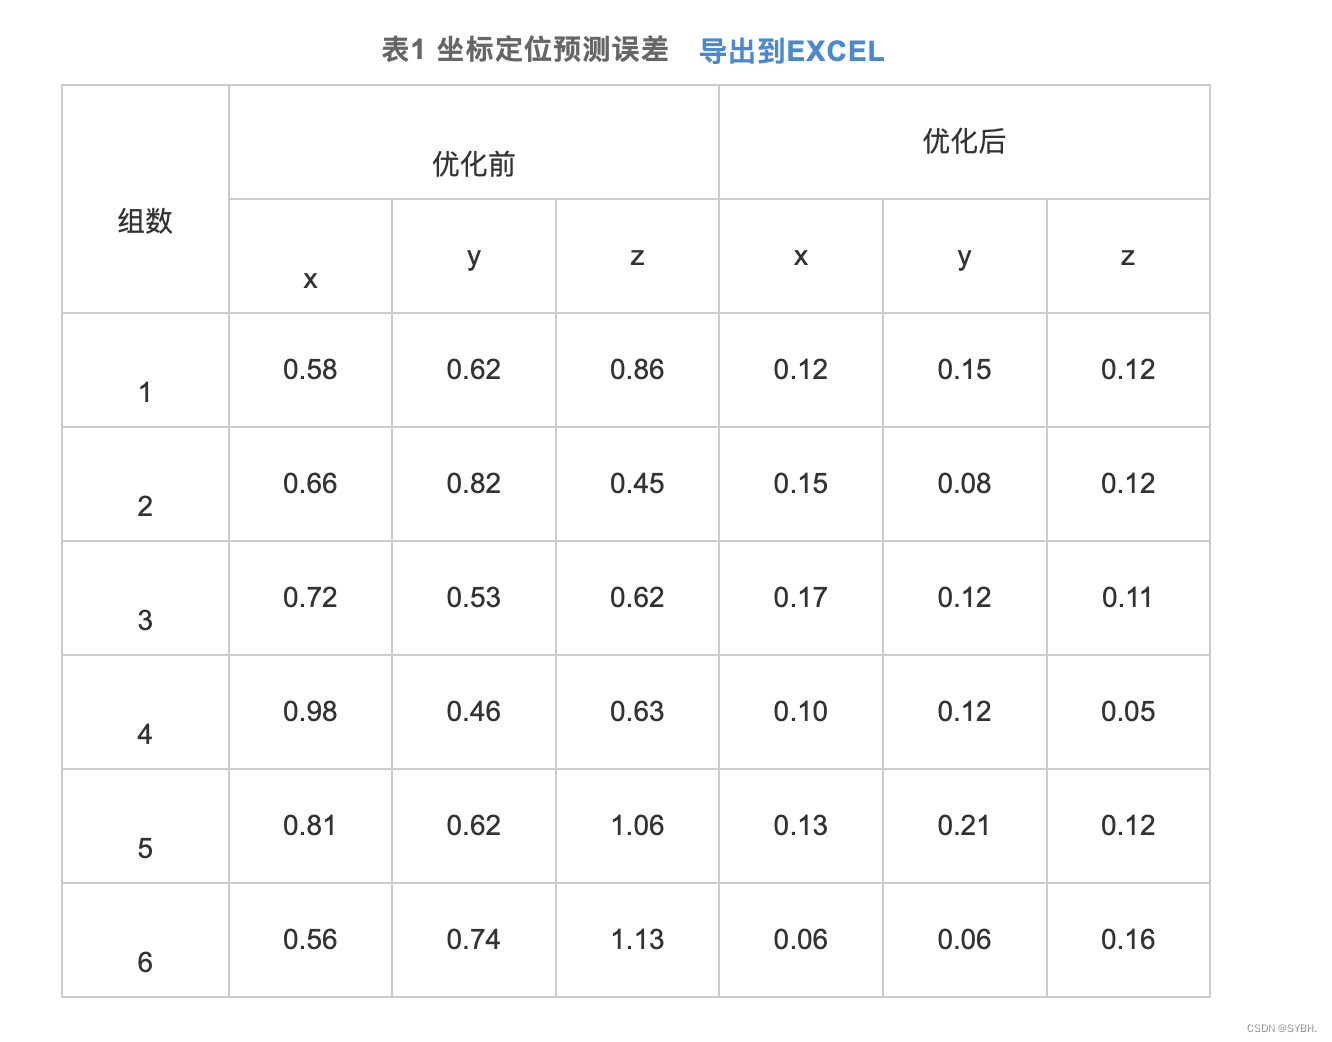
为评价经过改进的神经网络实际定位性能,通过改进BP网络构建二维与三维空间对应关系,对神经网络完成1000次训练后再把二维图像角点数据输入系统中进行测试。按照反向方式记录二维图像角点空间坐标输出结果,再跟定位块坐标开展差值比较,得到表2所示的结果,根据以上方式得到的差值作为最终定位精度。利用表2计算得到的改进BP网络进行双目视觉定位精度达到0.12 mm, 相对最初预测定位误差降低近0.01 mm。 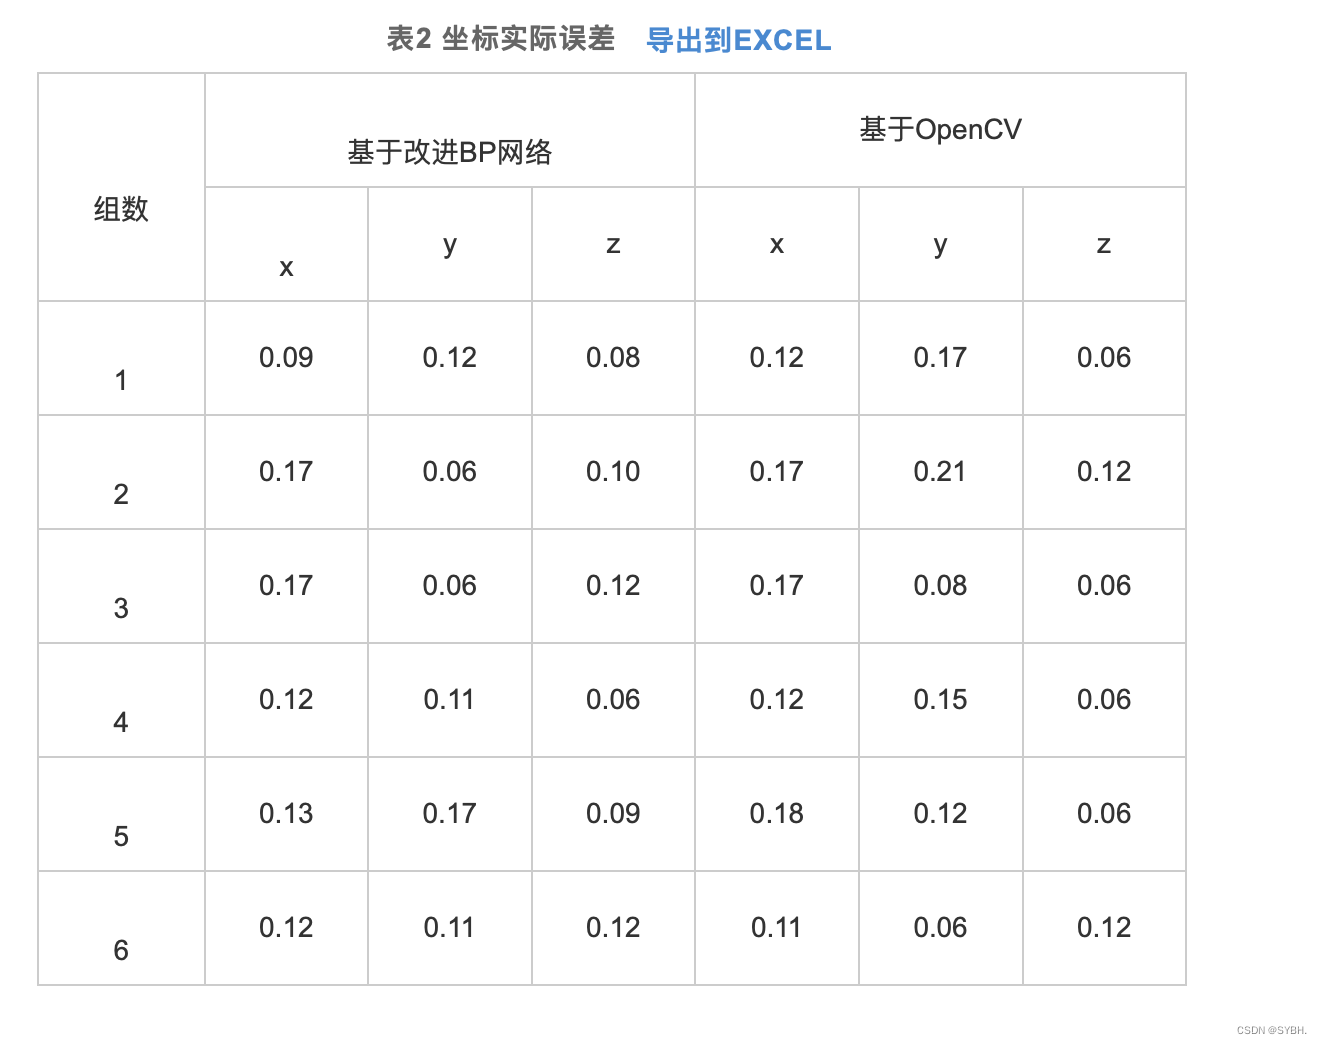
3.2 速度测试
为了对神经网络双目视觉定位结果可靠度进行验证,通过OpenCV完成双目视觉定位测试再跟定位结果进行比较。采用OpenCV传统双目视觉定位模式确定双目视觉参数,再利用定位后的参数进行反向计算得到二维图像平面内角点三维空间坐标数据。再对比上述三维空间计算角点坐标和真实三维空间角点坐标,由此确定定位精度。根据表2可知,以BP网络来定位双目视觉时获得的精度均值是0.12 mm, 以OpenCV定位的实际精度是0.10 mm。由此可以推断,以神经网络双目视觉进行定位时满足双目视觉定位精度条件。
 # -*- coding: utf-8 -*-
import argparse
import time
from pathlib import Pathimport cv2
import torch
import torch.backends.cudnn as cudnn
from numpy import randomimport numpy as np
from PIL import Image, ImageDraw, ImageFontfrom models.experimental import attempt_load
from utils.datasets import LoadStreams, LoadImages
from utils.general import check_img_size, check_requirements, check_imshow, non_max_suppression, apply_classifier, \scale_coords, xyxy2xywh, strip_optimizer, set_logging, increment_path
from utils.plots import plot_one_box
from utils.torch_utils import select_device, load_classifier, time_synchronizedfrom stereo.dianyuntu_yolo import preprocess, undistortion, getRectifyTransform, draw_line, rectifyImage,\stereoMatchSGBM, hw3ToN3, DepthColor2Cloud, view_cloudfrom stereo import stereoconfig_040_2num = 210 #207 209 210 211
def detect(save_img=False):num = 210source, weights, view_img, save_txt, imgsz = opt.source, opt.weights, opt.view_img, opt.save_txt, opt.img_sizewebcam = source.isnumeric() or source.endswith('.txt') or source.lower().startswith(('rtsp://', 'rtmp://', 'http://') )# Directoriessave_dir = Path( increment_path(Path(opt.project) / opt.name, exist_ok=opt.exist_ok) )  # increment run(save_dir / 'labels' if save_txt else save_dir).mkdir(parents=True, exist_ok=True)  # make dir# Initializeset_logging()device = select_device(opt.device)half = device.type != 'cpu'  # half precision only supported on CUDA# Load modelmodel = attempt_load(weights, map_location=device)  # load FP32 modelstride = int(model.stride.max())  # model strideimgsz = check_img_size(imgsz, s=stride)  # check img_sizeif half:model.half()  # to FP16# Second-stage classifierclassify = Falseif classify:modelc = load_classifier(name='resnet101', n=2)  # initializemodelc.load_state_dict(torch.load('weights/resnet101.pt', map_location=device)['model']).to(device).eval()# Set Dataloadervid_path, vid_writer = None, Noneif webcam:view_img = check_imshow()cudnn.benchmark = True  # set True to speed up constant image size inferencedataset = LoadStreams(source, img_size=imgsz, stride=stride)else:save_img = Truedataset = LoadImages(source, img_size=imgsz, stride=stride)print("img_size:")print(imgsz)# Get names and colorsnames = model.module.names if hasattr(model, 'module') else model.namescolors = [[random.randint(0, 255) for _ in range(3)] for _ in names]# Run inferenceif device.type != 'cpu':model(torch.zeros(1, 3, imgsz, imgsz).to(device).type_as(next(model.parameters())))  # run oncet0 = time.time()for path, img, im0s, vid_cap in dataset:img = torch.from_numpy(img).to(device)img = img.half() if half else img.float()  # uint8 to fp16/32img /= 255.0  # 0 - 255 to 0.0 - 1.0if img.ndimension() == 3:img = img.unsqueeze(0)# Inferencet1 = time_synchronized()pred = model(img, augment=opt.augment)[0]# Apply NMSpred = non_max_suppression(pred, opt.conf_thres, opt.iou_thres, classes=opt.classes, agnostic=opt.agnostic_nms)t2 = time_synchronized()# Apply Classifierif classify:pred = apply_classifier(pred, modelc, img, im0s)# Process detectionsfor i, det in enumerate(pred):  # detections per imageif webcam:  # batch_size >= 1p, s, im0, frame = path[i], '%g: ' % i, im0s[i].copy(), dataset.countelse:p, s, im0, frame = path, '', im0s, getattr(dataset, 'frame', 0)p = Path(p)  # to Pathsave_path = str(save_dir / p.name)  # img.jpgtxt_path = str(save_dir / 'labels' / p.stem) + ('' if dataset.mode == 'image' else f'_{frame}')  # img.txts += '%gx%g ' % img.shape[2:]  # print stringgn = torch.tensor(im0.shape)[[1, 0, 1, 0]]  # normalization gain whwhif len(det):# Rescale boxes from img_size to im0 sizedet[:, :4] = scale_coords(img.shape[2:], det[:, :4], im0.shape).round()# Print resultsfor c in det[:, -1].unique():n = (det[:, -1] == c).sum()  # detections per classs += f"{n} {names[int(c)]} {'s' * (n > 1)} , "  # add to string# Write resultsfor *xyxy, conf, cls in reversed(det):if save_txt:  # Write to filexywh = (xyxy2xywh(torch.tensor(xyxy).view(1, 4)) / gn).view(-1).tolist()  # normalized xywhprint("xywh  x : %d, y : %d"%(xywh[0],xywh[1]) )line = (cls, *xywh, conf) if opt.save_conf else (cls, *xywh)  # label formatwith open(txt_path + '.txt', 'a') as f:f.write(('%g ' * len(line)).rstrip() % line + '\n')if save_img or view_img:  # Add bbox to imagelabel = f'{names[int(cls)]} {conf:.2f} 'plot_one_box(xyxy, im0, label=label, color=colors[int(cls)], line_thickness=3)##print label x,y zuobiao x = (xyxy[0] + xyxy[2]) / 2y = (xyxy[1] + xyxy[3]) / 2#print(" %s is  x: %d y: %d " %(label,x,y) )height_0, width_0 = im0.shape[0:2]if (x <= int(width_0/2) ):t3 = time_synchronized()#################################stereo codep = numstring = ''#print("P is %d" %p )# 读取数据集的图片#iml = cv2.imread('./stereo/yolo/zuo/%szuo%d.bmp' %(string,p) )  # 左图#imr = cv2.imread('./stereo/yolo/you/%syou%d.bmp' %(string,p) )  # 右图#iml = cv2.imread('./stereo/yolo/zuo/%szuo%d.bmp' %(string,p) )  # 左图#imr = cv2.imread('./stereo/yolo/you/%syou%d.bmp' %(string,p) )  # 右图#height_0, width_0 = im0.shape[0:2]#print("width_0 =  %d "  % width_0)#print("height_0 = %d "  % height_0)iml = im0[0:int(height_0), 0:int(width_0/2)]imr = im0[0:int(height_0), int(width_0/2):int(width_0) ]height, width = iml.shape[0:2]#cv2.imshow("iml",iml)#cv2.imshow("imr",im0)#cv2.waitKey(0)#print("width =  %d "  % width)#print("height = %d "  % height)# 读取相机内参和外参config = stereoconfig_040_2.stereoCamera()# 立体校正map1x, map1y, map2x, map2y, Q = getRectifyTransform(height, width, config)  # 获取用于畸变校正和立体校正的映射矩阵以及用于计算像素空间坐标的重投影矩阵#print("Print Q!")#print("Q[2,3]:%.3f"%Q[2,3])iml_rectified, imr_rectified = rectifyImage(iml, imr, map1x, map1y, map2x, map2y)# 绘制等间距平行线,检查立体校正的效果line = draw_line(iml_rectified, imr_rectified)#cv2.imwrite('./yolo/%s检验%d.png' %(string,p), line)# 消除畸变iml = undistortion(iml, config.cam_matrix_left, config.distortion_l)imr = undistortion(imr, config.cam_matrix_right, config.distortion_r)# 立体匹配iml_, imr_ = preprocess(iml, imr)  # 预处理,一般可以削弱光照不均的影响,不做也可以iml_rectified_l, imr_rectified_r = rectifyImage(iml_, imr_, map1x, map1y, map2x, map2y)disp, _ = stereoMatchSGBM(iml_rectified_l, imr_rectified_r, True) #cv2.imwrite('./yolo/%s视差%d.png' %(string,p), disp)# 计算像素点的3D坐标(左相机坐标系下)points_3d = cv2.reprojectImageTo3D(disp, Q)  # 可以使用上文的stereo_config.py给出的参数#points_3d = points_3d'''#print("x is :%.3f" %points_3d[int(y), int(x), 0] )print('点 (%d, %d) 的三维坐标 (x:%.3fcm, y:%.3fcm, z:%.3fcm)' % (int(x), int(y), points_3d[int(y), int(x), 0]/10, points_3d[int(y), int(x), 1]/10, points_3d[int(y), int(x), 2]/10) )'''count = 0#try:while( (points_3d[int(y), int(x), 2] < 0) | (points_3d[int(y), int(x), 2] > 2500) ):count += 1x += countif( 0 < points_3d[int(y), int(x), 2] < 2300 ):breaky += countif( 0 < points_3d[int(y), int(x), 2] < 2300 ):breakcount += 1x -= countif( 0 < points_3d[int(y), int(x), 2] < 2300 ):breaky -= countif( 0 < points_3d[int(y), int(x), 2] < 2300 ):break#if(count%2==1):#    x += 1#else:#    y += 1text_cxy = "*"cv2.putText(im0, text_cxy, (x, y) ,  cv2.FONT_ITALIC, 1.2, (0,0,255), 3)#print("count is %d" %count)print('点 (%d, %d) 的三维坐标 (x:%.1fcm, y:%.1fcm, z:%.1fcm)' % (int(x), int(y), points_3d[int(y), int(x), 0]/10, points_3d[int(y), int(x), 1]/10, points_3d[int(y), int(x), 2]/10) )dis = ( (points_3d[int(y), int(x), 0] ** 2 + points_3d[int(y), int(x), 1] ** 2 + points_3d[int(y), int(x), 2] **2) ** 0.5 ) / 10print('点 (%d, %d) 的 %s 距离左摄像头的相对距离为 %0.1f cm' %(x, y,label, dis) )text_x = "x:%.1fcm" %(points_3d[int(y), int(x), 0]/10)text_y = "y:%.1fcm" %(points_3d[int(y), int(x), 1]/10)text_z = "z:%.1fcm" %(points_3d[int(y), int(x), 2]/10)text_dis = "dis:%.1fcm" %discv2.rectangle(im0,(xyxy[0]+(xyxy[2]-xyxy[0]),xyxy[1]),(xyxy[0]+(xyxy[2]-xyxy[0])+5+220,xyxy[1]+150),colors[int(cls)],-1);cv2.putText(im0, text_x, (xyxy[0]+(xyxy[2]-xyxy[0])+5, xyxy[1]+30),  cv2.FONT_ITALIC, 1.2, (255,255,255), 3)cv2.putText(im0, text_y, (xyxy[0]+(xyxy[2]-xyxy[0])+5, xyxy[1]+65),  cv2.FONT_ITALIC, 1.2, (255, 255, 255), 3)cv2.putText(im0, text_z, (xyxy[0]+(xyxy[2]-xyxy[0])+5, xyxy[1]+100), cv2.FONT_ITALIC, 1.2, (255, 255, 255), 3)cv2.putText(im0, text_dis, (xyxy[0]+(xyxy[2]-xyxy[0])+5, xyxy[1]+145), cv2.FONT_ITALIC, 1.2, (255, 255, 255), 3)t4 = time_synchronized()print(f'Done. ({t4 - t3:.3f}s)')# Print time (inference + NMS)print(f'{s}Done. ({t2 - t1:.3f}s)')# Stream resultsif view_img:cv2.imshow(str(p), im0)cv2.waitKey(1)  # 1 millisecond# Save results (image with detections)if save_img:if dataset.mode == 'image':cv2.imwrite(save_path, im0)else:  # 'video'if vid_path != save_path:  # new videovid_path = save_pathif isinstance(vid_writer, cv2.VideoWriter):vid_writer.release()  # release previous video writerfourcc = 'mp4v'  # output video codecfps = vid_cap.get(cv2.CAP_PROP_FPS)w = int(vid_cap.get(cv2.CAP_PROP_FRAME_WIDTH))h = int(vid_cap.get(cv2.CAP_PROP_FRAME_HEIGHT))vid_writer = cv2.VideoWriter(save_path, cv2.VideoWriter_fourcc(*fourcc), fps, (w, h))vid_writer.write(im0)if save_txt or save_img:s = f"\n{len(list(save_dir.glob('labels/*.txt')))} labels saved to {save_dir / 'labels'}" if save_txt else ''print(f"Results saved to {save_dir}{s}")print(f'Done. ({time.time() - t0:.3f}s)')if __name__ == '__main__':parser = argparse.ArgumentParser()parser.add_argument('--weights', nargs='+', type=str, default='last_dead_fish_1000.pt', help='model.pt path(s)')parser.add_argument('--source', type=str, default='./shuangmu_dead_fish_011.mp4' , help='source')  # file/folder, 0 for webcamparser.add_argument('--img-size', type=int, default=640, help='inference size (pixels)')parser.add_argument('--conf-thres', type=float, default=0.25, help='object confidence threshold')parser.add_argument('--iou-thres', type=float, default=0.45, help='IOU threshold for NMS')parser.add_argument('--device', default='', help='cuda device, i.e. 0 or 0,1,2,3 or cpu')parser.add_argument('--view-img', action='store_true', help='display results')parser.add_argument('--save-txt', action='store_true', help='save results to *.txt')parser.add_argument('--save-conf', action='store_true', help='save confidences in --save-txt labels')parser.add_argument('--classes', nargs='+', type=int, help='filter by class: --class 0, or --class 0 2 3')parser.add_argument('--agnostic-nms', action='store_true', help='class-agnostic NMS')parser.add_argument('--augment', action='store_true', help='augmented inference')parser.add_argument('--update', action='store_true', help='update all models')parser.add_argument('--project', default='runs/detect', help='save results to project/name')parser.add_argument('--name', default='exp', help='save results to project/name')parser.add_argument('--exist-ok', action='store_true', help='existing project/name ok, do not increment')opt = parser.parse_args()print(opt)check_requirements()with torch.no_grad():if opt.update:  # update all models (to fix SourceChangeWarning)for opt.weights in ['yolov5s.pt', 'yolov5m.pt', 'yolov5l.pt', 'yolov5x.pt']:detect()strip_optimizer(opt.weights)else:detect()
相关文章:
yolov5双目检测车辆识别(2023年+单目+双目+python源码+毕业设计)
行人识别yolov5和v7对比yolo车距源码:yolov5双目检测车辆识别(2023年单目双目python源码毕业设计)上盒岛APP,开线上盲盒商店http://www.hedaoapp.com/yunPC/goodsDetails?pid4132 为了提高传统遗传算法(genetic algorithm, GA)IGA优化BP网络迭代时间过长以及精度偏…...

华为OD机试题,用 Java 解【用户调度问题】问题
华为Od必看系列 华为OD机试 全流程解析+经验分享,题型分享,防作弊指南)华为od机试,独家整理 已参加机试人员的实战技巧华为od 2023 | 什么是华为od,od 薪资待遇,od机试题清单华为OD机试真题大全,用 Python 解华为机试题 | 机试宝典使用说明 参加华为od机试,一定要注意不…...

根据mybatis plus注解动态创建sqlite表和表字段
根据mybatis plus注解动态创建sqlite表和表字段 启动时动态创建sqlite数据库,根据mybatis plus注解动态创建表。如果有新增字段,动态创建字段。 文章目录根据mybatis plus注解动态创建sqlite表和表字段一、初始化数据库1.系统启动时初始化数据库2.初始化…...

同步、异步ETL架构的比较
背景介绍: 数据的抽取,转换和加载 (ETL, Extract, Transform, Load) 是构建数据仓库过程中最复杂也是至 关重要的一个步骤,我们通常用两种办法来处理 ETL 流程: 一种是异步(Asynchronous) ETL 方式, 也称为文本文件(Flat file)方式。 另外…...
【机会约束、鲁棒优化】具有排放感知型经济调度中机会约束和鲁棒优化研究【IEEE6节点、IEEE118节点算例】(Matlab代码实现)
💥💥💞💞欢迎来到本博客❤️❤️💥💥 🏆博主优势:🌞🌞🌞博客内容尽量做到思维缜密,逻辑清晰,为了方便读者。 ⛳️座右铭&a…...

用Python帮老叔选出好基金,大赚一笔,老叔专门提着茅台登门道谢
我有个老叔很喜欢买基金,因为不想被割韭菜,所以啥群都没进,全部自己精挑细选。 看着他的一个本子密密麻麻地写了一大堆东西,全是基金的数据分析,一大把年纪了挺不容易的,于是就决定帮他一把。 在跟他详谈…...
ZeroTier实现内网穿透详细教程,无需公网IP,实现异地组网
ZeroTier实现内网穿透详细教程,无需公网IP,实现异地组网ZeroTier1.官网注册账号,创建自己的局域网段2.点击创建好的网络,进入设置界面进行设置3.下载客户端,安装客户端,然后连接到网络中4.加入网络成功后&a…...

电商 SaaS 全渠道实时数据中台最佳实践
摘要:本文整理自聚水潭数据专家张成玉,聚水潭高级数据工程师应圣楚,在 FFA 2022 行业案例专场的分享。本篇内容主要分为四个部分:实时数仓的建设和发展数据中台的产品体系及架构实时计算的实践和优化对实时计算的未来展望Tips&…...

macos ncnn 安装踩坑记录···
安装真麻烦踩了无数坑,官方给的安装教程:macos安装ncnn, 安装过程老是报错,记录一下卡的比较久的,网上也不好找资料的错. 我的电脑: 1. 使用homebrew 的时候失败fatal: not in a git directory Error: Command failed…...
ESP32设备驱动-AM2301(DHT21)温度湿度传感器驱动
AM2301(DHT21)温度湿度传感器驱动 文章目录 AM2301(DHT21)温度湿度传感器驱动1、AM2301(DHT21)介绍2、硬件准备3、软件准备4、驱动实现1、AM2301(DHT21)介绍 AM2301 湿敏电容数字温湿度模块是一款含有已校准数字信号输出的温湿度复合传感器。它应用专用的数字模块采集技术和温…...

[数据结构]:16-归并排序(顺序表指针实现形式)(C语言实现)
目录 前言 已完成内容 归并排序实现 01-开发环境 02-文件布局 03-代码 01-主函数 02-头文件 03-PSeqListFunction.cpp 04-SortFunction.cpp 结语 前言 此专栏包含408考研数据结构全部内容,除其中使用到C引用外,全为C语言代码。使用C引用主要是…...
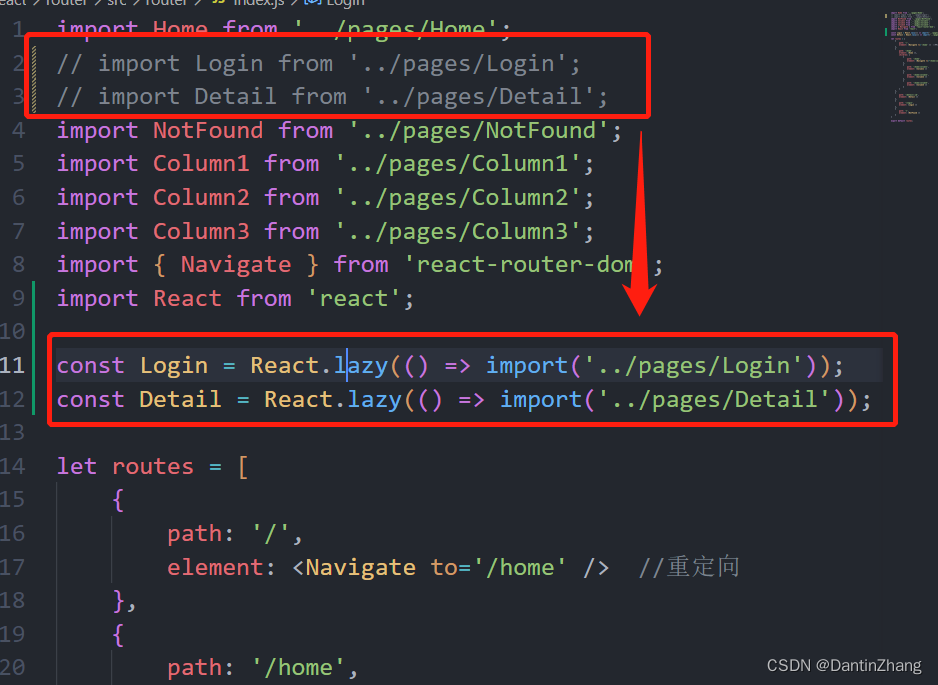
React(七):Router基本使用、嵌套路由、编程式导航、路由传参、懒加载
React(七)一、React-Router的基本使用1.安装和介绍2.路由的配置和跳转3.Navigate的使用4.如果找不到对应的路由路径?二、嵌套路由的用法三、编程式路由导航1.类组件中使用useNavigate2.函数式组件中使用useNavigate四、路由跳转传参1.设置好路…...
Java基础面试题(一)
Java基础面试题 一、面向对象和集合专题 1. 面向对象和面向过程的区别 面向过程:是分析解决问题的步骤,然后用函数把这些步骤一步一步地实现,然后在使用的时候一一调用则可。性能较高,所以单片机、嵌入式开发等一般采用面向过程…...
)
代码命名规范是一种责任也是一种精神(工匠精神)
代码命名规范之美规范概述命名规范管理类命名BootstrapProcessorManagerHolderFactoryProviderRegistrarEngineServiceTask传播类命名ContextPropagator回调类命名Handler ,Callback,Trigger,ListenerAware监控类命名MetricsEstimatorAccumul…...
奇淫技巧:阅读源码时基于一组快捷键,让我们知道身在何方!
一个十分蛋疼的问题 在我们阅读框架底层源码的时候,我们往往会一个方法一个方法的往下翻,翻了很久很快就会有这样的灵魂拷问:我从那个类(方法)来,我要到哪个(类)方法中去。这个时候…...

你真的弄懂this指向了吗
前言 在说 this 指向之前,请观察以下代码,并说出它们的输出结果: 第 1 组:标准函数 window.color "red"; let o {color: "blue", }; function sayColor() {console.log(this.color); }sayColor(); // 输…...
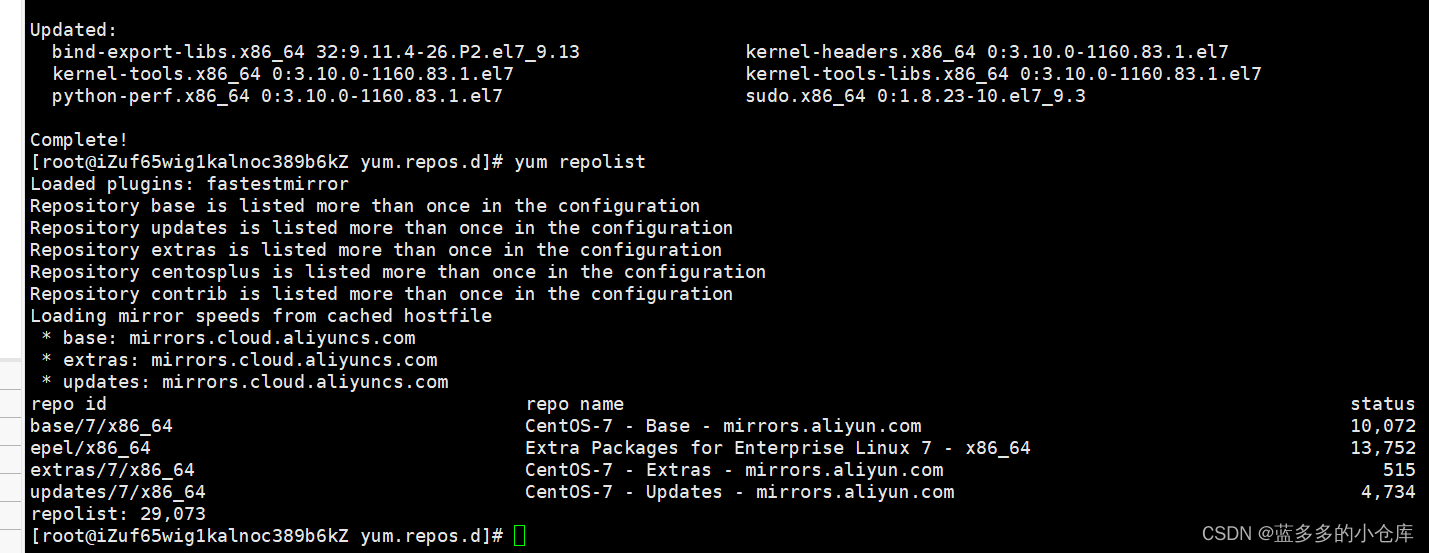
阿里云服务器使用教程:使用xshell、xFtp工具连接阿里云服务器(Centos7)并修改Centos7的yum源为阿里镜像源
目录 1、下载并安装xshell、xFtp 2、远程连接阿里云服务器 3、 修改Centos7的yum源为阿里镜像源 1、下载并安装xshell、xFtp XShell可以在Windows界面下来访问远端不同系统下的服务器,从而比较好的达到远程控制终端的目的。它支持 RLOGIN、SFTP、SERIAL、TELNET、…...
一文快速入门 HTML 网页基础
专栏简介: 前端从入门到进阶 题目来源: leetcode,牛客,剑指offer. 创作目标: 记录学习JavaEE学习历程 希望在提升自己的同时,帮助他人,,与大家一起共同进步,互相成长. 学历代表过去,能力代表现在,学习能力代表未来! 目录 1.HTML 结构 1.1. 认识 HTML 标签 1.2 HTML 文件结构…...
)
DEJA_VU3D - Cesium功能集 之 100-任意多边形(标绘)
前言 编写这个专栏主要目的是对工作之中基于Cesium实现过的功能进行整合,有自己琢磨实现的,也有参考其他大神后整理实现的,初步算了算现在有差不多实现小140个左右的功能,后续也会不断的追加,所以暂时打算一周2-3更的样子来更新本专栏(每篇博文都会奉上完整demo的源代码,…...

Cadence OrCAD Capture全局修改原理图的非本地库符号的方法图文教程Repalce Catch功能
⏪《上一篇》 🏡《总目录》 ⏩《下一篇》 目录 1,概述2,修改方法2.1,新建本地库2.2,待修改搬入本地库2.3,修改原理图符号2.4,全局更新原理图符号3,总结B站关注“硬小二”浏览更多演示视频 1,概述 在完成原理图设计...

3秒获取全网歌词:163MusicLyrics让多平台歌词提取效率提升10倍
3秒获取全网歌词:163MusicLyrics让多平台歌词提取效率提升10倍 【免费下载链接】163MusicLyrics Windows 云音乐歌词获取【网易云、QQ音乐】 项目地址: https://gitcode.com/GitHub_Trending/16/163MusicLyrics 在数字音乐时代,歌词已成为音乐体验…...

如何用Electron打造全平台视频播放神器:zyfun跨平台开发实战指南
如何用Electron打造全平台视频播放神器:zyfun跨平台开发实战指南 【免费下载链接】zyfun 跨平台桌面端视频资源播放器,免费高颜值. 项目地址: https://gitcode.com/gh_mirrors/zy/zyfun 在当今多设备、多系统的数字时代,一款真正优秀的视频播放器…...

开源编解码引擎OpenH264全解析:技术原理与实战技巧
开源编解码引擎OpenH264全解析:技术原理与实战技巧 【免费下载链接】openh264 Open Source H.264 Codec 项目地址: https://gitcode.com/gh_mirrors/op/openh264 在视频通信、直播和多媒体应用开发中,如何在保证画质的同时实现高效压缩ÿ…...

GLM-OCR场景应用:教育资料数字化、商务文档信息抽取实战
GLM-OCR场景应用:教育资料数字化、商务文档信息抽取实战 1. 引言:文档智能化的时代需求 在信息爆炸的今天,我们每天都要处理大量纸质文档和电子文件。教育机构需要将历年试卷数字化归档,企业财务部门要处理堆积如山的发票和合同…...

数字减影血管造影系统市场洞察:至2032年将攀升至557.6亿元
据恒州诚思最新调研数据显示,2025年全球数字减影血管造影系统(DSA)市场规模预计达386.7亿元,至2032年将攀升至557.6亿元,2026-2032年复合增长率(CAGR)为5.5%。这一增长受全球老龄化加速、心血管…...

Mermaid在线编辑器完整指南:3步制作专业图表零基础入门
Mermaid在线编辑器完整指南:3步制作专业图表零基础入门 【免费下载链接】mermaid-live-editor Edit, preview and share mermaid charts/diagrams. New implementation of the live editor. 项目地址: https://gitcode.com/GitHub_Trending/me/mermaid-live-edito…...

PLC新手必看:三菱FX2N顺序功能图的5个常见错误及解决方法
三菱FX2N顺序功能图实战避坑指南:从原理到调试的完整解决方案 第一次接触三菱FX2N的顺序功能图编程时,那种既兴奋又忐忑的心情至今记忆犹新。看着逻辑清晰的流程图在仿真中运行失常,或是设备突然"抽风"时的茫然,是每个P…...

若依框架单点登录!!!
一、不分离版在application.yml设置maxSession为1即可。修改shiro的配置shiro:session:# 同一个用户最大会话数,比如2的意思是同一个账号允许最多同时两个人登录(默认-1不限制)maxSession: 1# 踢出之前登录的/之后登录的用户,默认…...

告别手动操作!用Word宏/VBA实现doc批量转docx的隐藏技巧
职场效率革命:Word宏/VBA零代码实现文档格式批量升级 每天面对堆积如山的.doc文件,行政文员小张总要手动打开每个文件另存为.docx格式——这个机械操作不仅耗时费力,还容易遗漏文件。其实微软Office内置的自动化工具能完美解决这个问题&#…...

OpenClaw+Qwen3.5-4B-Claude:个人知识库自动更新系统
OpenClawQwen3.5-4B-Claude:个人知识库自动更新系统 1. 为什么需要自动化知识管理 作为一个技术从业者,我每天都会接触到大量信息——技术博客、论文摘要、行业动态、代码库更新等等。过去三年里,我尝试过各种笔记工具和知识管理方法&#…...