超详细的前后端实战项目(Spring系列加上vue3)前端篇(二)(一步步实现+源码)
好了,兄弟们,继昨天的项目之后,开始继续敲前端代码,完成前端部分
昨天完成了全局页面的代码,和登录页面的代码,不过昨天的代码还有一些需要补充的,这里添加一下
内容补充:在调用登录接口之后进行一个页面的跳转
先介绍一下router路由的使用吧(知道的兄弟们可以跳过哦)
页面的路由:1.安装vue-router :npm install vue-router @4 (在终端输入命令即可)。2.在index.js中创建路由器并导出。3.main.js中使用,4.<router-view>中展示
(这里因为刚开始创建项目的时候点击了vue Router,脚手架已经帮我们生成好了,那就不用管了,前三步自动完成,我们只管使用就好了)
这里在Login页面中添加
import {useRouter} from 'vue-router'
const router = useRouter()
const login = async()=>{let result = await userLoginService(loginData.value);renderIcon(result.msg?result.msg:'登录成功');router.push('/')
}
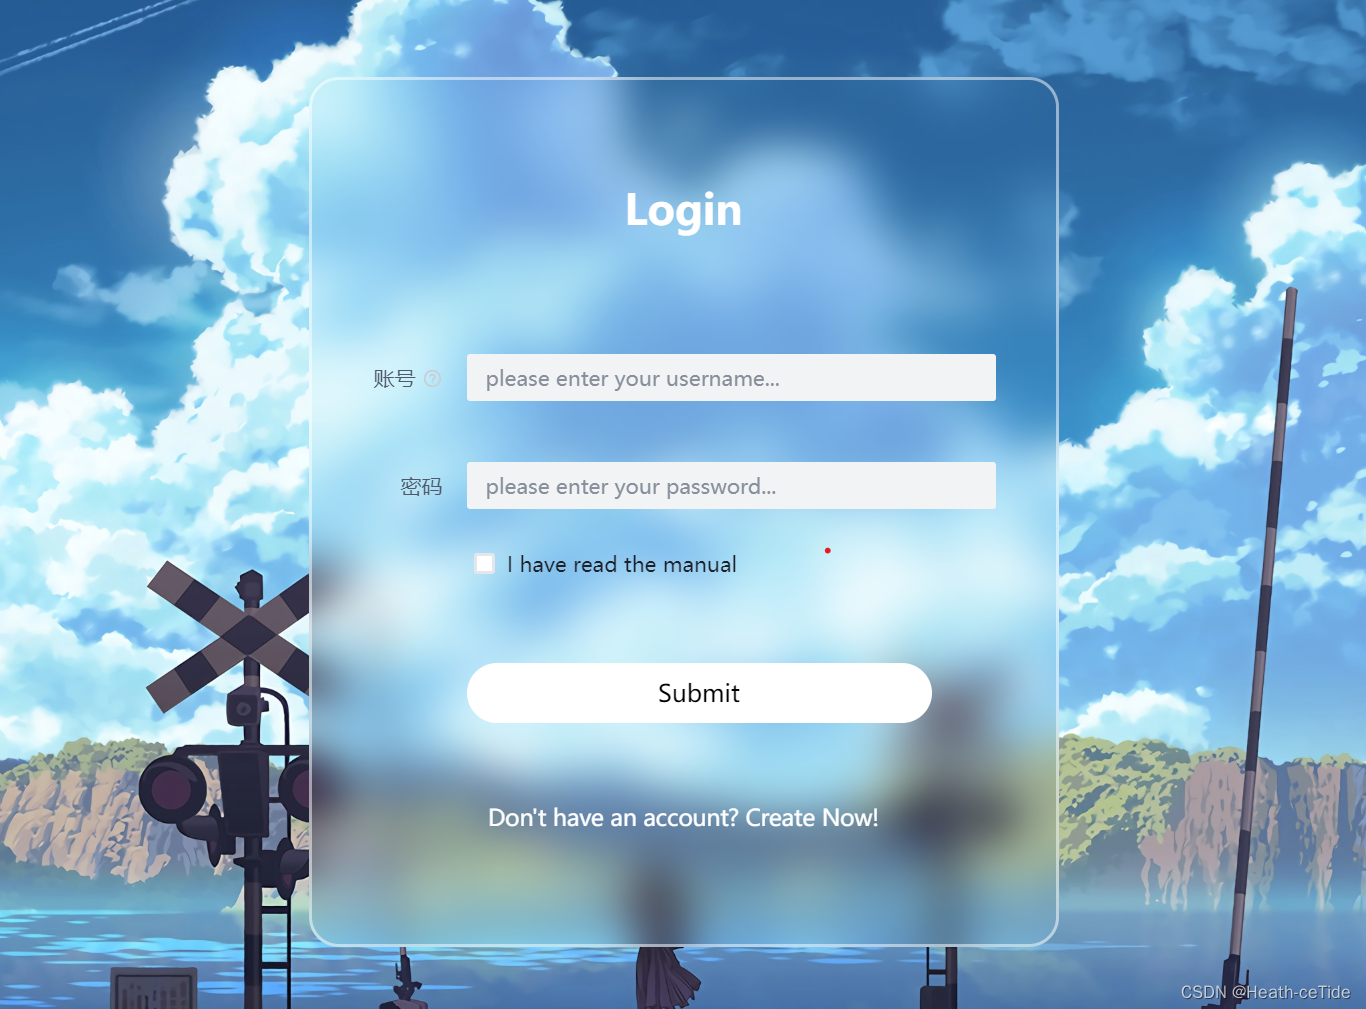
添加完这几行代码就OK了,这里我们可以试一下能不能跳转,
emmmm,因为暂时没有进行后端的开发,如果要测试的话,此时要么把调用后端的函数给注释了,要么使用接口测试工具(感觉好麻烦)
<script setup>
// import { h } from 'vue';
// import { IconExclamationCircleFill } from '@arco-design/web-vue/es/icon';
import { ref } from "vue";
// import {userLoginService} from '../api/user'
import {useRouter} from 'vue-router'
const router = useRouter()
const loginData = ref({username: "",password: "",isRead: false,
});const rules = [{validator: (value, cb) => {return new Promise((resolve) => {window.setTimeout(() => {if (value !== " ") {cb("content not empty");}resolve();}, 1000);});},},
];
// const renderIcon = () => h(IconExclamationCircleFill);
const login = async()=>{// let result = await userLoginService(loginData.value);// renderIcon(result.msg?result.msg:'登录成功');router.push('/')
}</script>
方便起见,还是用注释吧。
OK,我们来运行一下代码


在点击了Submit之后,成功跳转到了主页面,(记得把函数的注释去掉)
内容补充,GlobalPage.vue的样式修改(改了一下布局,现在能全局了)
<style scoped>
.global{height: 100vh;
}
.layout-demo :deep(.arco-layout-header),
.layout-demo :deep(.arco-layout-footer),
.layout-demo :deep(.arco-layout-sider-children),
.layout-demo :deep(.arco-layout-content) {display: flex;flex-direction: column;justify-content: center;color: var(--color-white);font-size: 16px;font-stretch: condensed;text-align: center;
}.layout-demo :deep(.arco-layout-header),
.layout-demo :deep(.arco-layout-footer) {height: 64px;background-color: var(--color-primary-light-4);
}.layout-demo :deep(.arco-layout-sider) {width: 206px;background-color: var(--color-primary-light-3);
}.layout-demo :deep(.arco-layout-content) {background-color: rgb(var(--arcoblue-6));
}.footer {background-color: aliceblue;padding: 16px;position: sticky;bottom: 0;left: 0;right: 0;text-align: center;letter-spacing: 3px;
}
</style>
内容补充: 在登录页补充开发一下注册页面。
之前只写了登录页面,当然也得有注册页面,来打造一个
其实只要有了登录页面,对于注册页面也就不难了,
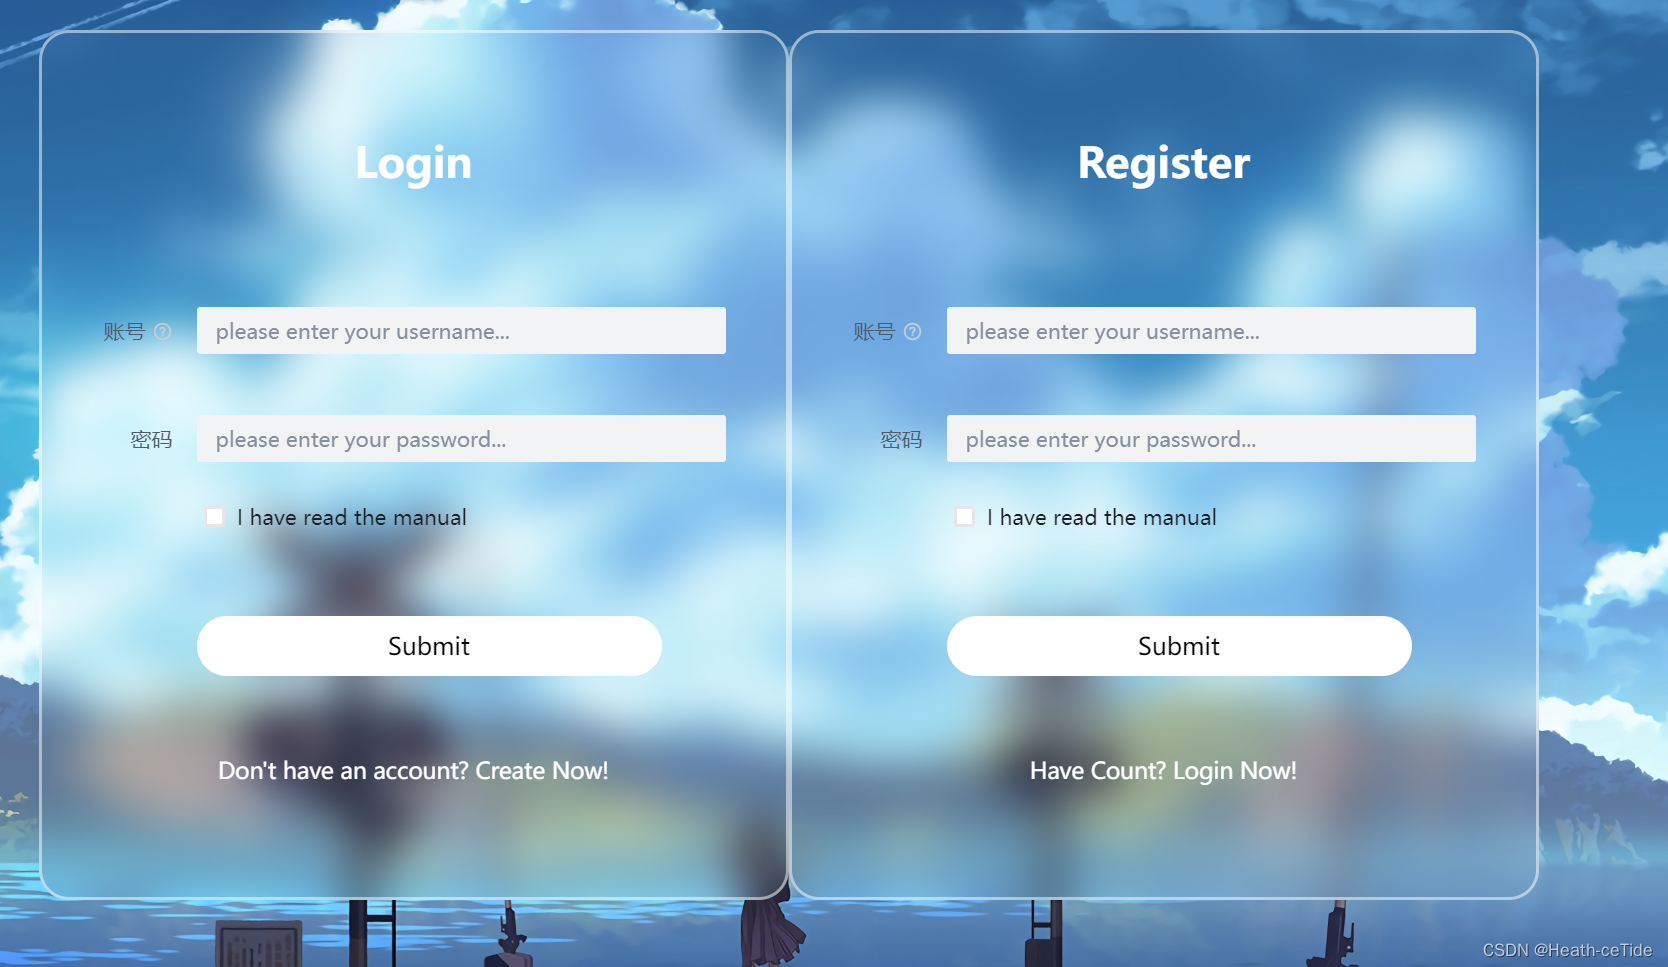
<div class="login-box" v-if="!isLogin"><a-form:model="loginData":style="{ width: '600px' }"@submit="handleSubmit"class="input-box"><h2 style="margin-bottom: 60px">Login</h2><a-form-itemfield="name"tooltip="Please enter username"label="账号"class="element":rules="rules"><a-inputv-model="loginData.username"placeholder="please enter your username..."style="margin-right: 40px"/></a-form-item><a-form-item field="post" label="密码" class="element" :rules="rules"><a-inputv-model="loginData.password"placeholder="please enter your password..."style="margin-right: 40px"/></a-form-item><a-form-item field="isRead"><a-checkbox v-model="loginData.isRead">I have read the manual</a-checkbox></a-form-item><a-form-item><a-button html-type="submit" class="input-box" @click="login">Submit</a-button></a-form-item><div class="register-link"><a @click="isLogin = !isLogin">Don't have an account? Create Now!</a></div></a-form></div>这是之前登录页面的代码,我们直接把它复制一份,再把h2标签的login改成register就好了
此时页面上就出现了两个表单,还记得之前的搜素框控制显示隐藏吗,这个也是这样,甚至更加简单,
<div class="login-box" v-if="!isLogin">在div标签这里用v-if来控制两个,
回忆之前的组件开发三部曲:前端样式代码(html,css)已经完成,下面开始数据绑定与事件
这里我们在script代码中加上
const isLogin = ref(false) //记得引入ref(之前好像引入过了)
那么:登录页的div: <div class="login-box" v-if="!isLogin">
注册页的div: <div class="login-box" v-if="isLogin">
这样就成功控制了一个显示一个隐藏的效果了(注意其中的逻辑关系,要让login先显示)
然后就是控制页面的转换了,当点击Don't have an account? Create Now!就转换到注册页,那么可以
<div class="register-link">
<a @click="isLogin = !isLogin">Don't have an account? Create Now!</a>
</div>
加一个点击效果进行转换
除此之外,注册页面用的输入框可跟登录页不一样,这里可以去组件库找找

这里可以使用其中的一些输入框和表单校验方法,不过数据绑定这块建议继续用ref
然后我们前往api/user.js,为用户注册写调用后端接口方法(这里跟登录差不多)
import request from '../utils/request'//创建一个调用登录接口函数
export const userLoginService = (loginData) =>{//用urlSearchParams完成传递const params = new URLSearchParams()for(let key in loginData){params.append(key,loginData[key]);}return request.post('/user/login',params);
}export const userRegisterService = (registerData) =>{//用urlSearchParams完成传递const params = new URLSearchParams()for(let key in registerData){params.append(key,registerData[key]);}return request.post('/user/register',params);
}
不能说长得很像,只能说根本就是一模一样。。
然后我们在Login登录界面编写调用后端接口方法
const register = async () => {
let result = await userRegisterService(registerData.value);
renderIcon(result.msg ? result.msg : "注册成功");
};
然后在上面submit按钮上绑定@click=“register”即可
下面来展示一下登录页目前的全部代码:
<template><div class="container"><div class="login-box" v-if="!isLogin"><a-form:model="loginData":style="{ width: '600px' }"@submit="handleSubmit"class="input-box"><h2 style="margin-bottom: 60px">Login</h2><a-form-itemfield="name"tooltip="Please enter username"label="账号"class="element":rules="rules"><a-inputv-model="loginData.username"placeholder="please enter your username..."style="margin-right: 40px"/></a-form-item><a-form-item field="post" label="密码" class="element" :rules="loginRules"><a-inputv-model="loginData.password"placeholder="please enter your password..."style="margin-right: 40px"/></a-form-item><a-form-item field="isRead"><a-checkbox v-model="loginData.isRead">I have read the manual</a-checkbox></a-form-item><a-form-item><a-button html-type="submit" class="input-box" @click="login">Enter</a-button></a-form-item><div class="register-link"><a @click="isLogin = !isLogin">Don't have an account? Create Now!</a></div></a-form></div><div class="login-box" v-if="isLogin"><a-form:model="loginData":style="{ width: '600px' }"@submit="handleSubmit"class="input-box"><h2 style="margin-bottom: 60px">Register</h2><a-formref="formRef":rules="regRules":model="registerData":style="{ width: '600px' }"@submit="handleSubmit"><a-form-item field="name" label="账号" validate-trigger="blur"><a-inputv-model="registerData.name"placeholder="please enter your username..."style="margin-right: 60px"/></a-form-item><a-form-item field="password" label="密码" validate-trigger="blur"><a-input-passwordv-model="registerData.password"placeholder="please enter your password..."style="margin-right: 60px"/></a-form-item><a-form-itemfield="password2"label="确认密码"validate-trigger="blur"><a-input-passwordv-model="registerData.password2"placeholder="please confirm your password..."style="margin-right: 60px"/></a-form-item><a-form-item field="email" label="email"><a-inputv-model="registerData.email"placeholder="please enter your email..."style="margin-right: 60px"/></a-form-item></a-form><a-form-item><a-button html-type="submit" class="input-box" @click="register">Submit</a-button></a-form-item><div class="register-link"><a @click="isLogin = !isLogin">Have Count? Login Now!</a></div></a-form></div></div>
</template>
<script setup>
import { h } from "vue";
import { IconExclamationCircleFill } from "@arco-design/web-vue/es/icon";
import { ref } from "vue";
import { userLoginService, userRegisterService } from "../api/user";
import { useRouter } from "vue-router";
const router = useRouter();
const loginData = ref({username: "",password: "",isRead: false,
});const loginRules = [{validator: (value, cb) => {return new Promise((resolve) => {window.setTimeout(() => {if (value !== " ") {cb("content not empty");}resolve();}, 1000);});},},
];
const renderIcon = () => h(IconExclamationCircleFill);
const login = async () => {let result = await userLoginService(loginData.value);renderIcon(result.msg ? result.msg : "登录成功");router.push("/");
};const register = async () => {let result = await userRegisterService(registerData.value);renderIcon(result.msg ? result.msg : "登录成功");
};//登录注册页显示隐藏
const isLogin = ref(false);const handleSubmit = ({ values, errors }) => {console.log("values:", values, "\nerrors:", errors);
};
const registerData = ref({name: "",password: "",password2: "",email: ""
});const regRules = {name: [{required: true,message:'name is required',},],password: [{required: true,message:'password is required',},],password2: [{required: true,message:'password is required',},{validator: (value, cb) => {if (value !== registerData.value.password) {cb('two passwords do not match')} else {cb()}}}],email: [{type: 'email',required: true,}],}</script><style scoped>
* {margin: 0;padding: 0;box-sizing: border-box;font-family: "Poppins", sans-serif;display: flex;justify-content: center;
}
.container {width: 100%;height: 100vh;background: url("../assets/background.jpg") no-repeat;background-size: cover;background-position: center;display: flex;justify-content: center;align-items: center;
}.container .login-box {position: relative;width: 500px;height: 580px;background-color: transparent;border: 2px solid rgba(255, 255, 255, 0.5);border-radius: 20px;display: flex;justify-content: center;align-items: center;backdrop-filter: blur(15px);
}.login-box h2 {font-size: 28px;color: #fff;text-align: center;
}.login-box .input-box {position: relative;width: 310px;margin: 30px 0;
}.input-box input {width: 80%;height: 60px;background: transparent;border: none;outline: none;font-size: 16px;color: #fff;padding: 0 2px 0 5px;
}.input-box input::placeholder {color: #f9f9f9;
}.input-box .icon {position: absolute;right: 8px;color: #fff;font-size: 16px;line-height: 25px;
}.login-box .remember-forget {margin: -15px 0 15px;font-size: 15px;color: #fff;display: flex;justify-content: space-between;
}.remember-forget label input {margin-right: 30px;
}.login-box button {width: 100%;height: 40px;background: #fff;border: none;outline: none;border-radius: 40px;cursor: pointer;font-size: 16px;color: #000;transition: all 0.5s;
}.login-box button:hover {background: #1f73c9;color: #fff;
}.login-box .register-link {font-size: 15px;color: #fff;text-align: center;margin: 5px 0 5px;
}.remember-forget a,
.register-link a {color: #fff;text-decoration: none;
}.remember-forget a:hover,
.register-link a:hover {text-decoration: underline;
}/* Responsive Design */
@media (max-width: 460px) {.container .login-box {width: 350px;}.login-box .input-box {width: 290px;}
}@media (max-width: 360px) {.container .login-box {width: 100%;height: 100vh;border: none;}
}
.element {margin: 20px 0;
}
</style>
全局页面跳转解决:
既然都讲到页面路由了,就多练练吧,
在全局页面(GlobalPage.vue)这一块我们把之前写死的searchPage去掉改成可变的router-view
<template><a-layout style="height: 400px"><a-layout-header><global-header></global-header></a-layout-header><a-layout><a-layout-sider theme="dark">Sider</a-layout-sider><a-layout-content><router-view></router-view></a-layout-content><!--就是这里--></a-layout><a-layout-footer><global-footer class="footer"></global-footer></a-layout-footer></a-layout>
</template>
然后就可以开始布置了,现在点击GlobalHeader.vue全局头部,
<template><div class="menu-demo"><a-menu mode="horizontal" theme="dark" :default-selected-keys="['1']"><a-menu-itemkey="0":style="{ padding: 0, marginRight: '38px' }"disabledclass="logo"><div:style="{width: '180px',height: '30px',background: 'var(--color-fill-3)',cursor: 'text',}"><img src="../assets/logo.png" width="180px"></div></a-menu-item><a-menu-item key="1"><router-link to="/main/search">全局搜索</router-link></a-menu-item><a-menu-item key="2"><router-link to="/main/article">文章大全</router-link></a-menu-item><a-menu-item key="3">Cloud Service</a-menu-item><a-menu-item key="4">Cooperation</a-menu-item></a-menu>这里修改一下a-menu-item标签,(一般在组件库这里会有专门的跳转属性这种,不过今天好像组件库页面打不开了,那暂时就用原始版的router-link来实现一下吧,(之后我会修改一下的))
这里布置了两个页面,全局搜素和文章大全,进行跳转,然后呢,去index.js处创建一下主页面的子路由,
下面,看代码展示
import { createRouter, createWebHashHistory } from 'vue-router'
import MainPage from '../components/GlobalPage.vue'
import LoginPage from '../components/LoginPage.vue'
import SearchPage from '../views/SearchPage.vue'
import ArticlePage from '../views/ArticlePage.vue'
const routes = [{path: '/',name: 'mainPage',component: MainPage,redirect: '/main/search',children: [{path: '/main/search',component: SearchPage},{path: '/main/article',component: ArticlePage}]},{path: '/login',name: 'loginPage',component: LoginPage}
]const router = createRouter({history: createWebHashHistory(),routes
})export default router
这里我目前添加了全局搜素和文章大全两个子页面(小细节:redirect: '/main/search',这里我使用了一个重定向,让每次进入‘/’页面的时候都会跳转到全局搜素页面处),全局搜素的页面之前已经写过了,那也就不用管了,这里我们添加以下文章大全的页面,在views文件夹下创建ArticlePage.vue文件用<vue>创建基本样子,
<template><div id="article">文章篇</div>
</template><script>
export default {}
</script><style></style>
先随便写一点吧,主要是要能现在展现以下跳转。
目前来看就差不多了,来试试能不能实现跳转。


好嘞,那么现在也就实现了这一功能,
好了,目前主要的一些前端样子也就差不多了,这一期的项目主要还是练练手,就做一些最基本文章管理这些吧。
文章管理界面开发:
既然写界面,我觉得还是先来一手布局比较合适
来吧,组件库见:

这里我没想太多,直接用这个朴实无华的布局吧。
先用代码写个初始布局
<template><div id="article"><a-divider /><a-layout style="height: 400px;"><a-layout-header>Header</a-layout-header><a-divider orientation="left">热点文章</a-divider><a-layout-content>Content</a-layout-content><a-layout-footer>Footer</a-layout-footer></a-layout></div>
</template><script>
export default {}
</script><style scoped>
body {margin: 0;background-color: #f5f5f5;
}/* fade-slide */
.fade-slide-leave-active,
.fade-slide-enter-active {transition: all 0.3s;
}.fade-slide-enter-from {transform: translateX(-30px);opacity: 0;
}.fade-slide-leave-to {transform: translateX(30px);opacity: 0;
}
</style>
这里我加了一个带有文字的分割线
然后就是最关键的content内容区域了,这里可以加上一些样式,(如果对自己的前端没有太自信的话,直接组件库!)
好,看一手,我们先找一个滑动条

就这个了,

将滚动条放入content区域之后,小改一下代码,调整大小,适应一下屏幕大小就好看多了
<template><div id="article"><a-divider /><a-layout style="height: 760px"><a-layout-header class="header">文章管理</a-layout-header><a-divider orientation="left">Cetide-Net</a-divider><a-layout-content><a-scrollbar class="rollBar"style="height: 673.34px; overflow: auto; margin: 10px 20px"><div class="content">Content</div></a-scrollbar></a-layout-content></a-layout></div>
</template><script>
export default {};
</script><style scoped>
#article {margin: 20px;
}/* fade-slide */
.fade-slide-leave-active,
.fade-slide-enter-active {transition: all 0.3s;
}.fade-slide-enter-from {transform: translateX(-30px);opacity: 0;
}.fade-slide-leave-to {transform: translateX(30px);opacity: 0;
}
.header {font-family: "Satisfy", cursive;font-size: 26px;color: rgb(93, 186, 216);padding-left: 50px;text-align: left;
}
.rollBar{}
.content {height: 2000px;width: 1424px;background-color: var(--color-primary-light-4);
}
</style>
然后就是存放文章的了,这里可以找找组件库的列表组件:
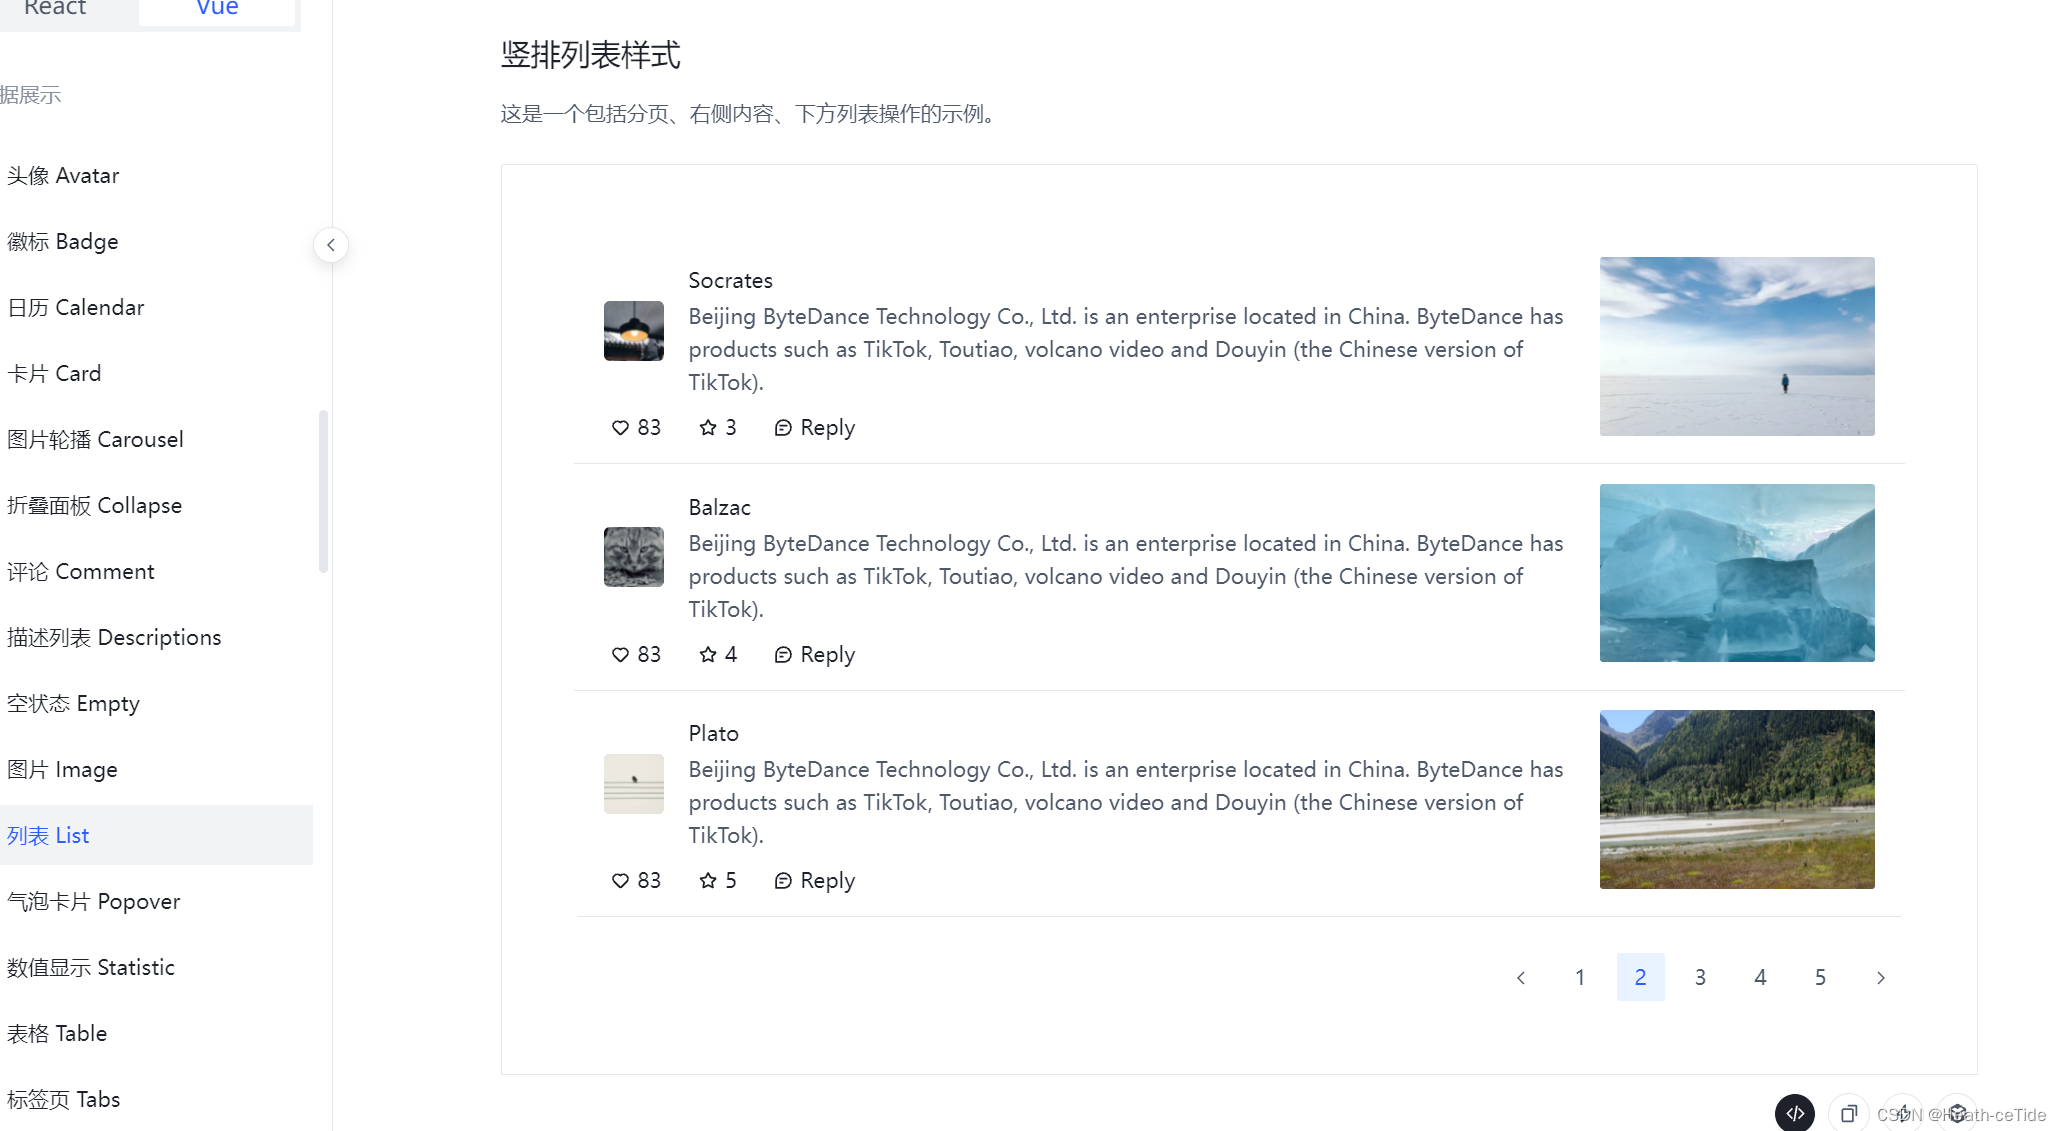
这个组件就很奈斯(分页条,评论按键都有),因为这里主要是文章大全,所以就不用加上编辑和删除功能了,不过可以加上一个评论功能

这里加一个显示神评的吧,到时候把点赞数最多的评论放到让文章大全页面都能看到
修改一下代码,嵌入文章大全页面.
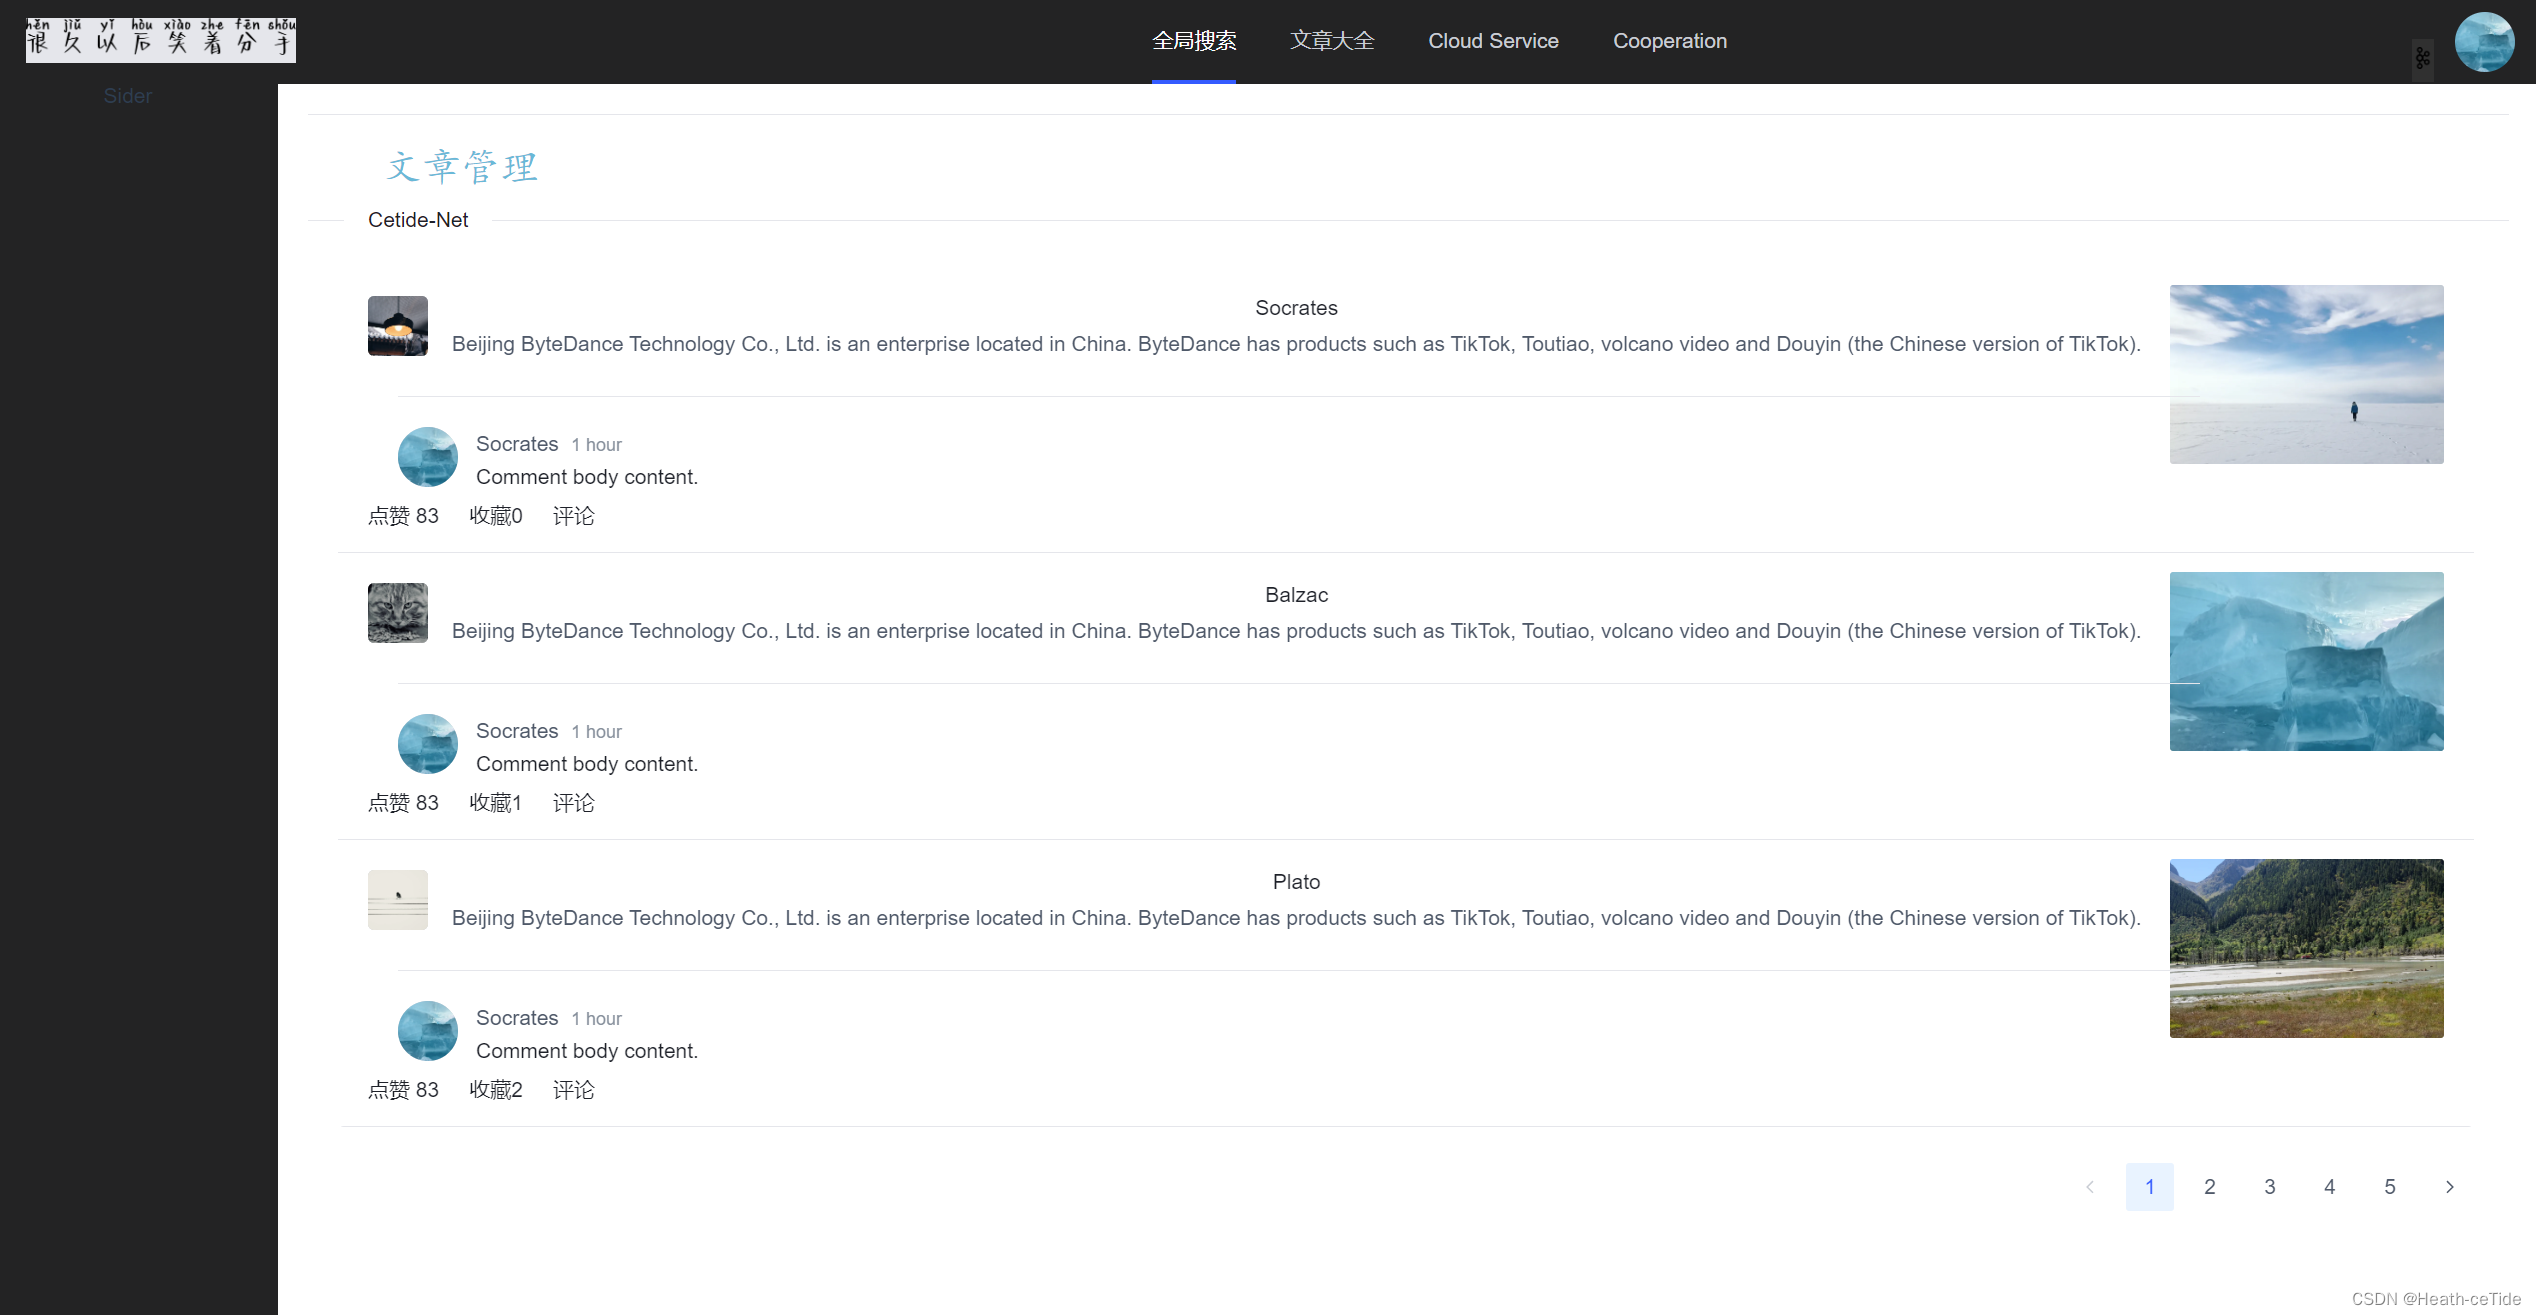
<template><div id="article"><a-divider /><a-layout style="height: 760px"><a-layout-header class="header">文章管理</a-layout-header><a-divider orientation="left">Cetide-Net</a-divider><a-layout-content><a-scrollbar class="rollBar"style="height: 673.34px; overflow: auto; margin: 10px 20px"><div class="content"><a-listclass="list-demo-action-layout":bordered="false":data="dataSource":pagination-props="paginationProps"><template #item="{ item }"><a-list-item class="list-demo-item" action-layout="vertical"><template #actions><span><icon-heart />点赞 83</span><span><icon-star />收藏{{ item.index }}</span><span><icon-message />评论</span></template><template #extra><div className="image-area"><img alt="arco-design" :src="item.imageSrc" /></div></template><a-list-item-meta:title="item.title":description="item.description"><template #avatar><a-avatar shape="square"><img alt="avatar" :src="item.avatar" /></a-avatar></template></a-list-item-meta><div style="width:100%; text-align: left; padding-left:20px"><a-divider /><a-comment author="Socrates" content="Comment body content." datetime="1 hour"><template #avatar><a-avatar><imgalt="avatar"src="https://p1-arco.byteimg.com/tos-cn-i-uwbnlip3yd/3ee5f13fb09879ecb5185e440cef6eb9.png~tplv-uwbnlip3yd-webp.webp"/></a-avatar></template></a-comment></div></a-list-item></template></a-list></div></a-scrollbar></a-layout-content></a-layout></div>
</template><script>
import { reactive } from 'vue'const names = ['Socrates', 'Balzac', 'Plato'];
const avatarSrc = ['//p1-arco.byteimg.com/tos-cn-i-uwbnlip3yd/a8c8cdb109cb051163646151a4a5083b.png~tplv-uwbnlip3yd-webp.webp','//p1-arco.byteimg.com/tos-cn-i-uwbnlip3yd/e278888093bef8910e829486fb45dd69.png~tplv-uwbnlip3yd-webp.webp','//p1-arco.byteimg.com/tos-cn-i-uwbnlip3yd/9eeb1800d9b78349b24682c3518ac4a3.png~tplv-uwbnlip3yd-webp.webp',
];
const imageSrc = ['//p1-arco.byteimg.com/tos-cn-i-uwbnlip3yd/29c1f9d7d17c503c5d7bf4e538cb7c4f.png~tplv-uwbnlip3yd-webp.webp','//p1-arco.byteimg.com/tos-cn-i-uwbnlip3yd/04d7bc31dd67dcdf380bc3f6aa07599f.png~tplv-uwbnlip3yd-webp.webp','//p1-arco.byteimg.com/tos-cn-i-uwbnlip3yd/1f61854a849a076318ed527c8fca1bbf.png~tplv-uwbnlip3yd-webp.webp',
];
const dataSource = new Array(15).fill(null).map((_, index) => {return {index: index,avatar: avatarSrc[index % avatarSrc.length],title: names[index % names.length],description:'Beijing ByteDance Technology Co., Ltd. is an enterprise located in China. ByteDance has products such as TikTok, Toutiao, volcano video and Douyin (the Chinese version of TikTok).',imageSrc: imageSrc[index % imageSrc.length],};
});export default {setup() {return {dataSource,paginationProps: reactive({defaultPageSize: 3,total: dataSource.length})}},
}
</script><style scoped>
#article {margin: 20px;
}/* fade-slide */
.fade-slide-leave-active,
.fade-slide-enter-active {transition: all 0.3s;
}.fade-slide-enter-from {transform: translateX(-30px);opacity: 0;
}.fade-slide-leave-to {transform: translateX(30px);opacity: 0;
}
.header {font-family: "Satisfy", cursive;font-size: 26px;color: rgb(93, 186, 216);padding-left: 50px;text-align: left;
}
.rollBar{}
.content {/* height: 2000px; */width: 1424px;
}.list-demo-action-layout .image-area {width: 183px;height: 119px;border-radius: 2px;overflow: hidden;}.list-demo-action-layout .list-demo-item {padding: 20px 0;border-bottom: 1px solid var(--color-fill-3);
}.list-demo-action-layout .image-area img {width: 100%;
}.list-demo-action-layout .arco-list-item-action .arco-icon {margin: 0 4px;
}
</style>
大家一定要看懂一些组件代码才好使用,(后续调用后端接口,使用后端数据库的时候就会用到)
这一期的项目,打算就先做一个文章管理页面,加上用户个人中心的东西就差不多了(主要还是先熟悉熟悉流程,后面可以看看加上一些更好的功能(也不能只是crud哈))
用户个人中心界面开发:
在component文件夹下面创建一个UserCentre.vue页面
先做一个雏形:

然后在index.js中注册页面
{
path: '/user',
name: 'userPage',
component: UserPage
}
然后做一个页面跳转吧,这里我们回到GlobalHeader.vue全局导航栏区域,
<template><div class="menu-demo"><a-menu mode="horizontal" theme="dark" :default-selected-keys="['1']"><a-menu-itemkey="0":style="{ padding: 0, marginRight: '38px' }"disabledclass="logo"><div:style="{width: '180px',height: '30px',background: 'var(--color-fill-3)',cursor: 'text',}"><img src="../assets/logo.png" width="180px"></div></a-menu-item><a-menu-item key="1"><router-link to="/main/search">全局搜索</router-link></a-menu-item><a-menu-item key="2"><router-link to="/main/article">文章大全</router-link></a-menu-item><a-menu-item key="3">Cloud Service</a-menu-item><a-menu-item key="4">Cooperation</a-menu-item></a-menu><div class="user-avatar"><img src="https://p1-arco.byteimg.com/tos-cn-i-uwbnlip3yd/3ee5f13fb09879ecb5185e440cef6eb9.png~tplv-uwbnlip3yd-webp.webp"alt="User Avatar" class="avatar-image"/><divclass="dropdown"style="font-family: 'Satisfy', cursive; margin-right: 20px"><button class="dropdown-button"><img src="../assets/list.png" width="15px" /></button><div class="dropdown-content"><a href="#">个人信息</a><a href="#">修改密码</a><a href="#">其他属性</a><a href="/#/login">退出登录</a></div></div></div></div>
</template>
<script setup></script><style scoped>
.logo{float: left;
}
.menu-demo {box-sizing: border-box;width: 100%;background-color: var(--color-neutral-2);
}
.user-avatar {/* position: absolute;right: 0;top: 4px; */
}.avatar-image {position: absolute;top: 10px;right: 16px;width: 40px;height: 40px;border-radius: 50%;cursor: pointer;z-index: 10;
}.dropdown {position: absolute;top: 28px;right: 50px;display: inline-block;z-index: 1;
}.dropdown-button {background-color: #303030;color: white;padding: 5px 0px;border: none;cursor: pointer;
}.dropdown-content {display: none;position: absolute;background-color: #f9f9f9;min-width: 85px;box-shadow: 0px 8px 16px 0px rgba(0, 0, 0, 0.2);z-index: 1;
}.dropdown-content a {color: black;padding: 8px 8px;text-decoration: none;display: block;
}.dropdown-content a:hover {background-color: #f1f1f1;
}.dropdown:hover .dropdown-content {display: block;
}
</style>
这里展示一下之前添加的一点点代码,然后在右上角添加了一个用户头像和一个下拉栏目(感觉代码写的不太好,这边还是建议大家去组件库里找一些比较方便的(这里我是自己写的))

<template><div class="menu-demo"><a-menu mode="horizontal" theme="dark" :default-selected-keys="['1']"><a-menu-itemkey="0":style="{ padding: 0, marginRight: '38px' }"disabledclass="logo"><div:style="{width: '180px',height: '30px',background: 'var(--color-fill-3)',cursor: 'text',}"><img src="../assets/logo.png" width="180px" /></div></a-menu-item><a-menu-item key="1"><router-link to="/main/search">全局搜索</router-link></a-menu-item><a-menu-item key="2"><router-link to="/main/article">文章大全</router-link></a-menu-item><a-menu-item key="3">Cloud Service</a-menu-item><a-menu-item key="4">Cooperation</a-menu-item></a-menu><div class="user-avatar"><imgsrc="https://p1-arco.byteimg.com/tos-cn-i-uwbnlip3yd/3ee5f13fb09879ecb5185e440cef6eb9.png~tplv-uwbnlip3yd-webp.webp"alt="User Avatar"class="avatar-image"/><divclass="dropdown"style="font-family: 'Satisfy', cursive; margin-right: 20px"><button class="dropdown-button"><img src="../assets/list.png" width="15px" /></button><div class="dropdown-content"><router-link to="/user">个人信息</router-link><router-link to="/login">修改密码</router-link><router-link to="/login">其他属性</router-link><router-link to="/login">退出登录</router-link></div></div></div></div>
</template>
<script setup>
</script><style scoped>
.logo {float: left;
}
.menu-demo {box-sizing: border-box;width: 100%;background-color: var(--color-neutral-2);
}
.user-avatar {/* position: absolute;right: 0;top: 4px; */
}.avatar-image {position: absolute;top: 10px;right: 16px;width: 40px;height: 40px;border-radius: 50%;cursor: pointer;z-index: 10;
}.dropdown {position: absolute;top: 28px;right: 50px;display: inline-block;z-index: 1;
}.dropdown-button {background-color: #303030;color: white;padding: 5px 0px;border: none;cursor: pointer;
}.dropdown-content {display: none;position: absolute;background-color: #f9f9f9;min-width: 85px;box-shadow: 0px 8px 16px 0px rgba(0, 0, 0, 0.2);z-index: 1;
}.dropdown-content a {color: black;padding: 8px 8px;text-decoration: none;display: block;
}.dropdown-content a:hover {background-color: #f1f1f1;
}.dropdown:hover .dropdown-content {display: block;
}
</style>
那么,这样就可以点击个人中心进行跳转到个人中心了(这里的退出登录bug很大,应该要调用专门的函数,去除登录状态什么的,之后有机会再改一下)

这里刚开始就是这样了,老样子,做个布局吧。

就用这个了
<template><div id="userCenter"><a-layout style="height: 100vh"><a-layout-header>Header</a-layout-header><a-layout style="margin: 24px 120px"><a-layout-sider>Sider</a-layout-sider><a-layout-content>Content</a-layout-content></a-layout><a-layout-footer>Footer</a-layout-footer></a-layout></div>
</template><script>
export default {};
</script><style>
</style>
稍微搭建一下用户界面吧,明天继续(hhh)(emmm,还以为今天能写完这部分的)
发一下代码吧(感觉这个代码后面要大改。。)
<template><div id="userCenter"><a-layout style="height: 100vh"><a-layout-header><div class="header"><div class="personal-introduce"><span class="name">我是小丑</span><span class="sex-icon"></span><span class="level-icon"></span></div><div class="professional">演员,代表作:</div></div></a-layout-header><a-layout style="margin: 24px 120px"><a-layout-sider>Sider</a-layout-sider><a-layout-content>Content</a-layout-content></a-layout><a-layout-footer>Footer</a-layout-footer></a-layout></div>
</template><script>
export default {};
</script><style lang="scss" scoped>
#userCenter {background: url("../assets/image.png") no-repeat bottom center / 100%100%;
}
.header {height: 20vh;margin-top: 5%;background: url("../assets/back.png") no-repeat center / 90%100%;
}.personal-introduce {display: flex;justify-content: center;align-items: flex-end;margin-top: 10px;text-shadow: 0px 0px 4px rgba(0, 0, 0, 0.31);.name {line-height: 29px;font-size: 22px;}.sex-icon {display: inline-block;width: 16px;height: 16px;margin: 0px 8px;margin-bottom: 4px;background: url(../assets/user-images/sex-icon.png) no-repeat center;background-size: contain;}.level-icon {display: inline-block;width: 16px;height: 16px;margin-bottom: 4px;background: url(../assets/user-images/leval-icon.png) no-repeat center;background-size: contain;}}
</style>
相关文章:
超详细的前后端实战项目(Spring系列加上vue3)前端篇(二)(一步步实现+源码)
好了,兄弟们,继昨天的项目之后,开始继续敲前端代码,完成前端部分 昨天完成了全局页面的代码,和登录页面的代码,不过昨天的代码还有一些需要补充的,这里添加一下 内容补充:在调用登…...
【国产中颖】SH79F9202U单片机驱动LCD段码液晶学习笔记
1. 引言 因新公司之前液晶数显表产品单片机一直用的是 C51单片机(SH79F9202U9),本人之前没有接触过这款单片机,为了维护老产品不得不重新研究研究这款单片机。 10位ADC LCD的增强型8051微控制器 SH79F9202是一种高速高效率8051可兼容单片机。在同样振…...

人工智能初识
🌞欢迎来到人工智能基础的世界 🌈博客主页:卿云阁 💌欢迎关注🎉点赞👍收藏⭐️留言📝 🌟本文由卿云阁原创! 📆首发时间:🌹2024年5月1…...

【算法刷题day60】Leetcode:84. 柱状图中最大的矩形
文章目录 Leetcode 84. 柱状图中最大的矩形解题思路代码总结 草稿图网站 java的Deque Leetcode 84. 柱状图中最大的矩形 题目:84. 柱状图中最大的矩形 解析:代码随想录解析 解题思路 反方向接雨水。见上一篇文章 代码 class Solution {public int la…...

ThingsBoard物联网网关在智慧城市数据采集中的应用
智慧城市由监控中心、采集网关、前端采集设备、前端感应执行器组成。 为何选用ThingsBoard作为平台 监控中心为物联网平台,该平台包含云计算、大数据、人工智能、物联网、GIS、云安全等主要模块,具备数据采集、数据交换、超大规模计算、数据分析、数据应…...

Java中的打印流PrintStream 和 PrintWriter
PrintStream和PrintWriter在Java中都是用于打印输出的类,但它们之间存在一些明显的区别。以下是关于这两个类的详细解释和比较: PrintStream 基本特性 PrintStream是一个字节打印流,它继承自FilterOutputStream。 主要操作byte流࿰…...
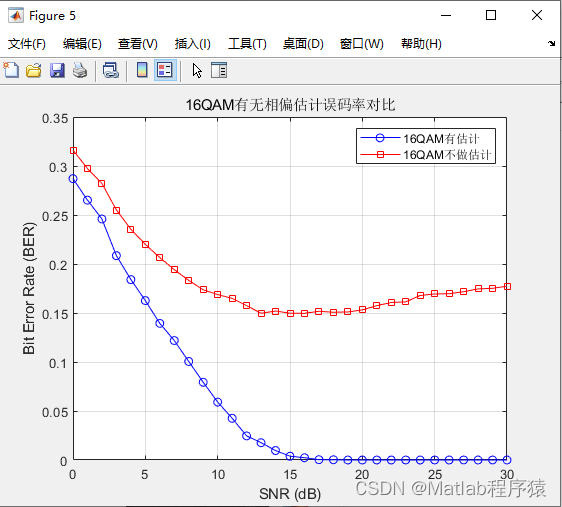
【MATLAB源码-第217期】基于matlab的16QAM系统相位偏移估计HOS算法仿真,对比补偿前后的星座图误码率。
操作环境: MATLAB 2022a 1、算法描述 高阶统计量(HOS)频偏估计算法 高阶统计量(Higher Order Statistics, HOS)频偏估计算法是一种先进的信号处理技术,广泛应用于现代数字通信系统中,以应对…...

C# CryptoStream流的详解与示例
在当今数字时代,数据安全变得越来越重要。保护敏感信息免受未授权访问是每个开发者的责任。在C#中,使用CryptoStream流可以方便地对数据进行加密和解密。本文将详细介绍C# CryptoStream库的用法、功能以及它如何对数据进行加密和解密。 一、CryptoStrea…...

Kubernetes 之 ReplicaSet
Kubernetes 之 ReplicaSet ReplicaSet 定义 ReplicaSet 是 Kubernetes 中的一种副本控制器,其主要作用是控制其管理的 Pod 的预设副本数量。它会持续监听这些 Pod 的运行状态,在Pod发生故障时执行重启策略,当 Pod 数量减少时会重新启动新的…...
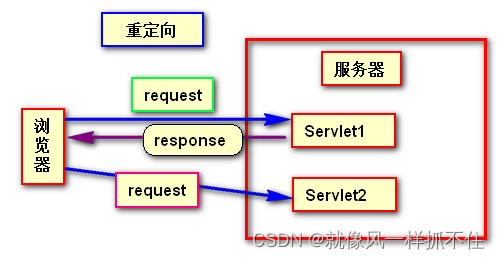
转发和重定向
目录 是什么 转发(Forwarding) 概念 特点 实现方式 重定向(Redirecting) 概念 特点 实现方式 转发和重定向区别整理 转发和重定向的适用场景 转发(Forwarding) 重定向(Redirect&am…...
源码部署ELK
目录 资源列表 基础环境 关闭防护墙 关闭内核安全机制 修改主机名 添加hosts映射 一、部署elasticsearch 修改limit限制 部署elasticsearch 修改配置文件 单节点 集群(3台节点集群为例) 启动 二、部署logstash 部署logstash 添加配置文件 启动 三、部署kiban…...

构造+模拟,CF1148C. Crazy Diamond
一、题目 1、题目描述 2、输入输出 2.1输入 2.2输出 3、原题链接 Problem - 1148C - Codeforces 二、解题报告 1、思路分析 题目提示O(5n)的解法了,事实上我们O(3n)就能解决,关键在于1,n的处理 我们读入数据a[],代表初始数组…...
CAD二次开发(2)-将直线对象添加到CAD图形文件
1. 准备工作 创建一个类库项目,如下: 2. 分析Line对象 Line类的初始化方法和参数 using Autodesk.AutoCAD.DatabaseServices; Line line new Line();Line 继承Curve 继承Entity 继承DBObject 继承Drawable 继承RXObject 初始化方法有两个…...

代码随想录二刷 Day05 | 242.有效的字母异位词,349. 两个数组的交集,202. 快乐数,1. 两数之和,454.四数相加II,383. 赎金信
题目与题解 参考资料:哈希表理论基础 Tips: 一般哈希表都是用来快速判断一个元素是否出现集合里哈希表生成原理:先通过哈希函数将变量映射为hashcode,如果二者hashcode相同,再通过哈希碰撞方法(拉链法&…...
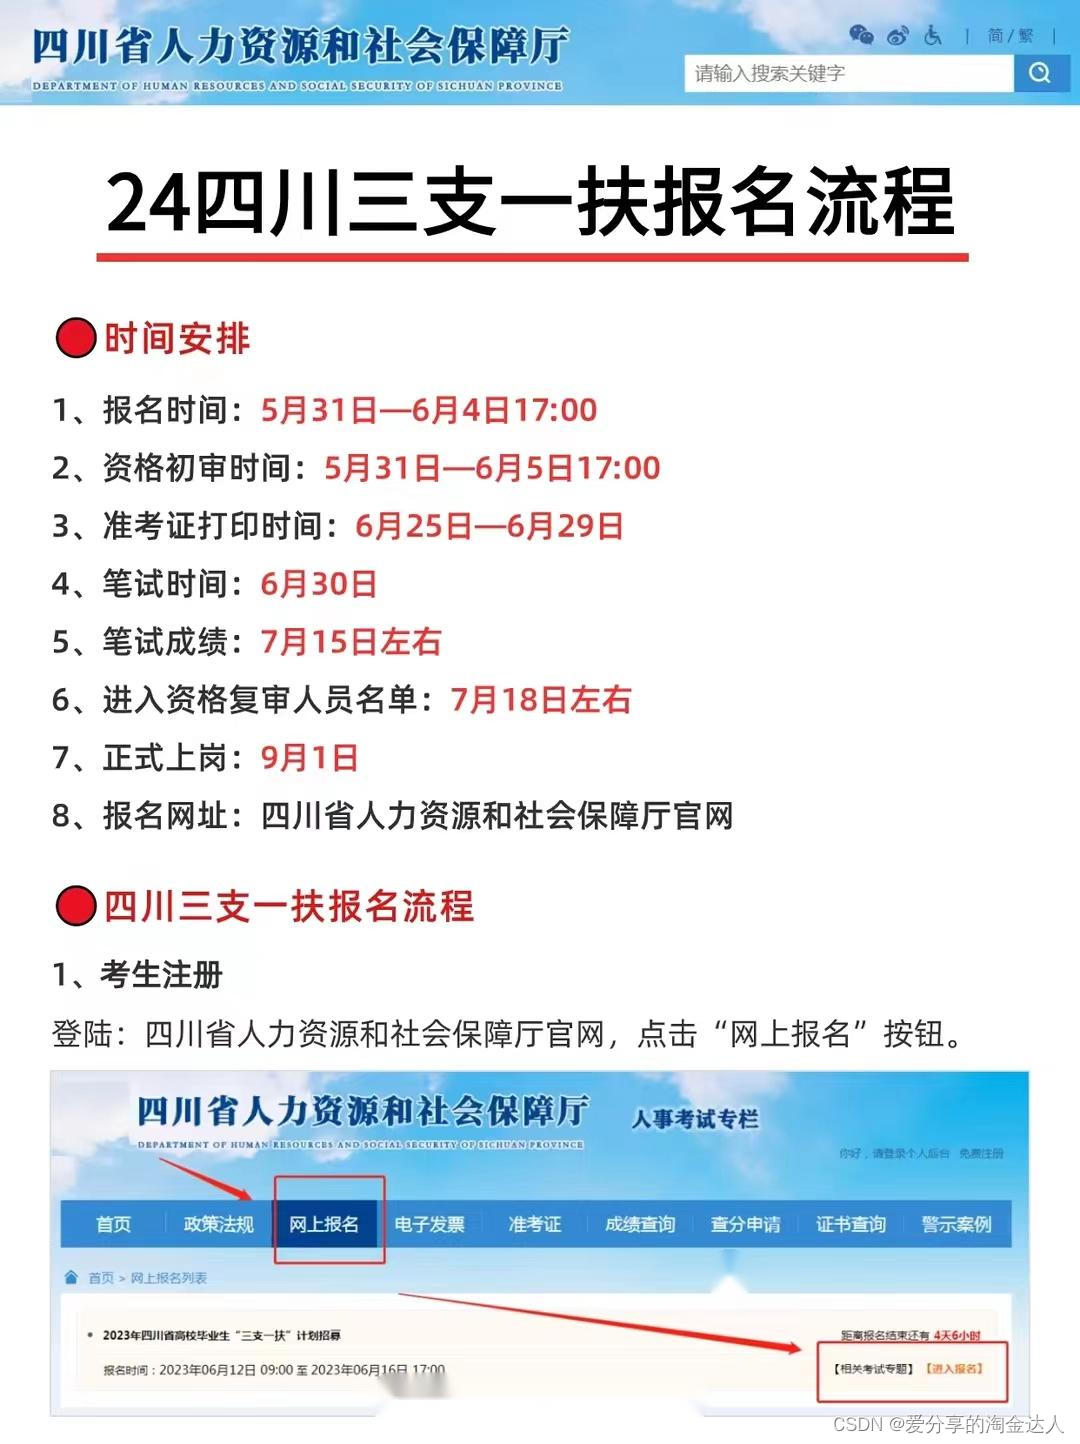
2024年四川省三支一扶报名流程图解✅
2024年四川省三支一扶报名流程图解✅ 🔴时间安排 1、报名时间:5月31日—6月4日17:00 2、资格初审时间:5月31日—6月5日17:00 3、准考证打印时间:6月25日—6月29日 4、笔试时间:6月30日 5、笔试成绩:7…...

js Dom基础
获取元素 1、getElementById() 通过id属性获取一个元素节点对象 <div id"div1"></div> <script> var div1 document.getElementById(div1) </script> 2、 getElementsByTagName()可以根据标签名来获取一组元素节点对象 这个方法会给我们返…...

pytest识别测试用例的机制以及和unittest的区别
pytest识别测试用例的机制 文件 以test_开头或以_test结尾的python文件,即test_xxx.py或xxx_test.py类,在第一点识别到的文件中的类,且满足一下任一条件: 1)以Test_开头,且没有__init__()初始化函数的类&a…...

民国漫画杂志《时代漫画》第17期.PDF
时代漫画17.PDF: https://url03.ctfile.com/f/1779803-1248612629-85326d?p9586 (访问密码: 9586) 《时代漫画》的杂志在1934年诞生了,截止1937年6月战争来临被迫停刊共发行了39期。 ps:资源来源网络!...

[AIGC] Spring Boot 2 自定义 Starter 指南
Spring Boot 包含一系列的 “Starter POMs”,它们都是一些方便的依赖描述符,你可以在你的应用中导入。在一些情况下,你可能想创建自己的自定义 starter。以下是创建自己的 Spring Boot Starter 的步骤。 文章目录 1. 创建基本的 Maven 项目2.…...

HCIP综合实验命令
目录 一、配置IP地址 二、配置DHCP 三、配置静态路由(内网通) 四、配置缺省路由 (外网通) 五、配置缺省 (全网通) 六、防环配置 七、配置远程登录 八、修改优先级 九、配置MP-GROUP 十、配置ppp进…...

AI技能开发脚手架:从零构建大模型应用的标准化起点
1. 项目概述:一个为AI技能开发量身定制的脚手架如果你正在或打算开发一个基于大语言模型的AI技能(Skill),无论是想集成到ChatGPT的GPTs里,还是想构建一个独立的AI Agent,那么你大概率会遇到一个共同的起点问…...

别再为本科毕业论文熬大夜!Paperxie 智能写作,一键搞定终稿的正确姿势
paperxie-免费查重复率aigc检测/开题报告/毕业论文/智能排版/文献综述/AI PPThttps://www.paperxie.cn/ai/dissertationhttps://www.paperxie.cn/ai/dissertation 又到了本科毕业论文冲刺的季节,多少同学还在对着空白文档发呆?选题纠结半天定不下来&…...

做定制开发的定制软件开发公司平台
在数字化转型浪潮下,“定制软件开发”几乎成了每一家力图通过技术构建壁垒的企业的必选项。然而,一个令人尴尬的现实是:很多企业在数字化上砸了重金,不仅没换来效率,反而陷入了“开发超预算、交付总延期、上线全是坑”…...
MySQL 大小管理 ——东方仙盟金丹期)
数据库优化(八)MySQL 大小管理 ——东方仙盟金丹期
1查询整个mysql下数据库大小SELECTtable_schema AS db_name,ROUND(SUM(data_length index_length)/1024/1024,2) AS size_mb FROM information_schema.tables GROUP BY table_schema ORDER BY size_mb DESC;| db_name | size_mb | -------------------------…...
)
【东亚美学AI化里程碑】:全球首份Midjourney Sumi-e风格Prompt工程白皮书(附东京艺术大学合作验证的17组对比测试数据)
更多请点击: https://intelliparadigm.com 第一章:东亚美学AI化的范式跃迁 东亚美学传统强调“留白”“气韵”“物哀”与“间”(ma)等非显性结构,其核心并非形式完备性,而在于感知张力与意义生成的临界状态…...

如何实现微信聊天记录永久保存:WeChatMsg完整备份终极指南
如何实现微信聊天记录永久保存:WeChatMsg完整备份终极指南 【免费下载链接】WeChatMsg 提取微信聊天记录,将其导出成HTML、Word、CSV文档永久保存,对聊天记录进行分析生成年度聊天报告 项目地址: https://gitcode.com/GitHub_Trending/we/W…...

通过curl命令快速测试Taotoken提供的各类大模型API响应效果
🚀 告别海外账号与网络限制!稳定直连全球优质大模型,限时半价接入中。 👉 点击领取海量免费额度 通过curl命令快速测试Taotoken提供的各类大模型API响应效果 对于习惯命令行操作或需要在无SDK环境中验证集成的开发者而言…...

Windows10系统V-rep安装避坑指南:从百度网盘资源到环境配置
1. 为什么选择V-rep以及准备工作 如果你是机器人学或仿真技术的初学者,V-rep(现更名为CoppeliaSim)绝对是一个值得尝试的仿真平台。它轻量级、跨平台,而且对硬件要求不高,特别适合在个人电脑上进行算法验证和教学演示…...

AI智能体技能库构建:从标准化接口到安全实践
1. 项目概述:从“技能库”到“智能体”的进化之路最近在折腾AI智能体开发的朋友,估计都绕不开一个核心问题:如何让一个智能体真正“能干”,而不仅仅是“能聊”?这背后,就是“技能”的构建与管理。今天要聊的…...
·面经深度解析)
前端八股文面经大全:上海威派格前端实习(2026-05-07)·面经深度解析
前言 大家好,我是木斯佳。 相信很多人都感受到了,在AI浪潮的席卷之下,前端领域的门槛在变高,纯粹的“增删改查”岗位正在肉眼可见地减少。曾经热闹非凡的面经分享,如今也沉寂了许多。但我们都知道,市场的…...