Netty SSL双向验证
Netty SSL双向验证
- 1. 环境说明
- 2. 生成证书
- 2.1. 创建根证书 密钥+证书
- 2.2. 生成请求证书密钥
- 2.3. 生成csr请求证书
- 2.4. ca证书对server.csr、client.csr签发生成x509证书
- 2.5. 请求证书PKCS#8编码
- 2.6. 输出文件
- 3. Java代码
- 3.1. Server端
- 3.2. Client端
- 3.3. 证书存放
- 4. 运行效果
- 4.1. SSL客户端发送消息:
- 4.2. 服务器收到SSL客户端消息:
- 4.3. 非SSL客户端发送消息:
- 4.4. 服务器收到非SSL客户端消息:
- 5. References:
1. 环境说明
- 本例使用windows10 + Win64OpenSSL-3_3_0(完整版,不是lite),netty版本4.1.77.Final,JDK-17
- openssl官方推荐合作下载地址:https://slproweb.com/download/Win64OpenSSL-3_3_0.exe
- ${openssl_home}是openssl的安装目录
- 所有命令在${openssl_home}/bin目录下执行
- windows下openssl的配置文件是${openssl_home}/bin/openssl.cfg,linux下是${openssl_home}/bin/openssl.conf,注意替换后缀名
- 需要手动按照openssl.cfg的配置创建好各种目录、文件
2. 生成证书
2.1. 创建根证书 密钥+证书
openssl genrsa -des3 -out demoCA/private/ca.key 4096openssl req -new -x509 -days 3650 -key demoCA/private/ca.key -out demoCA/certs/ca.crt
2.2. 生成请求证书密钥
openssl genrsa -des3 -out demoCA/private/server.key 2048openssl genrsa -des3 -out demoCA/private/client.key 2048
2.3. 生成csr请求证书
openssl req -new -key demoCA/private/server.key -out demoCA/certs/server.csr -config openssl.cfgopenssl req -new -key demoCA/private/client.key -out demoCA/certs/client.csr -config openssl.cfg
2.4. ca证书对server.csr、client.csr签发生成x509证书
openssl x509 -req -days 3650 -in demoCA/certs/server.csr -CA demoCA/certs/ca.crt -CAkey demoCA/private/ca.key -CAcreateserial -out demoCA/certs/server.crtopenssl x509 -req -days 3650 -in demoCA/certs/client.csr -CA demoCA/certs/ca.crt -CAkey demoCA/private/ca.key -CAcreateserial -out demoCA/certs/client.crt
2.5. 请求证书PKCS#8编码
openssl pkcs8 -topk8 -in demoCA/private/server.key -out demoCA/private/pkcs8_server.key -nocryptopenssl pkcs8 -topk8 -in demoCA/private/client.key -out demoCA/private/pkcs8_client.key -nocrypt
2.6. 输出文件
server端:ca.crt、server.crt、pkcs8_server.key
client端:ca.crt、client.crt、pkcs8_client.key
3. Java代码
3.1. Server端
- ServiceMain.java
public class ServiceMain implements CommandLineRunner {@Value("${netty.host}")private String host;@Value("${netty.port}")private int port;@Resourceprivate NettyServer nettyServer;public static void main(String[] args) {SpringApplication.run(ServiceMain.class, args);}@Overridepublic void run(String... args) throws Exception {InetSocketAddress address = new InetSocketAddress(host, port);ChannelFuture channelFuture = nettyServer.bind(address);Runtime.getRuntime().addShutdownHook(new Thread(() -> nettyServer.destroy()));channelFuture.channel().closeFuture().syncUninterruptibly();}
}
- NettyServer.java
package cn.a.service.netty;import io.netty.bootstrap.ServerBootstrap;
import io.netty.channel.Channel;
import io.netty.channel.ChannelFuture;
import io.netty.channel.ChannelOption;
import io.netty.channel.EventLoopGroup;
import io.netty.channel.nio.NioEventLoopGroup;
import io.netty.channel.socket.nio.NioServerSocketChannel;
import io.netty.handler.ssl.ClientAuth;
import io.netty.handler.ssl.SslContext;
import io.netty.handler.ssl.SslContextBuilder;
import lombok.extern.slf4j.Slf4j;
import org.springframework.context.ApplicationContext;
import org.springframework.stereotype.Component;
import org.springframework.util.ResourceUtils;import javax.annotation.Resource;
import java.io.File;
import java.net.InetSocketAddress;@Slf4j
@Component("nettyServer")
public class NettyServer {private final EventLoopGroup parentGroup = new NioEventLoopGroup();private final EventLoopGroup childGroup = new NioEventLoopGroup();private Channel channel;@ResourceApplicationContext applicationContext;/*** 绑定端口** @param address* @return*/public ChannelFuture bind(InetSocketAddress address) {ChannelFuture channelFuture = null;try {File certChainFile = ResourceUtils.getFile("classpath:server.crt");File keyFile = ResourceUtils.getFile("classpath:pkcs8_server.key");File rootFile = ResourceUtils.getFile("classpath:ca.crt");SslContext sslCtx = SslContextBuilder.forServer(certChainFile, keyFile).trustManager(rootFile).clientAuth(ClientAuth.REQUIRE).build();ServerBootstrap b = new ServerBootstrap();b.group(parentGroup, childGroup).channel(NioServerSocketChannel.class).option(ChannelOption.SO_BACKLOG, 1024).childHandler(new NettyChannelInitializer(applicationContext, sslCtx));channelFuture = b.bind(address).syncUninterruptibly();channel = channelFuture.channel();} catch (Exception e) {log.error(e.getMessage());} finally {if (null != channelFuture && channelFuture.isSuccess()) {log.info("netty server start done.");} else {log.error("netty server start error.");}}return channelFuture;}/*** 销毁*/public void destroy() {if (null == channel) return;channel.close();parentGroup.shutdownGracefully();childGroup.shutdownGracefully();}/*** 获取通道** @return*/public Channel getChannel() {return channel;}
}
- NettyChannelInitializer.java
package cn.a.service.netty;import io.netty.channel.ChannelInitializer;
import io.netty.channel.socket.SocketChannel;
import io.netty.handler.ssl.SslContext;
import org.springframework.context.ApplicationContext;public class NettyChannelInitializer extends ChannelInitializer<SocketChannel> {private final ApplicationContext applicationContext;private final SslContext sslContext;public NettyChannelInitializer(ApplicationContext applicationContext, SslContext sslCtx) {this.applicationContext = applicationContext;this.sslContext = sslCtx;}@Overrideprotected void initChannel(SocketChannel channel) throws Exception {// 添加SSL安装验证channel.pipeline().addLast(sslContext.newHandler(channel.alloc()));//发送时编码channel.pipeline().addLast(new FrameEncoder());//接收时解码channel.pipeline().addLast(new FrameDecoder());//业务处理器channel.pipeline().addLast(new NettyMsgHandler(applicationContext));}
}
3.2. Client端
- TestClientApp.java
package cn.a.service;import cn.hutool.core.util.IdUtil;
import cn.hutool.core.util.NumberUtil;
import cn.a.service.netty.FrameDecoder;
import cn.a.service.netty.FrameEncoder;
import cn.a.service.netty.NettyMsg;
import cn.a.service.netty.Session;
import io.netty.bootstrap.Bootstrap;
import io.netty.channel.*;
import io.netty.channel.nio.NioEventLoopGroup;
import io.netty.channel.socket.SocketChannel;
import io.netty.channel.socket.nio.NioSocketChannel;
import io.netty.handler.ssl.SslContext;
import io.netty.handler.ssl.SslContextBuilder;
import lombok.extern.slf4j.Slf4j;
import org.springframework.boot.autoconfigure.SpringBootApplication;import java.io.File;
import java.util.Scanner;@Slf4j
@SpringBootApplication
public class TestClientApp {private static final Session session = new Session().setId(IdUtil.randomUUID());public static void main(String[] args) {new Thread(new TestThread("127.0.0.1", 7890)).start();}private static class TestThread implements Runnable {private final String serverHost;private final int serverPort;public TestThread(String serverHost, int serverPort) {this.serverHost = serverHost;this.serverPort = serverPort;}@Overridepublic void run() {EventLoopGroup group = new NioEventLoopGroup();try {final String certsDir = "D:\\GIT\\secim_service\\service\\src\\main\\resources\\";File certChainFile = new File(certsDir + "client.crt");File keyFile = new File(certsDir + "pkcs8_client.key");File rootFile = new File(certsDir + "ca.crt");SslContext sslCtx = SslContextBuilder.forClient().keyManager(certChainFile, keyFile).trustManager(rootFile).build();Bootstrap b = new Bootstrap();b.group(group).channel(NioSocketChannel.class).option(ChannelOption.TCP_NODELAY, true).handler(new ChannelInitializer<SocketChannel>() {protected void initChannel(SocketChannel ch) throws Exception {// 添加SSL安装验证ch.pipeline().addLast(sslCtx.newHandler(ch.alloc()));ch.pipeline().addLast(new FrameEncoder());ch.pipeline().addLast(new FrameDecoder());ch.pipeline().addLast(new TestClientHandler(session));}});// 发起异步连接操作ChannelFuture f = b.connect(serverHost, serverPort);f.addListener(future -> {startConsoleThread(f.channel(), session);}).sync();// 等待客户端连接关闭f.channel().closeFuture().sync();} catch (Exception e) {e.printStackTrace();} finally {// 优雅退出,释放NIO线程组group.shutdownGracefully();}}}/*** 开启控制台线程** @param channel*/private static void startConsoleThread(Channel channel, Session session) {new Thread(() -> {while (!Thread.interrupted()) {log.info("输入指令:");Scanner scanner = new Scanner(System.in);String input;while (!"exit".equals((input = scanner.nextLine()))) {log.info("输入的命令是:{}", input);if (!NumberUtil.isInteger(input)) {log.error("输入的指令有误,请重新输入");continue;}NettyMsg nettyMsg;switch (Integer.parseInt(input)) {case 1:nettyMsg = TestMsgBuilder.buildIdentityMsg(session);break;default:log.error("无法识别的指令:{},请重新输入指令", input);nettyMsg = null;break;}if (null != nettyMsg) {channel.writeAndFlush(nettyMsg);}}}}).start();}
}
3.3. 证书存放

4. 运行效果
4.1. SSL客户端发送消息:

4.2. 服务器收到SSL客户端消息:

4.3. 非SSL客户端发送消息:

4.4. 服务器收到非SSL客户端消息:

5. References:
2020-07-14 15:01:55 小傅哥:netty案例,netty4.1中级拓展篇十三《Netty基于SSL实现信息传输过程中双向加密验证》
2017-07-04 11:44 骏马金龙:openssl ca(签署和自建CA)
相关文章:
Netty SSL双向验证
Netty SSL双向验证 1. 环境说明2. 生成证书2.1. 创建根证书 密钥证书2.2. 生成请求证书密钥2.3. 生成csr请求证书2.4. ca证书对server.csr、client.csr签发生成x509证书2.5. 请求证书PKCS#8编码2.6. 输出文件 3. Java代码3.1. Server端3.2. Client端3.3. 证书存放 4. 运行效果4…...

4.nginx反向代理、负载均衡
nginx反向代理、负载均衡 一、反向代理1、语法2、注意事项3、后端服务器记录客户端真实IP3.1 在nginx反向代理时添加x-real-ip字段3.2 后端httpd修改combined日志格式3.3 后端是nginx的情况 二、负载均衡 upstream模块1、负载均衡作用2、调度算法3、配置应用 一、反向代理 隐藏…...
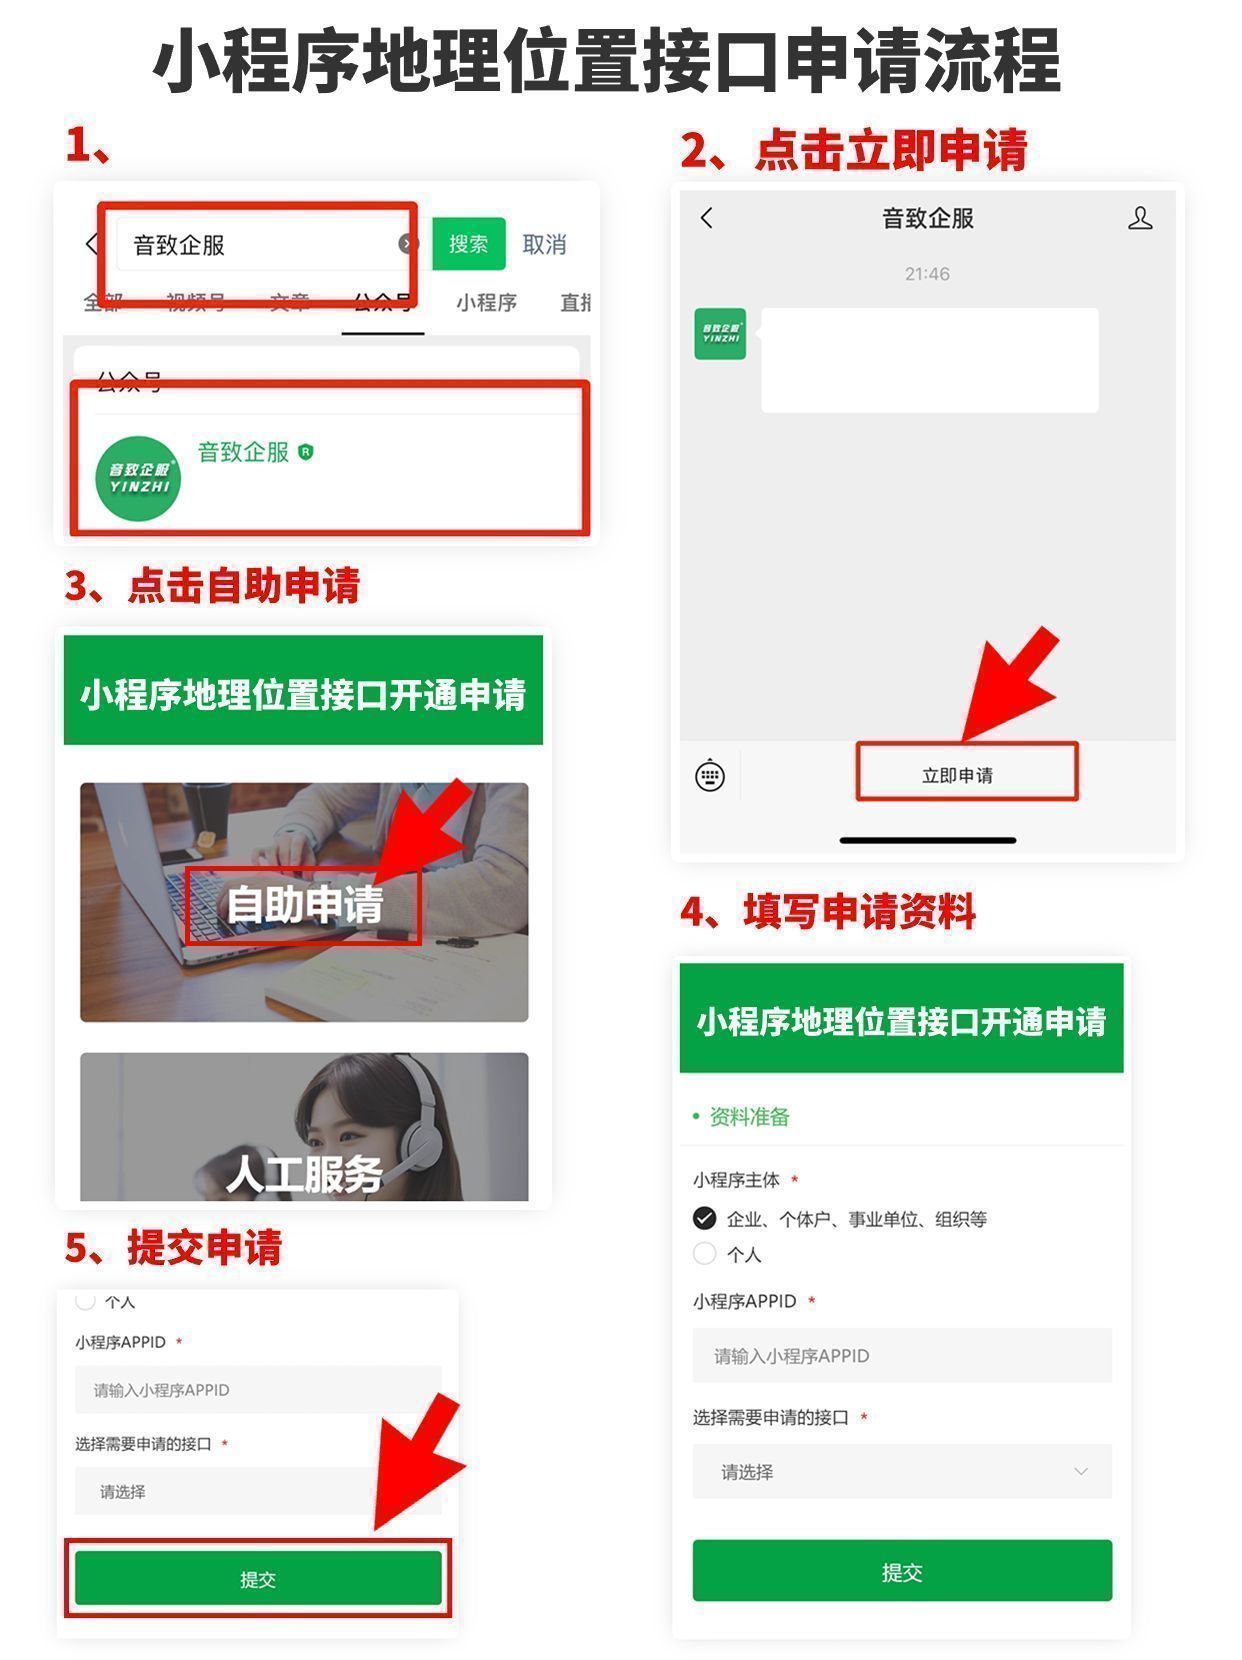
浅谈申请小程序地理位置权限的正确打开方式
小程序地理位置接口有什么功能? 这篇内容会教大家如何快速申请“获取当前的地理位置(onLocationChange)”接口,以便帮助大家顺利开通接口。以下内容是本人经历了多次的申请经历得出来的经验,来之不易,望大家…...

make modules 和 make modules_install
1. make modules 如:make ARCHarm64 CROSS_COMPILEaarch64-linux-gnu- modules 直接make,不加任何参数,就是make all,包含make modules。 make modules是单独编译模块,驱动被配置成M的都是modules,modul…...

docker 安装mysql,redis,rabbitmq
文章目录 docker 安装ngnix,mysql,redis,rabbitmq安装docker1.安装下载docker-ce源命令2.安装docker3.查看版本4.查看docker状态5.启动docker6.测试安装ngnix 安装mysql8.0.361.拉取mysql镜像2.安装mysql8 安装redis1.拉取redis7.0.11镜像2.安装redis3.进入容器内部…...
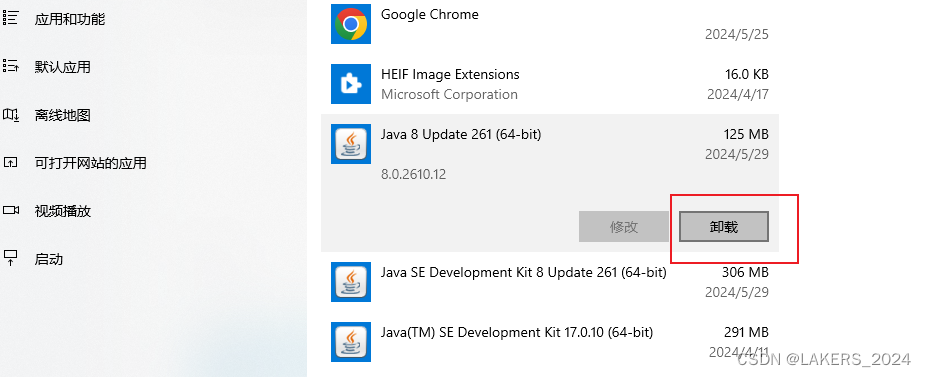
Windows配置java环境JDK
配置jdk环境非常简单,大概有以下几步: 下载jdk安装,然后双击进行安装配置环境变量(也不是一定非要配置环境变量,配置环境变量的好处就是,在任何位置,系统都可以找到安装路径,非常实用且方便) …...

英伟达驱动重装教程
离线安装NVIDIA驱动程序通常涉及下载驱动程序安装包并手动执行安装步骤。以下是详细步骤: 1. 下载NVIDIA驱动程序 首先,你需要在有网络连接的计算机上下载适合你系统的NVIDIA驱动程序安装包。可以从NVIDIA官方驱动下载页面下载。 选择你的GPU型号和操作系统,然后下载相应…...
【蓝桥杯嵌入式】 第六届国赛
目录 题目 配置 注意事项 代码 - 默写大师 EEPROM读写函数 LED驱动函数 ADC采集 上电初始化 LCD 按键 PWM互补输出 全部代码 hardware.c hardware.h control.c control.h main.c 题目 配置 注意事项 复制LCD的工程,先配置资源 --- 勾选完选项一…...
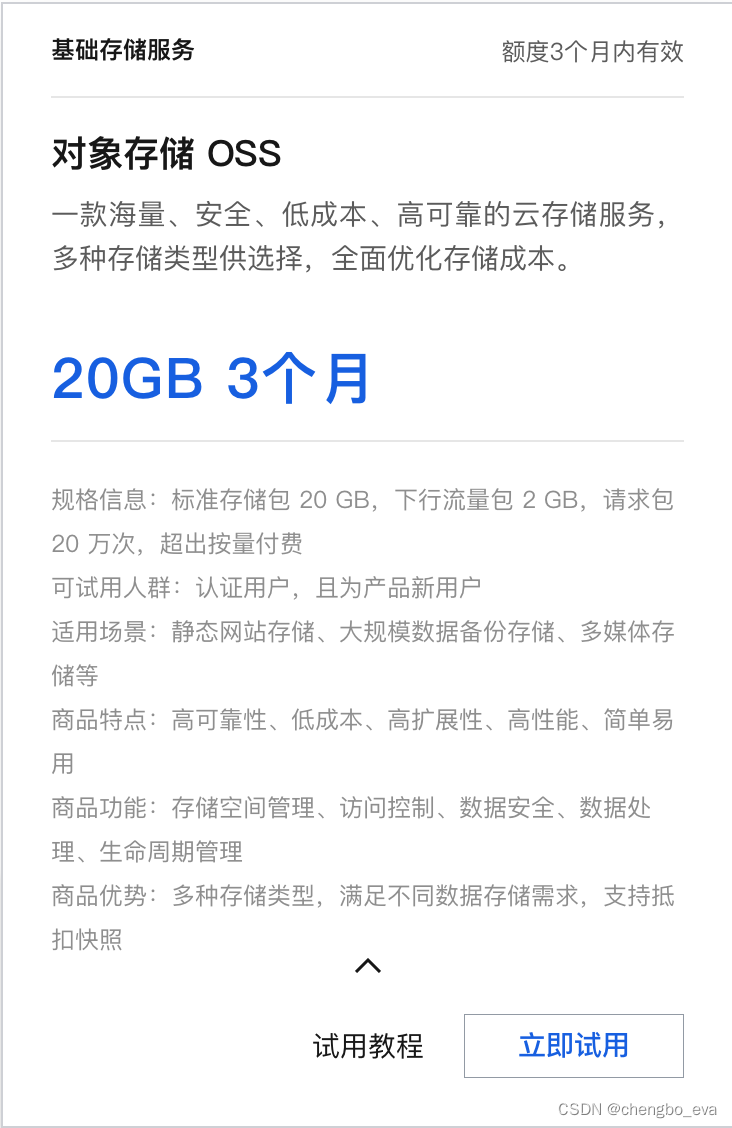
图片裁剪与上传处理方案 —— 基于阿里云 OSS 处理用户资料
目录 01: 通用组件:input 构建方案分析 02: 通用组件:input 构建方案 03: 构建用户资料基础样式 04: 用户基本资料修改方案 05: 处理不保存时的同步问题 06: 头像修改方案流程分析 07: 通用组件:Dialog 构建方案分析 08: 通用组件&…...
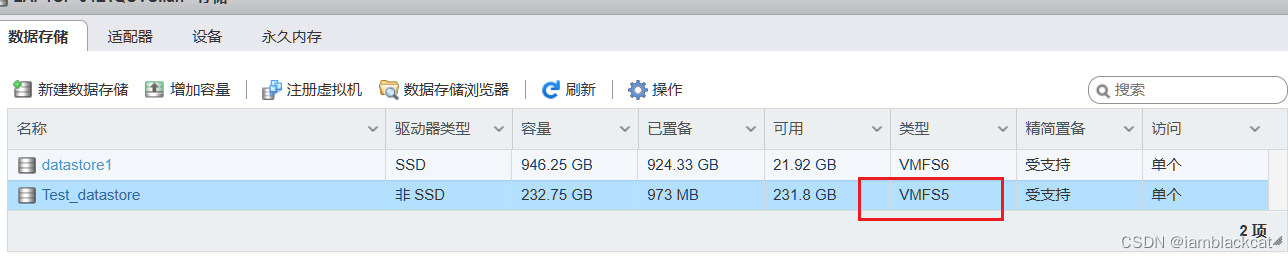
迷你主机Esxi 6.7挂载新硬盘
背景 硬件:零刻SER Pro 6 系统:vmware Exsi 6.7.0 Update 3 现有的硬盘槽位占满了,但空间不够用,想要通过USB外接移动硬盘来进行扩容。使用了一块250G的硬盘做测试。 步骤 TL;DR # 停止usbarbitrator服务 /etc/init.d/usbarbi…...
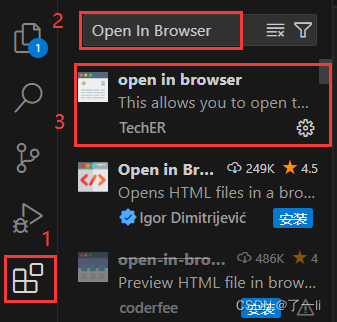
解决VSCode右键没有Open In Default Browser问题
在VSCode进行Web小程序测试时,我们在新建的HTML文件中输入 !会自动生成页面代码骨架,写入内容后,我们想要右键在浏览器中预览。发现右键没有“Open In Default Browser”选项。原因是没有安装插件。 下面是解决方案:首先在VSCode找…...
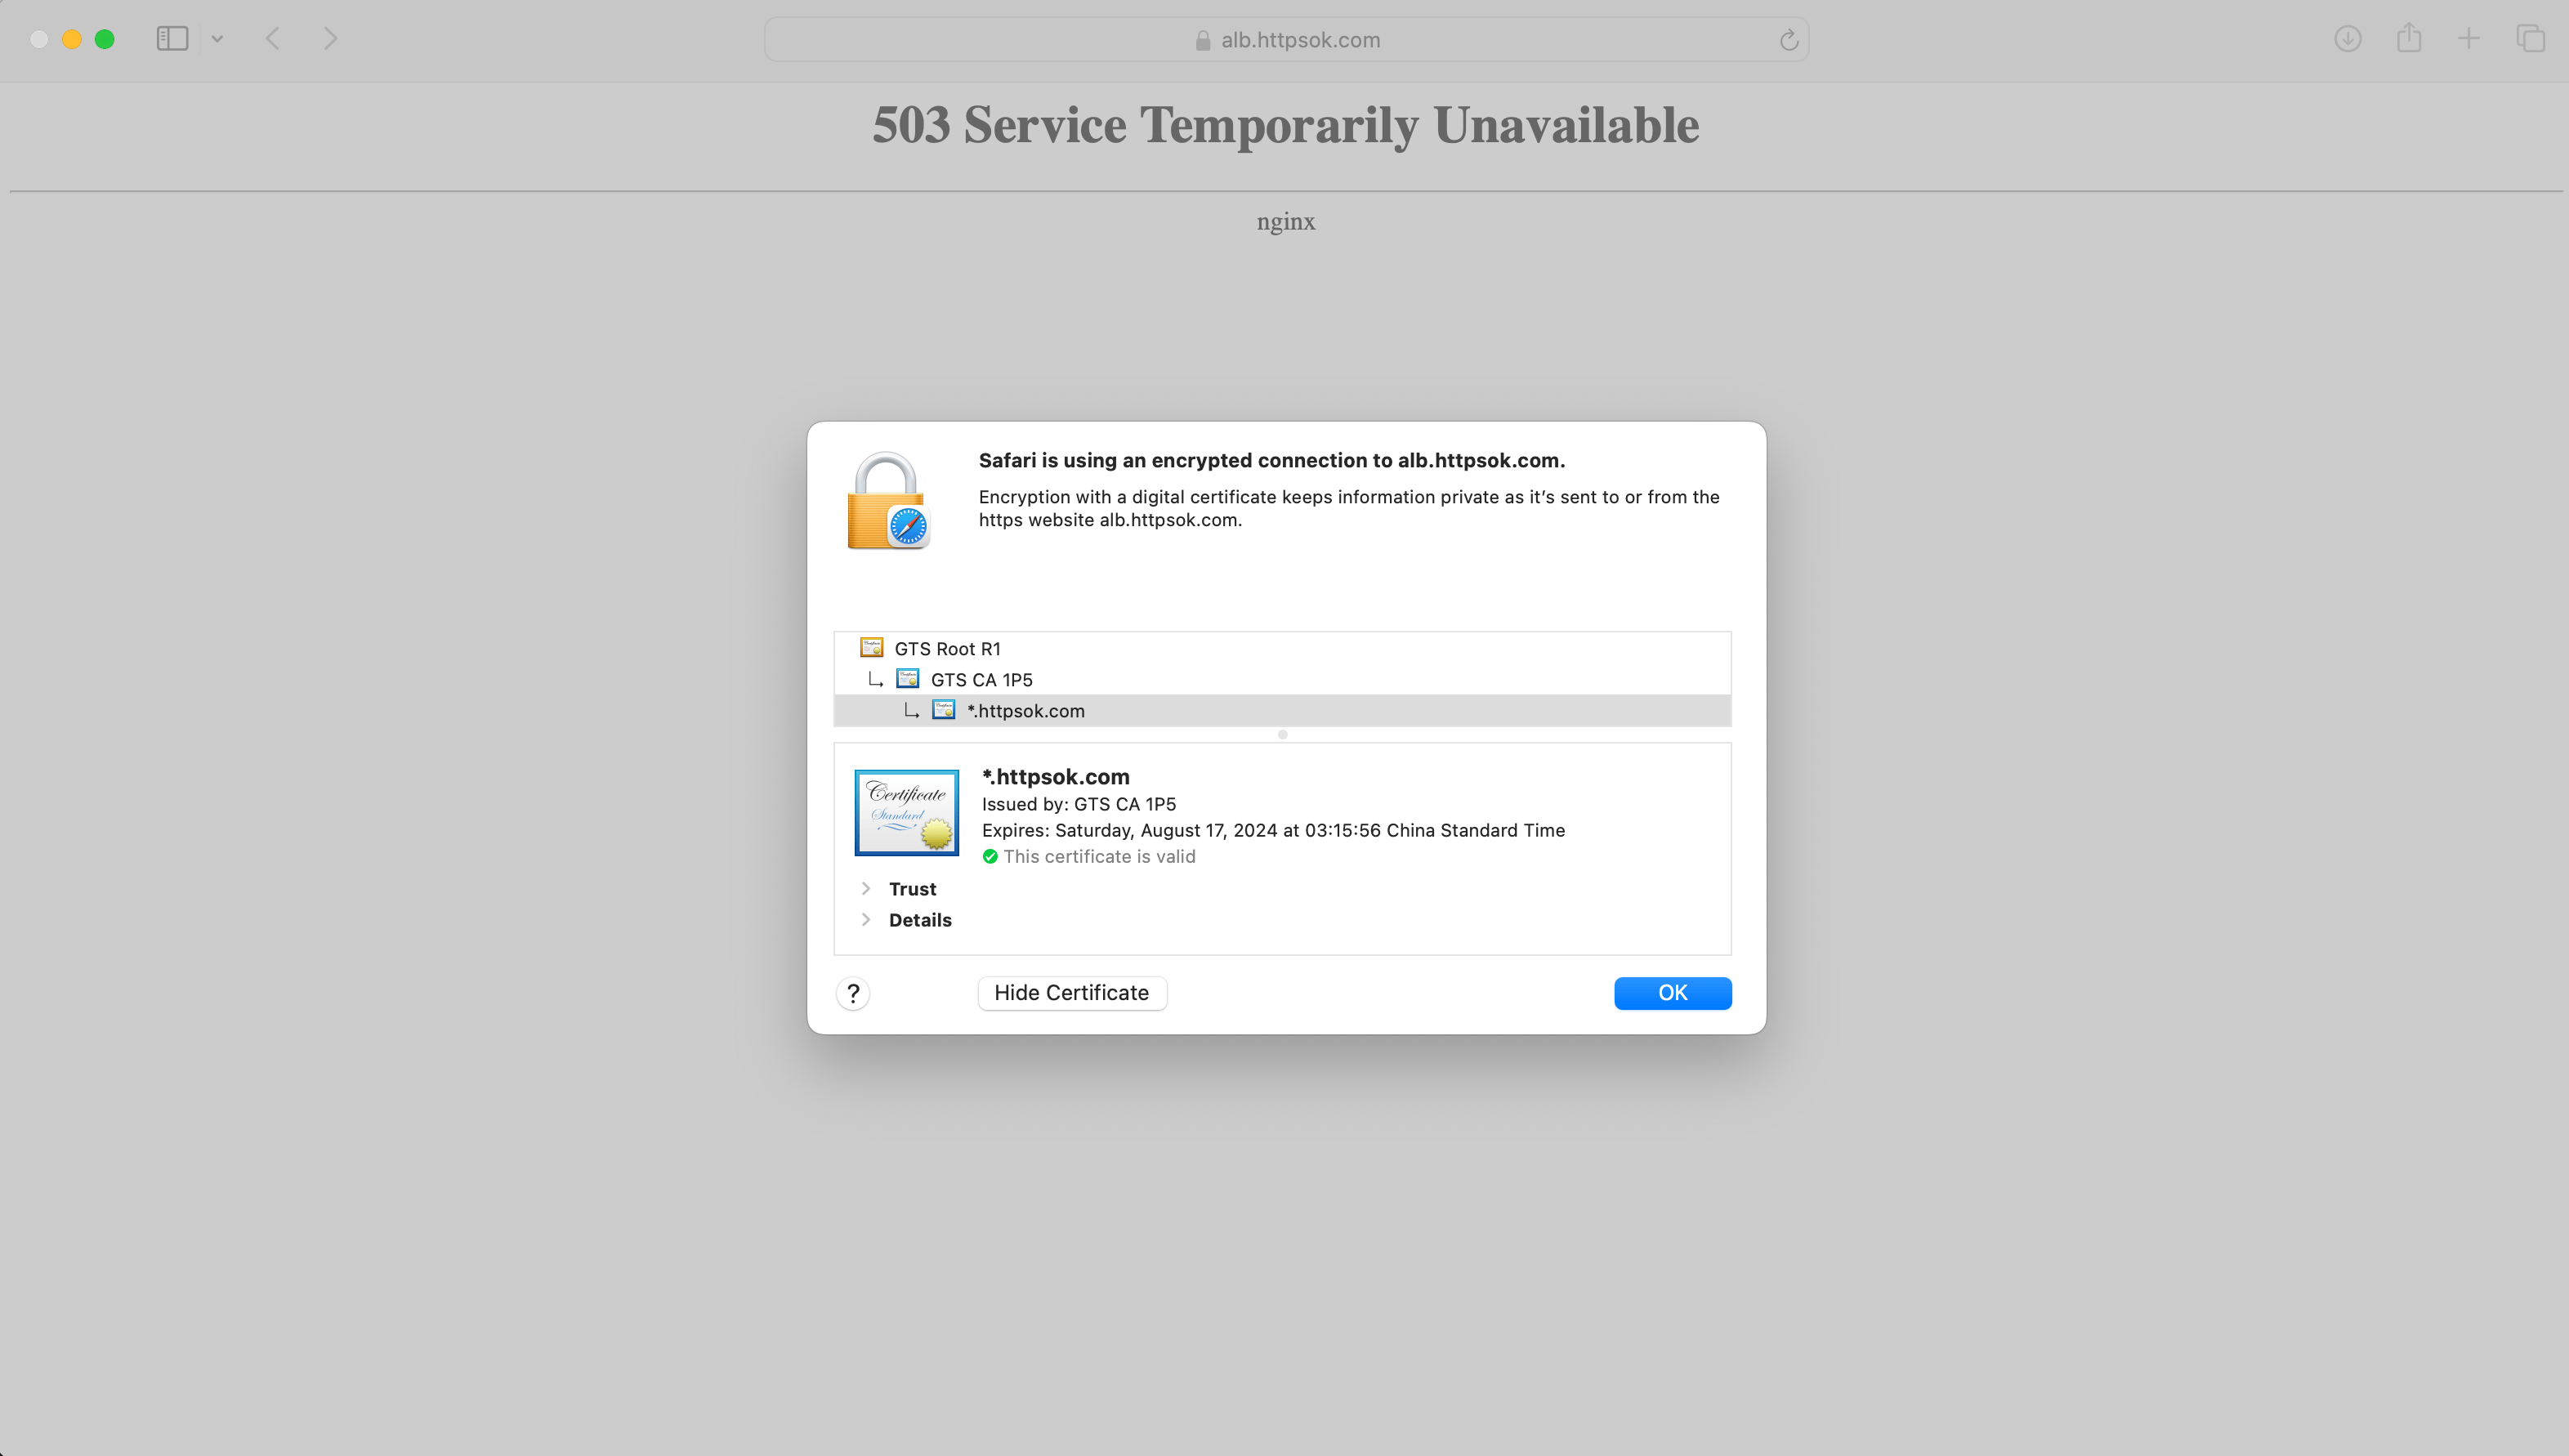
httpsok-v1.12.0支持LB证书自动部署
🔥httpsok-v1.12.0支持LB证书自动部署 介绍 httpsok 是一个便捷的 HTTPS 证书自动续签工具,基于全新的设计理念,专为 Nginx 、OpenResty 服务器设计。已服务众多中小企业,稳定、安全、可靠。 一行命令,一分钟轻松搞…...

基于Pytorch框架的深度学习EfficientNetV2神经网络中草药识别分类系统源码
第一步:准备数据 5种中草药数据:self.class_indict ["百合", "党参", "山魈", "枸杞", "槐花", "金银花"] ,总共有900张图片,每个文件夹单独放一种数据 第二步&a…...
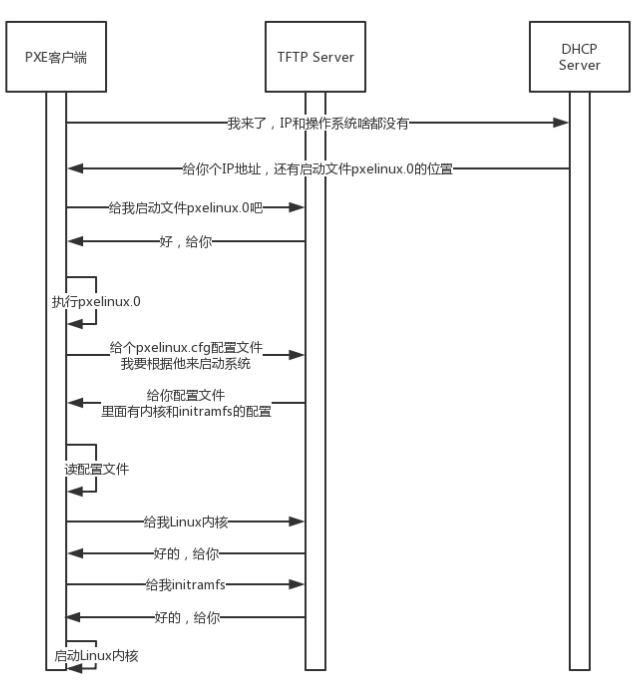
网络协议。
一、流程案例 接下来揭秘我要说的大事情,“双十一”。这和我们要讲的网络协议有什么关系呢? 在经济学领域,有个伦纳德里德(Leonard E. Read)创作的《铅笔的故事》。这个故事通过一个铅笔的诞生过程,来讲述…...

Excel单元格格式无法修改的原因与解决方法
Excel单元格格式无法更改可能由多种原因造成。以下是一些可能的原因及相应的解决方法: 单元格或工作表被保护: 如果单元格或工作表被设置为只读或保护状态,您将无法更改其中的格式。解决方法:取消单元格或工作表的保护。在Excel中…...

CasaOS玩客云安装全平台高速下载器Gopeed并实现远程访问
💝💝💝欢迎来到我的博客,很高兴能够在这里和您见面!希望您在这里可以感受到一份轻松愉快的氛围,不仅可以获得有趣的内容和知识,也可以畅所欲言、分享您的想法和见解。 推荐:kwan 的首页,持续学…...

JAVA学习-练习试用Java实现“最长回文子串”
问题: 给定一个字符串 s,找到 s 中最长的回文子串。 示例 1: 输入:s "babad" 输出:"bab" 解释:"aba" 同样是符合题意的答案。 示例 2: 输入:s …...
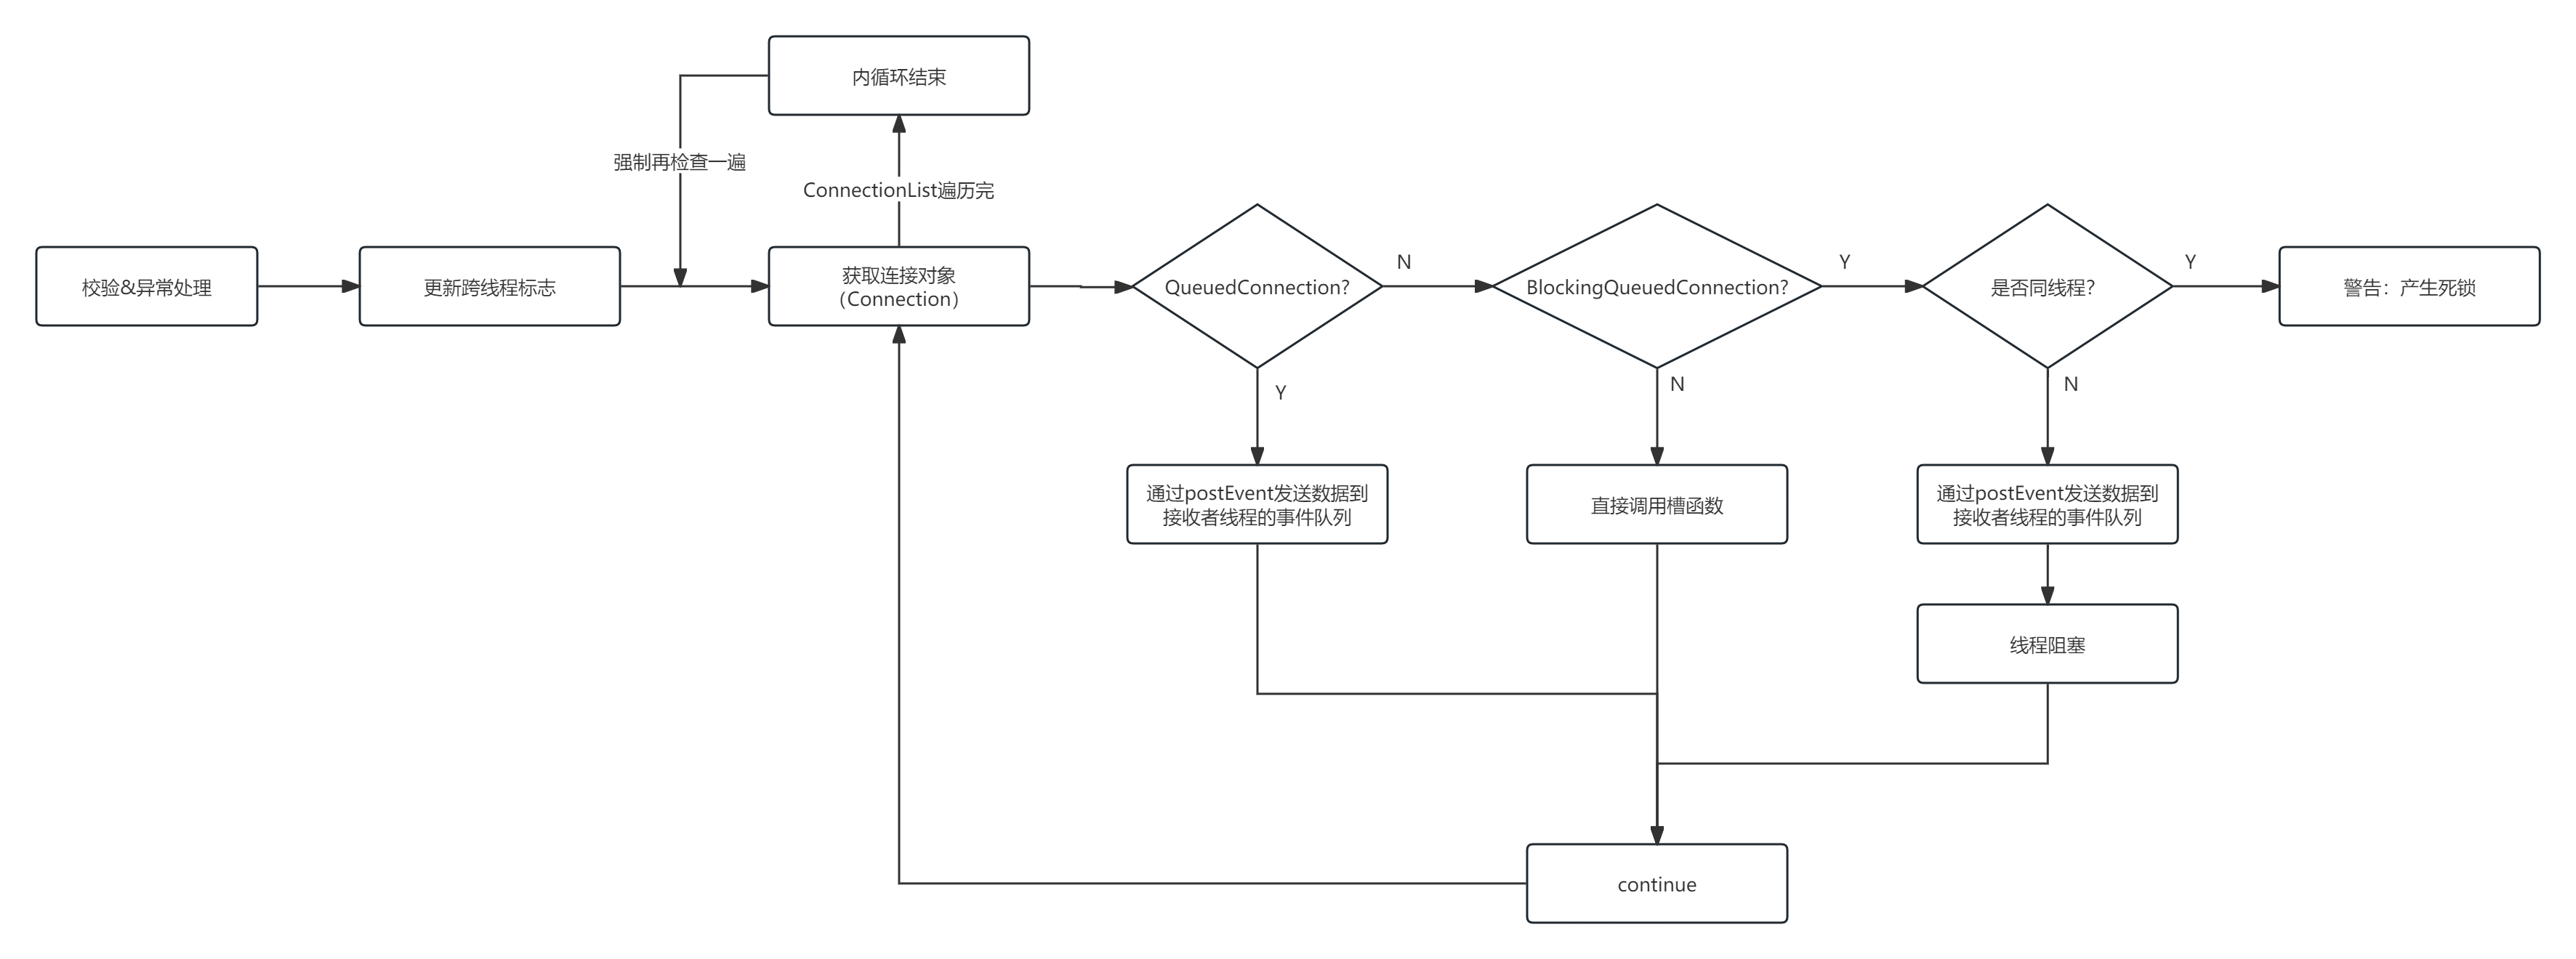
深入探索Qt框架系列之信号槽原理(三)
前面两篇分别介绍了QObject::connect和QMetaObject::Connection,那么信号槽机制的基础已经介绍完了,本文将介绍信号槽机制是如何从信号到槽的,以及多线程下是如何工作的。 信号槽机制源码解析 1. 信号的触发 以该系列的第一篇文章中的示例举…...
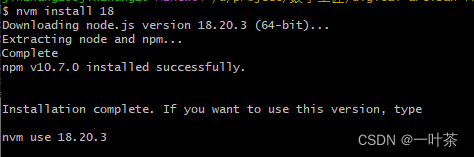
npm镜像源管理、nvm安装多版本node异常处理
查看当前使用的镜像源 npm config get registry --locationglobal 设置使用官方源 npm config set registry https://registry.npmjs.org/ --locationglobal 设置淘宝镜像源 npm config set registry https://registry.npm.taobao.org/ --locationglobal 需要更改淘宝镜像源地址…...
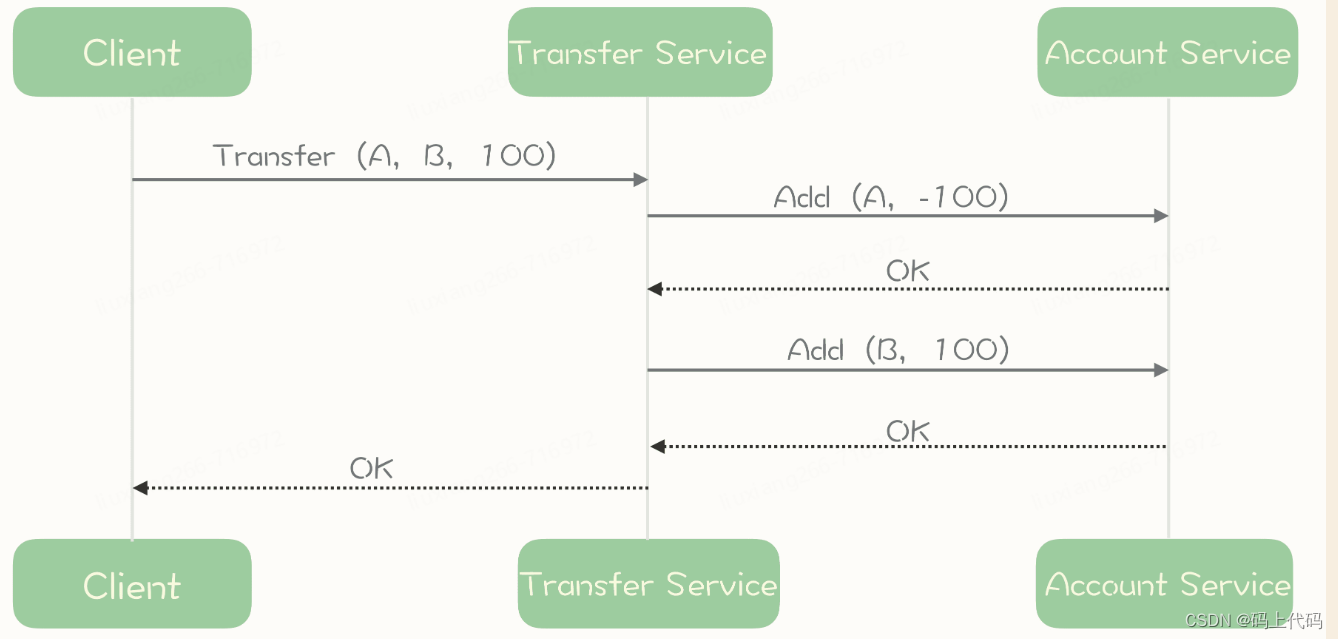
异步编程的魔力:如何显著提升系统性能
异步编程的魔力:如何显著提升系统性能 今天我们来聊聊一个对开发者非常重要的话题——异步编程。异步编程是提升系统性能的一种强大手段,尤其在需要高吞吐量和低时延的场景中,异步设计能够显著减少线程等待时间,从而提升整体性能。 异步设计如何提升系统性能? 我们通过…...

USB Type-C接口技术解析与工程实践
1. USB接口技术演进与Type-C核心优势USB Type-C接口自2014年发布以来,凭借其革命性的设计理念迅速成为移动设备的主流接口标准。作为从业十余年的硬件工程师,我见证了从USB 2.0 OTG到Type-C的完整迁移过程。与传统micro-A/B接口相比,Type-C最…...

MongoDB避坑指南:电脑名含中文导致 Invalid UTF-8 string 报错的完美解决
前言最近在配置 MongoDB 本地环境时,遇到了一个非常“玄学”的报错。明明按照教程一步步安装,环境变量也配好了,但无论是启动服务,还是使用 MongoDB Compass 连接本地数据库,都会直接报错。排查了半天,最后…...

Arduino开源贡献全流程:从Fork到Pull Request的工程实践
1. 项目概述与核心价值 如果你在玩Arduino,发现某个常用库有个小bug,或者想给它加个新功能,你会怎么做?是去论坛发个帖子,还是自己改完代码藏起来用?对于很多刚接触开源的朋友来说,虽然有心贡献…...
)
认识Python网络套接字编程之流式套接字(一)
流式套接字当你需要使用 TCP 协议进行通信时,需要创建流式套接字。这是套接字编程中最常用的一种。光谈这些概念显得很抽象,还是举送外卖的这个例子,假设你点了一份烤鸭,外卖骑手需要先去店铺取餐,然后送到你的家门口&…...

OCPP 1.6 协议详解:ClearChargingProfile 清除充电配置文件指令
一、指令概述 ClearChargingProfile(清除充电配置文件)是OCPP 1.6协议中由中央系统发起的管理指令,用于删除充电桩的一个或多个充电配置文件。通过此指令,中央系统可以清理不再需要的配置文件,恢复默认设置࿰…...

GSE魔兽世界宏编辑器:高级序列化技术与智能战斗自动化解决方案
GSE魔兽世界宏编辑器:高级序列化技术与智能战斗自动化解决方案 【免费下载链接】GSE-Advanced-Macro-Compiler GSE is an alternative advanced macro editor and engine for World of Warcraft. 项目地址: https://gitcode.com/gh_mirrors/gs/GSE-Advanced-Macr…...

告别命令行恐惧!用这个可视化软件5分钟搞定Abaqus三维Voronoi泡沫模型
零代码革命:5分钟用可视化工具构建Abaqus三维Voronoi泡沫模型 在材料科学与工程仿真领域,Voronoi结构因其独特的几何特性,成为模拟泡沫、多孔材料和晶体结构的黄金标准。然而传统建模方法对编程技能的硬性要求,让许多材料工程师和…...

IEA-15-240-RWT:15MW海上风机开源模型的完整入门指南
IEA-15-240-RWT:15MW海上风机开源模型的完整入门指南 【免费下载链接】IEA-15-240-RWT 15MW reference wind turbine repository developed in conjunction with IEA Wind 项目地址: https://gitcode.com/gh_mirrors/ie/IEA-15-240-RWT 你是否曾经想要研究海…...

完整掌握yuzu模拟器:专业级Switch游戏体验优化指南
完整掌握yuzu模拟器:专业级Switch游戏体验优化指南 【免费下载链接】yuzu 任天堂 Switch 模拟器 项目地址: https://gitcode.com/GitHub_Trending/yu/yuzu yuzu模拟器作为目前最成熟的任天堂Switch开源模拟器,为PC玩家提供了在电脑上畅玩Switch游…...

英雄联盟回放播放器终极指南:用ROFL-Player解锁你的游戏记忆
英雄联盟回放播放器终极指南:用ROFL-Player解锁你的游戏记忆 【免费下载链接】ROFL-Player (No longer supported) One stop shop utility for viewing League of Legends replays! 项目地址: https://gitcode.com/gh_mirrors/ro/ROFL-Player 还在为英雄联盟…...