离线安装kubesphere-详细操作,以及报错
离线安装kubesphere
官网地址
https://kubesphere.io/zh/docs/v3.4/installing-on-linux/introduction/air-gapped-installation/
1.先准备docker环境
[root@node1 ~]# tar -xf docker-24.0.6.tgz
[root@node1 ~]# ls
anaconda-ks.cfg        calico-v3.26.1.tar  docker             kk       kubekey-v3.0.13-linux-amd64.tar.gz  kubesphere.tar.gz  manifest-sample.yaml
calicoctl-linux-amd64  config-sample.yaml  docker-24.0.6.tgz  kubekey  kubekey.zip                         manifest-all.yaml  passwd
[root@node1 ~]# cd docker
[root@node1 docker]# ls
containerd  containerd-shim-runc-v2  ctr  docker  dockerd  docker-init  docker-proxy  runc
[root@node1 docker]# cd ..
[root@node1 ~]# ls
anaconda-ks.cfg        calico-v3.26.1.tar  docker             kk       kubekey-v3.0.13-linux-amd64.tar.gz  kubesphere.tar.gz  manifest-sample.yaml
calicoctl-linux-amd64  config-sample.yaml  docker-24.0.6.tgz  kubekey  kubekey.zip                         manifest-all.yaml  passwd
[root@node1 ~]# cp docker/* /usr/bin
[root@node1 ~]# vim /etc/systemd/system/docker.service
[root@node1 ~]# chmod +x /etc/systemd/system/docker.service
[root@node1 ~]# systemctl daemon-reload
[root@node1 ~]# systemctl start docker
[root@node1 ~]# systemctl enable docker
Created symlink from /etc/systemd/system/multi-user.target.wants/docker.service to /etc/systemd/system/docker.service.
[root@node1 ~]# docker ps
CONTAINER ID   IMAGE     COMMAND   CREATED   STATUS    PORTS     NAMES
2.配置服务
[root@node1 ~]# vim /etc/systemd/system/docker.service[Unit]
Description=Docker Application Container Engine
Documentation=https://docs.docker.com
After=network-online.target firewalld.service
Wants=network-online.target[Service]
Type=notify
ExecStart=/usr/bin/dockerd
ExecReload=/bin/kill -s HUP $MAINPID
LimitNODFILE=infinity
LimitNPROC=infinity
TimeoutStartSec=0
Delegate=yes
KillMode=process
Restart=on-failure
StartLimitBurst=3
StartLimitInterval=60s[Install]
WantedBy=multi-user.target
3.安装docker-compose
将文件放到/usr/local/bin
[root@node1 bin]# chmod +x /usr/local/bin/docker-compose
然后创建软链接
[root@node1 bin]# ln -s /usr/local/bin/docker-compose /usr/bin/docker-compose
验证服务
[root@node1 bin]# docker-compose --version
Docker Compose version v2.2.2
4.安装harbor
注释harbor可以不安装
解压文件
tar -zxvf harbor-offline-installer-v2.5.3.tgz
备份配置文件
cp harbor.yml.tmpl harbor.yml
vi harbor.yml
需要注释https的配置
hostname: 192.168.31.41
http:port: 80
harbor_admin_password: Harbor12345
database:password: root123max_idle_conns: 100max_open_conns: 900
data_volume: /root/harbor/data
trivy:ignore_unfixed: falseskip_update: falseoffline_scan: falseinsecure: false
jobservice:max_job_workers: 10
notification:webhook_job_max_retry: 10
chart:absolute_url: disabled
log:level: infolocal:rotate_count: 50rotate_size: 200Mlocation: /var/log/harbor
_version: 2.5.0
proxy:http_proxy:https_proxy:no_proxy:components:- core- jobservice- trivy
upload_purging:enabled: trueage: 168hinterval: 24hdryrun: false
安装操作
[root@node1 harbor]# ./install.sh [Step 0]: checking if docker is installed ...Note: docker version: 24.0.6[Step 1]: checking docker-compose is installed ...Note: docker-compose version: 2.2.2[Step 2]: loading Harbor images ...
Loaded image: goharbor/harbor-portal:v2.5.3
Loaded image: goharbor/harbor-core:v2.5.3
Loaded image: goharbor/redis-photon:v2.5.3
Loaded image: goharbor/prepare:v2.5.3
Loaded image: goharbor/harbor-db:v2.5.3
Loaded image: goharbor/chartmuseum-photon:v2.5.3
Loaded image: goharbor/harbor-jobservice:v2.5.3
Loaded image: goharbor/harbor-registryctl:v2.5.3
Loaded image: goharbor/nginx-photon:v2.5.3
Loaded image: goharbor/notary-signer-photon:v2.5.3
Loaded image: goharbor/harbor-log:v2.5.3
Loaded image: goharbor/harbor-exporter:v2.5.3
Loaded image: goharbor/registry-photon:v2.5.3
Loaded image: goharbor/notary-server-photon:v2.5.3
Loaded image: goharbor/trivy-adapter-photon:v2.5.3[Step 3]: preparing environment ...[Step 4]: preparing harbor configs ...
prepare base dir is set to /root/harbor
WARNING:root:WARNING: HTTP protocol is insecure. Harbor will deprecate http protocol in the future. Please make sure to upgrade to https
Clearing the configuration file: /config/portal/nginx.conf
Clearing the configuration file: /config/log/logrotate.conf
Clearing the configuration file: /config/log/rsyslog_docker.conf
Clearing the configuration file: /config/nginx/nginx.conf
Clearing the configuration file: /config/core/env
Clearing the configuration file: /config/core/app.conf
Clearing the configuration file: /config/registry/passwd
Clearing the configuration file: /config/registry/config.yml
Clearing the configuration file: /config/registry/root.crt
Clearing the configuration file: /config/registryctl/env
Clearing the configuration file: /config/registryctl/config.yml
Clearing the configuration file: /config/db/env
Clearing the configuration file: /config/jobservice/env
Clearing the configuration file: /config/jobservice/config.yml
Generated configuration file: /config/portal/nginx.conf
Generated configuration file: /config/log/logrotate.conf
Generated configuration file: /config/log/rsyslog_docker.conf
Generated configuration file: /config/nginx/nginx.conf
Generated configuration file: /config/core/env
Generated configuration file: /config/core/app.conf
Generated configuration file: /config/registry/config.yml
Generated configuration file: /config/registryctl/env
Generated configuration file: /config/registryctl/config.yml
Generated configuration file: /config/db/env
Generated configuration file: /config/jobservice/env
Generated configuration file: /config/jobservice/config.yml
loaded secret from file: /data/secret/keys/secretkey
Generated configuration file: /compose_location/docker-compose.yml
Clean up the input dirNote: stopping existing Harbor instance ...
[+] Running 10/10⠿ Container harbor-jobservice  Removed                                                                                                                                                                                          0.7s⠿ Container registryctl        Removed                                                                                                                                                                                         10.1s⠿ Container nginx              Removed                                                                                                                                                                                          0.0s⠿ Container harbor-portal      Removed                                                                                                                                                                                          0.7s⠿ Container harbor-core        Removed                                                                                                                                                                                          0.2s⠿ Container registry           Removed                                                                                                                                                                                          0.3s⠿ Container redis              Removed                                                                                                                                                                                          0.4s⠿ Container harbor-db          Removed                                                                                                                                                                                          0.4s⠿ Container harbor-log         Removed                                                                                                                                                                                         10.1s⠿ Network harbor_harbor        Removed                                                                                                                                                                                          0.0s[Step 5]: starting Harbor ...
[+] Running 10/10⠿ Network harbor_harbor        Created                                                                                                                                                                                          0.0s⠿ Container harbor-log         Started                                                                                                                                                                                          0.4s⠿ Container harbor-portal      Started                                                                                                                                                                                          1.6s⠿ Container redis              Started                                                                                                                                                                                          1.7s⠿ Container registryctl        Started                                                                                                                                                                                          1.5s⠿ Container registry           Started                                                                                                                                                                                          1.6s⠿ Container harbor-db          Started                                                                                                                                                                                          1.7s⠿ Container harbor-core        Started                                                                                                                                                                                          2.4s⠿ Container nginx              Started                                                                                                                                                                                          3.3s⠿ Container harbor-jobservice  Started                                                                                                                                                                                          3.2s
✔ ----Harbor has been installed and started successfully.----
查看对应的服务
[root@node1 harbor]# docker-compose ps
NAME                COMMAND                  SERVICE             STATUS              PORTS
harbor-core         "/harbor/entrypoint.…"   core                running (healthy)
harbor-db           "/docker-entrypoint.…"   postgresql          running (healthy)
harbor-jobservice   "/harbor/entrypoint.…"   jobservice          running (healthy)
harbor-log          "/bin/sh -c /usr/loc…"   log                 running (healthy)   127.0.0.1:1514->10514/tcp
harbor-portal       "nginx -g 'daemon of…"   portal              running (healthy)
nginx               "nginx -g 'daemon of…"   proxy               running (healthy)   0.0.0.0:80->8080/tcp, :::80->8080/tcp
redis               "redis-server /etc/r…"   redis               running (healthy)
registry            "/home/harbor/entryp…"   registry            running (healthy)
registryctl         "/home/harbor/start.…"   registryctl         running (healthy)
5.初始化服务报错
[root@node1 ~]# ./kk init registry -f config-sample.yaml -a kubesphere.tar.gz _   __      _          _   __| | / /     | |        | | / /
| |/ / _   _| |__   ___| |/ /  ___ _   _
|    \| | | | '_ \ / _ \    \ / _ \ | | |
| |\  \ |_| | |_) |  __/ |\  \  __/ |_| |
\_| \_/\__,_|_.__/ \___\_| \_/\___|\__, |__/ ||___/16:10:02 CST [GreetingsModule] Greetings
16:10:32 CST failed: [node1]
error: Pipeline[InitRegistryPipeline] execute failed: Module[GreetingsModule] exec failed:
failed: [node1] execute task timeout, Timeout=30s解决报错
[root@node1 ~]# vi /etc/hosts
追加地址
10.1.1.2  node1.cluster.local node1
10.1.1.2  dockerhub.kubekey.local
10.1.1.2  lb.kubesphere.local
改为自己电脑地址
[root@node1 ~]# sed -i 's/10.1.1.2/192.168.31.41/g' /etc/hosts
重新执行初始化命令
[root@node1 ~]# ./kk init registry -f config-sample.yaml -a kubesphere.tar.gz _   __      _          _   __| | / /     | |        | | / /
| |/ / _   _| |__   ___| |/ /  ___ _   _
|    \| | | | '_ \ / _ \    \ / _ \ | | |
| |\  \ |_| | |_) |  __/ |\  \  __/ |_| |
\_| \_/\__,_|_.__/ \___\_| \_/\___|\__, |__/ ||___/16:14:04 CST [GreetingsModule] Greetings
16:14:04 CST message: [node1]
Greetings, KubeKey!
16:14:04 CST success: [node1]
16:14:04 CST [UnArchiveArtifactModule] Check the KubeKey artifact md5 value
16:14:04 CST success: [LocalHost]
16:14:04 CST [UnArchiveArtifactModule] UnArchive the KubeKey artifact
/root/kubekey/cni/amd64/calicoctl
/root/kubekey/cni/v1.2.0/amd64/cni-plugins-linux-amd64-v1.2.0.tgz
/root/kubekey/cni/v3.26.1/amd64/calicoctl
/root/kubekey/crictl/v1.24.0/amd64/crictl-v1.24.0-linux-amd64.tar.gz
/root/kubekey/docker/24.0.6/amd64/docker-24.0.6.tgz
/root/kubekey/etcd/v3.4.13/amd64/etcd-v3.4.13-linux-amd64.tar.gz
/root/kubekey/helm/v3.9.0/amd64/helm
/root/kubekey/images/blobs/sha256/019d8da33d911d9baabe58ad63dea2107ed15115cca0fc27fc0f627e82a695c1----/root/kubekey/images/index.json
/root/kubekey/images/oci-layout
/root/kubekey/kube/v1.22.12/amd64/kubeadm
/root/kubekey/kube/v1.22.12/amd64/kubectl
/root/kubekey/kube/v1.22.12/amd64/kubelet
16:16:03 CST success: [LocalHost]
16:16:03 CST [UnArchiveArtifactModule] Create the KubeKey artifact Md5 file
16:16:33 CST success: [LocalHost]
16:16:33 CST [FATA] [registry] node not found in the roleGroups of the configuration file
报错显示没有对应的仓库的角色组,这个错误通常是指角色组缺少必须的注册节点registry node的定义
vi config-sample.yaml
registry:
- node1
缺少这个角色定义
apiVersion: kubekey.kubesphere.io/v1alpha2
kind: Cluster
metadata:name: sample
spec:hosts:- {name: node1, address: 192.168.31.41, internalAddress: 192.168.31.41, user: root, password: "123456"}roleGroups:etcd:- node1control-plane:- node1worker:- node1registry:- node1controlPlaneEndpoint:## Internal loadbalancer for apiservers# internalLoadbalancer: haproxydomain: lb.kubesphere.localaddress: ""port: 6443kubernetes:version: v1.22.12clusterName: cluster.localautoRenewCerts: truecontainerManager: dockeretcd:type: kubekeynetwork:plugin: calicokubePodsCIDR: 10.233.64.0/18kubeServiceCIDR: 10.233.0.0/18## multus support. https://github.com/k8snetworkplumbingwg/multus-cnimultusCNI:enabled: falseregistry:type: harbordomain: dockerhub.kubekey.localtls:selfSigned: truecertCommonName: dockerhub.kubekey.localauths:"dockerhub.kubekey.local":username: adminpassword: Harbor12345privateRegistry: "dockerhub.kubekey.local"namespaceOverride: "kubesphereio"
#    privateRegistry: ""
#    namespaceOverride: ""registryMirrors: []insecureRegistries: []addons: []
继续报错
[root@node1 ~]# ./kk init registry -f config-sample.yaml -a kubesphere.tar.gz _   __      _          _   __
| | / /     | |        | | / /
| |/ / _   _| |__   ___| |/ /  ___ _   _
|    \| | | | '_ \ / _ \    \ / _ \ | | |
| |\  \ |_| | |_) |  __/ |\  \  __/ |_| |
\_| \_/\__,_|_.__/ \___\_| \_/\___|\__, |__/ ||___/16:45:43 CST [GreetingsModule] Greetings
16:45:43 CST message: [node1]
Greetings, KubeKey!
16:45:43 CST success: [node1]
16:45:43 CST [UnArchiveArtifactModule] Check the KubeKey artifact md5 value
16:46:05 CST success: [LocalHost]
16:46:05 CST [UnArchiveArtifactModule] UnArchive the KubeKey artifact
16:46:05 CST skipped: [LocalHost]
16:46:05 CST [UnArchiveArtifactModule] Create the KubeKey artifact Md5 file
16:46:05 CST skipped: [LocalHost]
16:46:05 CST [RegistryPackageModule] Download registry package
16:46:05 CST message: [localhost]
downloading amd64 harbor v2.5.3  ...% Total    % Received % Xferd  Average Speed   Time    Time     Time  CurrentDload  Upload   Total   Spent    Left  Speed0     0    0     0    0     0      0      0 --:--:--  0:00:19 --:--:--     0curl: (6) Could not resolve host: kubernetes-release.pek3b.qingstor.com; 未知的错误
16:46:26 CST message: [LocalHost]
Failed to download harbor binary: curl -L -o /root/kubekey/registry/harbor/v2.5.3/amd64/harbor-offline-installer-v2.5.3.tgz https://kubernetes-release.pek3b.qingstor.com/harbor/releases/download/v2.5.3/harbor-offline-installer-v2.5.3.tgz error: exit status 6
16:46:26 CST failed: [LocalHost]
error: Pipeline[InitRegistryPipeline] execute failed: Module[RegistryPackageModule] exec failed:
failed: [LocalHost] [DownloadRegistryPackage] exec failed after 1 retries: Failed to download harbor binary: curl -L -o /root/kubekey/registry/harbor/v2.5.3/amd64/harbor-offline-installer-v2.5.3.tgz https://kubernetes-release.pek3b.qingstor.com/harbor/releases/download/v2.5.3/harbor-offline-installer-v2.5.3.tgz error: exit status 6
报错显示的是对应的下载失败,
这个报错原因是
/root/kubekey/registry/harbor/v2.5.3/amd64/harbor-offline-installer-v2.5.3.tgz对应的包没有
解决办法:把包放到对应路径
执行成功如下
17:28:50 CST [InitRegistryModule] Generate registry Certs
[certs] Generating "ca" certificate and key
[certs] dockerhub.kubekey.local serving cert is signed for DNS names [dockerhub.kubekey.local localhost node1] and IPs [127.0.0.1 ::1 192.168.31.41]
17:28:50 CST success: [LocalHost]
17:28:50 CST [InitRegistryModule] Synchronize certs file
17:28:51 CST success: [node1]
17:28:51 CST [InitRegistryModule] Synchronize certs file to all nodes
17:28:52 CST success: [node1]
17:28:52 CST [InstallRegistryModule] Sync docker binaries
17:28:52 CST skipped: [node1]
17:28:52 CST [InstallRegistryModule] Generate docker service
17:28:52 CST skipped: [node1]
17:28:52 CST [InstallRegistryModule] Generate docker config
17:28:52 CST skipped: [node1]
17:28:52 CST [InstallRegistryModule] Enable docker
17:28:52 CST skipped: [node1]
17:28:52 CST [InstallRegistryModule] Install docker compose
17:28:53 CST success: [node1]
17:28:53 CST [InstallRegistryModule] Sync harbor package
17:29:07 CST success: [node1]
17:29:07 CST [InstallRegistryModule] Generate harbor service
17:29:08 CST success: [node1]
17:29:08 CST [InstallRegistryModule] Generate harbor config
17:29:08 CST success: [node1]
17:29:08 CST [InstallRegistryModule] start harborLocal image registry created successfully. Address: dockerhub.kubekey.local17:30:14 CST success: [node1]
17:30:14 CST [ChownWorkerModule] Chown ./kubekey dir
17:30:14 CST success: [LocalHost]
17:30:14 CST Pipeline[InitRegistryPipeline] execute successfully
6.执行安装集群命令
[root@node1 ~]# ./kk create cluster -f config-sample.yaml -a kubesphere.tar.gz
17:33:38 CST [CopyImagesToRegistryModule] Copy images to a private registry from an artifact OCI Path
17:33:38 CST Source: oci:/root/kubekey/images:calico:cni:v3.26.1-amd64
17:33:38 CST Destination: docker://dockerhub.kubekey.local/kubesphereio/cni:v3.26.1-amd64
Getting image source signatures
Getting image source signatures
Getting image source signatures
Getting image source signatures
Getting image source signatures
17:33:38 CST success: [LocalHost]
17:33:38 CST [CopyImagesToRegistryModule] Push multi-arch manifest to private registry
17:33:38 CST message: [LocalHost]
get manifest list failed by module cache
17:33:38 CST failed: [LocalHost]
error: Pipeline[CreateClusterPipeline] execute failed: Module[CopyImagesToRegistryModule] exec failed:
failed: [LocalHost] [PushManifest] exec failed after 1 retries: get manifest list failed by module cache
[root@node1 ~]# sh ./create_project_harbor.sh
字符集问题注意,官网复制的报错已经修改后的
vi create_project_harbor.sh
#!/usr/bin/env bashurl="https://dockerhub.kubekey.local"
user="admin"
passwd="Harbor12345"
harbor_projects=(librarykubesphereiokubesphereargoprojcalicocorednsopenebscsipluginminiomirrorgooglecontainersosixiapromthanosiojimmidysongrafanaelasticistiojaegertracingjenkinsweaveworksopenpitrixjoosthofmannginxdemosfluentkubeedgeopenpolicyagent
)
for project in "${harbor_projects[@]}"; doecho "creating $project"curl -u "${user}:${passwd}" -X POST -H "Content-Type: application/json" "${url}/api/v2.0/projects" -d "{ \"project_name\": \"${project}\", \"public\": true}" -k #curl命令末尾加上 -kdone
因为扩容重启服务器
./kk init registry -f config-sample.yaml -a kubesphere.tar.gz 报错Error response from daemon: driver failed programming external connectivity on endpoint nginx (2fa557486fa4c826d124bedb59396bdbabbb63437892ea9ff7178562b2b51a9a): Error starting userland proxy: listen tcp4 0.0.0.0:443: bind: address already in use: Process exited with status 1
这个原因是本地有个nginx服务启动导致的
解决办法:停止服务 nginx -s stop
[root@node1 ~]# ./kk create cluster -f config-sample.yaml -a kubesphere.tar.gz
pull image failed: Failed to exec command: sudo -E /bin/bash -c "env PATH=$PATH docker pull dockerhub.kubekey.local/kubesphereio/pod2daemon-flexvol:v3.26.1 --platform amd64"
Error response from daemon: unknown: repository kubesphereio/pod2daemon-flexvol not found: Process exited with status 1
14:59:30 CST failed: [node1]
error: Pipeline[CreateClusterPipeline] execute failed: Module[PullModule] exec failed:
failed: [node1] [PullImages] exec failed after 3 retries: pull image failed: Failed to exec command: sudo -E /bin/bash -c "env PATH=$PATH docker pull dockerhub.kubekey.local/kubesphereio/pod2daemon-flexvol:v3.26.1 --platform amd64"
Error response from daemon: unknown: repository kubesphereio/pod2daemon-flexvol not found: Process exited with status 1
[root@node1 ~]#
报错缺少镜像
docker load -i pod2daemon-flexvo.tar
docker tag 36a93ec1aace dockerhub.kubekey.local/kubesphereio/pod2daemon-flexvol:v3.26.1
报错显示没有cert,证书有我问题的,先删除集群,
./kk delete cluster
#删除/root/kubekey/pki/etcd证书
[root@node1 etcd]# ls
admin-node1-key.pem  admin-node1.pem  ca-key.pem  ca.pem  member-node1-key.pem  member-node1.pem  node-node1-key.pem  node-node1.pem
[root@node1 etcd]# pwd
/root/kubekey/pki/etcd#然后修改/root/kubekey/node1,修改里面的ip地址
etcd.env
10-kubeadm.conf
[root@node1 node1]# ls
10-kubeadm.conf      backup-etcd.timer  etcd-backup.sh  etcd.service  harborSerivce  k8s-certs-renew.service  k8s-certs-renew.timer  kubelet.service  local-volume.yaml    nodelocaldnsConfigmap.yaml
backup-etcd.service  coredns-svc.yaml   etcd.env        harborConfig  initOS.sh      k8s-certs-renew.sh       kubeadm-config.yaml    kubesphere.yaml  network-plugin.yaml  nodelocaldns.yaml
[root@node1 node1]# pwd
/root/kubekey/node1
报错
Please wait for the installation to complete:   >>--->
14:33:26 CST failed: [node1]
error: Pipeline[CreateClusterPipeline] execute failed: Module[CheckResultModule] exec failed:
failed: [node1] execute task timeout, Timeout=2h
这个报错可能是存储资源不足,还有镜像拉取有问题,镜像推的repostiory 有问题,重新打包推送
成功执行
namespace/kubesphere-system unchanged
serviceaccount/ks-installer unchanged
customresourcedefinition.apiextensions.k8s.io/clusterconfigurations.installer.kubesphere.io unchanged
clusterrole.rbac.authorization.k8s.io/ks-installer unchanged
clusterrolebinding.rbac.authorization.k8s.io/ks-installer unchanged
deployment.apps/ks-installer unchanged
Warning: resource clusterconfigurations/ks-installer is missing the kubectl.kubernetes.io/last-applied-configuration annotation which is required by kubectl apply. kubectl apply should only be used on resources created declaratively by either kubectl create --save-config or kubectl apply. The missing annotation will be patched automatically.
clusterconfiguration.installer.kubesphere.io/ks-installer configured
15:40:14 CST success: [node1]
#####################################################
###              Welcome to KubeSphere!           ###
#####################################################Console: http://192.168.31.41:30880
Account: admin
Password: P@88w0rd
NOTES:1. After you log into the console, please check themonitoring status of service components in"Cluster Management". If any service is notready, please wait patiently until all components are up and running.2. Please change the default password after login.#####################################################
https://kubesphere.io             2024-06-28 14:48:07
#####################################################
15:40:16 CST success: [node1]
15:40:16 CST Pipeline[CreateClusterPipeline] execute successfully
Installation is complete.Please check the result using the command:kubectl logs -n kubesphere-system $(kubectl get pod -n kubesphere-system -l 'app in (ks-install, ks-installer)' -o jsonpath='{.items[0].metadata.name}') -f
注意;linux版本为centos7.8
相关文章:

离线安装kubesphere-详细操作,以及报错
离线安装kubesphere 官网地址 https://kubesphere.io/zh/docs/v3.4/installing-on-linux/introduction/air-gapped-installation/ 1.先准备docker环境 [rootnode1 ~]# tar -xf docker-24.0.6.tgz [rootnode1 ~]# ls anaconda-ks.cfg calico-v3.26.1.tar docker …...
Python Coala库:代码质量检查与自动化修复的利器
更多Python学习内容:ipengtao.com 在软件开发过程中,代码质量至关重要。高质量的代码不仅易于维护和扩展,还能减少错误和提升效率。为了确保代码质量,我们常常需要依赖代码分析工具。Python的Coala库就是这样一个强大的工具&#…...
MyBatis 映射文件中的 resultMap)
MyBatis(12)MyBatis 映射文件中的 resultMap
MyBatis 的 resultMap 是一种高级映射策略,用于处理复杂的SQL查询结果和Java对象之间的映射关系。resultMap 提供了比 auto-mapping 更为灵活的映射方式,它允许开发者显式指定数据库列和Java对象属性之间的映射关系,甚至可以处理复杂的数据结…...

C语言从入门到进阶(15万字总结)
前言: 《C语言从入门到进阶》这本书可是作者呕心沥血之作,建议零售价1元,当然这里开个玩笑。 本篇博客可是作者之前写的所有C语言笔记博客的集结,本篇博客不止有知识点,还有一部分代码练习。 有人可能会问ÿ…...
Java---Maven详解
一段新的启程, 披荆斩棘而前, 心中的梦想, 照亮每个黑暗的瞬间。 无论风雨多大, 我们都将坚强, 因为希望的火焰, 在胸中永不熄灭。 成功不是终点, 而是每一步的脚印, 用汗水浇灌&…...

服务器日志事件ID4107:从自动更新 cab 中提取第三方的根目录列表失败,错误为: 已处理证书链,但是在不受信任提供程序信任的根证书中终止。
在查看Windows系统日志时,你是否有遇到过事件ID4107错误,来源CAPI2,详细信息在 http://www.download.windowsupdate.com/msdownload/update/v3/static/trustedr/en/authrootstl.cab 从自动更新 cab 中提取第三方的根目录列表失败,…...
)
【高级篇】MySQL集群与分布式:构建弹性和高效的数据服务(十四)
引言 在探讨了《分区与分片》策略后,我们已经学会了如何在单一数据库层面有效管理大量数据和提升查询效率。本章,我们将踏上更高层次的探索之旅,深入MySQL集群与分布式技术的广阔领域。这些技术不仅能够横向扩展系统的处理能力和存储容量,还能显著增强数据服务的可靠性和响…...

vue3 学习记录
文章目录 props组合式组件 使用<script setup \>组合式组件 没有使用 <script setup\>选项式组件 this emits组合式组件 使用<script setup \>组合式组件 没有使用 <script setup\>选项式组件 this v-model 组件数据绑定单个model多个model实现 model …...

spring boot jar 启动报错 Zip64 archives are not supported
spring boot jar 启动报错 Zip64 archives are not supported 原因、解决方案问题为什么 spring boot 不支持 zip64zip、zip64 功能上的区别zip 的文件格式spring-boot-loader 是如何判断是否是 zip64 的? 参考 spring boot 版本是 2.1.8.RELEASE,引入以…...

BASH and SH in SHELL scripts
一、执行脚本的现象 为了测试一个小的功能,写了一个小脚本,类似的内容如下: #!/bin/shecho "start api test ......"for((i1;i<10;i)); do echo "cur id :" $i; done echo "end."执行一下,“…...
Qt Creator创建一个用户登录界面
目录 1 界面设计 2 代码 2.1 登录界面 2.2 注册界面 2.3 登陆后的界面 3 完整资源 这里主要记录了如何使用Qt Creator创建一个用户登录界面,能够实现用户的注册和登录功能,注册的用户信息存储在了一个文件之中,在登录时可以比对登录信息…...

等保测评练习卷14
等级保护初级测评师试题14 姓名: 成绩: 判断题(10110分) 1. 方案编制活动中测评对象确定、测评指…...
:学会线程池的使用)
学懂C#编程:常用高级技术——学会C#多线程开发(三):学会线程池的使用
在C#中,线程池(ThreadPool)是一种用于管理线程的机制,它可以有效地重用线程,减少线程创建和销毁的开销,从而提高程序的性能。线程池通常用于执行不需要立即完成的任务,如后台任务、异步操作等。…...

maven-gpg-plugin插件
开源项目SDK:https://github.com/mingyang66/spring-parent 个人文档:https://mingyang66.github.io/raccoon-docs/#/ 一、敏感信息泄漏警告 执行mvn install或mvn deploy时控制台会报如下告警: [WARNING] Parameter passphrase (user pr…...
Linux——echo命令,管道符,vi/vim 文本编辑器
1.echo 命令 作用 向终端设备上输出字符串或变量的存储数据 格式 echo " 字符串 " echo $ 变 量名 [rootserver ~] # echo $SHELL # 输出变量的值必须加 $ /bin/bash [rootserver ~] # str1" 我爱中国 " # 自定义变量 echo 重定向输出到文件 ec…...

CISCN--西南半决赛--pwn
1.vuln 这是主函数,数一下就发现可以溢出最后的0x4008d0 然后会执行到这里,逻辑就是在v0上写shellcode,不过执行写0x10,不够sh,很明显要先read。 以下是exp: from pwn import * context.archamd64 ioprocess(./vuln)…...
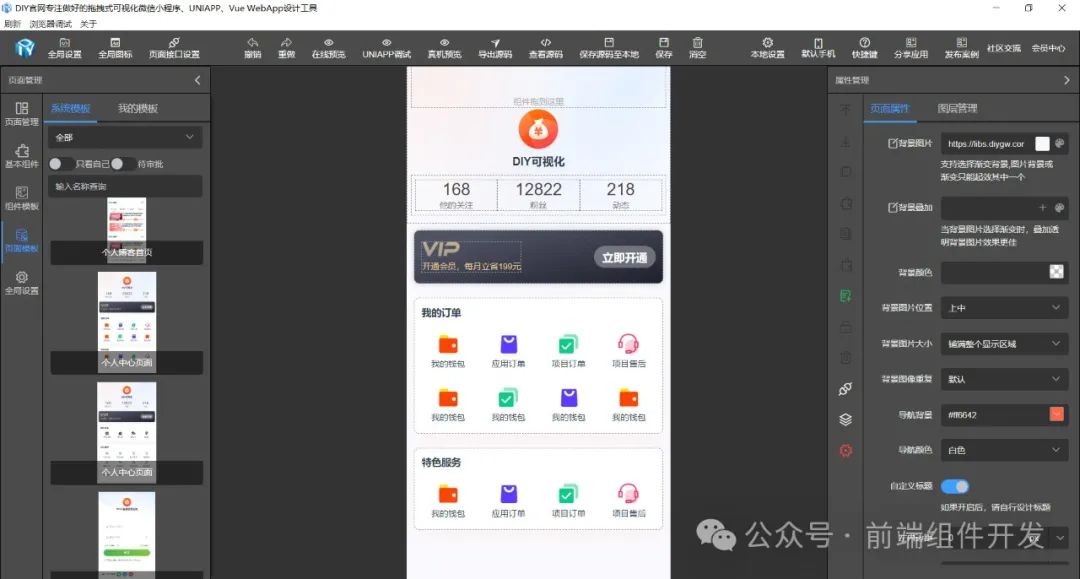
DIYGW UniApp低代码可视化平台:高效、灵活、安全的应用开发新途径
一、引言 在数字化快速发展的今天,企业对于快速构建多端应用的需求日益增长。然而,传统的应用开发方式往往面临周期长、成本高、技术门槛高等问题。为了解决这些问题,DIYGW UniApp低代码可视化平台应运而生,它以高效率、多端使用…...

Python爬虫技术及其原理探秘
导言 随着互联网的发展,大量的数据被存储在网络上,而我们需要从中获取有用的信息。Python作为一种功能强大且易于学习的编程语言,被广泛用于网络爬虫的开发。本文将详细介绍Python爬虫所需的技术及其原理,并提供相关的代码案例。…...

堆和栈的区别及应用场景
堆和栈的区别及应用场景 大家好,我是免费搭建查券返利机器人省钱赚佣金就用微赚淘客系统3.0的小编,也是冬天不穿秋裤,天冷也要风度的程序猿! 在计算机科学和编程领域,堆(Heap)和栈(…...

vant的dialog触发了其他overlay
原代码: <!-- dialog --><van-dialog v-model"showTipsDialog" title"温馨提示"><p>dialog内容</p></van-dialog><!-- overlay --><van-overlay style"display: flex" :show"showLoadingOverlay&q…...

SpringBatch学习
/*** 示例一:Tasklet 方式*/ Configuration EnableBatchProcessing public class TaskletBatchConfig {private static final Logger logger LoggerFactory.getLogger(TaskletBatchConfig.class);Autowiredprivate JobBuilderFactory jobBuilderFactory;Autowiredp…...
)
别再手动数脉冲了!用STM32定时器编码器模式搞定增量编码器(附CubeMX配置)
STM32硬件编码器模式实战:精准捕获增量编码器信号的工程指南 在电机控制、机器人关节定位和精密测量系统中,增量式编码器作为核心反馈元件,其信号处理质量直接影响整个系统的控制精度。传统的中断计数方式在高速脉冲场景下往往捉襟见肘&#…...
)
Kicad 5.99版本下,这4个插件让PCB设计效率翻倍(附保姆级安装教程)
KiCad 5.99版本效率革命:4款必备插件全解析与实战指南 刚接触KiCad的工程师常会遇到这样的困境:手动布线耗时费力、生产文件导出步骤繁琐、BOM表整理令人头疼。这些问题在中小型项目中尤为明显,往往让设计周期延长30%以上。而KiCad 5.99版本作…...

Vigil与其他监控工具集成:构建全方位监控体系的3种方案
Vigil与其他监控工具集成:构建全方位监控体系的3种方案 【免费下载链接】vigil 🚦 Microservices Status Page. Monitors a distributed infrastructure and sends alerts (Slack, SMS, etc.). 项目地址: https://gitcode.com/gh_mirrors/vig/vigil …...

OpenMC多群截面计算深度解析:传输修正合并的3种解决方案与性能优化实战
OpenMC多群截面计算深度解析:传输修正合并的3种解决方案与性能优化实战 【免费下载链接】openmc OpenMC Monte Carlo Code 项目地址: https://gitcode.com/gh_mirrors/op/openmc 你是否在使用OpenMC进行多群蒙特卡洛计算时,遇到模拟结果与参考值偏…...

终极Linux打印机兼容性解决方案:foo2zjs驱动完整实战指南
终极Linux打印机兼容性解决方案:foo2zjs驱动完整实战指南 【免费下载链接】foo2zjs A linux printer driver for QPDL protocol - copy of http://foo2zjs.rkkda.com/ 项目地址: https://gitcode.com/gh_mirrors/fo/foo2zjs foo2zjs是Linux系统上最全面的开源…...

3步构建企业级数据平台:从零到百万级数据管理的NocoDB实战指南
3步构建企业级数据平台:从零到百万级数据管理的NocoDB实战指南 【免费下载链接】nocodb 🔥 🔥 🔥 A Free & Self-hostable Airtable Alternative 项目地址: https://gitcode.com/GitHub_Trending/no/nocodb 在数字化转…...

如何快速解锁NCM加密音乐:NcmppGui完整使用指南
如何快速解锁NCM加密音乐:NcmppGui完整使用指南 【免费下载链接】ncmppGui 一个使用C编写的极速ncm转换GUI工具 项目地址: https://gitcode.com/gh_mirrors/nc/ncmppGui 你是否曾经下载了喜欢的音乐,却因为NCM格式的限制而无法在其他设备上播放&a…...

基于ReAct范式的链式追踪工具:提升学术研究效率的AI智能体实践
1. 项目概述与核心价值如果你经常需要做文献调研、追踪某个科学概念的源头,或者想搞清楚一个复杂话题背后的证据链,那你一定体会过在搜索引擎和无数个学术网站之间反复横跳的痛苦。传统的搜索方式,比如在Google Scholar里输入一个关键词&…...

为claudecode配置taotoken代理解决封号与token不足痛点
🚀 告别海外账号与网络限制!稳定直连全球优质大模型,限时半价接入中。 👉 点击领取海量免费额度 为 Claude Code 配置 Taotoken 代理解决封号与 Token 不足痛点 对于频繁使用 Claude Code 进行编程辅助的开发者而言,直…...