SpringBoot + MyBatisPlus 实现多租户分库
一、引言
在如今的软件开发中,多租户(Multi-Tenancy)应用已经变得越来越常见。多租户是一种软件架构技术,它允许一个应用程序实例为多个租户提供服务。每个租户都有自己的数据和配置,但应用程序实例是共享的。而在我们的Spring Boot + MyBatis Plus环境中,我们可以利用动态数据源来实现多租户分库。
二、实现原理
SpringBoot + MyBatisPlus 动态数据源实现多租户分库的原理主要是通过切换不同的数据库连接来实现。对于每个租户,应用程序会使用一个独立的数据库连接,这样每个租户就拥有了自己的数据隔离空间。具体来说,当我们创建一个新的租户时,我们同时也为这个租户创建一个新的数据库连接。这些数据库连接被存储在一个数据源工厂中,我们可以根据租户的ID或者其他唯一标识符来获取对应的数据库连接。当一个租户需要访问其数据时,我们从数据源工厂中获取该租户对应的数据库连接,然后使用这个连接来执行数据库操作。
三、引入依赖
在pom.xml文件中引入下述相关的依赖:
<?xml version="1.0" encoding="UTF-8"?>
<project xmlns="http://maven.apache.org/POM/4.0.0" xmlns:xsi="http://www.w3.org/2001/XMLSchema-instance"xsi:schemaLocation="http://maven.apache.org/POM/4.0.0 https://maven.apache.org/xsd/maven-4.0.0.xsd"><modelVersion>4.0.0</modelVersion><parent><groupId>org.springframework.boot</groupId><artifactId>spring-boot-starter-parent</artifactId><version>2.1.3.RELEASE</version><relativePath/> <!-- lookup parent from repository --></parent><groupId>com.bc</groupId><artifactId>demo</artifactId><version>0.0.1-SNAPSHOT</version><name>demo</name><description>Demo project for Spring Boot</description><properties><java.version>1.8</java.version></properties><dependencies><dependency><groupId>org.springframework.boot</groupId><artifactId>spring-boot-starter-web</artifactId></dependency><dependency><groupId>org.hibernate</groupId><artifactId>hibernate-validator</artifactId><version>6.0.1.Final</version></dependency><dependency><groupId>org.springframework.boot</groupId><artifactId>spring-boot-starter-test</artifactId><scope>test</scope></dependency><dependency><groupId>org.projectlombok</groupId><artifactId>lombok</artifactId><version>1.18.0</version><scope>provided</scope></dependency><dependency><groupId>cn.hutool</groupId><artifactId>hutool-all</artifactId><version>5.8.25</version></dependency><dependency><groupId>com.baomidou</groupId><artifactId>mybatis-plus-boot-starter</artifactId><version>3.5.3.1</version></dependency><dependency><groupId>mysql</groupId><artifactId>mysql-connector-java</artifactId><version>8.0.33</version></dependency></dependencies><build><plugins><plugin><groupId>org.springframework.boot</groupId><artifactId>spring-boot-maven-plugin</artifactId></plugin></plugins></build></project>
四、配置yml
在application.yml文件中添加下述配置:
server:port: 10086spring:application:name: demodatasource:url: jdbc:mysql://127.0.0.1:3306/demo?useUnicode=true&characterEncoding=utf8&serverTimezone=UTCusername: rootpassword: 123456driver-class-name: com.mysql.cj.jdbc.Drivertype: com.zaxxer.hikari.HikariDataSource
mybatis:mapper-locations: classpath:mapper/*.xmlmybatis-plus:configuration:log-impl: org.apache.ibatis.logging.stdout.StdOutImpl
五、数据准备
在demo库中新建一张名为“tenant_datasource”的表,用于存储多租户的数据源配置信息:
CREATE TABLE `tenant_datasource` (`tenant_id` varchar(50) NOT NULL,`url` varchar(255) DEFAULT NULL,`username` varchar(50) DEFAULT NULL,`password` varchar(50) DEFAULT NULL,PRIMARY KEY (`tenant_id`)
) ENGINE=InnoDB DEFAULT CHARSET=utf8;然后执行下述SQL往“tenant_datasource”表中插入一些测试数据:
insert into `tenant_datasource` (`tenant_id`, `url`, `username`, `password`) values('tenant1','jdbc:mysql://localhost:3306/tenant1_db','root','123456');
insert into `tenant_datasource` (`tenant_id`, `url`, `username`, `password`) values('tenant2','jdbc:mysql://localhost:3306/tenant2_db','root','123456');在tenant1_db库中新建一张名为“user”的表,用于存储多租户1的用户信息:
CREATE TABLE `user` (`id` int(11) NOT NULL AUTO_INCREMENT,`user_name` varchar(10) NOT NULL,`sex` tinyint(4) NOT NULL,PRIMARY KEY (`id`)
) ENGINE=InnoDB DEFAULT CHARSET=utf8;然后执行下述SQL往tenant1_db库在的“user”表中插入一些测试数据:
insert into `user` (`id`, `user_name`, `sex`) values('1','范闲','1');在tenant2_db库中新建一张名为“user”的表,用于存储多租户2的用户信息:
CREATE TABLE `user` (`id` int(11) NOT NULL AUTO_INCREMENT,`user_name` varchar(10) NOT NULL,`sex` tinyint(4) NOT NULL,PRIMARY KEY (`id`)
) ENGINE=InnoDB DEFAULT CHARSET=utf8;然后执行下述SQL往tenant2_db库在的“user”表中插入一些测试数据:
insert into `user` (`id`, `user_name`, `sex`) values('1','海棠朵朵','0');六、编写实体类
import com.baomidou.mybatisplus.annotation.IdType;
import com.baomidou.mybatisplus.annotation.TableField;
import com.baomidou.mybatisplus.annotation.TableId;
import com.baomidou.mybatisplus.annotation.TableName;
import lombok.Data;@TableName("user")
@Data
public class User {@TableId(type = IdType.AUTO)private Integer id;@TableField(value = "user_name")private String userName;@TableField(value = "sex")private Integer sex;
}
import com.baomidou.mybatisplus.annotation.IdType;
import com.baomidou.mybatisplus.annotation.TableField;
import com.baomidou.mybatisplus.annotation.TableId;
import com.baomidou.mybatisplus.annotation.TableName;
import lombok.Data;
import org.springframework.boot.jdbc.DataSourceBuilder;import javax.sql.DataSource;@Data
@TableName("tenant_datasource")
public class TenantDataSource {@TableId(type = IdType.INPUT)private String tenantId;@TableField(value = "url")private String url;@TableField(value = "username")private String username;@TableField(value = "password")private String password;public DataSource createDataSource() {return DataSourceBuilder.create().url(this.url).username(this.username).password(this.password).build();}
}七、编写默认数据源配置类
import lombok.Data;
import org.springframework.boot.context.properties.ConfigurationProperties;
import org.springframework.stereotype.Component;@Data
@Component
@ConfigurationProperties(prefix = "spring.datasource")
public class DynamicDataSourceProperties {private String url;private String username;private String password;
}
八、构建Mapper接口和xml文件
import com.baomidou.mybatisplus.core.mapper.BaseMapper;
import com.example.demo.entity.User;
import org.springframework.stereotype.Repository;@Repository
public interface UserMapper extends BaseMapper<User> {}
import com.baomidou.mybatisplus.core.mapper.BaseMapper;
import com.example.demo.entity.TenantDataSource;
import org.springframework.stereotype.Repository;@Repository
public interface TenantDataSourceMapper extends BaseMapper<TenantDataSource> {}在启动类配置扫描路径@MapperScan("com.example.demo.mapper"):
import org.mybatis.spring.annotation.MapperScan;
import org.springframework.boot.SpringApplication;
import org.springframework.boot.autoconfigure.SpringBootApplication;@MapperScan("com.example.demo.mapper")
@SpringBootApplication
public class DemoApplication {public static void main(String[] args) {SpringApplication.run(DemoApplication.class, args);}
}
九、编写业务实现类
import com.example.demo.entity.User;
import com.example.demo.mapper.UserMapper;
import org.springframework.beans.factory.annotation.Autowired;
import org.springframework.stereotype.Service;@Service
public class UserService {@Autowiredprivate UserMapper userMapper;public User getUserById(Long id) {User user = userMapper.selectById(id);return user;}
}
十、创建数据源管理器
import org.springframework.beans.factory.annotation.Autowired;
import org.springframework.boot.jdbc.DataSourceBuilder;
import org.springframework.stereotype.Component;import javax.annotation.PostConstruct;
import javax.sql.DataSource;
import java.util.HashMap;
import java.util.Map;/*** 创建数据源管理器*/
@Component
public class DataSourceManager {@Autowiredprivate DynamicDataSourceProperties dynamicDataSourceProperties;private final Map<String, DataSource> dataSources = new HashMap<>();@PostConstructpublic void init() {// 根据配置创建数据源并加入管理器DataSource defaultDataSource = DataSourceBuilder.create().url(dynamicDataSourceProperties.getUrl()).username(dynamicDataSourceProperties.getUsername()).password(dynamicDataSourceProperties.getPassword()).build();dataSources.put("default", defaultDataSource);}public void addDataSource(String tenantId, DataSource dataSource) {dataSources.put(tenantId, dataSource);}public DataSource getDataSource(String tenantId) {return dataSources.get(tenantId);}public Map<String, DataSource> getAllDataSources() {return dataSources;}/*** 判断是否包含数据源*/public boolean containDataSourceKey(String key) {return dataSources.containsKey(key);}
}
十一、创建租户上下文
import lombok.extern.slf4j.Slf4j;@Slf4j
public class TenantContext {// 使用ThreadLocal来存储当前线程的数据源名称(租户标识),保证多线程情况下,各自的数据源互不影响private static ThreadLocal<String> tenantId = ThreadLocal.withInitial(() -> "default");public static void setTenantId(String id) {tenantId.set(id);log.info("已切换到数据源:{}", id);}public static String getTenantId() {return tenantId.get();}public static void clear() {tenantId.remove();log.info("已切换回默认数据源");}
}
十二、创建动态数据源
创建一个动态数据源类,继承AbstractRoutingDataSource,用于动态切换数据源:
import lombok.Data;
import lombok.extern.slf4j.Slf4j;
import org.springframework.jdbc.datasource.lookup.AbstractRoutingDataSource;@Slf4j
@Data
public class DynamicDataSource extends AbstractRoutingDataSource {/*** 如果希望所有数据源在启动配置时就加载好,这里通过设置数据源Key值来切换数据源** @return*/@Overrideprotected Object determineCurrentLookupKey() {return TenantContext.getTenantId();}
}
十三、创建数据源配置
import org.springframework.beans.factory.annotation.Autowired;
import org.springframework.context.annotation.Bean;
import org.springframework.context.annotation.Configuration;
import org.springframework.jdbc.datasource.DataSourceTransactionManager;import java.util.HashMap;
import java.util.Map;/*** 创建数据源配置类,用于配置动态数据源*/@Configuration
public class DynamicDataSourceConfig {@Autowiredprivate DataSourceManager dataSourceManager;@Beanpublic DynamicDataSource dynamicDataSource() {// 1、将数据源default设置为默认数据源DynamicDataSource dynamicDataSource = new DynamicDataSource();dynamicDataSource.setDefaultTargetDataSource(dataSourceManager.getDataSource("default"));// 2、获取初始化时所有的数据源,并设置目标数据源,必须为targetDataSources设置初始值,否则会报错Map<Object, Object> targetDataSources = new HashMap<>();targetDataSources.putAll(dataSourceManager.getAllDataSources());dynamicDataSource.setTargetDataSources(targetDataSources);return dynamicDataSource;}@Beanpublic DataSourceTransactionManager transactionManager(DynamicDataSource dynamicDataSource) {return new DataSourceTransactionManager(dynamicDataSource);}
}
十四、创建多租户数据源服务
创建多租户数据源服务类,用于初始化多租户数据源:
import com.example.demo.entity.TenantDataSource;
import com.example.demo.mapper.TenantDataSourceMapper;
import org.springframework.beans.factory.annotation.Autowired;
import org.springframework.stereotype.Service;import javax.annotation.PostConstruct;
import java.util.HashMap;
import java.util.List;
import java.util.Map;@Service
public class MultiTenantDataSourceService {@Autowiredprivate DataSourceManager dataSourceManager;@Autowiredprivate DynamicDataSource dynamicDataSource;@Autowiredprivate TenantDataSourceMapper tenantDataSourceMapper;@PostConstructpublic void initialize() {// 1、从默认的数据源中查询出所有的租户信息,然后覆盖DynamicDataSource中的targetDataSources属性Map<Object, Object> targetDataSources = new HashMap<>();List<TenantDataSource> tenantDataSources = tenantDataSourceMapper.selectList(null);for (TenantDataSource tenantDataSource : tenantDataSources) {dataSourceManager.addDataSource(tenantDataSource.getTenantId(), tenantDataSource.createDataSource());}targetDataSources.putAll(dataSourceManager.getAllDataSources());dynamicDataSource.setTargetDataSources(targetDataSources);// 2、必须执行此操作,才会重新初始化AbstractRoutingDataSource中的resolvedDataSources,也只有这样,动态切换数据源才会起效dynamicDataSource.afterPropertiesSet();}
}
十五、构建拦截器,并将其注册到InterceptorRegistry中
import cn.hutool.core.util.StrUtil;
import com.example.demo.config.DataSourceManager;
import com.example.demo.config.TenantContext;
import org.springframework.beans.factory.annotation.Autowired;
import org.springframework.context.annotation.Configuration;
import org.springframework.web.servlet.HandlerInterceptor;import javax.servlet.http.HttpServletRequest;
import javax.servlet.http.HttpServletResponse;@Configuration
public class AuthInterceptor implements HandlerInterceptor {@Autowiredprivate DataSourceManager dataSourceManager;@Overridepublic boolean preHandle(HttpServletRequest request, HttpServletResponse response, Object handler) {String tenantId = request.getHeader("tenantId");if (StrUtil.isNotBlank(tenantId) && dataSourceManager.containDataSourceKey(tenantId) && (!"default".equals(tenantId))) {TenantContext.setTenantId(tenantId);return true;}else{return false;}}@Overridepublic void afterCompletion(HttpServletRequest request, HttpServletResponse response, Object handler, Exception ex) {TenantContext.clear();}
}
import com.example.demo.Interceptor.AuthInterceptor;
import org.springframework.beans.factory.annotation.Autowired;
import org.springframework.context.annotation.Configuration;
import org.springframework.web.servlet.config.annotation.InterceptorRegistry;
import org.springframework.web.servlet.config.annotation.WebMvcConfigurerAdapter;@Configuration
public class WebConfig extends WebMvcConfigurerAdapter {@Autowiredprivate AuthInterceptor authInterceptor;@Overridepublic void addInterceptors(InterceptorRegistry registry) {registry.addInterceptor(authInterceptor);}
}十六、创建Controller
import com.example.demo.entity.User;
import com.example.demo.serivice.UserService;
import org.springframework.beans.factory.annotation.Autowired;
import org.springframework.web.bind.annotation.GetMapping;
import org.springframework.web.bind.annotation.PathVariable;
import org.springframework.web.bind.annotation.RestController;@RestController
public class UserController {@Autowiredprivate UserService userService;@GetMapping("/user/{userId}")public User getUser(@PathVariable Long userId) {return userService.getUserById(userId);}
}
十七、测试
启动应用程序,通过访问localhost:10086/user/{userId} 来测试多租户分库功能:
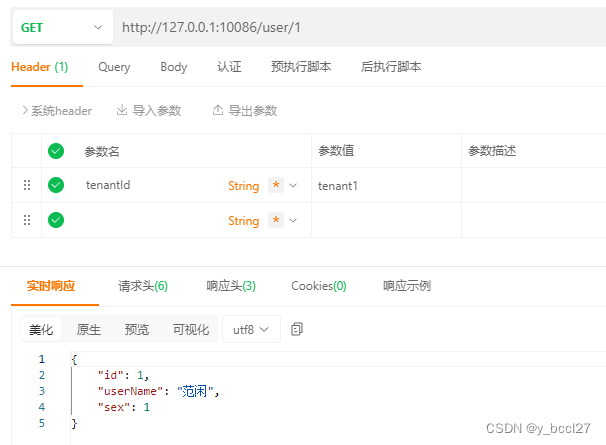
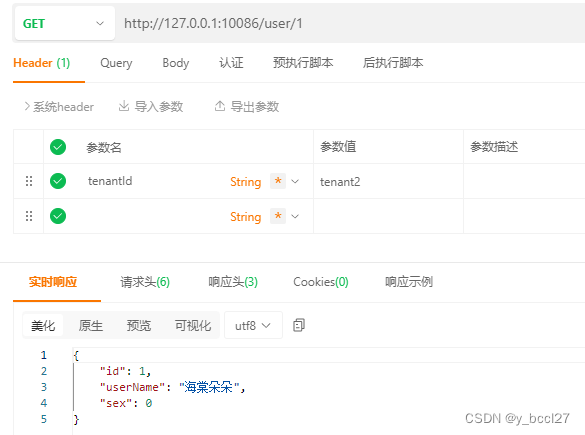
可以看到上述测试示例中,已经实现了不同的租户查询独立的数据库信息。
十八、适用场景
- 多租户系统开发:适用于多租户系统,每个租户有独立的数据库,通过动态数据源切换实现多租户数据隔离。
- 租户级数据隔离:当多个租户共享同一应用但需要数据隔离时,可以通过此模式实现。
- 灵活扩展:适用于系统需求可能动态扩展租户,每个租户有独立数据库的场景,不需修改系统架构。
十九、优点
- 数据隔离性强:每个租户有独立的数据库,数据隔离,保护租户数据安全。
- 性能优化:每个租户有独立的数据库,避免多租户共享同一数据库的性能瓶颈。
- 方便扩展:可以轻松实现动态增加新租户,每个租户有独立的数据库。
- 可维护性高:MyBatisPlus提供了便捷的操作数据库的功能,减少开发人员的工作量。
- 易用性强:Spring Boot集成MyBatisPlus,简化了配置和集成流程,提高开发效率。
二十、总结
Spring Boot与MyBatis Plus结合,通过动态数据源实现多租户分库,是一种高效、灵活、易维护的解决方案,适用于多租户系统的开发。可以有效地保护租户数据安全,提高系统性能,同时具有良好的可扩展性和可维护性。
相关文章:
SpringBoot + MyBatisPlus 实现多租户分库
一、引言 在如今的软件开发中,多租户(Multi-Tenancy)应用已经变得越来越常见。多租户是一种软件架构技术,它允许一个应用程序实例为多个租户提供服务。每个租户都有自己的数据和配置,但应用程序实例是共享的。而在我们的Spring Boot MyBati…...

【数据挖掘】银行信用卡风险大数据分析与挖掘
银行信用卡风险大数据分析与挖掘 1、实验目的 中国某个商业银行高层发现自家信用卡存在严重的欺诈和拖欠现象,已经影响到自身经营和发展。银行高层希望大数据分析部门采用数据挖掘技术,对影响用户信用等级的主要因素进行分析,结合信用卡用户的人口特征属性对欺诈行为和拖欠…...
使用 Qt 和 ECharts 进行数据可视化
文章目录 示例图表预览折线图散点图柱状图使用 Qt 和 ECharts 进行数据可视化一、准备工作1. 安装 Qt2. 准备 ECharts二、在 Qt 中使用 ECharts1. 创建 Qt 项目2. 配置项目文件3. 在 UI 中添加 WebEngineView4. 加载 ECharts三、创建折线图、散点图和柱状图1. 折线图2. 散点图3…...

【机器学习】在【Pycharm】中的实践教程:使用【逻辑回归模型】进行【乳腺癌检测】
目录 案例背景 具体问题 1. 环境准备 小李的理解 知识点 2. 数据准备 2.1 导入必要的库和数据集 小李的理解 知识点 2.2 数据集基本信息 小李的理解 知识点 注意事项 3. 数据预处理 3.1 划分训练集和测试集 小李的理解 知识点 注意事项 3.2 数据标准化 小李…...

【搭建Nacos服务】centos7 docker从0搭建Nacos服务
前言 本次搭建基于阿里云服务器系统为(CentOS7 Linux)、Nacos(2.0.3)、Docker version 26.1.4 本次搭建基于一个新的云服务器 安装java yum install -y java-1.8.0-openjdk.x86_64安装驱动以及gcc等前置需要的命令 yum install …...

将 build.gradle 配置从 Groovy 迁移到 Kotlin
目录 时间轴 常用术语 脚本文件命名 转换语法 为方法调用添加圆括号 为分配调用添加 转换字符串 重命名文件扩展名 将 def 替换为 val 或 var 为布尔值属性添加 is 前缀 转换列表和映射 配置 build 类型 从 buildscript 迁移到插件块 查找插件 ID 执行重构 转…...
5G(NR) NTN 卫星组网架构
5G(NR) NTN 卫星组网架构 参考 3GPP TR 38.821 5G NTN 技术适用于高轨、低轨等多种星座部署场景,是实现星地网络融合发展的可行技术路线。5G NTN 网络分为用户段、空间段和地面段三部分。其中用户段由各种用户终端组成,包括手持、便携站、嵌入式终端、车…...

WEB安全-文件上传漏洞
1 需求 2 接口 3 MIME类型 在Web开发中,MIME(Multipurpose Internet Mail Extensions)类型用于标识和表示文档的格式。这些类型在HTTP请求和响应头中扮演着重要的角色,告诉浏览器如何解释和处理接收到的资源12。 以下是一些Web开发…...
Python函数 之 函数基础
print() 在控制台输出 input() 获取控制台输⼊的内容 type() 获取变量的数据类型 len() 获取容器的⻓度 (元素的个数) range() ⽣成⼀个序列[0, n) 以上都是我们学过的函数,函数可以实现⼀个特定的功能。我们将学习⾃⼰如何定义函数, 实现特定的功能。 1.函数是什么…...
昇思25天学习打卡营第11天|SSD目标检测
SSD网络 目标检测问题可以分为以下两个问题:1)分类:所有类别的概率;2)定位: 4个值(中心位置x,y,宽w,高h) Single Shot MultiBox Detector,SSD:单阶段的目标检测算法,通过卷积神经网络进行特征…...

MySQL篇五:基本查询
文章目录 前言1. Create1.1 单行数据 全列插入1.2 多行数据 指定列插入1.3 插入否则更新1.4 替换 2. Retrieve2.1 SELECT 列2.1.1 全列查询2.1.2 指定列查询2.1.3 查询字段为表达式2.1.4 为查询结果指定别名2.1.5 结果去重 2.2 WHERE 条件2.2.1 练习 2.3 结果排序2.3.1 练习 …...
FreeBSD@ThinkPad x250因电池耗尽关机后无法启动的问题存档
好几次碰到电池耗尽FreeBSD关机,再启动,网络通了之后到了该出Xwindows窗体的时候,屏幕灭掉,网络不通,只有风扇在响,启动失败。关键是长按开关键后再次开机,还是启动失败。 偶尔有时候重启到单人…...

pdfplumber vs PyMuPDF:PDF文本、图像和表格识别的比较
pdfplumber vs PyMuPDF:PDF文本、图像和表格识别的比较 1. 文本提取pdfplumberPyMuPDF 2. 图像提取pdfplumberPyMuPDF 3. 表格提取pdfplumberPyMuPDF 总结 在处理PDF文件时,提取文本、图像和表格是常见的需求。本文将比较两个流行的Python PDF处理库:pdfplumber和PyMuPDF(fitz)…...

深入Django系列
Django简介与环境搭建 引言 在这个系列的第一天,我们将从Django的基本概念开始,逐步引导你搭建一个Django开发环境,并运行你的第一个Django项目。 Django简介 Django是一个开源的Web框架,它鼓励快速开发和干净、实用的设计。D…...

【Python】找Excel重复行
【背景】 找重复行虽然可以通过Excel实现,但是当数据量巨大时光是找结果就很费时间,所以考虑用Python实现。 【代码】 import pandas as pd# 读取Excel文件 file_path = your excel file path df = pd.read_excel(file_path)# 查找重复行 # 这里假设要检查所有列的重复项 …...

重读AI金典算法模型-GPT系列
2023年对于AI来说,可以算是一个里程碑式的年份,随着OpenAI的chatGPT的大火,遍地的生成式AI应用应运而生。在这些上层应用大放异彩的时候,我们需要了解一些底层的算法模型,并从中窥探出为什么时代选择了OpenAI的chatGPT…...

仙人掌中的SNMP检测不到服务器
登录有问题的服务器1.检测snmp localhost:~ # ps -ef|grep snmp root 55180 1 0 08:37 ? 00:00:08 /usr/sbin/snmpd -r -A -LF n /var/log/net-snmpd.log -p /var/run/snmpd.pid root 58436 53989 0 09:44 pts/0 00:00:00 grep --colorauto snmp2.检测…...
git只列出本地分支
git只列出本地分支 git branch --list git强制删除本地分支 git branch -D_error: the branch dlx-test is not fully merged. -CSDN博客文章浏览阅读648次。git branch -d 可以通过: git branch 查看所有本地分支及其名字,然后删除特定分支。git删除远程remote分支…...

算力狂飙|WAIC 2024上的服务器
7月7日,2024世界人工智能大会暨人工智能全球治理高级别会议(WAIC 2024)在上海落下帷幕。这场备受瞩目的AI盛宴与热辣夏日碰撞,吸引了全球科技、产业及学术界的广泛关注,线下参观人数突破30万人次,线上流量突…...
)
uniapp app端跳转第三方app(高德地图/百度地图为例)
1.先写一个picker选择器 <picker change"bindPickerChange" :value"index" :range"array"><view class"uni-input">{{array[index] || 打开第三方app }}</view></picker> 2.在data中定义好高德地图/百度地图…...

Windows XP图标主题:5分钟让你的现代Linux桌面重获经典魅力
Windows XP图标主题:5分钟让你的现代Linux桌面重获经典魅力 【免费下载链接】Windows-XP Remake of classic YlmfOS theme with some mods for icons to scale right 项目地址: https://gitcode.com/gh_mirrors/win/Windows-XP 还在怀念那个经典的开始按钮和…...

openclaw gateway网关运行详解
📘 Gateway 网关运行手册 — 关键内容与操作流程 1) Gateway 是什么 Gateway 网关服务 是一款长期运行的进程,用于处理连接控制、事件平面,与底层 Baileys / Telegram 等协议对接,为客户端提供 RPC/HTTP 接口。它自身启动后持续运…...

信息几何物理学:范式构建、本体坐标与世毫九理论科学谱系定位
信息几何物理学:范式构建、本体坐标与世毫九理论科学谱系定位 Information-Geometric Physics: Paradigm Construction, Ontological Coordinates and Scientific Pedigree Positioning of Shihao-9 Theory 作者:方见华 单位:世毫九实验室 摘要 当代人工智能与认知科学正…...

AI小白必看:收藏这份从零入门大模型的核心概念指南
本文通过一个生动的故事,用通俗易懂的方式讲解了AI领域最核心的7个概念:LLM(大语言模型)、Agent(智能体)、Skill(技能包)、MCP(模型上下文协议)、IDE…...

逆向工程实现GitHub Copilot HTTP API:解锁AI代码补全的无限集成可能
1. 项目概述:一个反向工程的“桥梁”如果你是一名开发者,并且对 GitHub Copilot 的智能代码补全能力印象深刻,但同时又希望能在自己偏爱的编辑器、IDE,甚至是命令行工具里直接调用它的能力,那么purocean/expose-github…...

Linux上运行Cursor编辑器:AppImage打包与AI编程环境搭建指南
1. 项目概述:一个为Linux用户定制的代码编辑器如果你是一名长期在Linux环境下工作的开发者,尤其是习惯了使用VS Code这类现代编辑器,但又对某些AI辅助编程工具(比如Cursor)的便捷性念念不忘,那么你很可能已…...

NextPy全栈框架:用Python构建AI智能体Web应用
1. 项目概述:当AI智能体遇上全栈Web开发最近在开源社区里,一个名为dot-agent/nextpy的项目引起了我的注意。作为一名长期在Web开发和AI应用落地之间“反复横跳”的开发者,我深知将AI能力,特别是智能体(Agent࿰…...

JAVA:类和对象完全解析
一、编程世界的乐高积木在面向对象编程(OOP)的宇宙中,类(Class)和对象(Object)如同乐高积木的基础模块。如果把程序看作一个虚拟城市,类就是建筑设计图,而对象则是根据图…...

如何5分钟掌握Jump:从安装到高效使用的完整教程
如何5分钟掌握Jump:从安装到高效使用的完整教程 【免费下载链接】jump Jump helps you navigate faster by learning your habits. ✌️ 项目地址: https://gitcode.com/gh_mirrors/ju/jump Jump是一款能够通过学习用户习惯来加速导航的命令行工具࿰…...

在校生想进网络安全行业?聊聊NISP二级这个‘校园版CISP’的含金量与报考全攻略
在校生如何通过NISP二级证书抢占网络安全行业先机 当各大高校计算机相关专业的学生还在为毕业后的就业方向发愁时,一批有远见的同学已经悄悄考取了被称为"校园版CISP"的NISP二级证书。这张由中国信息安全测评中心颁发的国家级证书,正在成为网络…...