Spring容器——基于XML注入
1. 容器:IOC
IoC 是 Inversion of Control 的简写,译为“控制反转”,它不是一门技术,而是一种设计思想,是一个重要的面向对象编程法则,能够指导我们如何设计出松耦合、更优良的程序
Spring 通过 IoC 容器来管理所有 Java 对象的实例化和初始化,控制对象与对象之间的依赖关系。我们将由 IoC 容器管理的 Java 对象称为 Spring Bean,它与使用关键字 new 创建的 Java 对象没有任何区别
IoC 容器是 Spring 框架中最重要的核心组件之一,它贯穿了 Spring 从诞生到成长的整个过程
1.1 IOC容器
1.1.1 控制反转
- 控制反转是一种思想。
- 控制反转是为了降低程序耦合度,提高程序扩展力。
- 控制反转,反转的是什么?
- 将对象的创建权利交出去,交给第三方容器负责。
- 将对象和对象之间关系的维护权交出去,交给第三方容器负责。
- 控制反转这种思想如何实现呢?
- DI(Dependency Injection):依赖注入
1.1.2 依赖注入
DI(Dependency Injection):依赖注入,依赖注入实现了控制反转的思想。
- 依赖注入:
- 指Spring创建对象的过程中,将对象依赖属性通过配置进行注入
- 依赖注入常见的实现方式包括两种:
- 第一种:set注入
- 第二种:构造注入
所以结论是:IOC 就是一种控制反转的思想, 而 DI 是对IoC的一种具体实现
Bean管理说的是:Bean对象的创建,以及Bean对象中属性的赋值(或者叫做Bean对象之间关系的维护)。
1.1.3 IOC容器在Spring的实现
Spring 的 IoC 容器就是 IoC思想的一个落地的产品实现。IoC容器中管理的组件也叫做 bean。在创建 bean 之前,首先需要创建IoC 容器。Spring 提供了IoC 容器的两种实现方式:
①BeanFactory
这是 IoC 容器的基本实现,是 Spring 内部使用的接口。面向 Spring 本身,不提供给开发人员使用。
②ApplicationContext
BeanFactory 的子接口,提供了更多高级特性。面向 Spring 的使用者,几乎所有场合都使用 ApplicationContext 而不是底层的 BeanFactory。
③ApplicationContext的主要实现类

| 类型名 | 简介 |
|---|---|
| ClassPathXmlApplicationContext | 通过读取类路径下的 XML 格式的配置文件创建 IOC 容器对象 |
| FileSystemXmlApplicationContext | 通过文件系统路径读取 XML 格式的配置文件创建 IOC 容器对象 |
| ConfigurableApplicationContext | ApplicationContext 的子接口,包含一些扩展方法 refresh() 和 close() ,让 ApplicationContext 具有启动、关闭和刷新上下文的能力。 |
| WebApplicationContext | 专门为 Web 应用准备,基于 Web 环境创建 IOC 容器对象,并将对象引入存入 ServletContext 域中。 |
3.2 基于XML管理bean
3.2.1、搭建子模块spring6-ioc-xml
添加依赖
<dependencies><!--spring context依赖--><!--当你引入Spring Context依赖之后,表示将Spring的基础依赖引入了--><dependency><groupId>org.springframework</groupId><artifactId>spring-context</artifactId><version>6.0.3</version></dependency><!--junit5测试--><dependency><groupId>org.junit.jupiter</groupId><artifactId>junit-jupiter-api</artifactId><version>5.3.1</version></dependency><!--log4j2的依赖--><dependency><groupId>org.apache.logging.log4j</groupId><artifactId>log4j-core</artifactId><version>2.19.0</version></dependency><dependency><groupId>org.apache.logging.log4j</groupId><artifactId>log4j-slf4j2-impl</artifactId><version>2.19.0</version></dependency>
</dependencies>
3.2.2 获取bean
- 方式一根据id获取
- 由于 id 属性指定了 bean 的唯一标识,所以根据 bean 标签的 id 属性可以精确获取到一个组件对象。上个实验中我们使用的就是这种
- 方式二:根据类型获取
@Test
public void testHelloWorld1(){ApplicationContext ac = new ClassPathXmlApplicationContext("beans.xml");//当根据类型获取bean时,要求IOC容器中指定类型的bean有且只能有一个HelloWorld bean = ac.getBean(HelloWorld.class);bean.sayHello();
}
- 方式三:根据id和类型
@Test
public void testHelloWorld2(){ApplicationContext ac = new ClassPathXmlApplicationContext("beans.xml");HelloWorld bean = ac.getBean("helloworld", HelloWorld.class);bean.sayHello();
}
3.2.3 依赖注入之setter注入
- 创建User类
package com.gdhd.domain;public class User {private String name;private Integer age;public String getName() {return name;}public void setName(String name) {this.name = name;}public Integer getAge() {return age;}public void setAge(Integer age) {this.age = age;}@Overridepublic String toString() {return "User{" +"name='" + name + '\'' +", age=" + age +'}';}
}- 配置bean时为属性赋值
<bean id="user" class="com.gdhd.domin.User"><!-- property标签:通过组件类的setXxx()方法给组件对象设置属性 --><!-- name属性:指定属性名(这个属性名是getXxx()、setXxx()方法定义的,和成员变量无关) --><!-- value属性:指定属性值 --><property name="name" value="张三"></property><property name="age" value="23"></property>
</bean>
- 测试
public class UserTest {@Testpublic void name(){ApplicationContext ac=new ClassPathXmlApplicationContext ("bean.xml");User user = (User) ac.getBean("user");System.out.println(user);}
}
}
3.2.4 依赖注入之构造器注入
- 在User类添加有参构造
public User(String name, Integer age) {this.name = name;this.age = age;}- 配置Bean
<bean id="user" class="com.gdhd.domain.User"><!-- constructor标签:通过组件类的构造器方法给组件对象设置属性 --><!--valus:赋值,name:指定参数名,index:指定参数所在位置的索引(从0开始)--><constructor-arg value="小道"></constructor-arg><constructor-arg value="30"></constructor-arg></bean>
测试
public class UserTest {@Testpublic void name(){ApplicationContext ac=new ClassPathXmlApplicationContext ("bean.xml");User user = (User) ac.getBean("user");System.out.println(user);}
}
3.2.5 特殊值处理
什么是字面量
int a=10
声明一个变量a,初始化为10,此时a就不代表字母a了,而是作为一个变量的名字,当我们引用a的时候,我们实际上拿到的值是10
而如果a是带引号的:‘a’,那么它现在不是一个变量,它就是代表a这个字母本身,这就是字面量。所以字面量没有引申含义,就是我们看到的这个数据本身
<!-- 使用value属性给bean的属性赋值时,Spring会把value属性的值看做字面量 -->
<property name="name" value="张三"/>
- null值
<property name="name"><null />
</property>
- xml实体
<!-- 小于号在XML文档中用来定义标签的开始,不能随便使用 -->
<!-- 解决方案一:使用XML实体来代替 -->
<property name="expression" value="a < b"/>
- CDATA节
<property name="expression"><!-- 解决方案二:使用CDATA节 --><!-- CDATA中的C代表Character,是文本、字符的含义,CDATA就表示纯文本数据 --><!-- XML解析器看到CDATA节就知道这里是纯文本,就不会当作XML标签或属性来解析 --><!-- 所以CDATA节中写什么符号都随意 --><value><![CDATA[a < b]]></value>
</property
3.2.6 为对象属性赋值
- 创建Dog类
package com.gdhd.domain;public class Dog {private String name;private Integer age;public String getName() {return name;}public void setName(String name) {this.name = name;}public Integer getAge() {return age;}public void setAge(Integer age) {this.age = age;}@Overridepublic String toString() {return "Dog{" +"name='" + name + '\'' +", age=" + age +'}';}public Dog(String name, Integer age) {this.name = name;this.age = age;}public Dog() {}}- 修改User类
private Dog dog;public String getName() {return name;}public Dog getDog() {return dog;}public void setDog(Dog dog) {this.dog = dog;}
方式一:引用外部的bean
配置Dog类的bean
<bean id="dog" class="com.gdhd.domain.Dog"><property name="name" value="旺财"></property><property name="age" value="16"></property></bean>
为User中的dog属性赋值
<property name="name" value="小道"></property><property name="age" value="15"></property><!-- ref属性:引用IOC容器中某个bean的id,将所对应的bean为属性赋值 --><property name="dog" ref="dog"></property>
方式二:内部bean
<property name="name" value="小道"></property><property name="age" value="15"></property><!-- 在一个bean中再声明一个bean就是内部bean --><!-- 内部bean只能用于给属性赋值,不能在外部通过IOC容器获取,因此可以省略id属性 --><property name="dog" ><bean id="dog" class="com.gdhd.domain.Dog"><property name="name" value="旺财"></property><property name="age" value="16"></property></bean></property>
方式三:级联属性赋值
    <bean id="user" class="com.gdhd.domain.User"><property name="name" value="小道"></property><property name="age" value="15"></property><property name="dog" ref="dogOne"></property><property name="dog.name" value="旺财"></property><property name="dog.age" value="145"></property><!--        <constructor-arg name="age" value="15"></constructor-arg>-->
<!--        <constructor-arg name="name" value="30"></constructor-arg>--></bean><bean id="dogOne" class="com.gdhd.domain.Dog"></bean>
3.2.7 为数组类型属性赋值
修改User类
private String[] hobbies;public String[] getHobbies() {return hobbies;
}public void setHobbies(String[] hobbies) {this.hobbies = hobbies;
}
配置Bean
<property name="hobbies" ><array><value>喝酒</value><value>看书</value></array></property>
3.2.8 为集合类型属性赋值
为List集合类型属性赋值
修改User类
private List<Dog> dogs;public List<Dog> getDogs() {return dogs;}public void setDogs(List<Dog> dogs) {this.dogs = dogs;}
配置bean
<property name="dogs"><list><ref bean="dogsOne"></ref><ref bean="dogsTwo"></ref><ref bean="dogsThree"></ref></list></property>若为Set集合类型属性赋值,只需要将其中的list标签改为set标签即可
为Map集合类型属性赋值
创建教师类Teacher
package com.gdhd.domain;public class Teacher {private Integer teachId;private String teachName;public Integer getTeachId() {return teachId;}public void setTeachId(Integer teachId) {this.teachId = teachId;}public String getTeachName() {return teachName;}public void setTeachName(String teachName) {this.teachName = teachName;}@Overridepublic String toString() {return "Teacher{" +"teachId=" + teachId +", teachName='" + teachName + '\'' +'}';}
}
创建Student类
package com.gdhd.domain;import java.util.Map;public class Student {private String name;private Integer age;private Map<String,Teacher> teacherMap;public String getName() {return name;}public void setName(String name) {this.name = name;}public Integer getAge() {return age;}public void setAge(Integer age) {this.age = age;}public Map<String, Teacher> getTeacherMap() {return teacherMap;}public void setTeacherMap(Map<String, Teacher> teacherMap) {this.teacherMap = teacherMap;}@Overridepublic String toString() {return "Student{" +"name='" + name + '\'' +", age=" + age +", teacherMap=" + teacherMap +'}';}
}
配置bean
<bean id="teacherOne" class="com.gdhd.domain.Teacher"><property name="teachId" value="1"></property><property name="teachName" value="语文老师"></property></bean><bean id="teacherFirst" class="com.gdhd.domain.Teacher"><property name="teachId" value="1"></property><property name="teachName" value="数学老师"></property></bean><bean id="student" class="com.gdhd.domain.Student"><property name="name" value="小王"></property><property name="age" value="24"></property><property name="teacherMap" ><map><entry><key><value>1001</value></key><ref bean="teacherOne"></ref></entry><entry><key><value>1002</value></key><ref bean="teacherFirst"></ref></entry></map></property></bean>
引用集合类型的bean
创建Lesson类
package com.gdhd.domain;public class Lesson {private String LessonName;public String getLessonName() {return LessonName;}public void setLessonName(String lesson) {LessonName = lesson;}@Overridepublic String toString() {return "Lesson{" +"Lesson='" + LessonName + '\'' +'}';}
}
修改Student类
private List<Lesson> lessons;public List<Lesson> getLessons() {return lessons;}public void setLessons(List<Lesson> lessons) {this.lessons = lessons;}
引用命名空间
使用util:list、util:map标签必须引入相应的命名空间
<?xml version="1.0" encoding="UTF-8"?>
<beans xmlns="http://www.springframework.org/schema/beans"xmlns:xsi="http://www.w3.org/2001/XMLSchema-instance"xmlns:util="http://www.springframework.org/schema/util"xsi:schemaLocation="http://www.springframework.org/schema/utilhttp://www.springframework.org/schema/util/spring-util.xsdhttp://www.springframework.org/schema/beanshttp://www.springframework.org/schema/beans/spring-beans.xsd">
配置bean
<?xml version="1.0" encoding="UTF-8"?>
<beans xmlns="http://www.springframework.org/schema/beans"xmlns:xsi="http://www.w3.org/2001/XMLSchema-instance"xmlns:util="http://www.springframework.org/schema/util"xsi:schemaLocation="http://www.springframework.org/schema/utilhttp://www.springframework.org/schema/util/spring-util.xsdhttp://www.springframework.org/schema/beanshttp://www.springframework.org/schema/beans/spring-beans.xsd">
<!--    1 创建三个对象-->
<!--    2 注入普通类型属性-->
<!--    3 使用util:类型 定义-->
<!--    4 在学生bean引入util:类型定义bean,完成list、map类型属性注入-->
<!--    list属性注入--><util:list id="lesson"><ref bean="lessonOne"></ref><ref bean="lessonTow"></ref></util:list><bean id="lessonOne" class="com.gdhd.domain.Lesson"><property name="lessonName" value="java开发"></property></bean><bean id="lessonTow" class="com.gdhd.domain.Lesson"><property name="lessonName" value="计算机网络"></property></bean>
<!--    map类型属性注入--><util:map id="map"><entry><key><value>1001</value></key><ref bean="TeacherOne"></ref></entry><entry><key><value>1002</value></key><ref bean="TeacherTow"></ref></entry></util:map><bean id="TeacherOne" class="com.gdhd.domain.Teacher"><property name="teachId" value="1001"></property><property name="teachName" value="王城老师"></property></bean><bean id="TeacherTow" class="com.gdhd.domain.Teacher"><property name="teachId" value="1001"></property><property name="teachName" value="王城老师"></property></bean><bean id="student" class="com.gdhd.domain.Student"><property name="name" value="小王"></property><property name="age" value="12"></property><property name="lessons" ref="lesson"></property><property name="teacherMap" ref="map"></property></bean>
</beans>
3.2.9 引入外部属性文件
- 加入依赖
 <!-- MySQL驱动 -->
<dependency><groupId>mysql</groupId><artifactId>mysql-connector-java</artifactId><version>8.0.30</version>
</dependency><!-- 数据源 -->
<dependency><groupId>com.alibaba</groupId><artifactId>druid</artifactId><version>1.2.15</version>
</dependency
- 创建外部属性文件
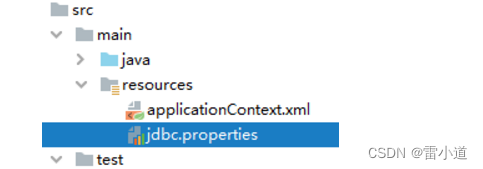
jdbc.user=root
jdbc.password=atguigu
jdbc.url=jdbc:mysql://localhost:3306/ssm?serverTimezone=UTC
jdbc.driver=com.mysql.cj.jdbc.Driver
- 引入属性文件
- 引入context 名称空间
<?xml version="1.0" encoding="UTF-8"?>
<beans xmlns="http://www.springframework.org/schema/beans"xmlns:xsi="http://www.w3.org/2001/XMLSchema-instance"xmlns:context="http://www.springframework.org/schema/context"xsi:schemaLocation="http://www.springframework.org/schema/beanshttp://www.springframework.org/schema/beans/spring-beans.xsdhttp://www.springframework.org/schema/contexthttp://www.springframework.org/schema/context/spring-context.xsd"></beans>
<!-- 引入外部属性文件 -->
<context:property-placeholder location="classpath:jdbc.properties"/>
注意:在使用 <context:property-placeholder> 元素加载外包配置文件功能前,首先需要在 XML 配置的一级标签 <beans> 中添加 context 相关的约束。
- 配置bean
<bean id="druidDataSource" class="com.alibaba.druid.pool.DruidDataSource"><property name="url" value="${jdbc.url}"/><property name="driverClassName" value="${jdbc.driver}"/><property name="username" value="${jdbc.user}"/><property name="password" value="${jdbc.password}"/>
</bean>
- 测试
@Test
public void testDataSource() throws SQLException {ApplicationContext ac = new ClassPathXmlApplicationContext("spring-datasource.xml");DataSource dataSource = ac.getBean(DataSource.class);Connection connection = dataSource.getConnection();System.out.println(connection);
}
3.2.10 bean的作用域
- 概念
- 在Spring中可以通过配置bean标签的scope属性来指定bean的作用域范围,取值含义参照下表
| 取值 | 含义 | 创建对象的时机 |
|---|---|---|
| singleton(默认) | 在IOC容器中,这个bean的对象始终为单实例 | IOC容器初始化时 |
| prototype | 这个bean在IOC容器中有多个实例 | 获取bean时 |
如果是在WebApplicationContext环境下还会有另外几个作用域(但不常用):
| 取值 | 含义 |
|---|---|
| request | 在一个请求范围内有效 |
| session | 在一个会话范围内有效 |
| 创建User类 |
public class User {private Integer id;private String username;private String password;private Integer age;public User() {}public User(Integer id, String username, String password, Integer age) {this.id = id;this.username = username;this.password = password;this.age = age;}public Integer getId() {return id;}public void setId(Integer id) {this.id = id;}public String getUsername() {return username;}public void setUsername(String username) {this.username = username;}public String getPassword() {return password;}public void setPassword(String password) {this.password = password;}public Integer getAge() {return age;}public void setAge(Integer age) {this.age = age;}@Overridepublic String toString() {return "User{" +"id=" + id +", username='" + username + '\'' +", password='" + password + '\'' +", age=" + age +'}';}
}
配置Bean
<!-- scope属性:取值singleton(默认值),bean在IOC容器中只有一个实例,IOC容器初始化时创建对象 -->
<!-- scope属性:取值prototype,bean在IOC容器中可以有多个实例,getBean()时创建对象 -->
<bean class="com.atguigu.spring6.bean.User" scope="prototype"></bean>
测试
@Test
public void testBeanScope(){ApplicationContext ac = new ClassPathXmlApplicationContext("spring-scope.xml");User user1 = ac.getBean(User.class);User user2 = ac.getBean(User.class);System.out.println(user1==user2);
}
3.2.11 Bean生命周期
①具体的生命周期过程
- bean对象创建(调用无参构造器)
- 给bean对象设置属性
- bean的后置处理器(初始化之前)
- bean对象初始化(需在配置bean时指定初始化方法)
- bean的后置处理器(初始化之后)
- bean对象就绪可以使用
- bean对象销毁(需在配置bean时指定销毁方法)
- IOC容器关闭
2.修改User类
public class User {private Integer id;private String username;private String password;private Integer age;public User() {System.out.println("生命周期:1、创建对象");}public User(Integer id, String username, String password, Integer age) {this.id = id;this.username = username;this.password = password;this.age = age;}public Integer getId() {return id;}public void setId(Integer id) {System.out.println("生命周期:2、依赖注入");this.id = id;}public String getUsername() {return username;}public void setUsername(String username) {this.username = username;}public String getPassword() {return password;}public void setPassword(String password) {this.password = password;}public Integer getAge() {return age;}public void setAge(Integer age) {this.age = age;}public void initMethod(){System.out.println("生命周期:3、初始化");}public void destroyMethod(){System.out.println("生命周期:5、销毁");}@Overridepublic String toString() {return "User{" +"id=" + id +", username='" + username + '\'' +", password='" + password + '\'' +", age=" + age +'}';}
}
- 配置bean
<!-- 使用init-method属性指定初始化方法 -->
<!-- 使用destroy-method属性指定销毁方法 -->
<bean class="com.atguigu.spring6.bean.User" scope="prototype" init-method="initMethod" destroy-method="destroyMethod"><property name="id" value="1001"></property><property name="username" value="admin"></property><property name="password" value="123456"></property><property name="age" value="23"></property>
</bean>
- 测试
@Test
public void testLife(){ClassPathXmlApplicationContext ac = new ClassPathXmlApplicationContext("spring-lifecycle.xml");User bean = ac.getBean(User.class);System.out.println("生命周期:4、通过IOC容器获取bean并使用");ac.close();
}
- bean的后置处理器
- bean的后置处理器会在生命周期的初始化前后添加额外的操作,需要实现BeanPostProcessor接口,且配置到IOC容器中,需要注意的是,bean后置处理器不是单独针对某一个bean生效,而是针对IOC容器中所有bean都会执行
- 创建bean的后置处理器
package com.atguigu.spring6.process;import org.springframework.beans.BeansException;
import org.springframework.beans.factory.config.BeanPostProcessor;
//实现BeanPostProcessor接口
public class MyBeanProcessor implements BeanPostProcessor {//在初始化之前执行@Overridepublic Object postProcessBeforeInitialization(Object bean, String beanName) throws BeansException {System.out.println("☆☆☆" + beanName + " = " + bean);return bean;}//在初始化之后执行@Overridepublic Object postProcessAfterInitialization(Object bean, String beanName) throws BeansException {System.out.println("★★★" + beanName + " = " + bean);return bean;}
}
在IOC容器中配置后置处理器
<!-- bean的后置处理器要放入IOC容器才能生效 -->
<bean id="myBeanProcessor" class="com.atguigu.spring6.process.MyBeanProcessor"/>
3.2.13 FactoryBean
- 简介
- FactoryBean是Spring提供的一种整合第三方框架的常用机制。和普通的bean不同,配置一个FactoryBean类型的bean,在获取bean的时候得到的并不是class属性中配置的这个类的对象,而是getObject()方法的返回值。通过这种机制,Spring可以帮我们把复杂组件创建的详细过程和繁琐细节都屏蔽起来,只把最简洁的使用界面展示给我们。
- 将来我们整合Mybatis时,Spring就是通过FactoryBean机制来帮我们创建SqlSessionFactory对象的。
/** Copyright 2002-2020 the original author or authors.** Licensed under the Apache License, Version 2.0 (the "License");* you may not use this file except in compliance with the License.* You may obtain a copy of the License at**      https://www.apache.org/licenses/LICENSE-2.0** Unless required by applicable law or agreed to in writing, software* distributed under the License is distributed on an "AS IS" BASIS,* WITHOUT WARRANTIES OR CONDITIONS OF ANY KIND, either express or implied.* See the License for the specific language governing permissions and* limitations under the License.*/
package org.springframework.beans.factory;import org.springframework.lang.Nullable;/*** Interface to be implemented by objects used within a {@link BeanFactory} which* are themselves factories for individual objects. If a bean implements this* interface, it is used as a factory for an object to expose, not directly as a* bean instance that will be exposed itself.** <p><b>NB: A bean that implements this interface cannot be used as a normal bean.</b>* A FactoryBean is defined in a bean style, but the object exposed for bean* references ({@link #getObject()}) is always the object that it creates.** <p>FactoryBeans can support singletons and prototypes, and can either create* objects lazily on demand or eagerly on startup. The {@link SmartFactoryBean}* interface allows for exposing more fine-grained behavioral metadata.** <p>This interface is heavily used within the framework itself, for example for* the AOP {@link org.springframework.aop.framework.ProxyFactoryBean} or the* {@link org.springframework.jndi.JndiObjectFactoryBean}. It can be used for* custom components as well; however, this is only common for infrastructure code.** <p><b>{@code FactoryBean} is a programmatic contract. Implementations are not* supposed to rely on annotation-driven injection or other reflective facilities.</b>* {@link #getObjectType()} {@link #getObject()} invocations may arrive early in the* bootstrap process, even ahead of any post-processor setup. If you need access to* other beans, implement {@link BeanFactoryAware} and obtain them programmatically.** <p><b>The container is only responsible for managing the lifecycle of the FactoryBean* instance, not the lifecycle of the objects created by the FactoryBean.</b> Therefore,* a destroy method on an exposed bean object (such as {@link java.io.Closeable#close()}* will <i>not</i> be called automatically. Instead, a FactoryBean should implement* {@link DisposableBean} and delegate any such close call to the underlying object.** <p>Finally, FactoryBean objects participate in the containing BeanFactory's* synchronization of bean creation. There is usually no need for internal* synchronization other than for purposes of lazy initialization within the* FactoryBean itself (or the like).** @author Rod Johnson* @author Juergen Hoeller* @since 08.03.2003* @param <T> the bean type* @see org.springframework.beans.factory.BeanFactory* @see org.springframework.aop.framework.ProxyFactoryBean* @see org.springframework.jndi.JndiObjectFactoryBean*/
public interface FactoryBean<T> {/*** The name of an attribute that can be* {@link org.springframework.core.AttributeAccessor#setAttribute set} on a* {@link org.springframework.beans.factory.config.BeanDefinition} so that* factory beans can signal their object type when it can't be deduced from* the factory bean class.* @since 5.2*/String OBJECT_TYPE_ATTRIBUTE = "factoryBeanObjectType";/*** Return an instance (possibly shared or independent) of the object* managed by this factory.* <p>As with a {@link BeanFactory}, this allows support for both the* Singleton and Prototype design pattern.* <p>If this FactoryBean is not fully initialized yet at the time of* the call (for example because it is involved in a circular reference),* throw a corresponding {@link FactoryBeanNotInitializedException}.* <p>As of Spring 2.0, FactoryBeans are allowed to return {@code null}* objects. The factory will consider this as normal value to be used; it* will not throw a FactoryBeanNotInitializedException in this case anymore.* FactoryBean implementations are encouraged to throw* FactoryBeanNotInitializedException themselves now, as appropriate.* @return an instance of the bean (can be {@code null})* @throws Exception in case of creation errors* @see FactoryBeanNotInitializedException*/@NullableT getObject() throws Exception;/*** Return the type of object that this FactoryBean creates,* or {@code null} if not known in advance.* <p>This allows one to check for specific types of beans without* instantiating objects, for example on autowiring.* <p>In the case of implementations that are creating a singleton object,* this method should try to avoid singleton creation as far as possible;* it should rather estimate the type in advance.* For prototypes, returning a meaningful type here is advisable too.* <p>This method can be called <i>before</i> this FactoryBean has* been fully initialized. It must not rely on state created during* initialization; of course, it can still use such state if available.* <p><b>NOTE:</b> Autowiring will simply ignore FactoryBeans that return* {@code null} here. Therefore it is highly recommended to implement* this method properly, using the current state of the FactoryBean.* @return the type of object that this FactoryBean creates,* or {@code null} if not known at the time of the call* @see ListableBeanFactory#getBeansOfType*/@NullableClass<?> getObjectType();/*** Is the object managed by this factory a singleton? That is,* will {@link #getObject()} always return the same object* (a reference that can be cached)?* <p><b>NOTE:</b> If a FactoryBean indicates to hold a singleton object,* the object returned from {@code getObject()} might get cached* by the owning BeanFactory. Hence, do not return {@code true}* unless the FactoryBean always exposes the same reference.* <p>The singleton status of the FactoryBean itself will generally* be provided by the owning BeanFactory; usually, it has to be* defined as singleton there.* <p><b>NOTE:</b> This method returning {@code false} does not* necessarily indicate that returned objects are independent instances.* An implementation of the extended {@link SmartFactoryBean} interface* may explicitly indicate independent instances through its* {@link SmartFactoryBean#isPrototype()} method. Plain {@link FactoryBean}* implementations which do not implement this extended interface are* simply assumed to always return independent instances if the* {@code isSingleton()} implementation returns {@code false}.* <p>The default implementation returns {@code true}, since a* {@code FactoryBean} typically manages a singleton instance.* @return whether the exposed object is a singleton* @see #getObject()* @see SmartFactoryBean#isPrototype()*/default boolean isSingleton() {return true;}
}
- 创建类UserFactoryBean
public class UserFactoryBean implements FactoryBean<User> {@Overridepublic User getObject() throws Exception {return new User();}@Overridepublic Class<?> getObjectType() {return User.class;}
}
- 配置bean
<bean id="user" class="com.atguigu.spring6.bean.UserFactoryBean"></bean>
- 测试
@Test
public void testUserFactoryBean(){//获取IOC容器ApplicationContext ac = new ClassPathXmlApplicationContext("spring-factorybean.xml");User user = (User) ac.getBean("user");System.out.println(user);
}
3.2.14 基于xml自动装配
自动装配:
根据指定的策略,在IOC容器中匹配某一个bean,自动为指定的bean中所依赖的类类型或接口类型属性赋值
- 创建模拟
创建类UserController
package com.atguigu.spring6.autowire.controller
public class UserController {private UserService userService;public void setUserService(UserService userService) {this.userService = userService;}public void saveUser(){userService.saveUser();}}
创建接口UserService
package com.atguigu.spring6.autowire.service
public interface UserService {void saveUser();}
创建类UserServiceImpl实现接口UserService
package com.atguigu.spring6.autowire.service.impl
public class UserServiceImpl implements UserService {private UserDao userDao;public void setUserDao(UserDao userDao) {this.userDao = userDao;}@Overridepublic void saveUser() {userDao.saveUser();}}
创建接口UserDao
package com.atguigu.spring6.autowire.dao
public interface UserDao {void saveUser();}
创建类UserDaoImpl实现接口UserDao
package com.atguigu.spring6.autowire.dao.impl
public class UserDaoImpl implements UserDao {@Overridepublic void saveUser() {System.out.println("保存成功");}}
- 配置Bean
使用bean标签的autowire属性设置自动装配效果
自动装配方式:byType
byType:根据类型匹配IOC容器中的某个兼容类型的bean,为属性自动赋值
若在IOC中,没有任何一个兼容类型的bean能够为属性赋值,则该属性不装配,即值为默认值null
若在IOC中,有多个兼容类型的bean能够为属性赋值,则抛出异常NoUniqueBeanDefinitionException
<bean id="userController" class="com.atguigu.spring6.autowire.controller.UserController" autowire="byType"></bean><bean id="userService" class="com.atguigu.spring6.autowire.service.impl.UserServiceImpl" autowire="byType"></bean><bean id="userDao" class="com.atguigu.spring6.autowire.dao.impl.UserDaoImpl"></bean>
自动装配方式:byName
byName:将自动装配的属性的属性名,作为bean的id在IOC容器中匹配相对应的bean进行赋值
<bean id="userController" class="com.atguigu.spring6.autowire.controller.UserController" autowire="byName"></bean><bean id="userService" class="com.atguigu.spring6.autowire.service.impl.UserServiceImpl" autowire="byName"></bean>
<bean id="userServiceImpl" class="com.atguigu.spring6.autowire.service.impl.UserServiceImpl" autowire="byName"></bean><bean id="userDao" class="com.atguigu.spring6.autowire.dao.impl.UserDaoImpl"></bean>
<bean id="userDaoImpl" class="com.atguigu.spring6.autowire.dao.impl.UserDaoImpl"></bean>
测试
@Test
public void testAutoWireByXML(){ApplicationContext ac = new ClassPathXmlApplicationContext("autowire-xml.xml");UserController userController = ac.getBean(UserController.class);userController.saveUser();
}
相关文章:
Spring容器——基于XML注入
1. 容器:IOC IoC 是 Inversion of Control 的简写,译为“控制反转”,它不是一门技术,而是一种设计思想,是一个重要的面向对象编程法则,能够指导我们如何设计出松耦合、更优良的程序 Spring 通过 IoC 容器来…...

设计模式(二十一)----行为型模式之状态模式
1 概述 【例】通过按钮来控制一个电梯的状态,一个电梯有开门状态,关门状态,停止状态,运行状态。每一种状态改变,都有可能要根据其他状态来更新处理。例如,如果电梯门现在处于运行时状态,就不能…...
 亲和⼒传播算法)
一分钟理解 AP(Affinity Propagation) 亲和⼒传播算法
从来没有一个算法让我研究好几天都搞不明白,AP算法算是第一个。弄了好几天,打草纸用了几十页,反复琢磨,最后都怀疑人生了。我觉得网上那么多介绍 AP 的文章,基本上没有一篇能讲明白的。最后我都觉得 AP 的作者可能都没…...

使用mybatis的映射文件操作存储过程
先随便创建一个存储过程 DELIMITER $$ CREATE PROCEDURE getUserNameById (IN i_id BIGINT, OUT o_name VARCHAR(10)) BEGINSELECT u.name INTO o_name FROM tb_user u WHERE id i_id; END $$delimiter $$ : 是将sql语句的结束符号先替换成$$的意思,因为sql是遇到…...
世界上最完美的两个软件,太厉害了!
今天给大家介绍两个软件,一个体现了人类在软件开发流程上的极致,另外一个则体现了程序员个体能力的巅峰。01航天飞机飞控软件先来说第一个,航天飞机飞行控制软件,就是下图这个大家伙。航天飞机重达120吨,还携带着2000吨…...
教你成为比卡卡西还牛逼的全能忍者,全拷贝与分割函数
如何成为一个集雷切,写轮眼侦查和拷贝与一身的卡卡西,下面教你! 目录 第一式——雷切! strtok 第二式——写轮眼侦查! strerror函数 第三式——写轮眼拷贝! memcpy 模拟实现memcpy函数 😎…...

【LeetCode】剑指 Offer(24)
目录 题目:剑指 Offer 47. 礼物的最大价值 - 力扣(Leetcode) 题目的接口: 解题思路: 代码: 过啦!!! 写在最后: 题目:剑指 Offer 47. 礼物的…...

javaEE 初阶 — CSS 元素的显示模式与盒模型
文章目录1. 元素的显示模式1.1 块级元素1.2 行内元素1.3 行内元素和块级元素的区别1.4 改变显示模式2. 盒模型2.1 边框2.1.1 边框的粗细2.1.2 边框的颜色2.1.3 边框的风格2.2 内边距2.3 外边距2.3.1 margin 的特殊情况1. 元素的显示模式 1.1 块级元素 常见的元素: h1 - h6 、…...

新星计划-我为什么要写博客?写博客的意义是什么
CSDN的各位友友们你们好,今天千泽要和大家交流一下写博客的意义,并且鼓励大家参加CSDN官方举办的新星计划,这个可以让我们更快的成长,十分有价值.接下来让我们一起开始吧!如果对您有帮助的话希望能够得到您的支持和帮助,我会持续更新的!🚩part1:自我介绍我是一名来自…...
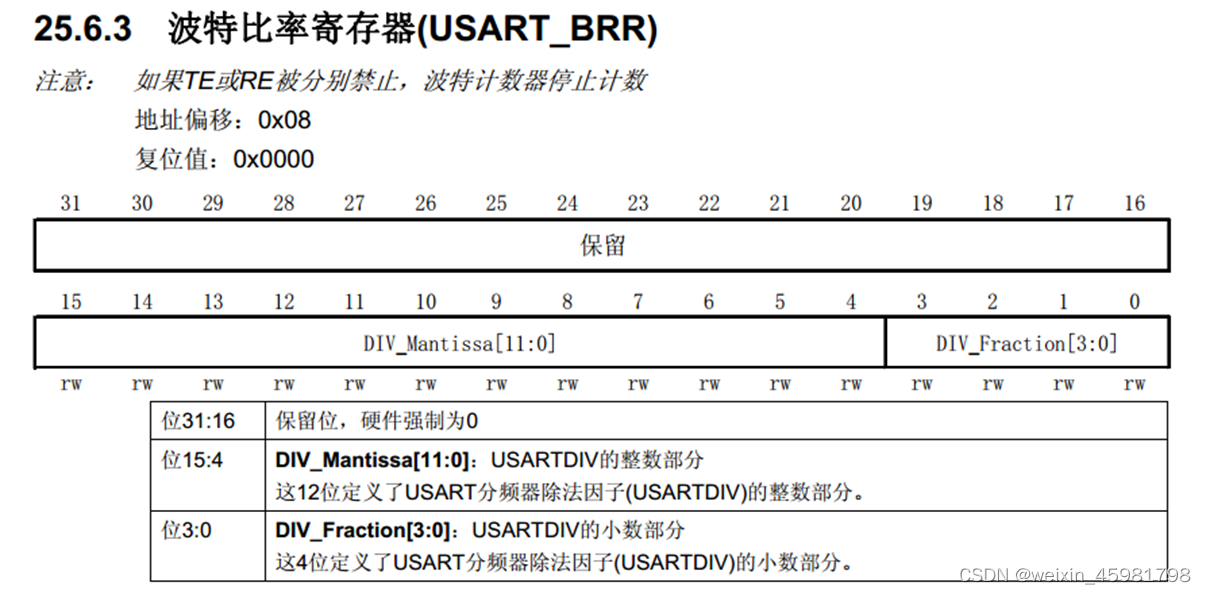
嵌入式学习笔记——STM32的USART收发字符串及串口中断
USART收发字符串及串口中断前言字符串的收发发送一个字符串接收字符串需求利用串口实现printf中断中断是什么前言 上一篇中,介绍了串口收发相关的寄存器,通过代码实现了一个字节的收发,本文接着上面的内容,通过功能函数实现字符串…...
)
数据分析之Pandas(1)
3.Pandas 文章目录3.Pandas3.1 Pandas基本介绍3.1.1 Pandas的基本数据结构3.1.1.1 Pandas库的Series类型3.1.1.2 Pandas库的DataFrame类型DataFrame初始化DataFrame查看数据3.1.2 Pandas读取数据及数据操作行操作添加一行删除一行列操作增加一列删除一列通过标签选择数据条件选…...
17、江科大stm32视频学习笔记——USART串口协议和USART串口外设
目录 1、通信接口 2、 硬件电路 3、电平标准 4、串口参数及时序 5、USART简介 6、USART工作 (1)写操作 (2)读操作 (3)帧头和帧尾的添加和除由电路自动执行 (4)硬件数据控制…...

leetcode:有效地括号
给定一个只包括 ‘(’,‘)’,‘{’,‘}’,‘[’,‘]’ 的字符串 s ,判断字符串是否有效。 有效字符串需满足: 左括号必须用相同类型的右括号闭合。 左括号必须以正确的顺序闭合。 每个右括号都…...

四等分list
Testpublic void s (){ int targ 4; List mList new ArrayList(); List<List> mEndList new ArrayList<>(); for (int i 0; i <34; i) { mList.add(“item” i); } // System.out.println(mList.toString()); if (mList.size() % targ ! 0) { for (int j …...

php连接sqlserver数据库
docker 安装sqlserver数据库sudo docker pull mcr.microsoft.com/mssql/server:2017-latestsudo docker run -e "ACCEPT_EULAY" -e "MSSQL_SA_PASSWORD<YourStrongPassw0rd>" -p 1433:1433 --name sqlserver --hostname sqlserver -d mcr.microsoft.…...
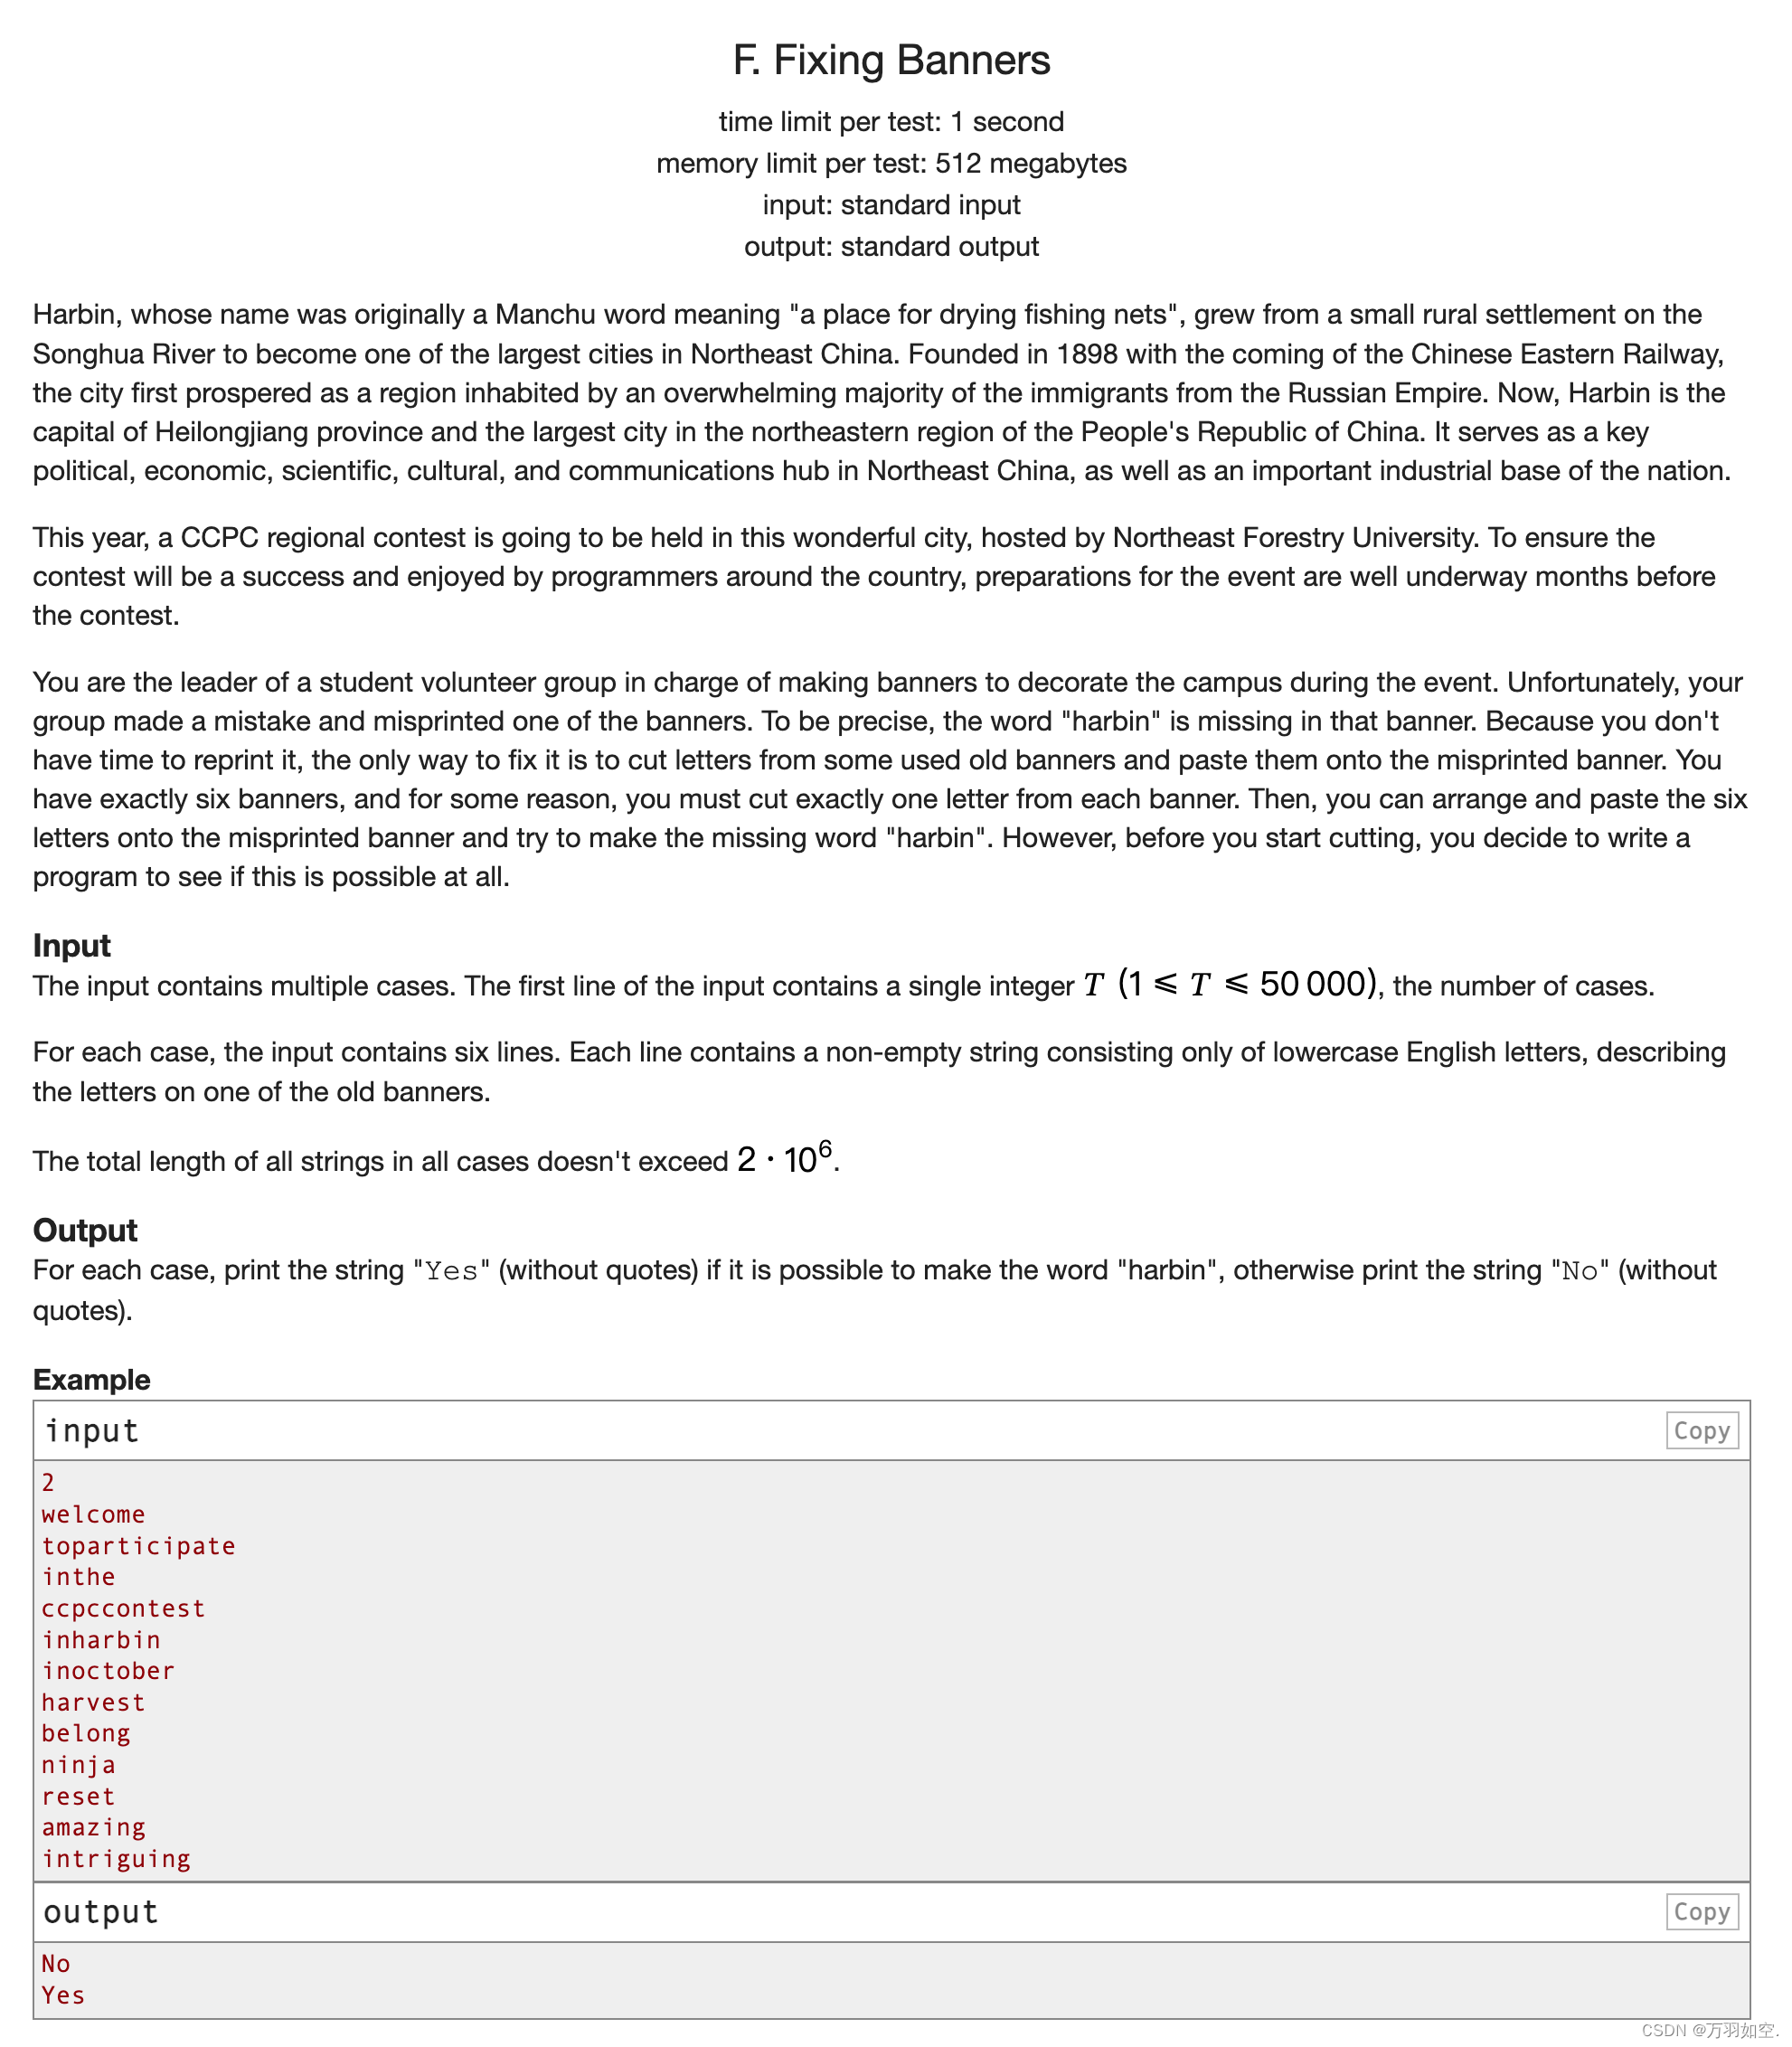
The 2019 China Collegiate Programming Contest Harbin Site F. Fixing Banners
Problem - F - Codeforces 翻译: 哈尔滨,这个名字最初是一个满语单词,意思是“晒渔网的地方”,从松花江边的一个小农村居民点发展成为中国东北最大的城市之一。1898年,随着中国东部铁路的到来,这座城市首先…...
Maven的下载和配置
一、前言 一般按要求下载jar ,但是jar 包版本不好控制。有时候就会jar版本不同导致项目运行的结果也有差异,这样在团队开发中,在多个项目开发的是,jar包还要进行拷贝,可能也会出现版本还jar损坏的情况,所以一个能统一…...

服务高并发、高性能、高可用实现方案
服务高并发、高性能、高可用实现方案 软件开发的三高指标:高并发、高性能、高可用。 高并发方面要求QPS 大于 10万;高性能方面要求请求延迟小于 100 ms;高可用方面要高于 99.99%(4个9) 一、高并发: 高并发是现在互联网分布式框架设…...
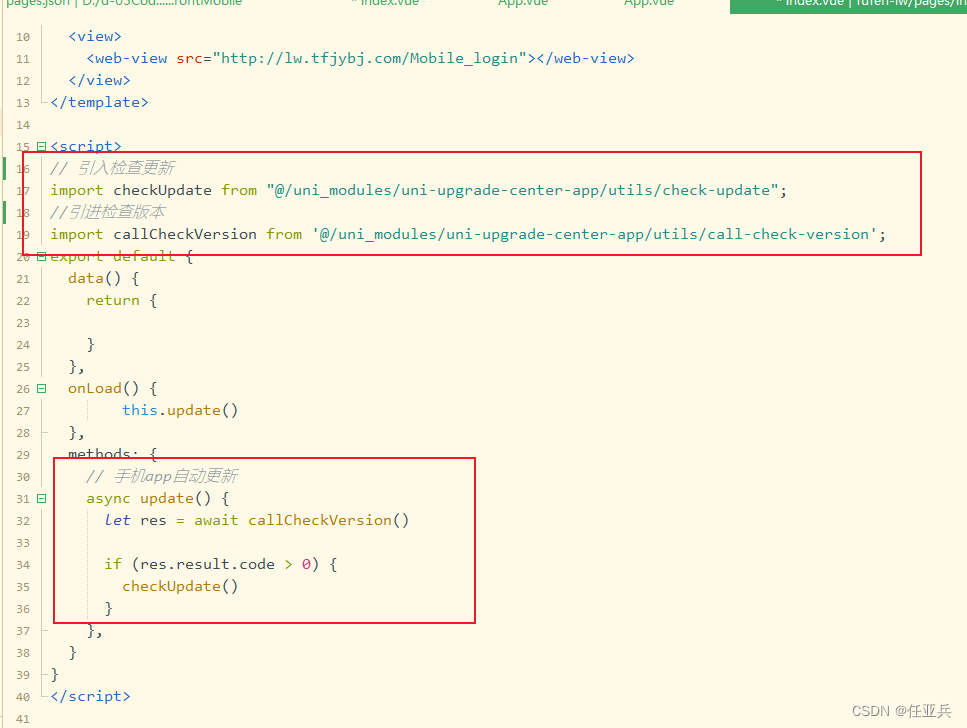
uniCloud在线升级APP配置教程
app在线升级背景实现思路流程流程背景 因用户需要添加手机h5页面来进数据操作实现思路流程 实现流程图流程 相关文档:帮助文档 https://uniapp.dcloud.net.cn/uniCloud/cf-functions.html 注册服务空间 https://unicloud.dcloud.net.cn/pages/login/login uni升级…...

idea常用的快捷键
idea常用的快捷键Alt回车 导入包,自动修正CtrlN 查找类CtrlShiftN 查找文件CtrlAltL 格式化代码CtrlAltO 优化导入的类和包AltInsert 生成代码(如get,set方法,构造函数等)CtrlE或者AltShiftC 最近更改的代码CtrlR 替换文本CtrlF 查找文本CtrlShiftSpace 自动补全代码Ctrl空格 代…...

告别模拟开关:用TLC7528双DAC为你的STM32项目扩展模拟输出通道
告别模拟开关:用TLC7528双DAC为你的STM32项目扩展模拟输出通道 在嵌入式系统开发中,模拟信号输出是许多控制系统的核心需求。无论是精密仪器、工业自动化还是音频处理,都需要稳定可靠的模拟输出通道。然而,大多数STM32微控制器内置…...

自动化测试系统开关架构与继电器选型指南
1. 自动化测试系统中的开关架构选择在自动化测试系统中,开关架构的选择直接影响着测试效率、信号完整性和系统成本。根据测试需求和被测设备(DUT)特性,我们可以将开关架构分为四种基本类型。1.1 无开关架构无开关架构是最直接的连接方式,每个…...

别再死记硬背了!用PyTorch和TensorFlow动手实现四种池化层,直观理解它的作用
用代码可视化理解深度学习中的池化层:PyTorch与TensorFlow实战指南 当你第一次听说"池化层"这个概念时,是否也感到困惑?为什么神经网络需要这样一个"缩小"图像的层?本文将通过PyTorch和TensorFlow两种框架的实…...


AI智能体构建实战:从架构设计到工程落地的关键挑战与解决方案
1. 项目概述:揭开AI智能体构建的隐秘面纱 “构建AI智能体”,这听起来像是当下最酷、最前沿的技术话题。无论是科技新闻还是行业论坛,你都能看到无数关于智能体如何自动化工作流、理解复杂指令、甚至自主决策的激动人心的讨论。然而࿰…...
)
不止于建模:用COMSOL几何操作优化你的仿真效率(分隔、二维轴对称实战)
不止于建模:用COMSOL几何操作优化你的仿真效率 在工程仿真领域,几何建模往往被视为前期准备工作,但真正的高手知道:建模阶段的每一个决策都会在后续网格划分和求解过程中产生指数级影响。我们曾对比过两个相似的电机散热模型——一…...

无需写代码!用 PackSoft 做数字展厅大屏
前言 做过展厅项目的朋友都懂这种痛—— 客户参观来了,讲解员打开浏览器,地址栏、书签栏、收藏夹全暴露在屏幕上,旁边还挂着一个没关的 QQ 弹窗……高端大气的数字展厅,体验瞬间拉低一个档次。 更麻烦的是:大屏全屏…...

如何快速掌握歌词滚动姬:新手到专家的5个终极秘籍
如何快速掌握歌词滚动姬:新手到专家的5个终极秘籍 【免费下载链接】lrc-maker 歌词滚动姬|可能是你所能见到的最好用的歌词制作工具 项目地址: https://gitcode.com/gh_mirrors/lr/lrc-maker 还在为音乐配上精准的LRC歌词而烦恼吗?歌词…...

光纤链路故障排查:从指示灯误导到光功率测量的工程实践
1. 项目概述:一个关于“指示灯谎言”的工程教训在电子工程和测试测量领域,我们习惯于依赖设备上的指示灯——那些绿色、红色或琥珀色的小灯——来快速判断系统状态。它们是我们与复杂硬件对话的直观语言。然而,今天我想分享一个十多年前的真实…...

Easydict:基于Raycast的智能翻译与查词插件,提升开发效率
1. 项目概述:一个为效率而生的翻译与查词工具如果你和我一样,是个常年和外语资料打交道的程序员、学生或研究者,那么“查词”和“翻译”这两件事,大概率是你工作流里最频繁、也最容易被中断的环节。传统的操作路径是什么ÿ…...