【NLP自然语言处理】基于BERT实现文本情感分类
Bert概述
BERT(Bidirectional Encoder Representations from Transformers)是一种深度学习模型,用于自然语言处理(NLP)任务。BERT的核心是由一种强大的神经网络架构——Transformer驱动的。这种架构包含了一种称为自注意力的机制,使BERT能够根据上下文(前后文)来衡量每个词的重要性。这种上下文感知赋予BERT生成上下文化词嵌入的能力,即考虑句子中词义的词表示。这就像BERT反复阅读句子以深入理解每个词的作用。
BERT的训练方式有两种:Masked Language Model和Next Sentence Prediction。参考这里
基于BERT实现文本情感分类
所谓情感分类就是指判断句子是积极情感还是消极情感,例如说“今天这顿饭太美味了”是积极的情感,“今天这顿饭简直吃不下去”是消极的情感。
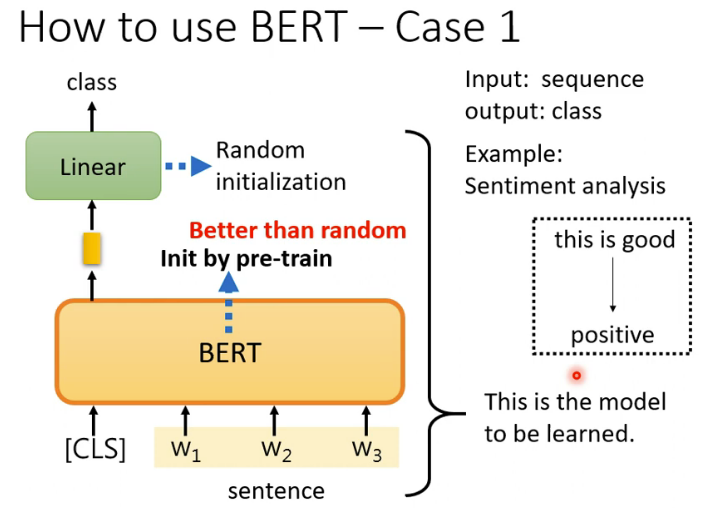
基于BERT完成情感分类的基本思路如图所示。我们知道BERT是一个预训练模型,我们把句子扔给它的时候,它对应每个字都会输出一个向量。但是在把句子扔给BERT之前,我们会在句子最前面增加一个特殊符号[CLS]。对应这个[CLS],BERT也会输出一个向量,我们就是利用这个向量来进行情感分类。为什么可以直接利用这个向量呢?这是因为BERT内部采用的是自注意力机制,自注意力机制的特点是考虑全局又聚焦重点,实际上[CLS]对应的向量已经嵌入了整个句子的信息,而且重点词字嵌入的信息权重要大。所以,我们将这个向量扔给一个全连接层,就可以完成分类任务了。参考这里
代码
数据预处理
数据集的下载,提取码为zfh3
import pandas as pd
import os
import logginglogging.basicConfig(format='%(asctime)s - %(levelname)s - %(name)s -   %(message)s',datefmt='%m/%d/%Y %H:%M:%S',level=logging.INFO)
logger = logging.getLogger(__name__)class InputExample(object):"""A single training/test example for simple sequence classification."""def __init__(self, text, label=None):self.text = textself.label = labelclass InputFeatures(object):"""A single set of features of data."""def __init__(self, input_ids, input_mask, segment_ids, label_id):self.input_ids = input_idsself.input_mask = input_maskself.segment_ids = segment_idsself.label_id = label_idclass DataProcessor(object):"""Base class for data converters for sequence classification data sets."""def get_train_examples(self, data_dir):"""Gets a collection of `InputExample`s for the train set."""raise NotImplementedError()def get_dev_examples(self, data_dir):"""Gets a collection of `InputExample`s for the dev set."""raise NotImplementedError()def get_test_examples(self, data_dir):"""Gets a collection of `InputExample`s for the test set."""raise NotImplementedError()def get_labels(self):"""Gets the list of labels for this data set."""raise NotImplementedError()@classmethoddef _read_csv(cls, input_file, quotechar=None):"""Reads a tab separated value file."""# dicts = []data = pd.read_csv(input_file)return dataclass MyPro(DataProcessor):'''自定义数据读取方法,针对json文件Returns:examples: 数据集,包含index、中文文本、类别三个部分'''def get_train_examples(self, data_dir):return self._create_examples(self._read_csv(os.path.join(data_dir, 'train_data.csv')), 'train')def get_dev_examples(self, data_dir):return self._create_examples(self._read_csv(os.path.join(data_dir, 'dev_data.csv')), 'dev')def get_test_examples(self, data_dir):return self._create_examples(self._read_csv(os.path.join(data_dir, 'test_data.csv')), 'test')def get_labels(self):return [0, 1]def _create_examples(self, data, set_type):examples = []for index, row in data.iterrows():# guid = "%s-%s" % (set_type, i)text = row['review']label = row['label']examples.append(InputExample(text=text, label=label))return examplesdef convert_examples_to_features(examples, label_list, max_seq_length, tokenizer, show_exp=True):'''Loads a data file into a list of `InputBatch`s.Args:examples      : [List] 输入样本,句子和labellabel_list    : [List] 所有可能的类别,0和1max_seq_length: [int] 文本最大长度tokenizer     : [Method] 分词方法Returns:features:input_ids  : [ListOf] token的id,在chinese模式中就是每个分词的id,对应一个word vectorinput_mask : [ListOfInt] 真实字符对应1,补全字符对应0segment_ids: [ListOfInt] 句子标识符,第一句全为0,第二句全为1label_id   : [ListOfInt] 将Label_list转化为相应的id表示'''label_map = {}for (i, label) in enumerate(label_list):label_map[label] = ifeatures = []for (ex_index, example) in enumerate(examples):# 分词tokens = tokenizer.tokenize(example.text)# tokens进行编码encode_dict = tokenizer.encode_plus(text=tokens,max_length=max_seq_length,pad_to_max_length=True,is_pretokenized=True,return_token_type_ids=True,return_attention_mask=True)input_ids = encode_dict['input_ids']input_mask = encode_dict['attention_mask']segment_ids = encode_dict['token_type_ids']assert len(input_ids) == max_seq_lengthassert len(input_mask) == max_seq_lengthassert len(segment_ids) == max_seq_lengthlabel_id = label_map[example.label]if ex_index < 5 and show_exp:logger.info("*** Example ***")logger.info("tokens: %s" % " ".join([str(x) for x in tokens]))logger.info("input_ids: %s" % " ".join([str(x) for x in input_ids]))logger.info("input_mask: %s" % " ".join([str(x) for x in input_mask]))logger.info("segment_ids: %s" % " ".join([str(x) for x in segment_ids]))logger.info("label: %s (id = %d)" % (example.label, label_id))features.append(InputFeatures(input_ids=input_ids,input_mask=input_mask,segment_ids=segment_ids,label_id=label_id))return features
如何理解?
将原始文本数据通过分词、编码等步骤转换为模型训练所需的格式,包括input_ids(编码后的token)、input_mask(注意力掩码)和segment_ids(token类型ids)。这些数据将作为模型的输入。
假设我们有一个文本示例,并且我们使用BERT分词器进行预处理。以下是示例文本和初始化分词器的代码:
from transformers import BertTokenizer# 示例文本
text = "Hello, how are you?"# 初始化BERT分词器
tokenizer = BertTokenizer.from_pretrained('bert-base-uncased')# 假设最大序列长度为10
max_seq_length = 10
接下来,我们将通过上面的代码片段对文本进行预处理:
# 假设我们的examples是一个包含单个文本的列表
examples = [{'text': text}]# 遍历示例列表
for (ex_index, example) in enumerate(examples):# 分词tokens = tokenizer.tokenize(example['text'])# tokens进行编码encode_dict = tokenizer.encode_plus(text=tokens,max_length=max_seq_length,pad_to_max_length=True,is_pretokenized=True,return_token_type_ids=True,return_attention_mask=True)input_ids = encode_dict['input_ids']input_mask = encode_dict['attention_mask']segment_ids = encode_dict['token_type_ids']# 打印结果print(f"Example {ex_index}")print(f"Tokens: {tokens}")print(f"Input IDs: {input_ids}")print(f"Input Mask: {input_mask}")print(f"Segment IDs: {segment_ids}")
执行上述代码后,我们将得到以下输出(输出可能会根据BERT模型的版本和分词器设置略有不同):
Example 0
Tokens: ['Hello', ',', 'how', 'are', 'you', '?']
Input IDs: [101, 7592, 1010, 2129, 2026, 102, 0, 0, 0, 0]
Input Mask: [1, 1, 1, 1, 1, 1, 0, 0, 0, 0]
Segment IDs: [0, 0, 0, 0, 0, 0, 0, 0, 0, 0]
解释输出:
- Tokens: 这是分词后的结果,原始文本被拆分为BERT模型可以理解的token。
- Input IDs: 每个token被转换为一个唯一的整数ID,表示其在词汇表中的位置。
- Input Mask: 表示哪些位置是真正的token(1),哪些位置是填充的(0)。在这个例子中,填充的部分是最后四个0。
- Segment IDs: 由于我们只有一个句子,所以所有token的segment ID都是0。如果文本包含多个句子,第二个句子的token将有一个不同的segment ID(通常是1)。
数据处理成dataSet
import torch
from torch.utils.data import Datasetclass MyDataset(Dataset):def __init__(self, features, mode):self.nums = len(features)self.input_ids = [torch.tensor(example.input_ids).long() for example in features]self.input_mask = [torch.tensor(example.input_mask).float() for example in features]self.segment_ids = [torch.tensor(example.segment_ids).long() for example in features]self.label_id = Noneif mode == 'train' or 'test':self.label_id = [torch.tensor(example.label_id) for example in features]def __getitem__(self, index):data = {'input_ids': self.input_ids[index],'input_mask': self.input_mask[index],'segment_ids': self.segment_ids[index]}if self.label_id is not None:data['label_id'] = self.label_id[index]return datadef __len__(self):return self.nums
模型的搭建
from torch import nn
import os
from transformers import BertModelclass ClassifierModel(nn.Module):def __init__(self,bert_dir,dropout_prob=0.1):super(ClassifierModel, self).__init__()config_path = os.path.join(bert_dir, 'config.json')assert os.path.exists(bert_dir) and os.path.exists(config_path), \'pretrained bert file does not exist'self.bert_module = BertModel.from_pretrained(bert_dir)self.bert_config = self.bert_module.configself.dropout_layer = nn.Dropout(dropout_prob)out_dims = self.bert_config.hidden_sizeself.obj_classifier = nn.Linear(out_dims, 2)def forward(self,input_ids,input_mask,segment_ids,label_id=None):bert_outputs = self.bert_module(input_ids=input_ids,attention_mask=input_mask,token_type_ids=segment_ids)seq_out, pooled_out = bert_outputs[0], bert_outputs[1]#对反向传播及逆行截断x = pooled_out.detach()out = self.obj_classifier(x)return out
模型的训练
BERT是一个预训练模型,我们把句子扔给它的时候,它对应每个字都会输出一个向量。【下载Bert模型==>操作手册】
from torch.utils.data import DataLoader
from torch.utils.tensorboard import SummaryWriter
from model import *
from dataset import *
from dataProcessor import *
import matplotlib.pyplot as plt
import time
from transformers import BertTokenizer
from transformers import logginglogging.set_verbosity_warning()
# 加载训练数据
datadir = "data"
bert_dir = "bert\\bert-chinese"
my_processor = MyPro()
label_list = my_processor.get_labels()train_data = my_processor.get_train_examples(datadir)
test_data = my_processor.get_test_examples(datadir)tokenizer = BertTokenizer.from_pretrained(bert_dir)train_features = convert_examples_to_features(train_data, label_list, 128, tokenizer)
test_features = convert_examples_to_features(test_data, label_list, 128, tokenizer)
train_dataset = MyDataset(train_features, 'train')
test_dataset = MyDataset(test_features, 'test')
train_data_loader = DataLoader(dataset=train_dataset, batch_size=64, shuffle=True)
test_data_loader = DataLoader(dataset=test_dataset, batch_size=64, shuffle=True)train_data_len = len(train_dataset)
test_data_len = len(test_dataset)
print(f"训练集长度:{train_data_len}")
print(f"测试集长度:{test_data_len}")# 创建网络模型
my_model = ClassifierModel(bert_dir)# 损失函数
loss_fn = nn.CrossEntropyLoss()# 优化器
learning_rate = 5e-3
#optimizer = torch.optim.SGD(my_model.parameters(), lr=learning_rate)
#  Adam 参数betas=(0.9, 0.99)
optimizer = torch.optim.Adam(my_model.parameters(), lr=learning_rate, betas=(0.9, 0.99))
# 总共的训练步数
total_train_step = 0
# 总共的测试步数
total_test_step = 0
step = 0
epoch = 50train_loss_his = []
train_totalaccuracy_his = []
test_totalloss_his = []
test_totalaccuracy_his = []
start_time = time.time()
my_model.train()
for i in range(epoch):print(f"-------第{i}轮训练开始-------")train_total_accuracy = 0for step, batch_data in enumerate(train_data_loader):# writer.add_images("tarin_data", imgs, total_train_step)print(batch_data['input_ids'].shape)output = my_model(**batch_data)loss = loss_fn(output, batch_data['label_id'])train_accuracy = (output.argmax(1) == batch_data['label_id']).sum()train_total_accuracy = train_total_accuracy + train_accuracyoptimizer.zero_grad()loss.backward()optimizer.step()total_train_step = total_train_step + 1train_loss_his.append(loss)#writer.add_scalar("train_loss", loss.item(), total_train_step)train_total_accuracy = train_total_accuracy / train_data_lenprint(f"训练集上的准确率:{train_total_accuracy}")train_totalaccuracy_his.append(train_total_accuracy)# 测试开始total_test_loss = 0my_model.eval()test_total_accuracy = 0with torch.no_grad():for batch_data in test_data_loader:output = my_model(**batch_data)loss = loss_fn(output, batch_data['label_id'])total_test_loss = total_test_loss + losstest_accuracy = (output.argmax(1) == batch_data['label_id']).sum()test_total_accuracy = test_total_accuracy + test_accuracytest_total_accuracy = test_total_accuracy / test_data_lenprint(f"测试集上的准确率:{test_total_accuracy}")print(f"测试集上的loss:{total_test_loss}")test_totalloss_his.append(total_test_loss)test_totalaccuracy_his.append(test_total_accuracy)torch.save(my_model, "bert_{}.pth".format(i))print("模型已保存")
模型的预测
# 假设这是您的分词器和预处理函数
from torch.utils.data import DataLoader
from transformers import BertTokenizer
import torch
from dataProcessor import convert_examples_to_features, MyPro, InputExample
from dataset import MyDatasetbert_dir = "bert\\bert-chinese"
tokenizer = BertTokenizer.from_pretrained(bert_dir)my_processor = MyPro()
label_list = my_processor.get_labels()# 从键盘读取输入
input_text = input("请输入一句话来判断其情感:")# 创建一个InputExample对象
input_texts = InputExample(text=input_text, label=0)  # 假设0表示消极,1表示积极# 使用convert_examples_to_features函数处理输入语句
test_features = convert_examples_to_features([input_texts], label_list, 128, tokenizer)
test_dataset = MyDataset(test_features, 'test')
test_data_loader = DataLoader(dataset=test_dataset, batch_size=64, shuffle=True)# 加载模型
my_model = torch.load("bert_10.pth", map_location=torch.device('cpu'))
my_model.eval()
with torch.no_grad():for batch_data in test_data_loader:outputs = my_model(**batch_data)# 判断类别
if outputs.argmax().item() == 1:print("积极")
else:print("消极")
视频推荐
Bert模型和Transformer到底哪个更牛?
用BERT做下游任务的栗子
文章推荐
BERT与Transformer:深入比较两者的差异 (baidu.com)
BERT模型和Transformer模型之间有何关系?_bert和transformer的关系-CSDN博客
掌握BERT:从初学者到高级的自然语言处理(NLP)全面指南 - IcyFeather233 - 博客园 (cnblogs.com)
相关文章:
【NLP自然语言处理】基于BERT实现文本情感分类
Bert概述 BERT(Bidirectional Encoder Representations from Transformers)是一种深度学习模型,用于自然语言处理(NLP)任务。BERT的核心是由一种强大的神经网络架构——Transformer驱动的。这种架构包含了一种称为自注…...

CSS选择器(1)
以内部样式表编写CSS选择器,其主要编写在<head></head>元素里,通过<style></style>标签来定义内部样式表。 基本语法为: 选择器{ 声明块 } 声明块:是由一对大括号括起来,声明块中是一个一个的…...

Claude 3.5 Sonnet模型发布,对比ChatGPT4o孰强孰弱
Anthropic 这家生而为打击 OpenAI 安全问题的公司,正式发布了Claude 3.5 Sonnet模型! 用官网的话就是: 今天,我们推出了 Claude 3.5 Sonnet,这是我们即将推出的 Claude 3.5 型号系列中的第一个版本。Claude 3.5 Sonne…...

MySQL 分库分表
分表 分表 将表按照某种规则拆分成多个表。 分表的使用原因 当数据量超大的时候,B-Tree索引效果很变差。 垂直分区 切分原则:把不常用或存储内容比较多的字段分到新的表中可使表存储更多数据。 原因,Innodb主索引叶子节点存储着当前行的所有信…...
AutoMQ 社区双周精选第十二期(2024.06.29~2024.07.12)
本期概要 欢迎来到 AutoMQ 第十一期双周精选!在过去两周里,主干动态方面,AutoMQ 跟进了 Apache Kafka 3.4.x BUG 修复,并进行了CPU & GC 性能优化,另外,AutoBalancing 的 Reporter 和 Retriever 也将支…...

Web开发:<div>标签作用
div作用 介绍基本用法特点和用途样式化示例嵌套示例与其他标签的对比总结 介绍 在Web开发中,<div> 标签是一个通用的容器元素,用于将HTML文档中的内容分组。它是一个块级元素,通常用于布局目的,因为它可以包含其他块级元素…...

如何使用unittest框架来编写和运行单元测试
Python 的 unittest 框架是用于编写和运行可重复的测试的一个强大工具。它允许你定义测试用例、测试套件、测试运行器和测试固件(fixtures),从而系统化地测试你的代码。以下是如何使用 unittest 框架来编写和运行单元测试的基本步骤ÿ…...

2024最新超详细SpringMvc常用注解总结
SpringMVC常用注解 控制器(Controller)相关注解: 1.Controller Controller 注解用于标识一个类为 Spring MVC 的控制器,它能够处理用户的请求并返回相应的视图或数据。通常与 RequestMapping 注解一起使用,以定义请求…...
的基础知识)
Linux硬件中断(IRQ)的基础知识
目录 一、中断的概念1.1 什么是硬件中断1.2 中断类型二、中断处理的工作原理2.1 中断请求2.2 中断向量2.3 中断服务例程(ISR)2.4 上下文切换2.5 中断处理2.6 任务恢复三、中断处理的编程3.1 注册中断处理函数3.2 注销中断处理函数四、中断和系统性能4.1 中断风暴4.2 IRQ亲和性…...

DP讨论——适配器模式
学而时习之,温故而知新。 敌人出招(使用场景) 说是自己的程序对接第三方的库,但是自己的代码的接口设计完毕了,如何对接上? 你出招 适配器模式就是为此而生的——我觉得应该是该解决方法被命名为了适配…...

window下tqdm进度条
原代码是linux下运行,修改后可在window下运行。 #ifndef TQDM_H #define TQDM_H#include <chrono> #include <ctime> #include <numeric> #include <ios> #include <string> #include <cstdlib> #include <iostream> #i…...
记录些Redis题集(1)
Redis内存淘汰触发条件的相关配置如下: Redis通过配置项maxmemory来设定其允许使用的最大内存容量。当Redis实际占用的内存达到这一阈值时,将触发内存淘汰机制,开始删除部分数据以释放内存空间,防止服务因内存溢出而异常。 Redi…...

防火墙双机热备带宽管理综合实验
一、实验拓扑 二、实验要求 12,对现有网络进行改造升级,将当个防火墙组网改成双机热备的组网形式,做负载分担模式,游客区和DMZ区走FW3,生产区和办公区的流量走FW1 13,办公区上网用户限制流量不超过100M&am…...

【Redis】哨兵(sentinel)
文章目录 一、哨兵是什么?二、 哨兵sentinel文件参数三、 模仿主机redis宕机四、哨兵运行流程和选举原理SDOWN主观下线ODOWN客观下线 五、 使用建议 以下是本篇文章正文内容 一、哨兵是什么? 哨兵巡查监控后台master主机是否故障,如果故障了…...
2024年高职云计算实验室建设及云计算实训平台整体解决方案
随着云计算技术的飞速发展,高职院校亟需构建一个与行业需求紧密结合的云计算实验室和实训平台。以下是针对2024年高职院校云计算实验室建设的全面解决方案。 1、在高职云计算实验室的建设与规划中,首要任务是立足于云计算学科的精准定位,紧密…...
入门实战篇,利用PADS Layout画电阻电容电感的封装
大家好,我是山羊君Goat。 不管怎么设计,怎么学习硬件知识,都需要实战,硬件工程师设计PCB是必不可少的(大部分来说),本篇主要从最基本的电阻电容电感的PCB设计封装来说起,算是最基础…...

解决npm install 安装报错记录贴
前言 环境背景 nodeJS v.14.8.3(nvm安装) package.json: “node-sass”:“8.0.0” 网络环境: 公司内网 镜像地址:公司的镜像源 解决报错过程: 1.换了最新版 vscode, 然后重装 node_modules 还是不行, 报PostCSS rec…...

CollectionUtils的使用
1、非空判断 判断集合是否为空 List<String>对象list,可以使用CollectionUtils中的isEmpty方法来判断list是否为空。代码如下 List<String> list new ArrayList<>(); boolean isEmpty CollectionUtils.isEmpty(list); System.out.println(is…...
WEB前端03-CSS3基础
CSS3基础 1.CSS基本概念 CSS是Cascading Style Sheets(层叠样式表)的缩写,它是一种对Web文档添加样式的简单机制,是一种表现HTML或XML等文件外观样式的计算机语言,是一种网页排版和布局设计的技术。 CSS的特点 纯C…...

【java深入学习第7章】用 Spring Boot 和 Java Mail 轻松实现邮件发送功能
引言 在现代的企业应用中,邮件发送是一个非常常见的功能。无论是用户注册后的验证邮件,还是系统通知邮件,邮件服务都扮演着重要的角色。本文将介绍如何在Spring Boot项目中整合Java Mail,实现发送邮件的功能。 一、准备工作 在…...
)
不止于箱线图:用TCGA泛癌配对样本数据,画出更高级的基因表达点线图(附完整R代码)
超越箱线图:TCGA泛癌配对样本数据的高级可视化实战指南 在生物信息学研究中,TCGA泛癌数据一直是探索癌症分子特征的宝贵资源。然而,大多数分析停留在简单的组间比较,使用箱线图展示基因表达差异,忽略了数据中更精细的模…...

随机森林在精准农业中的落地实践:地理空间建模与田间部署
1. 项目概述:当随机森林遇上农田里的厘米级变量在华北平原某农场的冬小麦田里,我第一次用随机森林模型预测氮肥施用量时,手里的无人机刚飞完第三圈,地面传感器网络正把土壤电导率、含水量、温度的实时数据推送到边缘计算节点。这不…...
)
构图不是靠感觉!用Fitts定律+格式塔原理验证的Midjourney 6大构图公式(附Python自动构图评分脚本)
更多请点击: https://kaifayun.com 第一章:构图不是靠感觉!用Fitts定律格式塔原理验证的Midjourney 6大构图公式(附Python自动构图评分脚本) 构图绝非主观直觉,而是可量化、可验证的视觉认知工程。我们基于…...

iTorrent完整指南:如何在iPhone上实现专业级种子下载管理
iTorrent完整指南:如何在iPhone上实现专业级种子下载管理 【免费下载链接】iTorrent Torrent client for iOS 16 项目地址: https://gitcode.com/gh_mirrors/it/iTorrent iTorrent是一款专为iOS 16设备设计的专业种子客户端应用,让你能够在iPhone…...

离子阱量子变分算法原理与优化实践
1. 离子原生量子变分算法解析在量子计算领域,变分量子算法(VQA)已成为解决组合优化问题的主流方法。这类算法的核心在于设计高效的参数化量子线路(ansatz),而传统方法通常依赖于大量纠缠门的组合。离子阱量…...

技术选型翻车实录:我们选的那个框架,两年后停止维护了
一、惊魂一刻:框架停更的暴击“紧急通知,我们一直使用的XX测试框架将于本月底停止维护!”当这条消息出现在团队工作群时,整个测试部瞬间陷入死寂。作为一家中型电商企业的测试负责人,我清楚地知道,这个框架…...

远程办公远控软件怎么选?ToDesk、向日葵、UU远程深度对比
远程办公远控软件怎么选?ToDesk、向日葵、UU远程深度对比远程办公这件事,现在很多人已经习惯了。但很多人忽略了一个问题——远程办公体验好不好,很大程度上取决于你用的远控软件怎么样。我之前帮公司选远控工具的时候,认真把市面…...

Captain AI:Ozon俄文内容本地化,打破语言壁垒,贴合本土需求
俄文内容本地化是Ozon商家立足俄罗斯市场的核心前提,Ozon平台95%以上的用户为俄语母语者,纯中文或机翻的内容不仅会导致搜索曝光降低,还可能因语言错误引发合规风险、影响买家信任。然而,国内商家普遍面临“俄语专业人才短缺、机翻…...

终极指南:如何用AhabAssistantLimbusCompany彻底解放《Limbus Company》游戏时间
终极指南:如何用AhabAssistantLimbusCompany彻底解放《Limbus Company》游戏时间 【免费下载链接】AhabAssistantLimbusCompany AALC,PC端Limbus Company小助手。AALC,Limbus Company Assistant on PC 项目地址: https://gitcode.com/gh_mi…...

VLA已死,WAM当立:机器人的GPT时刻到了吗?
就在刚刚过去的4月底,红杉资本举办的AI Ascent 2026大会上,英伟达机器人方向负责人Jim Fan抛出了一个极具争议的论断:“视觉语言模型VLA已死,世界动作模型WAM当立。”他还预测,未来一到两年内,机器人学习的…...