Android 10.0 Launcher 启动流程
在前面SystemUI启动流程中说到,在SystemServer中会去启动各种系统服务,这里的launcher也是启动的其中一个服务ActivityManagerService去启动的。在android10之前,系统四大组件的启动都是在ActivityManagerService中,在android10中,单独抽出了一个ActivityTaskManagerService,主要负责Activity的管理和调度。这里先来看下ActivityManagerService服务的启动:
frameworks/base/services/java/com/android/server/SystemServer.java
private void startBootstrapServices() {... ...// Activity manager runs the show.traceBeginAndSlog("StartActivityManager");// TODO: Might need to move after migration to WM.ActivityTaskManagerService atm = mSystemServiceManager.startService(ActivityTaskManagerService.Lifecycle.class).getService();mActivityManagerService = ActivityManagerService.Lifecycle.startService(mSystemServiceManager, atm);mActivityManagerService.setSystemServiceManager(mSystemServiceManager);mActivityManagerService.setInstaller(installer);mWindowManagerGlobalLock = atm.getGlobalLock();traceEnd();... ...
}
当SystemServiceManager调用 startService() 时,就会通过反射去创建传进去的class,然后在调用创建对象的 onStart() 方法,这里就是去初始化ActivityTaskManagerService和ActivityManagerService对象,并不会去启动launcher,而且系统服务启动分为三块:
frameworks/base/services/java/com/android/server/SystemServer.java
startBootstrapServices();   // 启动引导服务
startCoreServices();        // 启动核心服务
startOtherServices();       // 启动其他服务
在startOtherServices()中可以看到:
frameworks/base/services/java/com/android/server/SystemServer.java
private void startOtherServices() {... ...// We now tell the activity manager it is okay to run third party// code.  It will call back into us once it has gotten to the state// where third party code can really run (but before it has actually// started launching the initial applications), for us to complete our// initialization.mActivityManagerService.systemReady(() -> {... ...});
}
这就说明在所有服务初始化完成后,在这里会通知ActivityManagerService的systemReady()启动 launcher 的进程。
下面一起来看 launcher 是如何被启动起来的:
frameworks/base/services/core/java/com/android/server/am/ActivityManagerService.java
public void systemReady(final Runnable goingCallback, TimingsTraceLog traceLog) {... ...mAtmInternal.startHomeOnAllDisplays(currentUserId, "systemReady");... ...mAtmInternal.resumeTopActivities(false /* scheduleIdle */);... ...
}
mAtmInternal类型是ActivityTaskManagerInternal,这是一个抽象类,其实现是ActivityTaskManagerService的内部类LocalService:
frameworks/base/services/core/java/com/android/server/wm/ActivityTaskManagerService.java
final class LocalService extends ActivityTaskManagerInternal {... ...@Overridepublic boolean startHomeOnAllDisplays(int userId, String reason) {synchronized (mGlobalLock) {return mRootActivityContainer.startHomeOnAllDisplays(userId, reason);}}... ...@Overridepublic void resumeTopActivities(boolean scheduleIdle){synchronized (mGlobalLock){mRootActivityContainer.resumeFocusedStacksTopActivities();if(scheduleIdle){mStackSupervisor.scheduleIdleLocked();}}}... ...
}
这里的mRootActivityContainer类型是RootActivityContainer,按照文档上的说明,这是一个临时类,主要是将ActivityStackSupervisor.java中的一部分逻辑分离出来,在android11中,这个类就已经找不到了。替换成了RootWindowContainer,这里我们跟进 mRootActivityContainer.startHomeOnAllDisplays() 方法看,最终会调用到:startHomeOnDisplay() :
frameworks/base/services/core/java/com/android/server/wm/RootActivityContainer.java
boolean startHomeOnDisplay(int userId,String reason,int displayId,boolean allowInstrumenting,boolean fromHomeKey){// Fallback to top focused display if the displayId is invalid.if(displayId==INVALID_DISPLAY){displayId=getTopDisplayFocusedStack().mDisplayId;}Intent homeIntent=null;ActivityInfo aInfo=null;if(displayId==DEFAULT_DISPLAY){//拿到需要启动launcher的intent,通过resolveHomeActivity解析出需要启动的ActivityhomeIntent=mService.getHomeIntent();aInfo=resolveHomeActivity(userId,homeIntent);}else if(shouldPlaceSecondaryHomeOnDisplay(displayId)){Pair<ActivityInfo, Intent> info=resolveSecondaryHomeActivity(userId,displayId);aInfo=info.first;homeIntent=info.second;}if(aInfo==null||homeIntent==null){return false;}if(!canStartHomeOnDisplay(aInfo,displayId,allowInstrumenting)){return false;}// Updates the home component of the intent.homeIntent.setComponent(new ComponentName(aInfo.applicationInfo.packageName,aInfo.name));homeIntent.setFlags(homeIntent.getFlags()|FLAG_ACTIVITY_NEW_TASK);// Updates the extra information of the intent.if(fromHomeKey){homeIntent.putExtra(WindowManagerPolicy.EXTRA_FROM_HOME_KEY,true);}// Update the reason for ANR debugging to verify if the user activity is the one that// actually launched.final String myReason=reason+":"+userId+":"+UserHandle.getUserId(aInfo.applicationInfo.uid)+":"+displayId;mService.getActivityStartController().startHomeActivity(homeIntent,aInfo,myReason,displayId);return true;
}
这里可以分为两步看:
1、通过ActivityTaskManagerService的getHomeIntent()获取到需要启动的intent,在通过resolveHomeActivity()解析出需要启动Activity的信息,
2、mService.getActivityStartController()获取到的是ActivityStartController,这个类的主要作用是用于控制委派启动的Activity。
先来看下ActivityTaskManagerService的getHomeIntent() :
frameworks/base/services/core/java/com/android/server/wm/ActivityTaskManagerService.java
Intent getHomeIntent() {Intent intent = new Intent(mTopAction, mTopData != null ? Uri.parse(mTopData) : null);intent.setComponent(mTopComponent);intent.addFlags(Intent.FLAG_DEBUG_TRIAGED_MISSING);if (mFactoryTest != FactoryTest.FACTORY_TEST_LOW_LEVEL) {intent.addCategory(Intent.CATEGORY_HOME);}return intent;}
注意看 intent.addCategory(Intent.CATEGORY_HOME) ,这个代表的就是要启动Activity的意图,通常来说,整个系统的只会有一个应用会在清单文件中配置CATEGORY_HOME,如果配置了多个,系统在启动的时候就会要求用户手动去选择哪个作为启动应用,如果在系统设置应用中进行配置了,就会选择配置的那个应用启动。(这个 CATEGORY_HOME 配置,说白了就只有 launcher 程序才会有)。
回到主线,接着看mService.getActivityStartController().startHomeActivity() :
frameworks/base/services/core/java/com/android/server/wm/ActivityStartController.java
void startHomeActivity(Intent intent, ActivityInfo aInfo, String reason,TaskDisplayArea taskDisplayArea) {final ActivityOptions options = ActivityOptions.makeBasic();options.setLaunchWindowingMode(WINDOWING_MODE_FULLSCREEN);if (!ActivityRecord.isResolverActivity(aInfo.name)) {// The resolver activity shouldn't be put in home stack because when the foreground is// standard type activity, the resolver activity should be put on the top of current// foreground instead of bring home stack to front.options.setLaunchActivityType(ACTIVITY_TYPE_HOME);}final int displayId = taskDisplayArea.getDisplayId();options.setLaunchDisplayId(displayId);options.setLaunchTaskDisplayArea(taskDisplayArea.mRemoteToken.toWindowContainerToken());// The home activity will be started later, defer resuming to avoid unneccerary operations// (e.g. start home recursively) when creating home stack.mSupervisor.beginDeferResume();final ActivityStack homeStack;try {// Make sure home stack exists on display area.homeStack = taskDisplayArea.getOrCreateRootHomeTask(ON_TOP);} finally {mSupervisor.endDeferResume();}mLastHomeActivityStartResult = obtainStarter(intent, "startHomeActivity: " + reason).setOutActivity(tmpOutRecord).setCallingUid(0).setActivityInfo(aInfo).setActivityOptions(options.toBundle()).execute();mLastHomeActivityStartRecord = tmpOutRecord[0];if (homeStack.mInResumeTopActivity) {// If we are in resume section already, home activity will be initialized, but not// resumed (to avoid recursive resume) and will stay that way until something pokes it// again. We need to schedule another resume.mSupervisor.scheduleResumeTopActivities();}}/*** @return A starter to configure and execute starting an activity. It is valid until after* {@link ActivityStarter#execute} is invoked. At that point, the starter should be* considered invalid and no longer modified or used.*/ActivityStarter obtainStarter(Intent intent, String reason) {return mFactory.obtain().setIntent(intent).setReason(reason);}
这里主要是先获取一个ActivityStarter(主要用于启动Activity),然后把需要的参数设置进去,最后再调用它的ActivityStarter.execute()方法:
frameworks/base/services/core/java/com/android/server/wm/ActivityStarter.java
int execute() {try {... ...final LaunchingState launchingState;synchronized (mService.mGlobalLock) {final ActivityRecord caller = ActivityRecord.forTokenLocked(mRequest.resultTo);// 通过ActivityMetricsLogger.notifyActivityLaunching创建LaunchingState并记录创建Activity开始的时间launchingState = mSupervisor.getActivityMetricsLogger().notifyActivityLaunching(mRequest.intent, caller);}... ...// 执行启动请求res = executeRequest(mRequest);... ...// Notify ActivityMetricsLogger that the activity has launched.// ActivityMetricsLogger will then wait for the windows to be drawn and populate// WaitResult.// 通过ActivityMetricsLogger.notifyActivityLaunched记录Activity启动完成的时间mSupervisor.getActivityMetricsLogger().notifyActivityLaunched(launchingState, res,mLastStartActivityRecord);// 同时将Request.waitResult添加到ActivityStackSupervisor的mWaitingActivityLaunched中,等待窗口绘制完成return getExternalResult(mRequest.waitResult == null ? res: waitForResult(res, mLastStartActivityRecord)); } finally {onExecutionComplete();}}
通过上面代码我们知道,启动是在 executeRequest() 方法里:
frameworks/base/services/core/java/com/android/server/wm/ActivityStarter.java
private int executeRequest(Request request) {... ...//调用 startActivityUncheckedmLastStartActivityResult = startActivityUnchecked(r, sourceRecord, voiceSession,request.voiceInteractor, startFlags, true /* doResume */, checkedOptions, inTask,restrictedBgActivity, intentGrants);return mLastStartActivityResult;}
ActivityStarter.startActivityUnchecked()
frameworks/base/services/core/java/com/android/server/wm/ActivityStarter.java
private int startActivityUnchecked(final ActivityRecord r, ActivityRecord sourceRecord,IVoiceInteractionSession voiceSession, IVoiceInteractor voiceInteractor,int startFlags, boolean doResume, ActivityOptions options, Task inTask,boolean restrictedBgActivity, NeededUriGrants intentGrants) {int result = START_CANCELED;... ...try {//延时布局mService.deferWindowLayout();//执行startActivityInnerresult = startActivityInner(r, sourceRecord, voiceSession, voiceInteractor,startFlags, doResume, options, inTask, restrictedBgActivity, intentGrants);} finally {//恢复布局mService.continueWindowLayout();}... ...return result;}
ActivityStarter.startActivityInner()
frameworks/base/services/core/java/com/android/server/wm/ActivityStarter.java
int startActivityInner() { ... ...if (mDoResume) {//ActivityRecord 记录着 Activity 信息final ActivityRecord topTaskActivity =mStartActivity.getTask().topRunningActivityLocked();if (!mTargetStack.isTopActivityFocusable()|| (topTaskActivity != null && topTaskActivity.isTaskOverlay()&& mStartActivity != topTaskActivity)) {mTargetStack.getDisplay().mDisplayContent.executeAppTransition();} else {//执行resumeFocusedStacksTopActivitiesmRootWindowContainer.resumeFocusedStacksTopActivities(mTargetStack, mStartActivity, mOptions);}}... ...return START_SUCCESS;}
RootWindowContainer.resumeFocusedStacksTopActivities()
frameworks/base/services/core/java/com/android/server/wm/RootWindowContainer.java
boolean resumeFocusedStacksTopActivities(ActivityStack targetStack, ActivityRecord target, ActivityOptions targetOptions) {... ...//如果是栈顶Activity,启动resumeTopActivityUncheckedLockedif (targetStack != null && (targetStack.isTopStackInDisplayArea()|| getTopDisplayFocusedStack() == targetStack)) {result = targetStack.resumeTopActivityUncheckedLocked(target, targetOptions);}... ...if (!resumedOnDisplay) {//获取栈顶的 ActivityRecordfinal ActivityStack focusedStack = display.getFocusedStack();if (focusedStack != null) {//执行resumeTopActivityUncheckedLockedresult |= focusedStack.resumeTopActivityUncheckedLocked(target, targetOptions);}else if (targetStack == null) {result |= resumeHomeActivity(null /* prev */, "no-focusable-task",display.getDefaultTaskDisplayArea());}}return result;
}
ActivityStack.resumeTopActivityUncheckedLocked()
frameworks/base/services/core/java/com/android/server/wm/ActivityStack.java
boolean resumeTopActivityUncheckedLocked(ActivityRecord prev, ActivityOptions options) {if (mInResumeTopActivity) {// Don't even start recursing.return false;}boolean result = false;try {mInResumeTopActivity = true;// 执行 resumeTopActivityInnerLocked,// 最终调用到 ActivityStackSupervisor.startSpecificActivity()result = resumeTopActivityInnerLocked(prev, options);final ActivityRecord next = topRunningActivity(true /* focusableOnly */);if (next == null || !next.canTurnScreenOn()) {checkReadyForSleep();}} finally {mInResumeTopActivity = false;}return result;}
ActivityStackSupervisor.startSpecificActivity()
frameworks/base/services/core/java/com/android/server/wm/ActivityStackSupervisor.java
void startSpecificActivity(ActivityRecord r, boolean andResume, boolean checkConfig) {// Is this activity's application already running?final WindowProcessController wpc =mService.getProcessController(r.processName, r.info.applicationInfo.uid);boolean knownToBeDead = false;//进程存在if (wpc != null && wpc.hasThread()) {try {//真正启动Activity方法realStartActivityLocked(r, wpc, andResume, checkConfig);return;} catch (RemoteException e) {Slog.w(TAG, "Exception when starting activity "+ r.intent.getComponent().flattenToShortString(), e);}// If a dead object exception was thrown -- fall through to// restart the application.knownToBeDead = true;}r.notifyUnknownVisibilityLaunchedForKeyguardTransition();final boolean isTop = andResume && r.isTopRunningActivity();//进程不存在 mService =ATMSmService.startProcessAsync(r, knownToBeDead, isTop, isTop ? "top-activity" : "activity");}
startSpecificActivity() 这个方法是关键方法,如果进程已经存在直接执行 realStartActivityLocked 去启动 Activity,进程不存在则通过AMS去创建 Socket,然后通知 Zygote 去 fork 进程。由于这里第一次创建,所以会走到 startProcessAsync() 。
Launcher启动流程调用栈:

创建Socket建立连接
ActivityTaskManagerService.startProcessAsync()
frameworks/base/services/core/java/com/android/server/wm/ActivityTaskManagerService.java
void startProcessAsync(ActivityRecord activity, boolean knownToBeDead, boolean isTop,String hostingType) {try {if (Trace.isTagEnabled(TRACE_TAG_WINDOW_MANAGER)) {Trace.traceBegin(TRACE_TAG_WINDOW_MANAGER, "dispatchingStartProcess:"+ activity.processName);}// Post message to start process to avoid possible deadlock of calling into AMS with the// ATMS lock held.final Message m = PooledLambda.obtainMessage(ActivityManagerInternal::startProcess,mAmInternal, activity.processName, activity.info.applicationInfo, knownToBeDead,isTop, hostingType, activity.intent.getComponent());mH.sendMessage(m);} finally {Trace.traceEnd(TRACE_TAG_WINDOW_MANAGER);}}
通过handler发消息执行ActivityManagerInternal.startProcess() ,内部又转调用ActivityManagerService.startProcessLocked() :
frameworks/base/services/core/java/com/android/server/am/ActivityManagerService.java
@GuardedBy("this")
final ProcessRecord startProcessLocked(String processName,ApplicationInfo info, boolean knownToBeDead, int intentFlags,HostingRecord hostingRecord, int zygotePolicyFlags, boolean allowWhileBooting,boolean isolated, boolean keepIfLarge) {return mProcessList.startProcessLocked(processName, info, knownToBeDead, intentFlags,hostingRecord, zygotePolicyFlags, allowWhileBooting, isolated, 0 /* isolatedUid */,keepIfLarge, null /* ABI override */, null /* entryPoint */,null /* entryPointArgs */, null /* crashHandler */);
}
mProcessList类型是ProcessList,这是一个进程管理类,描述了进程的adj值,当系统资源吃紧时,就会根据这里描述的adj去判断杀死哪个应用来释放资源,可以通过adb shell dumpsys meminfo来查看当前所有进程的分类情况,接着来看下ProcessList.startProcessLocked():
frameworks/base/services/core/java/com/android/server/am/ProcessList.java
final ProcessRecord startProcessLocked(String processName, ApplicationInfo info,boolean knownToBeDead, int intentFlags, HostingRecord hostingRecord,boolean allowWhileBooting, boolean isolated, int isolatedUid, boolean keepIfLarge,String abiOverride, String entryPoint, String[] entryPointArgs, Runnable crashHandler) {ProcessRecord app;... ...checkSlow(startTime, "startProcess: stepping in to startProcess");final boolean success = startProcessLocked(app, hostingRecord, abiOverride);checkSlow(startTime, "startProcess: done starting proc!");return success ? app : null;}boolean startProcessLocked(ProcessRecord app, HostingRecord hostingRecord,boolean disableHiddenApiChecks, boolean mountExtStorageFull,String abiOverride) {... ...try {... ...// Start the process. It will either succeed and return a result containing// the PID of the new process, or else throw a RuntimeException.final String entryPoint = "android.app.ActivityThread";return startProcessLocked(hostingRecord, entryPoint, app, uid, gids,runtimeFlags, mountExternal, seInfo, requiredAbi, instructionSet, invokeWith,startTime);} catch (RuntimeException e) {Slog.e(ActivityManagerService.TAG, "Failure starting process " + app.processName, e);// Something went very wrong while trying to start this process; one// common case is when the package is frozen due to an active// upgrade. To recover, clean up any active bookkeeping related to// starting this process. (We already invoked this method once when// the package was initially frozen through KILL_APPLICATION_MSG, so// it doesn't hurt to use it again.)mService.forceStopPackageLocked(app.info.packageName, UserHandle.getAppId(app.uid),false, false, true, false, false, app.userId, "start failure");return false;}}boolean startProcessLocked(HostingRecord hostingRecord,String entryPoint,ProcessRecord app, int uid, int[] gids, int runtimeFlags, int mountExternal,String seInfo, String requiredAbi, String instructionSet, String invokeWith,long startTime) {... ...final Process.ProcessStartResult startResult = startProcess(app.hostingRecord,entryPoint, app, app.startUid, gids, runtimeFlags, mountExternal,app.seInfo, requiredAbi, instructionSet, invokeWith, app.startTime);... ...}private Process.ProcessStartResult startProcess(HostingRecord hostingRecord, String entryPoint,ProcessRecord app, int uid, int[] gids, int runtimeFlags, int mountExternal,String seInfo, String requiredAbi, String instructionSet, String invokeWith,long startTime) {try {Trace.traceBegin(Trace.TRACE_TAG_ACTIVITY_MANAGER, "Start proc: " +app.processName);checkSlow(startTime, "startProcess: asking zygote to start proc");final Process.ProcessStartResult startResult;if (hostingRecord.usesWebviewZygote()) {... ...} else if (hostingRecord.usesAppZygote()) {final AppZygote appZygote = createAppZygoteForProcessIfNeeded(app);startResult = appZygote.getProcess().start(entryPoint,app.processName, uid, uid, gids, runtimeFlags, mountExternal,app.info.targetSdkVersion, seInfo, requiredAbi, instructionSet,app.info.dataDir, null, app.info.packageName,/*useUsapPool=*/ false,new String[] {PROC_START_SEQ_IDENT + app.startSeq});} else {... ...}checkSlow(startTime, "startProcess: returned from zygote!");return startResult;} finally {Trace.traceEnd(Trace.TRACE_TAG_ACTIVITY_MANAGER);}}
这里有几个我们需要关注的点,一个是第二个方法定义的entryPoint=“android.app.ActivityThread”,这个就是后面创建进程时会通过反射调用到的类,再来看最后一个方法,这里会执行else if语句,也就是执行ZygoteProcess的start()方法。最终到 ZygoteProcess 的attemptUsapSendArgsAndGetResult 通过 Socket 通信,fork 一个新的 Launcher 进程,调用过程如图:

ZygoteProcess.attemptZygoteSendArgsAndGetResult()
frameworks/base/core/java/android/os/ZygoteProcess.java
private Process.ProcessStartResult attemptZygoteSendArgsAndGetResult(ZygoteState zygoteState, String msgStr) throws ZygoteStartFailedEx {try {final BufferedWriter zygoteWriter = zygoteState.mZygoteOutputWriter;final DataInputStream zygoteInputStream = zygoteState.mZygoteInputStream;zygoteWriter.write(msgStr);把应用进程的一些参数写给前面连接的zygote进程zygoteWriter.flush();//进入Zygote进程,处于阻塞状态//从socket中得到zygote创建的应用pid,赋值给 ProcessStartResult的对象Process.ProcessStartResult result = new Process.ProcessStartResult();result.pid = zygoteInputStream.readInt();result.usingWrapper = zygoteInputStream.readBoolean();return result;} catch (IOException ex) {zygoteState.close();}}
Zygote进程处理
ZygoteInit.main
frameworks/base/core/java/com/android/internal/os/ZygoteInit.java
public static void main(String argv[]) {Runnable caller;if (startSystemServer) {//Zygote Fork出的第一个进程 SystmeServerRunnable r = forkSystemServer(abiList, zygoteSocketName, zygoteServer);if (r != null) {r.run();return;}}//循环等待fork出其他的应用进程,比如Launchercaller = zygoteServer.runSelectLoop(abiList);...if (caller != null) {caller.run(); //执行runSelectLoop返回的Runnable对象,进入子进程}
}
ZygoteServer.runSelectLoop
frameworks/base/core/java/com/android/internal/os/ZygoteServer.java
Runnable runSelectLoop(String abiList) {while (true) {int pollReturnValue;try {//epoll机制 循环pollReturnValue = Os.poll(pollFDs, pollTimeoutMs);} catch (ErrnoException ex) {throw new RuntimeException("poll failed", ex);}...//来了消息后,调用processOneCommand()来进行进程的处理final Runnable command =  connection.processOneCommand(this);}
}
ZygoteConnection.processOneCommand
frameworks/base/core/java/com/android/internal/os/ZygoteConnection.java
Runnable processOneCommand(ZygoteServer zygoteServer) {//fork进程,得到新进程pid//pid=0 表示Zygote  fork子进程成功//pid > 0 表示子进程 的真正的PIDpid = Zygote.forkAndSpecialize(parsedArgs.mUid, parsedArgs.mGid, parsedArgs.mGids,parsedArgs.mRuntimeFlags, rlimits, parsedArgs.mMountExternal, parsedArgs.mSeInfo,parsedArgs.mNiceName, fdsToClose, fdsToIgnore, parsedArgs.mStartChildZygote,parsedArgs.mInstructionSet, parsedArgs.mAppDataDir, parsedArgs.mIsTopApp,parsedArgs.mPkgDataInfoList, parsedArgs.mWhitelistedDataInfoList,parsedArgs.mBindMountAppDataDirs, parsedArgs.mBindMountAppStorageDirs);try {//fork成功,第一次返回的pid = 0if (pid == 0) {return handleChildProc(parsedArgs, childPipeFd, parsedArgs.mStartChildZygote);} else {handleParentProc(pid, serverPipeFd);return null;}
}
ZygoteConnection.handleChildProc
这里主要执行到 ZygoteInit.zygoteInit,zygoteInit 进行一些环境的初始化、启动Binder进程等操作,最终反射执行 ActivityThread.main
frameworks/base/core/java/com/android/internal/os/ZygoteConnection.java
private Runnable handleChildProc(ZygoteArguments parsedArgs,FileDescriptor pipeFd, boolean isZygote) {closeSocket();Zygote.setAppProcessName(parsedArgs, TAG);if (!isZygote) {//App进程将会调用到这里,最终反射执行ActivityThread.mainreturn ZygoteInit.zygoteInit(parsedArgs.mTargetSdkVersion,parsedArgs.mDisabledCompatChanges,parsedArgs.mRemainingArgs, null /* classLoader */);} else {return ZygoteInit.childZygoteInit(parsedArgs.mTargetSdkVersion,parsedArgs.mRemainingArgs, null /* classLoader */);}}
Zygote进程调用栈:

ActivityThread中处理
Zygote fork出了 Launcher 的进程,并把接下来的 Launcher 启动任务交给了 ActivityThread 来进行,接下来我们就从 ActivityThread.main方法来分析 Launcher 的创建过程。
frameworks/base/core/java/android/app/ActivityThread.java
public static void main(String[] args) {Trace.traceBegin(Trace.TRACE_TAG_ACTIVITY_MANAGER, "ActivityThreadMain");... ...//创建主线程LooperLooper.prepareMainLooper();... ...ActivityThread thread = new ActivityThread();//执行attach... ...thread.attach(false, startSeq);//开启循环... ...Looper.loop();throw new RuntimeException("Main thread loop unexpectedly exited");}
这里就是android层面划分为一个应用进程的开始,初始化一个looper,也就是android中说的主线程,并开始looper循环,这里调用到了ActivitThread.attach() :
frameworks/base/core/java/android/app/ActivityThread.java
private void attach(boolean system, long startSeq) {sCurrentActivityThread = this;mSystemThread = system;if (!system) {... ...// 这里会拿到ActivityManagerService的代理final IActivityManager mgr = ActivityManager.getService();try {//应用的句柄发给AMS,从而使AMS可以管理新进程mgr.attachApplication(mAppThread, startSeq);} catch (RemoteException ex) {throw ex.rethrowFromSystemServer();}... ...} else {// 在前面讲Zygote进程的时候,里面创建ActivityThread就会执行到这里}//当系统配置发生变更时会执行这个回调ViewRootImpl.ConfigChangedCallback configChangedCallback= (Configuration globalConfig) -> {... ...};ViewRootImpl.addConfigCallback(configChangedCallback);}
这里会执行if语句里面的内容,mAppThread的类型是ApplicationThread,这个类的主要作用是在ActivityManagerService中回调回ActivityThread中来,mgr是ActivityManagerService的代理,在执行它的ActivityManagerService.attachApplication() 方法:
frameworks/base/services/core/java/com/android/server/am/ActivityManagerService.java
public final void attachApplication(IApplicationThread thread, long startSeq) {synchronized (this) {int callingPid = Binder.getCallingPid();final int callingUid = Binder.getCallingUid();final long origId = Binder.clearCallingIdentity();attachApplicationLocked(thread, callingPid, callingUid, startSeq);Binder.restoreCallingIdentity(origId);}}
ActivityManagerService.attachApplicationLocked()
调用AMS的 attachApplication(),最终层层调用到 ActivityStackSupervisor 的 realStartActivityLocked,真正准备去启动Activity。
frameworks/base/services/core/java/com/android/server/am/ActivityManagerService.java
private final boolean attachApplicationLocked(IApplicationThread thread,int pid, int callingUid, long startSeq) {... ...//这里会去调用ActivityThrea的bindApplication(),也就是会去创建Applicationthread.bindApplication(... ...)... ...//如果当前的Application记录仍然依附到之前的进程中,则清理掉if (app.thread != null) {handleAppDiedLocked(app, true, true);}... ...// See if the top visible activity is waiting to run in this process...if (normalMode) {try {//调用ActivityTaskManagerService的attachApplication(),最终层层调用到ActivityStackSupervisor.java的 realStartActivityLocked()didSomething = mAtmInternal.attachApplication(app.getWindowProcessController());} catch (Exception e) {Slog.wtf(TAG, "Exception thrown launching activities in " + app, e);badApp = true;}}... ...}
这里通过AMS最终会调用到ActivityStackSupervisor.realStartActivityLocked():
frameworks/base/services/core/java/com/android/server/wm/ActivityStackSupervisor.java
boolean realStartActivityLocked(ActivityRecord r, WindowProcessController proc,boolean andResume, boolean checkConfig) throws RemoteException {//确保所有的Activity执行了onPause才会往下继续执行if (!mRootActivityContainer.allPausedActivitiesComplete()) {// While there are activities pausing we skipping starting any new activities until// pauses are complete. NOTE: that we also do this for activities that are starting in// the paused state because they will first be resumed then paused on the client side.if (DEBUG_SWITCH || DEBUG_PAUSE || DEBUG_STATES) Slog.v(TAG_PAUSE,"realStartActivityLocked: Skipping start of r=" + r+ " some activities pausing...");return false;}... ...try {... ...try{... ...// Create activity launch transaction.final ClientTransaction clientTransaction = ClientTransaction.obtain(proc.getThread(), r.appToken);final DisplayContent dc = r.getDisplay().mDisplayContent;//在回调序列的末尾添加一条消息clientTransaction.addCallback(LaunchActivityItem.obtain(... ...));// Set desired final state.final ActivityLifecycleItem lifecycleItem;if (andResume) {lifecycleItem = ResumeActivityItem.obtain(dc.isNextTransitionForward());} else {lifecycleItem = PauseActivityItem.obtain();}//添加最后执行的生命周期状态clientTransaction.setLifecycleStateRequest(lifecycleItem);// 这里其实就是执行ClientTransaction的schedule()方法mService.getLifecycleManager().scheduleTransaction(clientTransaction);... ...} catch (RemoteException e) {if (r.launchFailed) {// 第二次启动失败,finish activity并放弃启动Slog.e(TAG, "Second failure launching "+ r.intent.getComponent().flattenToShortString() + ", giving up", e);proc.appDied();stack.requestFinishActivityLocked(r.appToken, Activity.RESULT_CANCELED, null,"2nd-crash", false);return false;}//第一次启动失败,尝试重启进程r.launchFailed = true;proc.removeActivity(r);throw e;}} finally {endDeferResume();}... ...return true;}
ActivityThread调用栈:

小结
至此已经走到 realStartActivityLocked,接下来就是 Activity 的启动流程,Activity 启动下篇文章会单独分析。总结一下 Launcher 启动流程,Launcher的启动经过了三个阶段:
1、SystemServer 创建AMS和ATMS,通过 SystemReady 进入 LauncherActivity 的调用
2、Zygote 进程 fork 出 Launcher 进程,通过 Socket 进行通信
3、进入 ActivityThread 的处理,完成 Launcher 的 Acitivty 启动
相关文章:
Android 10.0 Launcher 启动流程
在前面SystemUI启动流程中说到,在SystemServer中会去启动各种系统服务,这里的launcher也是启动的其中一个服务ActivityManagerService去启动的。在android10之前,系统四大组件的启动都是在ActivityManagerService中,在android10中…...

OPenCV高级编程——OpenCV视频读写及录制技术详解
目录 引言 一、视频读取技术 VideoCapture 类 构造函数 常用方法 二、视频写入技术 VideoWriter 类 构造函数 常用方法 三、视频录制技术 1. 包含OpenCV头文件 2. 初始化VideoCapture对象 3. 设置视频编码器 4. 读取和写入视频帧 5. 释放资源 6. 编码格式选择 …...

jenkins获取sonarqube质量门禁结果
前景 在使用 Jenkins 集成 SonarQube 时,获取质量门禁(Quality Gate)结果非常重要。SonarQube 的质量门禁是一种质量控制机制,用于评估代码质量是否符合预设的标准。以下是获取质量门禁结果的意义和作用: 评估代码质量…...

【AI-12】浅显易懂地说一下损失函数
什么是损失函数? 咱们可以把损失函数想象成一个衡量你做的事情“好不好”的尺子。 比如说你在预测明天的天气,你给出的预测结果和实际的天气情况之间会有差别。损失函数就是用来计算这个差别有多大的。 如果你的预测结果和实际情况非常接近,…...
)
Python和java中super的使用用法(有点小语法上的差距,老忘就在这里置顶了)
文章目录 1 在 Java 中:2 在 Python 中: 在 Java 和 Python 中,子类调用父类方法的语法略有不同: 1 在 Java 中: 使用 super 关键字:在子类中,可以使用 super 关键字来调用父类的方法。super …...

在 QML 中使用 C++ 类和对象
1.实现 C 类,从 QObject 或 QObject 的派生类继承 类中第一行添加 Q_OBJECT 宏 2.修饰成员函数或属性 Q_INVOKABLE 宏用来定义可通过元对象系统访问的方法 Q_PROPERTY 宏用来定义可通过元对象系统访问的属性 信号或者槽,都可以直接在 QML 中访问 3. 在…...

什么是接口?
在前后端开发的语境中,接口(Interface)是一个非常重要的概念,它充当了前端(通常是浏览器端或移动端应用)与后端(通常是服务器端的应用程序)之间进行数据交换的桥梁。接口定义了双方交…...

传统自然语言处理(NLP)与大规模语言模型(LLM)详解
自然语言处理(NLP)和大规模语言模型(LLM)是理解和生成人类语言的两种主要方法。本文将介绍传统NLP和LLM的介绍、运行步骤以及它们之间的比较,帮助新手了解这两个领域的基础知识。 传统自然语言处理(NLP&…...
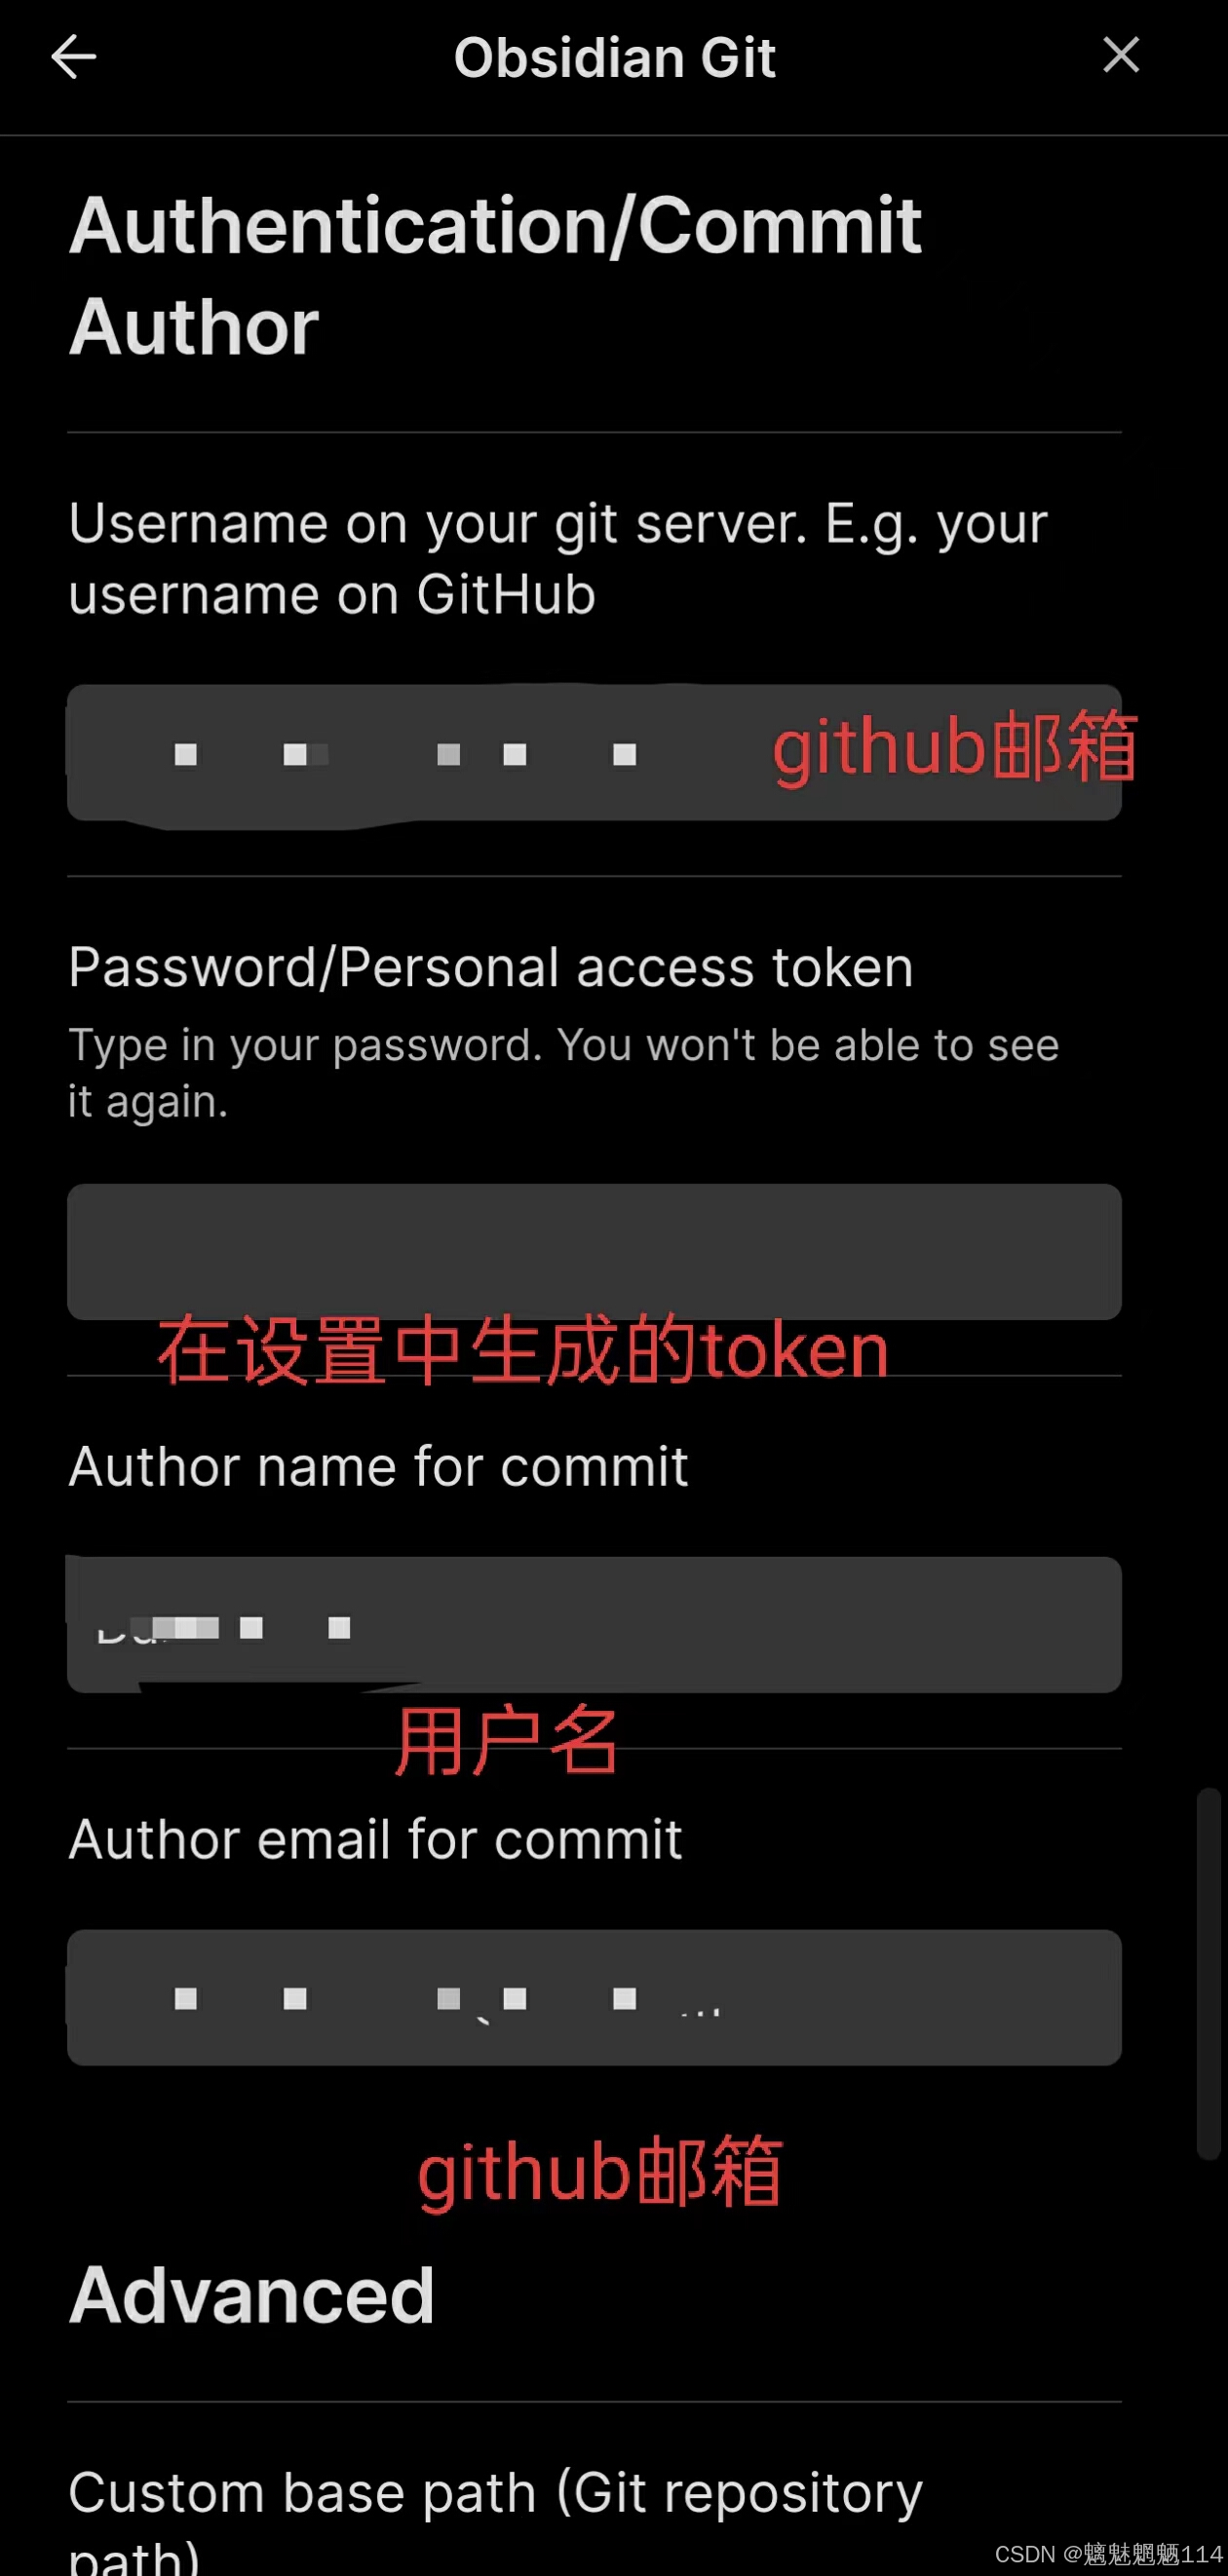
实现Obsidian PC端和手机端(安卓)同步
步骤 1:在PC端设置Obsidian 安装Obsidian和Git:确保你的PC上已经安装了Obsidian和Git。你可以从Obsidian官网和Git官网下载并安装。 克隆GitHub代码库:在PC上打开命令行(例如Windows的命令提示符或Mac/Linux的终端)&a…...

基于大模型的 Agent 进行任务规划的10种方式
基于大模型的 Agent 基本组成应该包含规划(planning),工具(Tools),执行(Action),和记忆(Memory)四个方面,本节将从 Agent 的概念、ReAct 框架、示例、以及一些论文思路来具体聊下任务规划的话题,…...
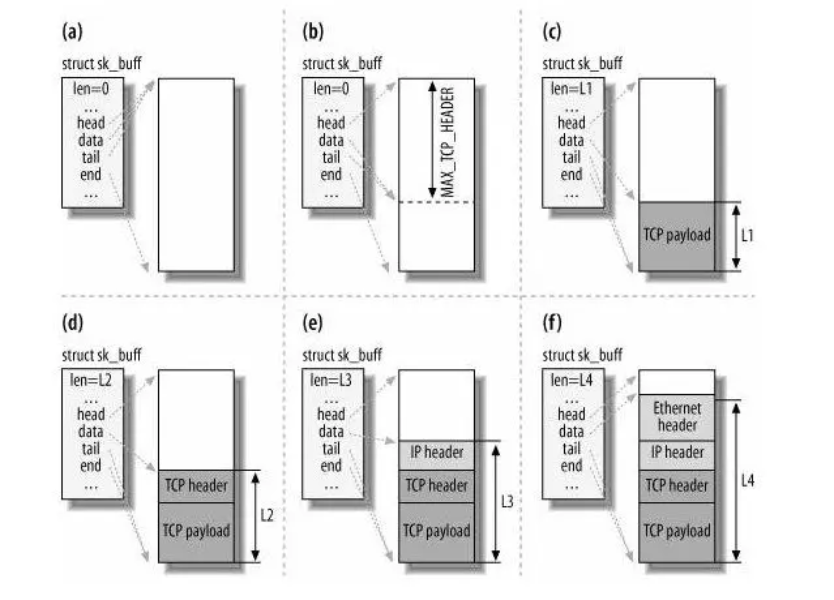
计算机网络01
文章目录 浏览器输入URL后发生了什么?Linux 系统是如何收发网络包的?Linux 网络协议栈Linux 接收网络包的流程Linux 发送网络包的流程 浏览器输入URL后发生了什么? URL解析 当在浏览器中输入URL后,浏览器首先对拿到的URL进行识别…...

基于SpringBoot微服务架构下前后端分离的MVVM模型浅析
基于SpringBoot微服务架构下前后端分离的MVVM模型浅析 “A Brief Analysis of MVVM Model in Front-end and Back-end Separation based on Spring Boot Microservices Architecture” 完整下载链接:基于SpringBoot微服务架构下前后端分离的MVVM模型浅析 文章目录 基于Spring…...

44444444444
4444444444444444...

数据结构与算法-二分搜索树节点的查找
💝💝💝首先,欢迎各位来到我的博客,很高兴能够在这里和您见面!希望您在这里不仅可以有所收获,同时也能感受到一份轻松欢乐的氛围,祝你生活愉快! 文章目录 引言一、二分搜…...

C++|设计模式(七)|⭐️观察者模式与发布/订阅模式,你分得清楚吗
本文内容来源于B站: 【「观察者模式」与「发布/订阅模式」,你分得清楚吗?】 文章目录 观察者模式(Observer Pattern)的代码优化观察者模式 与 发布订阅模式 他们是一样的吗?发布订阅模式总结 我们想象这样一…...

计算机毕业设计选题推荐-学院教学工作量统计系统-Java/Python项目实战
✨作者主页:IT毕设梦工厂✨ 个人简介:曾从事计算机专业培训教学,擅长Java、Python、微信小程序、Golang、安卓Android等项目实战。接项目定制开发、代码讲解、答辩教学、文档编写、降重等。 ☑文末获取源码☑ 精彩专栏推荐⬇⬇⬇ Java项目 Py…...

人机交互不仅仅是科技问题
人机交互不仅仅局限于物理和数理科学的应用,还涉及到更广泛的管理、文理、哲学、艺术、伦理以及法律等领域。下面这些领域在人机协同和智能系统应用中扮演着重要角色: 智能系统在企业管理、资源分配、决策支持等方面的应用,可以帮助管理者优化…...

Lua Debug.GetInfo
在 Lua 中,debug.getinfo 函数的第一个参数指定了要获取信息的函数的级别。这个级别是一个整数,表示调用栈的深度。以下是一些常见的级别和它们的含义: - 1:当前函数(即调用 debug.getinfo 的函数)。 - 2&a…...

每日刷题(最短路、图论)
目录 游戏 思路 代码 魔法 思路 代码 P1364 医院设置 思路 代码 P1144 最短路计数 思路 代码 游戏 I-游戏_河南萌新联赛2024第(三)场:河南大学 (nowcoder.com) 思路 利用dijkstra去寻找起点到其余所有点的最短路径,当…...

远程服务器训练网络之tensorboard可视化
cd到tensorboard events存储的位置 启动tensorboard tensorboard --logdir./ 得到运行结果: TensorBoard 1.13.1 at http://work:6006 (Press CTRLC to quit) 创建tunnel映射到本地,在本地ssh,最好使用公网地址 ssh -N -L 8080:localhost:60…...

探索TinyEditor:400字节内的微型全能代码编辑器
探索TinyEditor:400字节内的微型全能代码编辑器 【免费下载链接】TinyEditor A functional HTML/CSS/JS editor in less than 400 bytes 项目地址: https://gitcode.com/gh_mirrors/ti/TinyEditor 在前端开发工具领域,TinyEditor以其极致精简的设…...

如何高效定制Steam界面:实用美化插件开发指南
如何高效定制Steam界面:实用美化插件开发指南 【免费下载链接】millennium-steam-patcher Apply themes/customize Steam after the 2023-04-27 Chromium UI update https://discord.gg/MXMWEQKgJF 项目地址: https://gitcode.com/gh_mirrors/mi/millennium-steam…...

Jellyfin MetaTube插件:5分钟打造专业级媒体库的终极指南
Jellyfin MetaTube插件:5分钟打造专业级媒体库的终极指南 【免费下载链接】jellyfin-plugin-metatube MetaTube Plugin for Jellyfin/Emby 项目地址: https://gitcode.com/gh_mirrors/je/jellyfin-plugin-metatube MetaTube是一款专为Jellyfin和Emby设计的免…...

MozJPEG色彩空间扩展终极指南:支持RGBX、BGRX等32位格式的完整教程
MozJPEG色彩空间扩展终极指南:支持RGBX、BGRX等32位格式的完整教程 【免费下载链接】mozjpeg Improved JPEG encoder. 项目地址: https://gitcode.com/gh_mirrors/mo/mozjpeg MozJPEG作为libjpeg-turbo的增强版本,不仅提供了卓越的JPEG压缩性能&a…...

实战指南:Whisper 的 `prompt` 与 `initial_prompt` 参数在语音转文字中的高效应用
1. Whisper 语音转文字的核心参数解析 第一次用 Whisper 做语音转文字时,我发现同样的音频文件,同事转出来的结果总比我的准确率高。后来才发现,原来他偷偷用了一个叫 prompt 的秘密武器。这就像考试时的"小抄",给模型…...

5分钟上手:在浏览器中创造惊艳的流体艺术特效
5分钟上手:在浏览器中创造惊艳的流体艺术特效 【免费下载链接】WebGL-Fluid-Simulation Play with fluids in your browser (works even on mobile) 项目地址: https://gitcode.com/gh_mirrors/web/WebGL-Fluid-Simulation 想要在浏览器中体验令人惊叹的流体…...

InstructPix2Pix在.NET平台的应用开发实战
InstructPix2Pix在.NET平台的应用开发实战 1. 引言:当AI修图遇上.NET开发 想象一下这样的场景:电商平台的商品图片需要批量调整风格,摄影工作室想要快速实现创意效果,或者内容创作者需要即时编辑社交媒体图片。传统图像处理方式…...

Loop:让Mac窗口管理效率倍增的效率神器
Loop:让Mac窗口管理效率倍增的效率神器 【免费下载链接】Loop MacOS窗口管理 项目地址: https://gitcode.com/GitHub_Trending/lo/Loop 你是否也曾在多任务处理时,被杂乱无章的窗口搞得焦头烂额?切换应用时总要在一堆窗口中寻找目标&a…...

终极指南:如何用Ice轻松管理你的Mac菜单栏,打造清爽高效的工作空间
终极指南:如何用Ice轻松管理你的Mac菜单栏,打造清爽高效的工作空间 【免费下载链接】Ice Powerful menu bar manager for macOS 项目地址: https://gitcode.com/GitHub_Trending/ice/Ice 还在为杂乱的macOS菜单栏烦恼吗?Ice是一款专为…...

香农信息熵的5个常见误区:你以为的熵可能不是真正的熵
香农信息熵的5个常见误区:你以为的熵可能不是真正的熵 在机器学习与数据科学领域,香农信息熵(Shannon Entropy)常被视为衡量数据不确定性的黄金标准。但有趣的是,许多从业者在使用这一概念时,往往陷入一些…...