8月5日学习笔记 glibc安装与安全用户角色权限
一,glibc安装


1.安装依赖库
[root@localhost ~]# yum list installed |grep libaio
libaio.x86_64 0.3.109-
13.el7 @anaconda
[root@localhost ~]#
2.解压查看
[root@localhost ~]# ls
mysql-8.0.33-linux-glibc2.12-x86_64.tar
[root@localhost ~]# tar -xvf mysql-8.0.33-linuxglibc2.12-x86_64.tar
mysql-8.0.33-linux-glibc2.12-x86_64.tar.xz
mysql-router-8.0.33-linux-glibc2.12-x86_64.tar.xz
[root@localhost ~]# tar -xvf mysql-8.0.33-linuxglibc2.12-x86_64.tar.xz
mysql-8.0.33-linux-glibc2.12-x86_64
[root@localhost ~]# ls mysql-8.0.33-linuxglibc2.12-x86_64/
bin docs include lib LICENSE man README
share support-files
3.创建⽤户
[root@localhost ~]# useradd -r -s /sbin/nologin
mysql
[root@localhost ~]# id mysql
uid=27(mysql) gid=27(mysql) 组=27(mysql)
4.清空其他环境 mariadb
[root@localhost ~]# rm -rf /etc/my.cnf5.将解压文件放置在根目录下
[root@localhost ~]# mv mysql-8.0.33-linuxglibc2.12-x86_64/ /mysql8
[root@localhost ~]# ls /mysql8/
bin docs include lib LICENSE man README
share support-files6.切换mysql8⽬录,创建⼀个mysq-files
cd /mysql8/
mkdir mysql-files
7.修改mysql-files⽂件权限750和所属 mysql
[root@localhost mysql8]# chown mysql:mysql mysqlfiles/
[root@localhost mysql8]# chmod 750 mysql-files/
[root@localhost mysql8]# ls -l
总⽤量 296
drwxr-xr-x. 2 7161 31415 4096 3⽉ 17 2023 bin
drwxr-xr-x. 2 7161 31415 38 3⽉ 17 2023 docs
drwxr-xr-x. 3 7161 31415 4096 3⽉ 17 2023
include
drwxr-xr-x. 6 7161 31415 201 3⽉ 17 2023 lib
-rw-r--r--. 1 7161 31415 284945 3⽉ 17 2023
LICENSE
drwxr-xr-x. 4 7161 31415 30 3⽉ 17 2023 man
drwxr-x---. 2 mysql mysql 6 8⽉ 3 22:30
mysql-files
-rw-r--r--. 1 7161 31415 666 3⽉ 17 2023
README
drwxr-xr-x. 28 7161 31415 4096 3⽉ 17 2023
share
drwxr-xr-x. 2 7161 31415 77 3⽉ 17 2023
support-files
8.初始化数据库,找到初始密码
[root@localhost mysql8]# ./bin/mysqld --initialize
--user=mysql --basedir=/mysql8
2024-08-03T14:34:53.993391Z 0 [System] [MY-013169]
[Server] /mysql8/bin/mysqld (mysqld 8.0.33)
initializing of server in progress as process 2236
2024-08-03T14:34:54.003043Z 1 [System] [MY-013576]
[InnoDB] InnoDB initialization has started.
2024-08-03T14:34:55.674077Z 1 [System] [MY-013577]
[InnoDB] InnoDB initialization has ended.
2024-08-03T14:34:58.133984Z 6 [Note] [MY-010454]
[Server] A temporary password is generated for
root@localhost: .I//GqI,Z2-k
9.查看是否初始化成功过,可以看⽂件夹中
是否有data⽂件夹
[root@localhost mysql8]# ls
bin docs lib man README
support-files
data include LICENSE mysql-files share
10.设置ssl安全加密连接 敏感数据
[root@localhost mysql8]# ls ./bin/*ssl*
./bin/mysql_ssl_rsa_setup
[root@localhost mysql8]# ./bin/mysql_ssl_rsa_setup
--datadir=/mysql8/data
[root@localhost mysql8]# ls ./data/
auto.cnf #ib_16384_1.dblwr mysql.ibd sys
ca-key.pem ib_buffer_pool
performance_schema undo_001
ca.pem ibdata1
private_key.pem undo_002
client-cert.pem #innodb_redo
public_key.pem
client-key.pem #innodb_temp servercert.pem
#ib_16384_0.dblwr mysql serverkey.pem
11.其他配置
[root@localhost mysql8]# cp supportfiles/mysql.server /etc/init.d/mysql8
[root@localhost mysql8]# ls /etc/init.d/mysql8
/etc/init.d/mysql8
[root@localhost mysql8]# ls /etc/init.d/
functions mysql8 mysql8ls netconsole network
README
[root@localhost mysql8]#
# 默认情况下,启动⽂件认识安装⽬录在/usr/local/⽬录下
[root@localhost mysql8]# sed -n '/^basedir=/p'
/etc/init.d/mysql8
basedir=
[root@localhost mysql8]# sed -i
'/^basedir=/cbasedir=/mysql8' /etc/init.d/mysql8
[root@localhost mysql8]# sed -n '/^basedir=/p'
/etc/init.d/mysql8
basedir=/mysql8
[root@localhost mysql8]# sed -n '/^datadir=/p'
/etc/init.d/mysql8
datadir=
[root@localhost mysql8]# sed -i
'/^datadir=/cdatadir=/mysql8/data'
/etc/init.d/mysql8
[root@localhost mysql8]# sed -n '/^datadir=/p'
/etc/init.d/mysql8
datadir=/mysql8/data
[root@localhost mysql8]#
12.启动服务 不能使⽤systemctl
ot@localhost mysql8]# service mysql8 start
Starting MySQL.Logging to
'/mysql8/data/localhost.localdomain.err'.
.. SUCCESS!
[root@localhost mysql8]# ls /mysql8/data/*.err
/mysql8/data/localhost.localdomain.err
# 启动成功后会⽣成err⽇志⽂件,多看看,了解启动的详细原因
13.常⻅问题
1. 为什么要删除/etc/my.cnf⽂件
```
数据库初始化时候,会⾃动找my.cnf配置,但是原有的mariadb配
置⽂件,会失败
```
2. mysql-files⽂件夹
```
⽬前么有⽤,必须创建,可能导致⽆法启动,数据的备份和还原,导
⼊和到处所指定的默认⽬录
```
3. 判断数据库初始化成功
```
数据库的安装容易出错的地⽅是初始化,⽆法正常启动,确认⽅式
安装⽬录下是否⽣成data⽬录
```
4. 为什么要修改mysql.server放在/etc/init.d⽬录下
```
不放也可以,但是就⽆法使⽤service mysql8 start启动
只能使⽤bin/mysqld可执⾏⽂件启动
```
5. 为什么需要修改basedir和datadir
```
glibc是⼆进制绿⾊版本,默认配置很多,需要修改
```
6. 开机启动
```shell
[root@localhost mysql8]# chkconfig --list
注:该输出结果只显示 SysV 服务,并不包含
原⽣ systemd 服务。SysV 配置数据
可能被原⽣ systemd 配置覆盖。要列出 systemd 服务,请执⾏ 'systemctl listunit-files'。查看在具体 target 启⽤的服务请执⾏'systemctl list-dependencies [target]'。
netconsole 0:关 1:关 2:关 3:关 4:关 5:关 6:关
network 0:关 1:关 2:开 3:开 4:开 5:开 6:关#查看启动该列表
[root@localhost mysql8]# chkconfig --list
注:该输出结果只显示 SysV 服务,并不包含
原⽣ systemd 服务。SysV 配置数据
可能被原⽣ systemd 配置覆盖。要列出 systemd 服务,请执⾏ 'systemctl listunit-files'。查看在具体 target 启⽤的服务请执⾏'systemctl list-dependencies [target]'。
mysql8 0:关 1:关 2:开 3:开 4:开 5:开 6:关
netconsole 0:关 1:关 2:关 3:关 4:关 5:关 6:关
network 0:关 1:关 2:开 3:开 4:开 5:开 6:关
# 启动2345
[root@localhost mysql8]# chkconfig mysql8 on
[root@localhost mysql8]# chkconfig --list
注:该输出结果只显示 SysV 服务,并不包含
原⽣ systemd 服务。SysV 配置数据
可能被原⽣ systemd 配置覆盖。要列出 systemd 服务,请执⾏ 'systemctl listunit-files'。查看在具体 target 启⽤的服务请执⾏'systemctl list-dependencies [target]'。
mysql8 0:关 1:关 2:开 3:开 4:开 5:开 6:关
netconsole 0:关 1:关 2:关 3:关 4:关 5:关 6:关
network 0:关 1:关 2:开 3:开 4:开 5:开 6:关
# 3是字符界⾯,5是图形界⾯
```## 14 .mysql glibc版本后续设置
1. 修改密码1```shell[root@localhost mysql8]# ./bin/mysqladmin -uroot
password '123' -pEnter password:mysqladmin: [Warning] Using a password on the
command line interface can be insecure.Warning: Since password will be sent to server
in plain text, use ssl connection to ensure
password safety.Copyright (c) 2000, 2023, Oracle and/or its
affiliates.Oracle is a registered trademark of Oracle
Corporation and/or itsaffiliates. Other names may be trademarks of
their respectiveowners.Type 'help;' or '\h' for help. Type '\c' to
clear the current input statement.mysql>2. 修改密码2```shellmysql> set password='456';Query OK, 0 rows affected (0.02 sec)mysql> flush privileges;Query OK, 0 rows affected (0.01 sec) Copyright (c) 2000, 2023, Oracle and/or its
affiliates.Oracle is a registered trademark of Oracle
Corporation and/or itsaffiliates. Other names may be trademarks of
their respectiveowners.Type 'help;' or '\h' for help. Type '\c' to
clear the current input statement.mysql>```3. 将mysql的bin⽬录添加到环境变量中```shell[root@localhost mysql8]# sed -i '$aexport
PATH=/mysql8/bin/:$PATH' /etc/profile[root@localhost mysql8]# sed -n '$p'
/etc/profileexport PATH=/mysql8/bin/:$PATH[root@localhost mysql8]# source /etc/profile[root@localhost mysql8]# which mysql/mysql8/bin/mysql[root@localhost mysql8]# mysqld2024-08-03T15:53:05.871244Z 0 [System] [MY-
010116] [Server] /mysql8/bin/mysqld (mysqld 8.0.33)
starting as process 28612024-08-03T15:53:05.874283Z 0 [ERROR] [MY-
010123] [Server] Fatal error: Please read
"Security" section of the manual to find out how to
run mysqld as root!2024-08-03T15:53:05.874333Z 0 [ERROR] [MY-
010119] [Server] Aborting2024-08-03T15:53:05.874776Z 0 [System] [MY-
010910] [Server] /mysql8/bin/mysqld: Shutdown
complete (mysqld 8.0.33) MySQL Community Server -
GPL.[root@localhost mysql8]#```4. 配置⽂件```shell[root@localhost mysql8]# fgvim ./my.cnf[mysqld]basedir=/mysql8datadir=/mysql8/datasocket=/tmp/mysql.sock # 查看套接字⽂件[root@localhost mysql8]# ll /tmp/
总⽤量 12-rwx------. 1 root root 836 8⽉ 2 23:02 ksscript-64N_oNsrwxrwxrwx. 1 mysql mysql 0 8⽉ 4 00:02
mysql.sock-rw-------. 1 mysql mysql 5 8⽉ 4 00:02
mysql.sock.locksrwxrwxrwx. 1 mysql mysql 0 8⽉ 4 00:02
mysqlx.sock-rw-------. 1 mysql mysql 5 8⽉ 4 00:02
mysqlx.sock.lockdrwx------. 3 root root 17 8⽉ 3 20:49
systemd-private-23259a7f757e44ec9ab58b88e07ceefachronyd.service-poengE-rw-------. 1 root root 0 8⽉ 2 22:58
yum.log14. 安全配置 ⽣产环境
[root@localhost mysql8]# mysql_secure_installation
# ⼀路y下去 改密码,不允许远程等等
Securing the MySQL server deployment.
Enter password for user root:
VALIDATE PASSWORD COMPONENT can be used to test
passwords
and improve security. It checks the strength of
password
and allows the users to set only those passwords
which are
secure enough. Would you like to setup VALIDATE
PASSWORD component?
Press y|Y for Yes, any other key for No:
Using existing password for root.
Change the password for root ? ((Press y|Y for Yes,
any other key for No) : y
New password:
Re-enter new password:
Sorry, passwords do not match.
New password:
Re-enter new password:
By default, a MySQL installation has an anonymous
user,
allowing anyone to log into MySQL without having to
have
a user account created for them. This is intended
only for
testing, and to make the installation go a bit
smoother.
You should remove them before moving into a
production
environment.
Remove anonymous users? (Press y|Y for Yes, any
other key for No) : y
Success.
Normally, root should only be allowed to connect
from
'localhost'. This ensures that someone cannot guess
at
the root password from the network.
Disallow root login remotely? (Press y|Y for Yes,
any other key for No) : y
Success.
By default, MySQL comes with a database named
'test' that
anyone can access. This is also intended only for
testing,
and should be removed before moving into a
production
environment.
Remove test database and access to it? (Press y|Y
for Yes, any other key for No) : y
- Dropping test database...
Success.
- Removing privileges on test database...
Success.
Reloading the privilege tables will ensure that all
changes
made so far will take effect immediately.
Reload privilege tables now? (Press y|Y for Yes,
any other key for No) : y
Success.
All done!
[root@localhost mysql8]# mysql -uroot -p456
mysql: [Warning] Using a password on the command
line interface can be insecure.
Welcome to the MySQL monitor. Commands end with ;
or \g.
Your MySQL connection id is 11
Server version: 8.0.33 MySQL Community Server - GPL
Copyright (c) 2000, 2023, Oracle and/or its
affiliates.
Oracle is a registered trademark of Oracle
Corporation and/or its
affiliates. Other names may be trademarks of their
respective
owners.
Type 'help;' or '\h' for help. Type '\c' to clear
the current input statement.
mysql> quit
Bye
[root@localhost mysql8]#
二,安全用户角色权限
create user 'zhangmin'@'%' identified by
'Zhang_min123';grant all on *.* to 'zhangmin'create database if not exists test;use test;
create table user(id int primary key,username varchar(45) not null,password varchar(45) not null
);insert into test.user values(1,"zhangsan","123");
insert into test.user values(2,"lisi","456");
insert into test.user values(3,"wamngwi","789");
insert into test.user values(4,"zhaoliu","aaa");mysql> create user 'lilaosi'@'%' identified by
'lilaoshi_123';
ERROR 1819 (HY000): Your password does not satisfy
the current policy requirements
mysql> create user 'lilaosi'@'%' identified by
'Lilaoshi_123';
Query OK, 0 rows affected (0.01 sec)
mysql> alter user 'lilaosi'@'%' identified by
'Lilaosi_123';
Query OK, 0 rows affected (0.01 sec)
mysql> select host,user from mysql.user;
+-----------+------------------+
| host | user |
+-----------+------------------+
| % | lilaosi |
| % | root |
| % | zhangmin |
| localhost | mysql.infoschema |
| localhost | mysql.session |
| localhost | mysql.sys |
+-----------+------------------+
6 rows in set (0.00 sec)grant all on test.* to 'lilaosi';
# lilaosi就获得了test库中所有的表的操作权限,但是,由于
root没有个lilaosimysql库的权限,所以lilaosi账号⽆法查看
mysql库1.密码安全策略
查看密码策略
mysql> show variables like 'validate%';
+--------------------------------------+--------+
| Variable_name | Value |
+--------------------------------------+--------+
| validate_password.check_user_name | ON |
| validate_password.dictionary_file | |
| validate_password.length | 8 |
| validate_password.mixed_case_count | 1 |
| validate_password.number_count | 1 |
| validate_password.policy | MEDIUM |
| validate_password.special_char_count | 1 |
+--------------------------------------+--------+
7 rows in set (0.00 sec)mysql> set global validate_password.length=0;
mysql> set global validate_password.policy=LOW;
mysql> show variables like 'validate%';
+--------------------------------------+-------+
| Variable_name | Value |
+--------------------------------------+-------+
| validate_password.check_user_name | ON |
| validate_password.dictionary_file | |
| validate_password.length | 4 |
| validate_password.mixed_case_count | 0 |
| validate_password.number_count | 0 |
| validate_password.policy | LOW |
| validate_password.special_char_count | 0 |
+--------------------------------------+-------+2.⽤户
练习
创建三个账号,abc[abcd],ccc[a1b2c3] ,ddd[231343]
<mysql> create user 'efg'@'%' identified by 'efg';
ERROR 1819 (HY000): Your password does not satisfy
the current policy requirements
mysql> create user 'efgh'@'%' identified by 'efgh';
Query OK, 0 rows affected (0.01 sec)
mysql> select host,user from mysql.user;
+-----------+------------------+
| host | user |
+-----------+------------------+
| % | efgh |
| % | root |
| % | zhangmin |
| localhost | mysql.infoschema |
| localhost | mysql.session |
| localhost | mysql.sys |
| localhost | test1 |
+-----------+------------------+mysql> drop user 'zhangmin';
Query OK, 0 rows affected (0.02 sec)
mysql> select user from mysql.user;
+------------------+
| user |
+------------------+
| efgh |
| root |
| mysql.infoschema |
| mysql.session |
| mysql.sys |
| test1 |
+------------------+
6 rows in set (0.00 sec)mysql> alter user 'zhangmin' identified by
'abc123';
Query OK, 0 rows affected (0.01 sec)3.⻆⾊
mysql> create role 'a';
Query OK, 0 rows affected (0.00 sec)
mysql> show grants for 'a';
+-------------------------------+
| Grants for a@% |
+-------------------------------+
| GRANT USAGE ON *.* TO `a`@`%` |
+-------------------------------+
1 row in set (0.00 sec)
练习
1.添加jingli⻆⾊
create role 'jingli';
2.添加yuangong⻆⾊
craete role 'yaungong';
3.为jingli添加select insert delete update权限
grant select ,insert,delete,update on test.user to
'jingli';
4.为yuangong添加select,insert权限
grant select,insert on test.user to 'yuangong';
5.查看⻆⾊保存的表格
selet host,user from mysql.user;
6.查看⻆⾊的权限
show grants for 'jingli';
show grants for 'yaungogng';
新增bbb和ccc两个⽤户bbb是经理需要增删改查权限,ccc是员⼯是
只需要新增和查看的权限
grant jingli to ‘bbb’;
grant yuangong to 'ccc';4.权限
mysql> flush privileges;
Query OK, 0 rows affected (0.01 sec)mysql> grant system_user on *.* to "root";
mysql> show grants for 'root';
+--------------------------------------------------
---------------------------------------------------
---------------------------------------------------
---------------------------------------------------
---------------------------------------------------
---------------------------------------------------
---------------------------------------------------
------------------------------+
| Grants for root@%
|
+--------------------------------------------------
---------------------------------------------------
---------------------------------------------------
---------------------------------------------------
---------------------------------------------------
---------------------------------------------------
---------------------------------------------------
------------------------------+
| GRANT SELECT, INSERT, UPDATE, DELETE, CREATE,
DROP, RELOAD, SHUTDOWN, PROCESS, FILE, REFERENCES,
INDEX, ALTER, SHOW DATABASES, SUPER, CREATE
TEMPORARY TABLES, LOCK TABLES, EXECUTE, REPLICATION
SLAVE, REPLICATION CLIENT, CREATE VIEW, SHOW VIEW,
CREATE ROUTINE, ALTER ROUTINE, CREATE USER, EVENT,
TRIGGER, CREATE TABLESPACE, CREATE ROLE, DROP ROLE
ON *.* TO `root`@`%` WITH GRANT OPTION |
| GRANT SYSTEM_USER ON *.* TO `root`@`%`
|
+--------------------------------------------------
---------------------------------------------------
---------------------------------------------------
---------------------------------------------------
---------------------------------------------------
---------------------------------------------------
---------------------------------------------------
------------------------------+
2 rows in set (0.00 sec)mysql> show grants for "efgh";
+--------------------------------------------------
-+
| Grants for efgh@%
|
+--------------------------------------------------
-+
| GRANT SELECT, INSERT, DELETE ON *.* TO `efgh`@`%`
|
+--------------------------------------------------
-+
1 row in set (0.00 sec)练习步骤
1.添加aaa账户,设置密码aaaa
drop user aaa;
create user 'aaa'@'%' identified by 'aaaa';
2.使⽤aaa账户访问mysql服务
mysql -h127.0.0.1 -P3306 -uaaa -paaaa
3.查看test数据库发现么有权限
show databases;
4.退出并使⽤root账户登录
quit|exit
mysql -h127.0.0.1 -P3306 -uroot -proot0000
5.为aaa账户添加查看test.user表的权限
grant select on test.user to 'aaa';
6.退出root,使⽤aaa账户登录
quit|exit
mysql -h127.0.0.1 -P3306 -uaaa -paaaa
7.查看数据库,查看表,查看表内容 能够正常查看
show databases;
user test;
show tables;
select * from user;
8.输⼊数据,没有权限
insert into user values(5,"ermazi","ermazi");####
9.退出aaa使⽤root登录
quit|exit
mysql -h127.0.0.1 -P3306 -uroot -proot0000
10.为aaa添加insert权限
grant insert on test.user to 'aaa';
11.退出root使⽤aaa登录
exit|quit
mysql -h127.0.0.1 -P3306 -uaaa -paaaa
12.向user表添加⼀⾏新的数据
insert into test.user
values(6,"zhangsanfeng","zhangsanfen");
13.修改user中⼀⾏的数据的password(密码)为111,没有
update权限
update test.user set password='zsf' where username-
'zhangsanfeng';mysql> revoke all on *.* from "efgh";
Query OK, 0 rows affected (0.00 sec)
mysql> show grants for "efgh";
+----------------------------------+
| Grants for efgh@% |
+----------------------------------+
| GRANT USAGE ON *.* TO `efgh`@`%` |
+----------------------------------+
1 row in set (0.00 sec)相关文章:

8月5日学习笔记 glibc安装与安全用户角色权限
一,glibc安装 https://www.mysql.com/ 官⽹ https://downloads.mysql.com/archives/community/ https://downloads.mysql.com/archives/get/p/23/file/mysql-8.0.33-li nux-glibc2.12-x86_64.tar 安装步骤 1.安装依赖库 [rootlocalhost ~]# yum list installed |g…...

DrissionPage 一个替代selenium的pip --- 一个可以接管正在运行的chrome包
DrissionPage 一个替代selenium的pip包,持续更新 1、加载内容,并接管chrome浏览器 from DrissionPage import ChromiumPage, ChromiumOptions page ChromiumPage(addr_or_opts127.0.0.1:9222) print(page.title)ul page.eles(idform-submit) for i i…...

爬虫入门--了解相关工具
目录 1.爬虫与python 2.第一个爬虫 3.web请求的全过程 3.1服务器渲染 3.2前端JS渲染 4.浏览器工具 4.1Elements 4.2Console 4.3Source 4.4network(重点) 5.小结 1.爬虫与python 首先我们要知道,爬虫一定要用Python么? 非也~…...

django项目中通用的分页组件
文章目录 分页组件pager组件代码 分页组件 应用分页组件,需要以下两个步骤: 视图函数中:(先获取queryset,将request和queryset传入分页组件对象中,得到生成的html标签) def customer_list(requ…...

想实现ubuntu搭建sqli-labs靶场
目录 首先前期的nginx和php部署完成编辑编辑 Xftp导入sqli-labs 遇到了的问题 它提示我们请检查db-creds.inc 去尝试解决这个问题 尝试修改MySQL root密码 修改db-creds.inc配置 再次尝试依旧失败 思考:会不会是MySQL版本过高的原因 重新下载MySQL5.7.…...

tp8 按日期分组查出数据
1.如果数据库里时间字段都是时间戳,使用mysql中的from_unixtime()函数 field("from_unixtime(create_time,%Y-%m-%d) as time,group_concat(id)")->group(time)->select()2. 如果数据库是普通的日期格式(如2024-01-02 01:23:50)&#x…...
)
单例模式(懒汉模式,饿汉模式)
单例的饿汉模式:在主函数未调用之前该单例就已经存在了,所以不存在线程安全的问题。 class Singleton { private: Singleton(){} public:static Singleton s1;static Singleton* GetInstance(){return &s1;}Singleton(const Singleton&) delet…...

【Qt】Item Widgets 多元素控件
Qt中提供的多元素控件有: QListWidgetQListViewQTableWidgetQTableViewQTreeWidgetQTreeView 上述控件分为Widget和View,其区别如下: 以QTableWidget和QTableView为例 QTableView是基于MVC(Model-View-Controller)设计的控件。QTableView自身…...

sharded_inference_engine:MLXDynamicShardInferenceEngine;step
目录 sharded_inference_engine:MLXDynamicShardInferenceEngine 类属性 方法 __init__(self) async def infer_prompt(self, shard: Shard, prompt: str, inference_state: Optional[str] = None) -> (np.ndarray, str, bool) async def infer_tensor(self, shard: …...

JAVA开发学习-day21
JAVA开发学习-day21 1. 删除表单数据 根据ElementUI的官方组件指南,为表单每列的数据添加删除按钮 <el-table :data"tableData" style"width: 100%"><el-table-column prop"id" label"ID" width"180"…...

Python的安装环境以及应用
1.环境python2,Python 最新安装3.12可以使用源码安装 查看安装包 [rootpython001 ~]# yum list installed | grep epel 3[rootpython001 ~]# yum list installed | grep python [rootpython001 ~]# yum -y install python3 安装python3 查看版本 [root…...

TabLayout使用以及自定义tab标签
<?xml version"1.0" encoding"utf-8"?> <androidx.constraintlayout.widget.ConstraintLayout xmlns:android"http://schemas.android.com/apk/res/android"xmlns:app"http://schemas.android.com/apk/res-auto"xmlns:tool…...

第二十节、有限状态机和抽象类多态
一、抽象类 挂载到动画器上的就是继承抽象类代码 1、使用onenable周期函数启用 2、在每一个周期函数中对抽象类进行调用 3、隐藏公开的变量...

SQL注入实例(sqli-labs/less-23)
0、初始网页 1、闭合方式判断 闭合符号为单引号,通过测试发现过滤了注释,所以直接闭合 2、确定查询表的列数 确定查询表的列数为3列 ?id1 order by 3 3、确定回显位置 回显位置为第二列和第三列 ?id-1 union select 1,2,3 4、查看当前登录和数据…...

3.Redis数据类型(二)
LIST List 是一个简单的双向链表,支持从两端进行插入和删除操作。 常用命令: lpush/rpush/lrange lpush 插入一个或多个元素到列表的左端。 rpush 插入一个或多个元素到列表的右端。 lrange key start stop 获取元素(前闭后闭࿰…...

JavaWeb系列十一: Web 开发会话技术Session
Web 开发会话技术Session Session有什么用session基本原理session原理示意图session可以做什么如何理解Session Session常用方法Session底层实现机制原理分析图应用实例session实现原理动画 Session生命周期Session生命周期说明Session生命周期实例 作业布置 Session有什么用 …...

k8s中yaml文件的编写
目录 1.编写pod.yaml 2.编写deploment.yaml 3.编写service.yaml关联创建的pod 4.总结获取K8S资源配置清单文件模板方法 5.补充 1.编写pod.yaml vim demo1-pod.yaml apiVersion: v1 kind: Pod metadata:name: scj-podnamespace: xy101labels:app: nginxmylove: tangjunmyc…...

打卡第37天------动态规划
加油!不要放弃,那些冲进清北复交的高材生的水平真不是盖的,名不虚传,有实力的全能选手。我在刷题的过程中不得不表达一下对他们的钦佩。 这里在遍历顺序上可就有说法了。 如果求组合数就是外层for循环遍历物品,内层for遍历背包。如果求排列数就是外层for遍历背包,内层for…...

openfeign本地试用
目的:在本地搭建一个简单的openfeign使用场景,测试查询、新增等功能 平台:win10 技术栈:Springboot, SpringCloud, Nacos, Mybatis, MySql, Logback 框架作用说明: Nacos用于服务注册,将provider应用注…...

数据库|SQLServer数据库:查询函数(SUM、COUNT、MAX、MIN、AVG)的使用
哈喽,你好啊,我是雷工! 日拱一卒,进一寸有进一寸的欢喜,本节学习数据库查询函数的使用。 以下为学习笔记。 01 求和 SUM:对某一字段列进行求和运算; 示例: 对账号表Account的文章…...
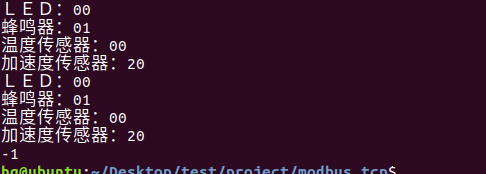
网络编程(Modbus进阶)
思维导图 Modbus RTU(先学一点理论) 概念 Modbus RTU 是工业自动化领域 最广泛应用的串行通信协议,由 Modicon 公司(现施耐德电气)于 1979 年推出。它以 高效率、强健性、易实现的特点成为工业控制系统的通信标准。 包…...
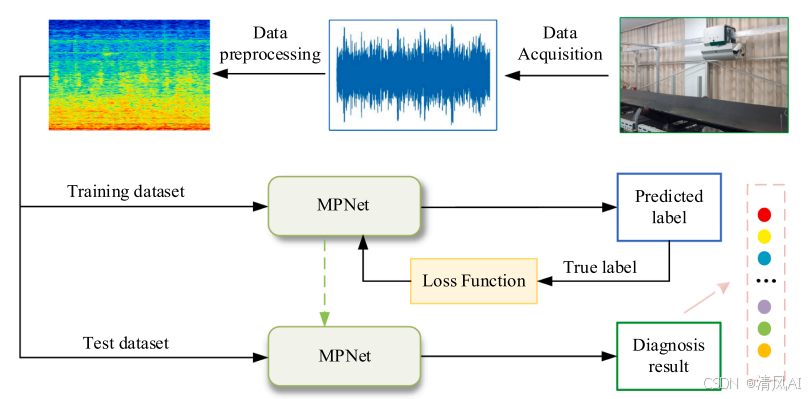
MPNet:旋转机械轻量化故障诊断模型详解python代码复现
目录 一、问题背景与挑战 二、MPNet核心架构 2.1 多分支特征融合模块(MBFM) 2.2 残差注意力金字塔模块(RAPM) 2.2.1 空间金字塔注意力(SPA) 2.2.2 金字塔残差块(PRBlock) 2.3 分类器设计 三、关键技术突破 3.1 多尺度特征融合 3.2 轻量化设计策略 3.3 抗噪声…...
C++实现分布式网络通信框架RPC(3)--rpc调用端
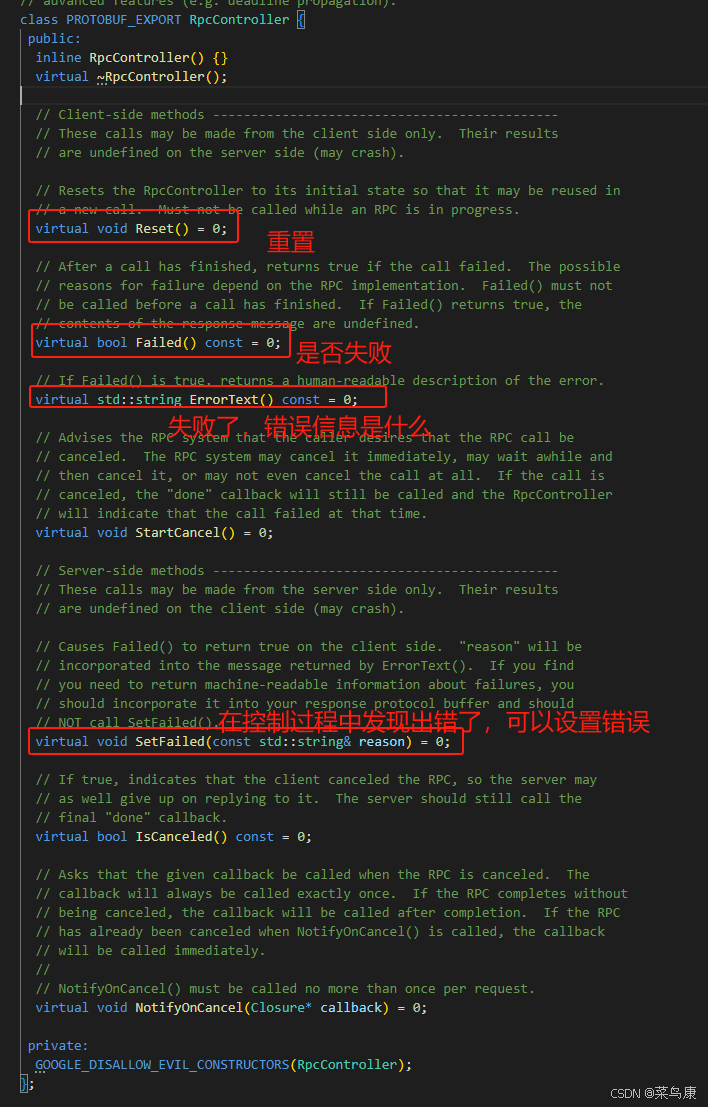
目录 一、前言 二、UserServiceRpc_Stub 三、 CallMethod方法的重写 头文件 实现 四、rpc调用端的调用 实现 五、 google::protobuf::RpcController *controller 头文件 实现 六、总结 一、前言 在前边的文章中,我们已经大致实现了rpc服务端的各项功能代…...
React第五十七节 Router中RouterProvider使用详解及注意事项
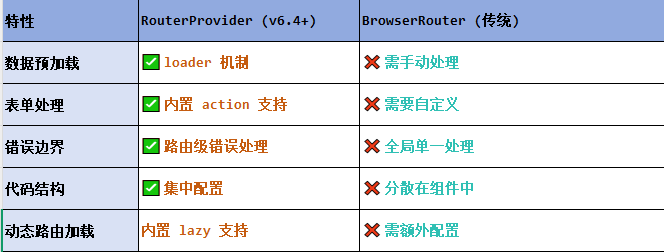
前言 在 React Router v6.4 中,RouterProvider 是一个核心组件,用于提供基于数据路由(data routers)的新型路由方案。 它替代了传统的 <BrowserRouter>,支持更强大的数据加载和操作功能(如 loader 和…...
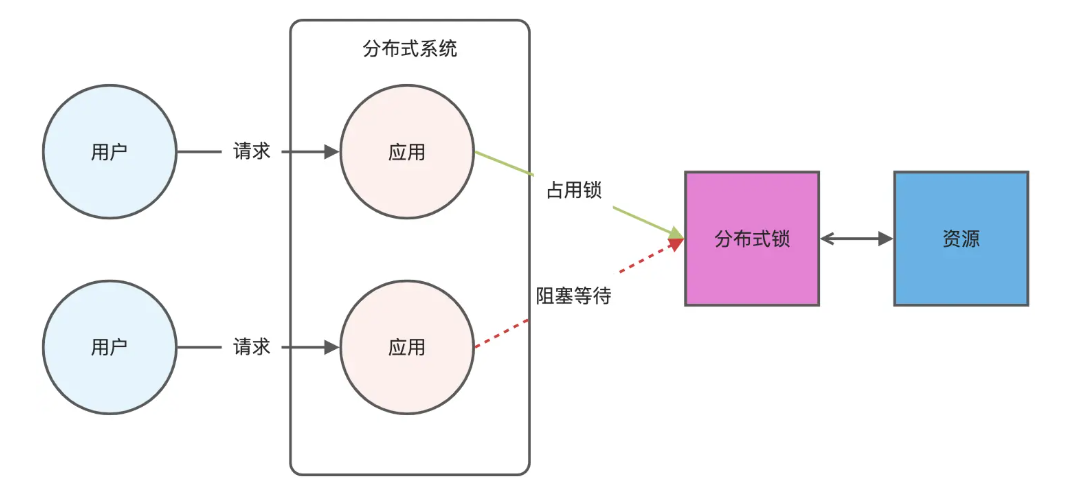
Redis相关知识总结(缓存雪崩,缓存穿透,缓存击穿,Redis实现分布式锁,如何保持数据库和缓存一致)
文章目录 1.什么是Redis?2.为什么要使用redis作为mysql的缓存?3.什么是缓存雪崩、缓存穿透、缓存击穿?3.1缓存雪崩3.1.1 大量缓存同时过期3.1.2 Redis宕机 3.2 缓存击穿3.3 缓存穿透3.4 总结 4. 数据库和缓存如何保持一致性5. Redis实现分布式…...
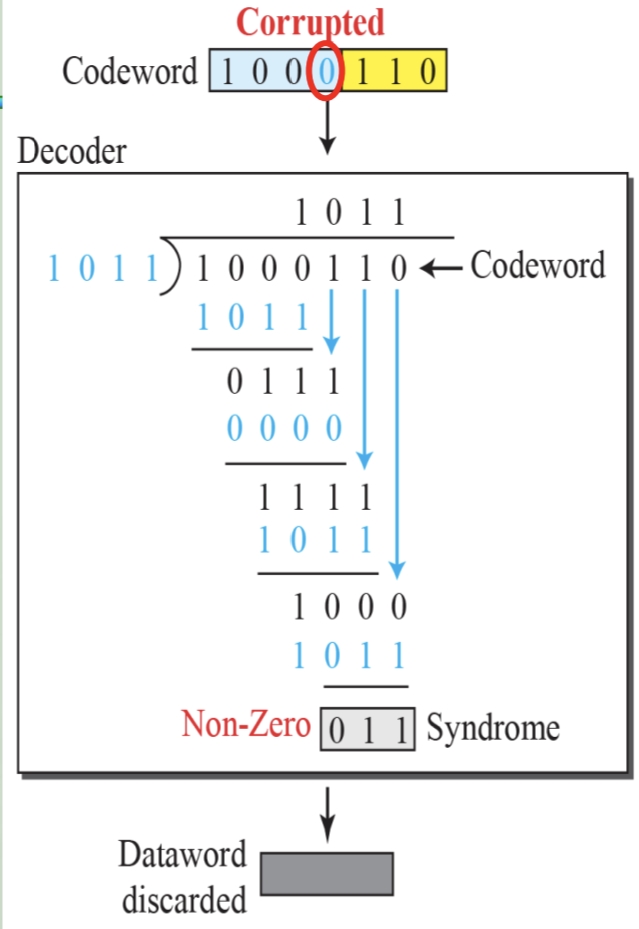
循环冗余码校验CRC码 算法步骤+详细实例计算
通信过程:(白话解释) 我们将原始待发送的消息称为 M M M,依据发送接收消息双方约定的生成多项式 G ( x ) G(x) G(x)(意思就是 G ( x ) G(x) G(x) 是已知的)࿰…...

JVM垃圾回收机制全解析
Java虚拟机(JVM)中的垃圾收集器(Garbage Collector,简称GC)是用于自动管理内存的机制。它负责识别和清除不再被程序使用的对象,从而释放内存空间,避免内存泄漏和内存溢出等问题。垃圾收集器在Ja…...

linux arm系统烧录
1、打开瑞芯微程序 2、按住linux arm 的 recover按键 插入电源 3、当瑞芯微检测到有设备 4、松开recover按键 5、选择升级固件 6、点击固件选择本地刷机的linux arm 镜像 7、点击升级 (忘了有没有这步了 估计有) 刷机程序 和 镜像 就不提供了。要刷的时…...
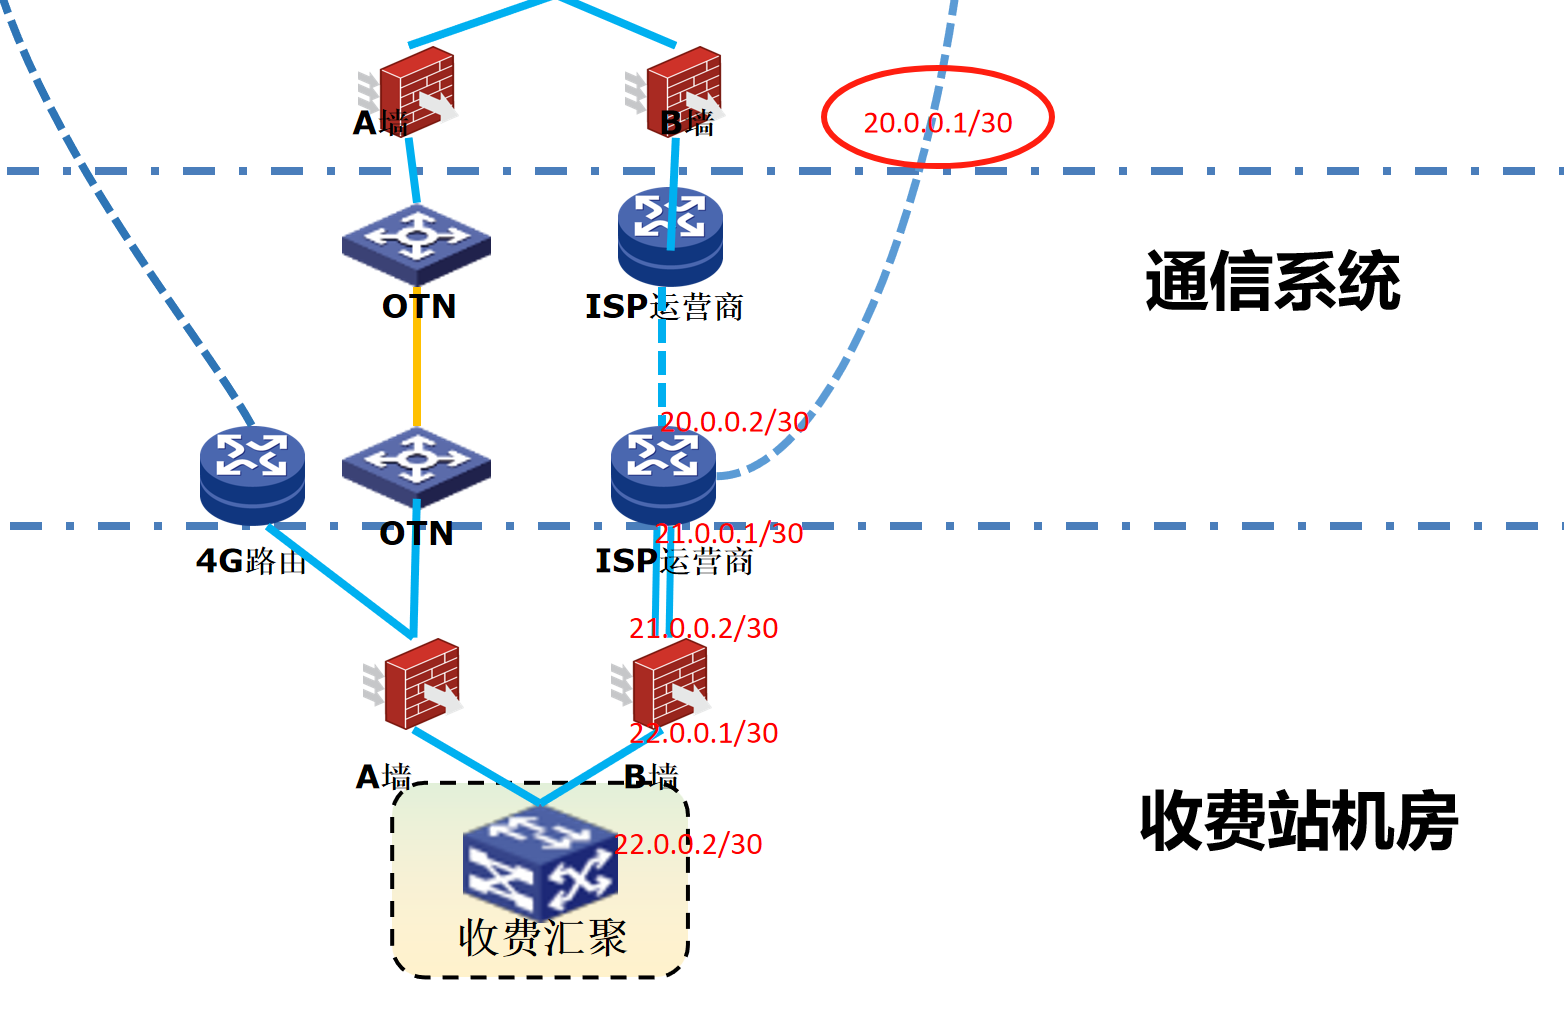
浪潮交换机配置track检测实现高速公路收费网络主备切换NQA
浪潮交换机track配置 项目背景高速网络拓扑网络情况分析通信线路收费网络路由 收费汇聚交换机相应配置收费汇聚track配置 项目背景 在实施省内一条高速公路时遇到的需求,本次涉及的主要是收费汇聚交换机的配置,浪潮网络设备在高速项目很少,通…...
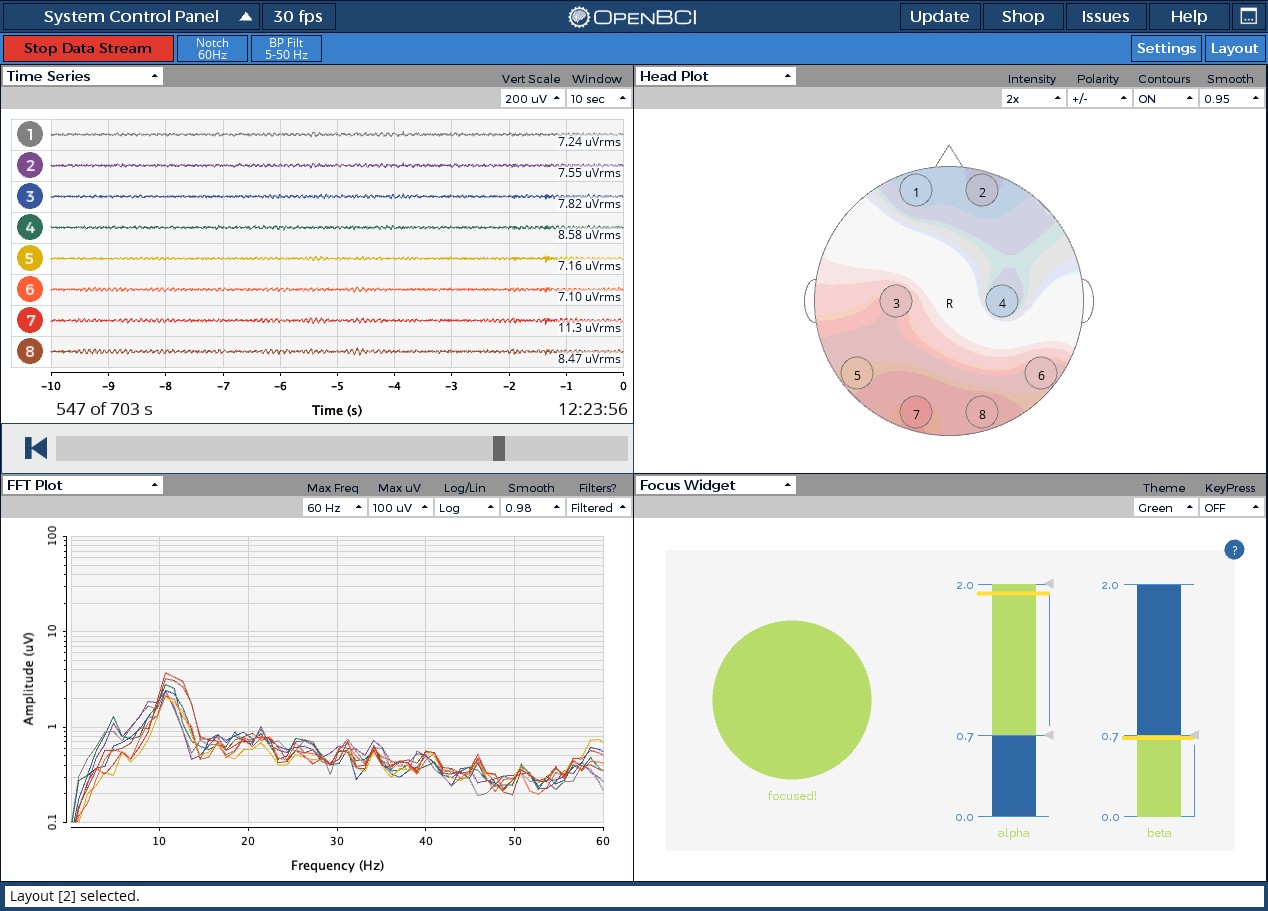
脑机新手指南(七):OpenBCI_GUI:从环境搭建到数据可视化(上)
一、OpenBCI_GUI 项目概述 (一)项目背景与目标 OpenBCI 是一个开源的脑电信号采集硬件平台,其配套的 OpenBCI_GUI 则是专为该硬件设计的图形化界面工具。对于研究人员、开发者和学生而言,首次接触 OpenBCI 设备时,往…...
