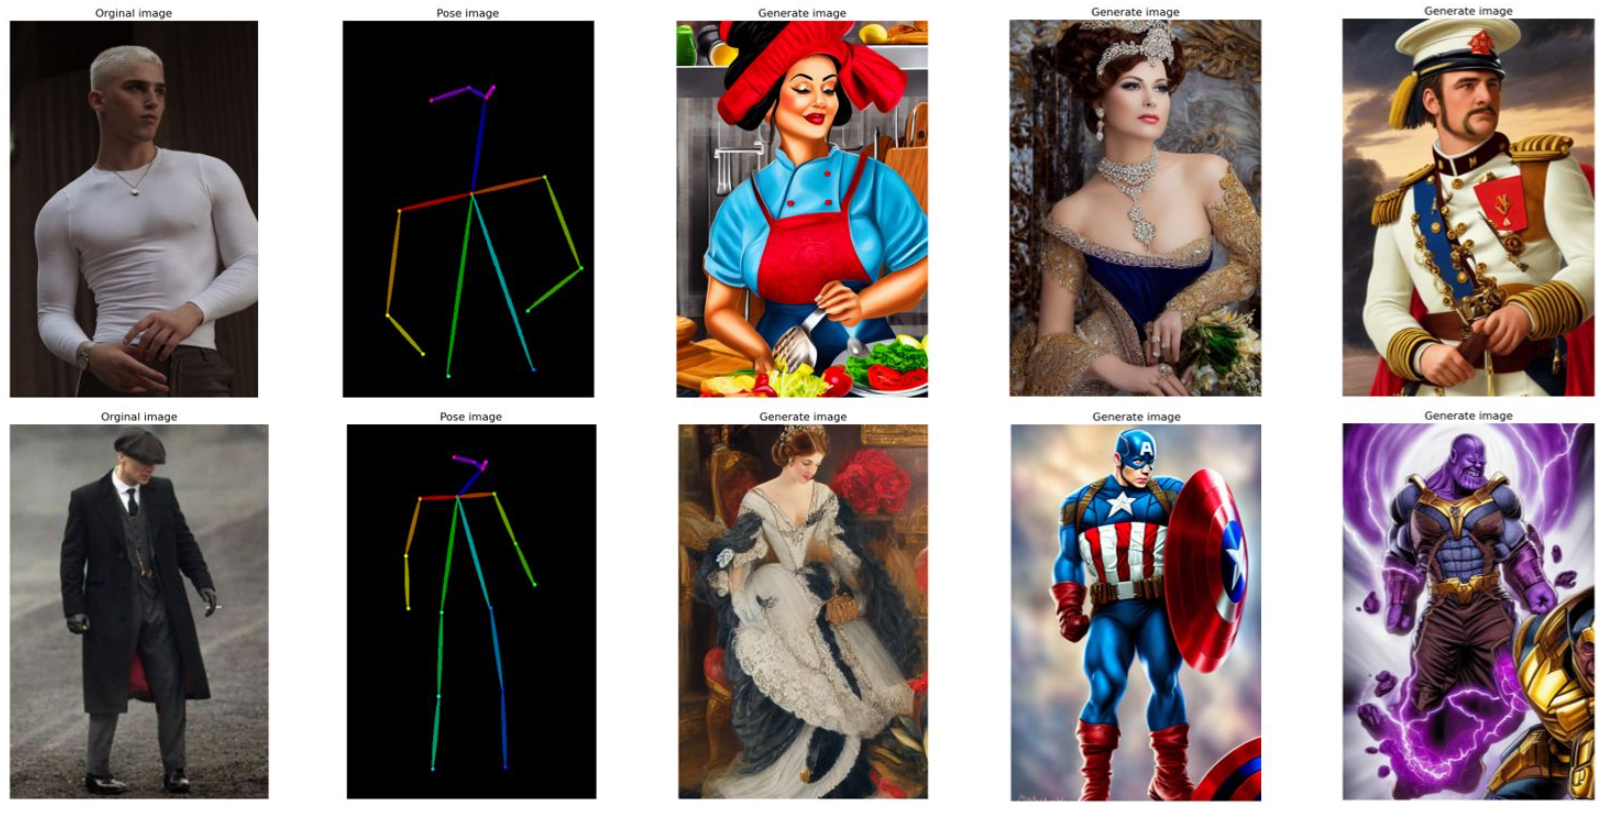
Pytorch人体姿态骨架生成图像
ControlNet是一个稳定扩散模型,可以复制构图和人体姿势。ControlNet解决了生成想要的确切姿势困难的问题。 Human Pose使用OpenPose检测关键点,如头部、肩膀、手的位置等。它适用于复制人类姿势,但不适用于其他细节,如服装、发型和背景。
使用方法: 输入一个图像,并提示模型生成一个图像。Openpose将为你检测姿势。
🔹 本案例需使用Pytorch-1.8 GPU-P100及以上规格运行
🔹 点击Run in ModelArts,将会进入到ModelArts CodeLab中,这时需要你登录华为云账号,如果没有账号,则需要注册一个,且要进行实名认证, 登录之后,等待片刻,即可进入到CodeLab的运行环境
1. 环境准备
为了方便用户下载使用及快速体验,本案例已将代码及control_sd15_openpose预训练模型转存至华为云OBS中。注意:为了使用该模型与权重,你必须接受该模型所要求的License,请访问huggingface的lllyasviel/ControlNet, 仔细阅读里面的License。模型下载与加载需要几分钟时间。
import os
import moxing as moxparent = os.path.join(os.getcwd(),'ControlNet')
if not os.path.exists(parent):mox.file.copy_parallel('obs://modelarts-labs-bj4-v2/case_zoo/ControlNet/ControlNet',parent)if os.path.exists(parent):print('Code Copy Completed.')else:raise Exception('Failed to Copy the Code.')
else:print("Code already exists!")pose_model_path = os.path.join(os.getcwd(),"ControlNet/models/control_sd15_openpose.pth")
body_model_path = os.path.join(os.getcwd(),"ControlNet/annotator/ckpts/body_pose_model.pth")
hand_model_path = os.path.join(os.getcwd(),"ControlNet/annotator/ckpts/hand_pose_model.pth")
if not os.path.exists(pose_model_path):mox.file.copy_parallel('obs://modelarts-labs-bj4-v2/case_zoo/ControlNet/ControlNet_models/control_sd15_openpose.pth',pose_model_path)mox.file.copy_parallel('obs://modelarts-labs-bj4-v2/case_zoo/ControlNet/ControlNet_models/body_pose_model.pth',body_model_path)mox.file.copy_parallel('obs://modelarts-labs-bj4-v2/case_zoo/ControlNet/ControlNet_models/hand_pose_model.pth',hand_model_path)if os.path.exists(pose_model_path):print('Models Download Completed')else:raise Exception('Failed to Copy the Models.')
else:print("Model Packages already exists!")
check GPU & 安装依赖
大约耗时1min
!nvidia-smi%cd ControlNet!pip uninstall torch torchtext -y
!pip install torch==1.12.1 torchvision==0.13.1 torchaudio==0.12.1
!pip install omegaconf==2.1.1 einops==0.3.0
!pip install pytorch-lightning==1.5.0
!pip install transformers==4.19.2 open_clip_torch==2.0.2
!pip install gradio==3.24.1
!pip install translate==3.6.1
!pip install scikit-image==0.19.3
!pip install basicsr==1.4.2
导包
import config
import cv2
import einops
import gradio as gr
import numpy as np
import torch
import randomfrom pytorch_lightning import seed_everything
from annotator.util import resize_image, HWC3
from annotator.openpose import OpenposeDetector
from cldm.model import create_model, load_state_dict
from cldm.ddim_hacked import DDIMSamplerfrom translate import Translator
from PIL import Image
import matplotlib.pyplot as plt
2. 加载模型
apply_openpose = OpenposeDetector()model = create_model('./models/cldm_v15.yaml').cpu()
model.load_state_dict(load_state_dict('./models/control_sd15_openpose.pth', location='cuda'))
model = model.cuda()
ddim_sampler = DDIMSampler(model)
3. 人体姿态生成图像
def infer(input_image, prompt, a_prompt, n_prompt, num_samples, image_resolution, detect_resolution, ddim_steps, guess_mode, strength, scale, seed, eta):trans = Translator(from_lang="ZH",to_lang="EN-US")prompt = trans.translate(prompt)a_prompt = trans.translate(a_prompt)n_prompt = trans.translate(n_prompt)# 图像预处理with torch.no_grad():if type(input_image) is str:input_image = np.array(Image.open(input_image))input_image = HWC3(input_image)detected_map, _ = apply_openpose(resize_image(input_image, detect_resolution))detected_map = HWC3(detected_map)img = resize_image(input_image, image_resolution)H, W, C = img.shape# 初始化检测映射detected_map = cv2.resize(detected_map, (W, H), interpolation=cv2.INTER_NEAREST)control = torch.from_numpy(detected_map.copy()).float().cuda() / 255.0control = torch.stack([control for _ in range(num_samples)], dim=0)control = einops.rearrange(control, 'b h w c -> b c h w').clone()# 设置随机种子if seed == -1:seed = random.randint(0, 65535)seed_everything(seed)if config.save_memory:model.low_vram_shift(is_diffusing=False)cond = {"c_concat": [control], "c_crossattn": [model.get_learned_conditioning([prompt + ', ' + a_prompt] * num_samples)]}un_cond = {"c_concat": None if guess_mode else [control], "c_crossattn": [model.get_learned_conditioning([n_prompt] * num_samples)]}shape = (4, H // 8, W // 8)if config.save_memory:model.low_vram_shift(is_diffusing=True)# 采样model.control_scales = [strength * (0.825 ** float(12 - i)) for i in range(13)] if guess_mode else ([strength] * 13) # Magic number. IDK why. Perhaps because 0.825**12<0.01 but 0.826**12>0.01samples, intermediates = ddim_sampler.sample(ddim_steps, num_samples,shape, cond, verbose=False, eta=eta,unconditional_guidance_scale=scale,unconditional_conditioning=un_cond)if config.save_memory:model.low_vram_shift(is_diffusing=False)# 后处理x_samples = model.decode_first_stage(samples)x_samples = (einops.rearrange(x_samples, 'b c h w -> b h w c') * 127.5 + 127.5).cpu().numpy().clip(0, 255).astype(np.uint8)results = [x_samples[i] for i in range(num_samples)]return [detected_map] + results
设置参数,生成图像
上传您的图像至./ControlNet/test_imgs/ 路径下,然后更改图像路径及其他参数后,点击运行。
➡参数说明:
🔸 img_path:输入图像路径,黑白稿
🔸 prompt:提示词
🔸 a_prompt:次要的提示
🔸 n_prompt: 负面提示,不想要的内容
🔸 image_resolution: 对输入的图片进行最长边等比resize
🔸 detect_resolution: 中间生成条件图像的分辨率
🔸 scale:文本提示的控制强度,越大越强
🔸 guess_mode: 盲猜模式,默认关闭,开启后生成图像将不受prompt影响,使用更多样性的结果,生成后得到不那么遵守图像条件的结果
🔸 seed: 随机种子
🔸 ddim_steps: 采样步数,一般15-30,值越大越精细,耗时越长
🔸 DDIM eta: 生成过程中的随机噪声系数,一般选0或1,1表示有噪声更多样,0表示无噪声,更遵守描述条件
🔸 strength: 这是应用 ControlNet 的步骤数。它类似于图像到图像中的去噪强度。如果指导强度为 1,则 ControlNet 应用于 100% 的采样步骤。如果引导强度为 0.7 并且您正在执行 50 个步骤,则 ControlNet 将应用于前 70% 的采样步骤,即前 35 个步骤。
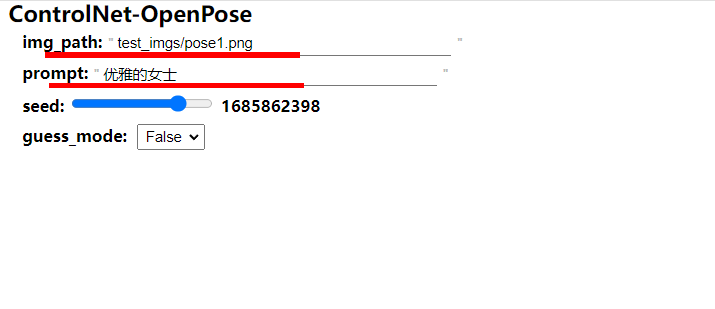
#@title ControlNet-OpenPose img_path = "test_imgs/pose1.png" #@param {type:"string"}
prompt = "优雅的女士" #@param {type:"string"}
seed = 1685862398 #@param {type:"slider", min:-1, max:2147483647, step:1}
guess_mode = False #@param {type:"raw", dropdown}a_prompt = '质量最好,非常详细'
n_prompt = '长体,下肢,解剖不好,手不好,手指缺失,手指多,手指少,裁剪,质量最差,质量低'
num_samples = 1
image_resolution = 512
detect_resolution = 512
ddim_steps = 20
strength = 1.0
scale = 9.0
eta = 0.0np_imgs = infer(img_path, prompt, a_prompt, n_prompt, num_samples, image_resolution, detect_resolution, ddim_steps, guess_mode, strength, scale, seed, eta)ori = Image.open(img_path)
src = Image.fromarray(np_imgs[0])
dst = Image.fromarray(np_imgs[1])
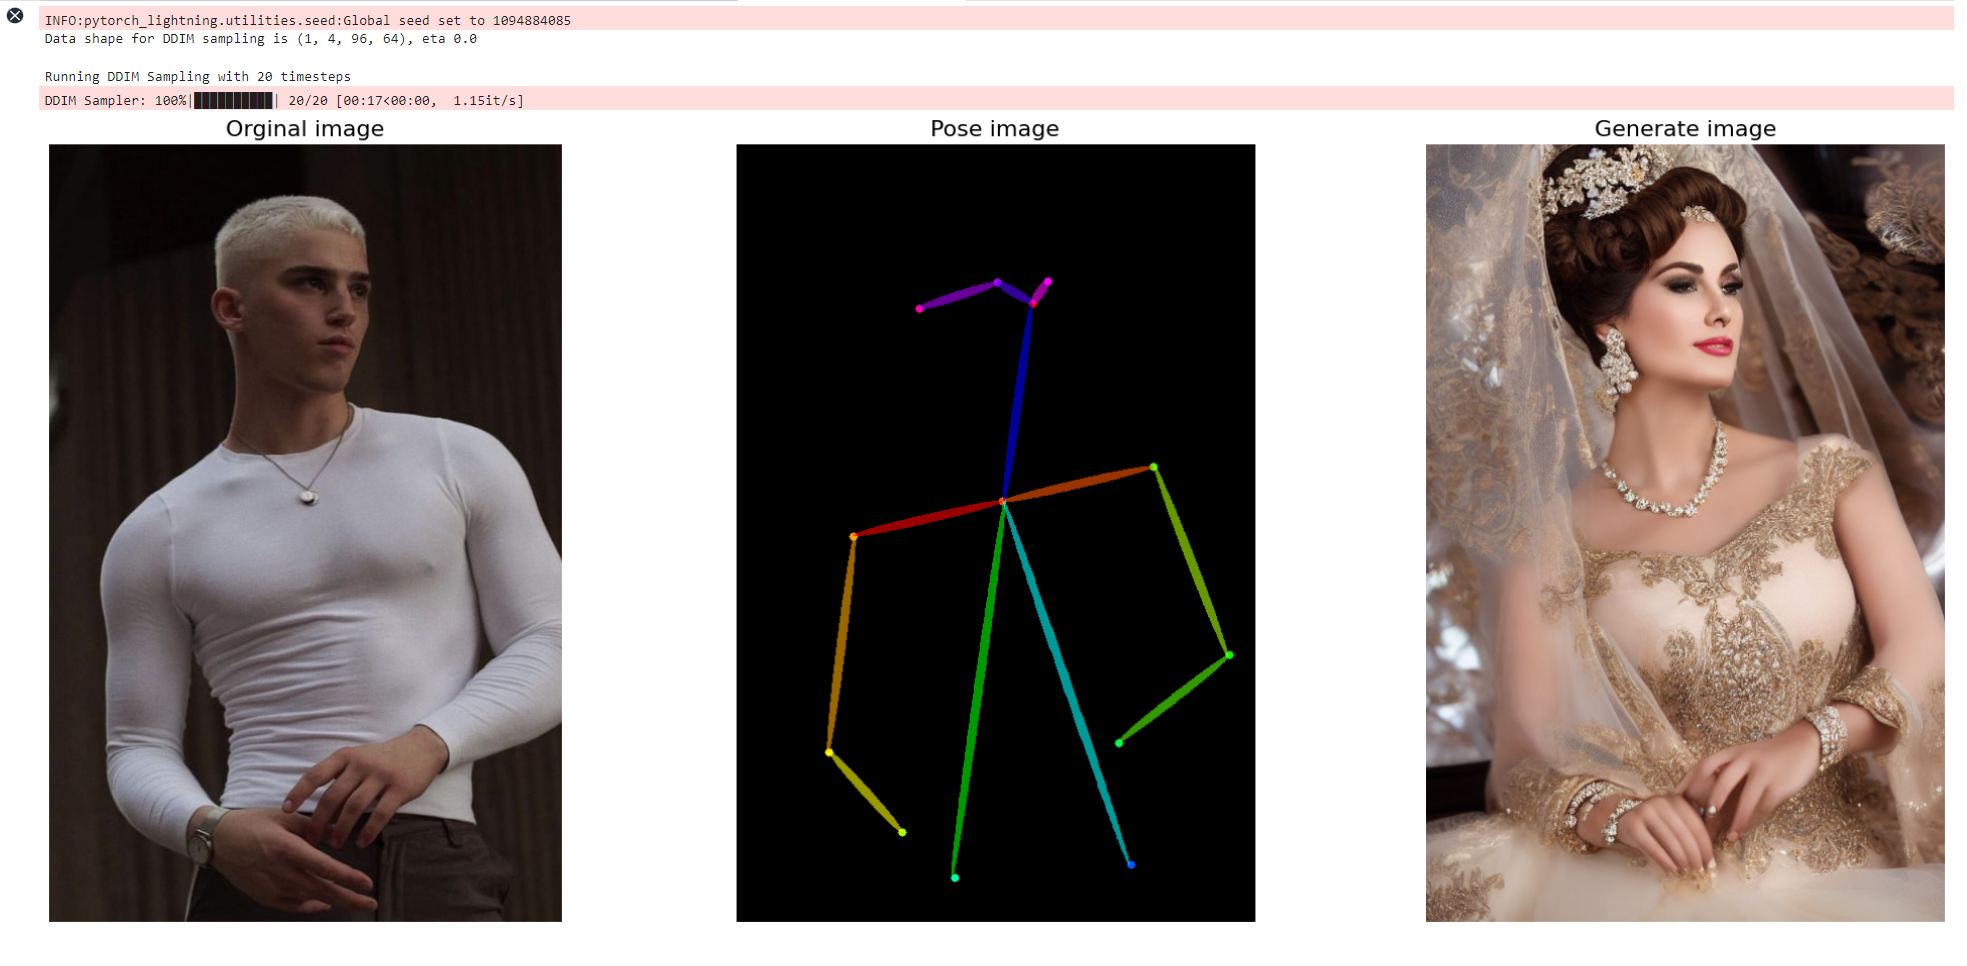
fig = plt.figure(figsize=(25, 10))ax1 = fig.add_subplot(1, 3, 1)
plt.title('Orginal image', fontsize=16)
ax1.axis('off')
ax1.imshow(ori)ax2 = fig.add_subplot(1, 3, 2)
plt.title('Pose image', fontsize=16)
ax2.axis('off')
ax2.imshow(src)ax3 = fig.add_subplot(1, 3, 3)
plt.title('Generate image', fontsize=16)
ax3.axis('off')
ax3.imshow(dst)plt.show()上传自己的照片,输入你的prompt提示词
运行结果:
4. Gradio可视化部署
Gradio应用启动后可在下方页面上传图片根据提示生成图像,您也可以分享public url在手机端,PC端进行访问生成图像。
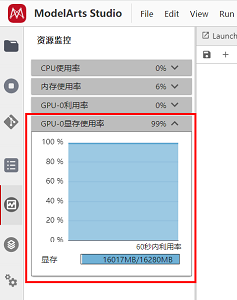
请注意: 在图像生成需要消耗显存,您可以在左侧操作栏查看您的实时资源使用情况,点击GPU显存使用率即可查看,当显存不足时,您生成图像可能会报错,此时,您可以通过重启kernel的方式重置,然后重头运行即可规避。
block = gr.Blocks().queue()
with block:with gr.Row():gr.Markdown("## 💃人体姿态生成图像")with gr.Row():with gr.Column():gr.Markdown("请上传一张人像图,设置好参数后,点击Run")input_image = gr.Image(source='upload', type="numpy")prompt = gr.Textbox(label="描述")run_button = gr.Button(label="Run")with gr.Accordion("高级选项", open=False):num_samples = gr.Slider(label="Images", minimum=1, maximum=3, value=1, step=1)image_resolution = gr.Slider(label="Image Resolution", minimum=256, maximum=768, value=512, step=64)strength = gr.Slider(label="Control Strength", minimum=0.0, maximum=2.0, value=1.0, step=0.01)guess_mode = gr.Checkbox(label='Guess Mode', value=False)detect_resolution = gr.Slider(label="OpenPose Resolution", minimum=128, maximum=1024, value=512, step=1)ddim_steps = gr.Slider(label="Steps", minimum=1, maximum=30, value=20, step=1)scale = gr.Slider(label="Guidance Scale", minimum=0.1, maximum=30.0, value=9.0, step=0.1)seed = gr.Slider(label="Seed", minimum=-1, maximum=2147483647, step=1, randomize=True)eta = gr.Number(label="eta (DDIM)", value=0.0)a_prompt = gr.Textbox(label="Added Prompt", value='best quality, extremely detailed')n_prompt = gr.Textbox(label="Negative Prompt",value='longbody, lowres, bad anatomy, bad hands, missing fingers, extra digit, fewer digits, cropped, worst quality, low quality')with gr.Column():result_gallery = gr.Gallery(label='Output', show_label=False, elem_id="gallery").style(grid=2, height='auto')ips = [input_image, prompt, a_prompt, n_prompt, num_samples, image_resolution, detect_resolution, ddim_steps, guess_mode, strength, scale, seed, eta]run_button.click(fn=infer, inputs=ips, outputs=[result_gallery])
block.launch(share=True)
INFO:botocore.vendored.requests.packages.urllib3.connectionpool:Starting new HTTP connection (1): proxy.modelarts.comINFO:botocore.vendored.requests.packages.urllib3.connectionpool:Starting new HTTPS connection (1): www.huaweicloud.com
Running on local URL:  http://127.0.0.1:7860Running on public URL: https://96b421e81ebf0fe302.gradio.live
This share link expires in 72 hours. For free permanent hosting and GPU upgrades (NEW!), check out Spaces: https://huggingface.co/spaces
相关文章:
Pytorch人体姿态骨架生成图像
ControlNet是一个稳定扩散模型,可以复制构图和人体姿势。ControlNet解决了生成想要的确切姿势困难的问题。 Human Pose使用OpenPose检测关键点,如头部、肩膀、手的位置等。它适用于复制人类姿势,但不适用于其他细节,如服装、发型和…...
前端面试常考的HTML标签知识!!!
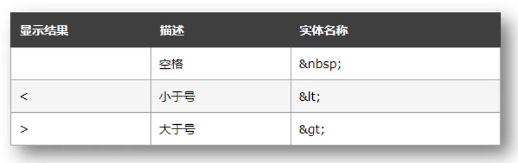
语义标签 标签名语义描述header网页头部网页的主要头部区域nav网页导航网页的导航链接区域footer网页底部网页的底部区域aside网页侧边栏网页的侧边栏区域section网页区块网页的独立区块 | article | 网页文章 | 网页的独立文章区域 | 字符实体 作用:在网页中显…...

Oracle触发器
Oracle触发器就是特定事件发生时自动执行的存储过程。 触发器基本使用 基本语法: create [or replace] trigger 触发器名称 alter | before | instead of [insert] [[or] update [of 列1,列2,...]] [[or] delete] on 表名 [referencing {OLD [as] old / NEW [as]…...

GPT-5:未来已来,我们如何共舞于智能新纪元?
GPT-5:未来已来,我们如何共舞于智能新纪元? 在科技日新月异的今天,人工智能(AI)的每一次飞跃都深刻地改变着人类社会的面貌。从AlphaGo击败围棋世界冠军,到GPT系列模型引领自然语言处理&#x…...

2024年6月 青少年机器人技术等级考试理论综合试卷(五级)
202406 青少年等级考试机器人理论真题五级 第 1 题 ESP32 for Arduino,通过引脚2读取按键开关的返回值,电路如下图所示,程序pinMode(2, mode);中,参数mode的值是?( ) A:INPUT B&…...

【Go】 HTTP编程3-路由httprouter
HttpRouter httprouter httprouter是第三方的库,不是go的标准库,使用命令 go get -u github.com/julienschmidt/httprouter ,下载该模块,-u表示如果已经下载但更新到最新版本Router 实现了http.Handler接口,为各种 re…...

Spring Boot 整合 SA-Token 使用详解
Spring Boot 整合 SA-Token 使用详解 在现代Web开发中,用户认证与授权是构建安全应用的基础。SA-Token是一个轻量级的Java权限认证框架,它以其简洁的API设计、高效的执行效率以及丰富的功能特性,成为了众多开发者在Spring Boot项目中实现用户…...
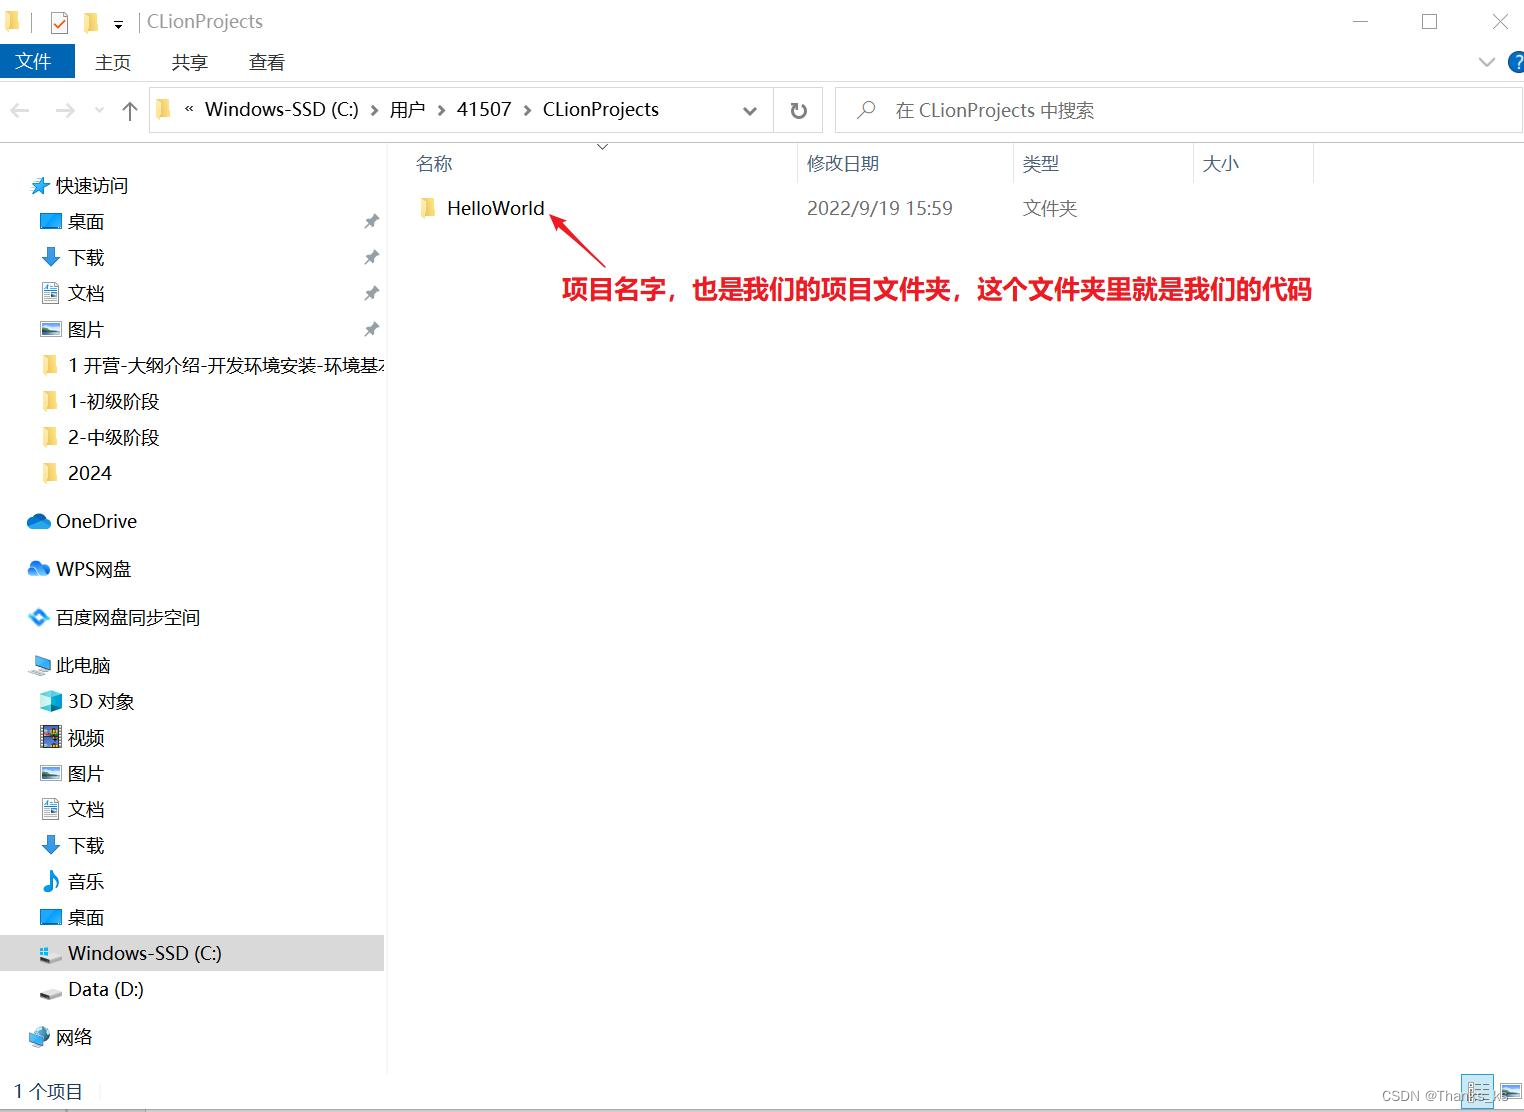
1.3 C 语言入门实战:从 Hello World 到基础语法解析
目录 1 程序的作用 2 初识 Hello World 2.1 新建项目 2.2 程序解释 3 printf 的作用 4 注释及其注意事项 4.1 单行注释 4.2 多行注释 4.3 嵌套错误 5 项目在磁盘上的位置 1 程序的作用 如下图所示,我们编写了一个可以做加法的程序,我们给程序…...

一文读懂什么是Go语言goroutine
1. 进程、线程和协程的区别 进程: 进程是具有一定独立功能的程序,进程是系统资源分配和调度的最小单位。每个进程都有自己的独立内存空间,不同进程通过进程间通信来通信。由于进程比较重量,占据独立的内存,所以上下文进程间的切换…...
计算机毕业设计 农家乐管理平台 Java+SpringBoot+Vue 前后端分离 文档报告 代码讲解 安装调试
🍊作者:计算机编程-吉哥 🍊简介:专业从事JavaWeb程序开发,微信小程序开发,定制化项目、 源码、代码讲解、文档撰写、ppt制作。做自己喜欢的事,生活就是快乐的。 🍊心愿:点…...

Spring Boot优缺点
Spring Boot 是一款用于简化Spring应用开发的框架,它集成了大量常用的框架和工具,大大简化了Spring项目的配置和部署。下面是Spring Boot的优缺点: 优点: 简化配置:Spring Boot自动配置功能可以根据应用的依赖自动配…...

Android Studio中创建apk签名文件
本文以macOS中Android Studio 2021.1.1版本为例介绍创建apk签名文件的操作步骤: 1.启动Android Studio,并打开一个Android项目。 2.依次点击菜单:Build -> Generate Signed Bundle / APK...。 3.在弹出的"Generate Signed Bundle or …...

CRC32 JAVA C#实现
项目中用到CRC32进行校验得地方,需要用到C#和java进行对比: 一、C#实现: class CRC32Cls { protected ulong[] Crc32Table; //生成CRC32码表 public void GetCRC32Table() { ulong Crc; …...
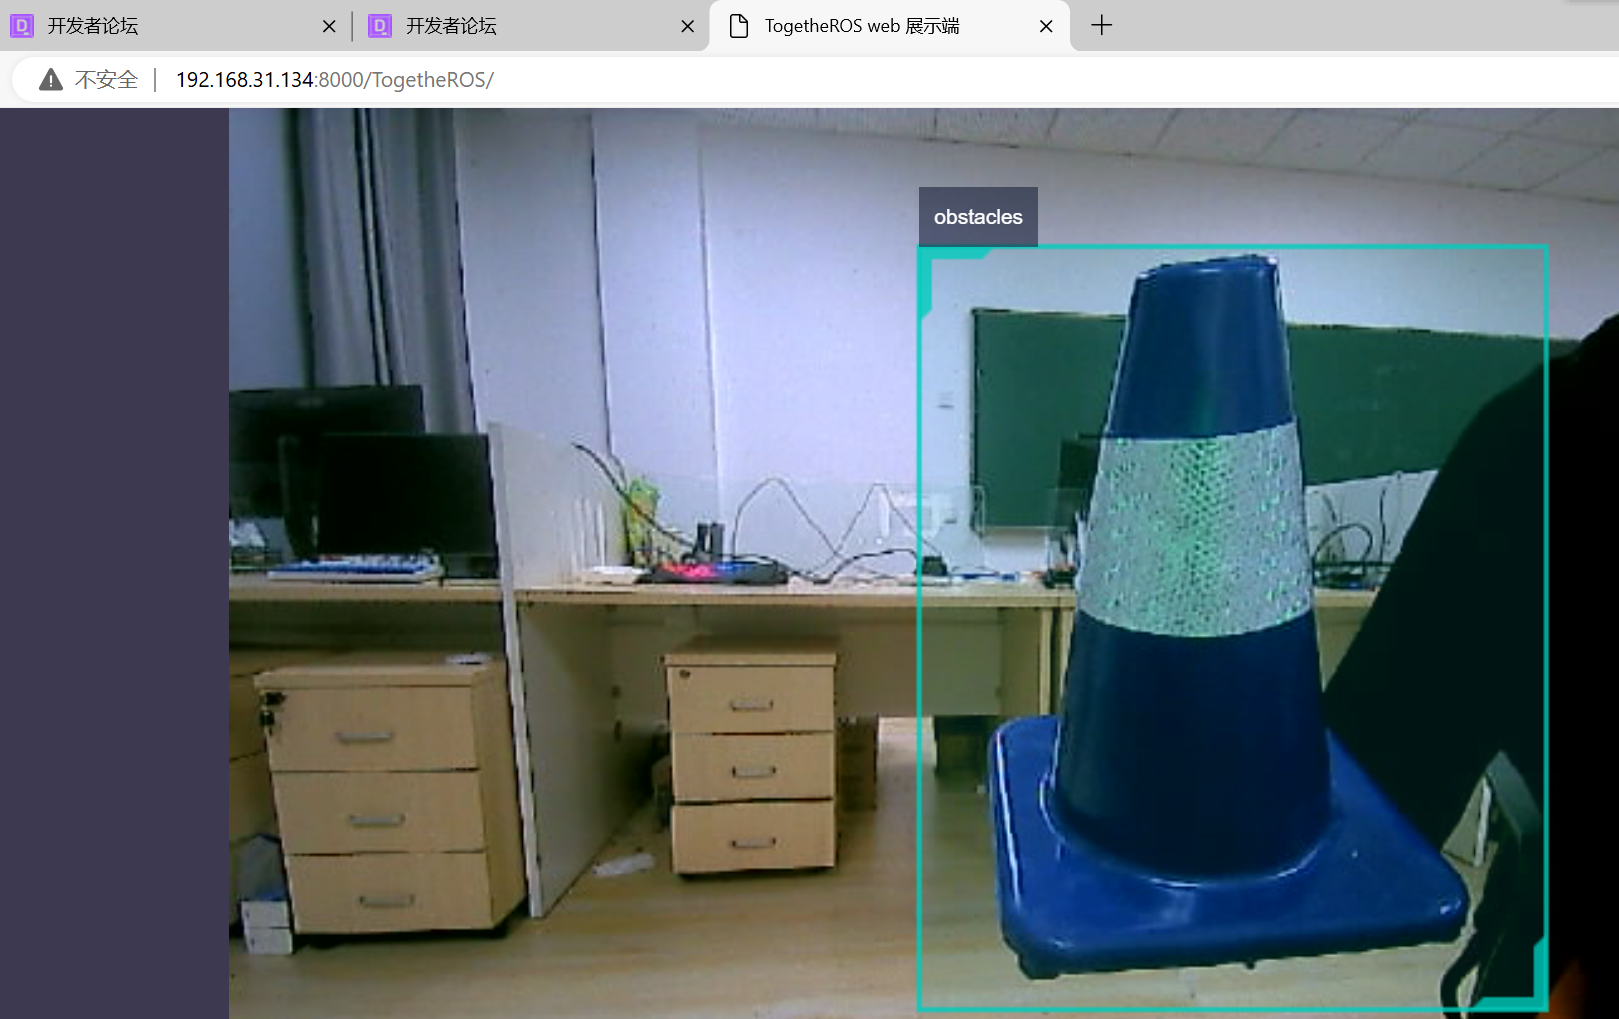
本科阶段最后一次竞赛Vlog——2024年智能车大赛智慧医疗组准备全过程——5Webscoket节点的使用
本科阶段最后一次竞赛Vlog——2024年智能车大赛智慧医疗组准备全过程——5Webscoket节点的使用 有了前面几篇文章的铺垫,现在已经可以实现我到手测试那一步的 1.解读usb_websocket_display.launch.py 首先进入这个目录/root/dev_ws/src/origincar/originca…...

深入学习小程序第二天:事件处理与用户交互
一、概念 1. 事件绑定与类型 在小程序中,通过在组件上添加特定的属性(如 bind 开头的属性)来绑定事件处理函数,以响应用户的交互操作。常见的事件类型包括触摸事件、表单事件和系统事件: 触摸事件:用于响…...

操作系统快速入门(一)
😀前言 本篇博文是关于操作系统的,希望你能够喜欢 🏠个人主页:晨犀主页 🧑个人简介:大家好,我是晨犀,希望我的文章可以帮助到大家,您的满意是我的动力😉&…...

Spring Cloud微服务性能优化:策略、实践与未来趋势
标题:Spring Cloud微服务性能优化:策略、实践与未来趋势 摘要 在微服务架构中,服务调用链路的性能优化是确保系统高效运行的关键。Spring Cloud作为微服务架构的主流实现之一,提供了多种工具和方法来优化服务间的调用。本文将深…...

秒懂C++之多态
目录 一. 多态的概念 二. 多态的定义及实现 多态的构成条件 虚函数重写的例外 协变(基类与派生类虚函数返回值类型不同) 析构函数的重写(基类与派生类析构函数的名字不同) 练习例题 final override 重载、覆盖(重写)、隐藏(重定义)的对比 三. 抽象类 四. 多态的原理…...

C语言:求最大数不用数组
(1)题目: 输入一批正数用空格隔开,个数不限,输入0时结束循环,并且输出这批整数的最大值。 (2)代码: #include "stdio.h" int main() {int max 0; // 假设输入…...

零门槛成为HelpLook推荐官,邀好友加入,奖励享不停!
什么!? 还有谁不知道HelpLook推荐官计划! 只需要简单地注册加入 在好友成功订阅套餐之后 可一次性获得20%的丰厚现金返佣 HelpLook是一款快速搭建AI知识库的系统,并帮助企业0代码搭建帮助中心、FAQs、SOPs、产品文档、说明书和…...

6款高效降AI率工具 改写实力出众
写论文时反复检测出的AI痕迹总让你提心吊胆?别担心,这里整理了6款真正好用的论文降AI率工具,堪称应对AI生成特征的“得力助手”。它们能有效识别并消除AI生成的痕迹,改写能力出众,帮你快速降低查重率,顺利通…...

Unity iOS构建报错SDK version is 0的根因与精准修复
1. 这个报错不是Unity在“发脾气”,而是工程配置在“装死”刚接手一个老项目,打开Unity编辑器,点Build Settings准备打包iOS,结果弹出一行红字:“SDK version is 0, cannot build”。我第一反应是——这什么鬼…...

如何在浏览器中一键解密所有加密音乐文件:Unlock-Music完全指南
如何在浏览器中一键解密所有加密音乐文件:Unlock-Music完全指南 【免费下载链接】unlock-music 在浏览器中解锁加密的音乐文件。原仓库: 1. https://github.com/unlock-music/unlock-music ;2. https://git.unlock-music.dev/um/web 项目地…...

对比不同模型在创意生成任务中的效果与token消耗差异
🚀 告别海外账号与网络限制!稳定直连全球优质大模型,限时半价接入中。 👉 点击领取海量免费额度 对比不同模型在创意生成任务中的效果与token消耗差异 在为一场创意大赛准备素材时,我们面临一个常见的选择:…...
)
大模型测试新范式:Claude端到端验证的5层断言体系(语义一致性/上下文连贯性/安全边界/成本阈值/时序鲁棒性)
更多请点击: https://codechina.net 第一章:大模型测试新范式:Claude端到端验证的5层断言体系(语义一致性/上下文连贯性/安全边界/成本阈值/时序鲁棒性) 传统LLM测试常聚焦于准确率或BLEU等静态指标,而Cla…...

从零开始构建个人知识库:kepano-obsidian笔记模板完整指南
从零开始构建个人知识库:kepano-obsidian笔记模板完整指南 【免费下载链接】kepano-obsidian My personal Obsidian vault template. A bottom-up approach to note-taking and organizing things I am interested in. 项目地址: https://gitcode.com/gh_mirrors/…...

5分钟掌握m4s-converter:将B站缓存视频无损转换为MP4的终极指南
5分钟掌握m4s-converter:将B站缓存视频无损转换为MP4的终极指南 【免费下载链接】m4s-converter 一个跨平台小工具,将bilibili缓存的m4s格式音视频文件合并成mp4 项目地址: https://gitcode.com/gh_mirrors/m4/m4s-converter 你是否曾在B站缓存了…...
——仅限首批500名开发者开放》)
企业级Veo 2提示词治理框架(含合规校验/版本回溯/效果归因三模块)——仅限首批500名开发者开放》
更多请点击: https://intelliparadigm.com 第一章:Veo 2提示词治理框架的核心定位与演进逻辑 Veo 2提示词治理框架并非单纯的技术工具升级,而是面向AIGC生产环境规模化、合规化与可审计化需求的战略性基础设施重构。其核心定位在于将离散、经…...

如何快速配置虚拟显示器:面向初学者的完整指南
如何快速配置虚拟显示器:面向初学者的完整指南 【免费下载链接】parsec-vdd ✨ Perfect virtual display for game streaming 项目地址: https://gitcode.com/gh_mirrors/pa/parsec-vdd 你是否在为游戏串流画质不佳而烦恼?或者需要为无显示器主机…...

Linux命令:perf
perf 命令 基本介绍 perf(Performance Counters for Linux)是 Linux 系统中用于性能分析的强大工具套件。它基于内核性能计数器(PMC),可以分析 CPU 使用率、内存访问、缓存命中率、分支预测等硬件级性能指标࿰…...