一键换肤(Echarts 自定义主题)
一键换肤(Echarts 自定义主题)
一、使用官方主题配置工具
官方主题配置工具:https://echarts.apache.org/zh/theme-builder.html

如果以上主题不满足使用,可以自己自定义主题

例如:修改背景、标题等,可按照设计师需求来更改

配置好之后,下载主题


有两种方式可选:JS 版本、JSON 版本,以 JSON 版本为例:
复制到项目中( theme.json ),
theme.json 文件示例:
{"categoryAxis": {"axisLine": {"show": true,"lineStyle": {"color": "green"}},"axisTick": {"show": true,"lineStyle": {"color": "green"}},"axisLabel": {"show": true,"color": "green"} },"valueAxis": {"axisLine": {"show": false,"lineStyle": {"color": "green"}},"axisLabel": {"show": true,"color": "green"}},"legend": {"textStyle": {"color": "green"}}
}
注册主题:
// 引入主题
import theme from './theme.json'// 使用echarts
import echarts from 'echarts'
echarts.registerTheme('customTheme', theme)
使用:
//使用echarts
<div id="test">...
</div>
<script>let myChart = echarts.init(document.getElementById("test"),"customTheme");let option = {...}myChart.setOption(option);
</script>
完整代码:
<template><div id="main" style="width: 600px; height: 400px"></div>
</template><script>
import theme from "./theme.json";
import * as echarts from "echarts";export default {mounted() {//注册主题echarts.registerTheme("customTheme", theme);//初始化使用主题var myChart = echarts.init(document.getElementById("main"), "customTheme"); // 使用dark 、light或无第二参数myChart.setOption({xAxis: {type: "category",data: ["Mon", "Tue", "Wed", "Thu", "Fri", "Sat", "Sun"],},yAxis: {type: "value",},series: [{data: [150, 230, 224, 218, 135, 147, 260],type: "line",},],});},
};
</script>
如果是多主题切换,则可以将各个主题的颜色整合在一个文件,分别注册
{"lightTheme": {"categoryAxis": {"axisLine": {"show": true,"lineStyle": {"color": "#cccccc"}},"axisTick": {"show": true,"lineStyle": {"color": "#cccccc"}},"axisLabel": {"show": true,"color": "#cccccc"}},"valueAxis": {"axisLine": {"show": false,"lineStyle": {"color": "#cccccc"}},"axisLabel": {"show": true,"color": "#cccccc"}},"legend": {"textStyle": {"color": "#cccccc"}}},"darkTheme": {"categoryAxis": {"axisLine": {"show": true,"lineStyle": {"color": "#ffffff"}},"axisTick": {"show": true,"lineStyle": {"color": "#ffffff"}},"axisLabel": {"show": true,"color": "#ffffff"}},"valueAxis": {"axisLine": {"show": false,"lineStyle": {"color": "#ffffff"}},"axisLabel": {"show": true,"color": "#ffffff"}},"legend": {"textStyle": {"color": "#ffffff"}}}
}
这样的话,就可以对应官方示例中的这种(深色/浅色模式)
https://echarts.apache.org/examples/zh/editor.html?c=line-simple

二、上述不满足使用的情况

这是因为执行先后顺序

先使用主题色(初始化),再配置的 option,option 里的颜色覆盖了主题里的颜色。
这种情况下,我这边是用了笨办法,一个个去设置(大家如果有好的办法,可以交流下)
给 x 轴、y轴、图例、标题单独设置了 深色模式下的颜色。
定义 darkTheme.json 文件:
{"title": {"textStyle": {"color": "rgba(255,255,255,0.6)"},"subtextStyle": {"color": "rgba(255,255,255,0.6)"}},"tooltip": {"backgroundColor": "rgba(5,22,38,0.9)","borderColor": "rgba(5,22,38,0.9)","textStyle": {"color": "rgba(255,255,255,0.6)"}},"categoryAxis": {"axisLine": {"lineStyle": {"color": "#CCCCCC"}}, "axisTick": {"lineStyle": {"color": "#CCCCCC"}},"axisLabel": {"color": "rgba(255,255,255,0.6)"}},"valueAxis": {"axisLine": {"lineStyle": {"color": "#CCCCCC"}},"axisLabel": {"color": "rgba(255,255,255,0.6)"},"nameTextStyle": {"color": "rgba(255,255,255,0.6)"},"splitLine": {"lineStyle": {"color": "rgba(5,22,38,0.7)"}}},"legend": {"textStyle": {"color": "rgba(255,255,255,0.8)"}}
}
使用
<script>
import { cloneDeep } from "lodash-es";
import darkTheme from "./darkTheme.json";export default {props: {option: {type: Object,default: null,},},name: "ChartCustomEcharts",data() {return {baseChart: null,};},methods: {setOption(option = this.option) {if (option && this.baseChart) {const result = this.getThemeColors(option);this.baseChart.setOption(result, true);}},initChart() {this.baseChart = echarts.init(this.$refs["baseChart"]);this.setOption();},getThemeColors(data) {const option = cloneDeep(data)const themeType = this.themeType;if (themeType === "dark") {// 标题if (option.title) {if (option.title.subtextStyle) {option.title.subtextStyle.color = darkTheme.title.subtextStyle.color;}}// 图例if (option.legend) {if (option.legend.textStyle) {option.legend.textStyle.color = darkTheme.legend.textStyle.color;} else {option.legend.textStyle = darkTheme.legend.textStyle;}}// x轴if (option.xAxis) {if (Array.isArray(option.xAxis)) {option.xAxis.forEach((work) => {if (work.axisLabel) {work.axisLabel.color = darkTheme.categoryAxis.axisLabel.color;}if (work.axisLine) {if (work.axisLine.lineStyle) {work.axisLine.lineStyle.color = darkTheme.categoryAxis.axisLine.lineStyle.color;} else {work.axisLine.lineStyle = darkTheme.categoryAxis.axisLine.lineStyle;}}});}}// Y轴if (option.yAxis) {if (Array.isArray(option.yAxis)) {option.yAxis.forEach((work) => {if (work.axisLabel) {work.axisLabel.color = darkTheme.valueAxis.axisLabel.color;}if (work.axisLine) {if (work.axisLine.lineStyle) {work.axisLine.lineStyle.color = darkTheme.valueAxis.axisLine.lineStyle.color;} else {work.axisLine.lineStyle = darkTheme.valueAxis.axisLine.lineStyle;}}if(work.splitLine){if(work.splitLine.lineStyle){work.splitLine.lineStyle.color = darkTheme.valueAxis.splitLine.lineStyle.color;}else{work.splitLine.lineStyle = darkTheme.valueAxis.splitLine.lineStyle}}if (work.nameTextStyle) {work.nameTextStyle.color = darkTheme.valueAxis.nameTextStyle.color;}});}}// tooltipif (option.tooltip) {option.tooltip.backgroundColor = darkTheme.tooltip.backgroundColor;option.tooltip.borderColor = darkTheme.tooltip.borderColor;if (option.tooltip.textStyle) {option.tooltip.textStyle.color = darkTheme.tooltip.textStyle.color;} else {option.tooltip.textStyle = darkTheme.tooltip.textStyle;}}}return option;},},
};
</script>
相关文章:
一键换肤(Echarts 自定义主题)
一键换肤(Echarts 自定义主题) 一、使用官方主题配置工具 官方主题配置工具:https://echarts.apache.org/zh/theme-builder.html 如果以上主题不满足使用,可以自己自定义主题 例如:修改背景、标题等,可…...
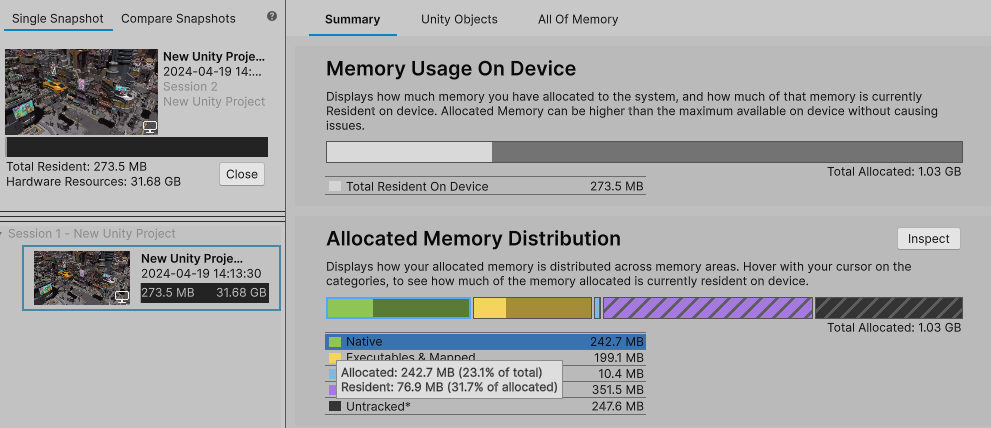
Unity 6 预览版正式发布
Unity 6 预览版发布啦,正式版本将于今年晚些时候正式发布! 下载链接: https://unity.com/releases/editor/whats-new/6000.0.0 Unity 6 预览版是 Unity 6 开发周期的最后一个版本,在去年 11 月 Unite 大会上,我们宣…...

如何跳过极狐GitLab 密钥推送保护功能?
极狐GitLab 是 GitLab 在中国的发行版,专门面向中国程序员和企业提供企业级一体化 DevOps 平台,用来帮助用户实现需求管理、源代码托管、CI/CD、安全合规,而且所有的操作都是在一个平台上进行,省事省心省钱。可以一键安装极狐GitL…...
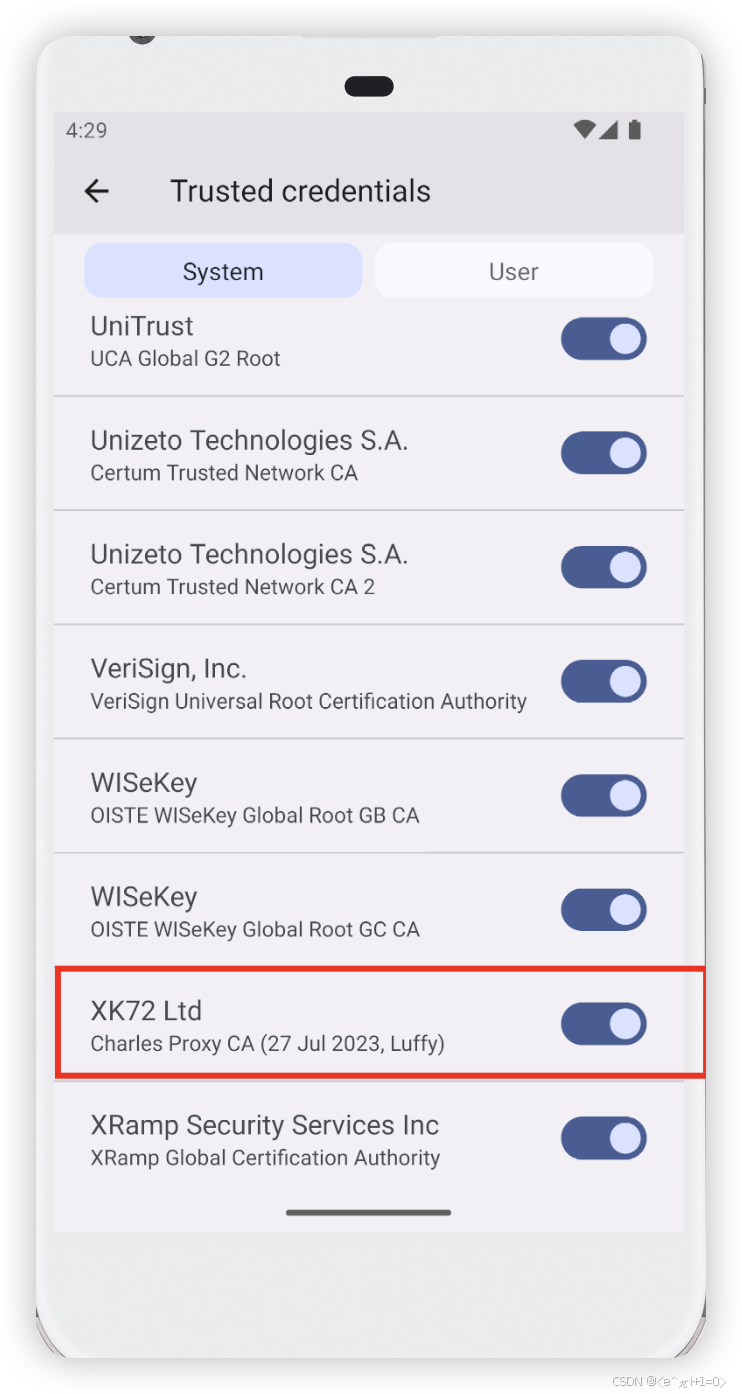
Android高版本抓包总结
方案1 CharlesVirtualXposedJustTrustMe 推荐使用三星手机此方案 VirtualXposed下载链接:https://github.com/android-hacker/VirtualXposed/releases JustTrustMe下载链接:https://github.com/Fuzion24/JustTrustMe/releases/ 下载完成后使用adb命令…...
《AI视频类工具之五—— 开拍》
一.简介 官网:开拍 - 用AI制作口播视频用AI制作口播视频https://www.kaipai.com/home?ref=ai-bot.cn 开拍是一款由美图公司在2023年推出,利用AI技术制作的短视频分享应用。这款工具通过AI赋能,为用户提供了从文案创作、视频拍摄到视频剪辑、包装的一站式解决方案,极大地…...

面试经典算法150题系列-最后一个单词的长度
最后一个单词的长度 给你一个字符串 s,由若干单词组成,单词前后用一些空格字符隔开。返回字符串中 最后一个 单词的长度。 单词 是指仅由字母组成、不包含任何空格字符的最大子字符串。 示例 1: 输入:s "Hello World&qu…...

RTT学习
电源管理组件 嵌入式系统低功耗管理的目的在于满足用户对性能需求的前提下,尽可能降低系统功耗以延长设备待机时间。 高性能与有限的电池能量在嵌入式系统中矛盾最为突出,硬件低功耗设计与软件低功耗管理的联合应用成为了解决矛盾的有效手段。 现在的各…...
|附赠完整面试流程)
前端面试题(二十五)|附赠完整面试流程
📝📝今日分享:前端面试题系列继续更新啦! 🤔🤔面试题是什么呢?这份前端面试题主要是上海某银行的中级前端面试题,面试时长属实没想到,挺短的!但从整个面试流程…...

【分布式系统】关于主流的几款分布式链路追踪工具
Jaeger 标准化与兼容性: Jaeger 支持 OpenTracing 和 OpenTelemetry 标准,这意味着它可以与各种微服务架构和应用框架无缝集成,提供了广泛的兼容性和灵活性。 数据存储选项: Jaeger 支持多种数据存储后端,如 Cassandra…...

【吸引力法则】探究人生欲:追求深度体验与宇宙链接
文章目录 什么是人生欲?唤醒人生欲:克服配得感的三大障碍1 第一大障碍:法执的压制2 第二大障碍:家庭的继承2.1 家庭创伤的代际传递2.2 家庭文化基因的传递2.2.1 “成年人最大的美德是让自己的生活过得更加精彩。”2.2.2 荷欧波诺波…...

REST framework-通用视图[Generic views]
Django’s generic views… were developed as a shortcut for common usage patterns… They take certain common idioms and patterns found in view development and abstract them so that you can quickly write common views of data without having to repeat yourself…...

行驶证OCR识别接口如何用Java调用
一、什么是行驶证OCR识别接口? 传入行驶证照片,行驶证图片上的文字信息,返回包括所有人、品牌型号、住址、车牌号、发动机号码、车辆识别代号、注册日期、发证日期等信息。 行驶证 OCR 接口的主要作用是代替手动输入,提高信息录…...
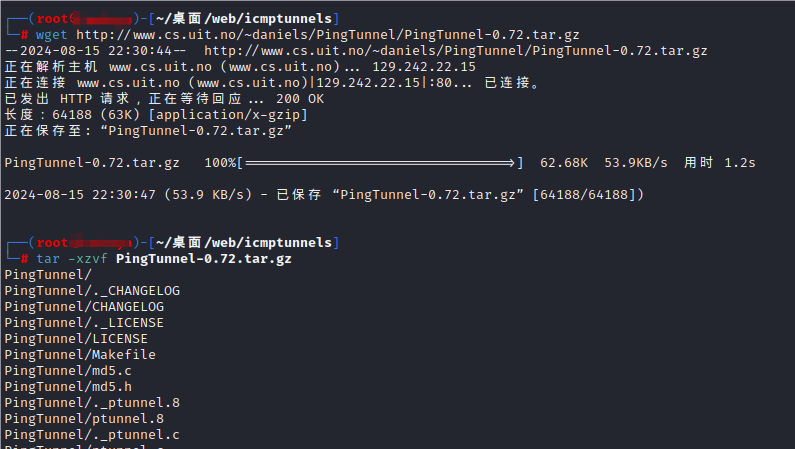
8月15日笔记
masscan安装使用 首先需要有c编译器环境。查看是否有c编译器环境: gcc -v如果系统中已经安装了 GCC,这个命令将输出 GCC 的版本信息。如果未安装,你会看到类似于 “command not found” 的错误消息。 如果没有下载,使用如下命令…...

CSS3 圆角
CSS3 圆角 引言 在网页设计中,圆角矩形是一种常见的设计元素,它们为页面带来了柔和的视觉体验。随着CSS3的推出,实现圆角矩形变得异常简单,无需依赖图片或复杂的JavaScript代码。本文将详细介绍CSS3中用于创建圆角矩形的border-…...
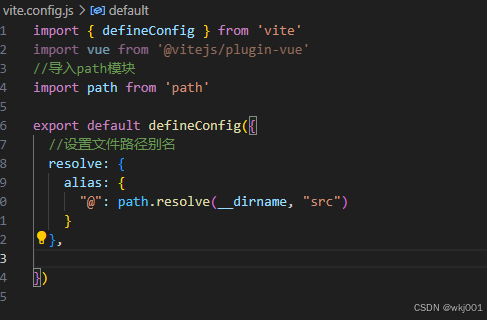
VUE项目中main.js中不能使用 @引入路径吗
VUE项目中main.js中不能使用 引入路径吗 vite.config已经配置了别名 但是在main.js中直接引入报错 修改成 相对路径后,保存消失 找到原因:vite.config 漏了引入 import { defineConfig } from ‘vite’ import vue from ‘vitejs/plugin-vue’ 导致…...

Spring日志
1.日志的作用 定位和发现问题(主要)系统监控数据采集日志审计...... 2.日志的使用 2.1 ⽇志格式的说明 2.2 打印日志 Spring集成了日志框架,直接使用即可 步骤: 1.定义日志对象 2.使⽤⽇志对象打印⽇志 RestController public class LoggerController {private static Logger…...
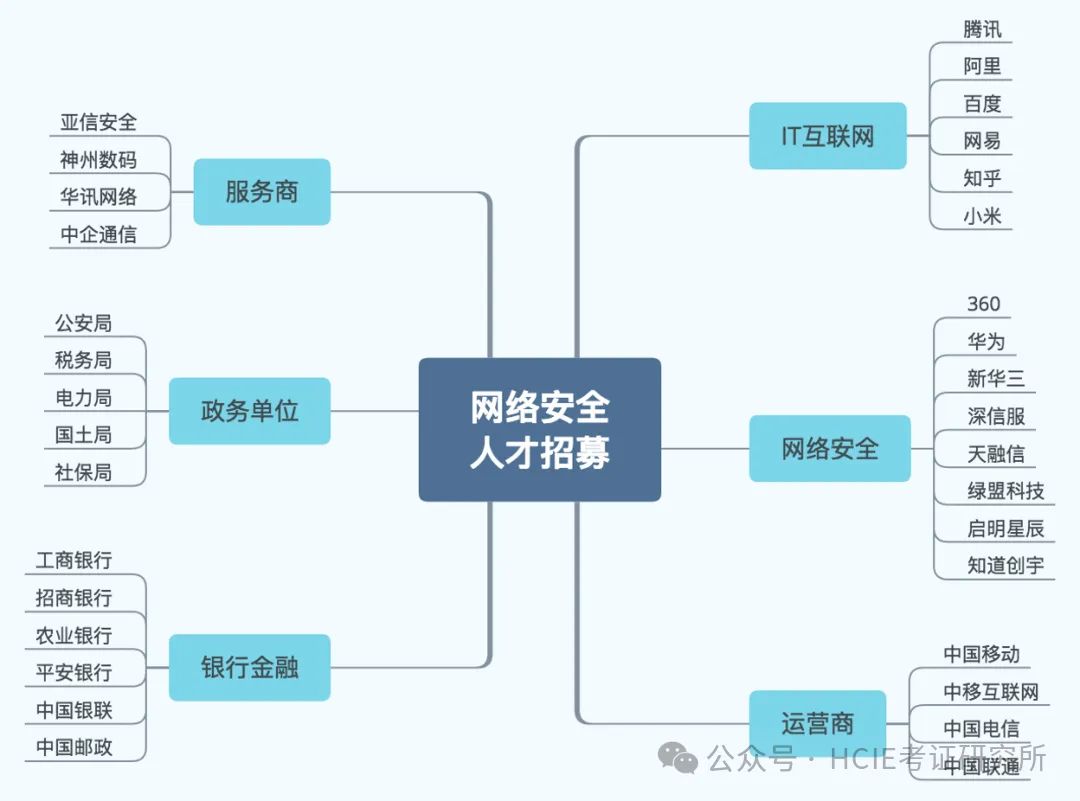
年薪30万+,TOP大厂月薪10万+....网络安全工程师凭什么?
时代飞速发展,我们的工作、生活乃至整个社会的运转都越来越依赖于网络。也因此,网络的无处不在带来了前所未有的安全风险。 从个人隐私泄露到企业机密被盗,再到国家关键基础设施遭受攻击,网络安全问题无处不在,威胁着…...

WebView 的常见的安全漏洞:
WebView 可能存在以下一些常见的安全漏洞: 跨站脚本攻击(XSS):恶意脚本可能通过网页注入到 WebView 中,从而获取用户数据或执行其他恶意操作。 跨站请求伪造(CSRF):攻击者可能诱导 …...

【python】Python中subprocess模块的参数解读以及应用实战
✨✨ 欢迎大家来到景天科技苑✨✨ 🎈🎈 养成好习惯,先赞后看哦~🎈🎈 🏆 作者简介:景天科技苑 🏆《头衔》:大厂架构师,华为云开发者社区专家博主,…...

opencv-python实战项目十一:背景减除法制作运动行人蒙版
文章目录 一,简介二,背景减除法介绍三,算法实现:四,效果: 一,简介 在智能视频监控、人流量统计和运动检测等领域,背景减除法是一种常用的图像处理技术。本文将带您走进OpenCV的世界…...

Win10家庭版别再卡了!保姆级教程:手动修复gpedit.msc路径,彻底关闭Antimalware Service
Win10家庭版性能优化实战:精准修复组策略路径与系统服务调优每次游戏激战正酣时突然卡顿,或是视频渲染到关键时刻系统响应迟缓,很多Win10家庭版用户都遭遇过这类困扰。任务管理器里那个名为"Antimalware Service Executable"的进程…...
)
从STM32迁移到普冉PY32F003:UART代码移植保姆级教程(附HAL库对比)
从STM32到普冉PY32F003的UART代码迁移实战指南 1. 国产MCU替代浪潮下的技术选择 近年来,半导体行业的供应链波动促使更多工程师将目光投向国产MCU解决方案。普冉PY32F003系列作为Cortex-M0内核的代表产品,以48MHz主频、64KB Flash和8KB RAM的配置&#x…...

Scroll Reverser:让Mac的多设备滚动体验回归直觉的免费神器
Scroll Reverser:让Mac的多设备滚动体验回归直觉的免费神器 【免费下载链接】Scroll-Reverser Per-device scrolling prefs on macOS. 项目地址: https://gitcode.com/gh_mirrors/sc/Scroll-Reverser 你是否曾经在MacBook的触控板和鼠标之间切换时࿰…...

打不开JupyterLab
因为安装某些依赖导致JupyterLab的依赖被动升级或降级,从而影响了JupyterLab的运行,此时可以SSH登录到实例,然后输入jupyter-lab命令进行确认,如果执行命令报错则说明是此问题,那么可以通过pip install jupyterlab再次…...
_kaic)
ssm207基于SSM的视频播放系统的设计与实现+vue(文档+源码)_kaic
第五章 系统的实现5.1 用户功能模块的实现5.1.1系统主界面用户进入本系统可查看系统信息,系统主界面展示如图5.1所示。图5.1网站主界面5.1.2视频详情界面用户可选择视频查看视频详情信息,并可进行视频播放操作,视频详情界面展示如图5.2所示。…...

阿波罗登月,不可能:读心术与影子叙事 ——不是向全世界展示登月,而是向全世界注射登月
阿波罗登月,不可能:读心术与影子叙事 ——不是向全世界展示登月,而是向全世界注射登月 Jianbing Zhu 1^{1}1 1^{1}1 ECT-OS-JiuHuaShan 文明实验室 ORCID: 0009-0006-8591-1891 DOI: 10.5281/zenodo.20373157 Email: ect-os-jiuhuashanzoho…...

深度解析DeTikZify:科研工作者的智能图表生成神器
深度解析DeTikZify:科研工作者的智能图表生成神器 【免费下载链接】DeTikZify Synthesizing Graphics Programs for Scientific Figures and Sketches with TikZ. 项目地址: https://gitcode.com/gh_mirrors/de/DeTikZify 在科研工作中,创建高质量…...

sngan_projection论文解读:ICLR2018两大GAN技术的完美结合
sngan_projection论文解读:ICLR2018两大GAN技术的完美结合 【免费下载链接】sngan_projection GANs with spectral normalization and projection discriminator 项目地址: https://gitcode.com/gh_mirrors/sn/sngan_projection sngan_projection是一个实现了…...

基于树莓派打造万能遥控器:从硬件选型到Web控制界面全解析
1. 项目概述:打造一个能“学习”的万能遥控器家里遥控器越来越多,电视、空调、风扇、灯带……每个设备都配一个,找起来麻烦,用起来也乱。市面上所谓的“万能遥控器”其实并不万能,它内置的码库有限,很多小众…...
)
告别KITTI!用TartanAir数据集在Unreal Engine仿真环境里“虐”你的VSLAM算法(附保姆级下载与使用指南)
用TartanAir数据集在Unreal Engine中打造VSLAM算法的"极限考场"当你的视觉SLAM算法在KITTI数据集上跑出98%的准确率时,是否意味着它已经准备好应对真实世界的复杂场景?现实往往会给乐观的开发者当头一棒——实验室里的"优等生"在遇到…...