使用html+css+js实现完整的登录注册页面
在这篇博客中,我们将讨论如何使用简单的 HTML 和 CSS 构建一个登录与注册页面。这个页面包含两个主要部分:登录界面和注册界面。我们还会展示如何通过 JavaScript 切换这两个部分的显示状态。
页面结构
我们将创建一个页面,其中包含两个主要的 div 元素:一个用于登录,另一个用于注册。默认情况下,登录部分会显示,注册部分会隐藏。用户可以通过点击按钮在这两个部分之间切换。
HTML 代码
以下是页面的 HTML 结构:
<div class="box"><div style=" width: 100%;height: 100%;"><div style="display: block;" id="myLogin" style="width: 100%;height: 100%;"><div class="left"><button class="register" type="submit" onclick="toggleDivRegister()">去注册</button></div><div class="right" style="margin-left: 300px;"><h2>登 录</h2><form action=""><div style="width: 400px;"><div><div style="display: flex;"><i class="iconPhone distant1"></i><input class="content" type="phone" placeholder="手机号" required></div><div style="display: flex;"><i class="iconPassword distant1"></i><input class="content" type="password" placeholder="密码" required></div></div><div style="padding: 10px;"><span style="float: left;display: flex;justify-content: center;align-content: center;"><input type="checkbox" style="vertical-align:top;" /><spanstyle="font-size: 14px;vertical-align:top;padding-left: 5px;">记住密码</span></span><span style="float: right;font-size: 15px;color: rgb(74, 159, 244);">忘记密码?</span></div></div><button class="submit" type="submit">登录</button></form></div></div><div style="display: none;" id="myRegister" style="width: 100%;height: 100%;"><div class="left"><button class="register" type="submit" onclick="toggleDivLogin()">去登录</button></div><div class="right" style="margin-left: 300px;"><h2 style="color: #74b9ff;font-size: 50px;margin-top: 40px;">注 册</h2><form action=""><div style="width: 400px;"><div><div style="display: flex;"><i class="iconPhone distant2"></i><input class="content" type="phone" placeholder="请输入手机号"style="height: 30px; padding-bottom: 10px;" required></div><div style="display: flex;"><i class="iconUser distant2"></i><input class="content" type="username" placeholder="请输入用户名"style="height: 30px; padding-bottom: 10px;" required></div><div style="display: flex;"><i class="iconPassword distant2"></i><input class="content" type="password" placeholder="请输入密码"style="height: 30px; padding-bottom: 10px;" required></div><div style="display: flex;"><i class="iconPassword distant2"></i><input class="content" type="password_reset" placeholder="请再次输入密码"style="height: 30px; padding-bottom: 10px;" required></div></div></div><button class="submit" type="submit" onclick="submitRegister()">立即注册</button></form></div></div></div></div>JavaScript 代码
为了实现登录和注册界面的切换,我们需要一些 JavaScript 代码。以下是实现这些功能的 JavaScript 函数:
function toggleDivRegister() {var x = document.getElementById("myRegister");var y = document.getElementById("myLogin");x.style.display = "block";y.style.display = "none";}function toggleDivLogin() {var x = document.getElementById("myRegister");var y = document.getElementById("myLogin");x.style.display = "none";y.style.display = "block";}function submitRegister() {// alert("注册成功!")}CSS 样式
接下来,我们需要为页面添加样式,以确保它在视觉上是吸引人的。将以下 CSS 代码保存在 styles.css 文件中:
* {margin: 0;padding: 0;box-sizing: border-box;}.box {width: 900px;height: 500px;background-color: rgba(255, 255, 255, 0.7);border-radius: 10px;margin: 10% auto;box-shadow: 0 0 10px 6px rgba(0, 0, 0, 0.1);position: relative;z-index: 1;}.box .left {width: 35%;height: 100%;position: absolute;z-index: 2;background-image: url(1.jpg);background-size: cover;}.register {position: absolute;width: 60%;height: 60px;color: #080808;background-color: transparent;font-size: 20px;border-radius: 5ch;border: 2px dotted #0984e3;margin: 70% 0 0 50%;transform: translateX(-50%);}.register:hover {color: #0984e3;}.box .right {display: flex;width: 65%;flex-direction: column;align-items: center;}.box .right h2 {color: #74b9ff;font-size: 50px;margin-top: 70px;}.box .right form {display: flex;flex-wrap: wrap;justify-content: center;}.box .right form .content {width: 100%;height: 50px;font-size: 20px;margin-top: 30px;padding: 10px 0 0 10px;border: none;border-bottom: 1px dotted #74b9ff;color: #74b9ff;}.right form .content:focus {outline: none;color: #74b9ff;padding: 10px 0 0 20px;}.right .submit {width: 60%;height: 60px;color: #f6f6f6;background-image: linear-gradient(120deg, #0984e3, #b1d2f6 100%);font-size: 20px;border-radius: 5ch;border: none;margin: 30px 0 0 50%;transform: translateX(-50%);}.right .submit:hover {box-shadow: 0 0 5px 5px rgba(20, 20, 20, 0.15);}.iconPhone {display: inline-block;height: 20px;width: 20px;background-image: url(img/phone.svg);background-size: cover;/*这里放置图标的绝对路径*/background-repeat: no-repeat;}.iconPassword {display: inline-block;height: 20px;width: 20px;background-image: url(img/password.svg);background-size: cover;/*这里放置图标的绝对路径*/background-repeat: no-repeat;}.iconUser {display: inline-block;height: 20px;width: 20px;background-image: url(img/user.svg);background-size: cover;/*这里放置图标的绝对路径*/background-repeat: no-repeat;}.distant2 {margin-top: 35px;}.distant1 {margin-top: 50px;}完整代码
<!DOCTYPE html>
<html lang="zh-CN"><head><meta charset="UTF-8"><meta http-equiv="X-UA-Compatible" content="IE=edge"><meta name="viewport" content="width=device-width, initial-scale=1.0"><title>登录页面</title><style>* {margin: 0;padding: 0;box-sizing: border-box;}.box {width: 900px;height: 500px;background-color: rgba(255, 255, 255, 0.7);border-radius: 10px;margin: 10% auto;box-shadow: 0 0 10px 6px rgba(0, 0, 0, 0.1);position: relative;z-index: 1;}.box .left {width: 35%;height: 100%;position: absolute;z-index: 2;background-image: url(1.jpg);background-size: cover;}.register {position: absolute;width: 60%;height: 60px;color: #080808;background-color: transparent;font-size: 20px;border-radius: 5ch;border: 2px dotted #0984e3;margin: 70% 0 0 50%;transform: translateX(-50%);}.register:hover {color: #0984e3;}.box .right {display: flex;width: 65%;flex-direction: column;align-items: center;}.box .right h2 {color: #74b9ff;font-size: 50px;margin-top: 70px;}.box .right form {display: flex;flex-wrap: wrap;justify-content: center;}.box .right form .content {width: 100%;height: 50px;font-size: 20px;margin-top: 30px;padding: 10px 0 0 10px;border: none;border-bottom: 1px dotted #74b9ff;color: #74b9ff;}.right form .content:focus {outline: none;color: #74b9ff;padding: 10px 0 0 20px;}.right .submit {width: 60%;height: 60px;color: #f6f6f6;background-image: linear-gradient(120deg, #0984e3, #b1d2f6 100%);font-size: 20px;border-radius: 5ch;border: none;margin: 30px 0 0 50%;transform: translateX(-50%);}.right .submit:hover {box-shadow: 0 0 5px 5px rgba(20, 20, 20, 0.15);}.iconPhone {display: inline-block;height: 20px;width: 20px;background-image: url(img/phone.svg);background-size: cover;/*这里放置图标的绝对路径*/background-repeat: no-repeat;}.iconPassword {display: inline-block;height: 20px;width: 20px;background-image: url(img/password.svg);background-size: cover;/*这里放置图标的绝对路径*/background-repeat: no-repeat;}.iconUser {display: inline-block;height: 20px;width: 20px;background-image: url(img/user.svg);background-size: cover;/*这里放置图标的绝对路径*/background-repeat: no-repeat;}.distant2 {margin-top: 35px;}.distant1 {margin-top: 50px;}</style><script>function toggleDivRegister() {var x = document.getElementById("myRegister");var y = document.getElementById("myLogin");x.style.display = "block";y.style.display = "none";}function toggleDivLogin() {var x = document.getElementById("myRegister");var y = document.getElementById("myLogin");x.style.display = "none";y.style.display = "block";}function submitRegister() {// alert("注册成功!")}</script><link rel="icon" href="man.png">
</head><body><div class="box"><div style=" width: 100%;height: 100%;"><div style="display: block;" id="myLogin" style="width: 100%;height: 100%;"><div class="left"><button class="register" type="submit" onclick="toggleDivRegister()">去注册</button></div><div class="right" style="margin-left: 300px;"><h2>登 录</h2><form action=""><div style="width: 400px;"><div><div style="display: flex;"><i class="iconPhone distant1"></i><input class="content" type="phone" placeholder="手机号" required></div><div style="display: flex;"><i class="iconPassword distant1"></i><input class="content" type="password" placeholder="密码" required></div></div><div style="padding: 10px;"><span style="float: left;display: flex;justify-content: center;align-content: center;"><input type="checkbox" style="vertical-align:top;" /><spanstyle="font-size: 14px;vertical-align:top;padding-left: 5px;">记住密码</span></span><span style="float: right;font-size: 15px;color: rgb(74, 159, 244);">忘记密码?</span></div></div><button class="submit" type="submit">登录</button></form></div></div><div style="display: none;" id="myRegister" style="width: 100%;height: 100%;"><div class="left"><button class="register" type="submit" onclick="toggleDivLogin()">去登录</button></div><div class="right" style="margin-left: 300px;"><h2 style="color: #74b9ff;font-size: 50px;margin-top: 40px;">注 册</h2><form action=""><div style="width: 400px;"><div><div style="display: flex;"><i class="iconPhone distant2"></i><input class="content" type="phone" placeholder="请输入手机号"style="height: 30px; padding-bottom: 10px;" required></div><div style="display: flex;"><i class="iconUser distant2"></i><input class="content" type="username" placeholder="请输入用户名"style="height: 30px; padding-bottom: 10px;" required></div><div style="display: flex;"><i class="iconPassword distant2"></i><input class="content" type="password" placeholder="请输入密码"style="height: 30px; padding-bottom: 10px;" required></div><div style="display: flex;"><i class="iconPassword distant2"></i><input class="content" type="password_reset" placeholder="请再次输入密码"style="height: 30px; padding-bottom: 10px;" required></div></div></div><button class="submit" type="submit" onclick="submitRegister()">立即注册</button></form></div></div></div></div>
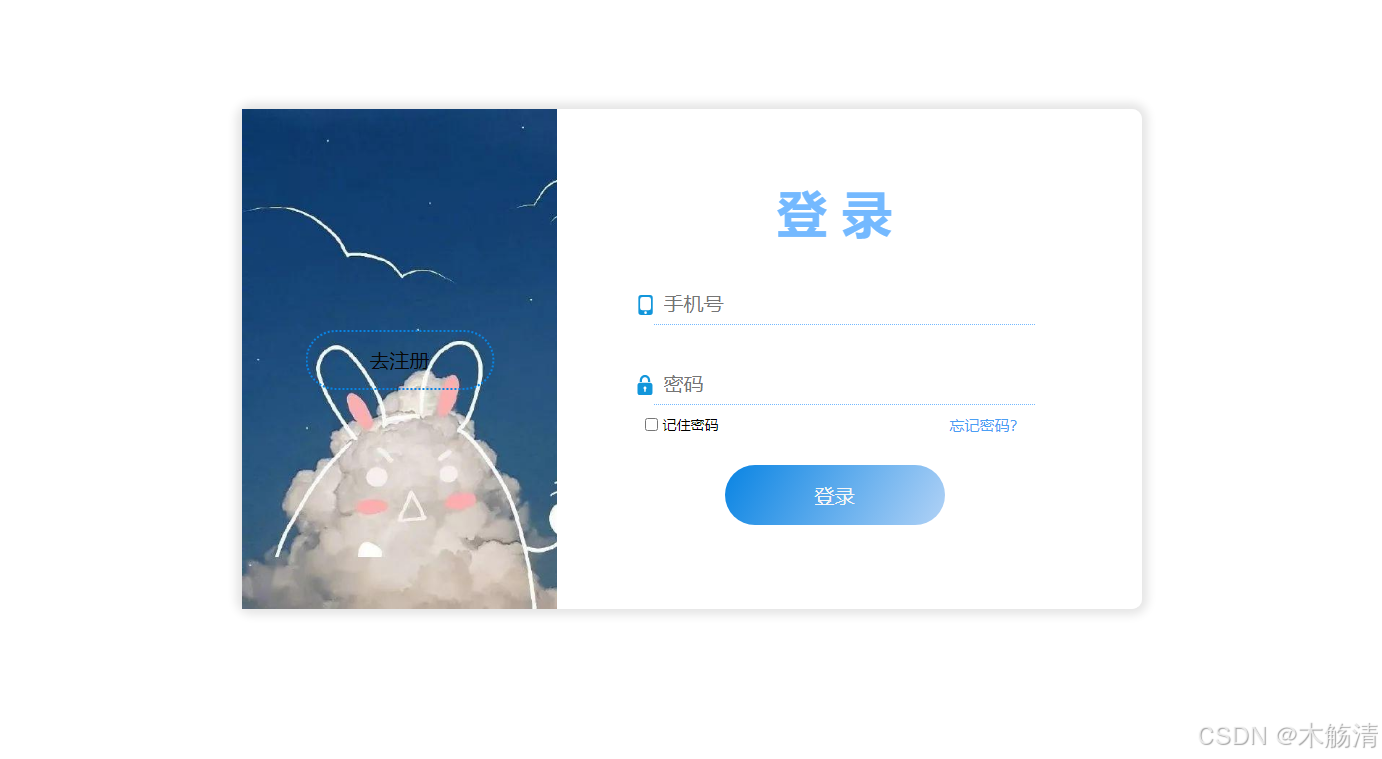
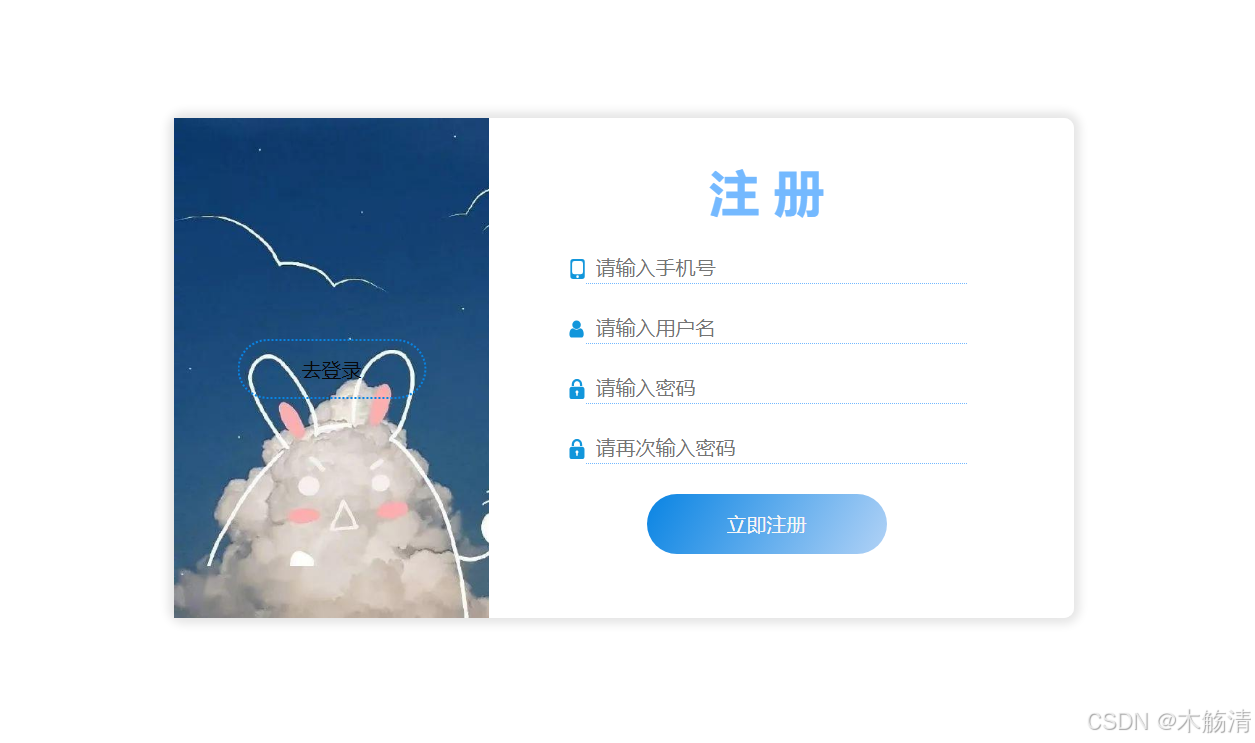
</body></html>实现效果
总结
在本教程中,我们创建了一个包含登录和注册功能的基本页面。通过 HTML 定义页面结构,使用 CSS 进行样式设计,并通过 JavaScript 实现页面功能,我们构建了一个功能完备的用户界面。这种基础的设计可以根据需要进一步扩展,例如添加表单验证、与后端 API 集成等。
希望这个详细的教程对您有所帮助!如果您有任何问题或建议,请在评论区留言,我们将尽快回复。
相关文章:
使用html+css+js实现完整的登录注册页面
在这篇博客中,我们将讨论如何使用简单的 HTML 和 CSS 构建一个登录与注册页面。这个页面包含两个主要部分:登录界面和注册界面。我们还会展示如何通过 JavaScript 切换这两个部分的显示状态。 页面结构 我们将创建一个页面,其中包含两个主要…...

2024年8月16日(运维自动化 ansible)
一、回顾 1、mysql和python (1)mysql5.7 1.1不需要执行mysql_ssl_rsa_setup 1.2change_master_to 不需要get public key (2)可以使用pymysql非交互的管理mysql 2.1pymysql.connect(host,user,password,database,port) 2.2 cursorconn.cursor() 2.3 cursor.execute("creat…...

荣耀Magicbook x14 扩容1TB固态
版权归作者所有,如有转发,请注明文章出处:https://cyrus-studio.github.io/blog/ 固态硬盘规格 在官网查看加装固态硬盘的接口规格 https://www.honor.com/cn/laptops/honor-magicbook-x14-2023/ https://club.honor.com/cn/thread-2847379…...

Springboot整合全文检索引擎Lucene
文章目录 前言Lucene的介绍springboot项目中如何整合Lucene简单用法1. 引入依赖2. 其它用到的类2. 创建索引3. 简单搜索4. 更新索引5. 删除索引6. 删除全部索引 Springboot整合Lucene复杂搜索1. 同时标题和内容中查找关键词2. 搜索结果高亮显示关键词3. 分页搜索4. 多关键词联合…...

【深度学习】【语音】TTS, 如何使用Python分析WAV的采样率、比特深度、通道数
文章目录 使用Python分析WAV文件的属性与可视化简介所需环境代码解析可视化音频数据结论使用Python分析WAV文件的属性与可视化 WAV文件录音要求 为了确保录制的音频文件符合TTS模型训练的质量标准,请遵循以下录音要求: 采样率要求:44.1 kHz说明:采样率44.1 kHz(即每秒采样…...
Linux的安装和使用
Linux 第一节 Linux 优势 1. 开源 为什么这么多的的设备都选择使用 Linux?因为它是开源软件(open source software),具有不同的含义。使用一个安全的操作系统工作变得必不可少的事,而 Linux 恰好满足了这个需求。因…...

查看一个exe\dll文件的依赖项
方法 使用一个Dependencies工具,检测exe文件的所有依赖项 工具使用 下载压缩包之后解压,解压后如下图所示 在命令行中运行Dependencies.exe程序会得到帮助菜单 查询某exe的所有依赖项,使用命令 Dependencies.exe -chain <查询文件> …...

高校科研信息管理系统pf
TOC springboot364高校科研信息管理系统pf 第1章 绪论 1.1 研究背景 互联网概念的产生到如今的蓬勃发展,用了短短的几十年时间就风靡全球,使得全球各个行业都进行了互联网的改造升级,标志着互联网浪潮的来临。在这个新的时代,…...

Linux 开机自动挂载共享文件设置
选择一个要共享的文件 点击确定 -> 确定 启动虚拟机 执行下面的命令 /YumSource 是我选择的共享文件夹,自行替换自已选择的文件夹 mkdir -p /mnt/hgfs cat >> /etc/fstab << EOF .host:/YumSource /mnt/hgfs fuse.vmhgfs-fuse allow_other defaul…...

c_cpp_properties.json、launch.json、 tasks.json
在 Visual Studio Code 中,c_cpp_properties.json、launch.json 和 tasks.json 是三个重要的配置文件,它们的作用如下: c_cpp_properties.json: 这个文件用于配置 C/C 扩展的 IntelliSense、编译器路径和包括路径等。它帮助 VS Co…...

mysql 一些知识点 面试用
mysql 1、4个隔离级别与3个现象2、快照读与当前读2.1 可重复读的情况下出现幻读问题的两种情况 3 数据库 常用引擎4、InnoDB存储引擎对MVCC的实现5、索引(重点)5.1 什么是索引5.2 索引的创建与删除5.2.1 查看表中有哪些索引5.2.2 添加索引5.2.3 删除索引 5.3 索引的分类5.4 树数…...

STM32之点亮LED灯
使用固件库实现LED点灯 LED灯: LED灯,是一种能够将电能转化为可见光的半导体器件 控制LED灯: LED灯的正极接到了3.3V,LED灯的负极接到了PA1,也就是GPIOA1引脚 只需要控制PA1为相对应的低电平,即可点亮对…...
)
Java 多线程练习2 (抽奖比较Runnable写法)
MultiProcessingExercise2 package MultiProcessingExercise120240814;import java.util.ArrayList; import java.util.Collections;public class MultiProcessingExercise1 {public static void main(String[] args) {// 需求:// 在此次抽奖过程中,抽奖…...

使用fastboot更新部分系统
使用fastboot更新部分系统 获取分区信息 > part list sunxi_flash 0Partition Map for UNKNOWN device 0 -- Partition Type: EFIPart Start LBA End LBA NameAttributesType GUIDPartition GUID1 0x00008000 0x000097c5 "boot-r…...

windows 加载portch遇到的错误
import torch 遇到如下错误 File "<stdin>", line 1, in <module> File "C:\Users\Administrator\AppData\Local\Programs\Python\Python311\Lib\site-packages\torch\__init__.py", line 148, in <module> raise err OSError: [W…...

如何将 CICD 模版重构为 CICD component?
极狐GitLab 是 GitLab 在中国的发行版,专门面向中国程序员和企业提供企业级一体化 DevOps 平台,用来帮助用户实现需求管理、源代码托管、CI/CD、安全合规,而且所有的操作都是在一个平台上进行,省事省心省钱。可以一键安装极狐GitL…...

数学建模——评价决策类算法(层次分析法、Topsis)
一、层次分析法 概念原理 通过相互比较确定各准则对于目标的权重, 及各方案对于每一准则的权重,这些权重在人的思维过程中通常是定性的, 而在层次分析法中则要给出得到权重的定量方法. 将方案层对准则层的权重及准则层对目标层的权重进行综合, 最终确定方案层对目标…...

KEEPALIVED 全csdn最详细----理论+实验(干货扎实,包教会的)
环境准备 主机名IP虚拟IP(VIP)功能ka1172.25.254.10172.25.254.100keepalived服务ka2172.25.254.20172.25.254.100keepalived服务realserver1172.25.254.110web服务realserver2172.25.254.120web服务 注意一定要关闭selinux,和防火墙,不然在…...

微信云开发云存储全部下载
一、安装 首先按照这个按照好依赖 安装 | 云开发 CloudBase - 一站式后端云服务 npm i -g cloudbase/cli 二、登录 tcb login 下载 首先在你要下载到的本地文件内创建一个名为:cloudbaserc.json 的json文件。 填入你的id {"envId":"你的云开发环…...

vos3000怎样对接voip落地语音网关呢?卡机和O口网关的配置技巧有哪些?
很多朋友没有接触过vos系统的使用,那么vos3000如何对接voip落地网关呢?卡机的配置技巧有哪些? VOS3000系统是针对中小等规模VoIP运营业务提供的支撑系统。 语音网关 落地网关分O口网关,S口网关,和全网通GOIP语音网关。…...

基于ChatGPT的智能网页数据抓取:原理、实践与成本优化
1. 项目概述:当ChatGPT遇上网页抓取最近在做一个数据驱动的项目,需要从几十个不同结构的网站上抓取产品信息,手动复制粘贴显然不现实,而传统的爬虫脚本又需要为每个网站单独写解析规则,费时费力。就在我头疼的时候&…...

如何为 Claude Code 配置 Taotoken 的稳定 API 连接
🚀 告别海外账号与网络限制!稳定直连全球优质大模型,限时半价接入中。 👉 点击领取海量免费额度 如何为 Claude Code 配置 Taotoken 的稳定 API 连接 Claude Code 作为一款强大的 AI 编程助手,其原生服务在某些地区可…...

MobaXterm远程桌面实战:在Ubuntu上配置与连接RDP服务
1. 为什么选择MobaXterm连接Ubuntu远程桌面 作为一名常年和Linux服务器打交道的开发者,我深知纯命令行操作有时会遇到效率瓶颈。特别是当需要处理图形界面应用或者进行复杂配置时,SSH终端就显得力不从心了。这时候,RDP远程桌面协议就成了救命…...

Go语言实现轻量级C2框架:从零构建命令控制原型
1. 项目概述:一个轻量级、可自托管的C2框架初探最近在整理自己的安全研究环境时,发现很多开源C2(Command and Control)框架要么过于庞大,依赖复杂,要么功能过于单一,难以满足从学习到模拟测试的…...

番茄小说下载器:如何用开源工具构建个人数字图书馆?
番茄小说下载器:如何用开源工具构建个人数字图书馆? 【免费下载链接】Tomato-Novel-Downloader 番茄小说下载器不精简版 项目地址: https://gitcode.com/gh_mirrors/to/Tomato-Novel-Downloader 你是否曾经遇到过这样的情况:在手机上追…...

Linux服务器安全加固第一步:用好chattr隐藏权限和umask默认值
Linux服务器安全加固实战:chattr与umask的防御艺术 当一台裸机Linux服务器首次上线时,大多数管理员会立即部署防火墙、更新补丁和配置SSH密钥登录——这些确实是安全基础。但真正经历过服务器入侵事件的老手都知道,攻击者往往从最不起眼的文件…...

2026届学术党必备的AI辅助写作网站实际效果
Ai论文网站排名(开题报告、文献综述、降aigc率、降重综合对比) TOP1. 千笔AI TOP2. aipasspaper TOP3. 清北论文 TOP4. 豆包 TOP5. kimi TOP6. deepseek 于学术研究范畴之内,撰写上一篇具备高质量水平的论文,乃是每一位学者…...

如何在Windows系统上一键部署终极包管理器:winget安装工具完全指南
如何在Windows系统上一键部署终极包管理器:winget安装工具完全指南 【免费下载链接】winget-install Install WinGet using PowerShell! Prerequisites automatically installed. Works on Windows 10/11 and Server 2019/2022. 项目地址: https://gitcode.com/gh…...

FanControl风扇控制:3分钟掌握专业级Windows散热管理终极指南
FanControl风扇控制:3分钟掌握专业级Windows散热管理终极指南 【免费下载链接】FanControl.Releases This is the release repository for Fan Control, a highly customizable fan controlling software for Windows. 项目地址: https://gitcode.com/GitHub_Tren…...

从SCI到中文核心:Endnote自定义Style保姆级教程,打造你的专属GB/T7714-2005模板
从SCI到中文核心:Endnote自定义Style保姆级教程,打造你的专属GB/T7714-2005模板 当你需要向不同期刊投稿时,是否遇到过参考文献格式反复调整的困扰?一个固定的Endnote模板往往难以满足多样化的投稿需求,尤其是中英文混…...