【Git】远程仓库
本博客的环境是 Ubuntu/Linux
文章目录
- 集中式与分布式的区别
- 远程仓库
- 新建远程仓库
- 克隆远程仓库
- 向远程仓库推送
- 从远程仓库拉取
- 配置Git
- 忽略指定文件
- 给命令配置别名
- 标签管理
- 创建标签
- 操作标签
- 多人协作
- 本地分支与远程分支连接
- 场景一
- 场景二
集中式与分布式的区别
引荐自关于Git这一篇就够了
Git是分布式版本控制系统,还有 svn,cvs 的集中式版本控制系统
区别在于,集中式版本控制,在每次写代码时都需要从服务器拉取一份下来,并且如果服务器丢失,那所有的数据就丢失了,本地只保存当前的版本信息。集中式将代码都放在一个服务器上集中管理,本地的所有回滚等操作都需要服务器支持

而分布式版本控制,通常也有一台充当 “中央服务器” 的电脑,但当你从主仓库拉取一份代码后,你的电脑也成为了服务器,相当于每个人的电脑都是一台服务器,都有完整的版本库,可以自由的在本地进行回滚,修改,提交,完成开发后合并到主仓库即可。

集中式都有一个主版本号,所有的版本迭代都以这个版本号为主,而分布式因为每个客户端都是服务器,所以没有固定的版本号,而使用由哈希算法生成的一个 commit id,用于回滚操作。同时也有一个master主仓库,是一切分支仓库的主仓库,我们可以推送提交到master并合并到主仓库上,主仓库的版本号会迭代一次。我们客户端上的 git 版本号无论迭代多少次,都跟master无关,只有合并时,master才迭代一次
远程仓库
上述说到,Git 是分布式版本控制,有一个“中央服务器”,我们熟知的 GitHub 和 Gitee 就充当了 “中央服务器”的作用。我们可以在上面创建仓库,这就是远程仓库,然后在本地机器上拉取一份代码下来,在本地进行开发,开发完成后提交给远程仓库,进行合并。
本篇博客,以Gitee为例
新建远程仓库
Gitee

点击“创建”,如此就创建了一个远程仓库

克隆远程仓库
克隆/下载远程仓库到本地,需要使用git clone命令
git clone [远程仓库链接]
链接的获取在仓库页面右上角的“克隆/下载”
链接最常用的是 —— HTTPS 和 SSH

- 使用
HTTPS方式没有要求,直接使用命令即可
ubuntu@VM-12-11-ubuntu:~/lesson/gitcode$ git clone https://gitee.com/bao-bao-hai-mian/remote_git.gitCloning into 'remote_git'...
remote: Enumerating objects: 4, done.
remote: Counting objects: 100% (4/4), done.
remote: Compressing objects: 100% (4/4), done.
Receiving objects: 100% (4/4), done.
remote: Total 4 (delta 0), reused 0 (delta 0), pack-reused 0
ubuntu@VM-12-11-ubuntu:~/lesson/gitcode$ ll
total 12
drwxrwxr-x  3 ubuntu ubuntu 4096 Sep 17 16:09 ./
drwxrwxr-x 10 ubuntu ubuntu 4096 Sep 15 14:48 ../
drwxrwxr-x  3 ubuntu ubuntu 4096 Sep 17 16:09 remote_git/
ubuntu@VM-12-11-ubuntu:~/lesson/gitcode$ cd remote_git/
ubuntu@VM-12-11-ubuntu:~/lesson/gitcode/remote_git$ ll
total 20
drwxrwxr-x 3 ubuntu ubuntu 4096 Sep 17 16:09 ./
drwxrwxr-x 3 ubuntu ubuntu 4096 Sep 17 16:09 ../
drwxrwxr-x 8 ubuntu ubuntu 4096 Sep 17 16:09 .git/
-rw-rw-r-- 1 ubuntu ubuntu  954 Sep 17 16:09 README.en.md
-rw-rw-r-- 1 ubuntu ubuntu 1315 Sep 17 16:09 README.md
- SSH 使用了公钥加密和公钥登录机制,使用该协议需要将本地的公钥设置到远程仓库中,由 Git 进行管理
- 首先要生成本地的公钥和私钥。在用户主目录下查看是否有
.ssh目录,再看该目录下是否有id_rsa(私钥)和id_rsa.pub(公钥)。如果没有,使用如下命令创建:
ssh-keygen -t rsa -C "邮箱"
#后续一路回车即可
- 将公钥配置到远程仓库中
cat id_rsa.pub
#再复制公钥
回到Gitee,点击头像 -> 设置 -> SSH公钥 -> 粘贴公钥

如此就可以使用 SSH 方式克隆远程仓库了
ubuntu@VM-12-11-ubuntu:~/lesson$ git clone git@gitee.com:bao-bao-hai-mian/remote_git.gitCloning into 'remote_git'...
The authenticity of host 'gitee.com (180.76.198.77)' can't be established.
ED25519 key fingerprint is SHA256:+ULzij2u99B9eWYFTw1Q4ErYG/aepHLbu96PAUCoV88.
This key is not known by any other names
Are you sure you want to continue connecting (yes/no/[fingerprint])? yes
Warning: Permanently added 'gitee.com' (ED25519) to the list of known hosts.
remote: Enumerating objects: 4, done.
remote: Counting objects: 100% (4/4), done.
remote: Compressing objects: 100% (4/4), done.
remote: Total 4 (delta 0), reused 0 (delta 0), pack-reused 0
Receiving objects: 100% (4/4), 2.10 KiB | 2.10 MiB/s, done.
当我们从远程仓库克隆后,实际上 Git 会自动把本地的 master 分支和远程的 master 分支连接起来,并且远程仓库的默认名称是 origin。
在本地我们可以使用 git remote命令查看远程仓库信息
git remote #显示远程库信息
git remote -v #显示更详细信息ubuntu@VM-12-11-ubuntu:~/lesson/remote_git$ git remote
origin
ubuntu@VM-12-11-ubuntu:~/lesson/remote_git$ git remote -v
origin	git@gitee.com:bao-bao-hai-mian/remote_git.git (fetch)
origin	git@gitee.com:bao-bao-hai-mian/remote_git.git (push)
使用 git remote -v显示有fetch(拉取)和push(推送)的地址,如果没有推送/拉取权限,就看不到相应的地址
向远程仓库推送
推送的命令如下:
git push [远程主机名] [本地分支名]:[远程分支名]
#例:
git push origin master:master#如果本地分支与远程分支相同,则可以简短一点
git push [远程主机名] [分支名]
在推送前,要对仓库的user.name和user.email进行配置,与远程仓库的用户名和邮箱相同
git config -l #以列表形式查看配置
git config user.name "用户名"
git config user.email "邮箱"#还可以带上 --global选项,使该配置在本机器所有仓库生效
git config --global user.name "用户名"
git config --global user.email "邮箱"
接下来完成开发后,就可以正常add添加、commit提交、push推送,三板斧
示例:在本地创建file.txt并编辑内容,然后推送到远程仓库
#新建并编辑文件
ubuntu@VM-12-11-ubuntu:~/lesson/remote_git$ vim file.txt
ubuntu@VM-12-11-ubuntu:~/lesson/remote_git$ cat file.txt
hello git
#添加到暂存区
ubuntu@VM-12-11-ubuntu:~/lesson/remote_git$ git add .
#提交到本地版本库
ubuntu@VM-12-11-ubuntu:~/lesson/remote_git$ git commit -m "add file:file.txt"
[master 4b2de81] add file:file.txt1 file changed, 1 insertion(+)create mode 100644 file.txt#推送到远程仓库
ubuntu@VM-12-11-ubuntu:~/lesson/remote_git$ git push origin master:master
Enumerating objects: 4, done.
Counting objects: 100% (4/4), done.
Delta compression using up to 2 threads
Compressing objects: 100% (2/2), done.
Writing objects: 100% (3/3), 317 bytes | 317.00 KiB/s, done.
Total 3 (delta 0), reused 0 (delta 0), pack-reused 0
remote: Powered by GITEE.COM [1.1.5]
remote: Set trace flag 7c4399be
To gitee.com:bao-bao-hai-mian/remote_git.git523bb3a..4b2de81  master -> master
如果是 SSH 协议,不需要每一次推送都输入密码,方便推送操作。但如果是 HTTPS 协议,每次推送时需要输入口令

从远程仓库拉取
如果远程仓库有修改,本地仓库并不会随着改变,本地仓库类似于对远程仓库的一次拷贝,后续若没有推送操作,双方并不会影响
为了保持本地仓库和远程仓库的一致性,基于最新的版本进行开发,可以进行拉取操作
git pull [远程主机名] [远程分支名]:[本地分支名]
#若远程与本地分支名相同,则可以简写
git pull [远程主机名] [分支名]
配置Git
忽略指定文件
在日常开发中,我们有些文件不想或不应该提交到远端,比如保存了数据库密码的配置文件,Git 使用.gitignore文件实现
在 Git 工作区的根目录下创建一个 .gitignore文件,然后把要忽略的文件名填进去,Git 就会自动忽略这些文件
Gitee在创建远程仓库的时候,就可以手动选择生成.gitignore文件

.gitignore文件使用如下:
- 可以直接指定要忽略的文件名
*.so:表示忽略所有以.so结尾的文件!文件名:表示不忽略该文件

上述文件表明,忽略所有以.so和.conf结尾的文件,但不忽略b.so,指定忽略a.txt。
ubuntu@VM-12-11-ubuntu:~/lesson/remote_git$ touch .gitignore
ubuntu@VM-12-11-ubuntu:~/lesson/remote_git$ vim .gitignore
ubuntu@VM-12-11-ubuntu:~/lesson/remote_git$ touch a.txt lib.so b.so
ubuntu@VM-12-11-ubuntu:~/lesson/remote_git$ git add .
ubuntu@VM-12-11-ubuntu:~/lesson/remote_git$ git commit -m "test .gitignore"
[master 19ee94c] test .gitignore2 files changed, 10 insertions(+)create mode 100644 .gitignorecreate mode 100644 b.so
可以看到,最后也确实忽略了a.txt和lib.so
不过 Git 也支持强制添加
git add -f [文件名] #带-f选项,表示强制添加
Git 还支持检查一个文件是否被忽略
git check-ignore -v [文件名]ubuntu@VM-12-11-ubuntu:~/lesson/remote_git$ git check-ignore -v lib.so
.gitignore:3:*.so	lib.so
Git 会告诉我们,.gitignore的第3行规则忽略了该文件
给命令配置别名
实际使用 Git 命令时,有些命令较长,Git 支持对命令进行简化
git config alias.[别名] [命令]#带上 --global选项使得配置所有仓库生效
#例:
git config --global alias.st status
git config --global alias.last 'log -l'
标签管理
Git 标签(tags) 是一种用于标记特定提交的机制,通常用于标识重要的版本点,例如发布版本。Git 标签是固定的,不会随着提交的改变而改变,可以帮助我们在项目的历史中轻松找到重要的节点
相比于难以记住的commit id,tag很好的解决了这个问题,因为tag一定要给一个让人容易记住,且有意义的名字。当我们需要回退到某个重要版本时,直接使用标签就能很快定位到
创建标签
#会给当前分支的最近一次提交打上标签
git tag [标签名] #查看所有标签
git tag#给指定commit id 打上标签
git tag [标签名] [commit id]#查看标签信息
git show [标签名]#创建带说明的标签,-a指定标签名,-m指定描述
git tag -a [标签名] -m "描述" [commit id]
示例:
#删除一些文件
ubuntu@VM-12-11-ubuntu:~/lesson/remote_git$ rm a.txt b.so lib.so
#添加&提交
ubuntu@VM-12-11-ubuntu:~/lesson/remote_git$ git add .
ubuntu@VM-12-11-ubuntu:~/lesson/remote_git$ git commit -m "rm files"
[master 7637b05] rm files1 file changed, 0 insertions(+), 0 deletions(-)delete mode 100644 b.so
ubuntu@VM-12-11-ubuntu:~/lesson/remote_git$ git log
commit 7637b05a643918778b562c0effc1135c6d803ab8 (HEAD -> master)
Author: bao-bao-hai-mian <1076847758@qq.com>
Date:   Tue Sep 17 21:22:56 2024 +0800rm files
#给最近的一次提交打上标签
ubuntu@VM-12-11-ubuntu:~/lesson/remote_git$ git tag -a v1.0 -m "rm files"
ubuntu@VM-12-11-ubuntu:~/lesson/remote_git$ git tag
v1.0
#查看标签信息
ubuntu@VM-12-11-ubuntu:~/lesson/remote_git$ git show v1.0
tag v1.0
Tagger: bao-bao-hai-mian <1076847758@qq.com>
Date:   Tue Sep 17 21:24:12 2024 +0800rm filescommit 7637b05a643918778b562c0effc1135c6d803ab8 (HEAD -> master, tag: v1.0)
Author: bao-bao-hai-mian <1076847758@qq.com>
Date:   Tue Sep 17 21:22:56 2024 +0800rm filesdiff --git a/b.so b/b.so
deleted file mode 100644
index e69de29..0000000
操作标签
如果标签打错了,也可以删除
git tag -d [标签名]
因为创建的标签都只存储在本地,不会自动推送到远程,所以可以在本地安全删除。
如果要推送某个标签到远程,使用命令
git push origin [标签名]ubuntu@VM-12-11-ubuntu:~/lesson/remote_git$ git push origin v1.0
Enumerating objects: 8, done.
Counting objects: 100% (8/8), done.
Delta compression using up to 2 threads
Compressing objects: 100% (6/6), done.
Writing objects: 100% (7/7), 741 bytes | 741.00 KiB/s, done.
Total 7 (delta 1), reused 0 (delta 0), pack-reused 0
remote: Powered by GITEE.COM [1.1.5]
remote: Set trace flag 7f4c2899
To gitee.com:bao-bao-hai-mian/remote_git.git* [new tag]         v1.0 -> v1.0
成功推送后,远程也可以看到标签

若本地有很多标签,也可以一次性推送
git push origin --tags
如果误推送了错误的标签,需要
- 在本地删除标签
- 将删除推送给远程
git tag -d [标签]
git push origin :[本地标签]
#例:推送时要指明标签在.git文件中的路径
git tag -d v1.0
git push origin :refs/tags/v1.0
多人协作
Git 的分布式版本控制正是服务于多人协作
在实际开发中,每个用户都有自己的gitee/github账号,如果要多人进行协同开发,必须要将用户添加进开发者,用户才有权限进行代码提交


实际开发中,在任何情况下其实都不允许直接在 master分支上修改代码,这是为了保证主分支的稳定,所以在开发新功能时。常常会新建其他分支,供开发时迭代使用
在 Gitee上也可以很简单的创建新分支

接下来,通过两个用户,分别在Linux和Windows上针对同项目进行协作开发
首先就是克隆远程仓库
双端都使用如下命令
git clone [远程仓库链接]
如果远程仓库创建了新的分支,可以通过 Git 拉取到本地
git pull [远程仓库] [远程分支]:[本地分支]#拉取远程仓库的新分支
git pull origin
#拉取(更新)远程仓库某分支的内容到本地分支
git pull origin dev:dev
查看仓库分支
git branch #只能查看本地分支
git branch -r #查看远程仓库分支
git branch -a #远程和本地都查看git branch -v #查看本地分支信息
git branch -vv #在显示信息的基础上额外显示连接的远程分支
本地分支与远程分支连接
将本地分支和远程分支连接,可以简化我们在拉取和推送时的命令
如果没有建立连接,那么拉取和推送时都需要输入完整命令
git pull [远程仓库] [远程分支]:[本地分支]
git push [远程仓库] [本地分支]:[本地分支]
而建立连接后,例如本地dev和远程dev建立连接,那么在本地dev拉取和推送只需简单的命令
git pull
git push
建立连接有两种方式
- 创建本地分支时,指明连接的远程分支
git checkout -b [本地分支] [远程分支]
#例
git checkout -b dev origin/dev
- 本地分支创建完后,在指明连接
git branch --set-upstream-to=[远程分支] [本地分支]
#例
git branch --set-upstream-to=origin/dev dev
使用如下命令可以查看连接情况
git branch -vv ubuntu@VM-12-11-ubuntu:~/lesson/remote_git$ git branch -vv
* dev    4b2de81 [origin/dev] add file:file.txtmaster 4b2de81 [origin/master] add file:file.txt
场景一
如果两个用户都对本地仓库的file.txt做修改并先后提交推送,会发生什么
假设Linux用户先完成开发并推送至远程仓库
#file.txt原先的内容
ubuntu@VM-12-11-ubuntu:~/lesson/remote_git$ cat file.txt
hello git
#开发
ubuntu@VM-12-11-ubuntu:~/lesson/remote_git$ vim file.txt
ubuntu@VM-12-11-ubuntu:~/lesson/remote_git$ cat file.txt
hello git
coding on Linux...
#添加,提交,推送
ubuntu@VM-12-11-ubuntu:~/lesson/remote_git$ git add .
ubuntu@VM-12-11-ubuntu:~/lesson/remote_git$ git commit -m "md file.txt:add one line"
[dev 62451e5] md file.txt:add one line1 file changed, 1 insertion(+)
ubuntu@VM-12-11-ubuntu:~/lesson/remote_git$ git push origin dev:dev
Username for 'https://gitee.com': bao-bao-hai-mian
Password for 'https://bao-bao-hai-mian@gitee.com':
Enumerating objects: 5, done.
Counting objects: 100% (5/5), done.
Delta compression using up to 2 threads
Compressing objects: 100% (2/2), done.
Writing objects: 100% (3/3), 292 bytes | 292.00 KiB/s, done.
Total 3 (delta 1), reused 0 (delta 0), pack-reused 0
remote: Powered by GITEE.COM [1.1.5]
remote: Set trace flag c4458a8a
To https://gitee.com/bao-bao-hai-mian/remote_git.git4b2de81..62451e5  dev -> dev
此时在远程仓库的dev分支下也能看到修改

此时再在Windows上进行开发并推送
#查看file.txt原先内容
Lenovo@ljh MINGW64 ~/Desktop/code/remote_git (dev)
$ cat file.txt
hello git
#完成开发
Lenovo@ljh MINGW64 ~/Desktop/code/remote_git (dev)
$ cat file.txt
hello git
coding on Windows...
#添加,提交,推送
Lenovo@ljh MINGW64 ~/Desktop/code/remote_git (dev)
$ git add .
Lenovo@ljh MINGW64 ~/Desktop/code/remote_git (dev)
$ git commit -m "md file.txt:add one line"
[dev 72df7f6] md file.txt:add one line1 file changed, 1 insertion(+)
Lenovo@ljh MINGW64 ~/Desktop/code/remote_git (dev)
$ git push origin dev:devTo https://gitee.com/bao-bao-hai-mian/remote_git.git! [rejected]        dev -> dev (fetch first)
error: failed to push some refs to 'https://gitee.com/bao-bao-hai-mian/remote_git.git'
hint: Updates were rejected because the remote contains work that you do not
hint: have locally. This is usually caused by another repository pushing to
hint: the same ref. If you want to integrate the remote changes, use
hint: 'git pull' before pushing again.
hint: See the 'Note about fast-forwards' in 'git push --help' for details.
但是此时,因为Linux用户先一步完成开发并推送到远程仓库,导致远程仓库和Windows的内容不同,推送失败,Git也给出了报错信息——“更新被拒绝因为远程仓库有本地仓库没有的东西,这通常是因为另一个用户推送了相同的分支,建议先使用git pull”
所以,建议在推送前,先拉取一下远程仓库,同步一下数据
#从远程仓库拉取内容
Lenovo@ljh MINGW64 ~/Desktop/code/remote_git (dev)
$ git pull
remote: Enumerating objects: 5, done.
remote: Counting objects: 100% (5/5), done.
remote: Compressing objects: 100% (2/2), done.
remote: Total 3 (delta 1), reused 0 (delta 0), pack-reused 0
Unpacking objects: 100% (3/3), 272 bytes | 22.00 KiB/s, done.
From https://gitee.com/bao-bao-hai-mian/remote_git4b2de81..62451e5  dev        -> origin/dev
Auto-merging file.txt
CONFLICT (content): Merge conflict in file.txt
Automatic merge failed; fix conflicts and then commit the result.
#有提示产生了合并冲突
Lenovo@ljh MINGW64 ~/Desktop/code/remote_git (dev|MERGING)
$ cat file.txt
hello git
<<<<<<< HEAD
coding on Windows...
=======
coding on Linux...
>>>>>>> 62451e5e20daec9dec13e9243719e8fce343f8ef
Git提示产生了合并冲突,我们需要手动更改代码,再提交推送。
注意:产生了合并冲突,在解决冲突后,一定要记得再提交推送一次
#解决了合并冲突
Lenovo@ljh MINGW64 ~/Desktop/code/remote_git (dev|MERGING)
$ cat file.txt
hello git
coding on Linux...
coding on Windows...
#推送三板斧
Lenovo@ljh MINGW64 ~/Desktop/code/remote_git (dev|MERGING)
$ git add .
Lenovo@ljh MINGW64 ~/Desktop/code/remote_git (dev|MERGING)
$ git commit -m "solve the merge conflict"
[dev ab49781] solve the merge conflict
Lenovo@ljh MINGW64 ~/Desktop/code/remote_git (dev)
$ git push
Enumerating objects: 10, done.
Counting objects: 100% (10/10), done.
Delta compression using up to 16 threads
Compressing objects: 100% (5/5), done.
Writing objects: 100% (6/6), 567 bytes | 567.00 KiB/s, done.
Total 6 (delta 2), reused 0 (delta 0), pack-reused 0 (from 0)
remote: Powered by GITEE.COM [1.1.5]
remote: Set trace flag 7b4c81a4
To https://gitee.com/bao-bao-hai-mian/remote_git.git62451e5..ab49781  dev -> dev
远程仓库可以看到最终结果

由此,两名开发者已经可以进行协同开发了,不断的git pull/add/commit/push,遇到冲突,就手动解决再推送
要想看到小伙伴的代码,只需要pull一下即可
最后,虽然是在分支上进行多人协作开发,但最终目的还是将开发后的代码合并到master上,让我们的项目运行最新的代码
接下来是建议流程:
- 切换到
master,先git pull拉取最新内容 - 在切换到
dev,合并master分支,如果有冲突,解决冲突 - 最后切换到
master,合并dev,最后推送到远程仓库
#切换到master,拉取最新内容
ubuntu@VM-12-11-ubuntu:~/lesson/remote_git$ git checkout master
Switched to branch 'master'
Your branch is up to date with 'origin/master'.
ubuntu@VM-12-11-ubuntu:~/lesson/remote_git$ git pull
Already up to date.
#切回dev,合并master,有冲突解决冲突
ubuntu@VM-12-11-ubuntu:~/lesson/remote_git$ git checkout dev
Switched to branch 'dev'
Your branch is up to date with 'origin/dev'.
ubuntu@VM-12-11-ubuntu:~/lesson/remote_git$ git merge master
Already up to date.
#切回master,合并dev,最后推送至远程仓库
ubuntu@VM-12-11-ubuntu:~/lesson/remote_git$ git checkout master
Switched to branch 'master'
Your branch is up to date with 'origin/master'.
ubuntu@VM-12-11-ubuntu:~/lesson/remote_git$ git merge dev
Updating 4b2de81..ab49781
Fast-forwardfile.txt | 2 ++1 file changed, 2 insertions(+)
ubuntu@VM-12-11-ubuntu:~/lesson/remote_git$ git add .
ubuntu@VM-12-11-ubuntu:~/lesson/remote_git$ git commit -m "merge dev"
On branch master
Your branch is ahead of 'origin/master' by 3 commits.(use "git push" to publish your local commits)
nothing to commit, working tree clean
ubuntu@VM-12-11-ubuntu:~/lesson/remote_git$ git push
Total 0 (delta 0), reused 0 (delta 0), pack-reused 0
remote: Powered by GITEE.COM [1.1.5]
remote: Set trace flag 644090b5
To https://gitee.com/bao-bao-hai-mian/remote_git.git4b2de81..ab49781  master -> master
最后在远程仓库的master分支也能看到修改后的内容

开发完成后,就可以将dev分支删除了
远程仓库删完分支后,在本地依然还能看到远程分支
ubuntu@VM-12-11-ubuntu:~/lesson/remote_git$ git branch -adev
* masterremotes/origin/HEAD -> origin/masterremotes/origin/devremotes/origin/master
需要使用命令来删除
git remote prune [远程仓库]ubuntu@VM-12-11-ubuntu:~/lesson/remote_git$ git remote prune origin
Pruning origin
URL: https://gitee.com/bao-bao-hai-mian/remote_git.git* [pruned] origin/dev
ubuntu@VM-12-11-ubuntu:~/lesson/remote_git$ git branch -adev
* masterremotes/origin/HEAD -> origin/masterremotes/origin/master
可以看到,远程仓库的dev被删除了,最后删除本地的dev分支即可
总结一下,在同一分支下进行多人协作的工作模式如下:
- 首先,可以试图使用
git push origin [分支]推送自己的修改- 如果推送失败,则因为远程分支比本地更新,需要先
git pull拉取新内容- 如果合并有冲突,则解决冲突,并在本地提交
- 没有冲突或者解决完冲突后,再用
git push origin [分支]推送就能成功- 功能开发完成后,
使用建立的流程,使得master合并开发分支,并推送,最后删除开发分支
场景二
一般情况下,如果有多需求需要多人同时进行开发,并不会在一个分支上进行多人开发,而是一个需求或一个功能点就创建一个feature分支
现在同时有两个需求需要开发,所以需要两个用户各自创建一个分支来完成开发
本次展示在本地创建分支,再通过推送的方式发到远端
Linux用户
#创建并切换feature-1分支
ubuntu@VM-12-11-ubuntu:~/lesson/remote_git$ git checkout -b feature-1
Switched to a new branch 'feature-1'
#完成需求开发
ubuntu@VM-12-11-ubuntu:~/lesson/remote_git$ vim function1
ubuntu@VM-12-11-ubuntu:~/lesson/remote_git$ cat function1
demand1 Done!
#推送三板斧
ubuntu@VM-12-11-ubuntu:~/lesson/remote_git$ git add .
ubuntu@VM-12-11-ubuntu:~/lesson/remote_git$ git commit -m "complete demand1"
[feature-1 4898bf6] complete demand11 file changed, 1 insertion(+)create mode 100644 function1
#因为远程没有仓库,所以可以在推送时指明建立
ubuntu@VM-12-11-ubuntu:~/lesson/remote_git$ git push --set-upstream origin feature-1
Enumerating objects: 4, done.
Counting objects: 100% (4/4), done.
Delta compression using up to 2 threads
Compressing objects: 100% (2/2), done.
Writing objects: 100% (3/3), 285 bytes | 285.00 KiB/s, done.
Total 3 (delta 1), reused 0 (delta 0), pack-reused 0
remote: Powered by GITEE.COM [1.1.5]
remote: Set trace flag f542d8bc
remote: Create a pull request for 'feature-1' on Gitee by visiting:
remote: https://gitee.com/bao-bao-hai-mian/remote_git/pull/new/bao-bao-hai-mian:feature-1...bao-bao-hai-mian:master
To https://gitee.com/bao-bao-hai-mian/remote_git.git* [new branch]      feature-1 -> feature-1
Branch 'feature-1' set up to track remote branch 'feature-1' from 'origin'.
因为远程仓库并没有feature-1分支,可以有以下两种方式
- 指定推送,远程仓库会创建指定分支
git push [远程仓库] [本地分支]:[远程分支]
#例
git push origin feature-1:feature-1
但是此时只是创建远程分支,并没有建立连接,建立连接可以简化拉取和推送的命令
建立连接
git branch --set-upstream-to=[远程分支] [本地分支]
#例
git branch --set-upstream-to=origin/feature-1 feature-1
- 推送时,直接建立连接
git push --set-upstream [远程仓库] [本地分支]:[远程分支]
#例,若本地和远程分支名相同,可简写
git push --set-upstream origin feature-1
Windows
#创建并切换分支
$ git checkout -b feature-2
Switched to a new branch 'feature-2'
#完成需求开发
Lenovo@ljh MINGW64 ~/Desktop/code/remote_git (feature-2)
$ cat funciton2
demand2 Done!
#三板斧
Lenovo@ljh MINGW64 ~/Desktop/code/remote_git (feature-2)
$ git add .
Lenovo@ljh MINGW64 ~/Desktop/code/remote_git (feature-2)
$ git commit -m "complete demand2"
[feature-2 4dff28d] complete demand21 file changed, 1 insertion(+)create mode 100644 funciton2
Lenovo@ljh MINGW64 ~/Desktop/code/remote_git (feature-2)
$ git push --set-upstream origin feature-2:feature-2
Enumerating objects: 4, done.
Counting objects: 100% (4/4), done.
Delta compression using up to 16 threads
Compressing objects: 100% (2/2), done.
Writing objects: 100% (3/3), 273 bytes | 273.00 KiB/s, done.
Total 3 (delta 1), reused 0 (delta 0), pack-reused 0 (from 0)
remote: Powered by GITEE.COM [1.1.5]
remote: Set trace flag 1e4a5894
remote: Create a pull request for 'feature-2' on Gitee by visiting:
remote: https://gitee.com/bao-bao-hai-mian/remote_git/pull/new/bao-bao-hai-mian:feature-2...bao-bao-hai-mian:master
To https://gitee.com/bao-bao-hai-mian/remote_git.git* [new branch]      feature-2 -> feature-2
branch 'feature-2' set up to track 'origin/feature-2'.
此时,双方都完成推送,在本地,你看不见他的文档,他看不见你的文档,推送时也没有任何冲突,互补影响
此时,远程仓库状态:

如果此时,Windows用户生病了,需要你帮忙完成一下需求开发,你需要
- 拉取
feature-2分支 - 完成开发
- 推送
#拉取分支
ubuntu@VM-12-11-ubuntu:~/lesson/remote_git$ git pull origin feature-2:feature-2
remote: Enumerating objects: 4, done.
remote: Counting objects: 100% (4/4), done.
remote: Compressing objects: 100% (2/2), done.
remote: Total 3 (delta 1), reused 0 (delta 0), pack-reused 0
Unpacking objects: 100% (3/3), 253 bytes | 253.00 KiB/s, done.
From https://gitee.com/bao-bao-hai-mian/remote_git* [new branch]      feature-2  -> feature-2* [new branch]      feature-2  -> origin/feature-2
#查看连接
ubuntu@VM-12-11-ubuntu:~/lesson/remote_git$ git branch -vv
* feature-1 4898bf6 [origin/feature-1] complete demand1feature-2 4dff28d complete demand2master    ab49781 [origin/master] solve the merge conflict
#建立连接
ubuntu@VM-12-11-ubuntu:~/lesson/remote_git$ git branch --set-upstream-to=origin/feature-2 feature-2
#切换分支
ubuntu@VM-12-11-ubuntu:~/lesson/remote_git$ git checkout feature-2
Switched to branch 'feature-2'
Your branch is up to date with 'origin/feature-2'.
#帮忙开发
ubuntu@VM-12-11-ubuntu:~/lesson/remote_git$ vim funciton2
ubuntu@VM-12-11-ubuntu:~/lesson/remote_git$ cat funciton2
demand2 Done!
Help coding
#三板斧
ubuntu@VM-12-11-ubuntu:~/lesson/remote_git$ git add .
ubuntu@VM-12-11-ubuntu:~/lesson/remote_git$ git commit -m "help coding"
[feature-2 8103ba9] help coding1 file changed, 2 insertions(+), 1 deletion(-)
ubuntu@VM-12-11-ubuntu:~/lesson/remote_git$ git push
Enumerating objects: 5, done.
Counting objects: 100% (5/5), done.
Delta compression using up to 2 threads
Compressing objects: 100% (2/2), done.
Writing objects: 100% (3/3), 279 bytes | 279.00 KiB/s, done.
Total 3 (delta 1), reused 0 (delta 0), pack-reused 0
remote: Powered by GITEE.COM [1.1.5]
remote: Set trace flag 9c4b1a99
To https://gitee.com/bao-bao-hai-mian/remote_git.git4dff28d..8103ba9  feature-2 -> feature-2
然后,Windows用户休息回来,继续开发或者开发已经完成,推送至远程
- 首先要拉取分支
- 继续开发或推送
开发完成,就可以合并分支了。还是使用建议的流程
- 切换到
master,先git pull拉取最新内容 - 在切换到
feature2,合并master分支,如果有冲突,解决冲突 - 最后切换到
master,合并feature2,最后推送到远程仓库
#切换到master
Lenovo@ljh MINGW64 ~/Desktop/code/remote_git (feature-2)
$ git checkout master
Switched to branch 'master'
Your branch is up to date with 'origin/master'.
#拉取最新内容
Lenovo@ljh MINGW64 ~/Desktop/code/remote_git (master)
$ git pull
Already up to date.
#切回feature-2
Lenovo@ljh MINGW64 ~/Desktop/code/remote_git (master)
$ git checkout feature-2
Switched to branch 'feature-2'
Your branch is up to date with 'origin/feature-2'.
#合并master
Lenovo@ljh MINGW64 ~/Desktop/code/remote_git (feature-2)
$ git merge master
Already up to date.
#切回master
Lenovo@ljh MINGW64 ~/Desktop/code/remote_git (feature-2)
$ git checkout master
Switched to branch 'master'
Your branch is up to date with 'origin/master'.
#合并feature-2
Lenovo@ljh MINGW64 ~/Desktop/code/remote_git (master)
$ git merge feature-2
Updating ab49781..8103ba9
Fast-forwardfunciton2 | 2 ++1 file changed, 2 insertions(+)create mode 100644 funciton2
#三板斧
Lenovo@ljh MINGW64 ~/Desktop/code/remote_git (master)
$ git add .
Lenovo@ljh MINGW64 ~/Desktop/code/remote_git (master)
$ git commit -m "merge feature-2"
On branch master
Your branch is ahead of 'origin/master' by 2 commits.(use "git push" to publish your local commits)
nothing to commit, working tree clean
Lenovo@ljh MINGW64 ~/Desktop/code/remote_git (master)
$ git push
Total 0 (delta 0), reused 0 (delta 0), pack-reused 0 (from 0)
remote: Powered by GITEE.COM [1.1.5]
remote: Set trace flag ca41d591
To https://gitee.com/bao-bao-hai-mian/remote_git.gitab49781..8103ba9  master -> master
Lenovo@ljh MINGW64 ~/Desktop/code/remote_git (master)
$
而Linux后提交,也是一样的流程,此处不过多展示
合并完后,删除开发分支

以上就是本篇博客的所有内容,感谢你的阅读
如果觉得本篇文章对你有所帮助的话,不妨点个赞支持一下博主,拜托啦,这对我真的很重要。

相关文章:
【Git】远程仓库
本博客的环境是 Ubuntu/Linux 文章目录 集中式与分布式的区别远程仓库新建远程仓库克隆远程仓库向远程仓库推送从远程仓库拉取 配置Git忽略指定文件给命令配置别名 标签管理创建标签操作标签 多人协作本地分支与远程分支连接场景一场景二 集中式与分布式的区别 引荐自关于Git这…...

苹果手机铃声怎么设置自己的歌?3个方法自定义手机铃声
苹果手机内部的手机铃声库只有固定的几首铃声,且都是纯音乐,比较单调,并不是所有用户都喜欢这些铃声。那么,苹果手机铃声怎么设置自己的歌呢?小编这里有3个方法,可以教大家如何将手机铃声设置成自己喜欢的歌…...
828华为云征文|华为Flexus云服务器搭建Cloudreve私人网盘
一、华为云 Flexus X 实例:开启高效云服务新篇🌟 在云计算的广阔领域中,资源的灵活配置与卓越性能犹如璀璨星辰般闪耀。华为云 Flexus X 实例恰似一颗最为耀眼的新星,将云服务器技术推向了崭新的高度。 华为云 Flexus X 实例基于…...

【AI学习】AI绘画发展简史
无意中读了一篇发表自2022年的文章,《AI绘画何以突飞猛进? 从历史到技术突破, 一文读懂火爆的AI绘画发展史》,写的比较有意思,科普了好多我原来不知道的历史。 简单提炼一下,做个笔记。 AI绘画重要事件 2012年 Google两位大名…...

使用LangChain创建简单的语言模型应用程序【快速入门指南】
## 引言在这篇文章中,我们将展示如何使用LangChain构建一个简单的语言模型(LLM)应用程序。这个应用程序的功能是将文本从英语翻译成其他语言。尽管应用程序的逻辑相对简单,但它能够帮助我们学习如何使用LangChain进行更多复杂的功…...
嵌入式人工智能项目及人工智能应用项目——大合集列表查阅
本文的项目合集列表可能更新不及时(会及时更新),可查阅实时更新的链接如下。 嵌入式人工智能及人工智能应用项目合集实时更新链接如下: 阿齐嵌入式人工智能及人工智能应用项目合集 (kdocs.cn)https://www.kdocs.cn/l/cc97tuieys4…...

心觉:成功学就像一把刀,有什么作用关键在于使用者(一)
Hi,我是心觉,与你一起玩转潜意识、脑波音乐和吸引力法则,轻松掌控自己的人生! 挑战每日一省写作173/1000天 很多人觉得成功学是鸡汤,是没用的,甚至是骗人的 我先保持中立,不知道对不对 我们先…...
GAMES101(10节,几何)
Geometry implicit隐式几何表示: 函数f(x,y,z): 根据函数fn描述几何,遍历所有空间内 的点,如果带入xyz到函数f(x,y,z)结果0那就绘制这个点 如果xyz求值结果>0表示在几何外,0在表面,<0在几何内 构造几何csg(…...

Android 中音频焦点的使用场景及示例
Android 中音频焦点的使用场景及代码示例 一、音频焦点简介 在 Android 系统中,音频焦点(Audio Focus)是一种机制,用于管理多个应用程序同时播放音频时的冲突。当一个应用程序请求音频焦点并获得它时,其他应用程序在…...

2. JDBC驱动是什么?如何在Java项目中配置MySQL的JDBC驱动?
JDBC驱动 是一种软件组件,它使Java应用程序能够与数据库进行交互。JDBC驱动是JDBC API的实现,负责将Java程序中的标准JDBC方法调用转化为数据库特定的操作。每个数据库(如MySQL、PostgreSQL、Oracle等)都有对应的JDBC驱动程序&…...

Nginx 跨域 + 无法设置 Cookie 解决办法
今天来分享一下关于项目部署上线时怎么解决跨域问题!!! 首先感谢一下大佬的方法,才让这个困扰我很久的问题得以解决!!! 这也是我请教大佬才解决的问题,大佬和我说,这是他耗费两周才解决的问题,我这也是属于前人栽树后人乘凉了,嘿嘿嘿!!! 前端问题 前端没有携带 cookie 导致后端…...
北森笔试测评之言语理解到底难不难
前篇笔记我提到过,言语理解是最难的,有同学质疑了。言语我都会做呀,甚至有的可以搜到,而图标和图形我有的不会。这里需要指出,会做不等于作对,可以回顾到高中甚至初中的时候,感觉做的好的一般都…...

Ubuntu下beanstalkd无法绑定局域网IP地址以及消息队列beanstalkd上的error: JOB_TOO_BIG的解决
一、ubuntu下beanstalkd无法绑定局域网IP地址 今天因为业务需要,我把之前安装的beanstalkd所绑定的IP地址由127.0.0.1改成局域网IP地址,但是怪了,显示beanstalkd已经启动,查看端口监控也显示IP地址变了,但是使用telnet…...
网络原理(3)—— 应用层、传输层(TCP)
1. 应用层 日常开发中最常用到的一层,主要涉及到两种情况: 1) 使用现成的应用层协议 2) 自己定义应用层协议 1.1 自定义应用层协议的流程 1. 明确前后端交互过程中需要传递哪些信息 实例:开发一个外卖软件 打开软件,首先需要展…...

Flutter - Win32程序是如何执行main函数
Win32程序的主体结构 int APIENTRY wWinMain(_In_ HINSTANCE instance, _In_opt_ HINSTANCE prev,_In_ wchar_t *command_line, _In_ int show_command) {// Attach to console when present (e.g., flutter run) or create a// new console when running with a debugger.if …...

linux-系统管理与监控-日志管理
Linux 系统管理与监控:日志管理 1. 日志管理概述 日志文件是系统在运行过程中记录的各种信息,它们是系统管理员排查问题、监控系统健康状况的重要工具。在 Linux 系统中,日志涵盖了系统事件、内核信息、用户操作、软件服务和应用程序等内容…...
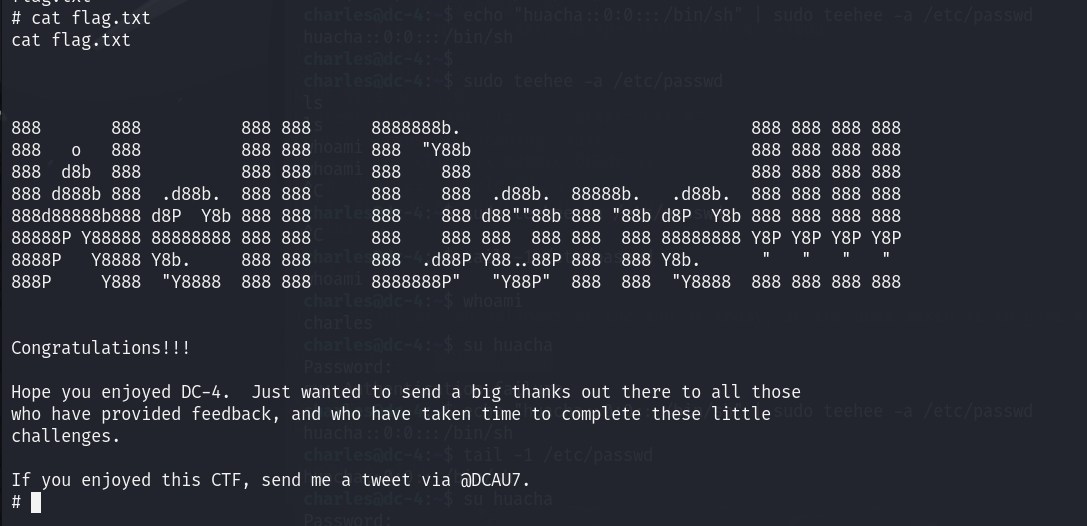
VulhubDC-4靶机详解
项目地址 https://download.vulnhub.com/dc/DC-4.zip实验过程 将下载好的靶机导入到VMware中,设置网络模式为NAT模式,然后开启靶机虚拟机 使用nmap进行主机发现,获取靶机IP地址 nmap 192.168.47.1-254根据对比可知DC-4的一个ip地址为192.1…...
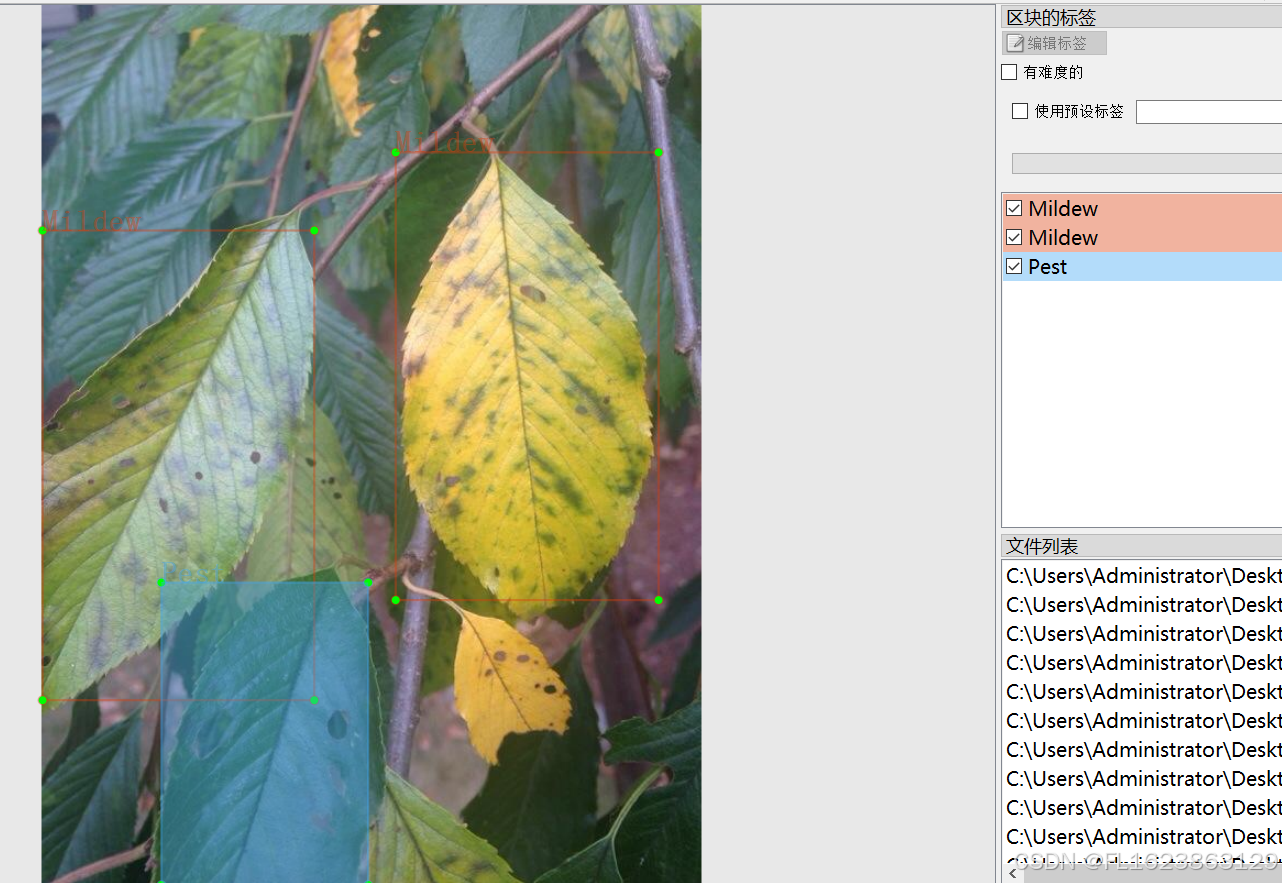
[数据集][目标检测]烟叶病害检测数据集VOC+YOLO格式612张3类别
数据集格式:Pascal VOC格式YOLO格式(不包含分割路径的txt文件,仅仅包含jpg图片以及对应的VOC格式xml文件和yolo格式txt文件) 图片数量(jpg文件个数):612 标注数量(xml文件个数):612 标注数量(txt文件个数):612 标注类别…...

Sapiens——人类视觉大模型的基础
引言 大规模预训练以及随后针对特定任务的语言建模微调取得了显著成功,已将这种方法确立为标准做法。同样, 计算机视觉方法正逐步采用大规模数据进行预训练。LAION5B、Instagram-3.5B、JFT-300M、LVD142M、Visual Genome 和 YFCC100M 等大型数据集的出现…...

《深度学习》【项目】 OpenCV 身份证号识别
目录 一、项目实施 1、自定义函数 2、定位模版图像中的数字 1)模版图二值化处理 运行结果: 2)展示所有数字 运行结果: 3、识别身份证号 1)灰度图、二值化图展示 运行结果 2)定位身份证号每一个数…...

基于2D工程图几何特征与梯度提升模型的制造成本智能预测
1. 项目概述:从图纸到报价的智能革命在制造业,尤其是像汽车零部件这样的离散制造领域,报价速度直接决定了订单的生死。传统上,拿到一张新的2D工程图(DWG格式),成本工程师需要花上几天甚至几周时…...

航空航天为什么离不开高强镁合金?国产替代到哪一步了
飞机每减重一千克,全年大约节省四千两百美元的燃油费用——这是航空工程师熟悉的经验值。在商业航空领域,这个数字还只是财务账;在战斗机、导弹和卫星的世界里,减重的收益被换算成更远的航程、更大的载荷、更高的机动性࿰…...

VMware ESXi 9.1.0.0集成NVME+网卡驱动版发布|新特性+驱动集成+部署升级+FAQ全指南
一、ESXi 9.1.0.0 正式版核心新特性 VMware ESXi 9.1.0.0(2026 年 5 月发布)是 vSphere 9.1 核心组件,聚焦硬件兼容扩展、性能跃升、安全加固、运维简化四大方向,重点强化 NVMe 存储与网卡生态适配,以下为关键更新&am…...

腾讯 Marvis 初级使用教程——从安装到上手
腾讯最新系统级AI助手Marvis(2026年5月20日发布),官网 https://marvis.qq.com,主打“一句话操作电脑”、跨端协同、GUI Agent执行。虽然是个【小龙虾】,但上手其实不难。这篇就简单写写 Marvis 的安装和基础使用&#…...
)
别再手动编译了!Matlab一键调用CEC2017测试函数的完整配置指南(附30个函数调用示例)
别再手动编译了!Matlab一键调用CEC2017测试函数的完整配置指南(附30个函数调用示例) 算法研究者们常常需要借助标准测试函数来验证优化算法的性能,而CEC2017测试函数集因其复杂性和多维度的挑战性,成为评估算法鲁棒性的…...

开源ELM327 OBD-II适配器:从硬件设计到多协议固件实现全解析
1. 项目概述:开源ELM327 OBD适配器如果你对汽车诊断、数据监控或者嵌入式开发感兴趣,那么自己动手做一个OBD-II适配器绝对是个能让你学到很多东西的硬核项目。今天要聊的,就是一个完全开源的、基于NXP LPC1517微控制器的ELM327兼容OBD适配器。…...

3分钟开启PC游戏分屏派对:NucleusCoop让单机游戏秒变多人同屏神器
3分钟开启PC游戏分屏派对:NucleusCoop让单机游戏秒变多人同屏神器 【免费下载链接】nucleuscoop Starts multiple instances of a game for split-screen multiplayer gaming! 项目地址: https://gitcode.com/gh_mirrors/nu/nucleuscoop 还在为热门PC游戏不支…...

在模型广场灵活选型让我找到了更适合代码生成的Taotoken模型
🚀 告别海外账号与网络限制!稳定直连全球优质大模型,限时半价接入中。 👉 点击领取海量免费额度 在模型广场灵活选型让我找到了更适合代码生成的Taotoken模型 开发代码辅助工具时,选择合适的模型是平衡效果与成本的关…...

Java项目中如何提升整体系统性能?
性能优化可以说是我们程序员的必修课,如果你想要跳出CRUD的苦海,成为一个更“高级”的程序员的话,性能优化这一关你是无论无何都要去面对的。为了提升系统性能,开发人员可以从系统的各个角度和层次对系统进行优化。除了最常见的代…...

XZ1018,100V,40A,NMOS 封装:TO252
封装:TO252类型:NVDS:100V VGS: 20V ID:40ARDS(ON):10V <14mΩRDS(ON):4.5V <19mΩ型号: XZ1018 封装:TO252类型…...