(k8s)kubernetes集群基于Containerd部署
-
资源列表
-
基础环境
-
一、基础环境准备
-
1.1、关闭Swap分区
-
1.2、添加hosts解析
-
1.3、桥接的IPv4流量传递给iptables的链
-
-
二、准备Containerd容器运行时
-
2.1、安装Containerd
-
2.2、配置Containerd
-
2.3、启动Containerd
-
-
三、部署Kubernetes集群
-
3.1、安装Kubeadm工具
-
3.2、配置crictl工具
-
3.3、配置Containerd镜像加速器
-
3.4、测试crictl工具是否可用
-
3.5、初始化Master节点
-
3.6、Node节点加入集群
-
-
四、部署网络插件(CNI)
-
4.1、拉取必要镜像
-
4.2、部署网络插件
-
4.2、查看节点状态
-
4.3、查看组件状态
-
4.4、查看所有Pod状态
-
-
五、Containerd基本操作
-
4.1、Crictl镜像管理
-
4.2、Crictl容器管理
-
4.3、Crictl Pod管理
-
资源列表
| 操作系统 | 配置 | 主机名 | IP |
|---|---|---|---|
| CentOS 7.9 | 2C4G | master | 192.168.93.101 |
| CentOS 7.9 | 2C4G | node1 | 192.168.93.102 |
| CentOS 7.9 | 2C4G | node2 | 192.168.93.103 |
基础环境
-
关闭防火墙
systemctl stop firewalld
systemctl disable firewalld-
关闭内核安全机制
setenforce 0
sed -i "s/^SELINUX=.*/SELINUX=disabled/g" /etc/selinux/config-
修改主机名
hostnamectl set-hostname master
hostnamectl set-hostname node1
hostnamectl set-hostname node2
一、基础环境准备
-
三台主机都要操作,以master节点为例进行演示
1.1、关闭Swap分区
# 临时关闭
[root@master ~]# swapoff -a
# 永久关闭
[root@master ~]# sed -i 's/.*swap.*/#&/g' /etc/fstab
1.2、添加hosts解析
[root@master ~]# cat >> /etc/hosts << EOF
192.168.93.101 master
192.168.93.102 node1
192.168.93.103 node2
EOF
1.3、桥接的IPv4流量传递给iptables的链
# 加载 overlay 内核模块
[root@master ~]# modprobe overlay
# 加载 br_netfilter 模块
[root@master ~]# modprobe br_netfilter
[root@master ~]# cat <<EOF | sudo tee /etc/sysctl.d/99-kubernetes-cri.conf
net.bridge.bridge-nf-call-iptables  = 1
net.ipv4.ip_forward                 = 1
net.bridge.bridge-nf-call-ip6tables = 1
EOF
[root@master ~]# sysctl --system
二、准备Containerd容器运行时
-
三台主机都要操作,以master节点为例进行演示
2.1、安装Containerd
# 添加 docker 源,containerd也在docker源内的
[root@master ~]# cat <<EOF | sudo tee /etc/yum.repos.d/docker-ce.repo
[docker]
name=docker-ce
baseurl=https://mirrors.aliyun.com/docker-ce/linux/centos/7/x86_64/stable/
enabled=1
gpgcheck=1
gpgkey=https://mirrors.aliyun.com/docker-ce/linux/centos/gpg
EOF# 快速建立 yum 缓存
[root@master ~]# yum makecache fast# 安装containerd
# 列出所有containerd版本
[root@master ~]# yum list containerd.io --showduplicates
[root@master ~]# yum -y install containerd.io-1.6.6-3.1.el7.x86_64
2.2、配置Containerd
# 生成配置文件
[root@master ~]# mkdir -p /etc/containerd
[root@master ~]# containerd config default | sudo tee /etc/containerd/config.toml # 修改/etc/containerd/config.toml文件中sandbox_image的值
[root@master ~]# grep 'sandbox_image' /etc/containerd/config.toml
# 在原有的基础上进行修改,sandbox_image = "registry.aliyuncs.com/google_containers/pause:3.9"
2.3、启动Containerd
[root@master ~]# systemctl enable containerd
[root@master ~]# systemctl start containerd
三、部署Kubernetes集群
3.1、安装Kubeadm工具
-
所有节点都要操作
[root@master ~]# cat << EOF >> /etc/yum.repos.d/kubernetes.repo
[kubernetes]
name=Kubernetes
baseurl=https://mirrors.aliyun.com/kubernetes/yum/repos/kubernetes-el7-x86_64/
enabled=1
gpgcheck=1
repo_gpgcheck=1
gpgkey=https://mirrors.aliyun.com/kubernetes/yum/doc/yum-key.gpg https://mirrors.aliyun.com/kubernetes/yum/doc/rpm-package-key.gpg
EOF# 快速建立yum缓存
[root@master ~]# yum makecache fast# 安装 kubectl:命令行管理工具、kubeadm:安装K8S集群工具、kubelet管理容器工具
[root@master ~]# yum install -y kubelet-1.27.0 kubeadm-1.27.0 kubectl-1.27.0# 切记这个时候不要启动,只需要设置为开机自启
[root@master ~]# systemctl enable kubelet.service
3.2、配置crictl工具
-
crictl是CRI兼容的容器运行时命令行接口。你可以使用它来检查和调试Kubernetes节点上的容器运行时和应用程序。crictl和它的源代码在 cri-tools 代码库
-
更好 Containerd后,以上我们常用的docker命令也不再使用了,取而代之的分别是 crictl 和 ctr 两个命令行客户端
-
crictl是遵循CRI接口规范的一个命令行工具,通常用它来检查和管理kubelet节点上的容器运行时和镜像
-
ctr是containerd的一个客户端工具
# 所有节点都要操作
[root@master ~]# cat << EOF >> /etc/crictl.yaml
runtime-endpoint: unix:///var/run/containerd/containerd.sock
image-endpoint: unix:///var/run/containerd/containerd.sock
timeout: 10
debug: false
EOF
3.3、配置Containerd镜像加速器
-
所有节点都要操作
# 在/etc/containerd/config.toml找到[plugins."io.containerd.grpc.v1.cri".registry.mirrors] ,默认在153行左右,在此行下面添加两行配置,阿里云的镜像加速器
[root@master ~]# vim /etc/containerd/config.toml [plugins."io.containerd.grpc.v1.cri".registry.mirrors][plugins."io.containerd.grpc.v1.cri".registry.mirrors."docker.io"]endpoint = ["https://i9h06ghu.mirror.aliyuncs.com"]# 保存退出,刷新服务
[root@master ~]# systemctl restart containerd
3.4、测试crictl工具是否可用
# 以拉取一个Nginx镜像进行演示是否可用
[root@master ~]# crictl pull nginx:latest
Image is up to date for sha256:605c77e624ddb75e6110f997c58876baa13f8754486b461117934b24a9dc3a85# 查看镜像
[root@master ~]# crictl images
IMAGE                     TAG                 IMAGE ID            SIZE
docker.io/library/nginx   latest              605c77e624ddb       56.7MB
3.5、初始化Master节点
-
在master节点上操作
# 生成配置文件
[root@master ~]# kubeadm config print init-defaults > kubeadm-init.yaml# 修改kubeadm-init.yaml文件的advertiseAddress、name、imageRepository,添加Pod网络podSubnet
[root@master ~]# vim kubeadm-init.yaml
apiVersion: kubeadm.k8s.io/v1beta3
bootstrapTokens:
- groups:- system:bootstrappers:kubeadm:default-node-tokentoken: abcdef.0123456789abcdefttl: 24h0m0susages:- signing- authentication
kind: InitConfiguration
localAPIEndpoint:advertiseAddress: 192.168.93.101bindPort: 6443
nodeRegistration:criSocket: unix:///var/run/containerd/containerd.sockimagePullPolicy: IfNotPresentname: mastertaints: null
---
apiServer:timeoutForControlPlane: 4m0s
apiVersion: kubeadm.k8s.io/v1beta3
certificatesDir: /etc/kubernetes/pki
clusterName: kubernetes
controllerManager: {}
dns: {}
etcd:local:dataDir: /var/lib/etcd
imageRepository: registry.cn-hangzhou.aliyuncs.com/google_containers
kind: ClusterConfiguration
kubernetesVersion: 1.27.0
networking:dnsDomain: cluster.localserviceSubnet: 10.96.0.0/12podSubnet: 10.244.0.0/16
scheduler: {}
# 初始化集群
[root@master ~]# kubeadm init --config=kubeadm-init.yaml
[init] Using Kubernetes version: v1.27.0
[preflight] Running pre-flight checks
[preflight] Pulling images required for setting up a Kubernetes cluster
[preflight] This might take a minute or two, depending on the speed of your internet connection
[preflight] You can also perform this action in beforehand using 'kubeadm config images pull'
W0629 11:07:42.117214 8814 images.go:80] could not find officially supported version of etcd for Kubernetes v1.27.0, falling back to the nearest etcd version (3.5.7-0)
W0629 11:08:11.311847 8814 checks.go:835] detected that the sandbox image "registry.aliyuncs.com/google_containers/pause:3.9" of the container runtime is inconsistent with that used by kubeadm. It is recommended that using "registry.cn-hangzhou.aliyuncs.com/google_containers/pause:3.9" as the CRI sandbox image.
[certs] Using certificateDir folder "/etc/kubernetes/pki"
[certs] Generating "ca" certificate and key
[certs] Generating "apiserver" certificate and key
[certs] apiserver serving cert is signed for DNS names [kubernetes kubernetes.default kubernetes.default.svc kubernetes.default.svc.cluster.local master] and IPs [10.96.0.1 192.168.93.101]
[certs] Generating "apiserver-kubelet-client" certificate and key
[certs] Generating "front-proxy-ca" certificate and key
[certs] Generating "front-proxy-client" certificate and key
[certs] Generating "etcd/ca" certificate and key
[certs] Generating "etcd/server" certificate and key
[certs] etcd/server serving cert is signed for DNS names [localhost master] and IPs [192.168.93.101 127.0.0.1 ::1]
[certs] Generating "etcd/peer" certificate and key
[certs] etcd/peer serving cert is signed for DNS names [localhost master] and IPs [192.168.93.101 127.0.0.1 ::1]
[certs] Generating "etcd/healthcheck-client" certificate and key
[certs] Generating "apiserver-etcd-client" certificate and key
[certs] Generating "sa" key and public key
[kubeconfig] Using kubeconfig folder "/etc/kubernetes"
[kubeconfig] Writing "admin.conf" kubeconfig file
[kubeconfig] Writing "kubelet.conf" kubeconfig file
[kubeconfig] Writing "controller-manager.conf" kubeconfig file
[kubeconfig] Writing "scheduler.conf" kubeconfig file
[kubelet-start] Writing kubelet environment file with flags to file "/var/lib/kubelet/kubeadm-flags.env"
[kubelet-start] Writing kubelet configuration to file "/var/lib/kubelet/config.yaml"
[kubelet-start] Starting the kubelet
[control-plane] Using manifest folder "/etc/kubernetes/manifests"
[control-plane] Creating static Pod manifest for "kube-apiserver"
[control-plane] Creating static Pod manifest for "kube-controller-manager"
[control-plane] Creating static Pod manifest for "kube-scheduler"
[etcd] Creating static Pod manifest for local etcd in "/etc/kubernetes/manifests"
W0629 11:08:41.485522 8814 images.go:80] could not find officially supported version of etcd for Kubernetes v1.27.0, falling back to the nearest etcd version (3.5.7-0)
[wait-control-plane] Waiting for the kubelet to boot up the control plane as static Pods from directory "/etc/kubernetes/manifests". This can take up to 4m0s
[apiclient] All control plane components are healthy after 6.001513 seconds
[upload-config] Storing the configuration used in ConfigMap "kubeadm-config" in the "kube-system" Namespace
[kubelet] Creating a ConfigMap "kubelet-config" in namespace kube-system with the configuration for the kubelets in the cluster
[upload-certs] Skipping phase. Please see --upload-certs
[mark-control-plane] Marking the node master as control-plane by adding the labels: [node-role.kubernetes.io/control-plane node.kubernetes.io/exclude-from-external-load-balancers]
[mark-control-plane] Marking the node master as control-plane by adding the taints [node-role.kubernetes.io/control-plane:NoSchedule]
[bootstrap-token] Using token: abcdef.0123456789abcdef
[bootstrap-token] Configuring bootstrap tokens, cluster-info ConfigMap, RBAC Roles
[bootstrap-token] Configured RBAC rules to allow Node Bootstrap tokens to get nodes
[bootstrap-token] Configured RBAC rules to allow Node Bootstrap tokens to post CSRs in order for nodes to get long term certificate credentials
[bootstrap-token] Configured RBAC rules to allow the csrapprover controller automatically approve CSRs from a Node Bootstrap Token
[bootstrap-token] Configured RBAC rules to allow certificate rotation for all node client certificates in the cluster
[bootstrap-token] Creating the "cluster-info" ConfigMap in the "kube-public" namespace
[kubelet-finalize] Updating "/etc/kubernetes/kubelet.conf" to point to a rotatable kubelet client certificate and key
[addons] Applied essential addon: CoreDNS
[addons] Applied essential addon: kube-proxyYour Kubernetes control-plane has initialized successfully!To start using your cluster, you need to run the following as a regular user:
#####################################################################mkdir -p $HOME/.kubesudo cp -i /etc/kubernetes/admin.conf $HOME/.kube/configsudo chown $(id -u):$(id -g) $HOME/.kube/config
#####################################################################
Alternatively, if you are the root user, you can run:export KUBECONFIG=/etc/kubernetes/admin.confYou should now deploy a pod network to the cluster.
Run "kubectl apply -f [podnetwork].yaml" with one of the options listed at:https://kubernetes.io/docs/concepts/cluster-administration/addons/Then you can join any number of worker nodes by running the following on each as root:
#####################################################################
kubeadm join 192.168.93.101:6443 --token abcdef.0123456789abcdef \--discovery-token-ca-cert-hash sha256:aa55ff35b12c120ff5a12098622122c77eff343d033a54d069d3e55364b4184d
###################################################################### 初始化成功以后要根据提示执行以下3个命令,才可以操作集群
[root@master ~]# mkdir -p $HOME/.kube
[root@master ~]# sudo cp -i /etc/kubernetes/admin.conf $HOME/.kube/config
[root@master ~]# sudo chown $(id -u):$(id -g) $HOME/.kube/config3.6、Node节点加入集群
-
所有Node节点都要操作
# node1节点
[root@node1 ~]# kubeadm join 192.168.93.101:6443 --token abcdef.0123456789abcdef \
> --discovery-token-ca-cert-hash sha256:aa55ff35b12c120ff5a12098622122c77eff343d033a54d069d3e55364b4184d
[preflight] Running pre-flight checks
[preflight] Reading configuration from the cluster...
[preflight] FYI: You can look at this config file with 'kubectl -n kube-system get cm kubeadm-config -o yaml'
[kubelet-start] Writing kubelet configuration to file "/var/lib/kubelet/config.yaml"
[kubelet-start] Writing kubelet environment file with flags to file "/var/lib/kubelet/kubeadm-flags.env"
[kubelet-start] Starting the kubelet
[kubelet-start] Waiting for the kubelet to perform the TLS Bootstrap...This node has joined the cluster:
* Certificate signing request was sent to apiserver and a response was received.
* The Kubelet was informed of the new secure connection details.Run 'kubectl get nodes' on the control-plane to see this node join the cluster.# node2节点
[root@node2 ~]# kubeadm join 192.168.93.101:6443 --token abcdef.0123456789abcdef \
> --discovery-token-ca-cert-hash sha256:aa55ff35b12c120ff5a12098622122c77eff343d033a54d069d3e55364b4184d
[preflight] Running pre-flight checks
[preflight] Reading configuration from the cluster...
[preflight] FYI: You can look at this config file with 'kubectl -n kube-system get cm kubeadm-config -o yaml'
[kubelet-start] Writing kubelet configuration to file "/var/lib/kubelet/config.yaml"
[kubelet-start] Writing kubelet environment file with flags to file "/var/lib/kubelet/kubeadm-flags.env"
[kubelet-start] Starting the kubelet
[kubelet-start] Waiting for the kubelet to perform the TLS Bootstrap...This node has joined the cluster:
* Certificate signing request was sent to apiserver and a response was received.
* The Kubelet was informed of the new secure connection details.Run 'kubectl get nodes' on the control-plane to see this node join the cluster.
# 如果加入集群的命令找不到了可以在master节点生成一个
[root@master ~]# kubeadm token create --print-join-command
kubeadm join 192.168.93.101:6443 --token 2d6hku.7esvsdqjfrvgkewg --discovery-token-ca-cert-hash sha256:aa55ff35b12c120ff5a12098622122c77eff343d033a54d069d3e55364b4184d
四、部署网络插件(CNI)
4.1、拉取必要镜像
-
所有节点都需要拉取以下两个镜像
-
在部署网络插件的过程中,实测是可能会有两个镜像拉取不来下,所以手动拉取一下,不过要使用魔法,拉取不到了评论或私信(开源免费)
# 以下是拉取镜像的命令,所有节点都需要有这两个镜像
[root@master ~]# crictl pull docker.io/flannel/flannel-cni-plugin:v1.1.2
[root@master ~]# crictl pull docker.io/flannel/flannel:v0.21.5-
如果有镜像的话,使用以下命令把镜像导入即可,我的镜像名字是自己打的标签
[root@master ~]# ctr -n k8s.io images import flannel.tar
unpacking docker.io/flannel/flannel:v0.21.5 (sha256:6f2d991efb758c5530e7de90761dfb29637b7604a807d431312e20189e09f9e6)...done
[root@master ~]# ctr -n k8s.io images import flannel-cni-plugin-v1.1.2.tar
unpacking docker.io/flannel/flannel-cni-plugin:v1.1.2 (sha256:539d3bf046c8581557f0747dbad9d3b78a4de112d3c0bf9d291651593060fc9f)...done# 查看镜像
[root@master ~]# crictl images | grep flannel
docker.io/flannel/flannel-cni-plugin                                          v1.1.2              7a2dcab94698c       8.25MB
docker.io/flannel/flannel                                                     v0.21.5             a6c0cb5dbd211       69.9MB
4.2、部署网络插件
4.2、部署网络插件
-
master节点操作即可
-
没有网络插件的私信或评论(免费开源)
[root@master ~]# kubectl apply -f kube-flannel.yaml
namespace/kube-flannel created
clusterrole.rbac.authorization.k8s.io/flannel created
clusterrolebinding.rbac.authorization.k8s.io/flannel created
serviceaccount/flannel created
configmap/kube-flannel-cfg created
daemonset.apps/kube-flannel-ds created
4.3、查看节点状态
[root@master ~]# kubectl get node
NAME     STATUS   ROLES           AGE   VERSION
master   Ready    control-plane   15m   v1.27.0
node1    Ready    <none>          12m   v1.27.0
node2    Ready    <none>          12m   v1.27.0
4.4、查看组件状态
[root@master ~]# kubectl get cs
Warning: v1 ComponentStatus is deprecated in v1.19+
NAME                 STATUS    MESSAGE                         ERROR
controller-manager   Healthy   ok
scheduler            Healthy   ok
etcd-0               Healthy   {"health":"true","reason":""}
4.5、查看所有Pod状态
[root@master ~]# kubectl get pod -A
NAMESPACE      NAME                             READY   STATUS    RESTARTS   AGE
kube-flannel   kube-flannel-ds-bkp7z            1/1     Running   0          2m5s
kube-flannel   kube-flannel-ds-q2565            1/1     Running   0          2m5s
kube-flannel   kube-flannel-ds-vz72p            1/1     Running   0          2m5s
kube-system    coredns-65dcc469f7-6x74z         1/1     Running   0          16m
kube-system    coredns-65dcc469f7-j8266         1/1     Running   0          16m
kube-system    etcd-master                      1/1     Running   0          16m
kube-system    kube-apiserver-master            1/1     Running   0          16m
kube-system    kube-controller-manager-master   1/1     Running   0          16m
kube-system    kube-proxy-2npvg                 1/1     Running   0          16m
kube-system    kube-proxy-8kqps                 1/1     Running   0          13m
kube-system    kube-proxy-zbc4h                 1/1     Running   0          13m
kube-system    kube-scheduler-master            1/1     Running   0          16m
五、Containerd基本操作
5.1、Crictl镜像管理
# 下载镜像
[root@master ~]# crictl pull nginx:latest# 查看所有镜像
[root@master ~]# crictl images# 查看镜像详细信息
[root@master ~]# crictl inspecti nginx:latest# 删除镜像
[root@master ~]# crictl rmi nginx:latest
5.2、Crictl容器管理
# 列出运行中的容器,查看所有容器加-a选项
[root@master ~]# crictl ps# 查看容器的详细信息
[root@master ~]# crictl inspect 07376dc402441# 启动容器
[root@master ~]# crictl start 07376dc402441# 停止容器
[root@master ~]# crictl stop 07376dc402441# 删除容器
[root@master ~]# crictl rm 07376dc402441# 打印日志
crictl logs <container-id 或 container-name># 进入容器执行命令
crictl exec -it <container-id 或 container-name> sh
5.3、Crictl Pod管理
# 打印所有 Pod
[root@node2 ~]# crictl pods
# 根据pod名称打印pod信息
[root@master ~]# crictl pods --name kube-proxy-trnjn# 根据标签打印 Pod,crictl pods --label key=value
[root@master ~]# crictl pods --label k8s-app=kube-proxy
相关文章:
kubernetes集群基于Containerd部署)
(k8s)kubernetes集群基于Containerd部署
资源列表 基础环境 一、基础环境准备 1.1、关闭Swap分区 1.2、添加hosts解析 1.3、桥接的IPv4流量传递给iptables的链 二、准备Containerd容器运行时 2.1、安装Containerd 2.2、配置Containerd 2.3、启动Containerd 三、部署Kubernetes集群 3.1、安装Kubeadm工具 3.2、…...

python内置模块pathlib.Path类操作目录和文件
python自带的pathlib模块提供了很多路径相关的功能,而pathlib.Path 是pathlib 模块中的一个核心类,它代表了文件系统中的一个路径,实现功能比如创建、删除、移动文件,读取和写入文件内容,遍历目录等。 Path 类跟os.pa…...

react开发环境搭建
文章目录 准备工作创建 React 项目使用 create-react-app 创建 React 项目使用 Vite 创建 React 项目启动项目效果安装出现的情况 react项目文件讲解1. 项目根目录2. 其他可能的目录和文件3. 配置文件 准备工作 Node.js 安装方法: 方式一:使用 NVM 安装…...

python 逻辑语句简记
什么语言都少不了逻辑处理语句的使用,python的逻辑处理语句有自身的使用特点,稍稍总结记录一下 一、断言 assert 条件 条件触发,程序执行中断 二、条件语句 if 条件: 执行内容 三、循环语句 while 条件: 循环体…...

8.进销存系统(基于springboot的进销存系统)
目录 1.系统的受众说明 2.开发技术与环境配置 2.1 SpringBoot框架 2.2 Java语言简介 2.3 MySQL环境配置 2.4 idea介绍 2.5 mysql数据库介绍 2.6 B/S架构 3.系统分析与设计 3.1 可行性分析 3.1.1 技术可行性 3.1.2 操作可行性 3.1.3经济可行性 3.4.1 数据库…...

深入理解主键回显:提升数据操作效率与准确性
在软件开发的世界中,主键回显是一个常常被提及但又容易被忽视其重要性的概念。今天,我们就来深入探讨一下主键回显的奥秘。 一、什么是主键回显? 在数据库设计中,主键是用于唯一标识表中每一行记录的字段。而主键回显࿰…...

springboot+阿里云物联网教程
需求背景 最近有一个项目,需要用到阿里云物联网,不是MQ。发现使用原来EMQX的代码去连接阿里云MQTT直接报错,试了很多种方案都不行。最终还是把错误分析和教程都整理一下。 需要注意的是,阿里云物联网平台和MQ不一样。方向别走偏了。 概念描述 EMQX和阿里云MQTT有什么区别…...

QT Creator cmake 自定义项目结构, 编译输出目录指定
1. 目的 将不同的源文件放到不同的目录下进行管理, 如下: build: 编译输出目录 include: 头文件目录 rsources: 资源文件目录 src: cpp文件目录 2. 创建完cmake工程后修改CMakeLists.txt 配置 注 : 这里头文件目录是include, 所以在includ…...

lunar无第三方依赖的公历、农历、法定节假日...日历工具库
文章目录 介绍maven示例示例(前后端)网址文档 介绍 lunar是一款无第三方依赖的公历(阳历)、农历(阴历、老黄历)、道历、佛历工具,支持星座、儒略日、干支、生肖、节气、节日、彭祖百忌、吉神(喜神/福神/财神/阳贵神/阴贵神)方位、胎神方位、…...
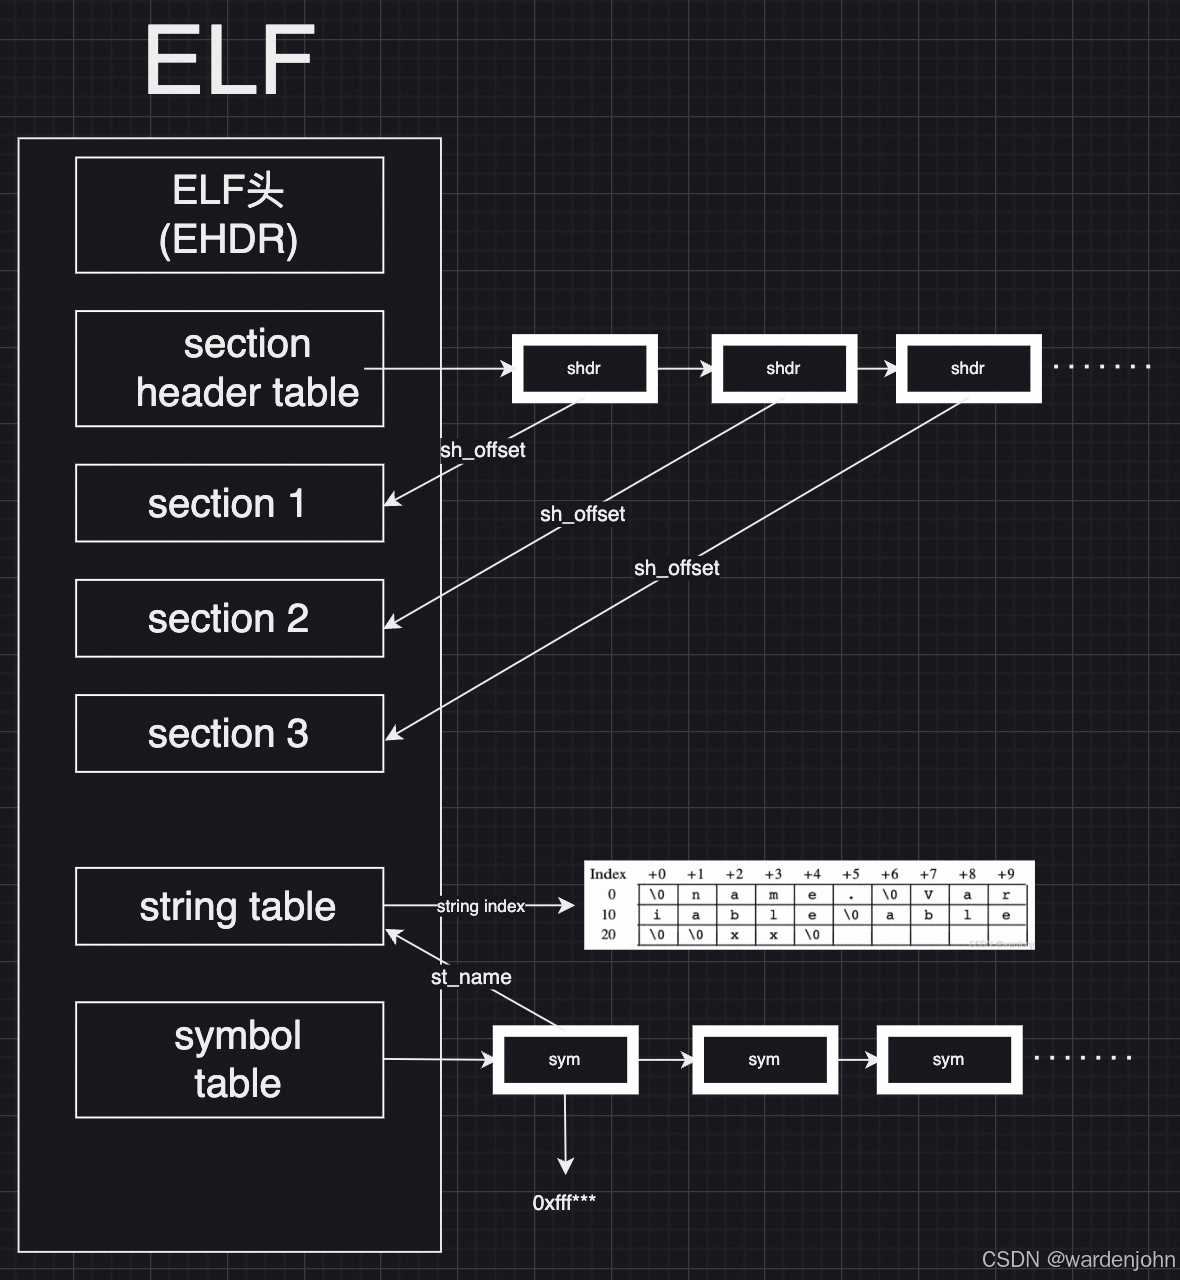
(全网最细)ELF文件详解
ELF文件是什么 ELF文件是一种对象文件格式。ELF文件的全程是(Executeable and Linking Format,可执行可链接格式)。ELF文件格式主要有三种: 可重定向文件。可重定向文件就是可以用于和其他对象文件链接来创建一个可执行或者可分…...

Leetcode面试经典150题-39.组合总和
给你一个 无重复元素 的整数数组 candidates 和一个目标整数 target ,找出 candidates 中可以使数字和为目标数 target 的 所有 不同组合 ,并以列表形式返回。你可以按 任意顺序 返回这些组合。 candidates 中的 同一个 数字可以 无限制重复被选取 。如…...

海外云市场分析
海外云市场数据洞察 2024 H1 季度数据 H1季度,全球云基础设施服务指数同比增长21%,达到798亿美元 (相比去年增加134亿美元),三大云服务提供商— AWS,微软Azure 和GCP 营收总增长率为24%,占总市场66%。 其中三大云厂商同比营收增长排序(2024 H1):微软 31%,G…...

显示和隐藏图片【JavaScript】
使用 JavaScript 来实现显示和隐藏图片。下面是一个简单的示例,展示如何通过按钮点击来切换图片的可见性。 实现效果: 代码: <!DOCTYPE html> <html lang"zh"><head><meta charset"UTF-8"><meta name&…...

Java调用数据库 笔记06 (修改篇)
1.创建Java的普通class类 2.加载驱动 Class.forName("com.mysql.jdbc.Driver"); 3.驱动管理类调用方法进行连接,得到连接对象 DriverManager.getConnection(url, user, password); 其中设置参数: static final String url "jdbc:my…...

virtualbox中的网络模式,网络设置,固定IP
virtualbox关于网络设置的文档:https://www.virtualbox.org/manual/topics/networkingdetails.html#networkingdetails DHCP Dynamic Host Configuration Protocol:动态主机配置协议,是专门用来给网络中的节点分发IP地址,确保每…...

2025年最新大数据毕业设计选题-Hadoop综合项目
选题思路 回忆学过的知识(Python、Java、Hadoop、Hive、Sqoop、Spark、算法等等。。。) 结合学过的知识确定大的方向 a. 确定技术方向,比如基于Hadoop、基于Hive、基于Spark 等等。。。 b. 确定业务方向,比如民宿分析、电商行为分析、天气分析等等。。。…...

实战C++手写线程池
课程总目录 文章目录 一、项目必备基础概念1.1 并发和并行1.2 多线程的优势1.3 线程的消耗1.4 线程池的优势1.5 线程池的两种模式:fixed模式和cached模式1.6 线程同步之线程互斥1.7 线程同步之线程通信1.7.1 条件变量1.7.2 信号量1.8 项目设计图浏览二、线程池代码展示三、线程…...

Alluxio Enterprise AI on K8s FIO 测试教程
Alluxio Enterprise AI on K8s FIO 测试视频教程 视频为Alluxio Enterprise AI on K8s FIO测试视频教程。fio是业内常用的磁盘与文件系统性能测试工具,下面内容将通过文字方式介绍Alluxio on k8s 进行fio测试的教程。 1. 测试环境 虚拟机规格:ecs.g3i.…...
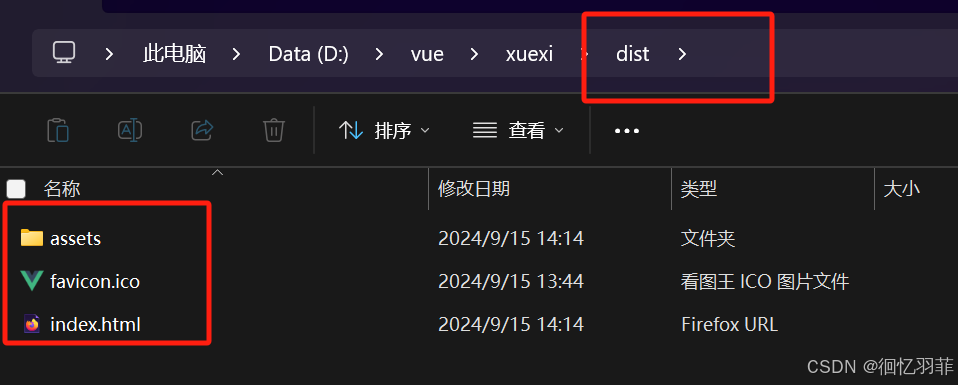
学习使用在windows系统上安装vue前端框架以及环境配置图文教程
学习使用在windows系统上安装vue前端框架以及环境配置图文教程 1、安装nodejs2、安装vue3、安装Vue-cli脚手架4、安装高版本5、创建vue项目6、启动项目7、配置开发环境8、发布项目 1、安装nodejs 点我查看教程 2、安装vue winR,打开cmd cnpm install vue -g表示安…...

基于Delphi的题库生成系统
基于Delphi的题库生成系统是一个复杂的项目,涉及到多个模块的设计和实现。以下是一个简化的代码案例,展示了如何使用Delphi构建一个基本的题库生成系统。 1. 数据库设计 首先,你需要设计一个数据库来存储试题信息。一个简单的数据库设计可…...

跨平台图形API实战选型:从Vulkan、DirectX到Metal与WebGPU的架构抉择
1. 图形API的演变与现状 十年前我刚入行时,OpenGL还是图形开发的主流选择。记得第一次在Ubuntu上配置GLFW环境就花了整整两天,而现在Vulkan只需要几行命令就能跑起来。这种变化背后是GPU架构的革命性演进——从固定功能管线到可编程着色器,再…...

为什么92%的康复科博士生还没用NotebookLM做系统评价?——2024年最新工具链适配白皮书首发
更多请点击: https://intelliparadigm.com 第一章:NotebookLM在康复医学研究中的范式革命 传统康复医学研究长期受限于多源异构数据整合困难、临床证据转化周期长、跨学科知识对齐成本高等瓶颈。NotebookLM 以“以文献为中心”的可溯源推理架构…...

永强数据恢复硬盘设备加密数据专业解锁恢复服务
在当今数字化时代,数据的重要性不言而喻。无论是个人用户存储的珍贵照片、视频,还是企业存储的关键商业数据,一旦丢失,都可能带来巨大的损失。而硬盘设备加密数据的丢失或无法解锁,更是让人头疼不已。北京永强数据恢复…...

JDK 17文本块实战:告别繁琐拼接,拥抱多行字符串新写法
1. 为什么我们需要文本块? 如果你写过Java代码,肯定遇到过这样的场景:需要处理多行字符串,比如HTML模板、SQL语句或者JSON数据。在JDK 17之前,我们只能通过字符串拼接的方式来实现,代码看起来就像是一团乱麻…...

【NotebookLM+IEA/IRENA数据融合实战】:72小时内完成新型储能技术竞争力评估
更多请点击: https://codechina.net 第一章:NotebookLM能源技术研究 NotebookLM 是 Google 推出的基于 AI 的研究协作者工具,其核心能力在于对用户上传的文档进行语义理解与上下文驱动的问答。在能源技术研究领域,NotebookLM 可显…...

JVM性能调优实战:从GC日志分析到内存泄漏排查的完整工具链
1. 项目概述:从“感觉卡顿”到“数据说话”的JVM调优之路在电商大促、金融交易峰值或者物联网设备海量上报的瞬间,后台服务的响应延迟哪怕增加几十毫秒,都可能直接转化为用户流失或交易失败。作为一线开发者,我们常常会收到“系统…...
RWKV:融合RNN与Transformer优势的高效语言模型架构解析与实践
1. 项目概述:一个“非Transformer”的现代语言模型 如果你最近在关注大语言模型(LLM)的开源生态,除了那些基于Transformer架构的“巨无霸”,可能还听说过一个名字有点特别的项目: RWKV 。这个由开发者Bli…...

RISC-V RT-Thread Smart用户态应用编译与QEMU运行实战指南
1. 项目概述:从内核到应用的完整RISC-V生态体验最近在折腾RT-Thread Smart(简称RTT-Smart)这个微内核实时操作系统,目标平台是qemu模拟的64位RISC-V虚拟机(qemu-virt64-riscv)。整个过程的核心,…...
)
WRF-CHEM模拟翻车?可能是你的namelist.chem没设对(附MEIC数据实战配置清单)
WRF-CHEM模拟异常排查指南:MEIC数据与namelist.chem的深度适配 当WRF-CHEM模拟结果出现异常时,很多用户会第一时间怀疑MEIC数据处理环节的问题,但实际上,namelist.chem参数与MEIC特性的匹配度才是更隐蔽的关键因素。本文将带您深入…...

代码生成器设计原理与实战:从模板引擎到自动化开发
1. 项目概述与核心价值最近在GitHub上看到一个挺有意思的项目,叫xintaofei/codeg。乍一看这个名字,可能有点摸不着头脑,codeg是啥?是“代码生成器”的缩写吗?还是某种新的开发工具?点进去研究了一番&#x…...