学习Tensorflow之基本操作
学习Tensorflow之基本操作
- Tensorflow基本操作
- 1. 创建张量
- (1) 创建标量
- (2) 创建向量
- (3) 创建矩阵
- (4) shape属性
- (5) 判别张量类型
- (6) 列表和ndarray转张量
- 2. 创建特殊张量
- (1) tf.ones与tf.ones_like
- (2) tf.zeros与tf.zeros_like
- (3) tf.fill
- (3) tf.random.normal
- (4) tf.random.uniform
- 3. 张量的运算
- (1) 四则运算
- (2) 绝对值、乘方、开平方
- (3) 矩阵乘法
- (4) tf.cast
- (5) 张量的索引与切片
- (6) tf.reshape
- (7) 增加和减少张量的维度
- (8) 维度交换
- 4. 字符串张量
- (1) 转为字符串张量
- (2) 字符串分割
- (3) 字符串拼接
- (3) 字符串大小写转换
- 5. 不规则张量
- (1) 创建不规则张量
- (2) 不规则张量的运算
- (3) 不规则张量的数学变换
Tensorflow基本操作
1. 创建张量
创建张量的函数为
tensorflow.constant(value,          值dtype = None,   类型(默认为32位)shape = None,   形状name = 'Const'  名称
)
(1) 创建标量
import tensorflow as tfscalarInt = tf.constant(2)
scalarFloat = tf.constant(3.0)
scalarString = tf.constant('Hello')print(scalarInt)
print(scalarFloat)
print(scalarString)
tf.Tensor(2, shape=(), dtype=int32)
tf.Tensor(3.0, shape=(), dtype=float32)
tf.Tensor(b’Hello’, shape=(), dtype=string)
从结果可以看出,标量的维度是0,所以shape值为空
(2) 创建向量
import tensorflow as tfvectorInt = tf.constant([2])
vectorFloat = tf.constant([3.0, 4.0])
vectorString = tf.constant(['Hello', 'World'])print(vectorInt)
print(vectorFloat)
print(vectorString)
tf.Tensor([2], shape=(1,), dtype=int32)
tf.Tensor([3. 4.], shape=(2,), dtype=float32)
tf.Tensor([b’Hello’ b’World’], shape=(2,), dtype=string)
向量的创建必须加上[],将他作为列表传入函数,方括号的个数代表着tensor的维度
(3) 创建矩阵
import tensorflow as tfmatrixInt = tf.constant([[2], [3]])
matrixFloat = tf.constant([[3.0, 4.0]])
matrixString = tf.constant([['Hello'], ['World']])print(matrixInt)
print(matrixFloat)
print(matrixString)
tf.Tensor(
[[2][3]], shape=(2, 1), dtype=int32)
tf.Tensor([[3. 4.]], shape=(1, 2), dtype=float32)
tf.Tensor(
[[b'Hello'][b'World']], shape=(2, 1), dtype=string)
(4) shape属性
shape属性记录着tensor的形状
| shape的取值 | 含义 |
|---|---|
| () | 该tensor是标量 |
| (列数, ) | 该tensor是向量 |
| (行数, 列数) | 该tensor是矩阵 |
| (层数, 行数, 列数) | 该tensor是数据立方体 |
(5) 判别张量类型
使用tf.rank()函数可以判别张量的类型
import tensorflow as tfscalarInt = tf.constant(5)
vectorFloat = tf.constant([3.0, 4.0])
matrixString = tf.constant([['Hello'], ['World']])print(tf.rank(scalarInt))
print(tf.rank(vectorFloat))
print(tf.rank(matrixString))
tf.Tensor(0, shape=(), dtype=int32)
tf.Tensor(1, shape=(), dtype=int32)
tf.Tensor(2, shape=(), dtype=int32)
这里的0、1、2代表的是tensor的维度
(6) 列表和ndarray转张量
tensorflow.convert_to_tensor(value,          值dtype = None,   类型(默认为32位)
)
import numpy as np
import tensorflow as tfl = [1, 2, 3]
array = np.array([1.0, 2.2])print(tf.convert_to_tensor(l))
print(tf.convert_to_tensor(array))
tf.Tensor([1 2 3], shape=(3,), dtype=int32)
tf.Tensor([1.  2.2], shape=(2,), dtype=float32)
2. 创建特殊张量
| 方法 | 作用 |
|---|---|
tf.ones(shape, dtype, name) | 创建全1的张量 |
tf.ones_like(input, dtype, name) | 创建全1的张量,包含所有与输入相同的形状 |
tf.zeros(shape, dtype, name) | 创建全0的张量 |
tf.zeros_like(input, dtype, name) | 创建全0的张量,包含所有与输入相同的形状 |
tf.fill(dims, value, name) | 创建值全相同的张量 |
tf.random.normal(shape, mean, stddev, dtype, seed, name) | 创建正态分布的张量 |
tf.random.uniform(shape, minval, maxval, dtype, seed, name) | 创建平均分布的张量 |
tf.random.poisson(shape, lam, dtype, seed, name) | 创建泊松分布的张量 |
tf.random.gamma(shape, alpha, beta, dtype, seed, name) | 创建伽马分布的张量 |
(1) tf.ones与tf.ones_like
import tensorflow as tfones = tf.ones((3, 3))
scalarInt = tf.constant(1)
print(ones)ones_like = tf.ones_like(scalarInt, dtype = tf.float32, name = 'ones_like')
print(ones_like)
tf.Tensor(
[[1. 1. 1.][1. 1. 1.][1. 1. 1.]], shape=(3, 3), dtype=float32)
tf.Tensor(1.0, shape=(), dtype=float32)
(2) tf.zeros与tf.zeros_like
import tensorflow as tfzeros = tf.zeros((3, 3))
scalarInt = tf.constant(1)
print(zeros)zeros_like = tf.zeros_like(scalarInt, dtype = tf.string, name = 'zeros_like')
print(zeros_like)
tf.Tensor(
[[0. 0. 0.][0. 0. 0.][0. 0. 0.]], shape=(3, 3), dtype=float32)
tf.Tensor(b'', shape=(), dtype=string)
从结果可以看出,对于字符串类型,0表示的空字符串
(3) tf.fill
import tensorflow as tffiveInt = tf.fill((3, 3), 5)
fiveString = tf.fill((3, 3), '5')
print(fiveInt)
print(fiveString)
tf.Tensor(
[[5 5 5][5 5 5][5 5 5]], shape=(3, 3), dtype=int32)
tf.Tensor(
[[b'5' b'5' b'5'][b'5' b'5' b'5'][b'5' b'5' b'5']], shape=(3, 3), dtype=string)
tf.fill()函数没有dtype参数,系统通过传入value的值来自动判断张量的类型
(3) tf.random.normal
import tensorflow as tfnormal = tf.random.normal((2, 2), 0.0, 1.0, tf.float16)
print(normal)
tf.Tensor(
[[-0.919  1.498][ 0.896 -2.05 ]], shape=(2, 2), dtype=float16)
默认情况下,创建的类型是tf.float32
(4) tf.random.uniform
import tensorflow as tfuniform = tf.random.uniform((2, 2), 0.0, 10.0, tf.float16)
print(uniform)
tf.Tensor(
[[2.09  2.812][2.822 6.21 ]], shape=(2, 2), dtype=float16)
默认情况下,创建的类型是tf.float32
3. 张量的运算
| 方法 | 作用 |
|---|---|
tf.add(x, y, name) 或 运算符 + | 计算张量相加 |
tf.subtract(x, y, name) 或 运算符 - | 计算张量相减 |
tf.multiply(x, y, name) 或 运算符 * | 计算张量相乘 |
tf.divide(x, y, name) 或 运算符 / | 计算张量相除 |
tf.abs(x, name) | 计算张量绝对值 |
tf.pow(x, y, name) | 计算张量乘方 |
tf.sqrt(x, name) | 计算张量开平方 |
tf.matmul(a, b, transpose_a, transpose_b) 或 运算符@ | 计算矩阵乘法 |
tf.cast(x, dtype, name) | 强制类型转换 |
tensor[层数][行数][列数] | 张量索引 |
[start : end : step] | 张量切片 |
tf.reshape(tensor, shape, name) | 张量维度转换 |
tf.expand_dims(input, axis, name) | 增加张量的维度 |
tf.squeeze(input, axis, name) | 减少张量的维度 |
tf.transpose(a, perm, conjugate) | 交换张量的维度 |
(1) 四则运算
import tensorflow as tft1 = tf.constant([1, 2])
t2 = tf.constant([2, 4])
print(tf.add(t1, t2))
print(tf.subtract(t1, t2))
print(tf.multiply(t1, t2))
print(tf.divide(t1, t2))
print()
print(t1 + t2)
print(t1 - t2)
print(t1 * t2)
print(t1 / t2)
tf.Tensor([3 6], shape=(2,), dtype=int32)
tf.Tensor([-1 -2], shape=(2,), dtype=int32)
tf.Tensor([2 8], shape=(2,), dtype=int32)
tf.Tensor([0.5 0.5], shape=(2,), dtype=float64)tf.Tensor([3 6], shape=(2,), dtype=int32)
tf.Tensor([-1 -2], shape=(2,), dtype=int32)
tf.Tensor([2 8], shape=(2,), dtype=int32)
tf.Tensor([0.5 0.5], shape=(2,), dtype=float64)
(2) 绝对值、乘方、开平方
import tensorflow as tft1 = tf.constant([-1.0, 2])print(tf.abs(t1))
print(tf.pow(t1, 3))
print(tf.sqrt(t1))
tf.Tensor([1. 2.], shape=(2,), dtype=float32)
tf.Tensor([-1.  8.], shape=(2,), dtype=float32)
tf.Tensor([      nan 1.4142135], shape=(2,), dtype=float32)
-1不能开平方,所以计算结果是nan,即not a number
(3) 矩阵乘法
import tensorflow as tfa = tf.constant([1, 2], shape = (1, 2))
b = tf.constant([1, 2], shape = (2, 1))print(a)
print(b)
print(tf.matmul(a, b))
tf.Tensor([[1 2]], shape=(1, 2), dtype=int32)
tf.Tensor(
[[1][2]], shape=(2, 1), dtype=int32)
tf.Tensor([[5]], shape=(1, 1), dtype=int32)
注意:相乘的矩阵必须满足矩阵乘法的规则
设置转置参数
import tensorflow as tfa = tf.constant([[1, 2]])
b = tf.constant([[1, 2]])
print(a)
print(b)
print(tf.matmul(a, b, False, True))
tf.Tensor([[1 2]], shape=(1, 2), dtype=int32)
tf.Tensor([[1 2]], shape=(1, 2), dtype=int32)
tf.Tensor([[5]], shape=(1, 1), dtype=int32)
在tensorflow中,向量是不能与矩阵进行乘法运算的,我们在学习数学的时候,都把向量看成了1维矩阵,但是tensorflow中向量是向量,不是矩阵
import tensorflow as tfa = tf.constant([1, 2])
b = tf.constant([[2], [1]])
print(a)
print(b)
print(tf.matmul(a, b, False, True))
tf.Tensor([1 2], shape=(2,), dtype=int32)
tf.Tensor(
[[2][1]], shape=(2, 1), dtype=int32)
tensorflow.python.framework.errors_impl.InvalidArgumentError: {{function_node __wrapped__MatMul_device_/job:localhost/replica:0/task:0/device:CPU:0}} In[0] and In[1] has different ndims: [2] vs. [2,1] [Op:MatMul]
所以,在tensorflow中需要注意,向量和矩阵不能进行运算
(4) tf.cast
强制类型转换
import tensorflow as tfscalarInt = tf.constant(2)
scalarFloat = tf.cast(scalarInt, dtype = tf.float32)
print(scalarInt)
print(scalarFloat)
tf.Tensor(2, shape=(), dtype=int32)
tf.Tensor(2.0, shape=(), dtype=float32)
(5) 张量的索引与切片
按照维度:
3维:tensor[层][行][列]
2维:tensor[行][列]
1维:tensor[列]
import tensorflow as tft = tf.constant([i for i in range(25)], shape = (5, 5))
print(t)
# t为2维,取第二行
print(t[1])
# 取第一行第二列
print(t[0, 1])
tf.Tensor(
[[ 0  1  2  3  4][ 5  6  7  8  9][10 11 12 13 14][15 16 17 18 19][20 21 22 23 24]], shape=(5, 5), dtype=int32)
tf.Tensor([5 6 7 8 9], shape=(5,), dtype=int32)
tf.Tensor(1, shape=(), dtype=int32)
取某一维度的全部元素,使用:
import tensorflow as tft = tf.constant([i for i in range(25)], shape = (5, 5))
print(t)
# 取所有行第二列
print(t[:, 1])
# 取第二行第全部列,即第二行
print(t[3, :])
tf.Tensor(
[[ 0  1  2  3  4][ 5  6  7  8  9][10 11 12 13 14][15 16 17 18 19][20 21 22 23 24]], shape=(5, 5), dtype=int32)
tf.Tensor([ 1  6 11 16 21], shape=(5,), dtype=int32)
tf.Tensor([15 16 17 18 19], shape=(5,), dtype=int32)
按照间隔取:[start : end : step]
取的范围为 [start : end),即不会取到end
import tensorflow as tft = tf.constant([i for i in range(25)], shape = (5, 5))
print(t)print(t[0:5:2])
tf.Tensor(
[[ 0  1  2  3  4][ 5  6  7  8  9][10 11 12 13 14][15 16 17 18 19][20 21 22 23 24]], shape=(5, 5), dtype=int32)
tf.Tensor(
[[ 0  1  2  3  4][10 11 12 13 14][20 21 22 23 24]], shape=(3, 5), dtype=int32)
(6) tf.reshape
张量维度转换
import tensorflow as tft = tf.constant([i for i in range(20)], shape = (4, 5))
print(t)t = tf.reshape(t, (2, 10))
print(t)
tf.Tensor(
[[ 0  1  2  3  4][ 5  6  7  8  9][10 11 12 13 14][15 16 17 18 19]], shape=(4, 5), dtype=int32)
tf.Tensor(
[[ 0  1  2  3  4  5  6  7  8  9][10 11 12 13 14 15 16 17 18 19]], shape=(2, 10), dtype=int32)
从结果可以看出4×5的矩阵转换成了2×10的矩阵
如果在reshape时,某一维度写-1,系统会自动计算出这个维度的值
import tensorflow as tft = tf.constant([i for i in range(20)], shape = (4, 5))
print(t)t = tf.reshape(t, (-1, 10))
print(t)
tf.Tensor(
[[ 0  1  2  3  4][ 5  6  7  8  9][10 11 12 13 14][15 16 17 18 19]], shape=(4, 5), dtype=int32)
tf.Tensor(
[[ 0  1  2  3  4  5  6  7  8  9][10 11 12 13 14 15 16 17 18 19]], shape=(2, 10), dtype=int32)
(4, 5) -> (-1, 10)可以理解为将4×5的矩阵转换成了若干行10列的矩阵
(7) 增加和减少张量的维度
使用tf.expand_dims()可以增加张量的维度
import tensorflow as tf# 增加张量的维度
t = tf.random.normal((2, 2))
print(t)
# 增加第一维度
t = tf.expand_dims(t, axis = 0)
print(t)
# 增加第四维度
t = tf.expand_dims(t, axis = 3)
print(t)
tf.Tensor(
[[-1.4346067  -0.69587547][-2.1144965   0.55389005]], shape=(2, 2), dtype=float32)
tf.Tensor(
[[[-1.4346067  -0.69587547][-2.1144965   0.55389005]]], shape=(1, 2, 2), dtype=float32)
tf.Tensor(
[[[[-1.4346067 ][-0.69587547]][[-2.1144965 ][ 0.55389005]]]], shape=(1, 2, 2, 1), dtype=float32)
从结果可以看出,增加了两个维度
使用tf.squeeze()可以减少张量的维度
import tensorflow as tft = tf.constant([[[[1], [2]]]])
print(t)
# 减少最后一个维度
t = tf.squeeze(t, axis = 3)
print(t)
tf.Tensor(
[[[[1][2]]]], shape=(1, 1, 2, 1), dtype=int32)
tf.Tensor([[[1 2]]], shape=(1, 1, 2), dtype=int32)
这里需要注意,减少的维度必须是1
(1, 2, 2, 2) 不能减少第四维度,即不能减少为(1, 2, 2, 2),但可以减少第一维度变成(2 ,2 ,2)
(8) 维度交换
使用tf.expand_dims()可以增加张量的维度
import tensorflow as tft = tf.zeros((1, 28, 28, 1))
print(t)
t = tf.transpose(t, [2, 3, 1, 0])
print(t)
[[[[ ... ]]]], shape=(1, 28, 28, 1), dtype=float32)
[[[[ ... ]]]], shape=(28, 1, 28, 1), dtype=float32)
每一个维度对应一个下标,从0开始
(1, 28, 28, 1) -> (0, 1, 2, 3)
tf.transpose()函数通过写下标的序号,把对应的维度进行交换
(2, 3, 1, 0) -> (28, 1, 28, 1)
4. 字符串张量
| 方法 | 作用 |
|---|---|
tf.strings.as_string(input, precision, scientific) | 转为字符串张量 |
tf.strings.bytes_split(input, name) | 分割每一个字符 |
tf.strings.split(input, sep) | 按照指定字符分割字符串 |
tf.strings.join(inputs, separator) | 字符串拼接 |
tf.strings.upper(input, encoding) | 将字符串转为大写 |
tf.strings.lower(input, encoding) | 将字符串转为小写 |
(1) 转为字符串张量
import tensorflow as tfstring = tf.constant([1.0, 2.0])
print(string)
t = tf.strings.as_string(string)
print(t)
t = tf.strings.as_string(string, precision = 3)
print(t)
tf.Tensor([1. 2.], shape=(2,), dtype=float32)
tf.Tensor([b'1.000000' b'2.000000'], shape=(2,), dtype=string)
tf.Tensor([b'1.000' b'2.000'], shape=(2,), dtype=string)
(2) 字符串分割
import tensorflow as tfstring = tf.constant('H e l l o')
print(tf.strings.bytes_split(string))
print(tf.strings.split(string, ' '))
tf.Tensor([b'H' b' ' b'e' b' ' b'l' b' ' b'l' b' ' b'o'], shape=(9,), dtype=string)
tf.Tensor([b'H' b'e' b'l' b'l' b'o'], shape=(5,), dtype=string)
(3) 字符串拼接
import tensorflow as tfstring = tf.constant([b'H' b' ' b'e' b' ' b'l' b' ' b'l' b' ' b'o'])
print(tf.strings.join(string))
tf.Tensor(b'H e l l o', shape=(), dtype=string)
(3) 字符串大小写转换
import tensorflow as tfstring = tf.constant('aaa')
upper = tf.strings.upper(string)
lower = tf.strings.lower(string)
print(upper)
print(lower)
tf.Tensor(b'AAA', shape=(), dtype=string)
tf.Tensor(b'aaa', shape=(), dtype=string)
5. 不规则张量
| 方法 | 作用 |
|---|---|
tf.ragged.constant(pylist, dtype) | 创建不规则张量 |
tf.ragged.map_flat_values(op, *args) | 对不规则张量进行数学变换 |
(1) 创建不规则张量
使用tf.ragged.constant()创建不规则张量
import tensorflow as tft = tf.ragged.constant([[1, 2], [], [1, 2, 3]])
print(t)
<tf.RaggedTensor [[1, 2], [], [1, 2, 3]]>
不规则张量类似Java中的数组,每一行的元素个数可以不一致
不规则张量中的所有元素类型必须是一致的
(2) 不规则张量的运算
import tensorflow as tft = tf.ragged.constant([[1, 2], [], [1, 2, 3]])
print(t + 2)
print(tf.subtract(t, 2))
print(t * 2)
print(tf.divide(t, 2))
<tf.RaggedTensor [[3, 4], [], [3, 4, 5]]>
<tf.RaggedTensor [[-1, 0], [], [-1, 0, 1]]>
<tf.RaggedTensor [[2, 4], [], [2, 4, 6]]>
<tf.RaggedTensor [[0.5, 1.0], [], [0.5, 1.0, 1.5]]>
同样的,不规则张量也支持普通张量的四则运算、乘法、开平方等
相同形状的不规则张量之间可以做四则运算、乘法、开平方等
import tensorflow as tfa = tf.ragged.constant([[1, 2], [], [1, 2, 3]])
b = tf.ragged.constant([[5, 6], [], [1, 2, 3]])
print(a + b)
print(tf.subtract(a, b))
print(a * b)
print(tf.divide(a, b))
<tf.RaggedTensor [[6, 8], [], [2, 4, 6]]>
<tf.RaggedTensor [[-4, -4], [], [0, 0, 0]]>
<tf.RaggedTensor [[5, 12], [], [1, 4, 9]]>
<tf.RaggedTensor [[0.2, 0.3333333333333333], [], [1.0, 1.0, 1.0]]>
如果形状不同,会报错
(3) 不规则张量的数学变换
使用tf.ragged.map_flat_values()对张量进行数学变换
import tensorflow as tfa = tf.ragged.constant([[1, 2], [], [1, 2, 3]])
print(a)
print(tf.ragged.map_flat_values(lambda x: x + 3, a))
<tf.RaggedTensor [[1, 2], [], [1, 2, 3]]>
<tf.RaggedTensor [[4, 5], [], [4, 5, 6]]>
相关文章:

学习Tensorflow之基本操作
学习Tensorflow之基本操作Tensorflow基本操作1. 创建张量(1) 创建标量(2) 创建向量(3) 创建矩阵(4) shape属性(5) 判别张量类型(6) 列表和ndarray转张量2. 创建特殊张量(1) tf.ones与tf.ones_like(2) tf.zeros与tf.zeros_like(3) tf.fill(3) tf.random.normal(4) tf.random.uni…...
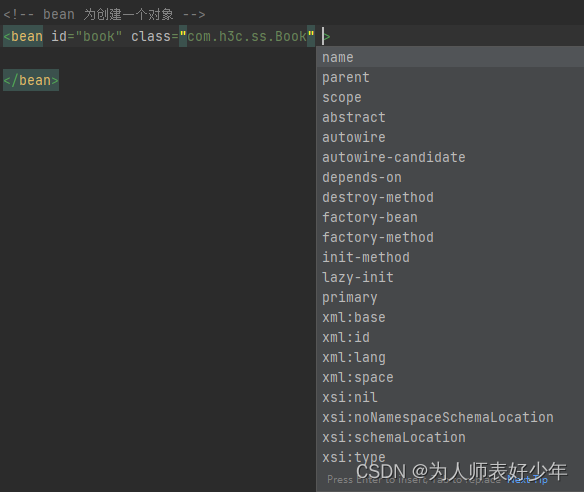
《Spring系列》第2章 解析XML获取Bean
一、基础代码 Spring加载bean实例的代码 public static void main(String[] args) throws IOException {// 1.获取资源Resource resource new ClassPathResource("bean.xml");// 2.获取BeanFactoryDefaultListableBeanFactory factory new DefaultListableBeanFa…...

小红书20230326暑假实习笔试
第一题:加密 小明学会了一种加密方式。他定义suc(x)为x在字母表中的后继,例如a的后继为b,b的后继为c… (即按字母表的顺序后一个)。特别的,z的后继为a。对于一个原字符串S,将其中每个字母x都替…...
【java】不要二、把字符串转成整数
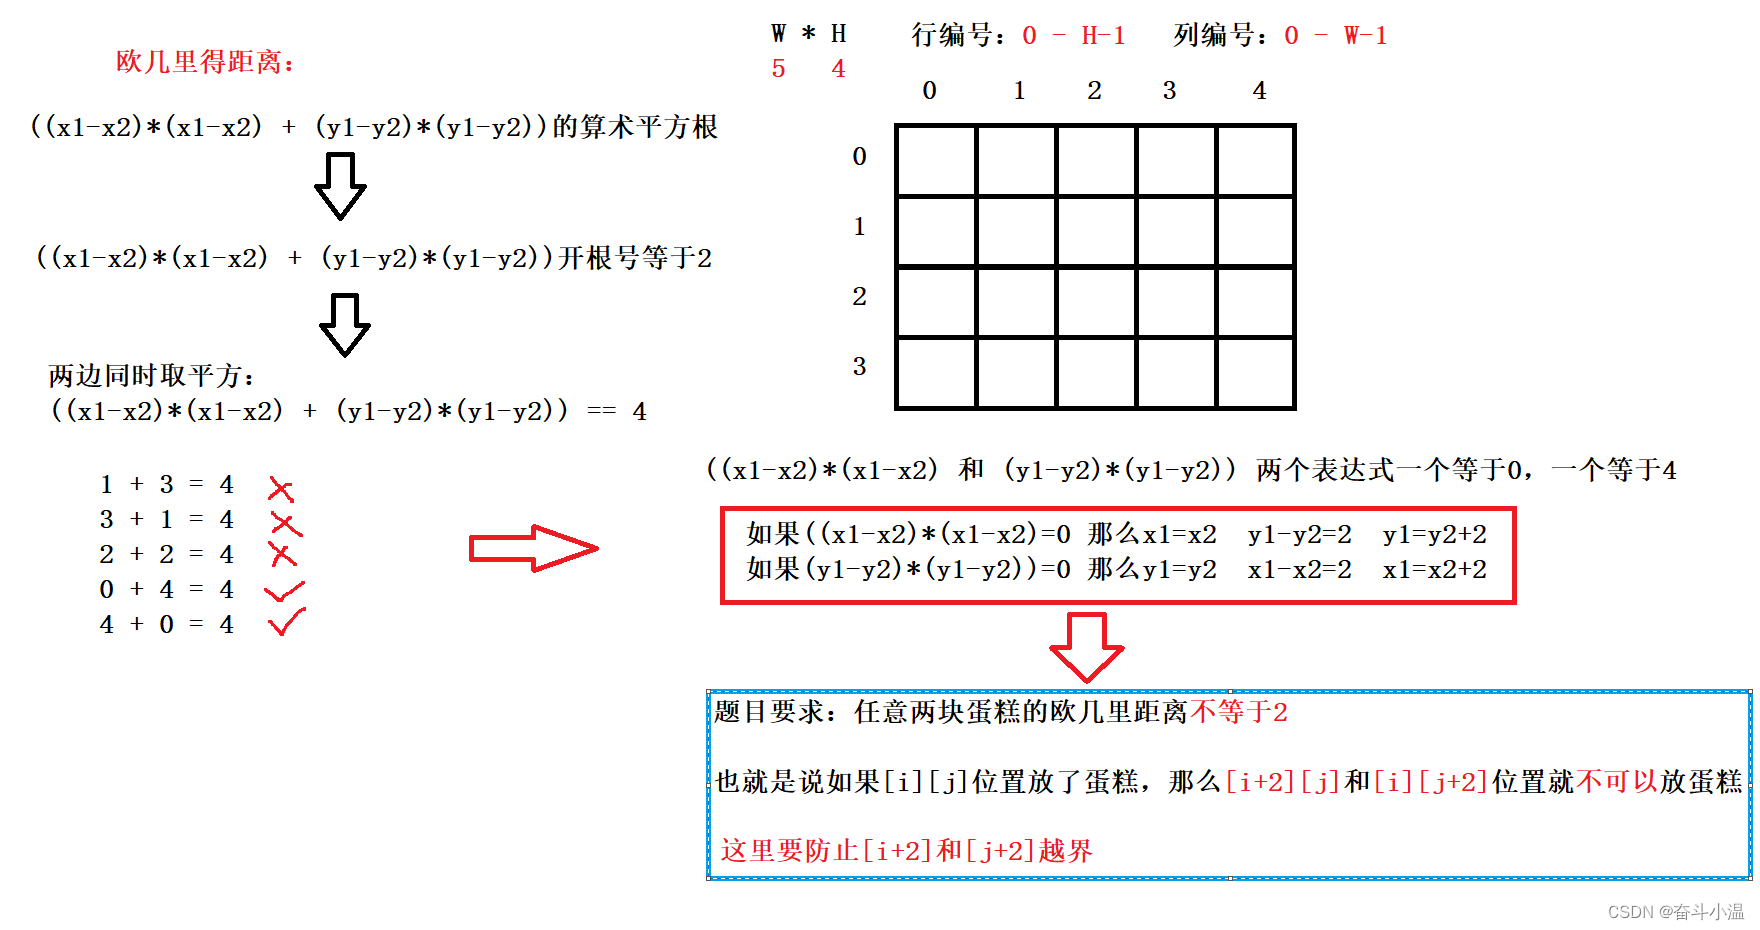
目录 🔥一、编程题 1.不要二 2.把字符串转换成整数 🔥一、编程题 1.不要二 链接:不要二_牛客题霸_牛客网 (nowcoder.com) 描述:二货小易有一个W*H的网格盒子,网格的行编号为0~H-1,网格的列编号为0~W-1…...

数据的质量管控工作
数据的质量管控工作,整个工作应该围绕启动阶段制定的目标进行。适当引入一些质量管控工具可帮助我们更高效的完成工作。 第一步、数据剖析 首先应该进行已知数据问题的评估,这里评估的范围也应控制本轮管控的目标范围内。其次,通过对数据进行…...

【SpringBoot笔记29】SpringBoot集成RabbitMQ消息队列
这篇文章,主要介绍SpringBoot如何集成RabbitMQ消息队列。 目录 一、集成RabbitMQ 1.1、引入amqp依赖 1.2、添加连接信息 1.3、添加RabbitMQ配置类...

前端架构师-week2-脚手架架构设计和框架搭建
将收获什么 脚手架的实现原理 Lerna的常见用法 架构设计技巧和架构图绘制方法 主要内容 学习如何以架构师的角度思考基础架构问题 多 Package 项目管理痛点和解决方案,基于 Lerna 脚手架框架搭建 imooc-cli 脚手架需求分析和架构设计,架构设计图 附赠内…...

CMake项目实战指令详细分析
CMake是一个跨平台的自动化构建系统,可以用简单的语句来描述所有平台的编译过程。CMake可以输出各种各样的编译文件,如Makefile、VisualStudio等。 CMake主要是编写CMakeLists.txt文件,然后用cmake命令将CMakeLists.txt文件转化为make所需要的…...

【深度学习】——LSTM参数设置
批大小设置 LSTM的批大小可以根据训练数据集的大小和计算资源的限制来确定。一般而言,批大小越大,训练速度越快,但可能会导致过拟合和内存限制。批大小越小,训练速度越慢,但对于较大的数据集和内存限制较严格的情况下…...
计算机网络高频60问 背完差不多了!!
计算机网络高频60问 网络分层结构 计算机网络体系大致分为三种,OSI七层模型、TCP/IP四层模型和五层模型。一般面试的时候考察比较多的是五层模型。 五层模型:应用层、传输层、网络层、数据链路层、物理层。 应用层:为应用程序提供交互服务…...
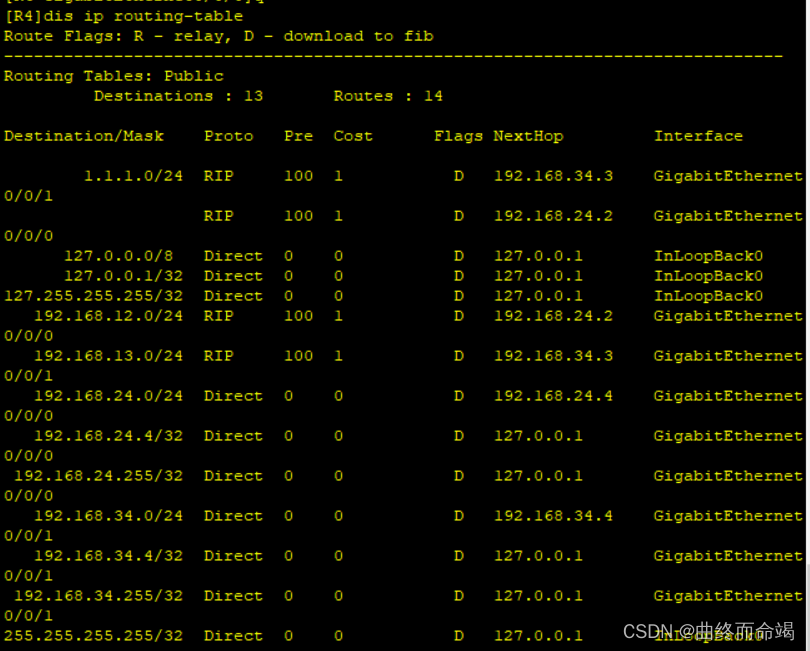
路由策略小实验
实验要求: 1、R1环回使用重发布,R2和R3使用双向重发布 2、使用路由策略解决,选路不佳 第一步,基础配置 [R1]int l0 [R1-LoopBack0]ip add 1.1.1.1 24 [R1-LoopBack0]int g0/0/0 [R1-GigabitEthernet0/0/0]ip add 192.168.12.1 …...

C语言realloc背后的内存管理
malloc申请内存,但不初始化。 calloc申请内存,且初始化为0。 free释放内存。 realloc重新分配已经分配的内存空间,可以变小,也可以变大。 以前一直有一个疑问,realloc是不是经常失败? 其实,rea…...

GPT可以被放任的在问答区应用吗?
GPT可以被放任的在问答区应用吗?1、CSDN问答乱象2、GPT-4,大增长时代的序幕数字生命离我们到底还有多远?AI 家教/老师/教育 距离独立又有哪些需要完成的过程?3、老顾对CSDN问答的一些看法老顾对GPT使用者的一些建议1、CSDN问答乱象…...
)
限制网络接口的一些简介(一)
大家在上网的时候,我们设置了www,当有来自internet的www要求时,我们的主机就会予以响应。这是因为你的主机已经开启了www的监听端口。所以,当我们启用一个daemon时,就可能触发主机的端口进行监听的动作,此时…...

ChatGPT如何批量撰写最新的热点自媒体文章
如何用ChatGPT创作高质量的自媒体文章 自媒体已成为互联网上的一个重要组成部分,无论您是想在社交媒体、博客中发布内容,高质量的文章都是自媒体成功的重要组成部分。ChatGPT是一个智能文章生成器,能够帮助创作者快速、高效地生成高质量的自…...
GPT4和ChatGPT的区别,太让人震撼
文 | Serendipity知乎 前言 GPT4上午朋友圈已经刷屏啦,不过我还在忙,刚刚才登上 GPT-4 ,现在来体验一下~ 附 GPT-4 能力测试站(无需魔法,仅供国内研究测试): https://gpt4test.com 附 Cha…...

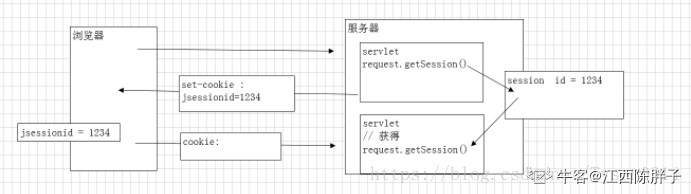
redis实战---分布式锁--单机篇
redis分布式锁故事背景什么是Redis分布式锁业务场景未加任何锁的代码单机情况下JVM级别加锁多服务部署总结提升故事背景 本篇文章是redis实战系列的第二篇文章。本章的主要内容是Redis分布式锁的相关知识。本篇文章将告诉你什么是分布式锁,结合一个业务场景&#x…...

Java正则表达式
Java 正则表达式 文章目录Java 正则表达式捕获组正则表达式语法Matcher 类的方法索引方法查找方法替换方法start 和 end 方法matches 和 lookingAt 方法replaceFirst 和 replaceAll 方法appendReplacement 和 appendTail 方法PatternSyntaxException 类的方法正则表达式是对字符…...
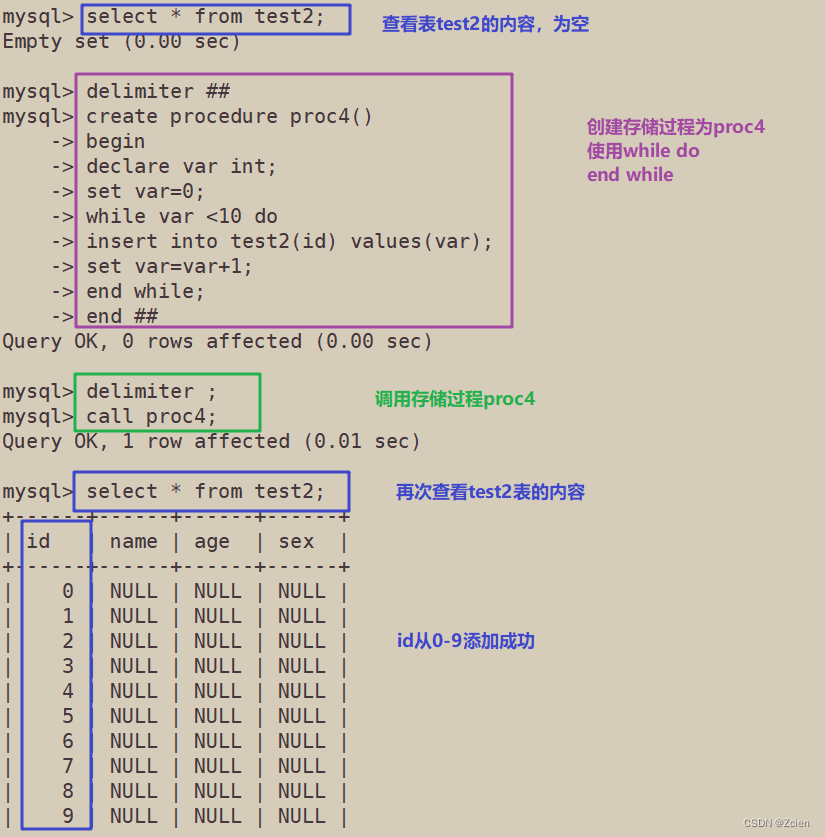
MySQL数据库之——高级[进阶]SQL语句(二)正则表达式和存储过程
文章目录一、正则表达式(REGEXP)1、正则表达式匹配符2、语法二、存储过程1、概述2、优点3、 创建、调用、查看和删除存储过程4、存储过程的控制语句一、正则表达式(REGEXP) 1、正则表达式匹配符 2、语法 SELECT 选项 FROM 表名 …...

Python基于周立功盒子的二次开发的准备工作
Python基于周立功盒子的二次开发的准备工作 一、基本介绍 基于周立功的二次开发是python通过调用zlgcan.dll,来实现CAN卡的通讯收发报文的,在python中通过ctypes模块调用c++动态库的接口函数(zlgcan.dll),我们需要根据我的电脑选择相对应版本的dll,比如64位的操…...

j | 禁忌 | n |孩
通过网盘分享的文件:禁 | 忌女 | 孩(日版) 链接: https://pan.baidu.com/s/1bjsnnvP2f1EiA8ySTbCAOg?pwdtqp2 提取码: tqp2...

ElevenLabs动画配音语音交付危机预警,紧急修复唇动不同步、语速断层、多语言混读错位的6大实时响应方案
更多请点击: https://intelliparadigm.com 第一章:ElevenLabs动画配音语音交付危机的本质溯源 当动画制作团队依赖 ElevenLabs API 实时生成角色语音时,突然出现的 429 Too Many Requests 响应、TTS 音频静音片段、以及语音情感断层现象&…...

毫秒算网的光通信技术——从“东数西算“到“毫秒用算“
引言:从"算力在哪"到"算力怎么到" 2021年启动的"东数西算"工程回答了一个根本问题:算力应该布局在哪里。通过在西部建设8大枢纽、10大集群,国家将算力基础设施与绿色能源禀赋深度耦合,开启了算力地…...
功能仿真)
在 Simulink 中实现并网双向 DC/AC 逆变器的无功补偿(SVG)功能仿真
目录 🛠️ 第一步:系统架构设计与模块搭建 ⚙️ 第二步:SVG 核心控制策略设计(双闭环控制) 📊 第三步:仿真运行与结果分析 手把手教你在 Simulink 中实现并网双向 DC/AC 逆变器的无功补偿(SVG)功能仿真。 在现代电力系统中,并网逆变器(如光伏、储能逆变器)不…...

用户为中心交互系统工程在智能制造系统中应用
用户为中心交互系统工程(User-Centered Interaction System Engineering, UCI-SE)是智能制造与 AI 时代下,重塑传统工业软件(如 MES、ERP、SCADA)和硬件控制终端(如 HMI、具身智能教导盒)的核心…...

不只是优化和频率:用GaussView 5.0玩转HOMO/LUMO、电子密度与反应位点预测
不只是优化和频率:用GaussView 5.0玩转HOMO/LUMO、电子密度与反应位点预测 在计算化学领域,Gaussian和GaussView的组合堪称黄金搭档。但许多研究者往往止步于基础的几何优化和频率计算,未能充分挖掘这套工具在反应机理研究和论文写作中的潜力…...

从IoU到Shape-IoU:如何让损失函数“看见”边界框的形状与尺度
1. 边界框回归的进化史:从IoU到Shape-IoU 目标检测任务中,边界框回归就像给物体"画框"的过程。早期的IoU(Intersection over Union)指标简单直观——用预测框和真实框的交集面积除以并集面积。这个指标在2016年之前是绝…...

nvm-windows深度实战:Windows平台Node.js版本管理的系统化解决方案
nvm-windows深度实战:Windows平台Node.js版本管理的系统化解决方案 【免费下载链接】nvm-windows A node.js version management utility for Windows. Ironically written in Go. 项目地址: https://gitcode.com/gh_mirrors/nv/nvm-windows nvm-windows是一…...

火绒安全软件实战教程:快速查杀、全盘查杀、自定义查杀到底怎么选?
🔥个人主页:杨利杰YJlio❄️个人专栏:《Sysinternals实战教程》《Windows PowerShell 实战》《WINDOWS教程》《IOS教程》《微信助手》《锤子助手》 《Python》 《Kali Linux》 《那些年未解决的Windows疑难杂症》🌟 让复杂的事情更…...

为什么83%的用户误读NotebookLM引用溯源?一文讲透证据链完整性校验四步法
更多请点击: https://intelliparadigm.com 第一章:为什么83%的用户误读NotebookLM引用溯源?一文讲透证据链完整性校验四步法 NotebookLM 的“引用溯源”功能并非传统意义上的文献标注,而是一套基于语义锚点与片段置信度的轻量级证…...