Pytest+selenium UI自动化测试实战实例
🍅 点击文末小卡片,免费获取软件测试全套资料,资料在手,涨薪更快
今天来说说pytest吧,经过几周的时间学习,有收获也有疑惑,总之最后还是搞个小项目出来证明自己的努力不没有白费
环境准备
1 确保您已经安装了python3.x
2 配置python3+pycharm+selenium2开发环境
3 安装pytest库pip install pytest
4 安装pytest -html 报告插件pip install pytest-html
5 安装pypiwin32库(用来模拟按键)pip install pypiwin32
6 安装openpyxl解析excel文件库pip install openpyxl
7 安装yagmail发送报告库pip install yagmail
8 确保已配置火狐或谷歌浏览器及对应驱动
9 确保已经正确配置好发送邮件的邮箱
项目简介
测试地址
https://mail.126.com
测试范围
1.126电子邮箱登录功能测试-验证正确帐号密码登录成功-验证错误用户名密码登录失败(有很多情况,用例里面做了充分的校验)
2.126电子邮箱添加联系人功能测试-验证正确填写必填项数据添加联系人成功-验证缺省必填项数据添加联系人失败-验证必填项字段数据格式错误添加联系人失败
3.126电子邮箱发送邮件功能测试-验证普通邮件发送成功-验证带附件邮件发送成功
项目设计
1.python编程语言设计测试脚本
2.webdriver驱动浏览器并操作页面元素
3.二次封装webdriver Api 操作方法
4.采用PageObject设计模式,设计测试业务流程
5.通过UI对象库存储页面操作元素
6.通过数据文件存储数据,读取数据,参数化测试用例并驱动测试执行
7.通过第三方插件pytest-html生成测试报告
8.通过yagmail第三方库,编写发送报告接口,测试工作完成后自动发送测试报告
目录结构
 1 PytestAutoTestFrameWork2 |—|config3 |——|__init__.py4 |——|conf.py5 |——|config.ini6 |—|data7 |——|__init__.py8 |——|tcData.xlsx9 |—Page
10 |——|PageObject.py
11 |———|__init__.py
12 |———|ContactPage.py
13 |———|HomePage.py
14 |———|LoginPage.py
15 |———|SendMailPage.py
16 |——|__init__.py
17 |——|BasePage.py
18 |—|report
19 |—|TestCases
20 |——|__init__.py
21 |——|conftest.py
22 |——|test_confactCase.py
23 |——|test_loginCase.py
24 |——|test_sendMailCase.py
25 |—|util
26 |——|__init__.py
27 |——|clipboard.py
28 |——|keyboard.py
29 |——|parseConFile.py
30 |——|parseExcelFile.py
31 |——|sendMailForReport.py
32 |—|conftest.py
33 |—|pytest.ini
34 |—|RunTestCase.py
代码实现
通过126邮箱测试范围分析,我们需要通过设计剪切板,模拟键盘完成附件上传操作,因此我们首先来编写这两个方法
clipboard.py-操作剪切板
 1 """2 ------------------------------------3 @Time : 2019/4/15 12:044 @Auth : linux超5 @File : clipboard.py6 @IDE  : PyCharm7 @Motto: Real warriors,dare to face the bleak warning,dare to face the incisive error!8 ------------------------------------9 """
10 import win32con
11 import win32clipboard as WC
12
13
14 class ClipBoard(object):
15     '''设置剪切板内容和获取剪切板内容'''
16
17     @staticmethod
18     def getText():
19         '''获取剪切板的内容'''
20         WC.OpenClipboard()
21         value = WC.GetClipboardData(win32con.CF_TEXT)
22         WC.CloseClipboard()
23         return value
24
25     @staticmethod
26     def setText(value):
27         '''设置剪切板的内容'''
28         WC.OpenClipboard()
29         WC.EmptyClipboard()
30         WC.SetClipboardData(win32con.CF_UNICODETEXT, value)
31         WC.CloseClipboard()
32
33
34 if __name__ == '__main__':
35     from selenium import webdriver
36
37     value = 'python'
38     driver = webdriver.Firefox()
39     driver.get('http://www.baidu.com')
40     query = driver.find_element_by_id('kw')
41     ClipBoard.setText(value)
42     clValue = ClipBoard.getText()
43     query.send_keys(clValue.decode('utf-8'))
keyboard.py-模拟键盘
 1 """2 ------------------------------------3 @Time : 2019/4/15 12:054 @Auth : linux超5 @File : keyboard.py6 @IDE  : PyCharm7 @Motto: Real warriors,dare to face the bleak warning,dare to face the incisive error!8 ------------------------------------9 """
10
11 # 模拟按键
12 import win32api
13 import win32con
14 import time
15
16
17 class KeyBoard(object):
18     """模拟按键"""
19     # 键盘码
20     vk_code = {
21         'enter' : 0x0D,
22         'tab' : 0x09,
23         'ctrl' : 0x11,
24         'v' : 0x56,
25         'a' : 0x41,
26         'x' : 0x58
27     }
28
29     @staticmethod
30     def keyDown(key_name):
31         """按下键"""
32         key_name = key_name.lower()
33         try:
34             win32api.keybd_event(KeyBoard.vk_code[key_name], 0, 0, 0)
35         except Exception as e:
36             print('未按下enter键')
37             print(e)
38
39     @staticmethod
40     def keyUp(key_name):
41         """抬起键"""
42         key_name = key_name.lower()
43         win32api.keybd_event(KeyBoard.vk_code[key_name], 0, win32con.KEYEVENTF_KEYUP, 0)
44
45     @staticmethod
46     def oneKey(key):
47         """模拟单个按键"""
48         key = key.lower()
49         KeyBoard.keyDown(key)
50         time.sleep(2)
51         KeyBoard.keyUp(key)
52
53     @staticmethod
54     def twoKeys(key1, key2):
55         """模拟组合按键"""
56         key1 = key1.lower()
57         key2 = key2.lower()
58         KeyBoard.keyDown(key1)
59         KeyBoard.keyDown(key2)
60         KeyBoard.keyUp(key1)
61         KeyBoard.keyUp(key2)
62
63
64 if __name__ == '__main__':
65     from selenium import webdriver
66     driver = webdriver.Firefox()
67     driver.get('http://www.baidu.com')
68     driver.find_element_by_id('kw').send_keys('python')
69     KeyBoard.twoKeys('ctrl', 'a')
70     KeyBoard.twoKeys('ctrl', 'x')
通过测试项目设计,我们需要把测试数据存放在Excel文件中,把页面操作元素存在UI对象库中也就是一个配置文件,那么我们需要对Excel 和 ini文件解析,因此我们开始编写这两个方法,设计UI对象库和测试数据文件
parseExcelFile.py-解析Excel文件
 1 """2 ------------------------------------3 @Time : 2019/4/22 16:124 @Auth : linux超5 @File : parseExcelFile.py6 @IDE  : PyCharm7 @Motto: Real warriors,dare to face the bleak warning,dare to face the incisive error!8 ------------------------------------9 """10 from openpyxl import load_workbook11 from config.conf import excelPath12 13 14 class ParseExcel(object):15 16     def __init__(self):17         self.wk = load_workbook(excelPath)18         self.excelFile = excelPath19 20     def getSheetByName(self, sheetName):21         """获取sheet对象"""22         sheet = self.wk[sheetName]23         return sheet24 25     def getRowNum(self, sheet):26         """获取有效数据的最大行号"""27         return sheet.max_row28 29     def getColsNum(self, sheet):30         """获取有效数据的最大列号"""31         return sheet.max_column32 33     def getRowValues(self, sheet, rowNum):34         """获取某一行的数据"""35         maxColsNum = self.getColsNum(sheet)36         rowValues = []37         for colsNum in range(1, maxColsNum + 1):38             value = sheet.cell(rowNum, colsNum).value39             if value is None:40                 value = ''41             rowValues.append(value)42         return tuple(rowValues)43 44     def getColumnValues(self, sheet, columnNum):45         """获取某一列的数据"""46         maxRowNum = self.getRowNum(sheet)47         columnValues = []48         for rowNum in range(2, maxRowNum + 1):49             value = sheet.cell(rowNum, columnNum).value50             if value is None:51                 value = ''52             columnValues.append(value)53         return tuple(columnValues)54 55     def getValueOfCell(self, sheet, rowNum, columnNum):56         """获取某一个单元格的数据"""57         value = sheet.cell(rowNum, columnNum).value58         if value is None:59             value = ''60         return value61 62     def getAllValuesOfSheet(self, sheet):63         """获取某一个sheet页的所有测试数据,返回一个元祖组成的列表"""64         maxRowNum = self.getRowNum(sheet)65         columnNum = self.getColsNum(sheet)66         allValues = []67         for row in range(2, maxRowNum + 1):68             rowValues = []69             for column in range(1, columnNum + 1):70                 value = sheet.cell(row, column).value71                 if value is None:72                     value = ''73                 rowValues.append(value)74             allValues.append(tuple(rowValues))75         return allValues76 77 78 if __name__ == '__main__':79     # excel = ParseExcel()80     # sheet = excel.getSheetByName('login')81     # print('行号:', excel.getRowNum(sheet))82     # print('列号:', excel.getColsNum(sheet))83     #84     # rowvalues = excel.getRowValues(sheet, 1)85     # columnvalues = excel.getColumnValues(sheet, 2)86     # valueofcell = excel.getValueOfCell(sheet, 1, 2)87     # allvalues = excel.getAllValuesOfSheet(sheet)88     #89     # print('第{}行数据{}'.format(1, rowvalues))90     # print('第{}列数据{}'.format(2, columnvalues))91     # print('{}{}单元格的内容{}'.format(1, 2, valueofcell))92     # print('login{}'.format(allvalues))93 94     excel = ParseExcel()95     sheet = excel.getSheetByName('mail')96     print('行号:', excel.getRowNum(sheet))97     print('列号:', excel.getColsNum(sheet))98 99     allvalues = excel.getAllValuesOfSheet(sheet)
100
101     print('sendmail{}'.format(allvalues))
parseConFile.py-解析配置文件
1 """2 ------------------------------------3 @Time : 2019/4/18 10:544 @Auth : linux超5 @File : parseConFile.py6 @IDE  : PyCharm7 @Motto: Real warriors,dare to face the bleak warning,dare to face the incisive error!8 ------------------------------------9 """
10 import configparser
11 from config.conf import configDir
12
13
14 class ParseConFile(object):
15
16     def __init__(self):
17         self.file = configDir
18         self.conf = configparser.ConfigParser()
19         self.conf.read(self.file, encoding='utf-8')
20
21     def getAllSections(self):
22         """获取所有的section,返回一个列表"""
23         return self.conf.sections()
24
25     def getAllOptions(self, section):
26         """获取指定section下所有的option, 返回列表"""
27         return self.conf.options(section)
28
29     def getLocatorsOrAccount(self, section, option):
30         """获取指定section, 指定option对应的数据, 返回元祖和字符串"""
31         try:
32             locator = self.conf.get(section, option)
33             if ('->' in locator):
34                 locator = tuple(locator.split('->'))
35             return locator
36         except configparser.NoOptionError as e:
37             print('error:', e)
38         return 'error: No option "{}" in section: "{}"'.format(option, section)
39
40     def getOptionValue(self, section):
41         """获取指定section下所有的option和对应的数据,返回字典"""
42         value = dict(self.conf.items(section))
43         return value
44
45
46 if __name__ == '__main__':
47     cf = ParseConFile()
48     print(cf.getAllSections())
49     print(cf.getAllOptions('126LoginAccount'))
50     print(cf.getLocatorsOrAccount('126LoginAccount', 'username'))
51     print(cf.getOptionValue('126LoginAccount'))
config.ini
1 [126LoginAccount];126邮箱正确的登录账号和密码;运行用例时请更换正确的用户名和密码2 username=linuxxiaochao3 password=xiaochao115204 [HomePageElements];126邮箱首页菜单栏元素5 homePage=id->_mail_tabitem_0_3text6 mailList=id->_mail_tabitem_1_4text7 applicationCenter=id->_mail_tabitem_2_5text8 inBox=id->_mail_tabitem_3_6text9 [LoginPageElements];126邮箱登录页面的元素
10 frame=xpath->//div[@id="loginDiv"]/iframe
11 username=xpath->//input[@name="email"]
12 password=xpath->//input[@name="password"]
13 loginBtn=xpath->//a[@id="dologin"]
14 ferrorHead=xpath->//div[@class="ferrorhead"]
15 [ContactPageElements];126邮箱添加联系人页面元素
16 new_contact=xpath->//span[text()="新建联系人"]
17 name=id->input_N
18 mail=xpath->//div[@id="iaddress_MAIL_wrap"]//input[@class="nui-ipt-input"]
19 star=xpath->//span[@class="nui-chk-text"]/preceding-sibling::span/b
20 phone=xpath->//div[@id='iaddress_TEL_wrap']//input[@class='nui-ipt-input']
21 comment=id->input_DETAIL
22 commit=xpath->//span[text()='确 定']
23 tooltip=xpath->//span[text()='请正确填写邮件地址。']
24 [SendMailPageElements];126邮箱发送邮件页面元素
25 writeMail=xpath->//div[@id='dvNavContainer']//span[text()='写 信']
26 addressee=xpath->//input[@aria-label='收件人地址输入框,请输入邮件地址,多人时地址请以分号隔开']
27 subject=xpath->//input[contains(@id, '_subjectInput')]
28 iframe=xpath->//iframe[@class="APP-editor-iframe"]
29 text=xpath->/html/body
30 sendBtn=xpath->//header//span[text()='发送']
31 expect=xpath->//h1[contains(@id,'_succInfo')]
32 uploadAttachment=xpath->//div[@title="点击添加附件"]
33 delete=xpath->//a[text()='删除']
新建excel文件,分3个sheet,分别为:login,contact,mail #每个sheet中数据可自行填写,驱动测试用例执行不同的数据进行测试
login

contact


数据,UI对象库,解析方法都已经有了,接下来通过PageObject模式设计编写每个页面的操作及封装126邮箱的功能,以便后续设计用例调用
BasePage.py-webdriver二次封装
 1 """2 ------------------------------------3 @Time : 2019/4/20 8:454 @Auth : linux超5 @File : BasePage.py6 @IDE  : PyCharm7 @Motto: Real warriors,dare to face the bleak warning,dare to face the incisive error!8 ------------------------------------9 """10 import time11 from selenium.webdriver.support import expected_conditions as EC12 from selenium.webdriver.support.wait import WebDriverWait as wd13 from selenium.webdriver.common.by import By14 from selenium.common.exceptions import NoSuchWindowException, TimeoutException, \15     NoAlertPresentException, NoSuchFrameException16 from selenium import webdriver17 18 from util.clipboard import ClipBoard19 from util.keyboard import KeyBoard20 from util.parseConFile import ParseConFile21 from util.parseExcelFile import ParseExcel22 23 24 class BasePage(object):25     """26     结合显示等待封装一些selenium 内置方法27     """28     cf = ParseConFile()29     excel = ParseExcel()30 31     def __init__(self, driver, outTime=30):32         self.byDic = {33         'id': By.ID,34         'name': By.NAME,35         'class_name': By.CLASS_NAME,36         'xpath': By.XPATH,37         'link_text': By.LINK_TEXT38         }39         self.driver = driver40         self.outTime = outTime41 42     def findElement(self, by, locator):43         """44         find alone element45         :param by: eg: id, name, xpath, css.....46         :param locator: id, name, xpath for str47         :return: element object48         """49         try:50             print('[Info:Starting find the element "{}" by "{}"!]'.format(locator, by))51             element = wd(self.driver, self.outTime).until(lambda x : x.find_element(by, locator))52         except TimeoutException as t:53             print('error: found "{}" timeout!'.format(locator), t)54         except NoSuchWindowException as e:55             print('error: no such "{}"'.format(locator), e)56         except Exception as e:57             raise e58         else:59             # print('[Info:Had found the element "{}" by "{}"!]'.format(locator, by))60             return element61 62     def findElements(self, by, locator):63         """64         find group elements65         :param by: eg: id, name, xpath, css.....66         :param locator: eg: id, name, xpath for str67         :return: elements object68         """69         try:70             print('[Info:start find the elements "{}" by "{}"!]'.format(locator, by))71             elements = wd(self.driver, self.outTime).until(lambda x : x.find_element(by, locator))72         except TimeoutException as t:73             print(t)74         except NoSuchWindowException as e:75             print(e)76         except Exception as e:77             raise e78         else:79             # print('[Info:Had found the elements "{}" by "{}"!]'.format(locator, by))80             return elements81 82     def isElementExsit(self, by, locator):83         """84         assert element if exist85         :param by: eg: id, name, xpath, css.....86         :param locator: eg: id, name, xpath for str87         :return: if element return True else return false88         """89         if by.lower() in self.byDic:90             try:91                 wd(self.driver, self.outTime).\92                     until(EC.visibility_of_element_located((self.byDic[by], locator)))93             except TimeoutException:94                 print('Error: element "{}" time out!'.format(locator))95                 return False96             except NoSuchWindowException:97                 print('Error: element "{}" not exsit!'.format(locator))98                 return False99             return True
100         else:
101             print('the "{}" error!'.format(by))
102
103     def isClick(self, by, locator):
104         """判断是否可点击,返回元素对象"""
105         if by.lower() in self.byDic:
106             try:
107                 element = wd(self.driver, self.outTime).\
108                     until(EC.element_to_be_clickable((self.byDic[by], locator)))
109             except Exception:
110                 return False
111             return element
112         else:
113             print('the "{}" error!'.format(by))
114
115     def isAlertAndSwitchToIt(self):
116         """
117         assert alert if exsit
118         :return: alert obj
119         """
120         try:
121             re = wd(self.driver, self.outTime).until(EC.alert_is_present())
122         except NoAlertPresentException:
123             return False
124         except Exception:
125             return False
126         return re
127
128     def switchToFrame(self, by, locator):
129         """判断frame是否存在,存在就跳到frame"""
130         print('info:switching to iframe "{}"'.format(locator))
131         if by.lower() in self.byDic:
132             try:
133                 wd(self.driver, self.outTime).\
134                     until(EC.frame_to_be_available_and_switch_to_it((self.byDic[by], locator)))
135             except TimeoutException as t:
136                 print('error: found "{}" timeout!'.format(locator), t)
137             except NoSuchFrameException as e:
138                 print('error: no such "{}"'.format(locator), e)
139             except Exception as e:
140                 raise e
141         else:
142             print('the "{}" error!'.format(by))
143
144     def switchToDefaultFrame(self):
145         """返回默认的frame"""
146         print('info:switch back to default iframe')
147         try:
148             self.driver.switch_to.default_content()
149         except Exception as e:
150             print(e)
151
152     def getAlertText(self):
153         """获取alert的提示信息"""
154         if self.isAlertAndSwitchToIt():
155             alert = self.isAlertAndSwitchToIt()
156             return alert.text
157         else:
158             return None
159
160     def getElementText(self, by, locator, name=None):
161         """获取某一个元素的text信息"""
162         try:
163             element = self.findElement(by, locator)
164             if name:
165                 return element.get_attribute(name)
166             else:
167                 return element.text
168         except:
169             print('get "{}" text failed return None'.format(locator))
170             return None
171
172     def loadUrl(self, url):
173         """加载url"""
174         print('info: string upload url "{}"'.format(url))
175         self.driver.get(url)
176
177     def getSource(self):
178         """获取页面源码"""
179         return self.driver.page_source
180
181     def sendKeys(self, by, locator, value=''):
182         """写数据"""
183         print('info:input "{}"'.format(value))
184         try:
185             element = self.findElement(by, locator)
186             element.send_keys(value)
187         except AttributeError as e:
188             print(e)
189
190     def clear(self, by, locator):
191         """清理数据"""
192         print('info:clearing value')
193         try:
194             element = self.findElement(by, locator)
195             element.clear()
196         except AttributeError as e:
197             print(e)
198
199     def click(self, by, locator):
200         """点击某个元素"""
201         print('info:click "{}"'.format(locator))
202         element = self.isClick(by, locator)
203         if element:
204             element.click()
205         else:
206             print('the "{}" unclickable!')
207
208     def sleep(self, num=0):
209         """强制等待"""
210         print('info:sleep "{}" minutes'.format(num))
211         time.sleep(num)
212
213     def ctrlV(self, value):
214         """ctrl + V 粘贴"""
215         print('info:pasting "{}"'.format(value))
216         ClipBoard.setText(value)
217         self.sleep(3)
218         KeyBoard.twoKeys('ctrl', 'v')
219
220     def enterKey(self):
221         """enter 回车键"""
222         print('info:keydown enter')
223         KeyBoard.oneKey('enter')
224
225     def waitElementtobelocated(self, by, locator):
226         """显示等待某个元素出现,且可见"""
227         print('info:waiting "{}" to be located'.format(locator))
228         try:
229             wd(self.driver, self.outTime).until(EC.visibility_of_element_located((self.byDic[by], locator)))
230         except TimeoutException as t:
231             print('error: found "{}" timeout!'.format(locator), t)
232         except NoSuchWindowException as e:
233             print('error: no such "{}"'.format(locator), e)
234         except Exception as e:
235             raise e
236
237     def assertValueInSource(self, value):
238         """断言某个关键字是否存在页面源码中"""
239         print('info:assert "{}" in page source'.format(value))
240         source = self.getSource()
241         assert value in source, '关键字"{}"不存在源码中!'.format(value)
242
243     def assertStringContainsValue(self, String, value):
244         """断言某段字符串包含另一个字符串"""
245         print('info:assert "{}" contains "{}"'.format(String, value))
246         assert value in String, '"{}"不包含"{}"!'.format(String, value)
247
248
249     @staticmethod
250     def getSheet(sheetName):
251         """获取某个sheet页的对象"""
252         sheet = BasePage.excel.getSheetByName(sheetName)
253         return sheet
254
255
256 if __name__ == "__main__":
257     driver = webdriver.Firefox()
258     frame = ('xpath', '//div[@id="loginDiv"]/ifram')
259     wait = BasePage(driver)
260     driver.get('https://mail.126.com/')
261     wait.switchToFrame(*frame)
262     username = wait.findElement('xpath', '//input[@name="email"]')
263     username.send_keys('账号')
264     if wait.isElementExsit('xpath', '//input[@name="password"]'):
265         wait.findElement('xpath', '//input[@name="password"]').send_keys('xiaochao11520')
266     wait.click('xpath', '//a[@id="dologin"]')
HomePage.py-邮箱首页选择菜单
 1 """2 ------------------------------------3 @Time : 2019/4/20 12:284 @Auth : linux超5 @File : HomePage.py6 @IDE  : PyCharm7 @Motto: Real warriors,dare to face the bleak warning,dare to face the incisive error!8 ------------------------------------9 """
10 from Page.BasePage import BasePage
11
12
13 class HomePage(BasePage):
14     # 配置文件读取元素
15     homePage = BasePage.cf.getLocatorsOrAccount('HomePageElements', 'homePage')
16     mailList = BasePage.cf.getLocatorsOrAccount('HomePageElements', 'mailList')
17     applicationCenter = BasePage.cf.getLocatorsOrAccount('HomePageElements', 'applicationCenter')
18     inBox = BasePage.cf.getLocatorsOrAccount('HomePageElements', 'inBox')
19     '''首页菜单选项'''
20     def selectMenu(self, Menu='mailList'):
21         """邮箱首页选择菜单"""
22         if Menu == 'mailList':
23             self.click(*HomePage.mailList)
24         elif Menu == 'homePage':
25             self.click(*HomePage.homePage)
26         elif Menu == 'applicationCenter':
27             self.click(*HomePage.applicationCenter)
28         elif Menu == 'inBox':
29             self.click(*HomePage.inBox)
30         else:
31             raise ValueError('''
32             菜单选择错误!
33             homePage->首页
34             mailList->通讯录
35             applicationCenter->应用中心
36             inBox->收件箱''')
37
38 if __name__=='__main__':
39     from selenium import webdriver
40     from Page.PageObject.LoginPage import LoginPage
41     driver = webdriver.Firefox()
42     login = LoginPage(driver)
43     login.login('账号', 'xiaochao11520')
44
45     home = HomePage(driver)
46     home.selectMenu()
LoginPage.py-封装登录功能
1 """2 ------------------------------------3 @Time : 2019/4/20 12:284 @Auth : linux超5 @File : LoginPage.py6 @IDE  : PyCharm7 @Motto: Real warriors,dare to face the bleak warning,dare to face the incisive error!8 ------------------------------------9 """
10 from Page.BasePage import BasePage
11
12
13 class LoginPage(BasePage):
14
15     # 配置文件读取元素
16     frame = BasePage.cf.getLocatorsOrAccount('LoginPageElements', 'frame')
17     username = BasePage.cf.getLocatorsOrAccount('LoginPageElements', 'username')
18     password = BasePage.cf.getLocatorsOrAccount('LoginPageElements', 'password')
19     loginBtn = BasePage.cf.getLocatorsOrAccount('LoginPageElements', 'loginBtn')
20     ferrorHead = BasePage.cf.getLocatorsOrAccount('LoginPageElements', 'ferrorHead')  # 登录失败提示
21
22     def login(self, userName, passWord):
23         '''登录'''
24         print('-------staring login-------')
25         self.loadUrl('https://mail.126.com')
26         self.switchToFrame(*LoginPage.frame)
27         self.clear(*LoginPage.username)
28         self.sendKeys(*LoginPage.username, userName)
29         self.clear(*LoginPage.password)
30         self.sendKeys(*LoginPage.password, passWord)
31         self.click(*LoginPage.loginBtn)
32         self.switchToDefaultFrame()
33         print('---------end login---------')
34
35     # add at 2019/04/19
36     def assertTextEqString(self, expected, name = None):
37         '''断言提示信息是否与期望的值相等'''
38         self.switchToFrame(*LoginPage.frame)
39         text = self.getElementText(*LoginPage.ferrorHead, name)
40         self.switchToDefaultFrame()
41         print('info: assert "{}" == "{}"'.format(text, expected))
42         assert text == expected, '{} != {}'.format(text, expected)
43
44 if __name__=="__main__":
45     from selenium import webdriver
46     driver = webdriver.Firefox()
47     login = LoginPage(driver, 30)
48     login.login('lin', '')
49     login.assertTextEqString('请输入密码')
ContactPage.py-封装添加联系人功能
 1 """2 ------------------------------------3 @Time : 2019/4/20 12:294 @Auth : linux超5 @File : ContactPage.py6 @IDE  : PyCharm7 @Motto: Real warriors,dare to face the bleak warning,dare to face the incisive error!8 ------------------------------------9 """
10 from Page.BasePage import BasePage
11
12
13 class ContactPage(BasePage):
14     # 配置文件读取元素
15     new_contact = BasePage.cf.getLocatorsOrAccount('ContactPageElements', 'new_contact')
16     name = BasePage.cf.getLocatorsOrAccount('ContactPageElements', 'name')
17     mail = BasePage.cf.getLocatorsOrAccount('ContactPageElements', 'mail')
18     star = BasePage.cf.getLocatorsOrAccount('ContactPageElements', 'star')
19     phone = BasePage.cf.getLocatorsOrAccount('ContactPageElements', 'phone')
20     comment = BasePage.cf.getLocatorsOrAccount('ContactPageElements', 'comment')
21     commit = BasePage.cf.getLocatorsOrAccount('ContactPageElements', 'commit')
22     errortip = BasePage.cf.getLocatorsOrAccount('ContactPageElements', 'tooltip')  # 错误提示
23
24     def newContact(self, Name, Mail, Star, Phone, Comment):
25         """添加联系人"""
26         print('--------string add contact--------')
27         self.click(*ContactPage.new_contact)
28         self.sendKeys(*ContactPage.name, Name)
29         self.sendKeys(*ContactPage.mail, Mail)
30         if Star == '1':
31             self.click(*ContactPage.star)
32         self.sendKeys(*ContactPage.phone, Phone)
33         self.sendKeys(*ContactPage.comment, Comment)
34         self.click(*ContactPage.commit)
35         print('--------end add contact--------')
36
37     def assertErrorTip(self, excepted):
38         """断言联系人添加失败时是否有提示信息"""
39         text = self.getElementText(*ContactPage.errortip)
40         print('info: assert "{}"=="{}"'.format(text, excepted))
41         assert text == excepted
42
43 if __name__ == '__main__':
44     from selenium import webdriver
45     from Page.PageObject.LoginPage import LoginPage
46     from Page.PageObject.HomePage import HomePage
47     driver = webdriver.Firefox()
48     home = HomePage(driver)
49     login = LoginPage(driver)
50     contact = ContactPage(driver)
51
52     login.login('账号', 'xiaochao11520')
53     home.selectMenu()
54     contact.newContact('281754041@qq.com')
SendMailPage.py-封装发送邮件功能
 1 """2 ------------------------------------3 @Time : 2019/4/20 9:164 @Auth : linux超5 @File : SendMailPage.py6 @IDE  : PyCharm7 @Motto: Real warriors,dare to face the bleak warning,dare to face the incisive error!8 ------------------------------------9 """
10 from Page.BasePage import BasePage
11
12
13 class SendMailPage(BasePage):
14     # 配置文件读取元素
15     writeMail = BasePage.cf.getLocatorsOrAccount('SendMailPageElements', 'writeMail')
16     addressee = BasePage.cf.getLocatorsOrAccount('SendMailPageElements', 'addressee')
17     subject = BasePage.cf.getLocatorsOrAccount('SendMailPageElements', 'subject')
18     iframe = BasePage.cf.getLocatorsOrAccount('SendMailPageElements', 'iframe')
19     text = BasePage.cf.getLocatorsOrAccount('SendMailPageElements', 'text')
20     sendBtn = BasePage.cf.getLocatorsOrAccount('SendMailPageElements', 'sendBtn')
21     expect = BasePage.cf.getLocatorsOrAccount('SendMailPageElements', 'expect')
22     uploadAttachment = BasePage.cf.getLocatorsOrAccount('SendMailPageElements', 'uploadAttachment')
23     delete = BasePage.cf.getLocatorsOrAccount('SendMailPageElements', 'delete')
24
25     def sendMail(self, Address, Subject, Text, PFA=''):
26         """发送邮件功能"""
27         print('------------string send mail---------------------')
28         self.click(*SendMailPage.writeMail)
29         self.sendKeys(*SendMailPage.addressee, Address)
30         self.sendKeys(*SendMailPage.subject, Subject)
31         self.switchToFrame(*SendMailPage.iframe)
32         self.sendKeys(*SendMailPage.text, Text)
33         self.switchToDefaultFrame()
34         if PFA:
35             self.click(*SendMailPage.uploadAttachment)
36             self.ctrlV(PFA)
37             self.enterKey()
38             self.waitElementtobelocated(*SendMailPage.delete)
39         self.click(*SendMailPage.sendBtn)
40         print('------------end send mail---------------------')
41
42 if __name__=='__main__':
43     from Page.PageObject.LoginPage import LoginPage
44     from selenium import webdriver
45     driver = webdriver.Firefox()
46
47     login = LoginPage(driver)
48     login.login('账号', 'xiaochao11520')
49     sendMail = SendMailPage(driver)
50     sendMail.sendMail('281754043@qq.com', 'pytest', 'pytest实战实例', 1, 'D:\KeyWordDriverTestFrameWork\geckodriver.log')
所有的准备工作都已经做好了,还有一个问题,我们的添加联系人和发送邮件应该是否应该在已经登录的前提下测试呢?答案是肯定的。所以我们在用例同目录下新建conftest.py文件并调用登录功能(为什么这么做,不明白的小伙伴可以去看一下我之前的文章,关于conftest.py的原理)
conftest.py-同用例目录下,调用登录功能
 1 """2 ------------------------------------3 @Time : 2019/4/20 15:104 @Auth : linux超5 @File : conftest.py6 @IDE  : PyCharm7 @Motto: Real warriors,dare to face the bleak warning,dare to face the incisive error!8 ------------------------------------9 """
10 import pytest
11 from Page.PageObject.LoginPage import LoginPage
12
13
14 # 从配置文件中获取正确的用户名和密码
15 userName = LoginPage.cf.getLocatorsOrAccount('126LoginAccount', 'username')
16 passWord = LoginPage.cf.getLocatorsOrAccount('126LoginAccount', 'password')
17 @pytest.fixture(scope='function')
18 def login(driver):
19     '''除登录用例,每一个用例的前置条件'''
20     print('------------staring login------------')
21     loginFunc = LoginPage(driver, 30)
22     loginFunc.login(userName, passWord)
23     yield
24     print('------------end login------------')
25     driver.delete_all_cookies()
ok,开始编写测试用例啦
test_loginCase.py-登录功能测试
 1 """2 ------------------------------------3 @Time : 2019/4/20 14:104 @Auth : linux超5 @File : test_loginCase.py6 @IDE  : PyCharm7 @Motto: Real warriors,dare to face the bleak warning,dare to face the incisive error!8 ------------------------------------9 """
10 import pytest
11 from Page.PageObject.LoginPage import LoginPage
12
13
14 @pytest.mark.loginTest
15 class TestLogin(object):
16
17     # 测试数据
18     loginSheet = LoginPage.getSheet('login')
19     data = LoginPage.excel.getAllValuesOfSheet(loginSheet)
20
21     # 正确的帐号和密码
22     userName = LoginPage.cf.getLocatorsOrAccount('126LoginAccount', 'username')
23     passWord = LoginPage.cf.getLocatorsOrAccount('126LoginAccount', 'password')
24
25     @pytest.fixture()
26     def teardown_func(self, driver):
27         """
28         执行每个用例之后要清除一下cookie,
29         否则你第一个账号登录之后,重新加载网址还是登录状态,无法测试后面的账号
30         """
31         yield
32         driver.delete_all_cookies()
33
34     @pytest.mark.parametrize('username, password, expect', data)
35     def test_login(self, teardown_func, driver, username, password, expect):
36         """测试登录"""
37         login = LoginPage(driver, 30)
38         login.login(username, password)
39         login.sleep(5)
40         # 增加登录失败时, 对提示信息的验证
41         if username == TestLogin.userName and password == TestLogin.passWord:
42             login.assertValueInSource(expect)
43         elif username == '':
44             login.assertTextEqString(expect)
45         elif username != '' and password == '':
46             login.assertTextEqString(expect)
47         elif username == '' and password == '':
48             login.assertTextEqString(expect)
49         else:
50             login.assertTextEqString(expect)
51
52
53 if __name__ == "__main__":
54     pytest.main(['-v', 'test_loginCase.py'])
test_contactCase.py-添加联系人功能测试
 1 """2 ------------------------------------3 @Time : 2019/4/20 16:154 @Auth : linux超5 @File : test_contactCase.py6 @IDE  : PyCharm7 @Motto: Real warriors,dare to face the bleak warning,dare to face the incisive error!8 ------------------------------------9 """
10 import re
11 import pytest
12 from Page.PageObject.HomePage import HomePage
13 from Page.PageObject.ContactPage import ContactPage
14
15
16 @pytest.mark.conatctTest
17 class TestAddContact(object):
18
19     # 测试数据
20     contactSheet = ContactPage.getSheet('contact')
21     data = ContactPage.excel.getAllValuesOfSheet(contactSheet)
22
23     @pytest.mark.newcontact
24     @pytest.mark.parametrize('Name, Mail, Star, Phone, Comment, expect', data)
25     def test_NewContact(self, driver, login, Name, Mail, Star, Phone, Comment, expect):
26         """测试添加联系人"""
27         home_page = HomePage(driver)
28         contact_page = ContactPage(driver)
29         home_page.selectMenu()
30         contact_page.newContact(Name, Mail, Star, Phone, Comment)
31         home_page.sleep(5)
32         # 校验错误的邮箱是否提示信息正确
33         if re.match(r'^.{1,}@[0-9a-zA-Z]{1,13}\..*$', Mail):
34             contact_page.assertValueInSource(expect)
35         else:
36             contact_page.assertErrorTip(expect)
37
38 if __name__ == '__main__':
39     pytest.main(['-v', 'test_contactCase.py'])
test_sendMailCase.py-发送邮件功能测试
 1 """2 ------------------------------------3 @Time : 2019/4/20 10:044 @Auth : linux超5 @File : test_sendMailCase.py6 @IDE  : PyCharm7 @Motto: Real warriors,dare to face the bleak warning,dare to face the incisive error!8 ------------------------------------9 """
10 import pytest
11 from Page.PageObject.SendMailPage import SendMailPage
12
13 @pytest.mark.sendMailTest
14 class TestSendMail(object):
15
16     sendMailSheet = SendMailPage.getSheet('mail')
17     data = SendMailPage.excel.getAllValuesOfSheet(sendMailSheet)
18
19     @pytest.mark.sendmail
20     @pytest.mark.parametrize('Address, Subject, Text, PFA', data)
21     def test_sendMail(self, driver, login, Address, Subject, Text,PFA):
22         """测试发送邮件,包括带附件的邮件"""
23         send_mail = SendMailPage(driver)
24         send_mail.sendMail(Address, Subject, Text, PFA)
25         send_mail.sleep(5)
26         assert send_mail.isElementExsit(*SendMailPage.expect)
27
28 if __name__=='__main__':
29     pytest.main(['-v', 'test_sendMailCase.py'])
问题
用例已经写完了,有两个问题
1.有没有发现我们的报告怎么生成的?也没有失败用例截图?
2.我们貌似并没有编写驱动浏览器的代码?
现在我们来解决这个两个问题
根据pytest的conftest.py文件的原理,我们可以把驱动浏览器的代码写在一个全局的conftest.py文件里面。报告生成其实是通过命令 pytest --html=‘report.html’ --self-contained-html生成的,但是这样的报告对用例的描述不是很清晰,且没有对失败用例截图,也不方便我们分析项目的缺陷,我们也可以填写代码放到这个文件里面
conftest.py-全局conftest.py文件
 1 """2 ------------------------------------3 @Time : 2019/4/12 14:104 @Auth : linux超5 @File : conftest.py6 @IDE  : PyCharm7 @Motto: Real warriors,dare to face the bleak warning,dare to face the incisive error!8 ------------------------------------9 """
10 import pytest
11 from selenium import webdriver
12 from py._xmlgen import html
13
14 _driver = None
15 # 测试失败时添加截图和测试用例描述(用例的注释信息)
16
17 @pytest.mark.hookwrapper
18 def pytest_runtest_makereport(item):
19     """
20     当测试失败的时候,自动截图,展示到html报告中
21     :param item:
22     """
23     pytest_html = item.config.pluginmanager.getplugin('html')
24     outcome = yield
25     report = outcome.get_result()
26     extra = getattr(report, 'extra', [])
27
28     if report.when == 'call' or report.when == "setup":
29         xfail = hasattr(report, 'wasxfail')
30         if (report.skipped and xfail) or (report.failed and not xfail):
31             file_name = report.nodeid.replace("::", "_")+".png"
32             screen_img = _capture_screenshot()
33             if file_name:
34                 html = '<div><img src="data:image/png;base64,%s" alt="screenshot" style="width:600px;height:300px;" ' \
35                        'onclick="window.open(this.src)" align="right"/></div>' % screen_img
36                 extra.append(pytest_html.extras.html(html))
37         report.extra = extra
38         report.description = str(item.function.__doc__)
39         report.nodeid = report.nodeid.encode("utf-8").decode("unicode_escape")
40
41
42 @pytest.mark.optionalhook
43 def pytest_html_results_table_header(cells):
44     cells.insert(1, html.th('Description'))
45     cells.insert(2, html.th('Test_nodeid'))
46     cells.pop(2)
47
48
49 @pytest.mark.optionalhook
50 def pytest_html_results_table_row(report, cells):
51     cells.insert(1, html.td(report.description))
52     cells.insert(2, html.td(report.nodeid))
53     cells.pop(2)
54
55
56 def _capture_screenshot():
57     """
58     截图保存为base64
59     :return:
60     """
61     return _driver.get_screenshot_as_base64()
62 # 这里我设置的级别是模块级别,也就是每个测试文件运行一次
63 # 可以设置为session,全部用例执行一次,但是针对126邮箱的话
64 # 登录次数太多会叫你验证,如果验证就没法执行用例了,我没有对验证处理(处理比较复杂)
65
66
67 @pytest.fixture(scope='module')
68 def driver():
69     global _driver
70     print('------------open browser------------')
71     _driver = webdriver.Firefox()
72
73     yield _driver
74     print('------------close browser------------')
75     _driver.quit()
最后呢,为了减小项目维护成本,我们把一些全局的配置项,放到我们的功能配置文件中共全局使用,包括运行用例的一些命令字符串,可以自行修改
conf.py-全局配置文件
 1 """2 ------------------------------------3 @Time : 2019/4/20 16:504 @Auth : linux超5 @File : conf.py6 @IDE  : PyCharm7 @Motto: Real warriors,dare to face the bleak warning,dare to face the incisive error!8 ------------------------------------9 """
10 from datetime import datetime
11 import os
12 # 项目根目录
13 projectDir = os.path.dirname(os.path.dirname(os.path.abspath(__file__)))
14 # 报告目录
15 reportDir = os.path.join(projectDir, 'report')
16 # ui对象库config.ini文件所在目录
17 configDir = os.path.join(projectDir, 'config', 'config.ini')
18 # 测试数据所在目录
19 excelPath = os.path.join(projectDir, 'data', 'tcData.xlsx')
20 # 当前时间
21 currentTime = datetime.now().strftime('%H_%M_%S')
22
23 # 邮件配置信息
24 # 邮件服务器
25 smtpServer = 'smtp.qq.com'
26 # 发送者
27 fromUser = '账号@qq.com'
28 # 发送者密码
29 fromPassWord = 'mhxvqpewblldbjhf'
30 # 接收者
31 toUser = ['账号@qq.com']# 可以同时发送给多人,追加到列表中
32 # 邮件标题
33 subject = 'xx项目自动化测试报告'
34 # 邮件正文
35 contents = '测试报告正文'
36 # 报告名称
37 htmlName = r'{}\testReport{}.html'.format(reportDir, currentTime)
38
39 # 脚本执行命令
40 args = r'pytest --html=' + htmlName+ ' ' + '--self-contained-html'
41 # modify by linuxchao at 2019/4/25
42 args_login = r'pytest --html='+ htmlName+ ' ' + '-m' + ' ' + 'loginTest'+ ' --self-contained-html'
43 args_contact = r'pytest --html='+ htmlName+ ' ' + '-m' + ' ' + 'contactTest'+ ' --self-contained-html'
44 args_sendmail = r'pytest --html='+ htmlName+ ' ' + '-m' + ' ' + 'sendMailTest'+ ' --self-contained-html'
运行项目
通过命令运行
1.cmd切换到项目的根目录,执行pytest --html=‘report.html’ --self-contained-html命令(此运行方式,无法发送测试报告邮件)
这种方式感觉有点low,我们换另外一种方式,可以通过os模块自动执行相关命令,编写运行用例代码
RunTestCase.py-执行用例文件
 1 """2 ------------------------------------3 @Time : 2019/4/15 16:144 @Auth : linux超5 @File : RunTestCase.py6 @IDE  : PyCharm7 @Motto: Real warriors,dare to face the bleak warning,dare to face the incisive error!8 ------------------------------------9 """
10 import sys
11 sys.path.append('.')
12 from config.conf import *
13 from util.sendMailForReprot import SendMailWithReport
14
15
16 def main():
17     # 判断项目的根目录是否在sys.path中,没有就添加
18     if projectDir not in sys.path:
19         sys.path.append(projectDir)
20     # 执行用例
21     os.system(args)
22     # 发送邮件
23     SendMailWithReport.send_mail(
24         smtpServer, fromUser, fromPassWord,
25         toUser, subject, contents,
26         htmlName)
27
28
29 if __name__ == '__main__':
30     main()
我们可以直接执行这个文件执行所用的测试用例了!
其实我们运行用例往往不只是 使用pytest --html=‘report.html’ --self-contained-html 这样一个简单的命令运行,通常会添加很多的命令选项,比如-v,-q,-s等等,那么怎么办呢?这时候就用到了pytest.ini配置文件了
只添加了几个简单的命令选项
pytest.ini-pytest配置文件
1 [pytest]
2 addopts=-vqs
3 testpaths=./TestCases
4 markers=
5     loginTest: Run login test cases
6     contactTest: Run add contact test cases
7     sendMailTest: Run send mail test cases
测试输出
1.自动生成html格式报告,其中报告里面附带用例执行日志明细,及用例失败自动截图(部分报告展示)


2.自动发送测试邮件给指定用户

最后感谢每一个认真阅读我文章的人,礼尚往来总是要有的,虽然不是什么很值钱的东西,如果你用得到的话可以直接拿走:
这些资料,对于做【软件测试】的朋友来说应该是最全面最完整的备战仓库,这个仓库也陪伴我走过了最艰难的路程,希望也能帮助到你!凡事要趁早,特别是技术行业,一定要提升技术功底。

相关文章:
Pytest+selenium UI自动化测试实战实例
🍅 点击文末小卡片,免费获取软件测试全套资料,资料在手,涨薪更快 今天来说说pytest吧,经过几周的时间学习,有收获也有疑惑,总之最后还是搞个小项目出来证明自己的努力不没有白费 环境准备 1 …...
服务器技术研究分析:存储从HBM到CXL
服务器变革:存储从HBM到CXL 在《从云到端,AI产业的新范式(2024)》中揭示,传统服务器价格低至1万美金,而配备8张H100算力卡的DGX H100AI服务器价值高达40万美金(约300万人民币)。 从供…...

下载并安装 WordPress 中文版
下载并安装 WordPress 中文版 1. 安装 LAMP 环境(Linux, Apache, MySQL, PHP)1. 安装 Apache2. 安装 MySQL3. 安装 PHP1. 下载并安装 WordPress 中文版1. 下载 WordPress2. 配置文件权限3 . 创建 MySQL 数据库4 . 配置 WordPress1. 安装 LAMP 环境(Linux, Apache, MySQL, PH…...

从零开始的LeetCode刷题日记:515.在每个树行中找最大值
一.相关链接 题目链接:515.在每个树行中找最大值 二.心得体会 这道题也是层序遍历,只需要记录每一层的最大值即可,反复比较记录最大值。 三.代码 class Solution { public:vector<int> largestValues(TreeNode* root) {vector<…...
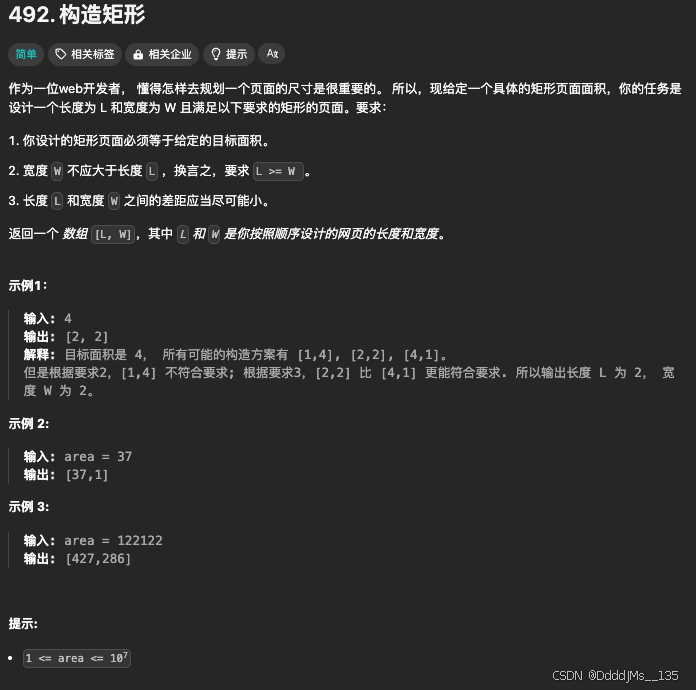
C语言 | Leetcode C语言题解之第492题构造矩形
题目: 题解: class Solution { public:vector<int> constructRectangle(int area) {int w sqrt(1.0 * area);while (area % w) {--w;}return {area / w, w};} };...

在FastAPI网站学python:虚拟环境创建和使用
Python虚拟环境(virtual environment)是一个非常重要的工具,它允许开发者为每个项目创建独立的Python环境,隔离您为每个项目安装的软件包,从而避免不同项目之间的依赖冲突。 学习参考FastAPI官网文档:Virt…...
)
安全风险评估(Security Risk Assessment, SRA)
安全风险评估(Security Risk Assessment, SRA)是识别、分析和评价信息安全风险的过程。它帮助组织了解其信息资产面临的潜在威胁,以及这些威胁可能带来的影响。通过风险评估,组织可以制定有效的风险管理策略,以减少或控…...
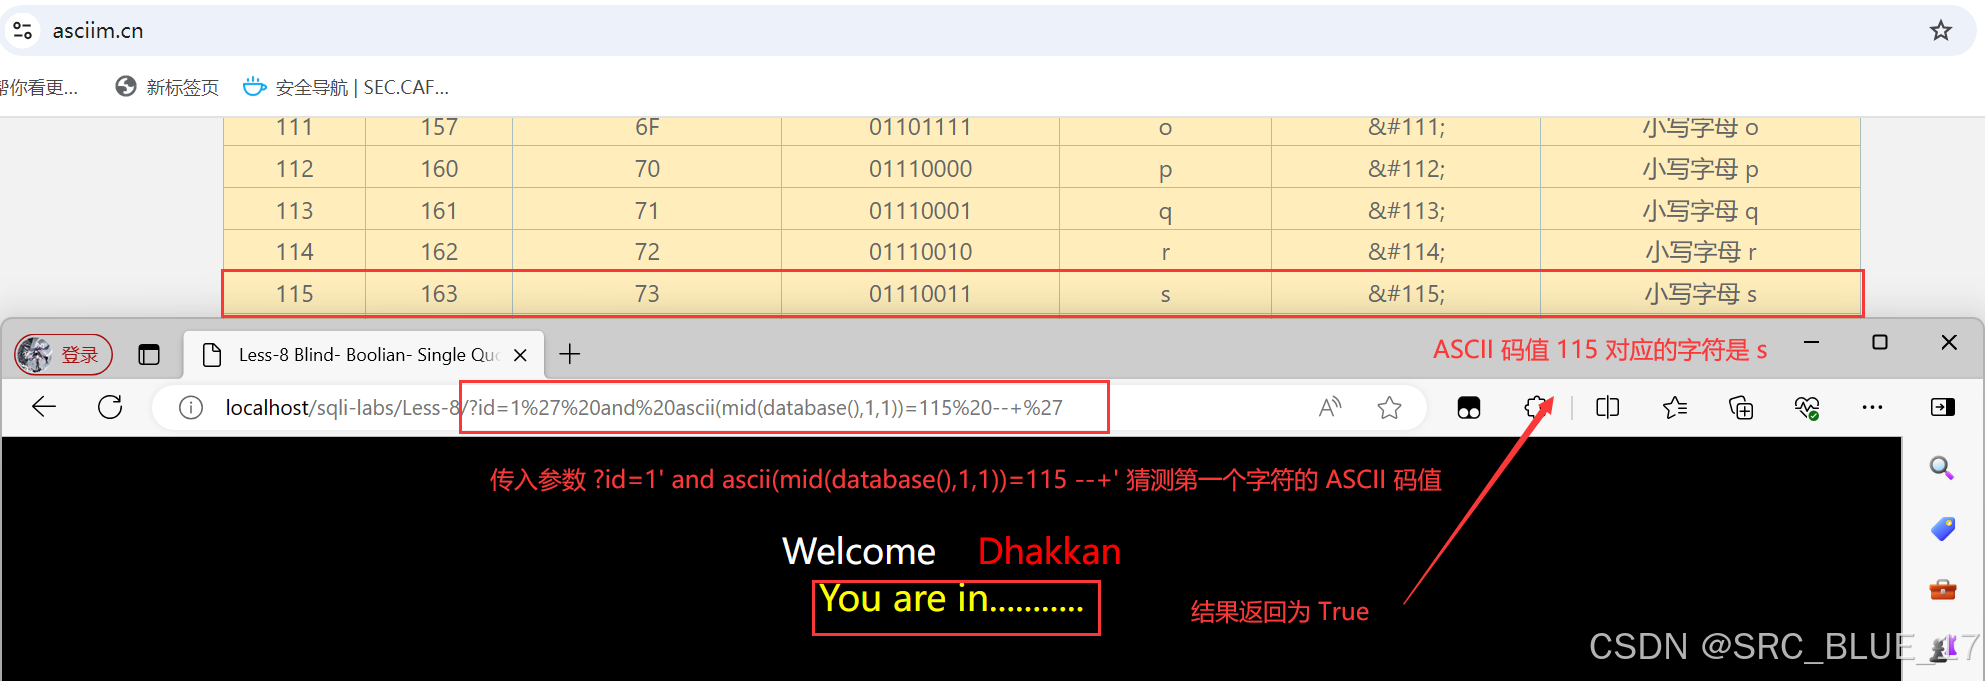
SQL Injection | SQL 注入 —— 布尔盲注
关注这个漏洞的其他相关笔记:SQL 注入漏洞 - 学习手册-CSDN博客 0x01:布尔盲注 —— 理论篇 布尔盲注(Boolean-Based Blind Injection)是一种常见的 SQL 注入技术,它适用于那些 SQL 注入时,查询结果不会直…...
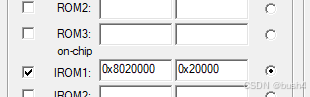
stm32 bootloader写法
bootloader写法: 假设app的起始地址:0x08020000,则bootloader的范围是0x0800,0000~0x0801,FFFF。 #define APP_ADDR 0x08020000 // 应用程序首地址定义 typedef void (*APP_FUNC)(void); // 函数指针类型定义 /*main函数中调用rum_app&#x…...

Unity3D 物体表面水滴效果详解
在游戏开发中,逼真的水滴效果能够显著提升游戏场景的真实感和沉浸感。Unity3D作为一款强大的游戏开发引擎,提供了丰富的工具和技术来实现这种效果。本文将详细介绍如何在Unity3D中实现物体表面的水滴效果,包括技术详解和代码实现。 对惹&…...
若依框架中spring security的完整认证流程,及其如何使用自定义用户表进行登录认证,学会轻松实现二开,嘎嘎赚块乾
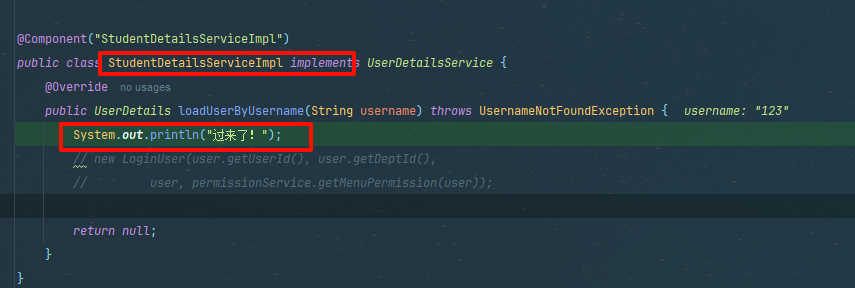
1)熟悉之前的SysUser登录流程 过滤器链验证配置 这里security过滤器链增加了前置过滤器链jwtFilter 该过滤器为我们自定义的,每次请求都会经过jwt验证 ok我们按ctrl alt B跳转过去来看下 首先会获取登录用户LoginUser 内部通过header键,获…...

selenium:操作滚动条的方法(8)
selenium支持几种操作滚动条的方法,主要介绍如下: 使用ActionChains 类模拟鼠标滚轮操作 使用函数ActionChains.send_keys发送按键Keys.PAGE_DOWN往下滑动页面,发送按键Keys.PAGE_UP往上滑动页面。 from selenium import webdriver from se…...
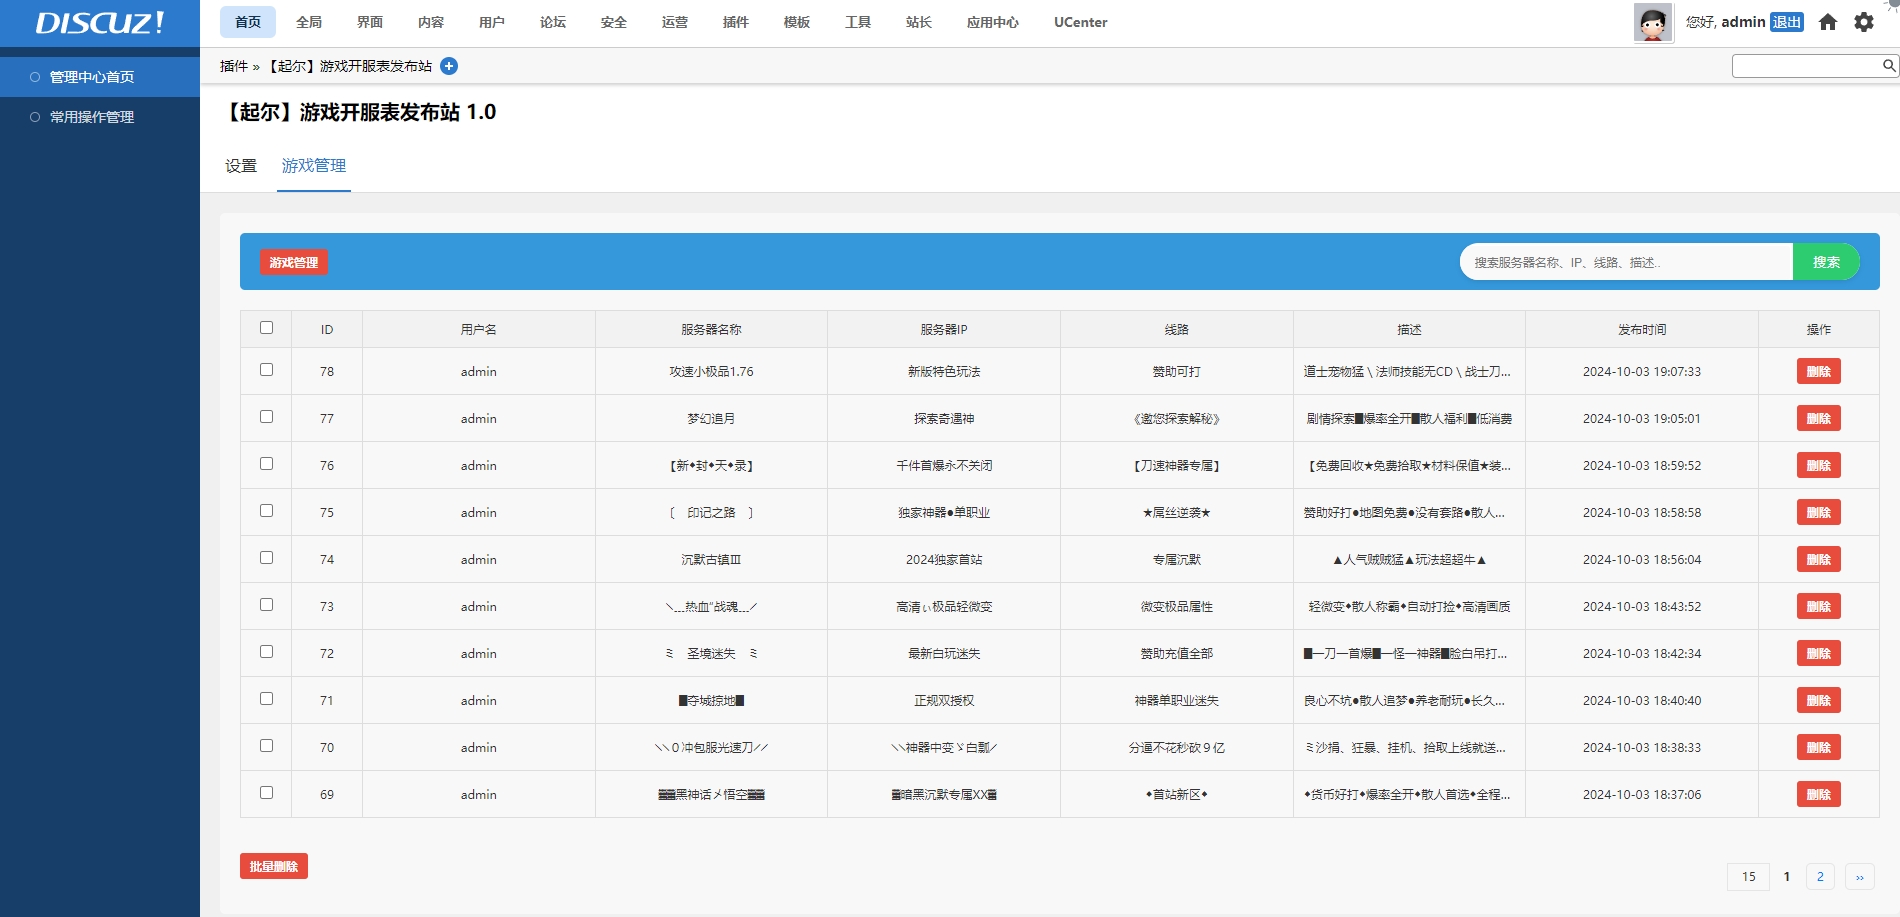
Discuz | 起尔开发 传奇开服表游戏公益服发布论坛网站插件
Discuz | 起尔开发 传奇开服表游戏公益服发布论坛网站插件 插件下载:源码 - 起尔开发的插件下载 演示地址:discuz.72jz.com 标黄和非标黄自动分开 在标黄时间内显示在上面置顶,标黄过期后自动显示在下面白色区域。 后台可以设置非标黄默认…...

问:JAVA对象的数据结构长啥样?
Java 对象在内存中的结构是一个复杂且精细的设计,它不仅关乎对象如何存储,还直接影响到垃圾回收(GC)、并发控制等运行时行为。一个典型的 Java 对象主要由三部分组成:对象头(Object Header)、实…...
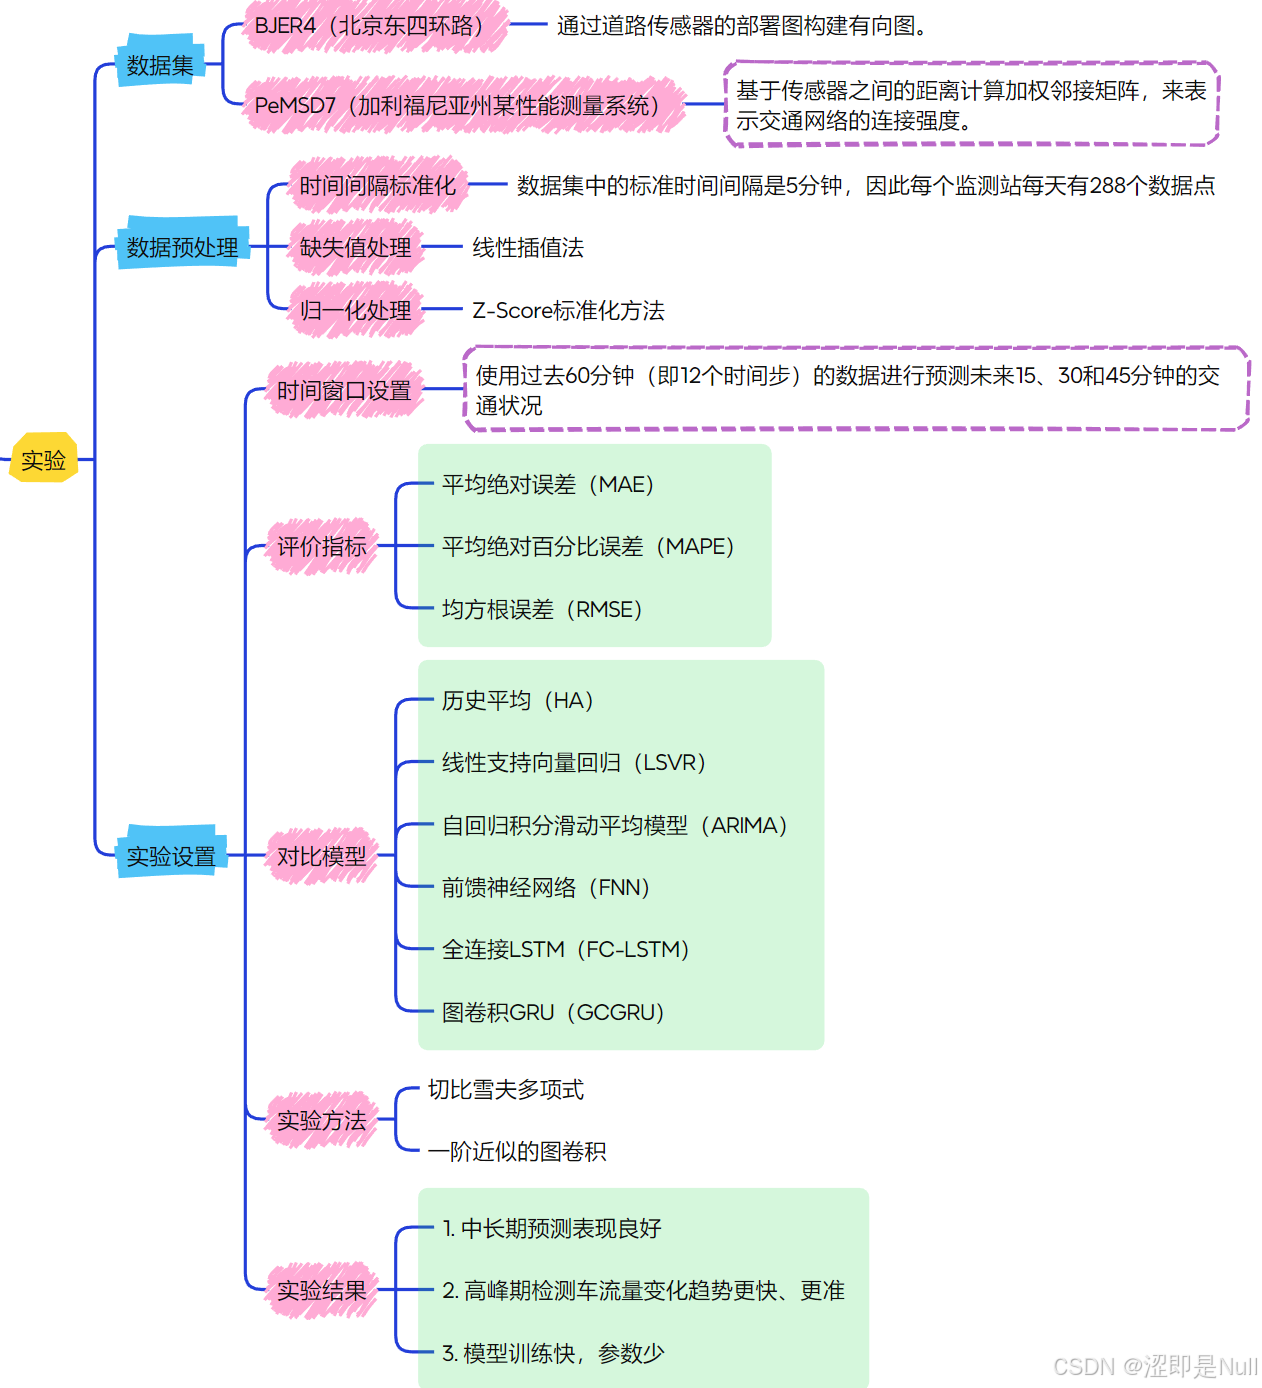
STGCN解读(论文+代码)
一、引言 引言部分不是论文的重点,主要讲述了交通预测的重要性以及一些传统方法的不足之处。进而推出了自己的模型——STGCN。 二、交通预测与图卷积 第二部分讲述了交通预测中路图和图卷积的概念。 首先理解道路图,交通预测被定义为典型的时间序列预测…...

perl读取目录,写入文件
perl读取目录,写入文件 此脚本有两个输入参数,第一个参数为需要打印的文件目录,第二个参数为打印后的文件名; 该脚本名称为out_file_full_path #!/bin/perluse 5.010; my $dir $ARGV[0]; # 此为第一个参数; opendi…...
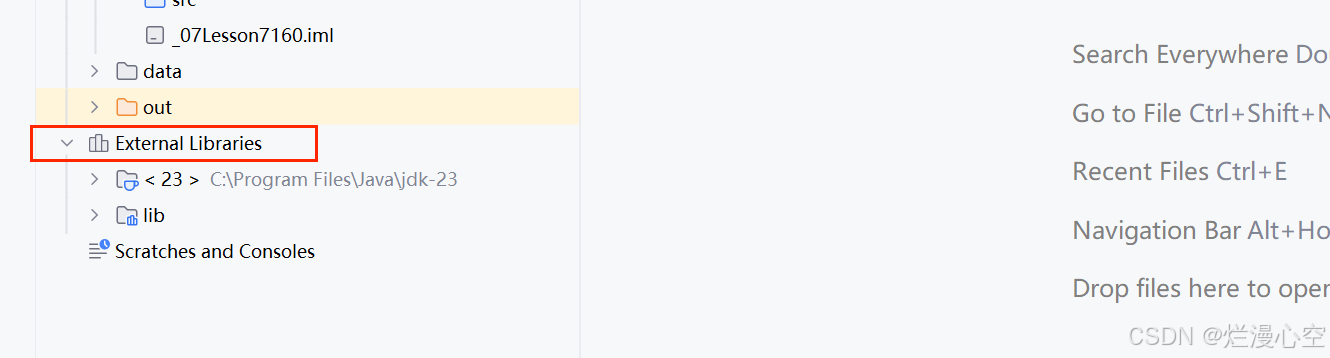
JDK-23与JavaFX配置在IDEA中
一、安装 1.IDEA安装,可以查看CSDN 2.JDK,JavaFX安装,可以查看CSDN 二、配置JDK 打开IDEA,选择个项目,点击图中的设置按钮: 点击项目设置: 点击“”添加JDK,寻找相应的JDK目录就行 三、配置…...
VSCode运行QT界面
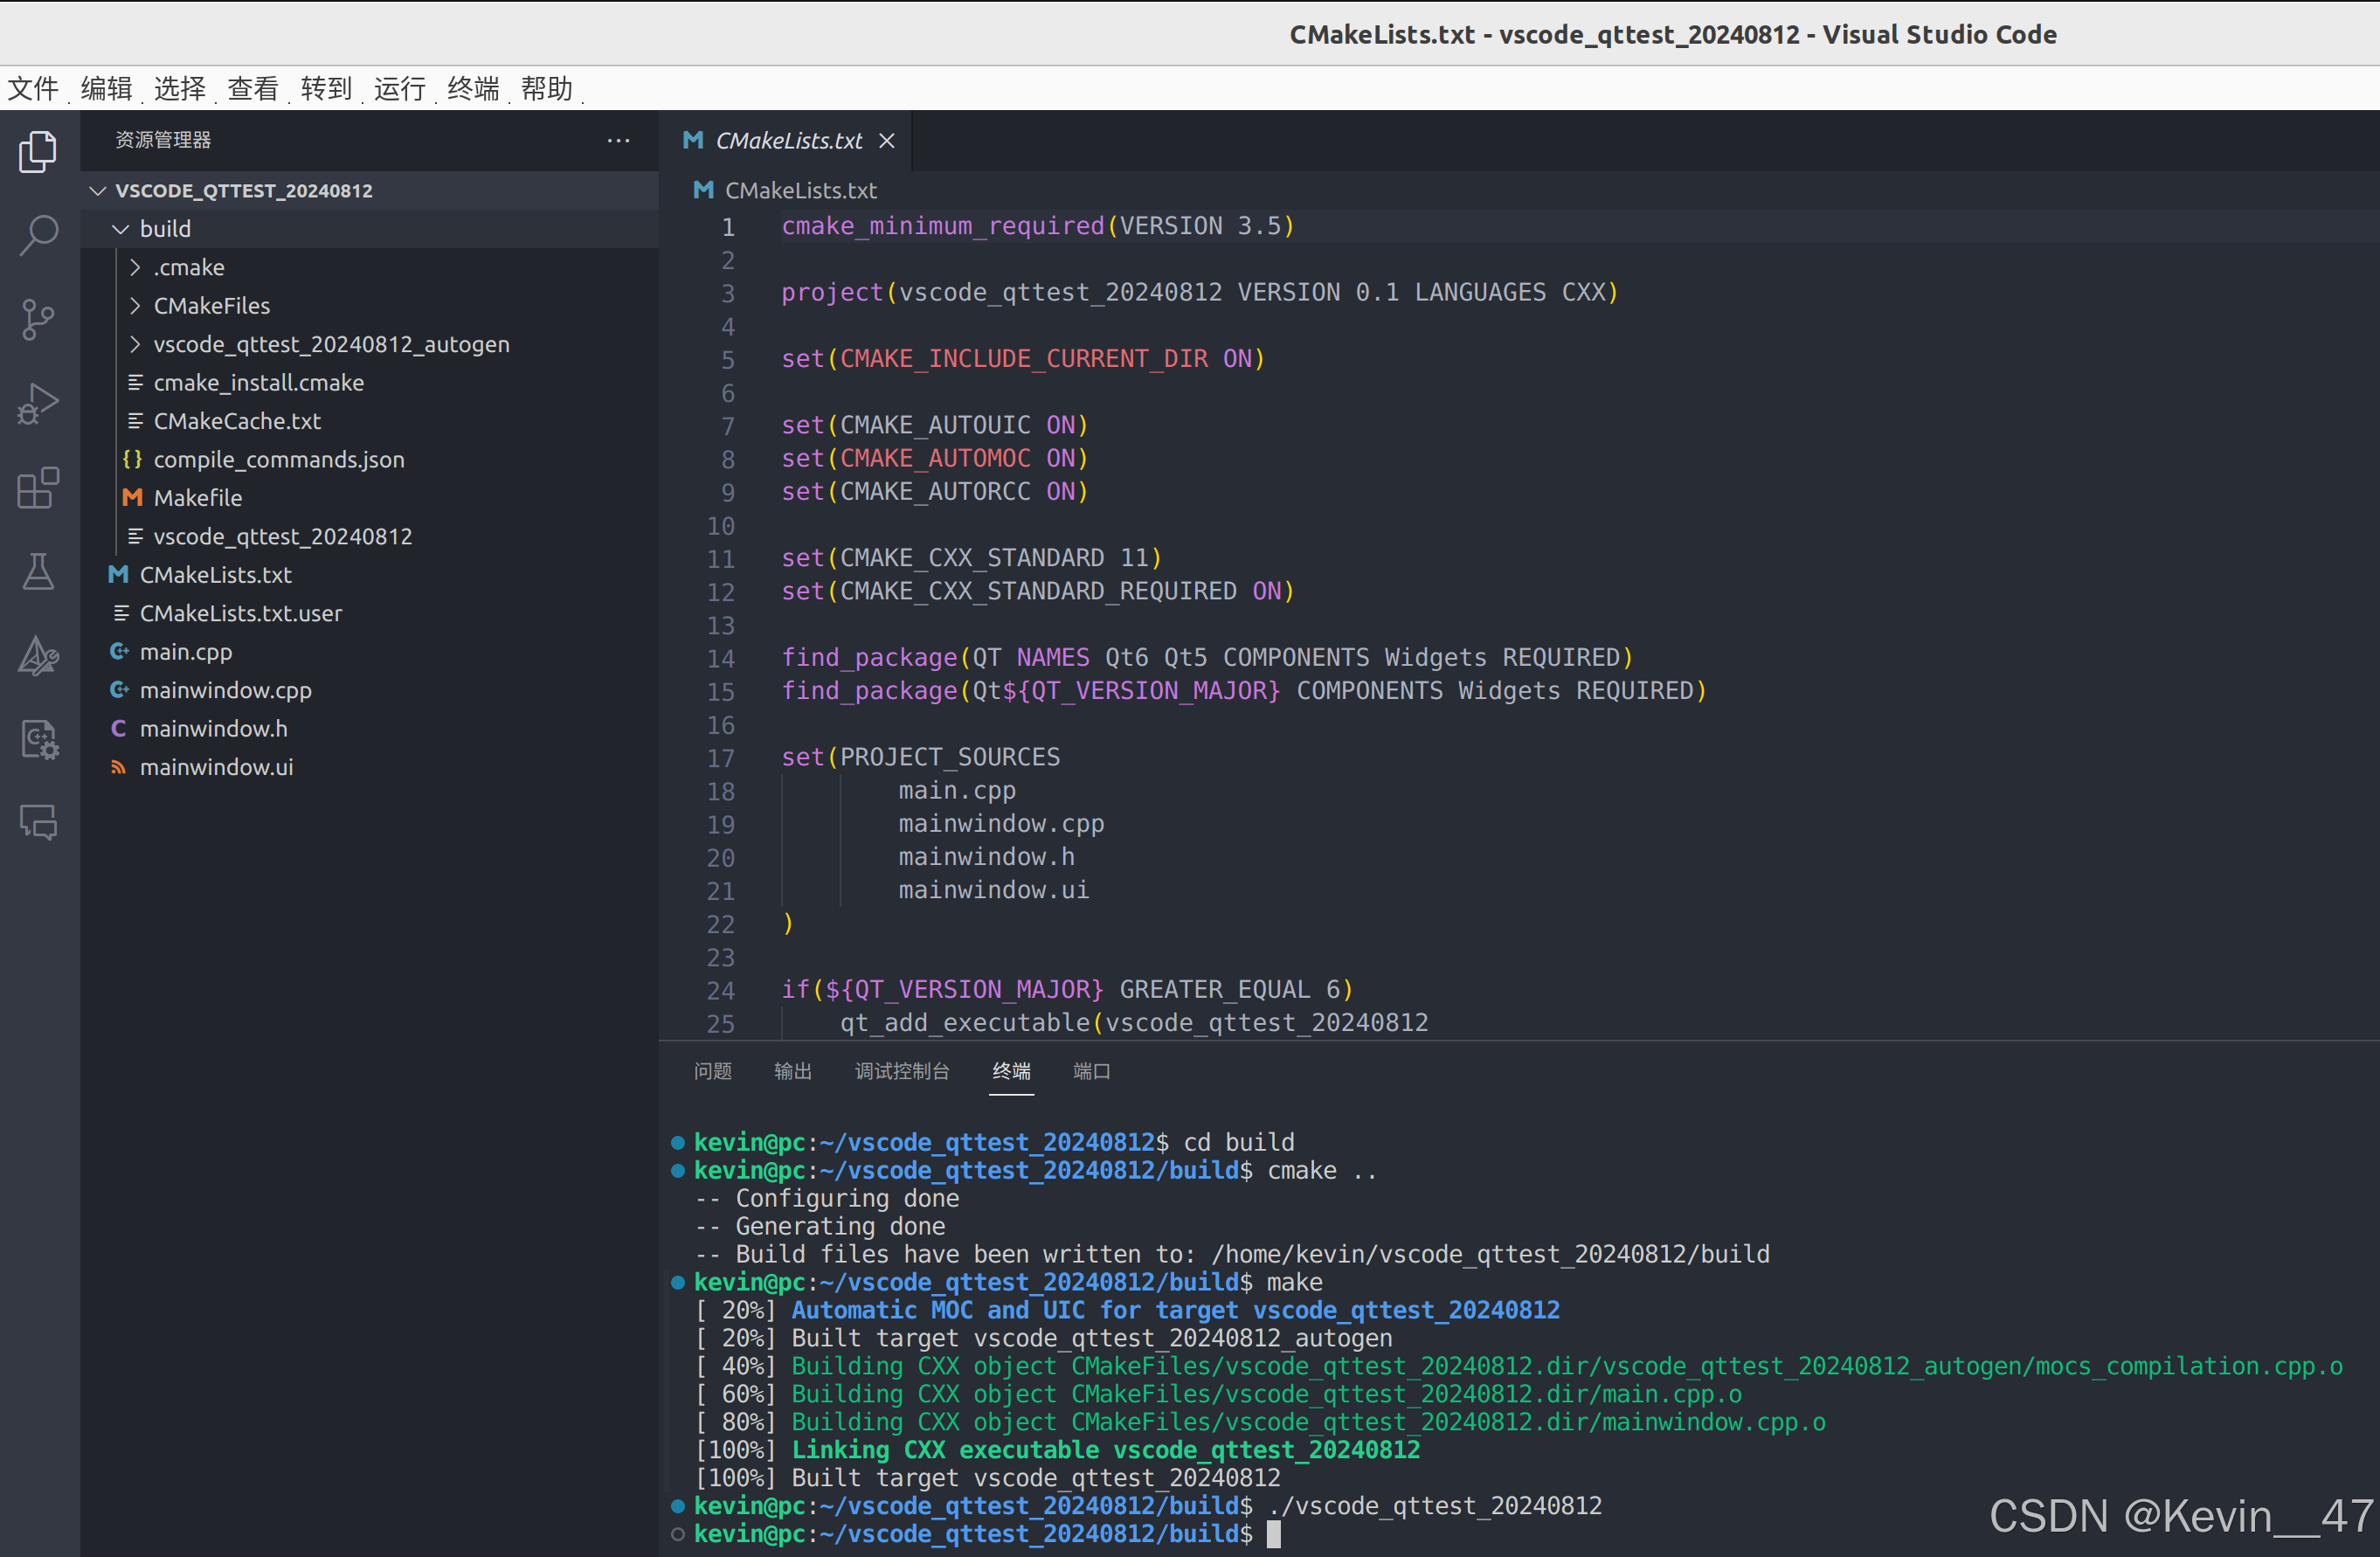
VSCode用久了,感觉Qt Creator的写起代码来还是不如VSCode得心应手,虽然目前还是存在一些问题,先把目前实现的状况做个记录,后续有机会再进一步优化。 当前方式 通过QtCreator创建一个CMake项目,然后使用CMake的方式在VSCode中进行编译。 claude给出的建议 左上角的名字会…...

npm-run-all 使用实践
参考: npm-run-all 背景 在前端开发中,你是否存在以下烦恼: 写 package.json 的 scripts 命令时,命令太过冗长,例如编译命令 build 需要执行清理 clean, 编译css build:css, 编译js build:js, 编译html build:html 命令,则 bui…...
 K)
【CCPC】The 2021 CCPC Guilin Onsite (XXII Open Cup, Grand Prix of EDG) K
Tax #图论 #最短路 #搜索 #暴力 题目描述 JB received his driver’s license recently. To celebrate this fact, JB decides to drive to other cities in Byteland. There are n n n cities and m m m bidirectional roads in Byteland, labeled by 1 , 2 , … , n 1,…...

基于2D工程图几何特征与梯度提升模型的制造成本智能预测
1. 项目概述:从图纸到报价的智能革命在制造业,尤其是像汽车零部件这样的离散制造领域,报价速度直接决定了订单的生死。传统上,拿到一张新的2D工程图(DWG格式),成本工程师需要花上几天甚至几周时…...

AI时代程序员职业发展与个人创业可行性研究报告
一、行业宏观变革(2026核心趋势数据佐证) 1.1 开发范式已彻底重构(行业不可逆拐点) 2026年正式进入AI Agent智能体开发时代,传统CRUD编码价值持续崩塌。 核心权威数据: Gartner预测:2026年75%企…...

SSE 基础知识
SSE 基础知识 一、概念定义 SSE 全称 Server-Sent Events,是基于HTTP协议的服务器单向数据推送技术。 建立一次长连接后,服务端可主动持续向前端推送数据,无需客户端反复轮询请求。 二、核心特点 单向通信:仅服务器 → 客户端发送…...

skills CANN开源社区贡献技能包开发指南
前言 开源社区的健康运转,不仅依赖核心代码的贡献,还需要降低贡献门槛、提供清晰的指南和自动化工具。skills仓库是CANN开源社区的"贡献技能包",提供了一系列辅助脚本、代码模板、CI检查和文档生成工具,帮助新手快速上…...

为你的Hermes Agent自定义Provider,接入Taotoken多模型池
🚀 告别海外账号与网络限制!稳定直连全球优质大模型,限时半价接入中。 👉 点击领取海量免费额度 为你的Hermes Agent自定义Provider,接入Taotoken多模型池 在构建复杂的AI应用时,开发者常常面临一个核心挑…...

通过Taotoken标准OpenAI协议实现分钟级集成现有代码
🚀 告别海外账号与网络限制!稳定直连全球优质大模型,限时半价接入中。 👉 点击领取海量免费额度 通过Taotoken标准OpenAI协议实现分钟级集成现有代码 1. 迁移背景与核心思路 许多开发团队在构建AI应用时,会直接使用O…...

操作符从浅入深的讲解
1. 操作符的分类 2. ⼆进制和进制转换 3. 原码、反码、补码 4. 移位操作符 5. 位操作符:&、|、^、~ 6. 单⽬操作符 7. 逗号表达式 8. 下标访问[]、函数调⽤() 9. 结构成员访问操作符 10. 操作符的属性:优先级、结合性 11. 表达式求值1.操作符的分类以…...

Metabase:零代码 BI 数据可视化工具,自建数据看板
Metabase:零代码 BI 数据可视化工具,自建数据看板 在数据驱动决策的时代,能快速看到业务数据的变化趋势至关重要。然而,专业 BI 工具(如 Tableau、Power BI)价格昂贵,而让每个业务同学都学 SQL …...

如何快速实现U盘文件自动备份:USBCopyer终极指南
如何快速实现U盘文件自动备份:USBCopyer终极指南 【免费下载链接】USBCopyer 😉 用于在插上U盘后自动按需复制该U盘的文件。”备份&偷U盘文件的神器”(写作USBCopyer,读作USBCopier) 项目地址: https://gitcode.…...

TigerVNC跨平台远程桌面解决方案:构建企业级安全连接的技术实践
TigerVNC跨平台远程桌面解决方案:构建企业级安全连接的技术实践 【免费下载链接】tigervnc High performance, multi-platform VNC client and server 项目地址: https://gitcode.com/gh_mirrors/ti/tigervnc 在数字化转型浪潮中,远程桌面访问已成…...