npm-run-all 使用实践
参考: npm-run-all
背景
在前端开发中,你是否存在以下烦恼:
- 写 package.json 的 scripts 命令时,命令太过冗长,例如编译命令
build需要执行清理clean, 编译cssbuild:css, 编译jsbuild:js, 编译htmlbuild:html命令,则build命令需要写成build: npm run clean && npm run build:css && npm run build:js && npm run build:html,这个命令太过冗长,npm run都是重复的,能不能写成build: clean build:css build:js build:html,甚至能不能更简单地写成build: clean build:*。 - 通常
build的过程是先进行类型检查,后进行编译:build: npm run typecheck && vite build,两者是串行的关系,能不能使两个命令并行执行以加快编译速度?
如果你也有类似烦恼,相信这篇文章对你有用。
安装
# npm 安装
$ npm install npm-run-all --save-dev
# yarn 安装
$ yarn add npm-run-all --dev
# pnpm 安装
$ pnpm add -D npm-run-all
使用
npm-run-all 包提供了3个命令:npm-run-all, run-s, run-p 。
最主要的命令是 npm-run-all,我们可以使用该命令创建复杂的命令计划。run-s 和 run-p 是简写命令,run-s 用于串行任务,run-p 用于并行任务。
npm-run-all
创建一个文件夹,并通过 pnpm init 将该文件夹初始化为一个项目。在该项目下创建4个脚本文件:
- clean.sh:
echo "$(date): start clean"
sleep 1
echo "$(date): clean finished!"
- build-css.sh
echo "$(date): start build:css"
sleep 1
echo "$(date): build:css finished!"
- build-js.sh
echo "$(date): start build:js"
sleep 3
echo "$(date): build:js finished!"
- build-html.sh
echo "$(date): start build:html"
sleep 1
echo "$(date): build:html finished!"
串行执行多个命令
为 package.json 添加脚本命令:
{"scripts": {"clean": "./clean.sh","build:css": "./build-css.sh","build:html": "./build-html.sh","build:js": "./build-js.sh","build": "npm-run-all clean build:css build:js build:html"}
}
使用 npm-run-all 后 build 命令简化了很多,执行 pnpm build 结果为:
> t1@1.0.0 build /Users/foolishflyfox/Code/Year2024/Mon10/day14/t1
> npm-run-all clean build:css build:js build:html> t1@1.0.0 clean /Users/foolishflyfox/Code/Year2024/Mon10/day14/t1
> ./clean.sh2024年10月14日 星期一 17时35分17秒 CST: start clean
2024年10月14日 星期一 17时35分18秒 CST: clean finished!> t1@1.0.0 build:css /Users/foolishflyfox/Code/Year2024/Mon10/day14/t1
> ./build-css.sh2024年10月14日 星期一 17时35分18秒 CST: start build:css
2024年10月14日 星期一 17时35分19秒 CST: build:css finished!> t1@1.0.0 build:js /Users/foolishflyfox/Code/Year2024/Mon10/day14/t1
> ./build-js.sh2024年10月14日 星期一 17时35分19秒 CST: start build:js
2024年10月14日 星期一 17时35分22秒 CST: build:js finished!> t1@1.0.0 build:html /Users/foolishflyfox/Code/Year2024/Mon10/day14/t1
> ./build-html.sh2024年10月14日 星期一 17时35分23秒 CST: start build:html
2024年10月14日 星期一 17时35分24秒 CST: build:html finished!
可以看到 clean, build:css, build:js, build:html 串行执行了。
用通配符简化命令
将 build 命令修改为 npm-run-all clean build:*,执行 pnpm build 结果为:
> t1@1.0.0 build /Users/foolishflyfox/Code/Year2024/Mon10/day14/t1
> npm-run-all clean build:*> t1@1.0.0 clean /Users/foolishflyfox/Code/Year2024/Mon10/day14/t1
> ./clean.sh2024年10月14日 星期一 17时39分45秒 CST: start clean
2024年10月14日 星期一 17时39分46秒 CST: clean finished!> t1@1.0.0 build:css /Users/foolishflyfox/Code/Year2024/Mon10/day14/t1
> ./build-css.sh2024年10月14日 星期一 17时39分46秒 CST: start build:css
2024年10月14日 星期一 17时39分47秒 CST: build:css finished!> t1@1.0.0 build:html /Users/foolishflyfox/Code/Year2024/Mon10/day14/t1
> ./build-html.sh2024年10月14日 星期一 17时39分48秒 CST: start build:html
2024年10月14日 星期一 17时39分49秒 CST: build:html finished!> t1@1.0.0 build:js /Users/foolishflyfox/Code/Year2024/Mon10/day14/t1
> ./build-js.sh2024年10月14日 星期一 17时39分49秒 CST: start build:js
2024年10月14日 星期一 17时39分52秒 CST: build:js finished!
可以看到 clean, build:css, build:html, build:js 串行执行了。执行 build:* 时,执行顺序按命令定义的先后顺序进行。
多个命令并行执行
将 build 命令修改为 npm-run-all --parallel clean build:*,执行结果为:
pnpm build> t1@1.0.0 build /Users/foolishflyfox/Code/Year2024/Mon10/day14/t1
> npm-run-all --parallel clean build:*> t1@1.0.0 build:css /Users/foolishflyfox/Code/Year2024/Mon10/day14/t1
> ./build-css.sh> t1@1.0.0 clean /Users/foolishflyfox/Code/Year2024/Mon10/day14/t1
> ./clean.sh> t1@1.0.0 build:html /Users/foolishflyfox/Code/Year2024/Mon10/day14/t1
> ./build-html.sh> t1@1.0.0 build:js /Users/foolishflyfox/Code/Year2024/Mon10/day14/t1
> ./build-js.sh2024年10月14日 星期一 17时49分47秒 CST: start build:css
2024年10月14日 星期一 17时49分47秒 CST: start build:html
2024年10月14日 星期一 17时49分47秒 CST: start clean
2024年10月14日 星期一 17时49分47秒 CST: start build:js
2024年10月14日 星期一 17时49分48秒 CST: build:html finished!
2024年10月14日 星期一 17时49分48秒 CST: build:css finished!
2024年10月14日 星期一 17时49分48秒 CST: clean finished!
2024年10月14日 星期一 17时49分50秒 CST: build:js finished!
可以看到4个命令已经并行执行了。上面 build 命令在 linux 可以写成 npm run clean & npm run build:css & npm run build:js & npm run build:html,执行结果为:
> t1@1.0.0 build /Users/foolishflyfox/Code/Year2024/Mon10/day14/t1
> npm run clean & npm run build:css & npm run build:js & npm run build:html> t1@1.0.0 clean
> ./clean.sh> t1@1.0.0 build:js
> ./build-js.sh> t1@1.0.0 build:html
> ./build-html.sh> t1@1.0.0 build:css
> ./build-css.sh2024年10月14日 星期一 19时21分14秒 CST: start build:css
2024年10月14日 星期一 19时21分14秒 CST: start build:js
2024年10月14日 星期一 19时21分14秒 CST: start build:html
2024年10月14日 星期一 19时21分14秒 CST: start clean
2024年10月14日 星期一 19时21分15秒 CST: build:html finished!
2024年10月14日 星期一 19时21分15秒 CST: build:css finished!
2024年10月14日 星期一 19时21分15秒 CST: clean finished!
2024年10月14日 星期一 19时21分17秒 CST: build:js finished!
也有并行执行的效果,不过问题在于 Windows 下的 cmd.exe 并不能识别 &,跨平台存在问题。
另外,因为 & 表示命令后台运行,因此并不是在 build 执行完以后才退出命令行。因为最后一条命令 npm run build:html 不是后台执行,因此命令行退出时间取决于该命令的执行时间,该命令延时1s,而执行时间最长的 npm run build:js 延时3s,因此在命令行退出时,npm run build:js 并没有执行完毕,会导致在 pnpm build 命令结束2s后才在终端输出 2024年10月14日 星期一 19时21分17秒 CST: build:js finished! 的问题。
多命令并行时一个命令执行失败
并行执行时,如果某个命令执行的退出码不是0,则正在执行的命令将被杀死。例如,我们将 build-html.sh 修改为:
echo "$(date): start build:html"
sleep 2
exit 1
echo "$(date): build:html finished!"
则执行 pnpm build 的结果为:
> t1@1.0.0 build /Users/foolishflyfox/Code/Year2024/Mon10/day14/t1
> npm-run-all --parallel clean build:*> t1@1.0.0 clean /Users/foolishflyfox/Code/Year2024/Mon10/day14/t1
> ./clean.sh> t1@1.0.0 build:css /Users/foolishflyfox/Code/Year2024/Mon10/day14/t1
> ./build-css.sh> t1@1.0.0 build:html /Users/foolishflyfox/Code/Year2024/Mon10/day14/t1
> ./build-html.sh> t1@1.0.0 build:js /Users/foolishflyfox/Code/Year2024/Mon10/day14/t1
> ./build-js.sh2024年10月14日 星期一 19时32分48秒 CST: start clean
2024年10月14日 星期一 19时32分48秒 CST: start build:css
2024年10月14日 星期一 19时32分48秒 CST: start build:html
2024年10月14日 星期一 19时32分48秒 CST: start build:js
2024年10月14日 星期一 19时32分49秒 CST: clean finished!
2024年10月14日 星期一 19时32分49秒 CST: build:css finished!ELIFECYCLE  Command failed with exit code 1.ELIFECYCLE  Command failed.
ERROR: "build:html" exited with 1.ELIFECYCLE  Command failed with exit code 1.
可以看到,在 build:html 错误退出前执行完毕的 clean, build:css 都输出完成信息,而执行时间比 build:html 长的 build:js 因为 build:html 的错误退出,导致无法继续执行,没有输出完成信息。
串行与并行混合执行
上面并行的例子中存在一个问题,因为 clean 和其他编译命令并行,可能导致刚编译好的文件被清理掉,我们要的结果是先执行 clean 命令,执行完成后再并行执行3个编译命令。可以将 build 命令修改为 npm-run-all --silent clean --parallel build:*,执行结果为:
> t1@1.0.0 build /Users/foolishflyfox/Code/Year2024/Mon10/day14/t1
> npm-run-all clean --silent --parallel build:*2024年10月14日 星期一 21时38分20秒 CST: start clean
2024年10月14日 星期一 21时38分21秒 CST: clean finished!
2024年10月14日 星期一 21时38分21秒 CST: start build:html
2024年10月14日 星期一 21时38分21秒 CST: start build:js
2024年10月14日 星期一 21时38分21秒 CST: start build:css
2024年10月14日 星期一 21时38分22秒 CST: build:html finished!
2024年10月14日 星期一 21时38分22秒 CST: build:css finished!
2024年10月14日 星期一 21时38分25秒 CST: build:js finished!
如果希望执行顺序为: 先执行 clean, 再并行执行 build:css build:js, 最后执行 build:html,可以将 build 命令改为: npm-run-all --silent clean --parallel build:css build:js --sequential build:html, 执行结果为:
> t1@1.0.0 build /Users/foolishflyfox/Code/Year2024/Mon10/day14/t1
> npm-run-all --silent clean --parallel build:css build:js --sequential build:html2024年10月14日 星期一 21时42分49秒 CST: start clean
2024年10月14日 星期一 21时42分50秒 CST: clean finished!
2024年10月14日 星期一 21时42分50秒 CST: start build:js
2024年10月14日 星期一 21时42分50秒 CST: start build:css
2024年10月14日 星期一 21时42分51秒 CST: build:css finished!
2024年10月14日 星期一 21时42分53秒 CST: build:js finished!
2024年10月14日 星期一 21时42分54秒 CST: start build:html
2024年10月14日 星期一 21时42分55秒 CST: build:html finished!
--sequential 可以改为 --serial。
例如: npm-run-all a b --parallel c d --sequential e f --parallel g h i 或 npm-run-all a b --parallel c d --serial e f --parallel g h i 的执行步骤为:
- 串行执行,先执行a,再执行b
- b 执行完后,并行执行 c 和 d
- c 和 d 都执行完后,串行执行 e 和 f
- f 执行完后,并行执行 g、h 和 i
通配符
之前我们看到 npm-run-all build:*,其中 * 就是一个通配符,并且分隔符不一定是冒号,例如我们将 package.json 中的 scripts 改为:
{"scripts": {"clean": "./clean.sh","build_css": "./build-css.sh","build_html": "./build-html.sh","build_js": "./build-js.sh","build": "npm-run-all --silent build_*"}
}
执行 pnpm build 的结果为:
> t1@1.0.0 build /Users/foolishflyfox/Code/Year2024/Mon10/day14/t1
> npm-run-all --silent build_*2024年10月14日 星期一 21时44分45秒 CST: start build:css
2024年10月14日 星期一 21时44分46秒 CST: build:css finished!
2024年10月14日 星期一 21时44分47秒 CST: start build:html
2024年10月14日 星期一 21时44分48秒 CST: build:html finished!
2024年10月14日 星期一 21时44分48秒 CST: start build:js
2024年10月14日 星期一 21时44分51秒 CST: build:js finished!
也是可以正常执行的。
甚至 * 也不一定在最后,例如 build 改为 npm-run-all --silent build_*s,将只执行 build:css 和 build:js,执行结果为:
> t1@1.0.0 build /Users/foolishflyfox/Code/Year2024/Mon10/day14/t1
> npm-run-all --silent build_*s2024年10月14日 星期一 21时45分53秒 CST: start build:css
2024年10月14日 星期一 21时45分54秒 CST: build:css finished!
2024年10月14日 星期一 21时45分54秒 CST: start build:js
2024年10月14日 星期一 21时45分57秒 CST: build:js finished!
传入参数
新建两个脚本用于接收命令行参数:
- foo.sh:
echo "foo: [1]=$1, [2]=$2, [3]=$3, [4]=$4, [5]=$5, [6]=$6" - bar.sh:
echo "bar: [1]=$1, [2]=$2, [3]=$3, [4]=$4, [5]=$5, [6]=$6"
为 scripts 添加如下内容:
{"scripts": {"test:foo": "./foo.sh","test:bar": "./bar.sh","test": "npm-run-all --parallel \"test:* 1 abc\"",}
}
则执行的结果为:
> t1@1.0.0 test /Users/foolishflyfox/Code/Year2024/Mon10/day14/t1
> npm-run-all --parallel "test:* 1 abc"> t1@1.0.0 test:foo /Users/foolishflyfox/Code/Year2024/Mon10/day14/t1
> ./foo.sh "1" "abc"> t1@1.0.0 test:bar /Users/foolishflyfox/Code/Year2024/Mon10/day14/t1
> ./bar.sh "1" "abc"foo: [1]=1, [2]=abc, [3]=, [4]=, [5]=, [6]=
bar: [1]=1, [2]=abc, [3]=, [4]=, [5]=, [6]=
上述的 test 命令改为 "test": "npm-run-all --parallel \"test:foo 1 abc\" \"test:bar 1 abc\"" 也是相同的效果。
参数占位符
如果我们希望在执行命令时,再通过命令行传入参数,可以使用参数占位符。下面的例子演示了参数占位符的使用:
{"test2": "npm-run-all \"test:foo {1}\" \"test:foo {1} {2}\" \"test:foo {@}\" \"test:foo {*}\" --"
}
注意,最后的 -- 不可少,否则参数会被作为命令,例如没有 -- 时执行 pnpm test2 a,结果为:
> t1@1.0.0 test2 /Users/foolishflyfox/Code/Year2024/Mon10/day14/t1
> npm-run-all "test:foo {1}" "test:foo {1} {2}" "test:foo {@}" "test:foo {*}" "a"ERROR: Task not found: "a"ELIFECYCLE  Command failed with exit code 1.
可以看到 a 被当做了一个任务。
加上 -- 后,执行 pnpm test2 1 aaa 1xy 的结果为:
> t1@1.0.0 test2 /Users/foolishflyfox/Code/Year2024/Mon10/day14/t1
> npm-run-all "test:foo {1}" "test:foo {1} {2}" "test:foo {@}" "test:foo {*}" -- "1" "aaa" "1xy"> t1@1.0.0 test:foo /Users/foolishflyfox/Code/Year2024/Mon10/day14/t1
> ./foo.sh "1"foo: [1]=1, [2]=, [3]=, [4]=, [5]=, [6]=> t1@1.0.0 test:foo /Users/foolishflyfox/Code/Year2024/Mon10/day14/t1
> ./foo.sh "1" "aaa"foo: [1]=1, [2]=aaa, [3]=, [4]=, [5]=, [6]=> t1@1.0.0 test:foo /Users/foolishflyfox/Code/Year2024/Mon10/day14/t1
> ./foo.sh "1" "aaa" "1xy"foo: [1]=1, [2]=aaa, [3]=1xy, [4]=, [5]=, [6]=> t1@1.0.0 test:foo /Users/foolishflyfox/Code/Year2024/Mon10/day14/t1
> ./foo.sh "1 aaa 1xy"foo: [1]=1 aaa 1xy, [2]=, [3]=, [4]=, [5]=, [6]=
在例子中可以很清楚的看出不同占位符的区别:
{1},{2}, … : 表示一个参数,{1}表示第一个参数,{2}表示第二个参数;{@}: 表示所有参数;{*}: 将所有参数合并为一个参数;
run-s / run-p
run-s 是 npm-run-all -s 或 npm-run-all --series 或 npm-run-all --sequential 的简写,表示串行执行命令。
run-p 是 npm-run-all -p 或 npm-run-all --parallel 的简写,表示并行执行命令。
scripts 中添加命令 "build-s": "run-s --silent build:*",执行结果为:
> t1@1.0.0 build-s /Users/foolishflyfox/Code/Year2024/Mon10/day14/t1
> run-s --silent build:*2024年10月14日 星期一 21时24分26秒 CST: start build:css
2024年10月14日 星期一 21时24分27秒 CST: build:css finished!
2024年10月14日 星期一 21时24分27秒 CST: start build:html
2024年10月14日 星期一 21时24分28秒 CST: build:html finished!
2024年10月14日 星期一 21时24分29秒 CST: start build:js
2024年10月14日 星期一 21时24分32秒 CST: build:js finished!
可以看到3个build命令是串行的。这里使用了 --silent 参数,减少系统的日志输出。
添加命令 "build-p": "run-p --silent build:*",执行结果为:
> t1@1.0.0 build-p /Users/foolishflyfox/Code/Year2024/Mon10/day14/t1
> run-p --silent build:*2024年10月14日 星期一 21时26分48秒 CST: start build:html
2024年10月14日 星期一 21时26分48秒 CST: start build:js
2024年10月14日 星期一 21时26分48秒 CST: start build:css
2024年10月14日 星期一 21时26分49秒 CST: build:html finished!
2024年10月14日 星期一 21时26分49秒 CST: build:css finished!
2024年10月14日 星期一 21时26分51秒 CST: build:js finished!
可以看到3个命令是并行执行的。
相关文章:

npm-run-all 使用实践
参考: npm-run-all 背景 在前端开发中,你是否存在以下烦恼: 写 package.json 的 scripts 命令时,命令太过冗长,例如编译命令 build 需要执行清理 clean, 编译css build:css, 编译js build:js, 编译html build:html 命令,则 bui…...
 K)
【CCPC】The 2021 CCPC Guilin Onsite (XXII Open Cup, Grand Prix of EDG) K
Tax #图论 #最短路 #搜索 #暴力 题目描述 JB received his driver’s license recently. To celebrate this fact, JB decides to drive to other cities in Byteland. There are n n n cities and m m m bidirectional roads in Byteland, labeled by 1 , 2 , … , n 1,…...

selenium的实际使用
1.标签页的切换 #获取当前所有的窗口 curdriver.window_handles #根据窗口索引进行切换 driver.switch_to.window(cur[1]) from selenium import webdriverimport timedriver webdriver.Chrome()driver.get(http://www.baidu.com)time.sleep(1)eledriver.find_element_by…...

OpenShift 4 - 云原生备份容灾 - Velero 和 OADP 基础篇
《OpenShift 4.x HOL教程汇总》 说明: 本文主要说明能够云原生备份容灾的开源项目 Velero 及其红帽扩展项目 OADP 的概念和架构篇。操作篇见《OpenShift 4 - 使用 OADP 对容器应用进行备份和恢复(附视频) 》 Velero 和 OADP 包含的功能和模…...
javaWeb项目-Springboot+vue-校园论坛系统功能介绍
本项目源码(点击下方链接下载):java-springbootvue-xx学校校园论坛信息系统实现源码(项目源码-说明文档)资源-CSDN文库 项目关键技术 开发工具:IDEA 、Eclipse 编程语言: Java 数据库: MySQL5.7 框架:ssm、Springboot…...

centors7升级GLIBC2.18
错误来源:找不到GLIBC2.18,因为glibc的版本是2.17 网上大多教程方法,反正我是行不通: 方法1:更新源,然后使用yum安装更新 方法2:下载源码,configrue,make执行 wget h…...

基于深度学习的异常检测
基于深度学习的异常检测是一项重要的研究领域,主要用于识别数据中的异常样本或行为。异常检测广泛应用于多个领域,如网络安全、金融欺诈检测、工业设备预测性维护、医疗诊断等。传统的异常检测方法通常依赖于统计分析或规则,但随着数据复杂性…...

深入理解 SQL 中的高级数据处理特性:约束、索引和触发器
在 SQL(Structured Query Language)中,除了基本的查询、插入、更新和删除操作外,还有一些高级的数据处理特性,它们对于确保数据的完整性、提高查询性能以及实现自动化的数据处理起着至关重要的作用。这些特性包括约束、…...
附带详细回答!!!)
IC验证面试中常问知识点总结(七)附带详细回答!!!
15、 TLM通信 15.1 实现两个组件之间的通信有哪几种方法?分别什么特点? 最简单的方法就是使用全局变量,在monitor里对此全局变量进行赋值,在scoreboard里监测此全局变量值的改变。这种方法简单、直接,不过要避免使用全局变量,滥用全局变量只会造成灾难性的后果。 稍微复…...

【前端】如何制作一个自己的网页(8)
以下内容接上文。 CSS的出现,使得网页的样式与内容分离开来。 HTML负责网页中有哪些内容,CSS负责以哪种样式来展现这些内容。因此,CSS必须和HTML协同工作,那么如何在HTML中引用CSS呢? CSS的引用方式有三种࿱…...

Java之模块化详解
Java模块化,作为Java 9引入的一项重大特性,通过Java Platform Module System (JPMS) 实现,为Java开发者提供了更高级别的封装和依赖管理机制。这一特性旨在解决Java应用的封装性、可维护性和性能问题,使得开发者能够构建更加结构化…...

HTB:Knife[WriteUP]
目录 连接至HTB服务器并启动靶机 1.How many TCP ports are open on Knife? 2.What version of PHP is running on the webserver? 并没有我们需要的信息,接着使用浏览器访问靶机80端口 尝试使用ffuf对靶机Web进行一下目录FUZZ 使用curl访问该文件获取HTTP头…...

MOE论文详解(4)-GLaM
2022年google在GShard之后发表另一篇跟MoE相关的paper, 论文名为GLaM (Generalist Language Model), 最大的GLaM模型有1.2 trillion参数, 比GPT-3大7倍, 但成本只有GPT-3的1/3, 同时效果也超过GPT-3. 以下是两者的对比: 跟之前模型对比如下, 跟GShard和Switch-C相比, GLaM是第一…...

LeetCode322:零钱兑换
题目链接:322. 零钱兑换 - 力扣(LeetCode) 代码如下 class Solution { public:int coinChange(vector<int>& coins, int amount) {vector<int> dp(amount 1, INT_MAX);dp[0] 0;for(int i 0; i < coins.size(); i){fo…...

速盾:高防 cdn 提供 cc 防护?
在当今网络环境中,网站面临着各种安全威胁,其中 CC(Challenge Collapsar)攻击是一种常见的分布式拒绝服务攻击方式。高防 CDN(Content Delivery Network,内容分发网络)作为一种有效的网络安全防…...

【大数据应用开发】2023年全国职业院校技能大赛赛题第10套
如有需要备赛资料和远程培训,可私博主,详细了解 目录 任务A:大数据平台搭建(容器环境)(15分) 任务B:离线数据处理(25分) 任务C:数据挖掘(10分) 任务D:数据采集与实时计算(20分) 任务E:数据可视化(15分) 任务F:综合分析(10分) 任务A:大数据平台搭…...
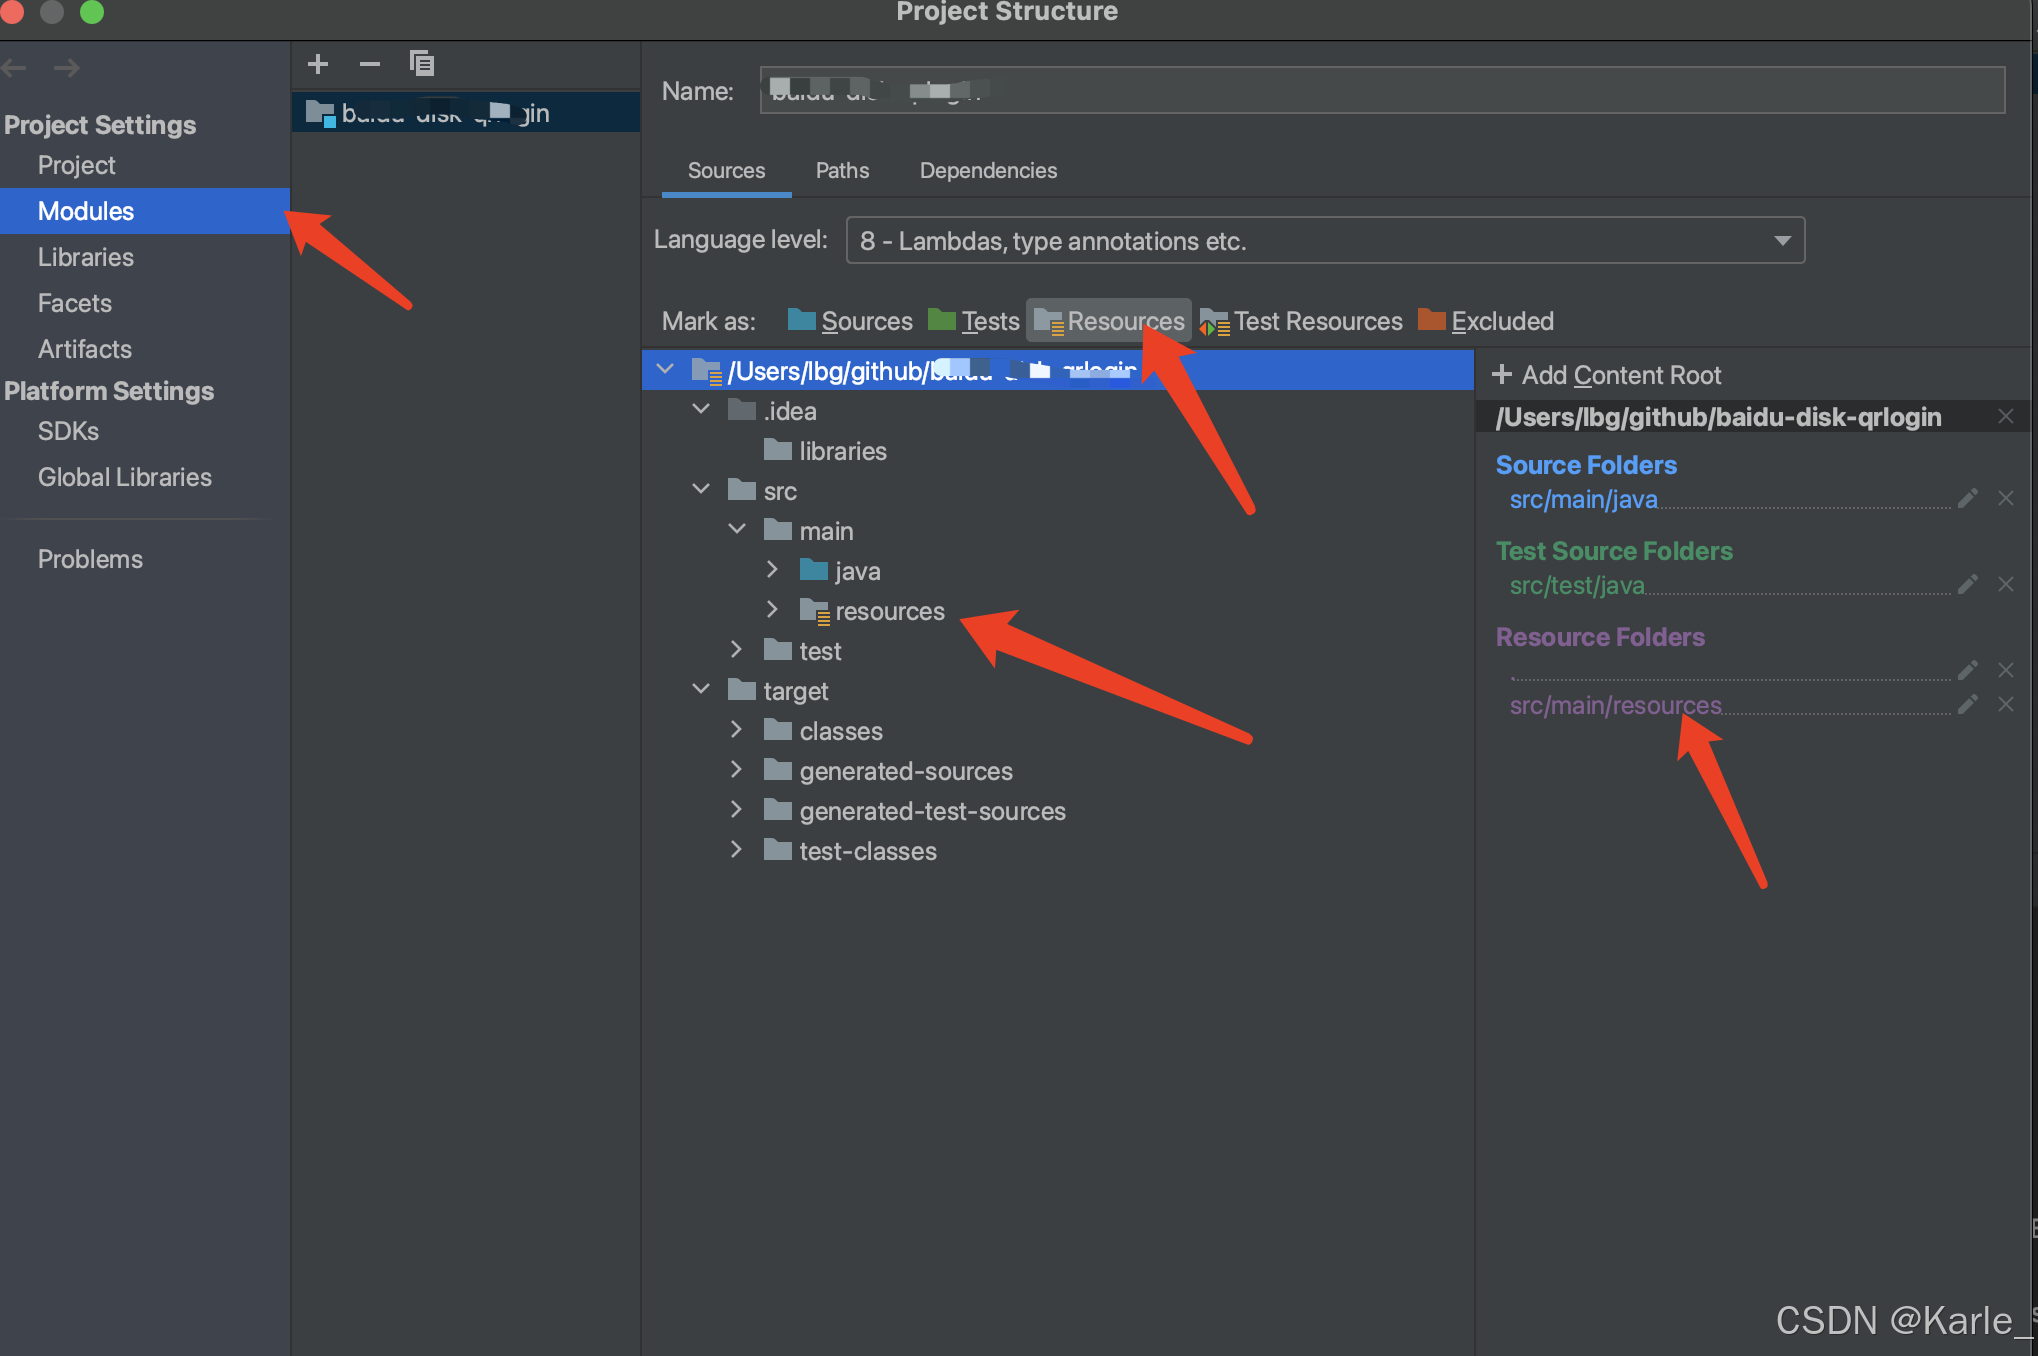
【源码部署】解决SpringBoot无法加载yml文件配置,总是使用8080端口方案
打开idea,file ->Project Structure 找到Modules ,在右侧找到resource目录,是否指定了resource,点击对应文件夹会有提示...

2010年国赛高教杯数学建模B题上海世博会影响力的定量评估解题全过程文档及程序
2010年国赛高教杯数学建模 B题 上海世博会影响力的定量评估 2010年上海世博会是首次在中国举办的世界博览会。从1851年伦敦的“万国工业博览会”开始,世博会正日益成为各国人民交流历史文化、展示科技成果、体现合作精神、展望未来发展等的重要舞台。请你们选择感兴…...

使用nginx配置静态页面展示
文章目录 前言正文安装nginx配置 前言 目前有一系列html文件,比如sphinx通过make html输出的文件,需要通过ip远程访问,这就需要ngnix 主要内容参考:https://blog.csdn.net/qq_32460819/article/details/121131062 主要针对在do…...
)
[IOI2018] werewolf 狼人(Kruskal重构树 + 主席树)
https://www.luogu.com.cn/problem/P4899 首先,我们肯定要建两棵Kruskal重构树的,然后判两棵子树是否有相同编号节点 这是个经典问题,我们首先可以拍成dfs序,然后映射过去,然后相当于是判断一个区间是否有 [ l , r …...

收藏必看|2026 版大厂 AI 岗位薪资曝光!普通程序员转型大模型最全指南
深夜收到大厂 HR 好友发来的内部资料,再三叮嘱切勿对外泄露。如今网络信息传播速度极快,这份 2026 年企业 AI 岗真实薪资内幕,也值得给广大程序员、零基础入行小白参考借鉴。 翻看完整薪资台账后,真切感受到当下大模型赛道的薪资差…...

开启Python GUI开发新纪元:Tkinter Designer可视化界面自动化生成终极指南
开启Python GUI开发新纪元:Tkinter Designer可视化界面自动化生成终极指南 【免费下载链接】Tkinter-Designer An easy and fast way to create a Python GUI 🐍 项目地址: https://gitcode.com/gh_mirrors/tk/Tkinter-Designer 在Python GUI开发…...

styled-theming 性能优化:如何避免主题切换时的性能瓶颈
styled-theming 性能优化:如何避免主题切换时的性能瓶颈 【免费下载链接】styled-theming Create themes for your app using styled-components 项目地址: https://gitcode.com/gh_mirrors/st/styled-theming styled-theming 是一个专为 styled-components …...
从模糊到电影级景深:Midjourney + Topaz Gigapixel联调方案(含LUT预设包+PSD分层模板)
更多请点击: https://codechina.net 第一章:从模糊到电影级景深:Midjourney Topaz Gigapixel联调方案(含LUT预设包PSD分层模板) 当Midjourney生成的图像存在主体边缘柔化、背景层次缺失或分辨率不足等问题时…...

别再只比参数了!从插件生态到中文优化,聊聊ChatGPT和文心一言的“隐形”差异
超越参数之争:ChatGPT与文心一言的生态与本土化实战解析 当技术评测文章还在反复比较模型参数量与发布时间时,真正影响日常工作效率的往往是那些未被量化的"软实力"。本文将从插件生态构建与中文场景优化两个维度,带您重新认识这两…...

不止于绘图:用GMT 6.4的`grdtrack`和`project`命令玩转地形剖面分析与可视化
不止于绘图:用GMT 6.4的grdtrack和project命令玩转地形剖面分析与可视化 当我们谈论地理空间分析时,很多人首先想到的是绘制精美的地图。但GMT(Generic Mapping Tools)的真正魅力在于它强大的地理计算能力。本文将带你超越基础绘图…...

树莓派Zero离线语音交互实战:TTS与STT引擎部署与优化
1. 项目概述:为什么选择树莓派 Zero 来实现语音功能?如果你玩过 Arduino、ESP32 这类微控制器,也接触过树莓派 4B 这样的单板电脑,那你大概能理解那种“选择困难症”:微控制器实时性强、功耗低,但算力有限&…...

从零开始的Linux#2 vim编辑器
介绍vi\vim是Linux中最经典的文本编辑器,vim是vi的全面升级版本,我们后面只用vim通过vim编辑器编辑文件,需要使用命令vim 文件路径如果文件路径表示的文件不存在,那么此命令会用于编辑新文件;如果存在则编辑已有文件模…...

Oracle数据库的DBCA界面创建数据库
一、采用DBCA界面方式创建数据库搜索dbca用管理员去运行疯狂的点下一步采用默认就行到监听这里会出有一些问题出问题了先把Enterprise Manager关掉就行,出问题了能自己找出来就行,一般不建议关掉,我这里直接图方便了这里选择所有账号使用同一…...
)
《Java 100 天进阶之路》第32篇:Java常用工具类(Objects、Collections、Arrays深入)
第32篇:Java常用工具类(Objects、Collections、Arrays深入) 📌 系列导航:《Java 100 天进阶之路》完整目录 | ⬅️ 上一篇:第31篇:Java数组详解 | ➡️ 下一篇:第33篇:Ja…...