Element UI
Element ui 就是基于vue的一个ui框架,该框架基于vue开发了很多相关组件,方便我们快速开发页面。
官网: https://element.eleme.io/#/zh-CN
安装Element UI
vue init webpack element(项目名)
确认项目是否构建成功:进入到项目的根路径
执行 npm start
访问 http://localhost:8080/
在vue脚手架项目中安装elementui
# 1.下载elementui的依赖npm i element-ui -S# 2.在【main.js】中指定当前项目中使用elementuiimport ElementUI from 'element-ui';import 'element-ui/lib/theme-chalk/index.css';//在vue脚手架中使用elementuiVue.use(ElementUI);
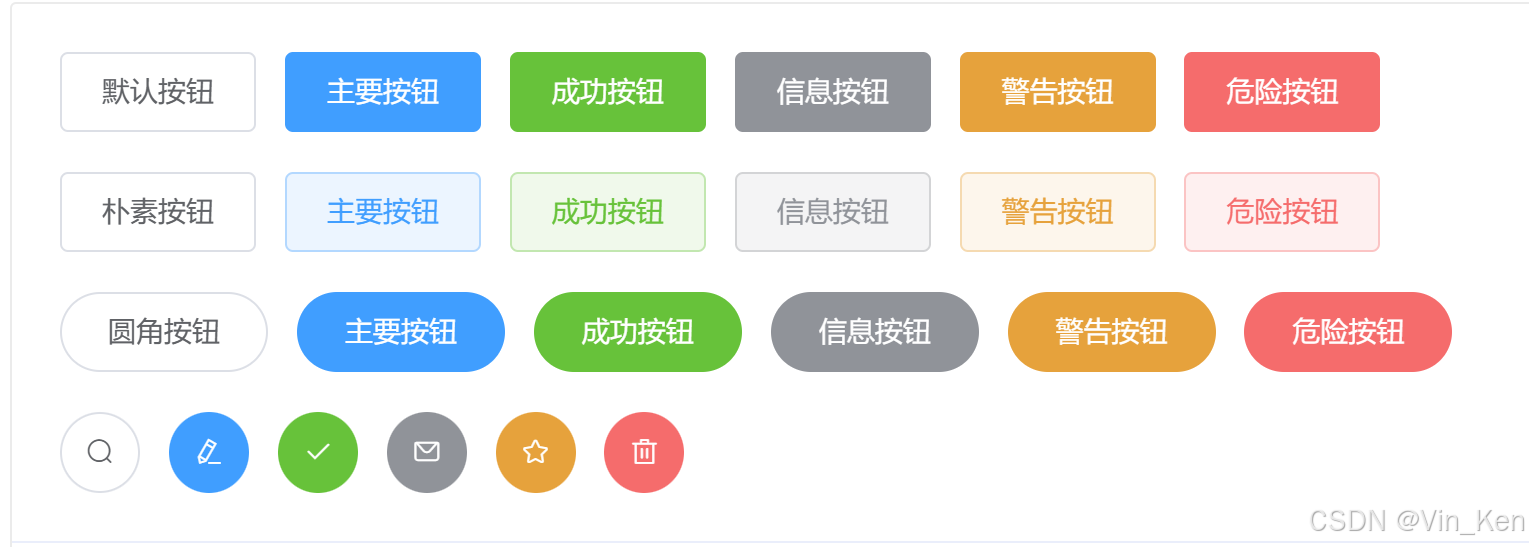
默认样式按钮
<el-row><el-button>默认按钮</el-button><el-button type="primary">主要按钮</el-button><el-button type="success">成功按钮</el-button><el-button type="info">信息按钮</el-button><el-button type="warning">警告按钮</el-button><el-button type="danger">危险按钮</el-button>
</el-row>
简洁按钮【plain】
<el-row><el-button plain>朴素按钮</el-button><el-button type="primary" plain>主要按钮</el-button><el-button type="success" plain>成功按钮</el-button><el-button type="info" plain>信息按钮</el-button><el-button type="warning" plain>警告按钮</el-button><el-button type="danger" plain>危险按钮</el-button>
</el-row>
圆角按钮【round】
<el-row><el-button round>圆角按钮</el-button><el-button type="primary" round>主要按钮</el-button><el-button type="success" round>成功按钮</el-button><el-button type="info" round>信息按钮</el-button><el-button type="warning" round>警告按钮</el-button><el-button type="danger" round>危险按钮</el-button>
</el-row>
图标按钮【icon】
<el-row><el-button icon="el-icon-search" circle></el-button><el-button type="primary" icon="el-icon-edit" circle></el-button><el-button type="success" icon="el-icon-check" circle></el-button><el-button type="info" icon="el-icon-message" circle></el-button><el-button type="warning" icon="el-icon-star-off" circle></el-button><el-button type="danger" icon="el-icon-delete" circle></el-button>
</el-row>
按钮组使用
<el-button-group><el-button type="primary" icon="el-icon-back">上一页</el-button><el-button type="primary" icon="el-icon-right">下一页</el-button>
</el-button-group>
- 在element ui中所有组件都是
el-组件名称方式进行命名 - 在element ui中组件的属性使用
都是直接将属性名=属性值方式写在对应的组件标签上
文字链接组件
<el-link target="_blank" href="http://www.baidu.com" >默认链接</el-link>
<el-link type="primary":underline="false">默认链接</el-link>
<el-link type="success" disabled>默认链接</el-link>
<el-link type="info" icon="el-icon-platform-eleme">默认链接</el-link>
<el-link type="warning">默认链接</el-link>
<el-link type="danger">默认链接</el-link>
Layout (栅格)布局组件的使用
<el-row><el-col :span="8">占用8份</el-col><el-col :span="8">占用8份</el-col><el-col :span="8">占用8份</el-col>
</el-row>
<el-row :gutter="50" tag="span"><el-col :span="4"><div style="border: 1px red solid;">占用4份</div></el-col><el-col :span="8"><div style="border: 1px red solid;">占用8份</div></el-col><el-col :span="3"><div style="border: 1px red solid;">占用3份</div></el-col><el-col :span="9"><div style="border: 1px red solid;">占用9份</div></el-col>
</el-row>
<el-row><el-col :span="12" :offset="9" :psuh="3" xs><div style="border: 1px blue solid;">我是占用12分</div></el-col><el-col :span="6"><div style="border: 1px blue solid;">我是占用6分</div></el-col>
</el-row>
Container 布局容器组件
<!--创建容器-->
<el-container><!--header--><el-header><div><h1>我是标题</h1></div></el-header><!--容器嵌套使用--><el-container><!--aside--><el-aside><div><h1>我是菜单</h1></div></el-aside><!--main--><el-main><div><h1>我是中心内容</h1></div></el-main></el-container><el-footer><div><h1>我是页脚</h1></div></el-footer>
</el-container>
水平容器
<el-container direction="horizontal">
当子元素中没有有 【el-header】 或 【el-footer】 时容器排列为【水平】
垂直容器
<el-container direction="vertical">
Form相关组件
Radio按钮
<el-radio v-model="label" name="sex" disabled label="男">男</el-radio>
<el-radio v-model="label" name="sex" border size="small" label="女">女</el-radio>
<el-radio v-model="label" border size="mini" label="女">女</el-radio>
<el-radio v-model="label" border size="medium" label="女">女</el-radio>
radio按钮组
<el-radio-group v-model="radio"><el-radio :label="3">备选项3</el-radio><el-radio :label="6">备选项6</el-radio><el-radio :label="9">备选项9</el-radio>
</el-radio-group>
<script>export default {name: "Radio",data() {return {radio: 6}}}
</script>
checkbox组件
<el-checkbox v-model="checked"  disabled true-label="北京">北京</el-checkbox>
<el-checkbox checked border true-label="上海">上海</el-checkbox>
<el-checkbox v-model="checked" true-label="天津">天津</el-checkbox>
复选框组的使用
<el-checkbox-group @change="bb" :min="1" v-model="checkList"><el-checkbox label="复选框 A"></el-checkbox><el-checkbox label="复选框 B"></el-checkbox><el-checkbox label="复选框 C"></el-checkbox><el-checkbox label="禁用" disabled></el-checkbox><el-checkbox label="选中且禁用" disabled></el-checkbox>
</el-checkbox-group><script>export default {name: "Checkbox",data(){return{checked:true,checkList:[],}},methods:{bb(){console.log(this.checkList);}}}
</script>
Input组件
<el-input v-model="name" disabled type="textarea"></el-input>
<el-input v-model="price" :maxlength="10" show-word-limit :minlength="5"></el-input>
<el-input prefix-icon="el-icon-user-solid" placeholder="请输入用户名" clearable v-model="username"></el-input>
<el-input suffix-icon="el-icon-star-off" placeholder="请输入密码" show-password type="password" clearable v-model="password"></el-input>
<script>export default {name: "Input",data() {return {restaurants: [],state1: '',state2: '',name:'xiaochen',price:0.0,username:"",password:"",};},}
</script>
注意:在elementui中所有组件 都存在 【属性、事件、方法】
属性:直接写在对应的组件标签上 使用方式:属性名=属性值方式
事件: 直接使用vue绑定事件方式写在对应的组件标签上 使用方式:@事件名=vue中事件处理函数
方法: 1. 在对应组件标签上使用ref=组件别名 2.通过使用this.$refs.组件别名.方法名()进行调用
Select选择器组件
# 1.数据写死在页面上
<el-select v-model="cityName"><el-option value="北京">北京</el-option><el-option value="天津">天津</el-option>
</el-select>注意:1.要求下拉列表中【必须存在option的value属性值】2.要求select中【必须使用v-model进行数据绑定】# 2.如何动态获取数据<el-select><el-option v-for="option in options" :label="option.name" :value="option.id" :key="option.id"></el-option></el-select><script>export default {name: "Select",data(){return{options:[{id:'1',name:"研发部"},{id:'2',name:"小卖部"},{id:'3',name:"小米部"},]}},}</script># 3.获取下拉列表选中数据
<!--选中哪个值,哪个值的value就会绑定给cityId--><el-select v-model="cityId" multiple clearable><el-option v-for="option in options" :label="option.name" :value="option.id" :key="option.id"></el-option>
</el-select>
<script>export default {name: "Select",data(){return{options:[{id:'1',name:"研发部"},{id:'2',name:"小卖部"},{id:'3',name:"小米部"},],cityId:''}},}
</script>
Switch 开关组件
<el-switch v-model="value"></el-switch><script>export default {name: "Switchs",data(){return{value:true}}}
</script>
DatePicker组件
<el-date-pickerv-model="createDate":editable="false":clearable="false"placeholder="请输入创建时间"type="daterange"start-placeholder="生产时间"end-placeholder="过期时间"format="yyyy/MM/dd">
</el-date-picker>
- Shortcuts: 用来增加日期组件的【快捷面板】
- Picker Options: 用来对日期控件做自定义配置
Upload组件
<el-upload :limit="3" :on-exceed="exceed" :multiple="false" :before-remove="beforeRemove" :on-remove="remove" :on-preview="show" :drag="true" accept=".txt,.png" :show-file-list="true" name="aaa" :data="info" action="https://jsonplaceholder.typicode.com/posts/":file-list="fileList"><i class="el-icon-upload"></i><div class="el-upload__text">将文件拖到此处,或<em>点击上传</em></div><div class="el-upload__tip" slot="tip">只能上传jpg/png文件,且不超过500kb</div>
</el-upload><script>export default {name: "Uploads",data() {return {fileList: [{name: 'food.jpeg',url: 'https://fuss10.elemecdn.com/3/63/4e7f3a15429bfda99bce42a18cdd1jpeg.jpeg?imageMogr2/thumbnail/360x360/format/webp/quality/100'}, {name: 'food2.jpeg',url: 'https://fuss10.elemecdn.com/3/63/4e7f3a15429bfda99bce42a18cdd1jpeg.jpeg?imageMogr2/thumbnail/360x360/format/webp/quality/100'}],info: {id:"21"}}},methods:{show(file){console.log(file);},remove(file,fileList){console.log(file);console.log(fileList);//alert(fileList.length)},beforeRemove(file,fileList){if(fileList.length<3){alert("上传文件不能少于3个")return false;}},exceed(file,fileList){alert("文件超出上传的个数限制")}}}
</script>
Form组件
<el-form ref="form" :model="form" label-width="80px"><el-form-item label="活动名称"><el-input v-model="form.name"></el-input></el-form-item>......<el-form-item><el-button type="primary" @click="onSubmit">立即创建</el-button><el-button>取消</el-button></el-form-item>
</el-form>
<script>export default {name: "Form",data() {return {form: {name: '',region: '',date1: '',date2: '',delivery: false,type: [],resource: '',desc: ''}}},methods: {onSubmit() {console.log('submit!');}}}
</script>
警告提示
<el-alert title="成功信息提示" :closable="false" type="success"><div slot>我是辅助信息</div>
</el-alert>
<el-alert title="成功信息提示" type="info"></el-alert>
<el-alert title="成功信息提示" type="warning"></el-alert>
<el-alert title="成功信息提示" type="error"></el-alert>
Message消息提示
# 1.创建最简单的消息this.$message('这是一个消息提示!!')# 2.自定义消息内容this.$message({message: h('p', null, [h('span', null, '订单创建成功,您的订单编号为: '),h('i', { style: 'color: teal' }, '87')])});# 3.不同主题的消息提示this.$message({message:'这是信息提示',type:"success",})//主题样式:  success  info  warning  error# 4.属性使用this.$message({message:'这是信息提示',type:"success",showClose:true,center:true,iconClass:'el-icon-user-solid',duration:0})
# 5.方法的使用this.$message.closeAll();
table表格组件
<el-table :data="tableData"><el-table-column prop="id" label="编号"></el-table-column><el-table-column prop="name" label="姓名"></el-table-column><el-table-column prop="age" label="年龄"></el-table-column><el-table-column prop="email" label="邮箱"></el-table-column>
</el-table>
<script>export default {name: "Tables",data(){return {tableData:[{id:21,name:"小陈",age:23,email:"60037647@qq.com"},{id:22,name:"小张",age:25,email:"60038647@qq.com"},]}}}
</script>
 <el-table :data="tableData.filter(data => !search || data.name.toLowerCase().includes(search.toLowerCase()))" >.....<!--展示搜索和操作--><el-table-column><template slot="header" slot-scope="scope"><el-inputv-model="search"size="mini"placeholder="输入关键字搜索"/></template><template slot-scope="scope"><el-buttonsize="mini"@click="handleEdit(scope.$index, scope.row)">编辑</el-button><el-buttonsize="mini"type="danger"@click="handleDelete(scope.$index, scope.row)">删除</el-button></template></el-table-column>
</el-table>
<script>export default {name: "Tables",data() {return {tableData: [{id: 21, name: "小陈", age: 23, email: "60037647@qq.com",dept: {id: 1, name: "研发部"}},{id: 22, name: "小张", age: 25, email: "60038647@qq.com",dept: {id: 1, name: "小卖部"}},{id: 23, name: "小李", age: 25, email: "60038657@qq.com",dept: {}},{id: 24, name: "小四", age: 25, email: "60038657@qq.com",dept: {}},],search: ''}},methods: {sorts(a, b) {return a.age - b.age;},showDept(row, column, cellValue, index) {if (cellValue) {return cellValue}return "暂无部门";},showCss({row, rowIndex}) {if (rowIndex % 2 == 0) {return "warning-row";}return "success-row";},selectRow(selection, row){console.log(selection);console.log(row);},clearSelect(){this.$refs.mytable.clearSelection();},handleEdit(index,row){console.log(index);console.log(row);},handleDelete(index,row){console.log(index);console.log(row);}}}
</script>
相关文章:

Element UI
Element ui 就是基于vue的一个ui框架,该框架基于vue开发了很多相关组件,方便我们快速开发页面。 官网: https://element.eleme.io/#/zh-CN 安装Element UI vue init webpack element(项目名)确认项目是否构建成功:进入到项目的根路径 执行 npm start 访问 h…...
②PROFINET转ModbusTCP, EtherCAT/Ethernet/IP/Profinet/ModbusTCP协议互转工业串口网关
EtherCAT/Ethernet/IP/Profinet/ModbusTCP协议互转工业串口网关https://item.taobao.com/item.htm?ftt&id822721028899 协议转换通信网关 PROFINET 转 Modbus TCP (接上一章) 配置使用 与 PROFINET 主站进行组态说明 这里介绍与西门子 PLC 的…...

python+Mosh网课笔记04
太久没写python代码了,学机器学习重新拾起python,笔记比较简陋。 参考:mosh python网课 一、导入同一文件夹下其他文件 first.py def swim():print("swim")def run():print("run")同一个文件夹下的second.py from f…...

【微服务】全面构建微服务监控体系:确保系统稳定与性能优化的关键
目录 引言一、微服务监控概述1.1 微服务监控的定义1.2 微服务监控的重要性1.3 监控的核心目标1.4 微服务监控的关键指标1.5 监控的策略 二、微服务监控的架构2.1 监控架构图2.2 架构组件2.3 监控架构示意图 三、微服务监控的工具3.1 工具概述3.2 Prometheus3.3 Grafana3.4 ELK …...

Gin框架操作指南08:日志与安全
官方文档地址(中文):https://gin-gonic.com/zh-cn/docs/ 注:本教程采用工作区机制,所以一个项目下载了Gin框架,其余项目就无需重复下载,想了解的读者可阅读第一节:Gin操作指南&#…...

鸿蒙系统 VS 安卓系统,谁将引领未来移动操作系统?
文章目录 1. 系统架构:微内核 vs 宏内核2. 设备生态:单设备 vs 全场景分布式3. 开发生态:安卓主导地位 vs 鸿蒙迅速崛起4. 性能与流畅度:安卓优化 vs 鸿蒙调度优势5. 安全性:Google 主导 vs 微内核高安全6. 市场影响力…...

PyTorch 中 functional.py 文件介绍
PyTorch PyTorch 是一个开源的机器学习库,广泛用于计算机视觉和自然语言处理等应用。它由 Facebook 的人工智能研究团队开发,并得到了许多研究机构和企业的支持。PyTorch 以其易用性、灵活性和强大的社区支持而受到欢迎。一些特点如下: 动态…...

SQL Injection | SQL 注入 —— 报错盲注
关注这个漏洞的其他相关笔记:SQL 注入漏洞 - 学习手册-CSDN博客 0x01:报错盲注 —— 理论篇 报错盲注(Error-Based Blind SQL Injection)是一种常见的 SQL 注入技术,适用于那些页面不会直接显示后端处理结果的查询方式…...

网络通信与并发编程(四)操作系统、进程理论、开启进程的两种方式
多道技术、进程理论 文章目录 多道技术、进程理论一、操作系统1.1操作系统1.2操作系统中的常见概念1.3操作系统的发展史 二、进程理论2.1同步、异步、阻塞、非阻塞2.2 进程的层次结构2.3 运行态、阻塞态、就绪态 三、开启进程的两种方式3.1使用Process创建进程的两种方式3.2 父…...
Java--集合(三)之vectorlinkedlisthashset结构
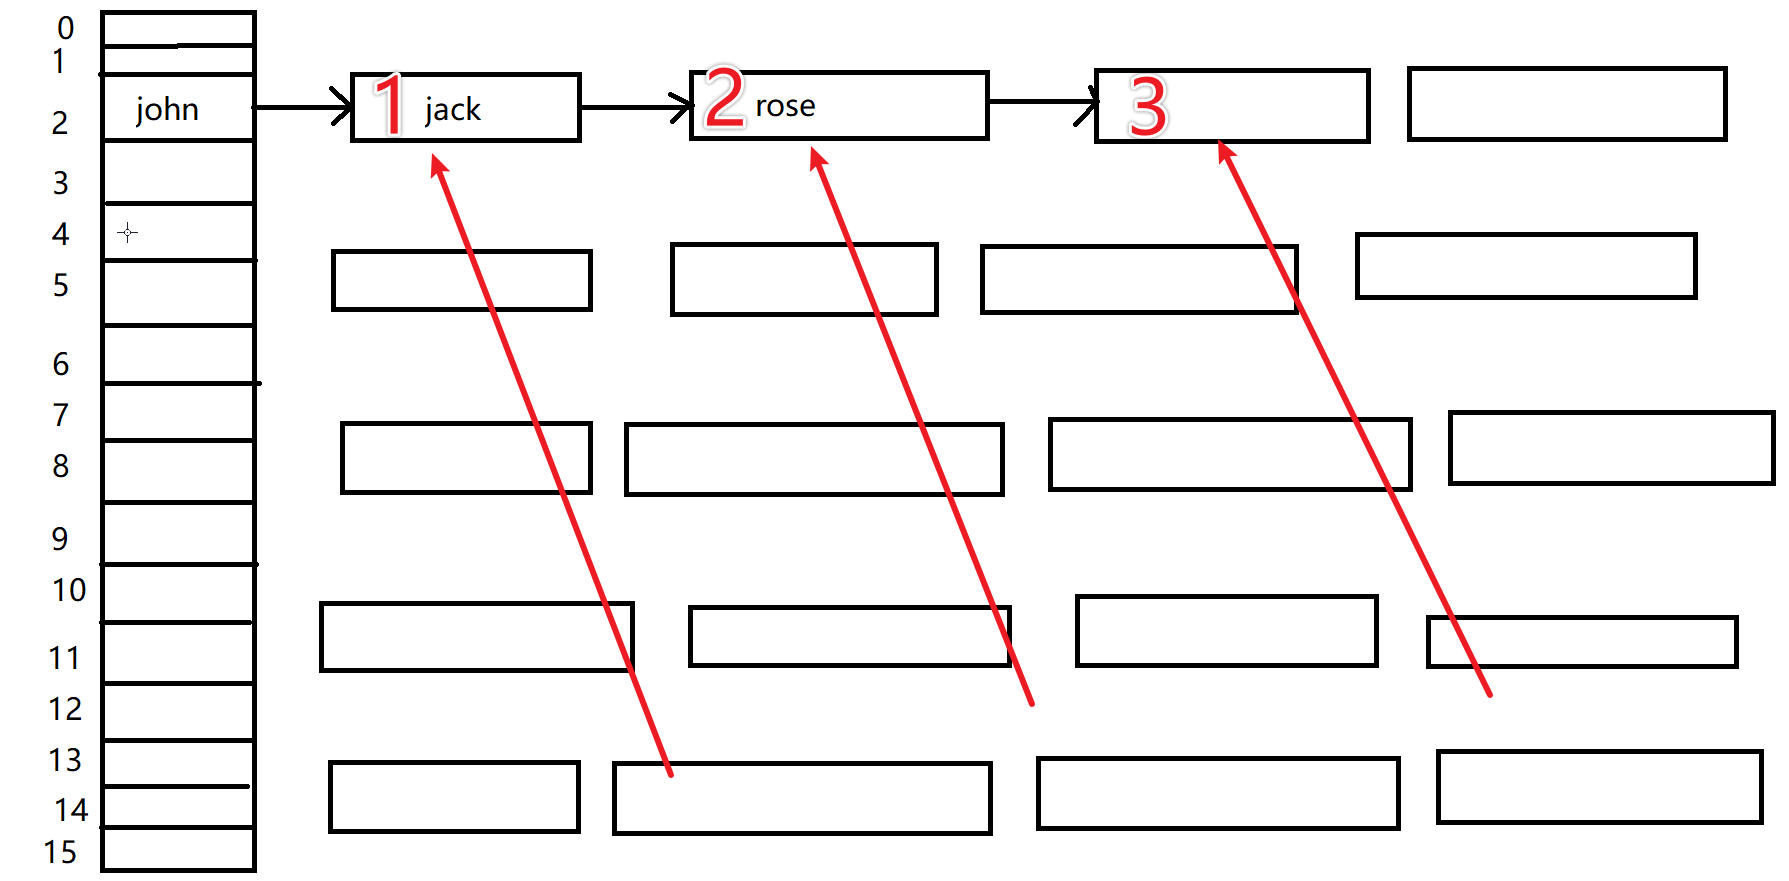
文章目录 0.架构图1.vector解析2.LinkedList分析2.1源码分析2.2迭代器遍历的三种方式 3.set接口的使用方法3.1基本使用说明3.2基本遍历方式3.3HashSet引入3.4数组链表模拟3.5hashset扩容机制3.6hashset源码解读3.7扩容*转成红黑树机制**我的理解 0.架构图 1.vector解析 和之前介…...

upload-labs Pass-04
upload-labs Pass-04 在进行测试前,先了解一下.htaccess文件 .htaccess文件 .htaccess是Apache网络服务器一个配置文件,当.htaccess文件被放置在一个通过Apache Web服务器加载的目录中,.htaccess文件会被Apache Web服务器软件检测并执行&…...

如何修改jupyter notebook的工作目录
1.生成配置文件: 打开Anaconda Prompt,输入如下命令 jupyter notebook --generate-config 用代码可以找到配置文件位置,如果没有填y可以生成。 2.修改配置文件: 修改jupyter_notebook_config.py的配置文件,需将c.Not…...

23种设计模式具体实现方法
提示:文章 文章目录 前言一、背景二、设计模式1、代理模式2、适配器模式2.1 总结 三、3.1 总结 前言 前期疑问: 本文目标: 一、背景 最近 二、设计模式 1、代理模式 参考的这篇文章,代理模式(Proxy) 同时这篇文章还引用了另…...

cisco网络安全技术第3章测试及考试
测试 使用本地数据库保护设备访问(通过使用 AAA 中央服务器来解决)有什么缺点? 试题 1选择一项: 必须在每个设备上本地配置用户帐户,是一种不可扩展的身份验证解决方案。 请参见图示。AAA 状态消息的哪一部分可帮助…...

数据结构练习题5(链表和栈)
1环形链表 II 给定一个链表的头节点 head ,返回链表开始入环的第一个节点。 如果链表无环,则返回 null。 如果链表中有某个节点,可以通过连续跟踪 next 指针再次到达,则链表中存在环。 为了表示给定链表中的环,评测…...

计算机网络408真题解析(湖科大教书匠)
09年...

uniapp+vue3+uview-plus修改默认样式
最近使用uniappvue3uview-plus开发微信小程序中,使用uview-plus自定义底部导航栏tabbar时,遇到修改默认样式不生效问题 使用传统的 ::v-deep、:deep、::v-deep,或者style标签中去掉scoped也是无效的,有好的方案欢迎交流ÿ…...

数控机械制造工厂ERP适用范围有哪些
在当今制造业高速发展的背景下,企业资源计划(ERP)系统已成为提升工厂管理效率、实现生产自动化与信息化的关键工具。特别是对于数控机械制造工厂而言,一个合适的ERP系统能够帮助其优化生产流程、提高产品质量、降低生产成本并增强市场竞争力。 1. 生产计…...

华为配置 之 Console线路配置
目录 简介: 知识点: 配置Console线路密码 1.密码认证模式 2.AAA认证模式 知识点: 总结: 简介: 使用PC模拟器与路由器相连(与交换机相连原理一样),在关机状态下,使用…...

小米等手机彻底关闭快应用
文章目录 快应用的是非最终措施:撤销快应用隐私协议配套措施:安卓去除开屏广告 无用的操作:载快应用小米手机无用,其他手机可以尝试的操作关闭唤起快应用服务打开防止误触、后台启动其他应用 其他措施:冻结、加密快应用…...

Linux链表操作全解析
Linux C语言链表深度解析与实战技巧 一、链表基础概念与内核链表优势1.1 为什么使用链表?1.2 Linux 内核链表与用户态链表的区别 二、内核链表结构与宏解析常用宏/函数 三、内核链表的优点四、用户态链表示例五、双向循环链表在内核中的实现优势5.1 插入效率5.2 安全…...

蓝桥杯 冶炼金属
原题目链接 🔧 冶炼金属转换率推测题解 📜 原题描述 小蓝有一个神奇的炉子用于将普通金属 O O O 冶炼成为一种特殊金属 X X X。这个炉子有一个属性叫转换率 V V V,是一个正整数,表示每 V V V 个普通金属 O O O 可以冶炼出 …...
算法:模拟
1.替换所有的问号 1576. 替换所有的问号 - 力扣(LeetCode) 遍历字符串:通过外层循环逐一检查每个字符。遇到 ? 时处理: 内层循环遍历小写字母(a 到 z)。对每个字母检查是否满足: 与…...
【C++进阶篇】智能指针
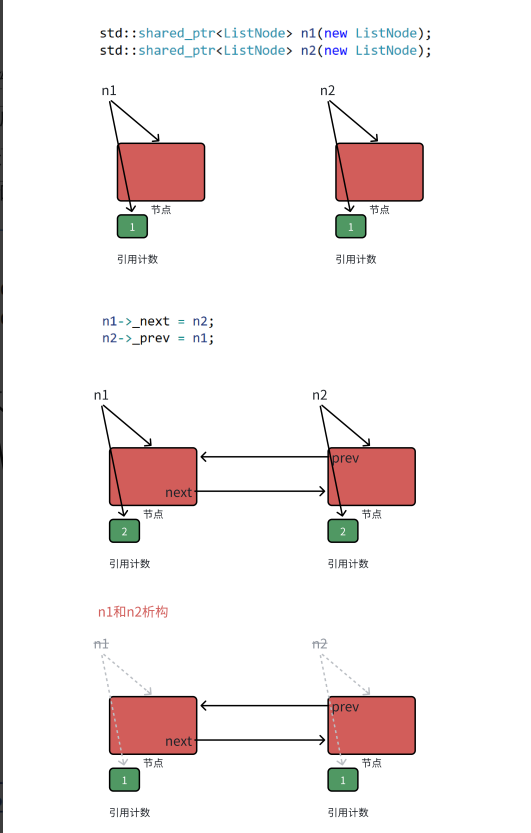
C内存管理终极指南:智能指针从入门到源码剖析 一. 智能指针1.1 auto_ptr1.2 unique_ptr1.3 shared_ptr1.4 make_shared 二. 原理三. shared_ptr循环引用问题三. 线程安全问题四. 内存泄漏4.1 什么是内存泄漏4.2 危害4.3 避免内存泄漏 五. 最后 一. 智能指针 智能指…...
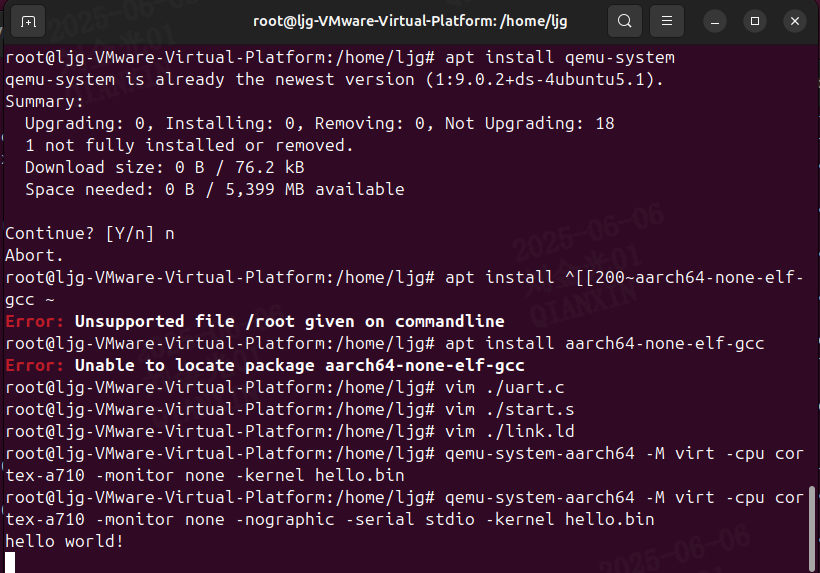
Qemu arm操作系统开发环境
使用qemu虚拟arm硬件比较合适。 步骤如下: 安装qemu apt install qemu-system安装aarch64-none-elf-gcc 需要手动下载,下载地址:https://developer.arm.com/-/media/Files/downloads/gnu/13.2.rel1/binrel/arm-gnu-toolchain-13.2.rel1-x…...

OD 算法题 B卷【正整数到Excel编号之间的转换】
文章目录 正整数到Excel编号之间的转换 正整数到Excel编号之间的转换 excel的列编号是这样的:a b c … z aa ab ac… az ba bb bc…yz za zb zc …zz aaa aab aac…; 分别代表以下的编号1 2 3 … 26 27 28 29… 52 53 54 55… 676 677 678 679 … 702 703 704 705;…...

Java 与 MySQL 性能优化:MySQL 慢 SQL 诊断与分析方法详解
文章目录 一、开启慢查询日志,定位耗时SQL1.1 查看慢查询日志是否开启1.2 临时开启慢查询日志1.3 永久开启慢查询日志1.4 分析慢查询日志 二、使用EXPLAIN分析SQL执行计划2.1 EXPLAIN的基本使用2.2 EXPLAIN分析案例2.3 根据EXPLAIN结果优化SQL 三、使用SHOW PROFILE…...

Linux-进程间的通信
1、IPC: Inter Process Communication(进程间通信): 由于每个进程在操作系统中有独立的地址空间,它们不能像线程那样直接访问彼此的内存,所以必须通过某种方式进行通信。 常见的 IPC 方式包括&#…...

DAY 45 超大力王爱学Python
来自超大力王的友情提示:在用tensordoard的时候一定一定要用绝对位置,例如:tensorboard --logdir"D:\代码\archive (1)\runs\cifar10_mlp_experiment_2" 不然读取不了数据 知识点回顾: tensorboard的发展历史和原理tens…...

Java多线程实现之Runnable接口深度解析
Java多线程实现之Runnable接口深度解析 一、Runnable接口概述1.1 接口定义1.2 与Thread类的关系1.3 使用Runnable接口的优势 二、Runnable接口的基本实现方式2.1 传统方式实现Runnable接口2.2 使用匿名内部类实现Runnable接口2.3 使用Lambda表达式实现Runnable接口 三、Runnabl…...
