【学习笔记】量化概述
Quantize量化概念与技术细节
题外话,在七八年前,一些关于表征的研究,会去做表征的压缩,比如二进制嵌入这种事情,其实做得很简单,无非是找个阈值,然后将浮点数划归为零一值,现在的Quantize差不多也是这么一回事,冷饭重炒,但在当下LLM的背景下,明显比那时候更有意义。
- HuggingFace bitsandbytes包
- GPTQ: data compression, GPU,arxiv.2210.17323
- GPTQ is a post-training quantization (PTQ) method for 4-bit quantization that focuses primarily on GPU inference and performance.
- to quantizing the weights of transformer-based models
- first applies scalar quant to the weights, followed by vector quant to the residuals
- The idea behind the method is that it will try to compress all weights to a 4-bit quantization by minimizing the mean squared error to that weight.
- During inference, it will dynamically dequantize its weights to float16 for improved performance whilst keeping memory low.
- GGUF: ggml, CPU, 这是与GPTQ相对应的量化方法,在CPU上实现推理优化。(过时)
- c++,
- llama.cpp, https://github.com/ggerganov/llama.cpp
- AWQ:activation aware quantization,arxiv.2306.00978
- 声称是对GPTQ的优化,提升了速度,但牺牲的精度小(都这样说)
安装(源码安装更容易成功):
# Latest HF transformers version for Mistral-like models
# !pip install git+https://github.com/huggingface/transformers.git
# !pip install accelerate bitsandbytes xformers# GPTQ Dependencies
# !pip install optimum
# !pip install auto-gptq --extra-index-url https://huggingface.github.io/autogptq-index/whl/cu118/
# 我这边走的是源码安装# GGUF Dependencies
# !pip install 'ctransformers[cuda]'
在llama3-8b上的测试:
from torch import bfloat16
import torch
from transformers import pipeline, AutoTokenizer, AutoModelForCausalLM
# Load in your LLM without any compression tricks
model_id = "meta-llama/Meta-Llama-3-8B-Instruct"
# model_id = "HuggingFaceH4/zephyr-7b-beta"
pipe = pipeline("text-generation",model=model_id,torch_dtype=bfloat16,device_map="auto"
)
pipe.model
输出模型的结构:
LlamaForCausalLM((model): LlamaModel((embed_tokens): Embedding(128256, 4096)(layers): ModuleList((0-31): 32 x LlamaDecoderLayer((self_attn): LlamaSdpaAttention((q_proj): Linear(in_features=4096, out_features=4096, bias=False)(k_proj): Linear(in_features=4096, out_features=1024, bias=False)(v_proj): Linear(in_features=4096, out_features=1024, bias=False)(o_proj): Linear(in_features=4096, out_features=4096, bias=False)(rotary_emb): LlamaRotaryEmbedding())(mlp): LlamaMLP((gate_proj): Linear(in_features=4096, out_features=14336, bias=False)(up_proj): Linear(in_features=4096, out_features=14336, bias=False)(down_proj): Linear(in_features=14336, out_features=4096, bias=False)(act_fn): SiLU())(input_layernorm): LlamaRMSNorm()(post_attention_layernorm): LlamaRMSNorm()))(norm): LlamaRMSNorm())(lm_head): Linear(in_features=4096, out_features=128256, bias=False)
)
一个细节,查看任意一个layer的权重值的分布(查看前10000个),发现是基本呈现零均值的正态分布的,这也是后面normal float(nf4)就是基于这样的前提做的量化:
import seaborn as sns
q_proj = pipe.model.model.layers[0].self_attn.q_proj.weight.detach().to(torch.float16).cpu().numpy().flatten()
plt.figure(figsize=(10, 6))
sns.histplot(q_proj[:10000], bins=50, kde=True)

chat template:
- llama3
<|begin_of_text|><|start_header_id|>system<|end_header_id|>....<|eot_id|><|start_header_id|>user<|end_header_id|>...<|eot_id|><|start_header_id|>assistant<|end_header_id|>...
- zephyr
<|system|> ... </s><|user|> ... </s><|assistant|> ... </s>
具体使用template:
# See https://huggingface.co/docs/transformers/main/en/chat_templating
messages = [{"role": "system","content": "You are a friendly chatbot.",},{"role": "user","content": "Tell me a funny joke about Large Language Models."},
]
prompt = pipe.tokenizer.apply_chat_template(messages, tokenize=False, add_generation_prompt=True)
print(prompt)
T = AutoTokenizer.from_pretrained(model_id)
# T
# T.encode('<|system|>')
<|begin_of_text|><|start_header_id|>system<|end_header_id|>You are a friendly chatbot.<|eot_id|><|start_header_id|>user<|end_header_id|>Tell me a funny joke about Large Language Models.<|eot_id|><|start_header_id|>assistant<|end_header_id|>
使用pipe进行生成:
outputs = pipe(prompt,max_new_tokens=256,do_sample=True,temperature=0.1,top_p=0.95
)
(torch.cuda.max_memory_allocated(device='cuda:0') + torch.cuda.max_memory_allocated(device='cuda:1')) / (1024*1024*1024) # 15.021286964416504,差不多是15GB
print(outputs[0]['generated_text'])
"""
<|begin_of_text|><|start_header_id|>system<|end_header_id|>You are a friendly chatbot.<|eot_id|><|start_header_id|>user<|end_header_id|>Tell me a funny joke about Large Language Models.<|eot_id|><|start_header_id|>assistant<|end_header_id|>Here's one:Why did the Large Language Model go to therapy?Because it was struggling to "process" its emotions and was feeling a little "disconnected" from its users! But in the end, it just needed to "retrain" its thoughts and "update" its perspective!Hope that made you LOL!
"""
使用accelerate作sharding(分片)
from accelerate import Accelerator# Shard our model into pieces of 1GB
accelerator = Accelerator()
accelerator.save_model(model=pipe.model,save_directory="./content/model",max_shard_size="4GB"
)
量化概述
- 4bit-NormalFloat (NF4, qlora: lora on a quantize LLMs,arxiv.2305.14314) consists of three steps:
- Normalization: The weights of the model are normalized so that we expect the weights to fall within a certain range. This allows for more efficient representation of more common values.(密度高的地方多分配离散值,密度低的地方少分配离散值,前提就是上面的正态分布)
- The weights of the model are first normalized to have zero mean and unit variance. This ensures that the weights are distributed around zero and fall within a certain range.
- Quantization: The weights are quantized to 4-bit. In NF4, the quantization levels are evenly spaced with respect to the normalized weights, thereby efficiently representing the original 32-bit weights.(所谓那些int4模型,就是每个权重都由16个离散值表示,int8就是64个,以此类推,这个主意之前bf16, float32, float16的具体表征,三者都有1bit用来存符号,bf16跟float32的区别在于小数位减少,float16则两者都变少,分别是1+8+7,1+8+23,1+5+10,比如同样一个0.1234,三者的结果就是0.1235351…,0.1234000…,0.1234130…,而75505则对应75505,inf,75264,即bf16是做了一个权衡,能表示很大的数,但是精度不够)
- The normalized weights are then quantized to 4 bits. This involves mapping the original high-precision weights to a smaller set of low-precision values. In the case of NF4, the quantization levels are chosen to be evenly spaced in the range of the normalized weights.
- Dequantization: Although the weights are stored in 4-bit, they are dequantized during computation which gives a performance boost during inference.
- During the forward pass and backpropagation, the quantized weights are dequantized back to full precision. This is done by mapping the 4-bit quantized values back to their original range. The dequantized weights are used in the computations, but they are stored in memory in their 4-bit quantized form.
- Normalization: The weights of the model are normalized so that we expect the weights to fall within a certain range. This allows for more efficient representation of more common values.(密度高的地方多分配离散值,密度低的地方少分配离散值,前提就是上面的正态分布)
- bitsandbytes 的分位数计算
- 密度高的地方多分配,密度低的地方少分配
- https://github.com/bitsandbytes-foundation/bitsandbytes/blob/main/bitsandbytes/functional.py#L267
- https://zhuanlan.zhihu.com/p/647378373
验证一下上面bf16, f32, f16的区别:
torch.set_printoptions(sci_mode=False)
X = torch.tensor([0.1234, 75535])
print(X, X.dtype) # tensor([    0.1234, 75535.0000]) torch.float32
print(X.to(torch.float16)) # tensor([0.1234,    inf], dtype=torch.float16)
print(X.to(torch.bfloat16)) # tensor([    0.1235, 75776.0000], dtype=torch.bfloat16)
接下来手动量化(用BitsAndBytes)
# Delete any models previously created
# del pipe, accelerator
del pipe# Empty VRAM cache
import gc
gc.collect()
torch.cuda.empty_cache()from transformers import BitsAndBytesConfig
from torch import bfloat16
model_id = "meta-llama/Meta-Llama-3-8B-Instruct" # Our 4-bit configuration to load the LLM with less GPU memory
bnb_config = BitsAndBytesConfig(load_in_4bit=True,  # 4-bit quantizationbnb_4bit_quant_type='nf4',  # Normalized float 4bnb_4bit_use_double_quant=True,  # Second quantization after the firstbnb_4bit_compute_dtype=bfloat16  # Computation type
)# Zephyr with BitsAndBytes Configuration
tokenizer = AutoTokenizer.from_pretrained(model_id)
model = AutoModelForCausalLM.from_pretrained(model_id,quantization_config=bnb_config,device_map='auto',
)# Create a pipeline
pipe = pipeline(model=model, tokenizer=tokenizer, task='text-generation')(torch.cuda.max_memory_allocated('cuda:0') +  torch.cuda.max_memory_allocated('cuda:1')) / (1024*1024*1024) # 5.5174360275268555,内存占用相较于上面的15G明显减少
参数含义在论文中都有,同样可以打印prompt都是没有区别的,输出发生变化
# See https://huggingface.co/docs/transformers/main/en/chat_templating
messages = [{"role": "system","content": "You are a friendly chatbot.",},{"role": "user","content": "Tell me a funny joke about Large Language Models."},
]
prompt = pipe.tokenizer.apply_chat_template(messages, tokenize=False, add_generation_prompt=True)
print(prompt)
"""
<|begin_of_text|><|start_header_id|>system<|end_header_id|>You are a friendly chatbot.<|eot_id|><|start_header_id|>user<|end_header_id|>Tell me a funny joke about Large Language Models.<|eot_id|><|start_header_id|>assistant<|end_header_id|>
"""outputs = pipe(prompt,max_new_tokens=256,do_sample=True,temperature=0.1,top_p=0.95
)
print(outputs[0]["generated_text"])"""
<|begin_of_text|><|start_header_id|>system<|end_header_id|>You are a friendly chatbot.<|eot_id|><|start_header_id|>user<|end_header_id|>Tell me a funny joke about Large Language Models.<|eot_id|><|start_header_id|>assistant<|end_header_id|>Why did the Large Language Model go to therapy?Because it was struggling to "process" its emotions and was worried it would "overfit" to its own biases!
"""
但是这个量化是不完全的混合精度量化(有int8也有float16):
-
load_in_8bit:
- embed_tokens 继续是 torch.float16
- 每个layer的内部(self attention)以及 mlp 部分是 int8
- 每个layer的output(layernorm)部分是 float16(如果 load 时传入了
torch_dtype=torch.bfloat16,则这部分为 torch.float16) - 同理适用于 load_in_4bit
model.embed_tokens.weight torch.float16 cuda:0
model.layers.0.self_attn.q_proj.weight torch.int8 cuda:0
model.layers.0.self_attn.k_proj.weight torch.int8 cuda:0
model.layers.0.self_attn.v_proj.weight torch.int8 cuda:0
model.layers.0.self_attn.o_proj.weight torch.int8 cuda:0
model.layers.0.mlp.gate_proj.weight torch.int8 cuda:0
model.layers.0.mlp.up_proj.weight torch.int8 cuda:0
model.layers.0.mlp.down_proj.weight torch.int8 cuda:0
model.layers.0.input_layernorm.weight torch.float16 cuda:0
model.layers.0.post_attention_layernorm.weight torch.float16 cuda:0
具体的参数输出和推理:
import torch
from torch import nn
from transformers import BitsAndBytesConfig, AutoModelForCausalLM, AutoTokenizer
from transformers.optimization import AdamW
# del model
import gc         # garbage collect library
gc.collect()
torch.cuda.empty_cache()
model = AutoModelForCausalLM.from_pretrained("meta-llama/Meta-Llama-3-8B", quantization_config=BitsAndBytesConfig(load_in_8bit=True,# load_in_4bit=True), torch_dtype=torch.bfloat16,device_map="auto")
for name, para in model.named_parameters():print(name, para.dtype, para.shape, para.device)
# ------
tokenizer = AutoTokenizer.from_pretrained('meta-llama/Meta-Llama-3-8B')
tokenizer.pad_token = tokenizer.eos_token
# 示例训练数据
texts = ["Hello, how are you?","The quick brown fox jumps over the lazy dog."
]# Tokenize数据
inputs = tokenizer(texts, return_tensors="pt", padding=True, truncation=True)
input_ids = inputs["input_ids"]
attention_mask = inputs["attention_mask"]# 移动到GPU(如果可用)
device = torch.device("cuda" if torch.cuda.is_available() else "cpu")
input_ids = input_ids.to(device)
attention_mask = attention_mask.to(device)
# model.to(device)# 设置优化器和损失函数
optimizer = AdamW(model.parameters(), lr=5e-5)
loss_fn = nn.CrossEntropyLoss()# 模型训练步骤
model.train()
outputs = model(input_ids, attention_mask=attention_mask, labels=input_ids)
loss = outputs.loss# 反向传播
optimizer.zero_grad()
loss.backward()
optimizer.step()
GPTQ
# Delete any models previously created
del tokenizer, model, pipe# Empty VRAM cache
import torch
import gc
gc.collect()
torch.cuda.empty_cache()
- https://huggingface.co/MaziyarPanahi/Meta-Llama-3-8B-Instruct-GPTQ
- install
- https://github.com/AutoGPTQ/AutoGPTQ
- 走源码安装是 ok 的;
- https://github.com/AutoGPTQ/AutoGPTQ
# GPTQ Dependencies
# !pip install optimum
# !pip install auto-gptq --extra-index-url https://huggingface.github.io/autogptq-index/whl/cu118/
from transformers import AutoModelForCausalLM, AutoTokenizer, pipeline# Load LLM and Tokenizer
model_id = "MaziyarPanahi/Meta-Llama-3-8B-Instruct-GPTQ"
tokenizer = AutoTokenizer.from_pretrained(model_id, use_fast=True)
model = AutoModelForCausalLM.from_pretrained(model_id,device_map="auto",trust_remote_code=False,revision="main"
)# Create a pipeline
pipe = pipeline(model=model, tokenizer=tokenizer, task='text-generation')# See https://huggingface.co/docs/transformers/main/en/chat_templating
messages = [{"role": "system","content": "You are a friendly chatbot.",},{"role": "user","content": "Tell me a funny joke about Large Language Models."},
]
prompt = pipe.tokenizer.apply_chat_template(messages, tokenize=False, add_generation_prompt=True)
print(prompt)outputs = pipe(prompt,max_new_tokens=256,do_sample=True,temperature=0.1,top_p=0.95
)
print(outputs[0]["generated_text"])(torch.cuda.max_memory_allocated('cuda:0') +  torch.cuda.max_memory_allocated('cuda:1')) / (1024*1024*1024) # 5.626893043518066,跟上面bytesandbits差不太多
GGUF
HUGGINGFACE的QuantFactory仓库下有很多量化模型,比如llama3-8b的:https://huggingface.co/QuantFactory/Meta-Llama-3-8B-instruct-GGUF
- GPT-Generated Unified Format,是由Georgi Gerganov定义发布的一种大模型文件格式。Georgi Gerganov是著名开源项目llama.cpp的创始人。
- GGML:GPT-Generated Model Language
- Although GPTQ does compression well, its focus on GPU can be a disadvantage if you do not have the hardware to run it.
- GGUF, previously GGML, is a quantization method that allows users to use the CPU to run an LLM but also offload some of its layers to the GPU for a speed up (
llama.cpp中的-ngl). Although using the CPU is generally slower than using a GPU for inference, it is an incredible format for those running models on CPU or Apple devices. - Especially since we are seeing smaller and more capable models appearing, like Mistral 7B, the GGUF format might just be here to stay!
- GGUF, previously GGML, is a quantization method that allows users to use the CPU to run an LLM but also offload some of its layers to the GPU for a speed up (
- Q4_K_M
- Q stands for Quantization.
- 4 indicates the number of bits used in the quantization process.
- K refers to the use of k-means clustering in the quantization.
- M represents the size of the model after quantization.
- (S = Small, M = Medium, L = Large).
这里说GGUF用的K均值聚类来做的量化,下面是一个通用的idea(不代表GGUF就是这么做的),其实就是一种分层聚类,还是数值型的,很浅然:
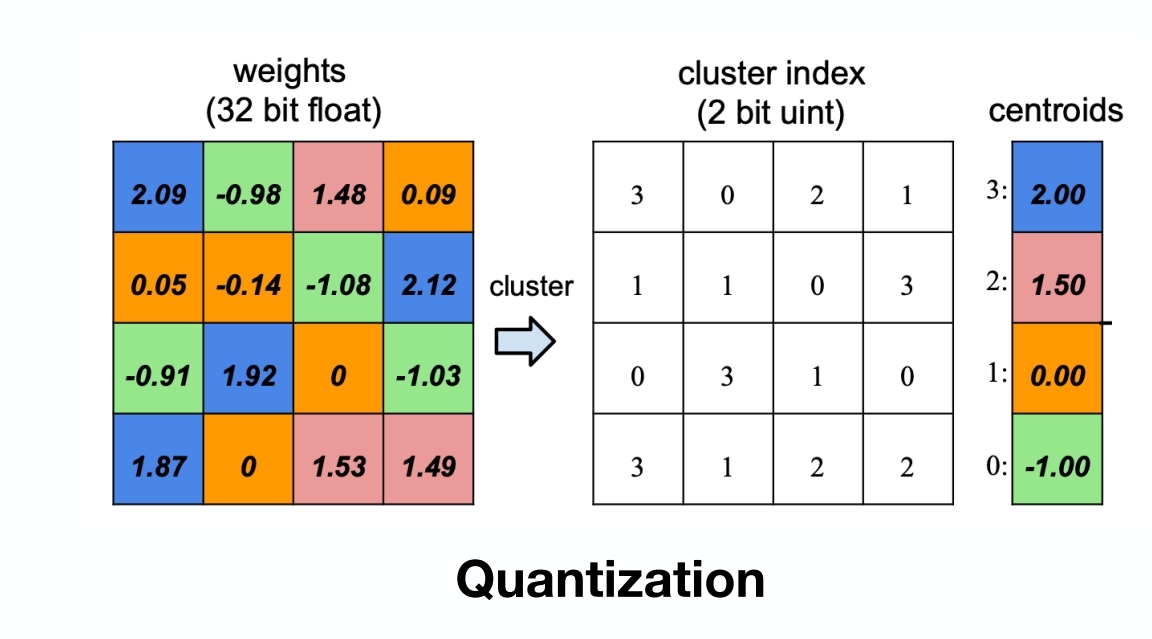
代码实现:
import numpy as np
from sklearn.cluster import KMeans# 原始权重矩阵
weights = np.array([[2.09, -0.98, 1.48, 0.09],[0.05, -0.14, -1.08, 2.12],[-0.91, 1.92, 0, -1.03],[1.87, 0, 1.53, 1.49]
])# K-means聚类
kmeans = KMeans(n_clusters=4)
kmeans.fit(weights.reshape(-1, 1))
cluster_indices = kmeans.predict(weights.reshape(-1, 1)).reshape(weights.shape)
centroids = kmeans.cluster_centers_.flatten()# 根据质心值排序
sorted_indices = np.argsort(centroids)
sorted_centroids = centroids[sorted_indices]# 创建索引映射
index_map = {old_idx: new_idx for new_idx, old_idx in enumerate(sorted_indices)}# 更新量化索引矩阵
new_cluster_indices = np.vectorize(index_map.get)(cluster_indices)print("重新排序后的量化索引矩阵:\n", new_cluster_indices)
print("重新排序后的质心值:\n", sorted_centroids)
"""
重新排序后的量化索引矩阵:[[3 0 2 1][1 1 0 3][0 3 1 0][3 1 2 2]]
重新排序后的质心值:[-1.   0.   1.5  2. ]
"""
使用GGUF进行推理优化:(建议用llama.cpp,否则容易失败)
del tokenizer, model, pipe# Empty VRAM cache
import torch
import gc
gc.collect()
torch.cuda.empty_cache()from ctransformers import AutoModelForCausalLM
from transformers import AutoTokenizer, pipeline# Load LLM and Tokenizer
# Use `gpu_layers` to specify how many layers will be offloaded to the GPU.
model = AutoModelForCausalLM.from_pretrained("QuantFactory/Meta-Llama-3-8B-Instruct-GGUF",model_file="Meta-Llama-3-8B-Instruct.Q4_K_M.gguf",# model_type="llama", gpu_layers=20, hf=True
)
tokenizer = AutoTokenizer.from_pretrained("QuantFactory/Meta-Llama-3-8B-Instruct-GGUF", use_fast=True
)# Create a pipeline
pipe = pipeline(model=model, tokenizer=tokenizer, task='text-generation')
AWQ
A new format on the block is AWQ (Activation-aware Weight Quantization) which is a quantization method similar to GPTQ. There are several differences between AWQ and GPTQ as methods but the most important one is that AWQ assumes that not all weights are equally important for an LLM’s performance.
In other words, there is a small fraction of weights that will be skipped during quantization which helps with the quantization loss.
As a result, their paper mentions a significant speed-up compared to GPTQ whilst keeping similar, and sometimes even better, performance.
下面使用vllm框架进行部署:
from vllm import LLM, SamplingParams# Load the LLM
sampling_params = SamplingParams(temperature=0.0, top_p=1.0, max_tokens=256)
llm = LLM(model="casperhansen/llama-3-8b-instruct-awq",quantization='awq',dtype='half',gpu_memory_utilization=.95,max_model_len=4096
)
tokenizer = AutoTokenizer.from_pretrained("casperhansen/llama-3-8b-instruct-awq")
# See https://huggingface.co/docs/transformers/main/en/chat_templating
messages = [{"role": "system","content": "You are a friendly chatbot.",},{"role": "user","content": "Tell me a funny joke about Large Language Models."},
]
prompt = tokenizer.apply_chat_template(messages, tokenize=False, add_generation_prompt=True)
print(prompt)
# Generate output based on the input prompt and sampling parameters
output = llm.generate(prompt, sampling_params)
print(output[0].outputs[0].text)
相关文章:
【学习笔记】量化概述
Quantize量化概念与技术细节 题外话,在七八年前,一些关于表征的研究,会去做表征的压缩,比如二进制嵌入这种事情,其实做得很简单,无非是找个阈值,然后将浮点数划归为零一值,现在的Qu…...

同步互斥相关习题10道 附详解
PV操作 2016 某系统允许最多10个进程同时读文件F,当同时读文件F的进程不满10个时,欲读该文件的其他文件可立即读,当已有10个进程在读文件F时读,其他欲读文件F的进程必须等待,直至有进程读完后退出方可去读 在实现管…...
【Python · PyTorch】卷积神经网络 CNN(LeNet-5网络)
【Python PyTorch】卷积神经网络 CNN(LeNet-5网络) 1. LeNet-5网络※ LeNet-5网络结构 2. 读取数据2.1 Torchvision读取数据2.2 MNIST & FashionMNIST 下载解包读取数据 2. Mnist※ 训练 LeNet5 预测分类 3. EMnist※ 训练 LeNet5 预测分类 4. Fash…...

Git 拉取指定分支创建项目
一 背景 因为项目过大,只需要部分分支的代码即可。 二 实现 方法一:使用 --single-branch 参数 git clone 支持只拉取指定分支,而不是整个库的所有分支: git clone --branch <branch_name> --single-branch <reposi…...
CF862B Mahmoud and Ehab and the bipartiteness(二分图的性质)
思路:一个二分图是由两个集合组成的,同一个集合中的节点间不能连边,所以一个二分图最多有cnt[1]*cnt[2]条边,题目给出一个树的n-1条边,要我们添加最多的边数使他成为二分图,添加的边数就是cnt[1]*cnt[2]-n1…...

React Native 全栈开发实战班 :数据管理与状态之React Hooks 基础
在 React Native 应用中,数据管理与状态管理是构建复杂用户界面的关键。React 提供了多种工具和模式来处理数据流和状态管理,包括 React Hooks、Context API 以及第三方状态管理库(如 Redux)。本章节将详细介绍 React Hooks 的基础…...

传奇996_22——自动挂机
登录钩子函数中执行 callscript(actor, "../QuestDiary/主界面基础按钮/主界面基础按钮QM", "基础按钮QM")基础按钮QM执行了已下代码 #IF Equal <$CLIENTFLAG> 1 #ACT goto PC端面板加载#IF Equal <$CLIENTFLAG> 2 #ACT goto 移动端面板加载…...

faiss 提供了多种索引类型
faiss 多种索引类型 在 faiss 中,IndexFlatL2 是一个简单的基于 L2 距离(欧几里得距离)进行索引的索引类型,但实际上,faiss 提供了多种索引类型,支持不同的度量方式和性能优化,您可以根据需求选…...

比rsync更强大的文件同步工具rclone
背景 多个复制,拷贝,同步文件场景,最大规模的是每次几千万规模的小文件需要从云上对象存储中拉取到本地。其他的诸如定期数据备份,单次性数据备份。 rsync是单线程的,开源的mrsync是多线程的,但适用范围没…...

《业务流程--穿越从概念到实践的丛林》读后感一:什么是业务流程
1.1 流程和业务流程概念辨析 业务流程建模标准(BPMN)对于业务流程的定义:一个业务流程由为了配合一个组织性或技术环境而一系列活动组成。这些活动共同实现一个业务目标。 业务流程再造最有名的倡导者托马斯.H.达文波特对于流程和业务流程的定义:流程是一组结构化且可度量的…...

解决docker mysql命令行无法输入中文
docker启动时,设置支持中文 docker run --name mysql-container -e MYSQL_ROOT_PASSWORDroot -d mysql:5.7 --character-set-serverutf8mb4 --collation-serverutf8mb4_unicode_ci --default-time-zone8:00 进入docker时,指定LANG即可 docker exec -it …...
基于Java Springboot城市公交运营管理系统
一、作品包含 源码数据库设计文档万字PPT全套环境和工具资源部署教程 二、项目技术 前端技术:Html、Css、Js、Vue、Element-ui 数据库:MySQL 后端技术:Java、Spring Boot、MyBatis 三、运行环境 开发工具:IDEA/eclipse 数据…...
Lc70--319.两个数组的交集(二分查找)---Java版
1.题目描述 2.思路 用集合求交集,因为集合里面的元素要满足不重复、无序、唯一。使得集合在去重、查找和集合操作(如交集、并集、差集等)中非常高效和方便。 3.代码实现 class Solution {public int[] intersection(int[] nums1, int[] nu…...
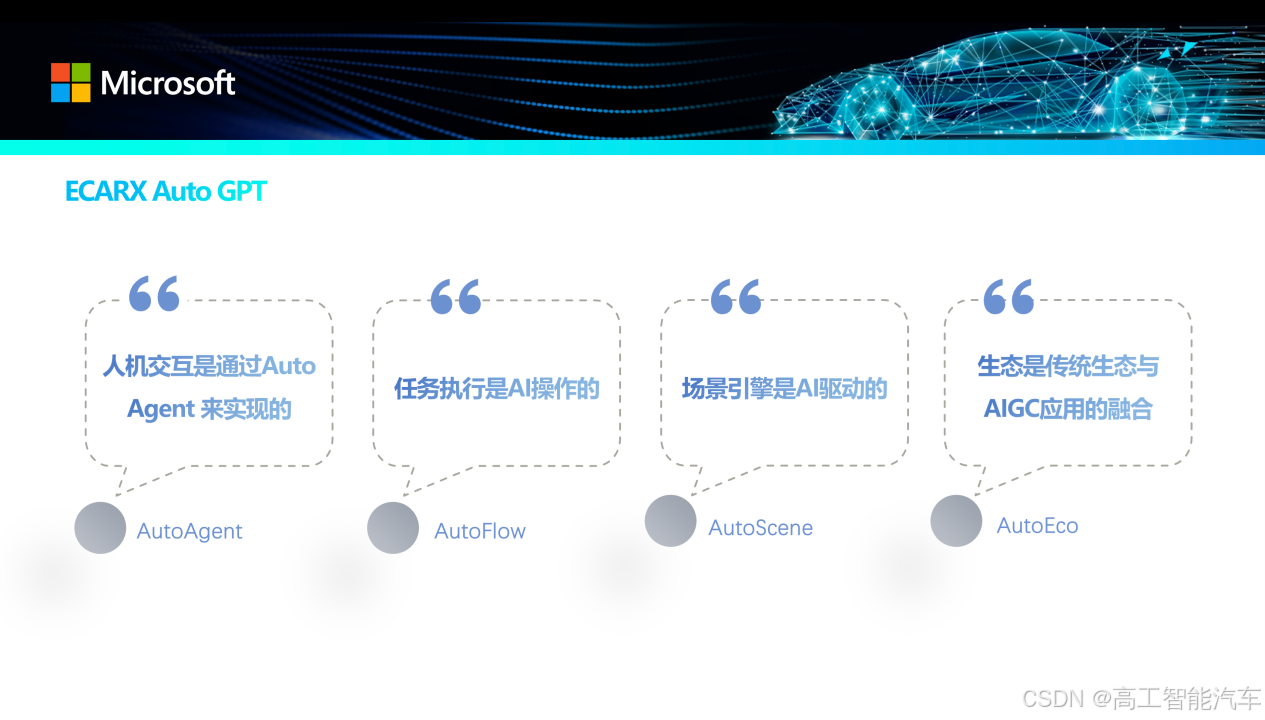
亿咖通科技应邀出席微软汽车行业智享会,分享ECARX AutoGPT全新实践
11月14日,全球出行科技企业亿咖通科技(纳斯达克股票代码:ECX)应邀于广州参加由微软举行的汽车行业智享会,揭晓了亿咖通科技对“AI定义汽车”时代的洞察与技术布局,分享了亿咖通科技汽车垂直领域大模型ECARX…...

Python教程:运算符重载
在Python中,运算符重载是通过定义特殊方法(也称为魔术方法)来实现的,这些特殊方法允许类的实例像内置类型那样使用运算符。 Python提供了一系列这样的特殊方法,用于重载各种运算符。 以下是一些常见的运算符重载特殊…...
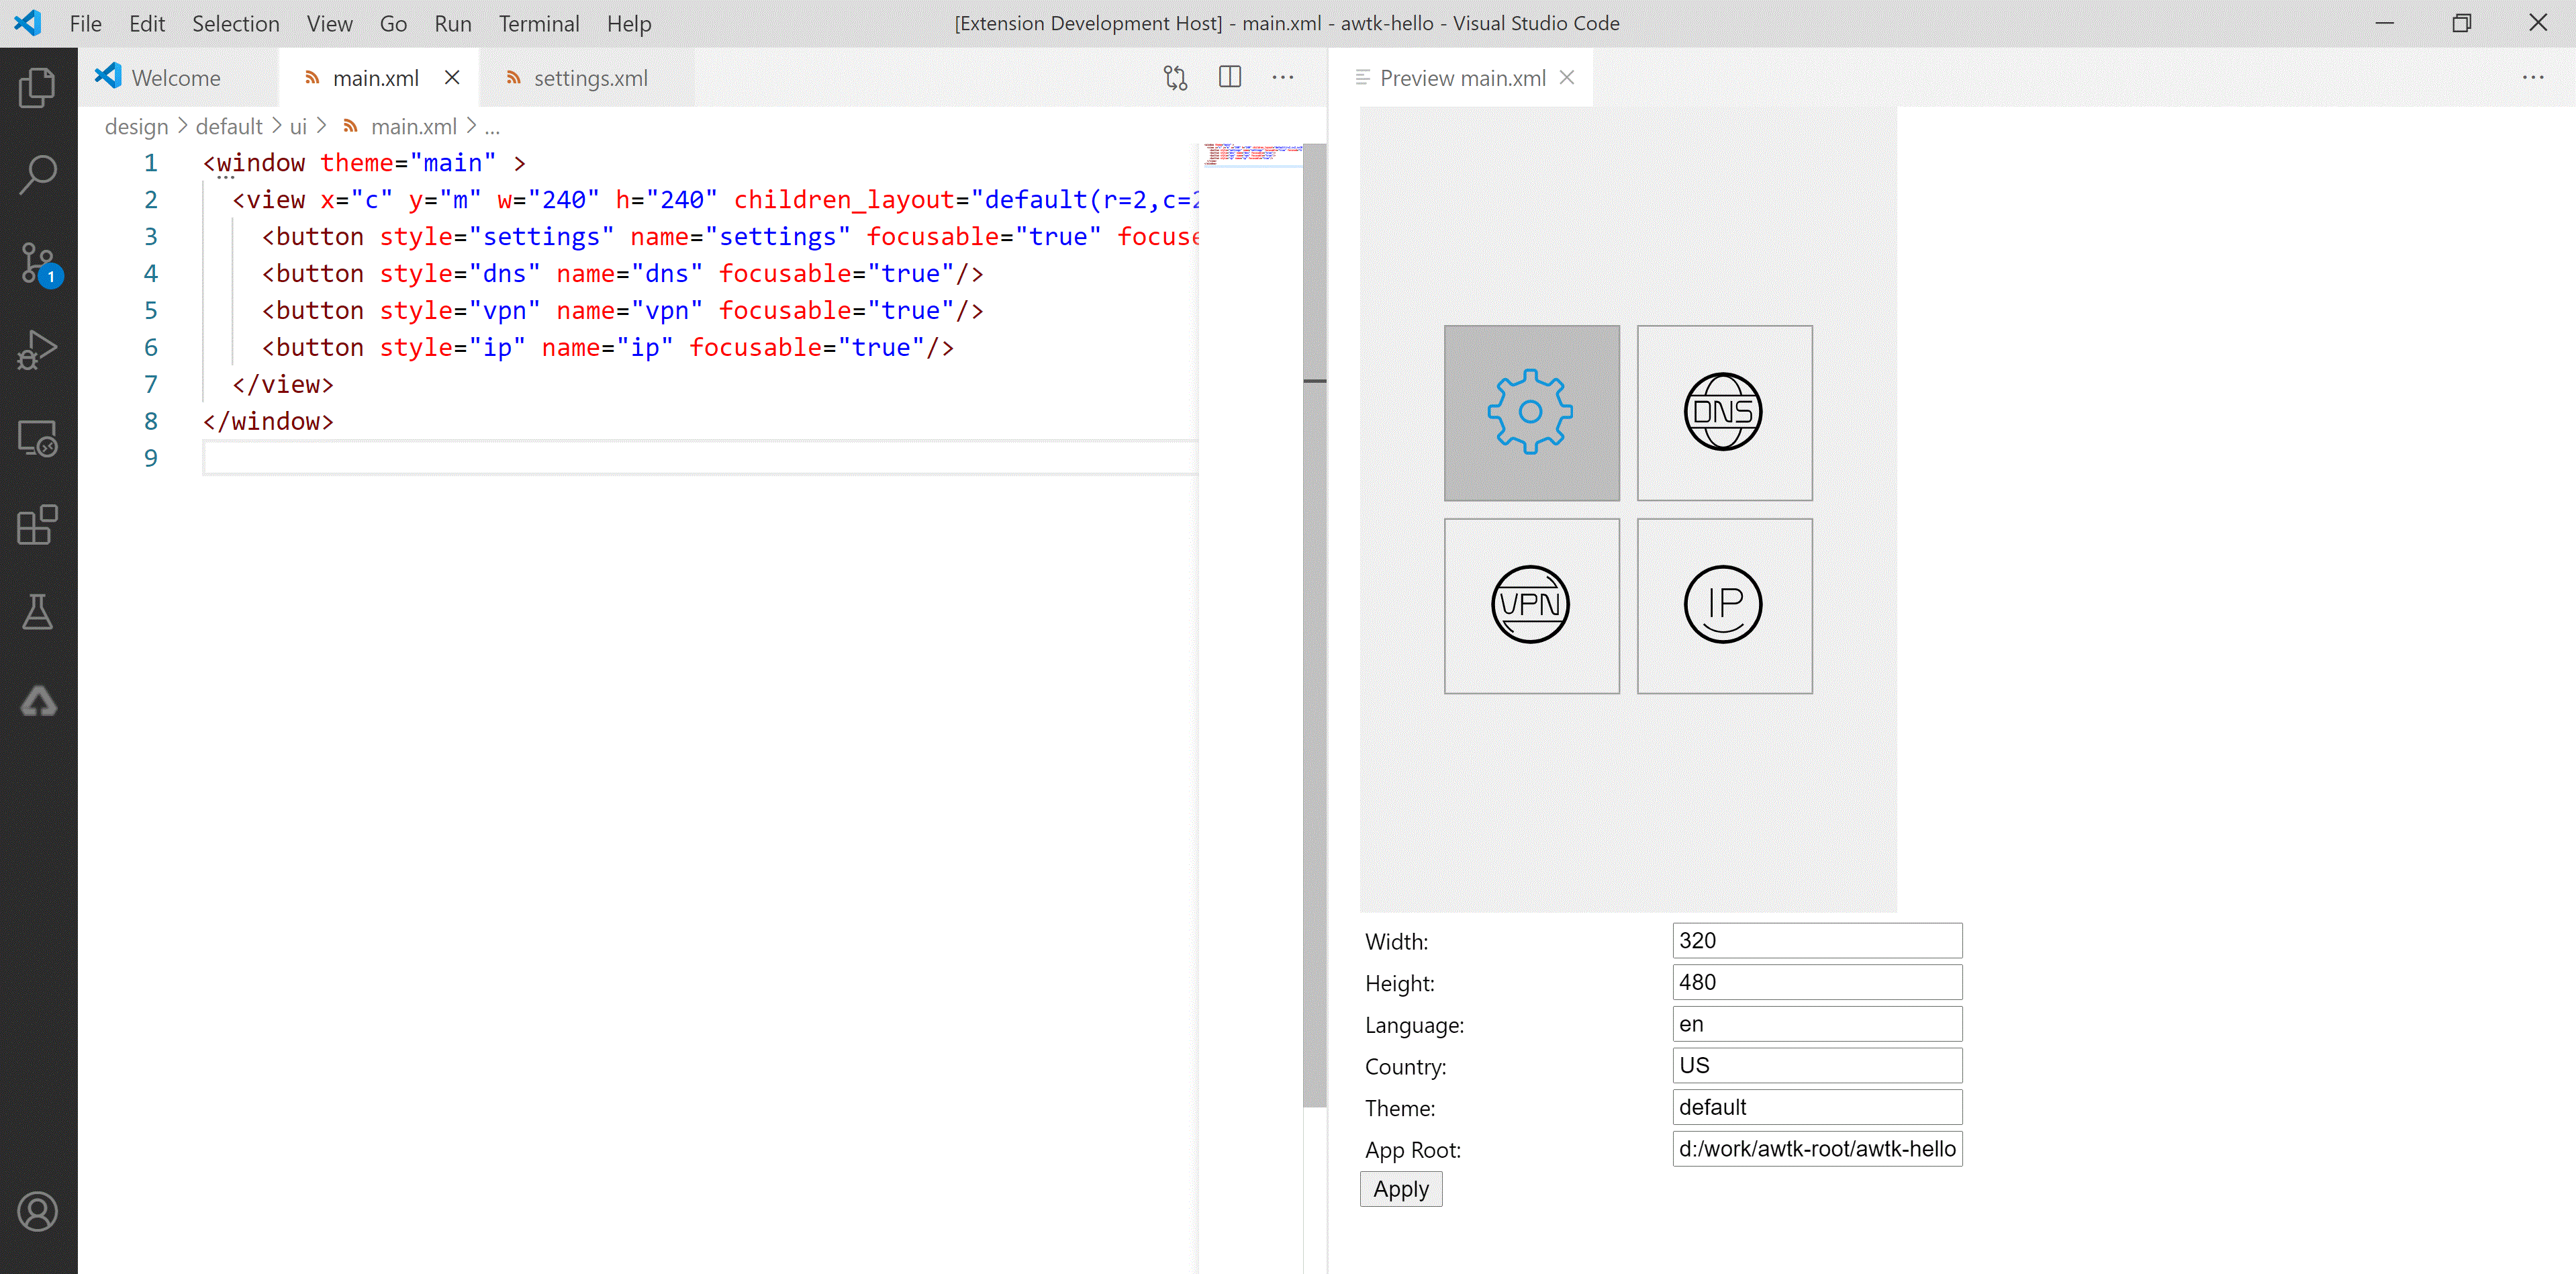
AWTK VSCode 实时预览插件端口冲突的解决办法
AWTK XML UI 预览插件:在 vscode 中实时预览 AWTK XML UI 文件,在 Copilot 的帮助下,可以大幅提高界面的开发效率。 主要特色: 真实的 UI 效果。可以设置主题,方便查看在不同主题下界面的效果。可以设置语言…...

【MySQL系列】深入理解MySQL中的存储、排序字符集
前言 在创建数据库时,我们经常会需要填写数据库的所用字符集、排序规则,字符集和排序规则是两个非常重要的概念,它们决定了数据库如何存储和比较字符串数据。在 MySQL 中,常用的存储字符集有 utf8、utf8mb4,而排序字符…...
RPC-健康检测机制
什么是健康检测? 在真实环境中服务提供方是以一个集群的方式提供服务,这对于服务调用方来说,就是一个接口会有多个服务提供方同时提供服务,调用方在每次发起请求的时候都可以拿到一个可用的连接。 健康检测,能帮助从连…...
关于Java处理Excel常规列表记录,并入库的操作
1.描述 对于常规的Excel列表(二维表格)的入库处理,一般的mysql连接工具,例如Navicat就支持。但是,因为业务需要,不想每次都去手动导入,所以这里采用编码且定时任务的形式来实现。 2.Excel常规列…...
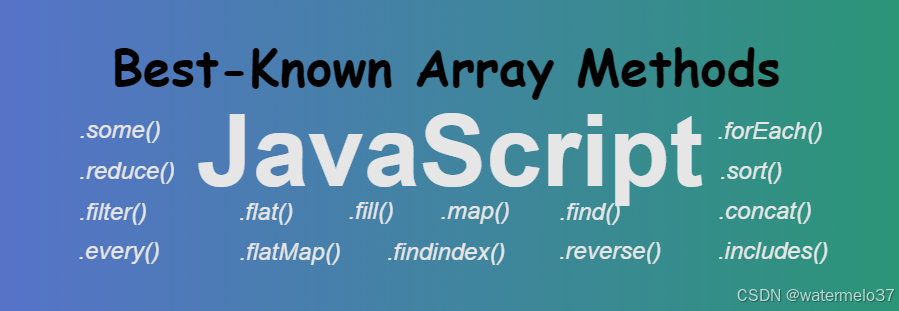
深入理解 JavaScript 中的 Array.find() 方法:原理、性能优势与实用案例详解
目录 深入理解 JavaScript 中的 Array.find() 方法:原理、性能优势与实用案例详解 一、引言:为什么要使用Array.find() 二、Array.find()的使用与技巧 1、基础语法 2、返回值 3、使用技巧 三、Array.find()的优势与实际应用案例 1、利用返回引用…...

电力系统网络安全:从风险认知到威胁建模的实战指南
1. 从日常运维到风险认知:重新审视大容量电力系统的安全基线在能源行业干了十几年,我见过太多同行把大容量电力系统(Bulk Energy System, BES)的运维简化为“确保别停电”。日常的告警处理、设备巡检、工单流转构成了工作的全部叙…...
)
别再手动折腾了!用Stack Builder一键搞定PostGIS 2.1 for PostgreSQL 9.2 (Windows 64位)
告别繁琐配置:用Stack Builder轻松部署PostGIS空间数据库 在Windows环境下配置PostgreSQL的空间扩展PostGIS,传统方式往往需要手动下载安装包、配置环境变量、执行SQL脚本等一系列操作。对于刚接触空间数据库的开发者来说,这个过程既耗时又容…...

从理论到落地,一文读懂现代AI Agent的完整记忆流水线
来源:DeepHub IMBA 本文约6500字,建议阅读13分钟本文介绍 AI Agent 四大记忆分类与流水线,解析生产架构、选型方案及常见落地误区。每一次 LLM 调用都是无状态的。模型读上下文窗口,生成响应然后忘掉一切。这对单轮问答没问题。对…...

告别adb shell:用Python脚本一键搞定Android屏幕截图与导出
Python自动化:告别adb shell,一键搞定Android屏幕截图与导出 每次调试Android应用时,手动敲adb命令截图、导出、重命名,是不是让你感到效率低下?作为一名长期与Android设备打交道的开发者,我深知这种重复劳…...
)
从零到上手:用LDAP Browser连接和管理你的OpenLDAP服务器(Windows平台实战)
从零到上手:用LDAP Browser连接和管理你的OpenLDAP服务器(Windows平台实战) 在企业级身份认证体系中,LDAP(轻量级目录访问协议)扮演着核心角色。许多技术团队虽然已经部署了OpenLDAP服务端,却苦…...

【Gemini赋能Google Maps路线优化实战指南】:20年导航算法专家亲授5大降本增效核心策略
更多请点击: https://intelliparadigm.com 第一章:Gemini赋能Google Maps路线优化的底层逻辑与演进脉络 Google Maps 路线规划正经历从传统图算法向多模态智能推理的范式迁移。Gemini 模型并非简单替代 Dijkstra 或 A*,而是作为实时决策中枢…...

Obsidian-Templates:卡片盒笔记法的终极模板库,构建你的第二大脑
Obsidian-Templates:卡片盒笔记法的终极模板库,构建你的第二大脑 【免费下载链接】Obsidian-Templates A repository containing templates and scripts for #Obsidian to support the #Zettelkasten method for note-taking. 项目地址: https://gitco…...

SPSS数据合并避坑指南:键变量设置、缺失值处理与常见错误解析
SPSS数据合并实战避坑手册:从原理到解决方案 数据合并是SPSS分析过程中最基础也最容易出错的环节之一。许多用户在按照网络教程操作后,常常发现合并结果与预期不符——变量丢失、数据错乱、大量缺失值涌现。这些问题往往源于对合并原理的理解不足和关键细…...
)
YOLO 全景解析:从 v8 到 v26(基于 Ultralytics 本仓库)
本文基于当前仓库 ultralytics-main 源码逐行解析,覆盖 v8 → v9 → v10 → v11 → v12 → v26 的主干、Neck、Head、损失、训练、验证、推理、导出与量化。文中的代码引用全部指向本仓库实际文件与行号,方便 Ctrl+点进去核对。 0. 阅读地图 关注点 你应该看哪一章 关键源码 …...

终极网络性能测试指南:iperf3 Windows版完全教程
终极网络性能测试指南:iperf3 Windows版完全教程 【免费下载链接】iperf3-win-builds iperf3 binaries for Windows. Benchmark your network limits. 项目地址: https://gitcode.com/gh_mirrors/ip/iperf3-win-builds 还在为网络速度慢而烦恼吗?…...