Android Studio开发学习(五)———LinearLayout(线性布局)
一、布局
认识了解一下Android中的布局,分别是: LinearLayout(线性布局),RelativeLayout(相对布局),TableLayout(表格布局), FrameLayout(帧布局),AbsoluteLayout(绝对布局),GridLayout(网格布局) 等。

二、LinearLayout详解
1.常见属性
(1)id值: android:id="@+id/"
id相当于一个标识,方便后期写代码时找到
android:id="@+id/linearlayuot"(2)布局宽度:android:layout_width;布局高度:android:layout_height
这两个属性一般放在一起写,且必须设定,里面的值可以任意进行调整,可以是与父组件相同的match_parent,也可以是适应自身大小的wrap_content,还可以是各种数值,如50dp,100dp;其中dp是一种屏幕密度的抽象单位。
// match_parent:与父组件相同
// wrap_content:适应自身大小android:layout_width="match_parent"
android:layout_height="wrap_content"(3)外边距:android:layout_margin;内边距:android:padding

| 外边距 | |
| android:layout_margin | 整体距离 |
| android:layout_marginTop | 顶部距离 |
| android:layout_marginLeft / android:layout_marginStart | 左部距离 |
| android:layout_marginRight / android:layout_marginEnd | 右部距离 |
| android:layout_marginBottom | 底部距离 |
| 内边距 | |
| android:padding | 整体距离 |
| android:paddingTop | 顶部距离 |
| android:paddingLeft / android:paddingStart | 左部距离 |
| android:paddingRight / android:paddingEnd | 右部距离 |
| android:paddingBottom | 底部距离 |
标注:左右的距离有两种表现形式,以左为例,一种是Left一种是Start,这里主要是跟版本有关,4.2以上用Start代替Left,同理右部。
(4)定位:andorid:orientation
简单明了就是控件怎么布局,它有两个属性,水平的horizontal,垂直的vertical。
<!-- android:orientation="vertical" 垂直--><LinearLayoutandroid:layout_width="match_parent"android:layout_height="400dp"android:orientation="vertical"><androidx.appcompat.widget.AppCompatButtonandroid:layout_width="wrap_content"android:layout_height="wrap_content"android:background="@color/blue"/><androidx.appcompat.widget.AppCompatButtonandroid:layout_width="wrap_content"android:layout_height="wrap_content"android:background="@color/pink"/><androidx.appcompat.widget.AppCompatButtonandroid:layout_width="wrap_content"android:layout_height="wrap_content"android:background="#00FF99"/><androidx.appcompat.widget.AppCompatButtonandroid:layout_width="wrap_content"android:layout_height="wrap_content"android:background="#AA6699"/></LinearLayout>
<!-- android:orientation="horizontal" 水平--><LinearLayoutandroid:layout_width="match_parent"android:layout_height="400dp"android:orientation="horizontal"><androidx.appcompat.widget.AppCompatButtonandroid:layout_width="wrap_content"android:layout_height="wrap_content"android:background="@color/blue"/><androidx.appcompat.widget.AppCompatButtonandroid:layout_width="wrap_content"android:layout_height="wrap_content"android:background="@color/pink"/><androidx.appcompat.widget.AppCompatButtonandroid:layout_width="wrap_content"android:layout_height="wrap_content"android:background="#00FF99"/><androidx.appcompat.widget.AppCompatButtonandroid:layout_width="wrap_content"android:layout_height="wrap_content"android:background="#AA6699"/></LinearLayout>
在一个布局中只能有一种排列方式,要么垂直要么水平,如果想多实现,可以多用几个布局,分模块的进行布局管理 。
(5)对齐方式:andorid:gravity
对齐方式就是布局中的控件所在的位置,我们现在主要的阅读方式为从左向右,从上向下,所以,再添加控件时,会自动的放于左上角,切记第一条属性是写在大布局中的,而不是单个的控件中,以此段代码为例,第二个可以放置在控件中调整位置,在此处我们以第一种方式为例,因为内容大同小异,只是编写的位置不同罢了
<LinearLayoutandroid:layout_width="match_parent"android:layout_height="400dp"android:orientation="vertical"android:gravity="center"><androidx.appcompat.widget.AppCompatButtonandroid:layout_width="wrap_content"android:layout_height="wrap_content"android:background="@color/blue"/><androidx.appcompat.widget.AppCompatButtonandroid:layout_width="wrap_content"android:layout_height="wrap_content"android:background="@color/pink"/><androidx.appcompat.widget.AppCompatButtonandroid:layout_width="wrap_content"android:layout_height="wrap_content"android:background="#00FF99"/><androidx.appcompat.widget.AppCompatButtonandroid:layout_width="wrap_content"android:layout_height="wrap_content"android:background="#AA6699"/></LinearLayout>| 对齐方式 | ||
| andorid:gravity="center" | 整体居中 |  |
| andorid:gravity="left" / andorid:gravity="start" / andorid:gravity="top" | 左部 |  |
| andorid:gravity="right" / andorid:gravity="end" | 右部 |  |
| andorid:gravity="bottom" | 底部 |  |
| andorid:gravity="center_horizontal" | 水平居中 |  |
| andorid:gravity="center_vertical" | 垂直居中 |  |
2.权重:andorid:layout_weight
权重就是控件所占剩余布局的比例问题,怎样分配问题
<LinearLayoutandroid:layout_width="match_parent"android:layout_height="match_parent"android:orientation="horizontal"android:background="#e50c0c"><LinearLayoutandroid:layout_width="0dp"android:layout_height="fill_parent"android:background="#ffc0cb"android:layout_weight="1" /><LinearLayoutandroid:layout_width="0dp"android:layout_height="fill_parent"android:background="#0000ff"android:layout_weight="1" /></LinearLayout>权重andorid:layout_weight=”“的值是可以随便定义的,里面的数字相当于权重,设置的数字相加为整个布局的大小,比如以上代码为例,第一个控件权重为1,第二个也为1,也就是说整个布局大小为2,两个控件各占1,数字可以任意更改,控件也可以任意添加,重要的是美观如下图

将一个控件的权重设置为2,则它 占整个布局的三分之二

0dp的设置一般情况都是因为权重问题,这样便可以按照自己所设置的比例进行显示,水平布局设置width,垂直布局设置height=0dp。
前面提到了权重是占剩余部分的占据比例,是因为我们在设计时不一定都是0dp,有可能提前某个控件设置了长度或是高度,这时,如果我们再用权重属性,分开的就是整个布局剩下没有占用的部分,例如:同样的代码,我将第一个LinearLayout的宽度提前设置了200dp。现在来看看效果
<LinearLayoutandroid:layout_width="match_parent"android:layout_height="match_parent"android:orientation="horizontal"android:background="#e50c0c"><LinearLayoutandroid:layout_width="200dp"android:layout_height="fill_parent"android:background="#ffc0cb"android:layout_weight="1" /><LinearLayoutandroid:layout_width="0dp"android:layout_height="fill_parent"android:background="#0000ff"android:layout_weight="2" /></LinearLayout>
第一个控件先占了整个布局的一部分,剩余的部再进行分割。
附加:Java代码中设置weight属性
1.在activity_main.xml文件中新建一个<LinearLayout>
<LinearLayoutandroid:id="@+id/abc"android:layout_width="match_parent"android:layout_height="match_parent"android:orientation="horizontal"android:background="#e50c0c"></LinearLayout>2.在 MainActivity.java 文件中设置weight
package com.example.example;import android.os.Bundle;
import android.widget.Button;
import android.widget.LinearLayout;
import androidx.appcompat.app.AppCompatActivity;
public class MainActivity extends AppCompatActivity { @Overrideprotected void onCreate(Bundle savedInstanceState) {super.onCreate(savedInstanceState);setContentView(R.layout.activity_main);// 创建一个 LinearLayout 对象LinearLayout linearLayout = new LinearLayout(MainActivity.this);// 设置 LinearLayout 的布局方向为垂直linearLayout.setOrientation(LinearLayout.VERTICAL);// 创建一个按钮对象Button button = new Button(MainActivity.this);button.setText("点击");// 创建 LinearLayout.LayoutParams 对象并设置相应参数LinearLayout.LayoutParams layoutParams = new LinearLayout.LayoutParams(LinearLayout.LayoutParams.MATCH_PARENT,LinearLayout.LayoutParams.WRAP_CONTENT);layoutParams.weight = 1.0f;// 将布局参数应用到按钮上button.setLayoutParams(layoutParams);// 将按钮添加到 LinearLayout 中linearLayout.addView(button);LinearLayout rootLayout = findViewById(R.id.abc);// 将 LinearLayout 添加到活动的根布局中rootLayout.addView(linearLayout);}
}
3.运行应用 即可

3. 为LinearLayout设置分割线
(1)直接在布局中添加一个view
<LinearLayoutandroid:layout_width="match_parent"android:layout_height="wrap_content"android:orientation="vertical"android:layout_marginTop="16dp"android:layout_marginBottom="16dp"><!-- 添加一条细线作为背景 --><Viewandroid:layout_width="match_parent"android:layout_height="1dp"android:background="#000000" /><!-- 在这里添加其他布局元素 --></LinearLayout>
(2)第二种是使用LinearLayout的一个divider属性
直接为LinearLayout设置分割线 这里就需要自己准备一张线的图片了
a. android:divider 设置作为分割线的图片
src/main/res/drawable 下面创建 ktv_line_div.xml 内容为:
<?xml version="1.0" encoding="utf-8"?>
<shape xmlns:android="http://schemas.android.com/apk/res/android"android:shape="rectangle"><solid android:color="#808080" /> <!-- 灰色背景 --><size android:height="1dp" /> <!-- 定义细线高度为1dp -->
</shape>
b. android:showDividers 设置分割线的位置,none(无),beginning(开始),end(结束),middle(每两个组件间)
c. android:dividerPadding 设置分割线的可以控制分隔线与子视图之间的间距,使布局在显示分隔线时具有更灵活的外观效果,主要用于 AdapterView(如ListView、GridView)中的分隔线样式
<LinearLayout xmlns:android="http://schemas.android.com/apk/res/android"android:id="@+id/LinearLayout1"android:layout_width="match_parent"android:layout_height="match_parent"android:divider="@drawable/ktv_line_div"android:orientation="vertical"android:showDividers="middle"android:dividerPadding="10dp" ><Buttonandroid:layout_width="wrap_content"android:layout_height="wrap_content"android:text="按钮1" /><Buttonandroid:layout_width="wrap_content"android:layout_height="wrap_content"android:text="按钮2" /></LinearLayout>
应用之后就可以看到细线

4. 注意事项
使用Layout_gravity的一个很重要的问题
问题内容: 在一个LinearLayout的水平方向中布置两个TextView,想让一个左,一个右,怎么搞?
<LinearLayout xmlns:android="http://schemas.android.com/apk/res/android"xmlns:tools="http://schemas.android.com/tools"android:layout_width="match_parent"android:layout_height="match_parent"android:orientation="horizontal"  ><TextViewandroid:layout_width="wrap_content"android:layout_height="200dp"android:layout_gravity="left"android:background="#ffc0cb"android:gravity="center"android:text="~~~~~~~pink......" /><TextViewandroid:layout_width="wrap_content"android:layout_height="200dp"android:layout_gravity="right"android:background="#0000ff"android:gravity="center"android:text="~~~~~~~blue......" />
</LinearLayout>
运行结果:

看到这里,可能会想在外层LinearLayout加个 android:gravity="left" 的属性,然后设置第二个 TextView的 android:layout_gravity 为 android:layout_gravity=“right"
<LinearLayout xmlns:android="http://schemas.android.com/apk/res/android"xmlns:tools="http://schemas.android.com/tools"android:layout_width="match_parent"android:layout_height="match_parent"android:orientation="horizontal"  android:gravity="left"   ><TextViewandroid:layout_width="wrap_content"android:layout_height="200dp"android:layout_gravity="left"android:background="#ffc0cb"android:gravity="center"android:text="~~~~~~~pink......" /><TextViewandroid:layout_width="wrap_content"android:layout_height="200dp"android:layout_gravity="right"android:background="#0000ff"android:gravity="center"android:text="~~~~~~~blue......" />
</LinearLayout>
运行结果没变化:

小编想说当 android:orientation="vertical" 时, 只有水平方向的设置才起作用,垂直方向的设置不起作用。 即: left , right , center_horizontal 是生效的。 当 android:orientation="horizontal" 时, 只有垂直方向的设置才起作用,水平方向的设置不起作用。 即: top , bottom , center_vertical 是生效的。
当改成 android:orientation="vertical" 时,看一下效果:

综上可看出,仍然没有实现想要对结果,像这种情况是建议使用 RelativeLayout(相对布局)
非要用LinearLayout的解决的话也可以:
<LinearLayout xmlns:android="http://schemas.android.com/apk/res/android"android:id="@+id/LinearLayout1"android:layout_width="match_parent"android:layout_height="match_parent"android:orientation="horizontal" ><TextViewandroid:layout_width="0dp"android:layout_height="200dp"android:layout_weight="1"android:background="#0000ff"android:gravity="center"android:text="O(∩_∩)O哈哈~" /><Viewandroid:layout_width="0dp"android:layout_height="0dp"android:layout_weight="1" /><TextViewandroid:layout_width="130dp"android:layout_height="200dp"android:background="#ffc0cb"android:gravity="center"android:text="(*^__^*) 嘻嘻……" /></LinearLayout>在两个 TextView 之间添加了一个空的 View,并将它的 layout_weight 设置为 1。这样第二个 TextView 就会被挤到右边,并且两个 TextView 以及中间的 View 将占据同样的空间,实现了水平方向上的靠右对齐。

三、总结

相关文章:

Android Studio开发学习(五)———LinearLayout(线性布局)
一、布局 认识了解一下Android中的布局,分别是: LinearLayout(线性布局),RelativeLayout(相对布局),TableLayout(表格布局), FrameLayout(帧布局),AbsoluteLayout(绝对布局),GridLayout(网格布局) 等。 二、…...
RAG 版面分析------文本分块面)
大模型(LLMs)RAG 版面分析------文本分块面
一、为什么需要对文本分块? 使用大型语言模型(LLM)时,切勿忽略文本分块的重要性,其对处理结果的好坏有重大影响。 考虑以下场景:你面临一个几百页的文档,其中充满了文字,你希望对其…...

Web3游戏先锋 Big Time Studios 重磅推出 $OL 通证,赋能 Open Loot 游戏平台
作为 Web3 游戏领域的领军者,Big Time Studios 不仅创造了热门游戏《Big Time》,还开发了 Open Loot 平台,至今交易量已超过 5 亿美元。如今,Open Loot 平台的活跃用户可以获得 $OL 代币,这是该平台推出的首个实用型代…...

Linux—ln(link files)命令使用方法(How to create links on Linux)
Linux—ln(link files)命令使用方法 在 Linux 系统中工作时,需要在不同的目录中使用相同的文件时,不必在每个目录下都复制一份文件,这样不仅浪费磁盘空间,还会导致文件管理上的混乱。 ln(link files) 便是…...

学习日记_20241110_聚类方法(K-Means)
前言 提醒: 文章内容为方便作者自己后日复习与查阅而进行的书写与发布,其中引用内容都会使用链接表明出处(如有侵权问题,请及时联系)。 其中内容多为一次书写,缺少检查与订正,如有问题或其他拓展…...

解决Oracle DECODE函数字符串截断问题的深度剖析20241113
解决Oracle DECODE函数字符串截断问题的深度剖析 在使用Oracle数据库进行开发时,开发者可能会遇到一些令人困惑的问题。其中,在使用DECODE函数时,返回的字符串被截断就是一个典型的案例。本文将以学生管理系统为背景,深入探讨这个…...
)
开源模型应用落地-语音转文本-whisper模型-AIGC应用探索(二)
一、前言 语音转文本技术具有重要价值。它能提高信息记录和处理的效率,使人们可以快速将语音内容转换为可编辑、可存储的文本形式,方便后续查阅和分析。在教育领域,可帮助学生更好地记录课堂重点;在办公场景中,能简化会议记录工作。同时,该技术也为残障人士提供了便利,让…...

PHP框架 单一入口和多入口以及优缺点
在PHP框架中,单一入口和多入口是两种不同的应用架构设计方式,以下是关于这两者及其优缺点的详细解释: 一、单一入口 定义: 单一入口(Single Entry Point)指的是应用程序通过一个统一的文件(通…...

PhpSpreadsheet导出图片
PhpSpreadsheet导出图片 //导出public function pdf($ids){$jzInfo $this->model->where(id,$ids)->find();try {//巡检人员$staff_ids \app\admin\model\inspection\Plan::where(id,$jzInfo[plan_id])->value(staff_id);$staff_names \app\admin\model\inspect…...

AI 提示词(Prompt)入门 十:最佳实践|详细询问,提供细节!
1、原则解释 当与 ChatGPT 交流时,提供具体和详细的信息非常重要。 这样做可以帮助 ChatGPT 更准确地理解你的需求和上下文,从而生成更相关和有用的回答 明确的信息可以包括具体的问题背景、相关领域的说明、你所期望的答案类型等。 2、如何实践 明…...

web应用安全和信息泄露预防
文章目录 1:spring actuator导致的信息泄露1.1、Endpoint配置启用检测1.2、信息泄露复现1.3、防御 2:服务端口的合理使用3:弱口令(密码)管理4:服务端攻击4.1、短信业务,文件上传等资源型接口1、…...

《人工智能深度学习的基本路线图》
《人工智能深度学习的基本路线图》 基础准备阶段 数学基础: 线性代数:深度学习中大量涉及矩阵运算、向量空间等概念,线性代数是理解和处理这些的基础。例如,神经网络中的权重矩阵、输入向量的运算等都依赖于线性代数知识。学习内容…...

基于Java Springboot宠物猫售卖管理系统
一、作品包含 源码数据库全套环境和工具资源部署教程 二、项目技术 前端技术:Html、Css、Js、Vue、Element-ui 数据库:MySQL 后端技术:Java、Spring Boot、MyBatis 三、运行环境 开发工具:IDEA/eclipse 数据库:…...

力扣-Hot100-链表其三【算法学习day.36】
前言 ###我做这类文档一个重要的目的还是给正在学习的大家提供方向(例如想要掌握基础用法,该刷哪些题?)我的解析也不会做的非常详细,只会提供思路和一些关键点,力扣上的大佬们的题解质量是非常非常高滴&am…...

iOS逆向入门:使用theos注入第三方依赖库
背景 theos是一个跨平台的软件开发框架,常用于管理,开发和部署iOS项目,同时也是开发iOS越狱插件的主要工具。和MonkeyDev不同的是,它不依赖于xcode,可以在多个操作系统上运行。一个完整的iOS越狱开发流程包括…...

JavaScript 原型
JavaScript 的原型(Prototype)是其面向对象编程模型的核心概念之一,它决定了对象如何继承属性和方法。通过理解 JavaScript 的原型,你可以更好地理解对象之间的关系以及如何扩展对象功能。 核心概念 [[Prototype]](内部…...

力扣 LeetCode 20. 有效的括号(Day5:栈与队列)
解题思路: 使用栈 只有三种情况 1. ( [ { } ] ( ( 左括号多了 -> 最后栈中经过抵消会剩下括号 2. [ { ( ] } ] 括号不匹配 -> return false 3. [ { } ] ( ) ) ) 右括号多了 -> 未遍历完时,栈提前为空,…...

git使用及上线流程(仅为我工作中常用)
推荐软件或者直接终端 ⚠️注意:在确保远程和本地分支都可使用的情况下 git常见使用命令 ls---查看所有目录 pwd---本机密码 cd 目录名---进入目录 Touch ---创建文本文件 git status---查看状态 git branch---查看分支 git pull---拉取远程最新代码 git checkou…...

React Native 全栈开发实战班 - 打包发布之热更新
在完成 React Native 应用的开发与性能优化后,下一步就是将应用打包并发布到各大应用市场,如 Apple App Store 和 Google Play Store。本章节已经详细介绍了打包与发布的流程,包括 Android 和 iOS 平台的配置、打包步骤、签名配置以及发布到应…...

2024年11月16日 星期六 重新整理Go技术
今日格言 坚持每天进步一点点~ 一个人也可以是一个团队~ 学习全栈开发, 做自己喜欢的产品~~ 简介 大家好, 我是张大鹏, 今天是2024年11月16日星期六, 很高兴在这里给大家分享技术. 今天又是休息的一天, 做了很多的思考, 整理了自己掌握的技术, 比如Java, Python, Golang,…...

基于距离变化能量开销动态调整的WSN低功耗拓扑控制开销算法matlab仿真
目录 1.程序功能描述 2.测试软件版本以及运行结果展示 3.核心程序 4.算法仿真参数 5.算法理论概述 6.参考文献 7.完整程序 1.程序功能描述 通过动态调整节点通信的能量开销,平衡网络负载,延长WSN生命周期。具体通过建立基于距离的能量消耗模型&am…...
【JVM】- 内存结构
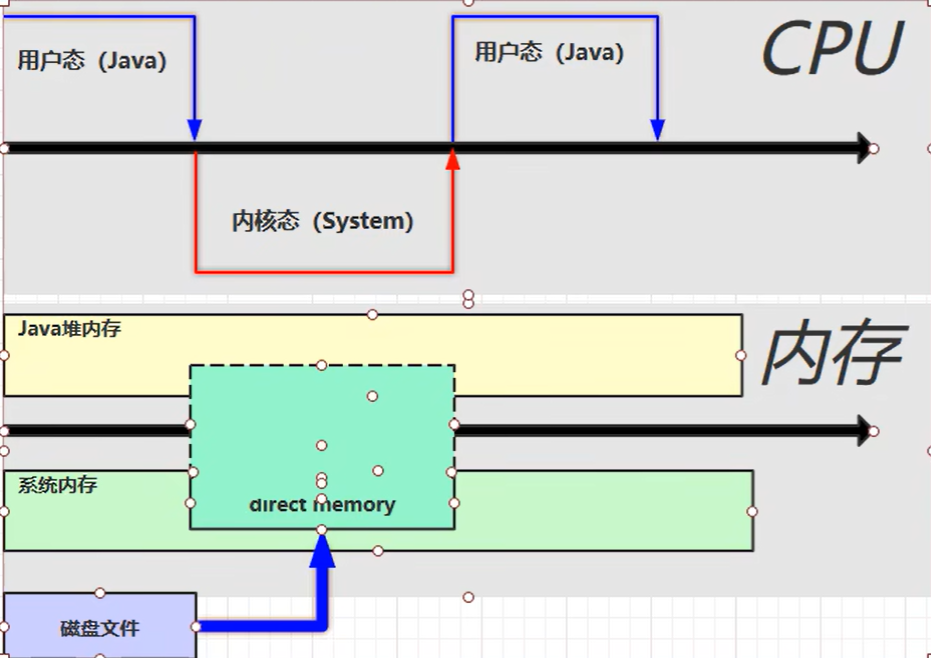
引言 JVM:Java Virtual Machine 定义:Java虚拟机,Java二进制字节码的运行环境好处: 一次编写,到处运行自动内存管理,垃圾回收的功能数组下标越界检查(会抛异常,不会覆盖到其他代码…...
MMaDA: Multimodal Large Diffusion Language Models
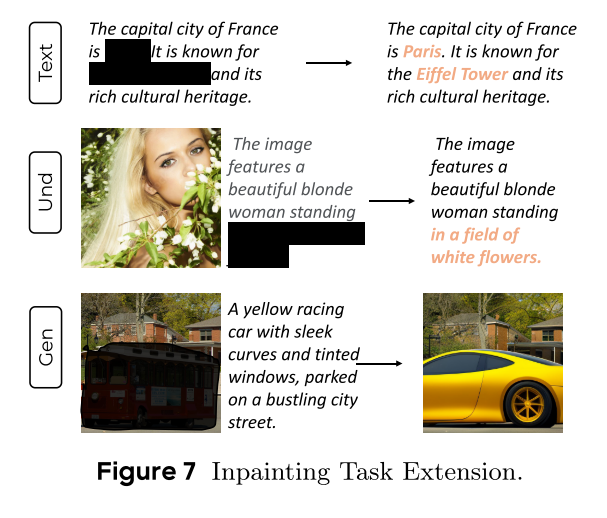
CODE : https://github.com/Gen-Verse/MMaDA Abstract 我们介绍了一种新型的多模态扩散基础模型MMaDA,它被设计用于在文本推理、多模态理解和文本到图像生成等不同领域实现卓越的性能。该方法的特点是三个关键创新:(i) MMaDA采用统一的扩散架构…...
)
Angular微前端架构:Module Federation + ngx-build-plus (Webpack)
以下是一个完整的 Angular 微前端示例,其中使用的是 Module Federation 和 npx-build-plus 实现了主应用(Shell)与子应用(Remote)的集成。 🛠️ 项目结构 angular-mf/ ├── shell-app/ # 主应用&…...
系统掌握PyTorch:图解张量、Autograd、DataLoader、nn.Module与实战模型
本文较长,建议点赞收藏,以免遗失。更多AI大模型应用开发学习视频及资料,尽在聚客AI学院。 本文通过代码驱动的方式,系统讲解PyTorch核心概念和实战技巧,涵盖张量操作、自动微分、数据加载、模型构建和训练全流程&#…...
)
Leetcode33( 搜索旋转排序数组)
题目表述 整数数组 nums 按升序排列,数组中的值 互不相同 。 在传递给函数之前,nums 在预先未知的某个下标 k(0 < k < nums.length)上进行了 旋转,使数组变为 [nums[k], nums[k1], …, nums[n-1], nums[0], nu…...

DeepSeek源码深度解析 × 华为仓颉语言编程精粹——从MoE架构到全场景开发生态
前言 在人工智能技术飞速发展的今天,深度学习与大模型技术已成为推动行业变革的核心驱动力,而高效、灵活的开发工具与编程语言则为技术创新提供了重要支撑。本书以两大前沿技术领域为核心,系统性地呈现了两部深度技术著作的精华:…...

如何在Windows本机安装Python并确保与Python.NET兼容
✅作者简介:2022年博客新星 第八。热爱国学的Java后端开发者,修心和技术同步精进。 🍎个人主页:Java Fans的博客 🍊个人信条:不迁怒,不贰过。小知识,大智慧。 💞当前专栏…...

前端工具库lodash与lodash-es区别详解
lodash 和 lodash-es 是同一工具库的两个不同版本,核心功能完全一致,主要区别在于模块化格式和优化方式,适合不同的开发环境。以下是详细对比: 1. 模块化格式 lodash 使用 CommonJS 模块格式(require/module.exports&a…...
李沐--动手学深度学习--GRU
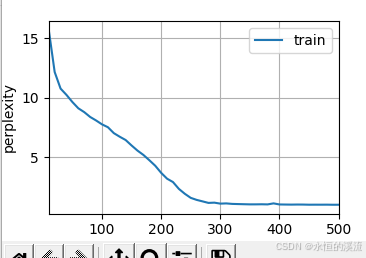
1.GRU从零开始实现 #9.1.2GRU从零开始实现 import torch from torch import nn from d2l import torch as d2l#首先读取 8.5节中使用的时间机器数据集 batch_size,num_steps 32,35 train_iter,vocab d2l.load_data_time_machine(batch_size,num_steps) #初始化模型参数 def …...
