30分钟内搭建一个全能轻量级springboot 3.4 + 脚手架 <5> 5分钟集成好caffeine并使用注解操作缓存
快速导航
<1> 5分钟快速创建一个springboot web项目
<2> 5分钟集成好最新版本的开源swagger ui,并使用ui操作调用接口
<3> 5分钟集成好druid并使用druid自带监控工具监控sql请求
<4> 5分钟集成好mybatisplus并使用mybatisplus generator自动生成代码
<5> 5分钟集成好caffeine并使用注解操作缓存
<6> 5分钟集成好前端页面,使用vue开发前端
目录
- 一、准备工作
- 1.1 maven 安装caffeine和相关依赖
- 1.2 配置caffeine
- 1.2.1 javaconfig配置caffeine
- 1.2.2 缓存代码编写
- 1.3 注解说明
- 二、测试
- 三、注解操作缓存原理以及一些难点排查
- 3.1 注解操作缓存原理
- 3.2 难点排查
- 总结
在 Spring Boot 中,注解操作缓存的原理基于 Spring 的缓存抽象 (Spring Cache Abstraction)。使用缓存注解时,Spring 会自动处理与缓存相关的逻辑,而开发者只需要专注于业务代码。常用的缓存注解有 @Cacheable、@CachePut 和 @CacheEvict。
一、准备工作
1.1 maven 安装caffeine和相关依赖
<dependency><groupId>com.github.ben-manes.caffeine</groupId><artifactId>caffeine</artifactId><version>3.1.8</version> <!-- 确保版本兼容 -->
</dependency>
<dependency><groupId>org.springframework.boot</groupId><artifactId>spring-boot-starter-cache</artifactId>
</dependency>
1.2 配置caffeine
有两种配置方式
1.2.1 javaconfig配置caffeine
package com.example.demo.config;import com.github.benmanes.caffeine.cache.Caffeine;
import org.springframework.cache.CacheManager;
import org.springframework.cache.annotation.EnableCaching;
import org.springframework.cache.caffeine.CaffeineCacheManager;
import org.springframework.context.annotation.Bean;
import org.springframework.context.annotation.Configuration;import java.util.List;
import java.util.concurrent.TimeUnit;@Configuration
@EnableCaching
public class CacheConfig {@Beanpublic Caffeine<Object, Object> caffeineConfig() {return Caffeine.newBuilder().maximumSize(1000).expireAfterWrite(5, TimeUnit.MINUTES)
//                .weakKeys() // 很坑会,基本上很快就把key清理掉了,缓存再也命中不了.recordStats();}@Beanpublic CacheManager cacheManager(Caffeine<Object, Object> caffeine) {CaffeineCacheManager cacheManager = new CaffeineCacheManager();cacheManager.setCaffeine(caffeine);cacheManager.setCacheNames(List.of(new String[]{"users"}));return cacheManager;}}
1.2.2 缓存代码编写
TestController
package com.example.demo.web;import com.example.demo.entity.User;
import com.example.demo.service.IUserService;
import io.swagger.v3.oas.annotations.Operation;
import io.swagger.v3.oas.annotations.tags.Tag;
import jakarta.annotation.Resource;
import org.springframework.web.bind.annotation.GetMapping;
import org.springframework.web.bind.annotation.PathVariable;
import org.springframework.web.bind.annotation.RequestMapping;
import org.springframework.web.bind.annotation.RestController;import java.util.List;@RestController
@RequestMapping("/test")
@Tag(name = "User API", description = "用户管理相关接口")
public class TestController {@Resourceprivate IUserService userService;@GetMapping("")@Operation(method = "test", summary = "测试接口")public String test(){return "test";}@GetMapping("/user")@Operation(method = "allUsers", summary = "获取所有用户")public List<User> allUsers(){return userService.list();}@GetMapping("/user/{id}")@Operation(method = "getUserCache", summary = "获取用户缓存")public void testGetUserCache(@PathVariable String id){User user = userService.getUserById(id);System.out.println(user);}}
UserServiceImpl
package com.example.demo.service.impl;import com.baomidou.mybatisplus.extension.service.impl.ServiceImpl;
import com.example.demo.entity.User;
import com.example.demo.mapper.UserMapper;
import com.example.demo.service.IUserService;
import org.springframework.cache.annotation.CacheConfig;
import org.springframework.cache.annotation.CacheEvict;
import org.springframework.cache.annotation.CachePut;
import org.springframework.cache.annotation.Cacheable;
import org.springframework.stereotype.Service;/*** <p>* 测试用户 服务实现类* </p>** @author allens* @since 2025-01-15*/
@Service
public class UserServiceImpl extends ServiceImpl<UserMapper, User> implements IUserService {@Cacheable(value = "users", key = "'user_' + #id", unless = "#result == null")public User getUserById(String id) {// 模拟数据库查询return this.getBaseMapper().selectById(id);}@CachePut(value = "users", key = "#id")public void updateUser(String id, String name) {// 模拟更新数据库并返回新值User user = this.getBaseMapper().selectById(id);user.setName(name);this.getBaseMapper().updateById(user);}@CacheEvict(value = "users", key = "#id")public void deleteUser(String id) {// 模拟删除数据库记录System.out.println("User with id " + id + " has been deleted from database and cache.");this.getBaseMapper().deleteById(id);}@CacheEvict(value = "users", allEntries = true)public void clearCache() {System.out.println("All user cache has been cleared.");}}
1.3 注解说明
请参考我的这篇文章 Springboot 注解使用详解
二、测试

点击发送请求,第一次执行了sql,第二次在方法体中打断点,发现没有进入。且日志未输出相关查询数据库操作。

三、注解操作缓存原理以及一些难点排查
3.1 注解操作缓存原理
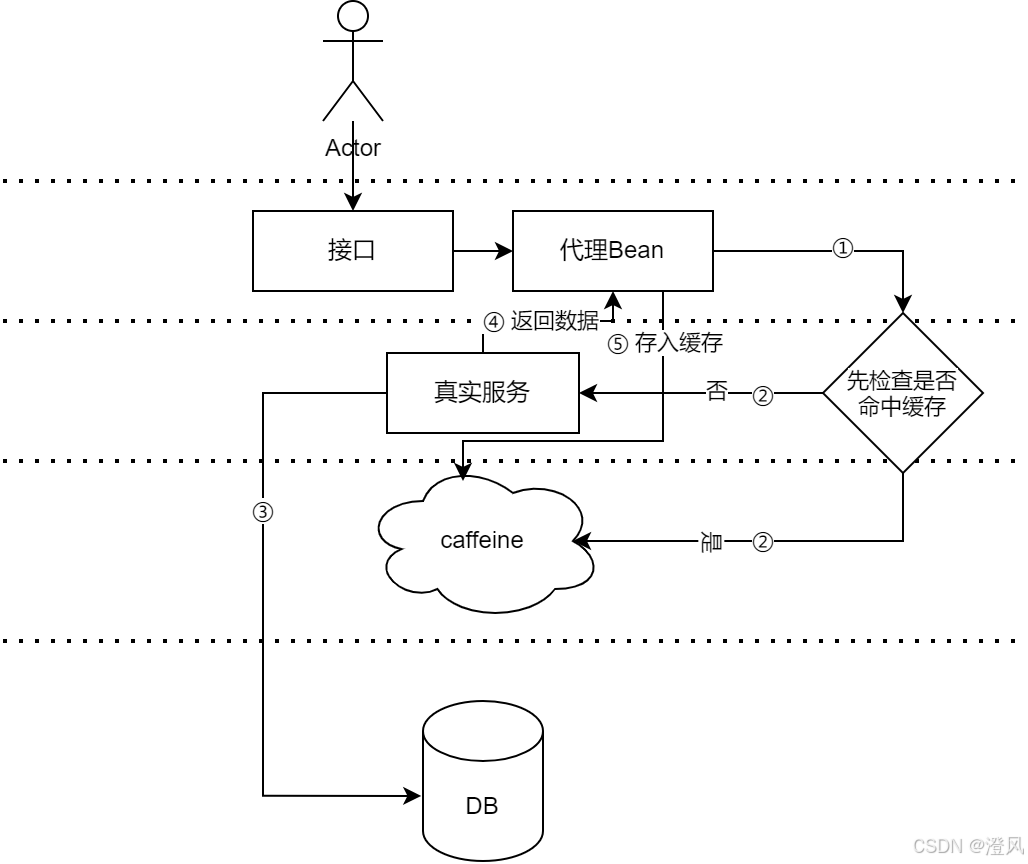
工作原理总结:
1. 代理模式:Spring 使用动态代理或 CGLIB 代理来拦截带有缓存注解的方法调用。代理会在方法调用之前或之后进行缓存操作。
开启注解缓存是靠 @EnableCaching 来实现的,那么我们从这个注解开始入手:
@Target(ElementType.TYPE)
@Retention(RetentionPolicy.RUNTIME)
@Documented
@Import(CachingConfigurationSelector.class)
public @interface EnableCaching {/*** Indicate whether subclass-based (CGLIB) proxies are to be created as opposed* to standard Java interface-based proxies. The default is {@code false}. <strong>* Applicable only if {@link #mode()} is set to {@link AdviceMode#PROXY}</strong>.* <p>Note that setting this attribute to {@code true} will affect <em>all</em>* Spring-managed beans requiring proxying, not just those marked with {@code @Cacheable}.* For example, other beans marked with Spring's {@code @Transactional} annotation will* be upgraded to subclass proxying at the same time. This approach has no negative* impact in practice unless one is explicitly expecting one type of proxy vs another,* for example, in tests.*/boolean proxyTargetClass() default false;/*** Indicate how caching advice should be applied.* <p><b>The default is {@link AdviceMode#PROXY}.</b>* Please note that proxy mode allows for interception of calls through the proxy* only. Local calls within the same class cannot get intercepted that way;* a caching annotation on such a method within a local call will be ignored* since Spring's interceptor does not even kick in for such a runtime scenario.* For a more advanced mode of interception, consider switching this to* {@link AdviceMode#ASPECTJ}.*/AdviceMode mode() default AdviceMode.PROXY;/*** Indicate the ordering of the execution of the caching advisor* when multiple advices are applied at a specific joinpoint.* <p>The default is {@link Ordered#LOWEST_PRECEDENCE}.*/int order() default Ordered.LOWEST_PRECEDENCE;}
@Import(CachingConfigurationSelector.class) 我们进入CachingConfigurationSelector 看下:
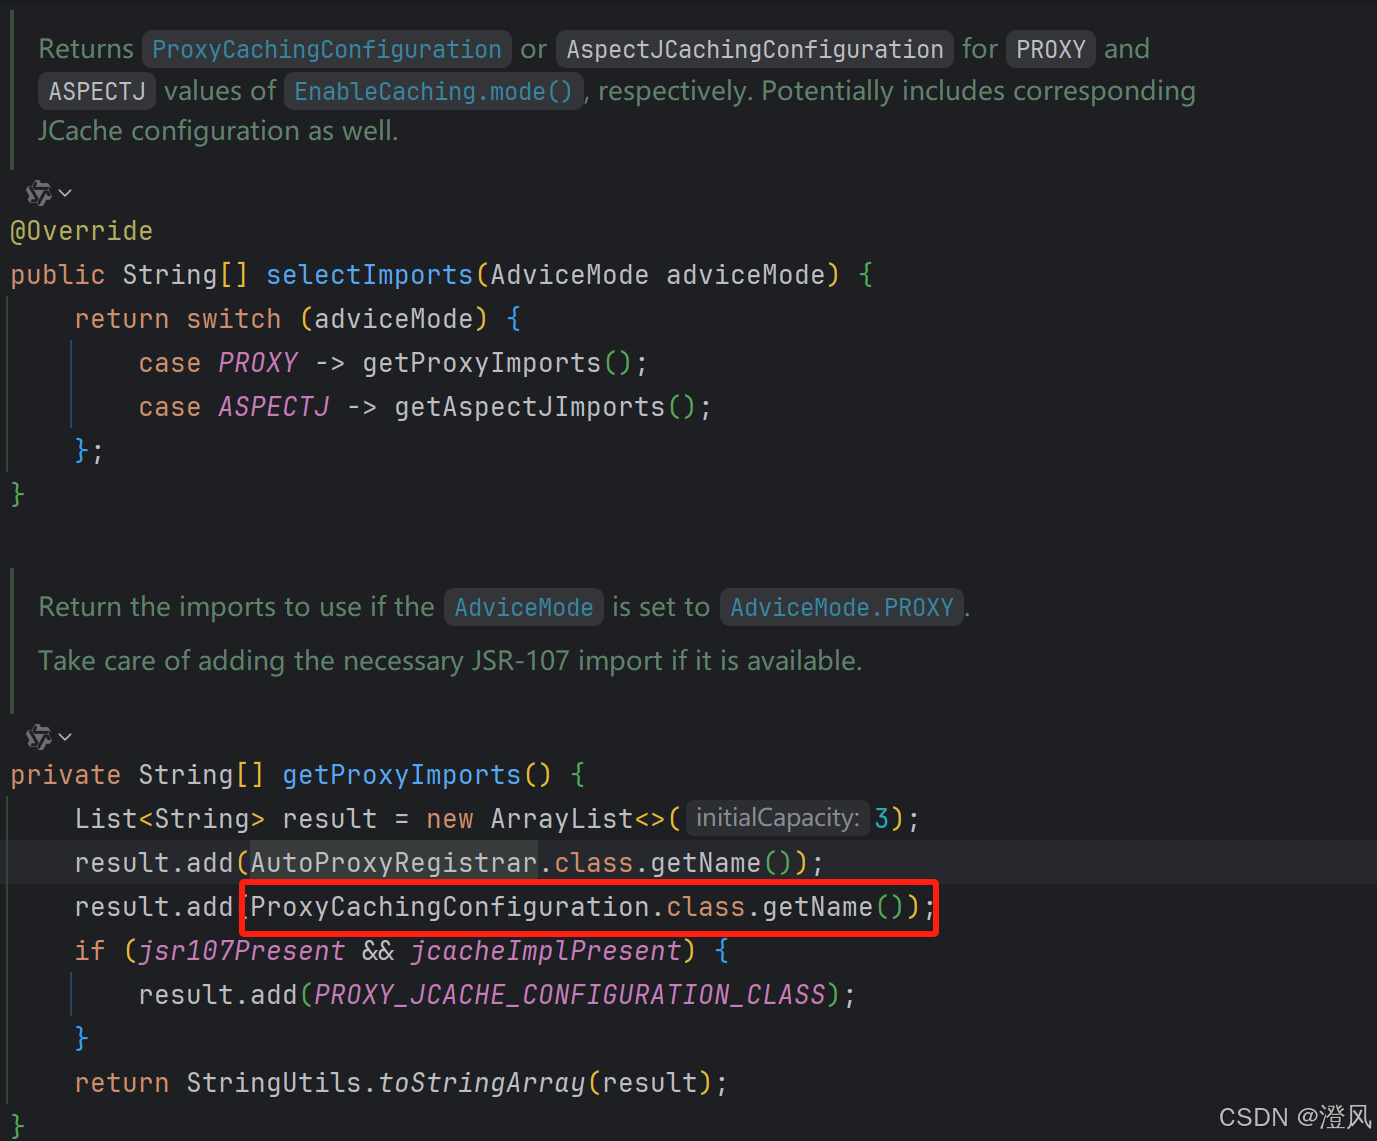
点击进入ProxyCachingConfiguration
@Bean(name = CacheManagementConfigUtils.CACHE_ADVISOR_BEAN_NAME)@Role(BeanDefinition.ROLE_INFRASTRUCTURE)public BeanFactoryCacheOperationSourceAdvisor cacheAdvisor(CacheOperationSource cacheOperationSource, CacheInterceptor cacheInterceptor) {BeanFactoryCacheOperationSourceAdvisor advisor = new BeanFactoryCacheOperationSourceAdvisor();advisor.setCacheOperationSource(cacheOperationSource);advisor.setAdvice(cacheInterceptor);if (this.enableCaching != null) {advisor.setOrder(this.enableCaching.<Integer>getNumber("order"));}return advisor;
}@Bean
@Role(BeanDefinition.ROLE_INFRASTRUCTURE)
public CacheOperationSource cacheOperationSource() {// Accept protected @Cacheable etc methods on CGLIB proxies, as of 6.0.return new AnnotationCacheOperationSource(false);
}@Bean
@Role(BeanDefinition.ROLE_INFRASTRUCTURE)
public CacheInterceptor cacheInterceptor(CacheOperationSource cacheOperationSource) {CacheInterceptor interceptor = new CacheInterceptor();interceptor.configure(this.errorHandler, this.keyGenerator, this.cacheResolver, this.cacheManager);interceptor.setCacheOperationSource(cacheOperationSource);return interceptor;
}
我们可以看到动态代理注入了一个interceptor,我们这个时候就可以猜测,所有的缓存操作都是在这个interceptor里边进行操作的(不熟悉动态代理原理的可以先去看下)。
public class CacheInterceptor extends CacheAspectSupport implements MethodInterceptor, Serializable {@Override@Nullablepublic Object invoke(final MethodInvocation invocation) throws Throwable {Method method = invocation.getMethod();CacheOperationInvoker aopAllianceInvoker = () -> {try {return invocation.proceed();}catch (Throwable ex) {throw new CacheOperationInvoker.ThrowableWrapper(ex);}};Object target = invocation.getThis();Assert.state(target != null, "Target must not be null");try {return execute(aopAllianceInvoker, target, method, invocation.getArguments());}catch (CacheOperationInvoker.ThrowableWrapper th) {throw th.getOriginal();}}
}
再点击进入 CacheAspectSupport 发现有个方法叫execute,礼拜呢有一个findCachedValue方法,这个就是查询缓存有没有命中,如果有命中直接返回缓存,如果没命中那么就会执行员原服务方法获取数据。
@Nullable
private Object execute(CacheOperationInvoker invoker, Method method, CacheOperationContexts contexts) {if (contexts.isSynchronized()) {// Special handling of synchronized invocationreturn executeSynchronized(invoker, method, contexts);}// Process any early evictionsprocessCacheEvicts(contexts.get(CacheEvictOperation.class), true,CacheOperationExpressionEvaluator.NO_RESULT);// Check if we have a cached value matching the conditionsObject cacheHit = findCachedValue(invoker, method, contexts); // 查询缓存if (cacheHit == null || cacheHit instanceof Cache.ValueWrapper) { // 判断是否命中缓存return evaluate(cacheHit, invoker, method, contexts);}return cacheHit;
}
CacheAspectSupport.findCachedValue
@Nullable
private Object findCachedValue(CacheOperationInvoker invoker, Method method, CacheOperationContexts contexts) {for (CacheOperationContext context : contexts.get(CacheableOperation.class)) {if (isConditionPassing(context, CacheOperationExpressionEvaluator.NO_RESULT)) {Object key = generateKey(context, CacheOperationExpressionEvaluator.NO_RESULT);Object cached = findInCaches(context, key, invoker, method, contexts); // 查找缓存if (cached != null) {if (logger.isTraceEnabled()) {logger.trace("Cache entry for key '" + key + "' found in cache(s) " + context.getCacheNames());}return cached;}else {if (logger.isTraceEnabled()) {logger.trace("No cache entry for key '" + key + "' in cache(s) " + context.getCacheNames());}}}}return null;
}
CacheAspectSupport.findInCaches
@Nullable
private Object findInCaches(CacheOperationContext context, Object key,CacheOperationInvoker invoker, Method method, CacheOperationContexts contexts) {for (Cache cache : context.getCaches()) {if (CompletableFuture.class.isAssignableFrom(context.getMethod().getReturnType())) {CompletableFuture<?> result = doRetrieve(cache, key);  // 重试策略if (result != null) {return result.exceptionally(ex -> {getErrorHandler().handleCacheGetError((RuntimeException) ex, cache, key);return null;}).thenCompose(value -> (CompletableFuture<?>) evaluate((value != null ? CompletableFuture.completedFuture(unwrapCacheValue(value)) : null),invoker, method, contexts));}else {continue;}}if (this.reactiveCachingHandler != null) {Object returnValue = this.reactiveCachingHandler.findInCaches(context, cache, key, invoker, method, contexts);if (returnValue != ReactiveCachingHandler.NOT_HANDLED) {return returnValue;}}Cache.ValueWrapper result = doGet(cache, key);if (result != null) {return result;}}return null;
}
CacheAspectSupport.doGet 可以看到最终拿的就是我们在cache manager 里边配置的cache
@Nullable
protected Cache.ValueWrapper doGet(Cache cache, Object key) {try {return cache.get(key); }catch (RuntimeException ex) {getErrorHandler().handleCacheGetError(ex, cache, key);return null;  // If the exception is handled, return a cache miss}
}
2. 缓存管理:缓存的存储和取用是通过 Spring 的缓存抽象来管理的。缓存的实现可以是简单的内存缓存,也可以是分布式缓存,如 Redis 等。
3. 缓存策略:开发者可以通过注解设置不同的缓存策略,例如缓存的键、值、过期时间、条件等。
这种基于注解的缓存方式极大地简化了缓存操作,让开发者专注于业务逻辑的实现,而缓存的管理由 Spring 自动处理。
3.2 难点排查
在做demo的时候发现配置也没错,也没有说是通过本文件的方法去调用提供缓存的方法(这样不走代理,无法执行命中缓存操作),后来发现是weakkey导致的。假如说内存不够的情况下,key就会被直接清楚掉,而我电脑可分配内存很少。可能会频繁触发GC,导致cache key被清除掉了。不清楚weakReference作用的同学可以去看下我写的另一篇文章:
WeakReference浅析
@Bean
public Caffeine<Object, Object> caffeineConfig() {return Caffeine.newBuilder().maximumSize(1000).expireAfterWrite(5, TimeUnit.MINUTES)
//                .weakKeys() // 很坑会,基本上很快就把key清理掉了,缓存再也命中不了.recordStats();
}
总结
散会
相关文章:
30分钟内搭建一个全能轻量级springboot 3.4 + 脚手架 <5> 5分钟集成好caffeine并使用注解操作缓存
快速导航 <1> 5分钟快速创建一个springboot web项目 <2> 5分钟集成好最新版本的开源swagger ui,并使用ui操作调用接口 <3> 5分钟集成好druid并使用druid自带监控工具监控sql请求 <4> 5分钟集成好mybatisplus并使用mybatisplus generator自…...

【设计模式-结构型】装饰器模式
一、什么是装饰器模式 装饰器模式(Decorator Pattern)是一种结构型设计模式,它的核心思想是在不改变原有对象结构的情况下,动态地给对象增加一些功能,从而达到扩展功能的目的。举个例子,今天在家妈妈给蒸馒…...

分布式数据存储基础与HDFS操作实践(副本)
以下为作者本人撰写的报告,步骤略有繁琐,不建议作为参考内容,可以适当浏览,进一步理解。 一、实验目的 1、理解分布式文件系统的基本概念和工作原理。 2、掌握Hadoop分布式文件系统(HDFS)的基本操作。 …...

Linux 进程前篇(冯诺依曼体系结构和操作系统)
目录 一.冯诺依曼体系结构 1.概念 2.硬件层面的数据流 3.总结加补充 二.操作系统 (Operating System) 1.概念 2.设计OS的目的 3.定位 4.操作系统的管理 5.计算机体系的层状结构 在我们认识进程之前,我们先了解什么是冯诺依曼体系结构 一.冯诺依曼体系结构…...

Springboot Redisson 分布式锁、缓存、消息队列、布隆过滤器
redisson-spring-boot-starter 是 Redisson 提供的 Spring Boot 集成包,旨在简化与 Redis 的交互,包括分布式锁、缓存、消息队列、布隆过滤器等功能的实现。 Maven 依赖 在 Spring Boot 项目中添加 redisson-spring-boot-starter 依赖: <…...
【C语言】_字符串拷贝函数strcpy
目录 1. 函数声明及功能 2. 使用示例 3. 注意事项 4. 模拟实现 4.1 第一版:基本功能判空const修饰 4.2 第二版:优化对于\0的单独拷贝 4.3 第三版:仿strcpy的char*返回值 1. 函数声明及功能 char * strcpy ( char * destination, cons…...

基于 Vue 的拖拽缩放卡片组件:实现思路、方法及使用指南
引言 在前端开发中,实现可交互的组件能够极大地提升用户体验。本文将介绍一个基于 Vue 封装的可缩放卡片组件,从实现思路、代码具体实现以及使用方法等方面进行详细阐述,帮助开发者更好地理解和运用这一组件。项目源码地址:https…...

nginx 实现 正向代理、反向代理 、SSL(证书配置)、负载均衡 、虚拟域名 ,使用其他中间件监控
我们可以详细地配置 Nginx 来实现正向代理、反向代理、SSL、负载均衡和虚拟域名。同时,我会介绍如何使用一些中间件来监控 Nginx 的状态和性能。 1. 安装 Nginx 如果你还没有安装 Nginx,可以通过以下命令进行安装(以 Ubuntu 为例࿰…...

Kafka客户端-“远程主机强迫关闭了一个现有的连接”故障排查及解决
Kafka客户端-“远程主机强迫关闭了一个现有的连接”故障排查及解决 1. 故障现象 Kafka客户端发送数据时,出现“远程主机强迫关闭了一个现有的连接”错误,导致数据发送失败。错误信息如下: 2. 故障排查 【1】. 查看服务网络状态 出现故障…...

Node.js - Express框架
1. 介绍 Express 是一个基于 Node.js 的 Web 应用程序框架,主要用于快速、简便地构建 Web 应用程序 和 API。它是目前最流行的 Node.js Web 框架之一,具有轻量级、灵活和功能丰富的特点。 核心概念包括路由,中间件,请求与响应&a…...

AWS Lambda
AWS Lambda 是 Amazon Web Services(AWS)提供的无服务器计算服务,它让开发者能够运行代码而不需要管理服务器或基础设施。AWS Lambda 会自动处理代码的执行、扩展和计费,开发者只需关注编写和部署代码,而无需担心底层硬…...

mysql 如何快速删除表数据
在数据库管理中, 经常会遇到需要删除大量数据的情况. 对于 MySQL 数据库而言, 如何高效快速地删除数据是一个值得深入探讨的问题. 本文将详细介绍几种在 MySQL 中快速删除数据的方法及相关注意事项. delete 语句 delete 语句可以删除符合条件的指定数据, 但是在删除大量数据…...

物联网网关Web服务器--lighttpd服务器部署与应用测试
以下是在国产ARM处理器E2000飞腾派开发板上部署 lighttpd 并进行 CGI 应用开发的步骤: 1、lighttpd简介 Lighttpd 是一款轻量级的开源 Web 服务器软件,具有以下特点和功能: 特点 轻量级:Lighttpd 在设计上注重轻量级和高效性&a…...

vmware虚拟机配置ubuntu 18.04(20.04)静态IP地址
VMware版本 :VMware Workstation 17 Pro ubuntu版本:ubuntu-18.04.4-desktop-amd64 主机环境 win11 1. 修改 VMware虚拟网络编辑器 打开vmware,点击顶部的“编辑"菜单,打开 ”虚拟化网络编辑器“ 。 选择更改设置&#…...

智能家居篇 一、Win10 VM虚拟机安装 Home Assistant 手把手教学
智能家居篇 一、Win10 VM虚拟机安装 Home Assistant 手把手教学 文章目录 [智能家居篇]( )一、Win10 VM虚拟机安装 Home Assistant 手把手教学 前言一.下载Vm版本的HomeAsistant安装包 二.打开Vmware选择新建虚拟机1.选择自定义高级2.选择16.x及以上3.选择稍后安装4.根据官网的…...

Flutter插件制作、本地/远程依赖及缓存机制深入剖析(原创-附源码)
Flutter插件在开发Flutter项目的过程中扮演着重要的角色,我们从 https://pub.dev 上下载添加到项目中的第三方库都是以包或者插件的形式引入到代码中的,这些第三方工具极大的提高了开发效率。 深入的了解插件的制作、发布、工作原理和缓存机…...

Python猜数小游戏
Python 实现的《猜数游戏》 介绍 本文将展示如何使用 Python 编写一个简单的《猜数游戏》。这个游戏将会生成一个1到10之间的随机数,用户有最多三次机会来猜测正确的数字。如果用户猜对了,游戏将结束并显示恭喜信息;如果没有猜对࿰…...
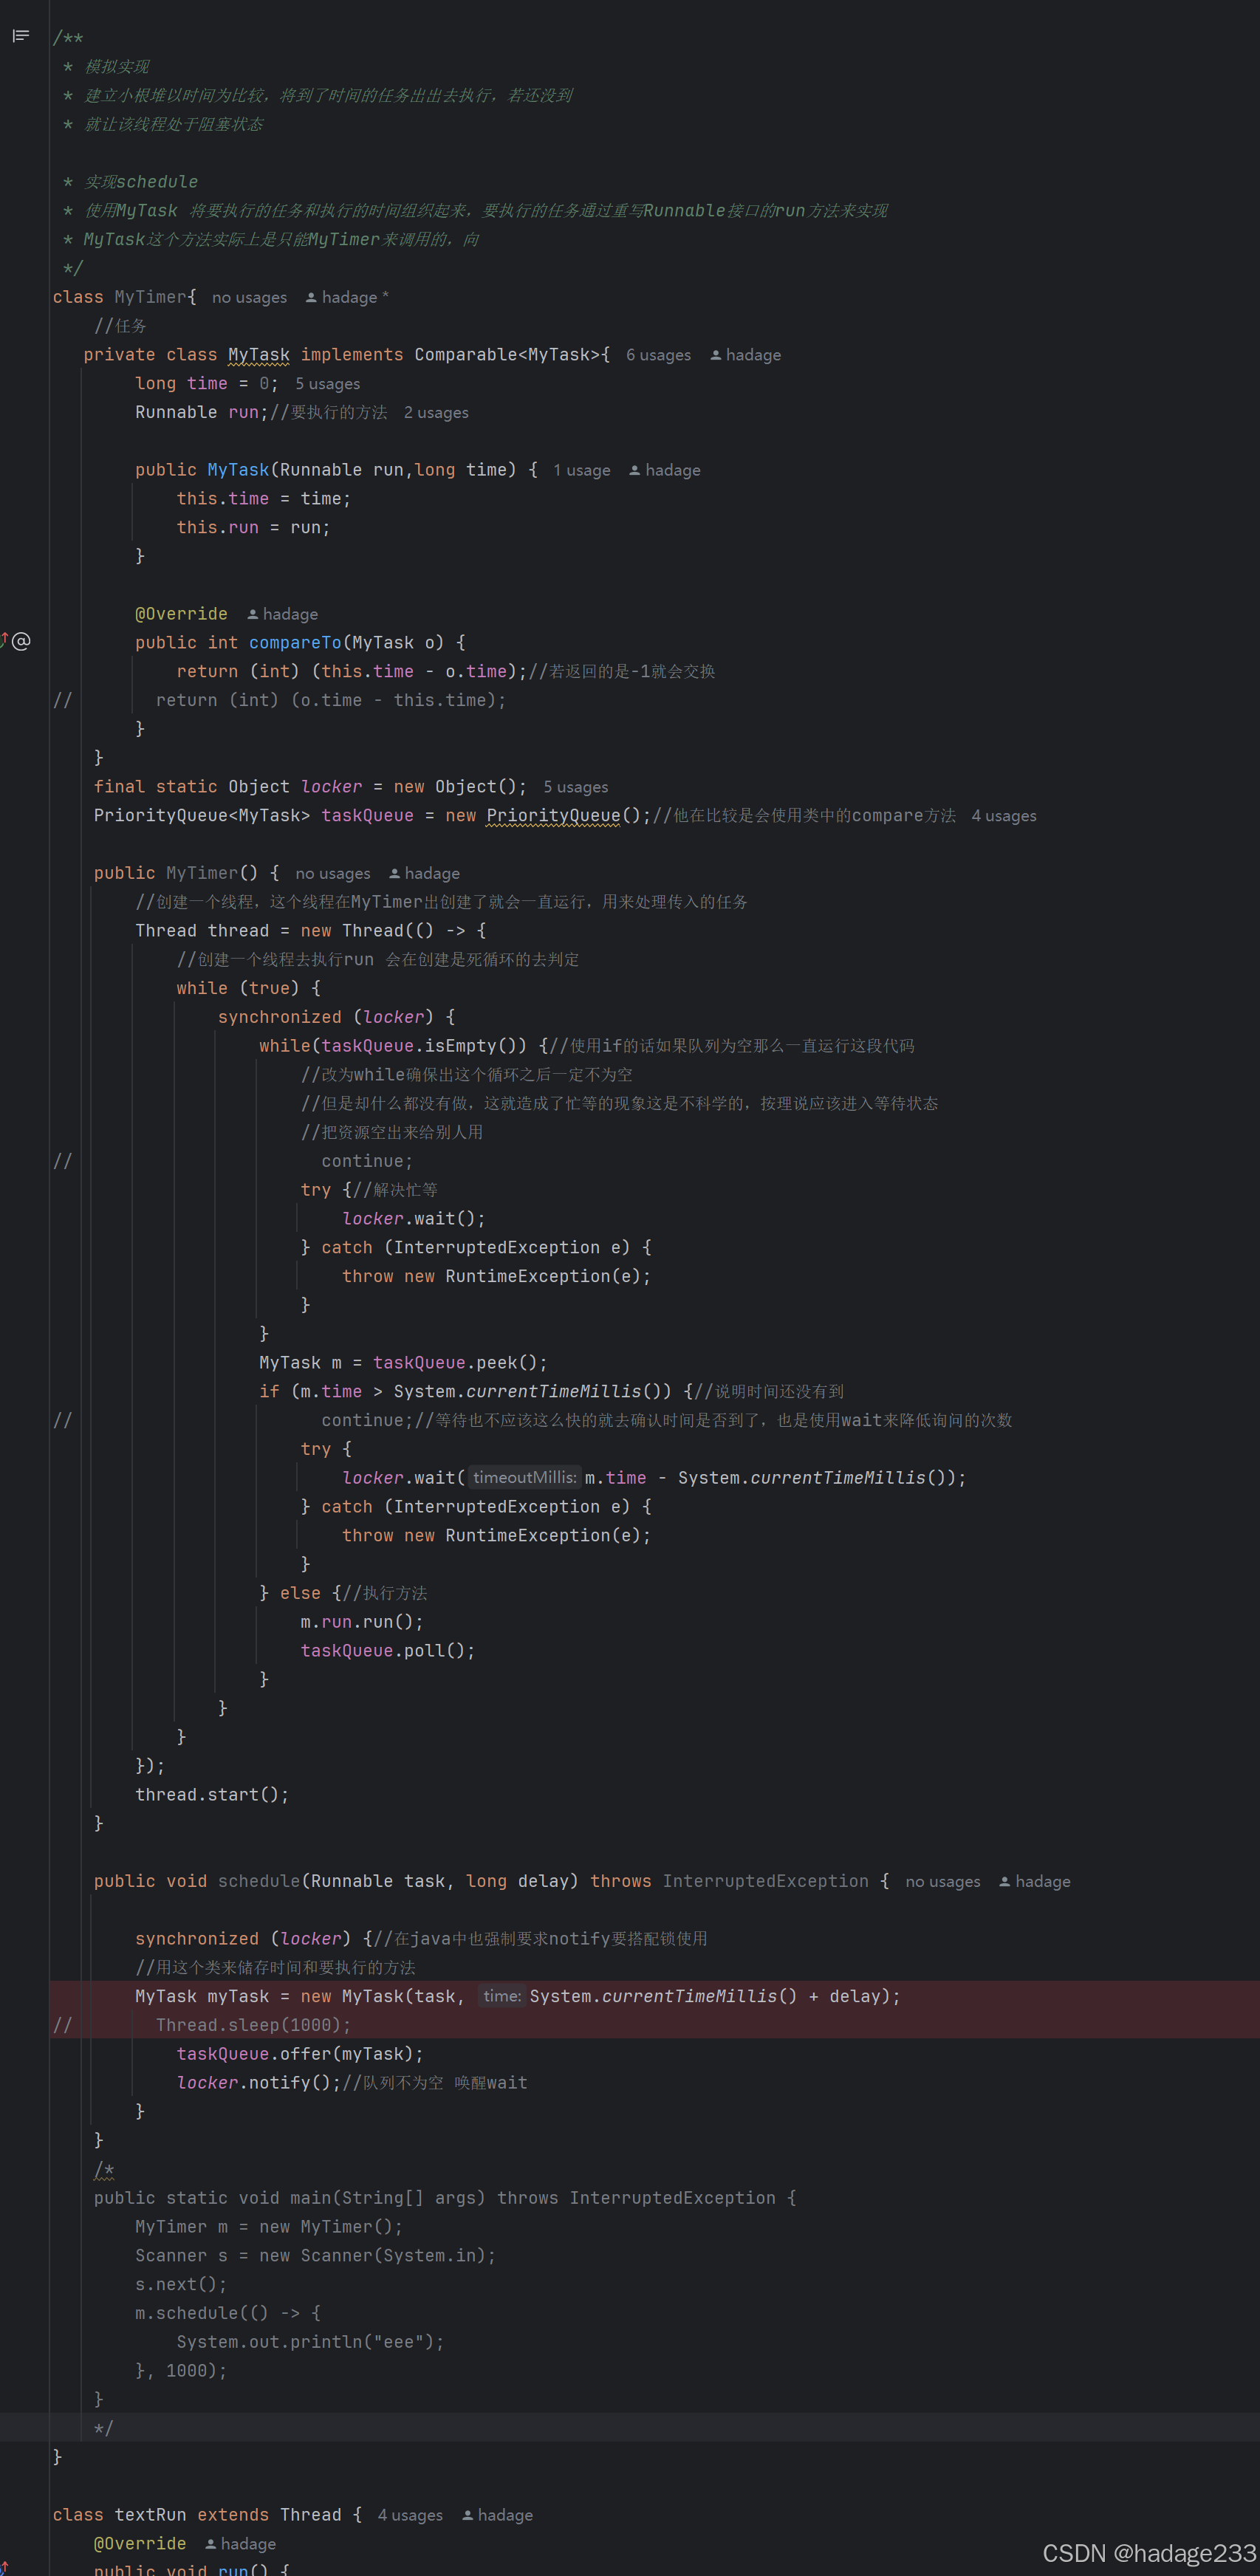
--- 用java实现一个计时器 ---
这里的计时器值得是当线程设定的时间过了之后,自动执行该线程的工作 设计 MyTimer 既然是要在指定的时间之后执行任务,那么传入的参数就应该有run方法(需要执行的任务),time(在多少时间之后执行ÿ…...

OPI4A,目标检测,口罩检测,mnn,YoloX
记得之前,使用了bubbling导师复现的python版yolox,训练了自建的口罩数据集,得到了h5文件,又转换成pb文件,再使用阿里巴巴的MNN,使用它的MNNConvert,转换成mnn文件 最终实现了,在树莓…...

C#与Vue2上传下载Excel文件
1、上传文件流程:先上传文件,上传成功,返回文件名与url,然后再次发起请求保存文件名和url到数据库 前端Vue2代码: 使用element的el-upload组件,action值为后端接收文件接口,headers携带session信…...

从分立逻辑到单片机:基于ATmega8的MIDI通道分析仪设计与实现
1. 项目概述:从分立逻辑到单片机的MIDI通道分析仪进化史二十年前,当我在《Elektor》杂志上发表第一版MIDI通道分析仪时,整个数字音乐世界还处于一个相当“硬核”的阶段。那个版本的设计,用今天的话来说,简直就是一场“…...
)
Midjourney锐化效果失效真相(2024官方未公开的渲染管线瓶颈解析)
更多请点击: https://intelliparadigm.com 第一章:Midjourney锐化效果失效真相(2024官方未公开的渲染管线瓶颈解析) 自2024年V6.2版本起,大量用户反馈 --stylize 与 --sharp 参数组合下图像边缘锐化效果显著弱化&am…...
)
告别混乱绑定!在UE5 GAS中优雅管理技能输入(基于GameplayTag)
告别混乱绑定!在UE5 GAS中优雅管理技能输入(基于GameplayTag)当你的UE5 RPG项目发展到中期,技能数量从十几个膨胀到几十个时,最痛苦的莫过于发现InputAction绑定已经变成一团乱麻。每次新增技能都要修改输入绑定逻辑&a…...
提升你的图表专业度?)
从科研图表到商业报表:如何用Matplotlib的legend()提升你的图表专业度?
从科研图表到商业报表:如何用Matplotlib的legend()提升你的图表专业度? 在数据驱动的决策时代,图表不仅是科研论文中的证据载体,更是商业汇报中的说服工具。我曾见证一位生物统计学家将同一组临床试验数据呈现给三种不同受众&…...

利用 Taotoken 多模型能力为智能客服场景提供备份路由
🚀 告别海外账号与网络限制!稳定直连全球优质大模型,限时半价接入中。 👉 点击领取海量免费额度 利用 Taotoken 多模型能力为智能客服场景提供备份路由 智能客服系统是许多企业与用户交互的关键入口,其响应能力和服务…...

3大突破性功能:用HiveWE革新你的魔兽争霸III地图创作体验
3大突破性功能:用HiveWE革新你的魔兽争霸III地图创作体验 【免费下载链接】HiveWE A Warcraft III world editor. 项目地址: https://gitcode.com/gh_mirrors/hi/HiveWE 还在为传统魔兽争霸III编辑器缓慢的加载速度和复杂的操作界面而烦恼吗?Hive…...

数字合成器d-FORMANT:从模拟经典到数字复刻的工程实践
1. 项目概述:从模拟经典到数字复刻如果你对合成器稍有了解,或者对电子音乐制作背后的硬件感兴趣,那么“FORMANT”这个名字你一定不陌生。它最初是上世纪70年代由《Elektor》杂志发布的一款模拟单音合成器,以其清晰的模块化设计和出…...

绝了!原来毕业论文还能这样写?2026降AIGC工具推荐合集
还在为查重率爆红、AI痕迹太明显、格式乱成一团而发愁?2026 年的 AI 论文工具早已不只是写文章那么简单,从选题构思到降AIGC率、去AI痕迹、查重优化,全流程智能辅助,帮你把论文写作变得简单高效,告别熬夜改稿的焦虑&am…...

Hitboxer:终极SOCD按键重映射解决方案,彻底解决游戏按键冲突问题
Hitboxer:终极SOCD按键重映射解决方案,彻底解决游戏按键冲突问题 【免费下载链接】socd Key remapper for epic gamers 项目地址: https://gitcode.com/gh_mirrors/so/socd 在激烈的游戏对战中,你是否曾因同时按下左右方向键而导致角色…...

从XAI到HXAI:构建以人为中心的可解释AI框架与实践
1. 项目概述:从“黑箱”到“白盒”,构建可信AI的演进之路在机器学习项目里摸爬滚打了十几年,我见过太多因为模型“说不清道不明”而引发的信任危机。一个在测试集上表现完美的信用评分模型,可能因为无法向风控专家解释“为什么拒绝…...