Spring Boot + Vue 接入腾讯云人脸识别API(SDK版本3.1.830)
一、需求分析
这次是基于一个Spring Boot +Vue的在线考试系统进行二次开发,添加人脸识别功能以防止学生替考。其他有对应场景的也可按需接入API,方法大同小异。
主要有以下两个步骤:
- 人脸录入:将某个角色(如学生)的人脸绑定其唯一属性(如学号)录入人脸库
- 人脸搜索(人脸识别):传递当前用户唯一属性(如学号)+ 摄像头图像给后台,在人脸库中进行匹配
二、腾讯云官网开通人脸服务
-
注册并进入官网:https://cloud.tencent.com/
-
主页搜索人脸识别,并进入产品控制台开通服务
-
创建人员库(注意人员库ID,后续会使用)

-
阅读查看官网API文档

三、后端开发
依赖(腾讯云核心SDK)
<dependency><groupId>com.tencentcloudapi</groupId><artifactId>tencentcloud-sdk-java</artifactId><version>3.1.830</version></dependency>
配置
tencent:face:secret-id: xxxsecret-key: xxxregion: ap-guangzhougroup-id: exam_stu_face
import com.tencentcloudapi.common.Credential;
import com.tencentcloudapi.iai.v20200303.IaiClient;
import org.springframework.beans.factory.annotation.Value;
import org.springframework.context.annotation.Bean;
import org.springframework.context.annotation.Configuration;@Configuration
public class TencentCloudConfig {@Value("${tencent.face.secret-id}")private String secretId;@Value("${tencent.face.secret-key}")private String secretKey;@Value("${tencent.face.region}")private String region;@Value("${tencent.face.group-id}")private String groupId;@Beanpublic Credential credential() {return new Credential(secretId, secretKey);}@Beanpublic IaiClient iaiClient() {return new IaiClient(credential(), region);}public String getGroupId() {return groupId;}
}
控制器
import com.mindskip.xzs.service.tencentcloud.FaceService;
import com.tencentcloudapi.common.exception.TencentCloudSDKException;
import lombok.extern.slf4j.Slf4j;
import org.springframework.beans.factory.annotation.Autowired;
import org.springframework.http.MediaType;
import org.springframework.http.ResponseEntity;
import org.springframework.web.bind.annotation.PostMapping;
import org.springframework.web.bind.annotation.RequestMapping;
import org.springframework.web.bind.annotation.RequestParam;
import org.springframework.web.bind.annotation.RestController;
import org.springframework.web.multipart.MultipartFile;import java.util.HashMap;
import java.util.Map;@Slf4j
@RestController
@RequestMapping("/api/face")
public class FaceController {@Autowiredprivate FaceService faceService;/*** 人脸注册接口** @param studentId* @param file* @return*/@PostMapping(value = "/register", consumes = MediaType.MULTIPART_FORM_DATA_VALUE)public ResponseEntity<Map<String, Object>> handleRegistration(@RequestParam("studentId") String studentId,@RequestParam("file") MultipartFile file) {Map<String, Object> responseBody = new HashMap<>();try {faceService.registerFace(studentId, file);log.info("人脸录入成功");responseBody.put("code", 200);responseBody.put("message", "人脸录入成功");return ResponseEntity.ok().body(responseBody);} catch (TencentCloudSDKException e) {log.error("Tencent Cloud SDK Exception: ", e);String errorMsg = parseTencentError(e);responseBody.put("code", 500);responseBody.put("message", errorMsg);return ResponseEntity.status(500).body(responseBody);} catch (IllegalArgumentException e) {log.error("参数错误:{}", e.getMessage());responseBody.put("code", 400);responseBody.put("message", e.getMessage());return ResponseEntity.badRequest().body(responseBody);} catch (Exception e) {log.error("系统异常:", e);responseBody.put("code", 500);responseBody.put("message", "系统异常");return ResponseEntity.status(500).body(responseBody);}}/*** 人脸验证接口** @param studentId* @param file* @return*/@PostMapping(value = "/verify", consumes = MediaType.MULTIPART_FORM_DATA_VALUE)public ResponseEntity<Map<String, Object>> handleVerification(@RequestParam("studentId") String studentId,@RequestParam("file") MultipartFile file) {Map<String, Object> responseBody = new HashMap<>();try {boolean isValid = faceService.verifyFace(studentId, file);log.info("人脸验证结果:{}", isValid);responseBody.put("code", 200);responseBody.put("success", isValid);responseBody.put("message", isValid ? "人脸验证成功" : "人脸验证失败");return ResponseEntity.ok().body(responseBody);} catch (TencentCloudSDKException e) {log.error("Tencent Cloud SDK Exception: ", e);String errorMsg = parseTencentError(e);responseBody.put("code", 500);responseBody.put("success", false);responseBody.put("message", errorMsg);return ResponseEntity.status(500).body(responseBody);} catch (IllegalArgumentException e) {log.error("参数错误:{}", e.getMessage());responseBody.put("code", 400);responseBody.put("success", false);responseBody.put("message", e.getMessage());return ResponseEntity.badRequest().body(responseBody);} catch (Exception e) {log.error("系统异常:", e);responseBody.put("code", 500);responseBody.put("success", false);responseBody.put("message", "系统异常");return ResponseEntity.status(500).body(responseBody);}}// 补充错误码解析private String parseTencentError(TencentCloudSDKException e) {// 具体错误码处理逻辑if (e.getMessage().contains("InvalidParameterValue.PersonIdAlreadyExist")) {return "该考生已存在人脸信息";}if (e.getMessage().contains("InvalidParameterValue.FaceNotExist")) {return "人脸信息不存在";}if (e.getMessage().contains("InvalidParameterValue.NoFaceInPhoto")) {return "照片中未检测到人脸";}return "腾讯云服务异常:" + e.getMessage();}
}
服务层
import com.mindskip.xzs.configuration.tencentcloud.TencentCloudConfig;
import com.tencentcloudapi.common.exception.TencentCloudSDKException;
import com.tencentcloudapi.iai.v20200303.IaiClient;
import com.tencentcloudapi.iai.v20200303.models.*;
import org.springframework.beans.factory.annotation.Autowired;
import org.springframework.stereotype.Service;
import org.springframework.web.multipart.MultipartFile;import java.io.IOException;
import java.util.Base64;@Service
public class FaceService {@Autowiredprivate IaiClient iaiClient;@Autowiredprivate TencentCloudConfig config;/*** 录入人脸** @param studentId* @param imageFile* @throws IOException* @throws TencentCloudSDKException*/public void registerFace(String studentId, MultipartFile imageFile)throws IOException, TencentCloudSDKException {// 1. 人脸检测DetectFaceRequest detectRequest = new DetectFaceRequest();detectRequest.setImage(base64Encode(imageFile.getBytes()));DetectFaceResponse detectResponse = iaiClient.DetectFace(detectRequest);// 验证检测结果if (detectResponse.getFaceInfos() == null) {throw new IllegalArgumentException("照片中必须包含且仅包含一张人脸");}// 2. 创建人员并添加人脸CreatePersonRequest createRequest = new CreatePersonRequest();createRequest.setGroupId(config.getGroupId());createRequest.setPersonId(studentId);createRequest.setPersonName("考生_" + studentId);createRequest.setImage(base64Encode(imageFile.getBytes()));iaiClient.CreatePerson(createRequest);}/*** 人脸验证** @param studentId* @param imageFile* @return* @throws IOException* @throws TencentCloudSDKException*/public boolean verifyFace(String studentId, MultipartFile imageFile)throws IOException, TencentCloudSDKException {// 1. 人脸检测DetectFaceRequest detectRequest = new DetectFaceRequest();detectRequest.setImage(base64Encode(imageFile.getBytes()));DetectFaceResponse detectResponse = iaiClient.DetectFace(detectRequest);// 验证检测结果if (detectResponse.getFaceInfos() == null) {throw new IllegalArgumentException("照片中必须包含且仅包含一张人脸");}// 2. 人脸搜索SearchPersonsRequest searchRequest = new SearchPersonsRequest();searchRequest.setGroupIds(new String[]{config.getGroupId()});searchRequest.setImage(base64Encode(imageFile.getBytes()));searchRequest.setMaxPersonNum(1L); // 最多返回1个结果SearchPersonsResponse searchResponse = iaiClient.SearchPersons(searchRequest);// 3. 验证结果if (searchResponse.getResults() != null && searchResponse.getResults().length > 0) {Result result = searchResponse.getResults()[0];if (result.getCandidates() != null && result.getCandidates().length > 0) {Candidate candidate = result.getCandidates()[0];// 判断匹配的用户ID且置信度大于80(阈值可根据需求调整)return studentId.equals(candidate.getPersonId()) && candidate.getScore() > 80;}}return false;}private String base64Encode(byte[] bytes) {return Base64.getEncoder().encodeToString(bytes);}
}
四、前端开发
人脸录入
人脸录入弹窗组件<template><el-dialogtitle="人脸录入":visible.sync="visible"width="800px"@close="handleClose"><div class="capture-container"><div class="capture-layout"><!-- 左侧输入区域 --><div class="input-section"><!-- 摄像头预览 --><div v-show="captureMode === 'camera'" class="camera-preview"><video ref="video" autoplay class="video"></video><canvas ref="canvas" class="canvas" style="display: none;"></canvas><el-buttontype="primary"@click="capture"class="capture-btn">拍照</el-button></div><!-- 图片上传 --><el-uploadv-show="captureMode === 'upload'"class="avatar-uploader"action="#":show-file-list="false":before-upload="beforeUpload":http-request="handleUpload"><img v-if="imageUrl" :src="imageUrl" class="avatar"><div v-else class="uploader-default"><i class="el-icon-plus avatar-uploader-icon"></i><div class="upload-tip">上传清晰正面照(支持JPG/PNG)</div></div></el-upload></div><!-- 右侧预览区域 --><div class="preview-section"><div class="preview-title">照片预览</div><div class="preview-content"><img v-if="imageUrl" :src="imageUrl" class="preview-image"><div v-else class="preview-placeholder"><i class="el-icon-picture-outline"></i><p>预览区域</p></div></div></div></div><!-- 模式切换 --><div class="mode-switch"><el-radio-group v-model="captureMode"><el-radio-button label="camera">摄像头拍摄</el-radio-button><el-radio-button label="upload">图片上传</el-radio-button></el-radio-group></div></div><div slot="footer"><el-button @click="visible = false">取消</el-button><el-buttontype="primary":disabled="!imageData"@click="submitFace">确认提交</el-button></div></el-dialog>
</template><script>
import { registerCamera, stopCamera } from '@/utils/camera'
import { compressImage } from '@/utils/image'
import { post } from '@/utils/request'export default {data () {return {visible: false,captureMode: 'camera',imageUrl: '',imageData: null,studentId: null,mediaStream: null}},methods: {open (studentId) {this.studentId = studentIdthis.visible = truethis.$nextTick(() => {if (this.captureMode === 'camera') {this.initCamera()}})},async initCamera () {try {this.mediaStream = await registerCamera(this.$refs.video)} catch (error) {this.$message.error('摄像头访问失败,请检查权限')this.captureMode = 'upload'}},capture () {const video = this.$refs.videoconst canvas = this.$refs.canvascanvas.width = video.videoWidthcanvas.height = video.videoHeightcanvas.getContext('2d').drawImage(video, 0, 0)canvas.toBlob(async blob => {this.imageData = await compressImage(blob)this.imageUrl = URL.createObjectURL(this.imageData)}, 'image/jpeg', 0.8)},async beforeUpload (file) {const isImage = ['image/jpeg', 'image/png'].includes(file.type)if (!isImage) {this.$message.error('只能上传JPG/PNG格式图片')return false}return true},async handleUpload ({ file }) {try {this.imageData = await compressImage(file)this.imageUrl = URL.createObjectURL(this.imageData)} catch (error) {this.$message.error('图片处理失败')}},async submitFace () {try {const formData = new FormData()formData.append('file', this.imageData)formData.append('studentId', this.studentId)console.log(this.studentId)console.log(formData)const res = await post('/api/face/register', formData)if (res.code === 200) {this.$message.success('人脸录入成功')this.visible = false} else {this.$message.error(res.message || '录入失败')}} catch (error) {this.$message.error('请求失败,请稍后重试')}},handleClose () {if (this.mediaStream) {stopCamera(this.mediaStream)}this.imageUrl = ''this.imageData = null}},watch: {captureMode (newVal) {if (newVal === 'camera') {this.initCamera()} else if (this.mediaStream) {stopCamera(this.mediaStream)this.mediaStream = null}}}
}
</script><style scoped>
.capture-layout {display: flex;gap: 20px;margin-bottom: 20px;
}.input-section,
.preview-section {flex: 1;min-width: 0;
}.preview-section {border: 1px dashed #d9d9d9;border-radius: 6px;padding: 10px;
}.preview-title {color: #606266;font-size: 14px;margin-bottom: 10px;text-align: center;
}.preview-content {height: 340px;display: flex;justify-content: center;align-items: center;
}.preview-image {max-width: 100%;max-height: 100%;object-fit: contain;
}.preview-placeholder {text-align: center;color: #999;
}.preview-placeholder i {font-size: 40px;margin-bottom: 10px;
}.camera-preview {position: relative;height: 360px;border: 1px dashed #d9d9d9;border-radius: 6px;
}.video, .canvas {width: 100%;height: 100%;object-fit: cover;
}.capture-btn {position: absolute;bottom: 20px;left: 50%;transform: translateX(-50%);
}.avatar-uploader {height: 360px;
}.avatar {max-width: 100%;max-height: 400px;
}.uploader-default {text-align: center;
}.upload-tip {margin-top: 10px;color: #999;
}.mode-switch {margin-top: 20px;text-align: center;
}
</style>摄像头访问/停止js
export const registerCamera = async (videoElement) => {const constraints = {video: {width: { ideal: 1280 },height: { ideal: 720 },facingMode: 'user'}}const stream = await navigator.mediaDevices.getUserMedia(constraints)videoElement.srcObject = streamawait new Promise(resolve => videoElement.onloadedmetadata = resolve)return stream
}export const stopCamera = (stream) => {stream.getTracks().forEach(track => track.stop())
}
图像压缩js
export const compressImage = (file, quality = 0.8) => {return new Promise((resolve, reject) => {const reader = new FileReader()reader.onload = (e) => {const img = new Image()img.onload = () => {const canvas = document.createElement('canvas')const ctx = canvas.getContext('2d')// 限制最大尺寸const maxWidth = 1024const scale = maxWidth / img.widthcanvas.width = maxWidthcanvas.height = img.height * scalectx.drawImage(img, 0, 0, canvas.width, canvas.height)canvas.toBlob(blob => resolve(new File([blob], file.name, { type: 'image/jpeg' })),'image/jpeg',quality)}img.src = e.target.result}reader.readAsDataURL(file)})
}
在自己需要添加人脸录入的页面引入弹窗组件FaceCaptureDialog即可,如:
<template><div class="app-container"><!-- ... --><!-- 呼出弹窗按钮 --><el-button size="mini" type="success" @click="openFaceDialog(row)" class="link-left">录入人脸</el-button><!-- ... --><face-capture-dialog ref="faceDialog" /></div>
</template><script>
import FaceCaptureDialog from '@/components/face/FaceCaptureDialog'// ...// 点击事件(呼出人脸录入弹窗)// row.id -> 学生id,传递到弹窗组件methods: {openFaceDialog(row) {this.$refs.faceDialog.open(row.id)},// ...
</script>
人脸搜索
人脸搜索弹窗<template><el-dialog :title="title" :visible.sync="visible" width="400px" :close-on-click-modal="false":close-on-press-escape="false" :show-close="false"><div v-if="loading" class="loading-container"><i class="el-icon-loading"></i><span>人脸识别中...</span></div><div v-else><video ref="video" width="300" height="200" autoplay playsinline></video><canvas ref="canvas" width="300" height="200" style="display: none;"></canvas><el-button type="primary" @click="capture">点击拍照</el-button></div></el-dialog>
</template><script>
import { post } from '@/utils/request'export default {props: {studentId: {type: String,required: true}},data () {return {visible: false,loading: false,stream: null}},methods: {open () {this.visible = truethis.initCamera()},close () {this.visible = falsethis.stopCamera()},async initCamera () {const constraints = { video: true }try {this.stream = await navigator.mediaDevices.getUserMedia(constraints)this.$refs.video.srcObject = this.stream} catch (error) {this.$message.error('无法访问摄像头,请检查权限设置')}},stopCamera () {if (this.stream) {this.stream.getTracks().forEach(track => track.stop())this.stream = null}},async capture () {this.stopCamera()const canvas = this.$refs.canvasconst video = this.$refs.videocanvas.getContext('2d').drawImage(video, 0, 0, canvas.width, canvas.height)const imgData = canvas.toDataURL('image/jpeg')const formData = new FormData()formData.append('studentId', this.studentId)formData.append('file', this.dataURLtoBlob(imgData))this.loading = truepost(`/api/face/verify`, formData, {headers: { 'Content-Type': 'multipart/form-data' }}).then(response => {this.loading = falseif (response.success) {this.$message.success('人脸验证成功!')this.$emit('verifySuccess')} else {this.$message.error(`人脸验证失败:${response.message}`)this.$emit('verifyError', response.message) // 触发 verifyError 事件this.initCamera() // 重新初始化摄像头}this.visible = false // 验证完成后关闭弹窗}).catch(error => {this.loading = falsethis.$message.error('人脸验证失败,请稍后重试')this.$emit('verifyError', error.message) // 触发 verifyError 事件this.initCamera() // 重新初始化摄像头})},dataURLtoBlob (dataurl) {const arr = dataurl.split(',')const mime = arr[0].match(/:(.*?);/)[1]const bstr = atob(arr[1])let n = bstr.lengthconst u8arr = new Uint8Array(n)while (n--) {u8arr[n] = bstr.charCodeAt(n)}return new Blob([u8arr], { type: mime })}}
}
</script><style scoped>
/* 自定义样式 */
</style>在需要的页面引入人脸搜索弹窗,目前的流程就是进入做题页面后弹窗识别考生,三次识别失败后强制退出(根据需要,可以考虑间隔多少时间再次人脸认证,注意后端权限校验):
<template><div><!-- ... --><!-- 弹窗组件 --><FaceVerifyDialog ref="faceVerifyDialog" :studentId="currentUserId" @verifySuccess="handleVerifySuccess"@verifyError="handleVerifyError"/><!-- ... --></div>
</template><script>import FaceVerifyDialog from '@/components/face/FaceVerifyDialog.vue'export default {components: { FaceVerifyDialog },data () {return {currentUserId: '', // 用于存储当前用户的 studentId// ...isFaceVerified: false // 是否完成人脸识别验证}},// ...mounted () {this.initFaceVerify() // 初始化人脸识别},// ...methods: {// ...initFaceVerify () {// 开题前验证this.$alert('开考前需要进行人脸识别验证', '人脸验证提示', {closeOnClickModal: false, // 禁用点击背景关闭closeOnPressEscape: false, // 禁用按下 ESC 关闭showClose: false, // 隐藏关闭按钮callback: () => {// 弹窗关闭后的回调this.$refs.faceVerifyDialog.open()}})},handleVerifySuccess () {this.isFaceVerified = true // 标记验证成功this.closeFaceVerifyDialog()},handleVerifyError (error) {// 验证失败,允许用户重试,超过 3 次失败强制退出this.verifiedCount++if (this.verifiedCount >= 3) {this.$message.warning('人脸识别失败次数超过限制,请联系管理员', '人脸验证失败')this.closeFaceVerifyDialog()this.logout() // 退出登录} else {this.$message.error(`人脸识别失败:${error},可以点击重新验证`)}},closeFaceVerifyDialog () {this.$refs.faceVerifyDialog.close()},logout () {// 登出}},// ...
</script>
测试
录入成功后可以再腾讯云 -> 人脸识别控制台 -> 人脸库 看到录入的人脸:
识别测试过程就不展示了 (`へ´*)ノ

相关文章:

Spring Boot + Vue 接入腾讯云人脸识别API(SDK版本3.1.830)
一、需求分析 这次是基于一个Spring Boot Vue的在线考试系统进行二次开发,添加人脸识别功能以防止学生替考。其他有对应场景的也可按需接入API,方法大同小异。 主要有以下两个步骤: 人脸录入:将某个角色(如学生&…...

【SpringSecurity】springboot整合SpringSecurity实现登录校验与权限认证
【SpringSecurity】springboot整合SpringSecurity实现登录校验与权限认证 【一】SpringSecurity框架简介【二】SpringSecurity与shiro【1】SpringSecurity特点【2】shiro特点【3】SpringSecurity和shiro总结 【三】SpringSecurity过滤器【1】SpringSecurity中常见的过滤器【2】…...

【HarmonyOS Next】鸿蒙应用公钥和证书MD5指纹的获取
【HarmonyOS Next】鸿蒙应用公钥和证书MD5指纹的获取 一、问题背景 政府的icp备案时,或者某些三方SDK以来的管理后台,都需要配置鸿蒙应用的公钥和证书MD5指纹 二、解决方案 专有名词解释: 华为AppGallery Connect简称 AGC平台࿰…...

父组件用的是原生监听,子组件用的是onClick,子组件添加了stopPropagation还是没有阻止传播
父组件用事件监听,子组件用onClick,即使子组件加了stopPropagation还是没有阻止冒泡。父组件可能使用原生的addEventListener来绑定事件,而子组件用的是React的onClick事件。这时候,虽然子组件调用了e.stopPropagation()ÿ…...

ui设计公司兰亭妙微分享:科研单位UI界面设计
科研单位的UI界面设计是一项至关重要的任务,它不仅关乎科研工作的效率,还直接影响到科研人员的用户体验。以下是对科研单位UI界面设计的详细分析: 一、设计目标 科研单位的UI界面设计旨在提升科研工作的效率与便捷性,同时确保科…...

python绘制年平均海表温度、盐度、ph分布图
python绘制年平均海表温度、盐度、ph图 文章目录 python绘制年平均海表温度、盐度、ph分布图前言一、数据准备二、代码编写2.1. python绘制年平均海表温度(主要)2.2. python绘制年平均海表盐度(选看)2.3. python绘制年平均海表ph&…...

windows中kafka集群部署示例
注意 kafka包路径不要太长,不然启动时候 这里再单独下个zookeeper做为三个kafka实例broker的注册中心 修改Zookeeper配置文件 脚本内容 call bin/zkServer.cmd 不然的话就进bin目录双击zkServer.cmd 配置Zookeeper的另外一种方式 用Kafka自带的zookeeper 例如我复制一份 …...

获取GitHub的OAuth2的ClientId和ClientSecrets
获取 GitHub OAuth2 登录所需的 client-id 和 client-secret 登录 GitHub:使用你的 GitHub 账号登录到 GitHub。访问开发者设置:点击右上角的头像,选择 Settings,然后在左侧导航栏中选择 Developer settings。创建新的 OAuth 应用…...

self-attention部分代码注释
多头注意力机制(Multi-Head Attention, MHA),是 Transformer 模型的核心组件之一。以下是对代码的逐行解析和详细说明: attention-is-all-you-need-pytorch-master\transformer\SubLayers.py class MultiHeadAttention(nn.Mo…...

idea里的插件spring boot helper 如何使用,有哪些强大的功能,该如何去习惯性的运用这些功能
文章精选推荐 1 JetBrains Ai assistant 编程工具让你的工作效率翻倍 2 Extra Icons:JetBrains IDE的图标增强神器 3 IDEA插件推荐-SequenceDiagram,自动生成时序图 4 BashSupport Pro 这个ides插件主要是用来干嘛的 ? 5 IDEA必装的插件&…...
及应用程序修改自身配置并保留注释)
常用的配置文件格式对比(ini,toml,yaml,json,env,settings.py)及应用程序修改自身配置并保留注释
代码与环境配置解耦 git分支的代码应做到“环境无关”:代码本身不硬编码任何环境特定的配置(如数据库连接、密钥、API地址),而是通过外部机制动态注入。 配置与代码分离:将配置信息存储在代码库之外(如环…...

Java IO 和 NIO 的基本概念和 API
一、 Java IO (Blocking IO) 基本概念: Java IO 是 Java 平台提供的用于进行输入和输出操作的 API。Java IO 基于 流 (Stream) 的模型,数据像水流一样从一个地方流向另一个地方。Java IO 主要是 阻塞式 I/O (Blocking I/O),即线程在执行 I/O …...

小智AI桌宠机器狗
本文主要介绍如何利用开源小智AI制作桌宠机器狗 1 源码下载 首先下载小智源码,下载地址, 下载源码后,使用vsCode打开,需要在vscode上安装esp-idf,安装方式请自己解决 2 源码修改 2.1添加机器狗控制代码 在目录main/iot/things下添加dog.cc文件,内容如下; #include…...

MySQL 入门“鸡”础
一、Win10 与Ubuntu安装 以下是一篇针对 Ubuntu 安装 MySQL 的过程中写的示例: --- # Ubuntu 安装 MySQL 详细指南 在本教程中,我们将向您展示如何在 Ubuntu 上安装 MySQL,并完成基本的安全配置。以下是具体步骤: # 1. 安装 …...
的使用方法)
Redis 中有序集合(Sorted Set)的使用方法
文章目录 前言1. 有序集合的特点2. 常用命令2.1 添加元素(ZADD)2.2 获取元素分数(ZSCORE)2.3 获取元素排名(ZRANK / ZREVRANK)2.4 获取范围内的元素(ZRANGE / ZREVRANGE)2.5 获取分数…...

WIn32 笔记:本专栏课件
专栏导航 上一篇:在VS2019里面,调整代码字体大小 回到目录 下一篇:无 本节前言 在之前的讲解里面,我讲解了 Visual Studio 软件的一些个基础操作步骤。从本节开始,我们进入预备章。 本节内容,属于是 …...

Unity git 获取当前修改或者新增的文件列表
直接上代码 using System; using System.Collections.Generic; using System.Diagnostics; using System.IO; using System.Text.RegularExpressions; using UnityEngine;public class GitFileStatusCheckerTools : MonoBehaviour {// 获取Git变更文件列表(新增/修…...
)
结构型模式 - 桥接模式 (Bridge)
结构型模式 - 桥接模式 (Bridge) 桥接模式是一种结构型设计模式,它将抽象部分与实现部分分离,使它们可以独立地变化。 // 软件接口,作为实现部分 interface Software {void run(); }// 游戏软件类,实现 Software 接口 class Game…...

如何让传统制造企业从0到1实现数字化突破?
随着全球制造业不断向智能化、数字化转型,传统制造企业面临着前所未有的机遇与挑战。数字化转型不仅是技术的革新,更是管理、文化、业务流程等全方位的变革。从零开始,如何带领一家传统制造企业走向数字化突破,是许多企业领导者面…...

【Elasticsearch】script_fields 和 runtime_fields的区别
script_fields和runtime_fields都是 Elasticsearch 中用于动态计算字段值的功能,但它们在实现方式、应用场景和性能表现上存在显著区别。以下是两者的详细对比: 1.定义和应用场景 • script_fields: • 定义:通过 Painless 脚本…...
深度学习在微纳光子学中的应用
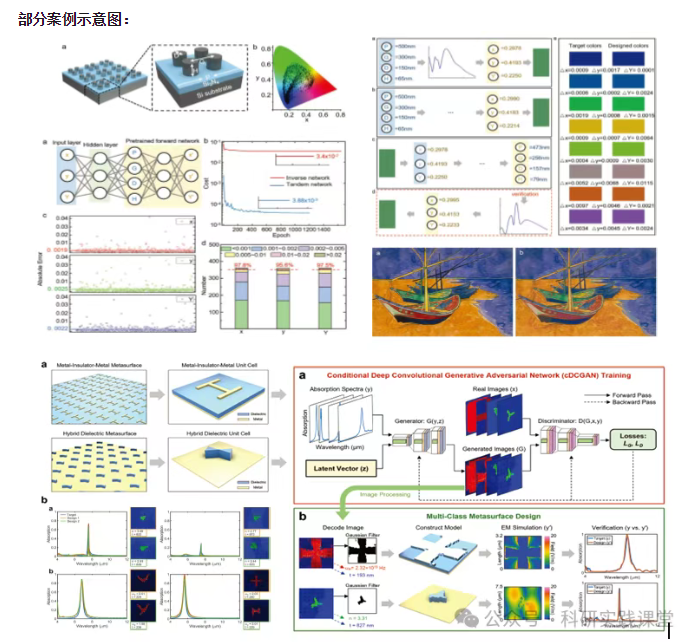
深度学习在微纳光子学中的主要应用方向 深度学习与微纳光子学的结合主要集中在以下几个方向: 逆向设计 通过神经网络快速预测微纳结构的光学响应,替代传统耗时的数值模拟方法。例如设计超表面、光子晶体等结构。 特征提取与优化 从复杂的光学数据中自…...

解锁数据库简洁之道:FastAPI与SQLModel实战指南
在构建现代Web应用程序时,与数据库的交互无疑是核心环节。虽然传统的数据库操作方式(如直接编写SQL语句与psycopg2交互)赋予了我们精细的控制权,但在面对日益复杂的业务逻辑和快速迭代的需求时,这种方式的开发效率和可…...

大语言模型如何处理长文本?常用文本分割技术详解
为什么需要文本分割? 引言:为什么需要文本分割?一、基础文本分割方法1. 按段落分割(Paragraph Splitting)2. 按句子分割(Sentence Splitting)二、高级文本分割策略3. 重叠分割(Sliding Window)4. 递归分割(Recursive Splitting)三、生产级工具推荐5. 使用LangChain的…...
【开发技术】.Net使用FFmpeg视频特定帧上绘制内容
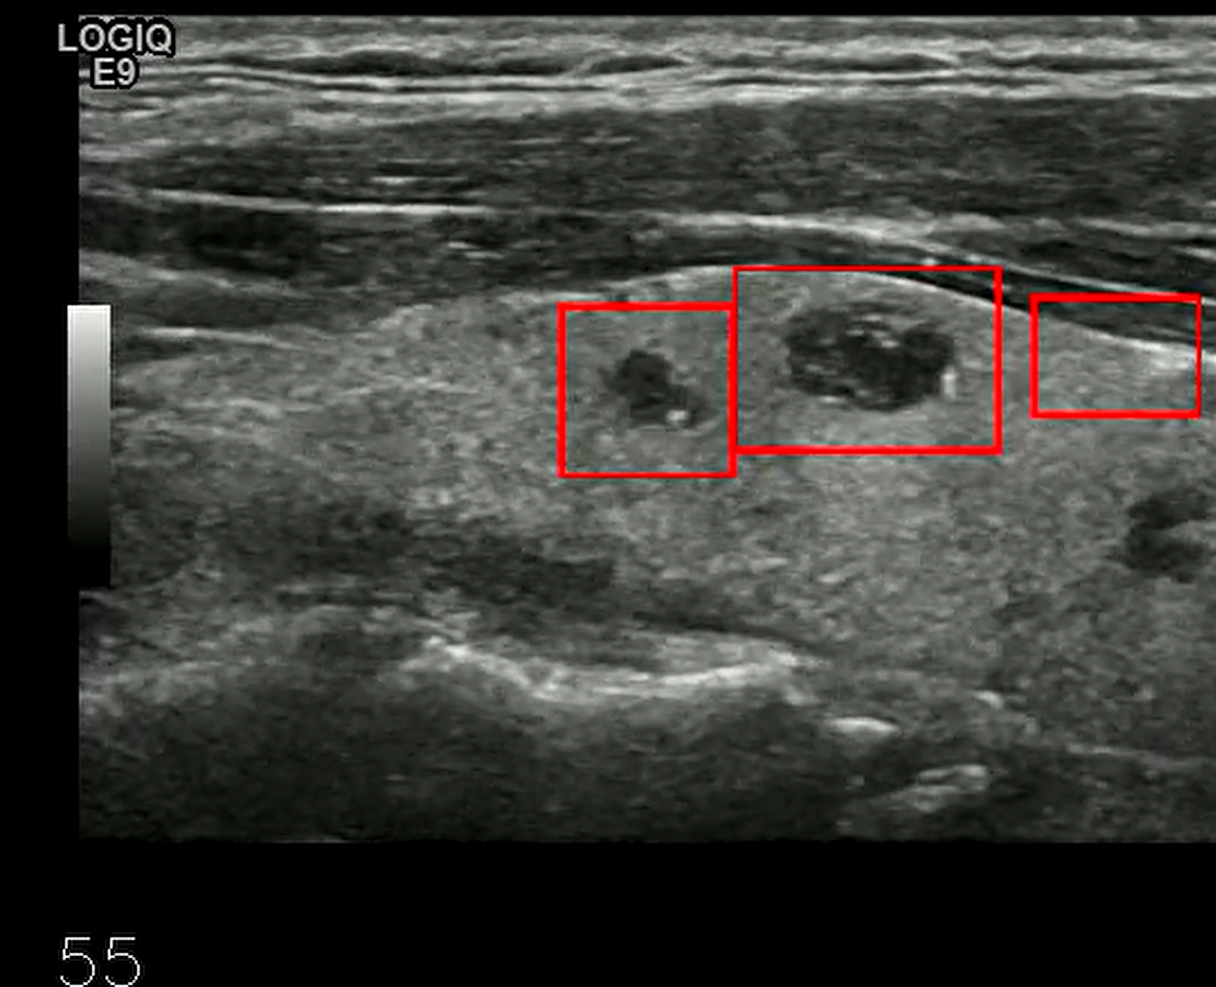
目录 一、目的 二、解决方案 2.1 什么是FFmpeg 2.2 FFmpeg主要功能 2.3 使用Xabe.FFmpeg调用FFmpeg功能 2.4 使用 FFmpeg 的 drawbox 滤镜来绘制 ROI 三、总结 一、目的 当前市场上有很多目标检测智能识别的相关算法,当前调用一个医疗行业的AI识别算法后返回…...
使用 Streamlit 构建支持主流大模型与 Ollama 的轻量级统一平台
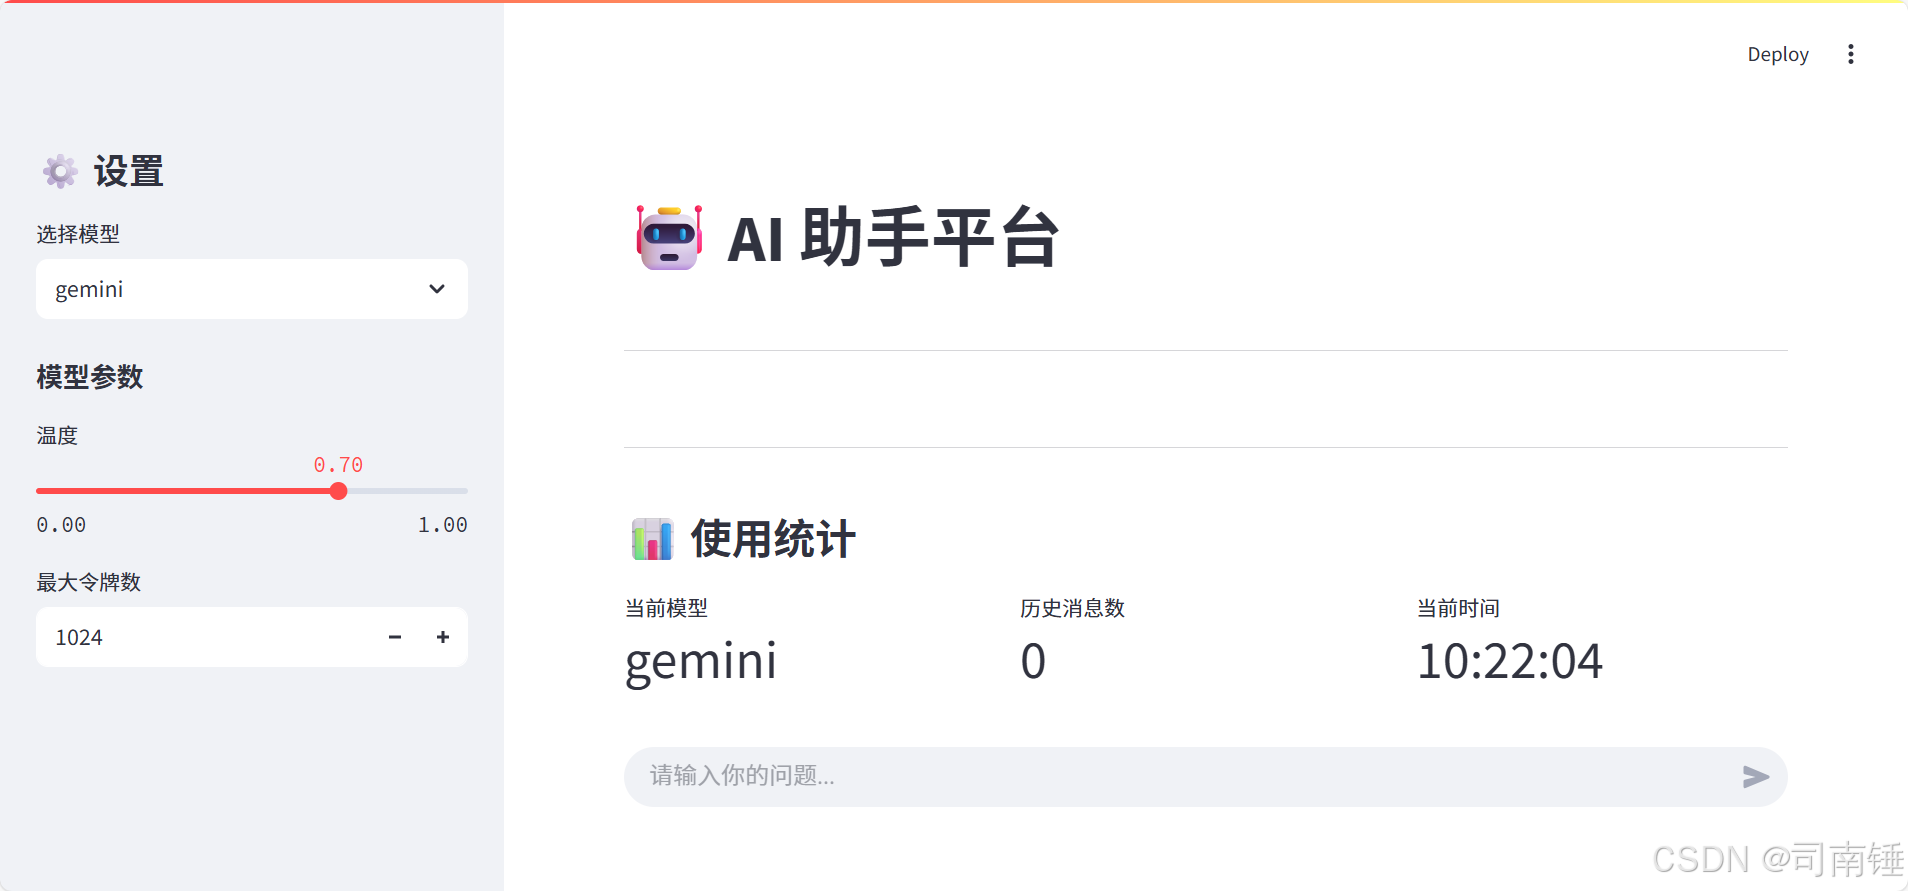
🎯 使用 Streamlit 构建支持主流大模型与 Ollama 的轻量级统一平台 📌 项目背景 随着大语言模型(LLM)的广泛应用,开发者常面临多个挑战: 各大模型(OpenAI、Claude、Gemini、Ollama)接口风格不统一;缺乏一个统一平台进行模型调用与测试;本地模型 Ollama 的集成与前…...
)
Angular微前端架构:Module Federation + ngx-build-plus (Webpack)
以下是一个完整的 Angular 微前端示例,其中使用的是 Module Federation 和 npx-build-plus 实现了主应用(Shell)与子应用(Remote)的集成。 🛠️ 项目结构 angular-mf/ ├── shell-app/ # 主应用&…...
七、数据库的完整性
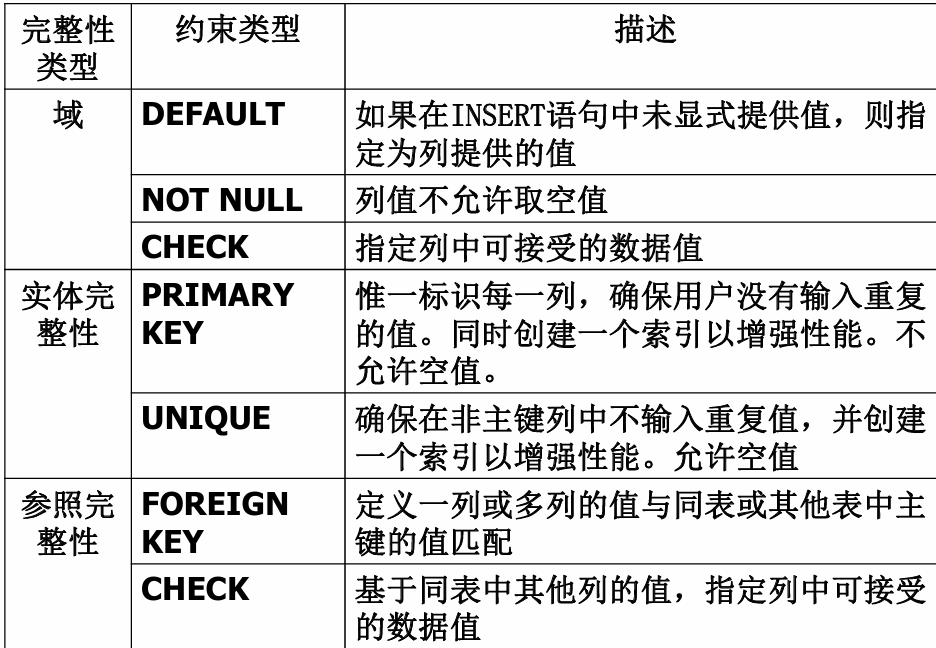
七、数据库的完整性 主要内容 7.1 数据库的完整性概述 7.2 实体完整性 7.3 参照完整性 7.4 用户定义的完整性 7.5 触发器 7.6 SQL Server中数据库完整性的实现 7.7 小结 7.1 数据库的完整性概述 数据库完整性的含义 正确性 指数据的合法性 有效性 指数据是否属于所定…...
LLMs 系列实操科普(1)
写在前面: 本期内容我们继续 Andrej Karpathy 的《How I use LLMs》讲座内容,原视频时长 ~130 分钟,以实操演示主流的一些 LLMs 的使用,由于涉及到实操,实际上并不适合以文字整理,但还是决定尽量整理一份笔…...
详细解析)
Caliper 负载(Workload)详细解析
Caliper 负载(Workload)详细解析 负载(Workload)是 Caliper 性能测试的核心部分,它定义了测试期间要执行的具体合约调用行为和交易模式。下面我将全面深入地讲解负载的各个方面。 一、负载模块基本结构 一个典型的负载模块(如 workload.js)包含以下基本结构: use strict;/…...

根目录0xa0属性对应的Ntfs!_SCB中的FileObject是什么时候被建立的----NTFS源代码分析--重要
根目录0xa0属性对应的Ntfs!_SCB中的FileObject是什么时候被建立的 第一部分: 0: kd> g Breakpoint 9 hit Ntfs!ReadIndexBuffer: f7173886 55 push ebp 0: kd> kc # 00 Ntfs!ReadIndexBuffer 01 Ntfs!FindFirstIndexEntry 02 Ntfs!NtfsUpda…...
