在ubuntu 24.04.2 通过 Kubeadm 安装 Kubernetes v1.31.6

文章目录
- 1. 简介
- 2. 准备
- 3. 配置 containerd
- 4. kubeadm 安装集群
- 5. 安装网络 calico 插件
1. 简介
本指南介绍了如何在 Ubuntu 24.04.2 LTS 上安装和配置 Kubernetes 1.31.6 集群,包括容器运行时 containerd 的安装与配置,以及使用 kubeadm 进行集群初始化。
2. 准备
root@ECS-koreacentral-T4:~# hostnamectlStatic hostname: ECS-koreacentral-T4Icon name: computer-vmChassis: vm 🖴Machine ID: c88bb0e23b5541e488ff6c6c5bb305abBoot ID: 9992b6a929f94d86b3e83195008137aeVirtualization: microsoft
Operating System: Ubuntu 24.04.2 LTSKernel: Linux 6.8.0-1021-azureArchitecture: x86-64Hardware Vendor: Microsoft CorporationHardware Model: Virtual Machine
Firmware Version: Hyper-V UEFI Release v4.1Firmware Date: Fri 2024-03-08Firmware Age: 11month 3wroot@ECS-koreacentral-T4:~# freetotal        used        free      shared  buff/cache   available
Mem:        57585648     1128332    56230412        4124      804752    56457316
Swap:              0           0           0
root@ECS-koreacentral-T4:~# df -Th
Filesystem     Type      Size  Used Avail Use% Mounted on
/dev/root      ext4      495G  1.9G  494G   1% /
tmpfs          tmpfs      28G     0   28G   0% /dev/shm
tmpfs          tmpfs      11G  1.1M   11G   1% /run
tmpfs          tmpfs     5.0M     0  5.0M   0% /run/lock
efivarfs       efivarfs  128M   26K  128M   1% /sys/firmware/efi/efivars
/dev/sda16     ext4      881M   59M  761M   8% /boot
/dev/sda15     vfat      105M  6.1M   99M   6% /boot/efi
/dev/sdb1      ext4      346G   32K  328G   1% /mnt
tmpfs          tmpfs     5.5G   12K  5.5G   1% /run/user/1000
3. 配置 containerd
containerd 是 Kubernetes 推荐的容器运行时。本指南提供了 install-containerd-k8s-v1.31.4.sh 脚本来自动下载并安装所需组件,包括:
- runc
- containerd
- nerdctl
- crictl
- CNI 插件
$ cat install-containerd-k8s-v1.31.4.sh
#!/bin/bashname=`basename $0 .sh`
ENABLE_DOWNLOAD=${ENABLE_DOWNLOAD:-true}
BASE_DIR="$( dirname "$( readlink -f "${0}" )" )"if [ ! -e files ]; thenmkdir -p files
fiFILES_DIR=./files
IMAGES_DIR=./images# download files, if not found
download() {url=$1dir=$2filename=$(basename $1)mkdir -p ${FILES_DIR}/$dirif [ ! -e ${FILES_DIR}/$dir/$filename ]; thenecho "==> download $url"(cd ${FILES_DIR}/$dir && curl -SLO $1)fi
}download_files() {if $ENABLE_DOWNLOAD; then# TODO: These version must be same as kubespray. Refer `roles/downloads/defaults/main.yml` of kubespray.RUNC_VERSION=1.2.3CONTAINERD_VERSION=1.7.24NERDCTL_VERSION=1.7.7CRICTL_VERSION=1.31.1CNI_VERSION=1.4.0download https://github.com/opencontainers/runc/releases/download/v${RUNC_VERSION}/runc.amd64 runc/v${RUNC_VERSION}download https://github.com/containerd/containerd/releases/download/v${CONTAINERD_VERSION}/containerd-${CONTAINERD_VERSION}-linux-amd64.tar.gzdownload https://github.com/containerd/nerdctl/releases/download/v${NERDCTL_VERSION}/nerdctl-${NERDCTL_VERSION}-linux-amd64.tar.gzdownload https://github.com/kubernetes-sigs/cri-tools/releases/download/v${CRICTL_VERSION}/crictl-v${CRICTL_VERSION}-linux-amd64.tar.gzdownload https://github.com/containernetworking/plugins/releases/download/v${CNI_VERSION}/cni-plugins-linux-amd64-v${CNI_VERSION}.tgz kubernetes/cnielseFILES_DIR=./files
fi}select_latest() {local latest=$(ls $* | tail -1)if [ -z "$latest" ]; thenecho "No such file: $*"exit 1fiecho $latest
}install_runc() {# Install runc
echo "==> Install runc"
sudo cp $(select_latest "${FILES_DIR}/runc/v*/runc.amd64") /usr/local/bin/runc
sudo chmod 755 /usr/local/bin/runc}install_nerdctl() {
# Install nerdctl
echo "==> Install nerdctl"
tar xvf $(select_latest "${FILES_DIR}/nerdctl-*-linux-amd64.tar.gz") -C /tmp
sudo cp /tmp/nerdctl /usr/local/bin}install_crictl () {
# Install crictl plugins
echo "==> Install crictl plugins"
sudo tar xvzf $(select_latest "${FILES_DIR}/crictl-v*-linux-amd64.tar.gz") -C /usr/local/bincat > /etc/crictl.yaml <<EOF
runtime-endpoint: unix:///run/containerd/containerd.sock
image-endpoint: unix:///run/containerd/containerd.sock
timeout: 10
debug: false
EOF}install_containerd() {
# Install containerd
echo "==> Install containerd"echo ""
cat <<EOF | sudo tee /etc/modules-load.d/containerd.conf
overlay
br_netfilter
EOF
systemctl restart systemd-modules-load.service
cat <<EOF | sudo tee /etc/sysctl.d/99-kubernetes-cri.conf
net.bridge.bridge-nf-call-iptables  = 1
net.ipv4.ip_forward                 = 1
net.bridge.bridge-nf-call-ip6tables = 1
EOF
sysctl --systemsudo tar xvf $(select_latest "${FILES_DIR}/containerd-*-linux-amd64.tar.gz") --strip-components=1 -C /usr/local/bincat > /etc/systemd/system/containerd.service <<EOF
# Copyright The containerd Authors.
#
# Licensed under the Apache License, Version 2.0 (the "License");
# you may not use this file except in compliance with the License.
# You may obtain a copy of the License at
#
#     http://www.apache.org/licenses/LICENSE-2.0
#
# Unless required by applicable law or agreed to in writing, software
# distributed under the License is distributed on an "AS IS" BASIS,
# WITHOUT WARRANTIES OR CONDITIONS OF ANY KIND, either express or implied.
# See the License for the specific language governing permissions and
# limitations under the License.[Unit]
Description=containerd container runtime
Documentation=https://containerd.io
After=network.target local-fs.target[Service]
ExecStartPre=-/sbin/modprobe overlay
ExecStart=/usr/local/bin/containerdType=notify
Delegate=yes
KillMode=process
Restart=always
RestartSec=5
# Having non-zero Limit*s causes performance problems due to accounting overhead
# in the kernel. We recommend using cgroups to do container-local accounting.
LimitNPROC=infinity
LimitCORE=infinity
LimitNOFILE=infinity
# Comment TasksMax if your systemd version does not supports it.
# Only systemd 226 and above support this version.
TasksMax=infinity
OOMScoreAdjust=-999[Install]
WantedBy=multi-user.target
EOFsudo mkdir -p \/etc/systemd/system/containerd.service.d \/etc/containerd \/var/lib/containerd \/run/containerdcontainerd config default | tee /etc/containerd/config.toml
sed -i "s#SystemdCgroup\ \=\ false#SystemdCgroup\ \=\ true#g" /etc/containerd/config.toml
cat /etc/containerd/config.toml | grep SystemdCgroupecho "==> Start containerd"
sudo systemctl daemon-reload && sudo systemctl enable --now containerd && sudo systemctl restart containerd && sudo systemctl status containerd | grep Active
}install_cni() {
# Install cni plugins
echo "==> Install CNI plugins"
sudo mkdir -p /opt/cni/bin
sudo tar xvzf $(select_latest "${FILES_DIR}/kubernetes/cni/cni-plugins-linux-amd64-v*.tgz") -C /opt/cni/bin}action=$1case $action ind )download_files;;i|install)install_nerdctlinstall_crictlinstall_runcinstall_containerdinstall_cni;;*)echo "Usage: $name [d|i]"echo "sh $name d: it is download packages."echo "sh$name i: it is install packages.";;
esac
exit 0
下载软件
$ sh install-containerd-k8s-v1.31.4.sh d
安装软件
$ sh install-containerd-k8s-v1.31.4.sh i
查看containerd状态
$ systemctl status containerd.service
查看版本
nerdctl --version
crictl --version
runc --version
输出
nerdctl version 1.7.7
crictl version v1.31.1
runc version 1.2.3
commit: v1.2.3-0-g0d37cfd4
spec: 1.2.0
go: go1.22.10
libseccomp: 2.5.5
4. kubeadm 安装集群
sudo apt-get update
sudo apt-get install -y apt-transport-https ca-certificates curl gpg
curl -fsSL https://pkgs.k8s.io/core:/stable:/v1.31/deb/Release.key | sudo gpg --dearmor -o /etc/apt/keyrings/kubernetes-apt-keyring.gpg
echo 'deb [signed-by=/etc/apt/keyrings/kubernetes-apt-keyring.gpg] https://pkgs.k8s.io/core:/stable:/v1.31/deb/ /' | sudo tee /etc/apt/sources.list.d/kubernetes.list
sudo apt-get update
查询版本
root@ECS-koreacentral-T4:~# apt-cache policy kubelet
kubelet:Installed: (none)Candidate: 1.31.6-1.1Version table:1.31.6-1.1 500500 https://pkgs.k8s.io/core:/stable:/v1.31/deb  Packages1.31.5-1.1 500500 https://pkgs.k8s.io/core:/stable:/v1.31/deb  Packages1.31.4-1.1 500500 https://pkgs.k8s.io/core:/stable:/v1.31/deb  Packages1.31.3-1.1 500500 https://pkgs.k8s.io/core:/stable:/v1.31/deb  Packages1.31.2-1.1 500500 https://pkgs.k8s.io/core:/stable:/v1.31/deb  Packages1.31.1-1.1 500500 https://pkgs.k8s.io/core:/stable:/v1.31/deb  Packages1.31.0-1.1 500500 https://pkgs.k8s.io/core:/stable:/v1.31/deb  Packages
root@ECS-koreacentral-T4:~# apt-cache policy kubeadm
kubeadm:Installed: (none)Candidate: 1.31.6-1.1Version table:1.31.6-1.1 500500 https://pkgs.k8s.io/core:/stable:/v1.31/deb  Packages1.31.5-1.1 500500 https://pkgs.k8s.io/core:/stable:/v1.31/deb  Packages1.31.4-1.1 500500 https://pkgs.k8s.io/core:/stable:/v1.31/deb  Packages1.31.3-1.1 500500 https://pkgs.k8s.io/core:/stable:/v1.31/deb  Packages1.31.2-1.1 500500 https://pkgs.k8s.io/core:/stable:/v1.31/deb  Packages1.31.1-1.1 500500 https://pkgs.k8s.io/core:/stable:/v1.31/deb  Packages1.31.0-1.1 500500 https://pkgs.k8s.io/core:/stable:/v1.31/deb  Packages
root@ECS-koreacentral-T4:~#
安装集群
sudo apt-get -y install kubelet=1.31.6-1.1 kubeadm=1.31.6-1.1 kubectl=1.31.6-1.1
sudo apt-mark hold kubelet kubeadm kubectl
sudo systemctl enable --now kubelet
kubeadm init --kubernetes-version=v1.31.6 --pod-network-cidr=10.96.0.0/12 --apiserver-advertise-address=10.0.0.4
输出:
root@ECS-koreacentral-T4:~# kubeadm init --kubernetes-version=v1.31.6 --pod-network-cidr=10.96.0.0/12 --apiserver-advertise-address=10.0.0.4
[init] Using Kubernetes version: v1.31.6
[preflight] Running pre-flight checks
[preflight] Pulling images required for setting up a Kubernetes cluster
[preflight] This might take a minute or two, depending on the speed of your internet connection
[preflight] You can also perform this action beforehand using 'kubeadm config images pull'
W0227 06:11:14.927695   30673 checks.go:846] detected that the sandbox image "registry.k8s.io/pause:3.8" of the container runtime is inconsistent with that used by kubeadm.It is recommended to use "registry.k8s.io/pause:3.10" as the CRI sandbox image.
[certs] Using certificateDir folder "/etc/kubernetes/pki"
[certs] Generating "ca" certificate and key
[certs] Generating "apiserver" certificate and key
[certs] apiserver serving cert is signed for DNS names [ecs-koreacentral-t4 kubernetes kubernetes.default kubernetes.default.svc kubernetes.default.svc.cluster.local] and IPs [10.96.0.1 10.0.0.4]
[certs] Generating "apiserver-kubelet-client" certificate and key
[certs] Generating "front-proxy-ca" certificate and key
[certs] Generating "front-proxy-client" certificate and key
[certs] Generating "etcd/ca" certificate and key
[certs] Generating "etcd/server" certificate and key
[certs] etcd/server serving cert is signed for DNS names [ecs-koreacentral-t4 localhost] and IPs [10.0.0.4 127.0.0.1 ::1]
[certs] Generating "etcd/peer" certificate and key
[certs] etcd/peer serving cert is signed for DNS names [ecs-koreacentral-t4 localhost] and IPs [10.0.0.4 127.0.0.1 ::1]
[certs] Generating "etcd/healthcheck-client" certificate and key
[certs] Generating "apiserver-etcd-client" certificate and key
[certs] Generating "sa" key and public key
[kubeconfig] Using kubeconfig folder "/etc/kubernetes"
[kubeconfig] Writing "admin.conf" kubeconfig file
[kubeconfig] Writing "super-admin.conf" kubeconfig file
[kubeconfig] Writing "kubelet.conf" kubeconfig file
[kubeconfig] Writing "controller-manager.conf" kubeconfig file
[kubeconfig] Writing "scheduler.conf" kubeconfig file
[etcd] Creating static Pod manifest for local etcd in "/etc/kubernetes/manifests"
[control-plane] Using manifest folder "/etc/kubernetes/manifests"
[control-plane] Creating static Pod manifest for "kube-apiserver"
[control-plane] Creating static Pod manifest for "kube-controller-manager"
[control-plane] Creating static Pod manifest for "kube-scheduler"
[kubelet-start] Writing kubelet environment file with flags to file "/var/lib/kubelet/kubeadm-flags.env"
[kubelet-start] Writing kubelet configuration to file "/var/lib/kubelet/config.yaml"
[kubelet-start] Starting the kubelet
[wait-control-plane] Waiting for the kubelet to boot up the control plane as static Pods from directory "/etc/kubernetes/manifests"
[kubelet-check] Waiting for a healthy kubelet at http://127.0.0.1:10248/healthz. This can take up to 4m0s
[kubelet-check] The kubelet is healthy after 1.001206836s
[api-check] Waiting for a healthy API server. This can take up to 4m0s
[api-check] The API server is healthy after 6.00167991s
[upload-config] Storing the configuration used in ConfigMap "kubeadm-config" in the "kube-system" Namespace
[kubelet] Creating a ConfigMap "kubelet-config" in namespace kube-system with the configuration for the kubelets in the cluster
[upload-certs] Skipping phase. Please see --upload-certs
[mark-control-plane] Marking the node ecs-koreacentral-t4 as control-plane by adding the labels: [node-role.kubernetes.io/control-plane node.kubernetes.io/exclude-from-external-load-balancers]
[mark-control-plane] Marking the node ecs-koreacentral-t4 as control-plane by adding the taints [node-role.kubernetes.io/control-plane:NoSchedule]
[bootstrap-token] Using token: b56uy1.w1v7pe0vuxnrcj42
[bootstrap-token] Configuring bootstrap tokens, cluster-info ConfigMap, RBAC Roles
[bootstrap-token] Configured RBAC rules to allow Node Bootstrap tokens to get nodes
[bootstrap-token] Configured RBAC rules to allow Node Bootstrap tokens to post CSRs in order for nodes to get long term certificate credentials
[bootstrap-token] Configured RBAC rules to allow the csrapprover controller automatically approve CSRs from a Node Bootstrap Token
[bootstrap-token] Configured RBAC rules to allow certificate rotation for all node client certificates in the cluster
[bootstrap-token] Creating the "cluster-info" ConfigMap in the "kube-public" namespace
[kubelet-finalize] Updating "/etc/kubernetes/kubelet.conf" to point to a rotatable kubelet client certificate and key
[addons] Applied essential addon: CoreDNS
[addons] Applied essential addon: kube-proxyYour Kubernetes control-plane has initialized successfully!To start using your cluster, you need to run the following as a regular user:mkdir -p $HOME/.kubesudo cp -i /etc/kubernetes/admin.conf $HOME/.kube/configsudo chown $(id -u):$(id -g) $HOME/.kube/configAlternatively, if you are the root user, you can run:export KUBECONFIG=/etc/kubernetes/admin.confYou should now deploy a pod network to the cluster.
Run "kubectl apply -f [podnetwork].yaml" with one of the options listed at:https://kubernetes.io/docs/concepts/cluster-administration/addons/Then you can join any number of worker nodes by running the following on each as root:kubeadm join 10.0.0.4:6443 --token b56uy1.w1v7pe0vuxnrcj42 \--discovery-token-ca-cert-hash sha256:ccbb7ad4040c10bf6e927f30fa7709127f28e3201a3241da8f16af9f3a834940
root@ECS-koreacentral-T4:~#
配置kubeconfig
$ mkdir -p $HOME/.kube
$ sudo cp -i /etc/kubernetes/admin.conf $HOME/.kube/config
$ sudo chown $(id -u):$(id -g) $HOME/.kube/config
查看集群状态
root@ECS-koreacentral-T4:~# k get node
NAME                  STATUS     ROLES           AGE     VERSION
ecs-koreacentral-t4   NotReady   control-plane   2m50s   v1.31.6
root@ECS-koreacentral-T4:~# kubectl get pod -A
NAMESPACE     NAME                                          READY   STATUS    RESTARTS   AGE
kube-system   coredns-7c65d6cfc9-cndd5                      0/1     Pending   0          3m
kube-system   coredns-7c65d6cfc9-zm5wd                      0/1     Pending   0          3m
kube-system   etcd-ecs-koreacentral-t4                      1/1     Running   0          3m6s
kube-system   kube-apiserver-ecs-koreacentral-t4            1/1     Running   0          3m6s
kube-system   kube-controller-manager-ecs-koreacentral-t4   1/1     Running   0          3m6s
kube-system   kube-proxy-mcbt2                              1/1     Running   0          3m
kube-system   kube-scheduler-ecs-koreacentral-t4            1/1     Running   0          3m6s
5. 安装网络 calico 插件
kubectl apply -f https://docs.projectcalico.org/manifests/calico.yaml
root@ECS-koreacentral-T4:~# k get node
NAME                  STATUS   ROLES           AGE     VERSION
ecs-koreacentral-t4   Ready    control-plane   4m16s   v1.31.6
root@ECS-koreacentral-T4:~# k get pod -A
NAMESPACE     NAME                                          READY   STATUS              RESTARTS   AGE
kube-system   calico-kube-controllers-6879d4fcdc-tlspt      0/1     ContainerCreating   0          27s
kube-system   calico-node-fgrvd                             0/1     Running             0          27s
kube-system   coredns-7c65d6cfc9-cndd5                      0/1     ContainerCreating   0          4m14s
kube-system   coredns-7c65d6cfc9-zm5wd                      0/1     ContainerCreating   0          4m14s
kube-system   etcd-ecs-koreacentral-t4                      1/1     Running             0          4m20s
kube-system   kube-apiserver-ecs-koreacentral-t4            1/1     Running             0          4m20s
kube-system   kube-controller-manager-ecs-koreacentral-t4   1/1     Running             0          4m20s
kube-system   kube-proxy-mcbt2                              1/1     Running             0          4m14s
kube-system   kube-scheduler-ecs-koreacentral-t4            1/1     Running             0          4m20s
root@ECS-koreacentral-T4:~# k get pod -A
NAMESPACE     NAME                                          READY   STATUS    RESTARTS   AGE
kube-system   calico-kube-controllers-6879d4fcdc-tlspt      1/1     Running   0          37s
kube-system   calico-node-fgrvd                             1/1     Running   0          37s
kube-system   coredns-7c65d6cfc9-cndd5                      1/1     Running   0          4m24s
kube-system   coredns-7c65d6cfc9-zm5wd                      1/1     Running   0          4m24s
kube-system   etcd-ecs-koreacentral-t4                      1/1     Running   0          4m30s
kube-system   kube-apiserver-ecs-koreacentral-t4            1/1     Running   0          4m30s
kube-system   kube-controller-manager-ecs-koreacentral-t4   1/1     Running   0          4m30s
kube-system   kube-proxy-mcbt2                              1/1     Running   0          4m24s
kube-system   kube-scheduler-ecs-koreacentral-t4            1/1     Running   0          4m30s
参考:
- https://kubernetes.io/docs/setup/production-environment/tools/kubeadm/install-kubeadm/
- https://kubernetes.io/docs/setup/production-environment/tools/kubeadm/create-cluster-kubeadm/
相关文章:
在ubuntu 24.04.2 通过 Kubeadm 安装 Kubernetes v1.31.6
文章目录 1. 简介2. 准备3. 配置 containerd4. kubeadm 安装集群5. 安装网络 calico 插件 1. 简介 本指南介绍了如何在 Ubuntu 24.04.2 LTS 上安装和配置 Kubernetes 1.31.6 集群,包括容器运行时 containerd 的安装与配置,以及使用 kubeadm 进行集群初始…...

基于Python socket库构建的基于 P2P 的文件共享系统示例
基于 P2P 的文件共享系统 实现方式: 使用 Python 的socket库构建 P2P 网络,节点之间通过 TCP 或 UDP 协议进行通信。每个节点维护一个文件列表,并向其他节点广播自己拥有的文件信息。当一个节点需要某个文件时,它会向网络中的其…...

JavaScript 函数重载:灵活应对多场景的编程技巧
在 JavaScript 中,函数重载(Function Overloading)是一个常见的需求。尽管 JavaScript 本身并不支持传统意义上的函数重载(即在同一个作用域内定义多个同名函数,根据参数的不同调用不同的函数),…...

通过 PromptTemplate 生成干净的 SQL 查询语句并执行SQL查询语句
问题描述 在使用 LangChain 和 Llama 模型生成 SQL 查询时,遇到了 sqlite3.OperationalError 错误。错误信息如下: OperationalError: (sqlite3.OperationalError) near "sql SELECT Name FROM MediaType LIMIT 5; ": syntax error [SQL: …...

用大白话解释缓存Redis +MongoDB是什么有什么用怎么用
Redis和MongoDB是什么? Redis:像你家的“小冰箱”,专门存高频使用的食物(数据)。它是基于内存的键值数据库,读写速度极快(每秒超10万次操作)。比如你每次打开手机App,用…...

计算机毕业设计SpringBoot+Vue.js汽车销售网站(源码+文档+PPT+讲解)
温馨提示:文末有 CSDN 平台官方提供的学长联系方式的名片! 温馨提示:文末有 CSDN 平台官方提供的学长联系方式的名片! 温馨提示:文末有 CSDN 平台官方提供的学长联系方式的名片! 作者简介:Java领…...

【0010】HTML水平线标签详解
如果你觉得我的文章写的不错,请关注我哟,请点赞、评论,收藏此文章,谢谢! 本文内容体系结构如下: 一、水平线标签概述 在HTML中,<hr>标签用于在网页上插入一条水平线,其主要…...

FastExcel与Reactor响应式编程深度集成技术解析
一、技术融合背景与核心价值 在2025年企业级应用开发中,大规模异步Excel处理与响应式系统架构的结合已成为技术刚需。FastExcel与Reactor的整合方案,通过以下技术协同实现突破性性能: 内存效率革命:FastExcel的流式字节操作与Re…...
Netty是如何实现零拷贝的?
大家好,我是锋哥。今天分享关于【Netty是如何实现零拷贝的?】面试题。希望对大家有帮助; Netty是如何实现零拷贝的? 1000道 互联网大厂Java工程师 精选面试题-Java资源分享网 Netty是一个高性能的Java网络应用框架,它…...

【大模型➕知识图谱】大模型结合医疗知识图谱:解锁智能辅助诊疗系统新范式
【大模型➕知识图谱】大模型结合医疗知识图谱:解锁智能辅助诊疗系统新范式 大模型结合医疗知识图谱:解锁智能辅助诊疗系统新范式引言一、系统架构1.1 系统架构图1.2 架构模块说明1.2.1 用户输入1.2.2 大模型(语义理解与意图识别)1.2.3 Agent(问题解析与任务分配)1.2.4 问…...

Spring Boot @Component注解介绍
Component 是 Spring 中的一个核心注解,用于声明一个类为 Spring 管理的组件(Bean)。它是一个通用的注解,可以用于任何层次的类(如服务层、控制器层、持久层等)。通过 Component 注解,Spring 会…...
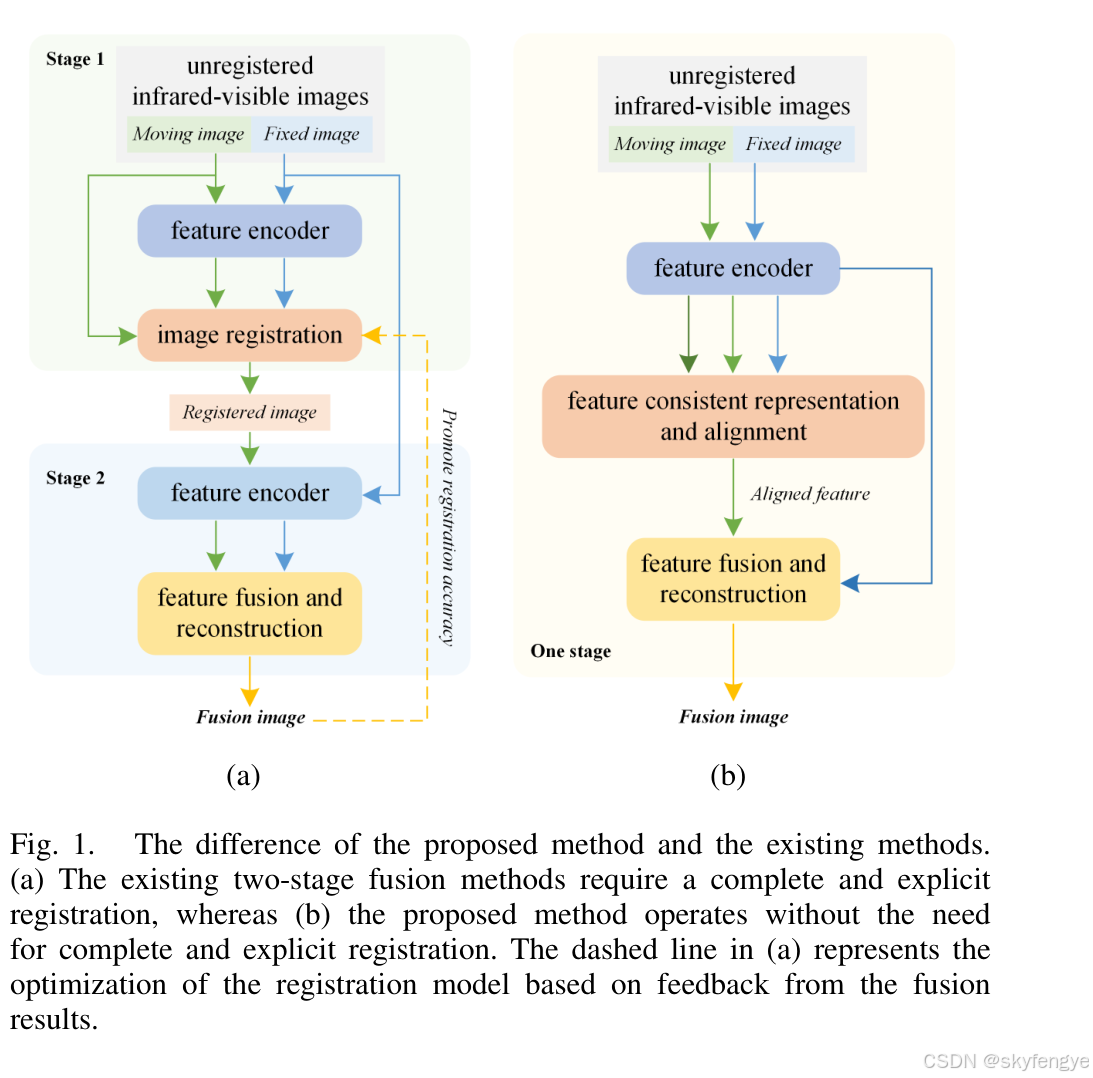
MulFS-CAP: Multimodal Fusion-supervisedCross-modal
一种用于无注册红外-可见图像融合的单阶段框架。与传统的两阶段方法不同,MulFS-CAP结合了隐式注册和融合,简化了处理流程并增强了实用性。该方法使用共享的浅层特征编码器,同时进行特征对齐和图像融合。通过引入可学习的模态字典,…...
WordPress多语言插件GTranslate
GTranslate是一个免费的WordPress多语言插件,它允许您将网站内容翻译成多种语言。这个插件提供了一个简单易用的界面,让您可以在WordPress后台直接进行翻译操作。以下是GTranslate插件的一些主要特点: 免费使用:GTranslate插件完…...

wordpress子分类调用父分类名称和链接的3种方法
专为导航而生,在wordpress模板制作过程中常常会在做breadcrumbs导航时会用到,子分类调用父分类的名称和链接,下面这段简洁的代码,可以完美解决这个问题。 <?php echo get_category_parents( $cat, true, » ); ?…...

Prometheus + Grafana 监控
Prometheus Grafana 监控 官网介绍:Prometheus 是一个开源系统 监控和警报工具包最初由 SoundCloud 构建。自 2012 年成立以来,许多 公司和组织已经采用了 Prometheus,并且该项目具有非常 活跃的开发人员和用户社区。它现在是一个独立的开源…...

初学STM32之简单认识IO口配置(学习笔记)
在使用51单片机的时候基本上不需要额外的配置IO,不过在使用特定的IO的时候需要额外的设计外围电路,比如PO口它是没有内置上拉电阻的。因此若想P0输出高电平,它就需要外接上拉电平。(当然这不是说它输入不需要上拉电阻,…...

springboot2.7.18升级springboot3.3.0遇到的坑
druid的警告,警告如下: 运行警告2025-02-28T09:20:31.28508:00 WARN 18800 --- [ restartedMain] trationDelegate$BeanPostProcessorChecker : Bean com.alibaba.druid.spring.boot3.autoconfigure.stat.DruidSpringAopConfiguration of type [com.a…...

gtest 和 gmock讲解
Google Test(gtest)和 Google Mock(gmock)是 Google 开发的用于 C 的测试框架和模拟框架,以下是对它们的详细讲解: Google Test(gtest) 简介 Google Test 是一个用于 C 的单元测试框…...
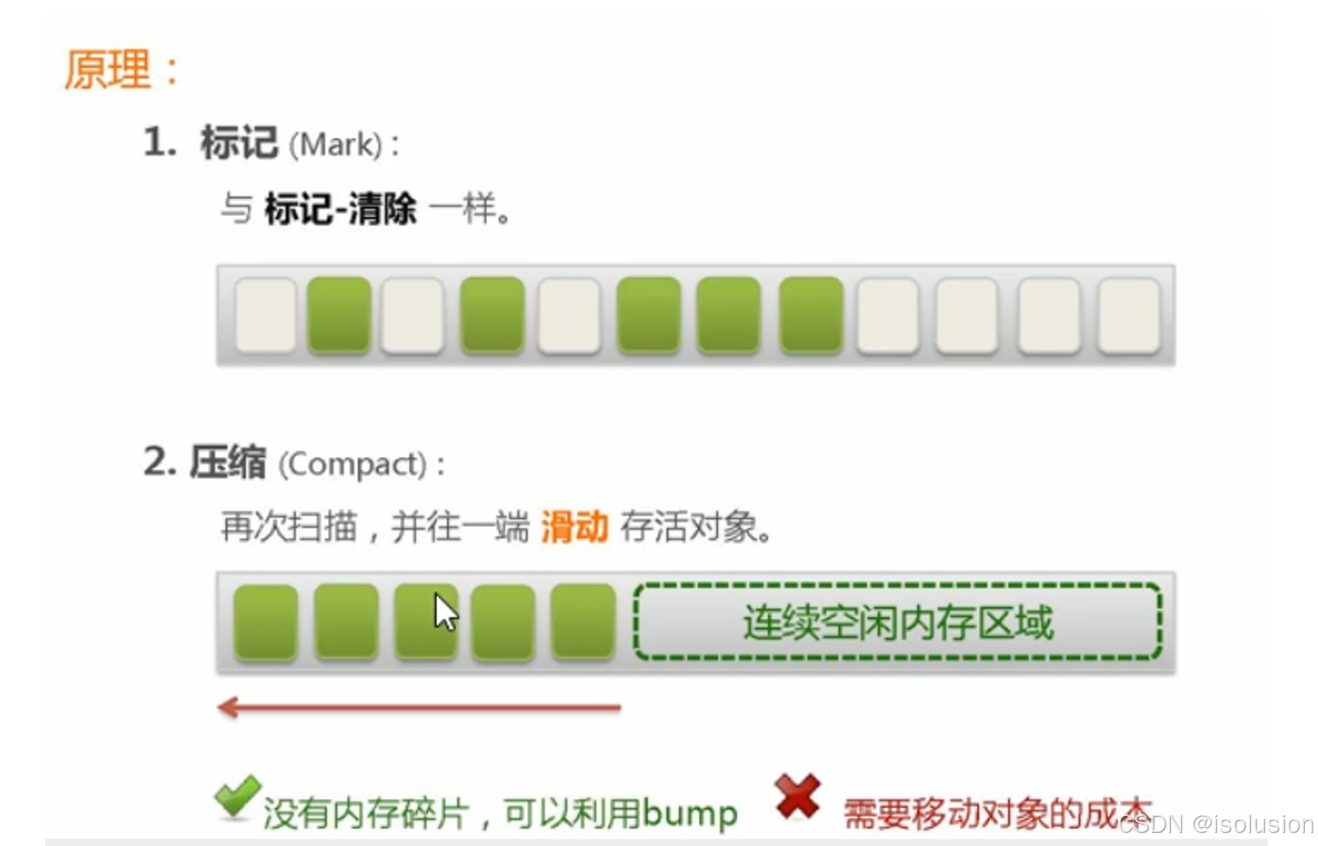
GC垃圾回收介绍及GC算法详解
目录 引言 GC的作用域 什么是垃圾回收? 常见的GC算法 1.引用计数法 2.复制算法 3.标记清除 4.标记整理 小总结 5.分代收集算法 ps:可达性分析算法? 可达性分析的作用 可达性分析与垃圾回收算法的关系 结论 引言 在编程世界中,…...

2020 年英语(一)考研真题 笔记(更新中)
Section I Use of English(完型填空) 原题 Directions:Read the following text. Choose the best word (s) for each numbered blank and mark A, B, C or D on the ANSWER SHEET. (10 points) Even if families are less likely to si…...

别再乱买电源线!服务器供电踩坑后果惨重
选服务器电源线,一定要把控好接口匹配、电流大小、安全认证、线缆长度和材质用料五大核心要点,任何一项忽略,都极易造成设备损坏,甚至引发电路起火,机房用电安全不容忽视,选睿阜更安心。先对接口࿱…...

LLM提示压缩技术:原理、实现与优化实践
1. 提示压缩技术概述在大型语言模型(LLM)应用中,推理延迟已成为关键瓶颈。当处理包含多个检索段落的RAG(检索增强生成)系统时,长上下文会导致提示(prompt)体积膨胀,显著增…...

实战精通openpilot自动驾驶系统:从安装到深度定制的完整指南
实战精通openpilot自动驾驶系统:从安装到深度定制的完整指南 【免费下载链接】openpilot openpilot is an operating system for robotics. Currently, it upgrades the driver assistance system on 300 supported cars. 项目地址: https://gitcode.com/GitHub_T…...

Unity UI实战:Input Field输入框从入门到精通,搞定用户交互与数据获取
Unity UI实战:Input Field输入框从入门到精通,搞定用户交互与数据获取在游戏和应用开发中,用户输入是不可或缺的交互环节。无论是简单的登录界面、复杂的设置面板,还是实时聊天系统,Input Field都是连接用户与程序的关…...

差分隐私生成模型实战:从理论保障到隐私攻击与审计评估
1. 项目概述与核心挑战在医疗健康、社会科学研究以及政府统计等领域,处理包含个人敏感信息的表格数据是一项常态。这些数据是宝贵的研究资源,但其使用受到严格的隐私法规(如GDPR、HIPAA等)的约束。传统的数据脱敏或匿名化方法&…...

别装Matlab了!用这个免费网站Desmos,5分钟搞定函数绘图和矩阵计算
告别笨重软件:用Desmos在线工具5分钟完成专业级数学计算数学计算和可视化是科研、工程和教学中不可或缺的环节。传统解决方案如Matlab、Mathematica虽然功能强大,但存在价格昂贵、安装包庞大、启动缓慢等问题。对于需要快速验证数学问题的用户来说&#…...

AI 术语通俗词典:RAG
RAG 是大语言模型、自然语言处理、知识问答、智能客服、企业知识库和 AI 应用开发中非常重要的一个术语,全称是 Retrieval-Augmented Generation,通常翻译为“检索增强生成”。它用来描述一种让大语言模型先从外部资料中检索相关内容,再基于这…...

Nginx基于反向代理的负载均衡
一、引言:从单点到集群,流量分发的艺术当你的应用用户量从几百飙升到几万,单台服务器很快就会成为性能瓶颈,甚至面临宕机风险。此时,最直接有效的解决方案就是横向扩展——部署多台服务器组成集群。但新问题随之而来&a…...

FanControl终极指南:5步实现Windows风扇智能控制,让电脑散热更安静更高效
FanControl终极指南:5步实现Windows风扇智能控制,让电脑散热更安静更高效 【免费下载链接】FanControl.Releases This is the release repository for Fan Control, a highly customizable fan controlling software for Windows. 项目地址: https://g…...

CSS伪类详解:从基础到高级应用
CSS伪类详解:从基础到高级应用 一、什么是CSS伪类 CSS伪类是一种选择器,用于选择处于特定状态的元素。它们以冒号 : 开头,可以为元素的不同状态设置不同的样式。伪类的强大之处在于它们能够根据用户交互、文档结构或元素状态来动态改变样式&a…...