动力节点王鹤SpringBoot3学习笔记——第四章 访问数据库
目录
第四章 访问数据库
4.1 DataSource
4.2 轻量的JdbcTemplate
4.2.1 准备环境
4.2.1.1 准备数据库和表脚本
4.2.1.2 创建Spring Boot工程
4.2.2 JdbcTemplate访问MySQL
4.2.3 NamedParameterJdbcTemplate
4.2.4 多表查询
4.3 MyBatis
4.3.1 单表CRUD
4.3.2 ResultMap
4.3.3 SQL提供者
4.3.4 @One一对一查询
4.3.5 @Many一对多查询
4.3.6 常用配置参数
4.3.7 MybatisAutoConfiguration
4.4 适合的连接池
4.5 声明式事务
4.5.1.1 准备事务演示环境
4.5.1.2 添加事务注解
4.5.1.3 无效事务1
4.5.1.4 无效事务2
4.5.1.5 事务回滚规则
视频:动力节点SpringBoot3从入门到项目实战
第四章 访问数据库
Spring Boot框架为SQL数据库提供了广泛的支持,既有用JdbcTemplate直接访问JDBC,同时支持“object relational mapping”技术(如Hibernate,MyBatis)。Spring Data独立的项目提供对多种关系型和非关系型数据库的访问支持。比如 MySQL, Oracle , MongoDB , Redis, R2DBC,Apache Solr,Elasticsearch...
Spring Boot也支持嵌入式数据库比如H2, HSQL, and Derby。这些数据库只需要提供jar包就能在内存中维护数据。我们这章访问关系型数据库。
4.1 DataSource
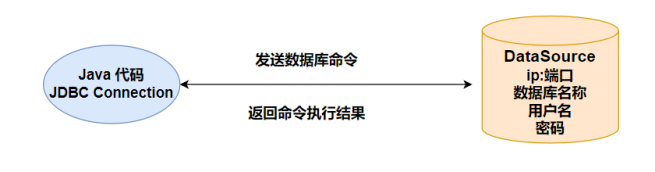
通常项目中使用MySQL,Oracle,PostgreSQL等大型关系数据库。Java中的jdbc技术支持了多种关系型数据库的访问。在代码中访问数据库,我们需要知道数据库程序所在的ip,端口,访问数据库的用户名和密码以及数据库的类型信息。以上信息用来初始化数据源,数据源也就是DataSource。数据源表示数据的来源,从某个ip上的数据库能够获取数据。javax.sql.DataSource接口表示数据源,提供了标准的方法获取与数据库绑定的连接对象(Connection)。
javax.sql.Connection是连接对象,在Connection上能够从程序代码发送查询命令,更新数据的语句给数据库;同时从Connection获取命令的执行结果。Connection很重要,像一个电话线把应用程序和数据库连接起来。
DataSource在application配置文件中以spring.datasource.*作为配置项。类似下面的代码:
spring.datasource.url=jdbc:mysql://localhost/mydb
spring.datasource.username=dbuser
spring.datasource.password=dbpass
DataSourceProperties.java是数据源的配置类,更多配置参考这个类的属性。
@ConfigurationProperties(prefix = "spring.datasource")
public class DataSourceProperties implements BeanClassLoaderAware, InitializingBean {
}
Spring Boot能够从spring.datasource.url推断所使用的数据驱动类,如果需要特殊指定请设置spring.datasource.driver-class-name为驱动类的全限定名称。
Spring Boot支持多种数据库连接池,优先使用 HikariCP,其次是Tomcat pooling,再次是 Commons DBCP2,如果以上都没有,最后会使用Oracle UCP连接池。当项目中starter依赖了spring-boot-starter-jdbc 或者spring-boot-starter-data-jpa默认添加HikariCP连接池依赖,也就是默认使用HikariCP连接池。
4.2 轻量的JdbcTemplate
使用JdbcTemplate我们提供自定义SQL, Spring执行这些SQL得到记录结果集。JdbcTemplate和NamedParameterJdbcTemplate类是自动配置的,您可以@Autowire注入到自己的Bean中。开箱即用。
JdbcTemplate执行完整的SQL语句,我们将SQL语句拼接好,交给JdbcTemplate执行,JdbcTemplate底层就是使用JDBC执行SQL语句。是JDBC的封装类而已。
NamedParameterJdbcTemplate可以在SQL语句部分使用“:命名参数”作为占位符, 对参数命名,可读性更好。NamedParameterJdbcTemplate包装了JdbcTemplate对象,“:命名参数”解析后,交给JdbcTemplate执行SQL语句。
JdbcTemplateAutoConfiguration自动配置了JdbcTemplate对象,交给JdbcTemplateConfiguration创建了JdbcTemplate对象。并对JdbcTemplate做了简单的初始设置(QueryTimeout,maxRows等)。
4.2.1 准备环境
访问数据库先准备数据库的script。SpringBoot能够自动执行DDL,DML脚本。两个脚本文件名称默认是schema.sql和data.sql。脚本文件在类路径中自动加载。
自动执行脚本还涉及到spring.sql.init.mode配置项:
- always:总是执行数据库初始化脚本
- never:禁用数据库初始化
更进一步
Spring Boot处理特定的数据库类型,为特定的数据库定制script文件。首先设置spring.sql.init.platform=hsqldb、h2、oracle、mysql、postgresql等等,其次准备 schema-${platform}. sql 、 data-${platform}. sql 脚本文件。
4.2.1.1 准备数据库和表脚本
首先创建数据库,安装MySQL8.5。有可用的MySQL数据库就可以,最好是5以上版本。
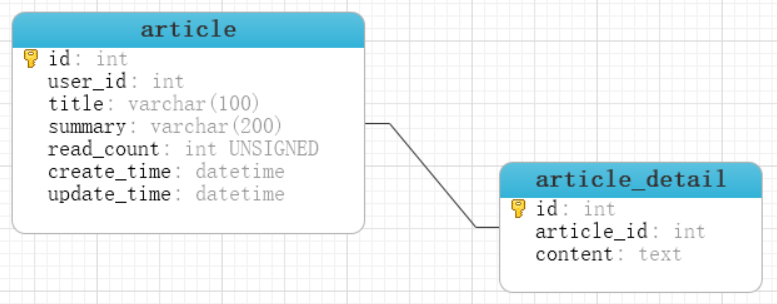
数据库名称Blog , 表目前使用一个 article(文章表),初始两条数据。
schema.sql
CREATE TABLE `article` (`id` int(11) NOT NULL AUTO_INCREMENT COMMENT '主键',`user_id` int(11) NOT NULL COMMENT '作者ID',`title` varchar(100) NOT NULL COMMENT '文章标题',`summary` varchar(200) DEFAULT NULL COMMENT '文章概要',`read_count` int(11) unsigned zerofill NOT NULL COMMENT '阅读读数',`create_time` datetime NOT NULL COMMENT '创建时间',`update_time` datetime NOT NULL COMMENT '最后修改时间',PRIMARY KEY (`id`)) ENGINE=InnoDB AUTO_INCREMENT=1 DEFAULT CHARSET=utf8mb4;data.sql
INSERT INTO `article` VALUES ('1','2101','SpringBoot核心注解',
'核心注解的主要作用','00000008976','2023-01-16 12:11:12','2023-01-16 12:11:19');
INSERT INTO `article` VALUES ('2','356752','JVM调优',
'HotSpot虚拟机详解','00000000026','2023-01-16 12:15:27','2023-01-16 12:15:30');
4.2.1.2 创建Spring Boot工程
新建Spring Boot工程Lession09-JdbcTemplate
构建工具:Maven
包名:com.bjpowernode.jdbc
JDK:19
Starter依赖:Lombok,MySQL Driver, JDBC API
Maven依赖(pom.xml)
<dependency><groupId>org.springframework.boot</groupId><artifactId>spring-boot-starter-jdbc</artifactId>
</dependency><dependency><groupId>com.mysql</groupId><artifactId>mysql-connector-j</artifactId><scope>runtime</scope>
</dependency><dependency><groupId>org.projectlombok</groupId><artifactId>lombok</artifactId><optional>true</optional>
</dependency><dependency><groupId>org.springframework.boot</groupId><artifactId>spring-boot-starter-test</artifactId><scope>test</scope>
</dependency>
IDEA Maven Tool查看依赖列表

依赖包含了连接池com.zaxxer:HikariCP:5.0.1 , spring-jdbc 6.0.3 , mysql驱动mysql-connector-j 8.0.31。
4.2.2 JdbcTemplate访问MySQL
项目中依赖了spring-jdbc 6.0.3,JdbcTemplate对象会自动创建好。把JdbcTemplate对象注入给你的Bean,再调用JdbcTemplate的方法执行查询,更新,删除的SQL。
JdbcTemplate上手快,功能非常强大。提供了丰富、实用的方法,归纳起来主要有以下几种类型的方法:
- execute方法:可以用于执行任何SQL语句,常用来执行DDL语句。
- update、batchUpdate方法:用于执行新增、修改与删除等语句。
- query和queryForXXX方法:用于执行查询相关的语句。
- call方法:用于执行数据库存储过程和函数相关的语句。
我们在2.2.1.2已经创建了Spring Boot工程,在工程上继续添加代码,完成对Blog库,article表的CRUD。
step1:将schema.sql , data.sql拷贝到resources目录

step2:修改application.properties
spring.datasource.driver-class-name=com.mysql.cj.jdbc.Driver
spring.datasource.url=jdbc:mysql://localhost:3306/blog?serverTimezone=Asia/Shanghai&useUnicode=true&characterEncoding=utf8&autoReconnect=true&useSSL=falsespring.datasource.username=root
spring.datasource.password=123456
#总是执行数据库脚本,以后设置为never
spring.sql.init.mode=always
step3: 创建实体类 ArticlePO
@Data
@NoArgsConstructor
@AllArgsConstructor
public class ArticlePO {private Integer id;private Integer userId;private String title;private String summary;private Integer readCount;private LocalDateTime createTime;private LocalDateTime updateTime;
}
Lomok注解给类的属性生成set,get方法。 默认和所有参数构造方法
step4: 单元测试,注入JdbcTemplate对象
@SpringBootTest
public class TestJdbcTemplate {@Resourceprivate JdbcTemplate jdbcTemplate;
}
测试聚合函数
@Test
void testCount() {String sql="select count(*) as ct from article";Long count = jdbcTemplate.queryForObject(sql, Long.class);
System.out.println("文章总数 = " + count);
}
测试“?”占位符
@Test
void testQuery() {// ?作为占位符String sql = "select * from article where id= ? ";//BeanPropertyRowMapper 将查询结果集,列名与属性名称匹配, 名称完全匹配或驼峰ArticlePO article = jdbcTemplate.queryForObject(sql,new BeanPropertyRowMapper<>(ArticlePO.class), 1 );
System.out.println("查询到的文章 = " + article);
}
测试自定义RowMapper
@Test
void testQueryRowMapper() {//只能查询出一个记录,查询不出记录抛出异常String sql = "select * from article where id= " + 1;ArticlePO article = jdbcTemplate.queryForObject(sql, (rs, rownum) -> {var id = rs.getInt("id");var userId = rs.getInt("user_id");var title = rs.getString("title");var summary = rs.getString("summary");var readCount = rs.getInt("read_count");var createTime = new Timestamp(rs.getTimestamp("create_time").getTime())
.toLocalDateTime();var updateTime = new Timestamp(rs.getTimestamp("update_time").getTime())
.toLocalDateTime();return new ArticlePO(id, userId, title, summary, readCount,createTime, updateTime);
});
System.out.println("查询的文章 = " + article);
}
测试List集合
@Test
void testList() {String sql="select * from article  order by id ";List<Map<String, Object>> listMap = jdbcTemplate.queryForList(sql);listMap.forEach( el->{el.forEach( (field,value)->{
System.out.println("字段名称:"+field+",列值:"+value);
});System.out.println("===================================");
});
}
测试更新记录
@Test
void testUpdate() {String sql="update article set title = ? where id= ? ";//参数是从左往右 第一个,第二个...
int updated = jdbcTemplate.update(sql, "Java核心技术思想", 2);
System.out.println("更新记录:"+updated);
}
4.2.3 NamedParameterJdbcTemplate
NamedParameterJdbcTemplate能够接受命名的参数,通过具名的参数提供代码的可读性,JdbcTemplate使用的是参数索引的方式。
在使用模板的位置注入NamedParameterJdbcTemplate对象,编写SQL语句,在SQL中WHERE部分“:命名参数”。调用NamedParameterJdbcTemplate的诸如query,queryForObject, execute,update等时,将参数封装到Map中。
step1:注入模板对象
@Resource
private JdbcTemplate jdbcTemplate;
step2: 使用命名参数
@Test
void testNameQuery() {// :参数名String sql="select count(*) as ct from article where user_id=:uid and read_count > :num";//key是命名参数Map<String,Object> param = new HashMap<>();param.put("uid", 2101);param.put("num", 0);    Long count = nameJdbcTemplate.queryForObject(sql, param, Long.class);System.out.println("用户被阅读的文章数量 = " + count);
}
4.2.4 多表查询
多表查询关注是查询结果如何映射为Java Object。常用两种方案:一种是将查询结果转为Map。列名是key,列值是value,这种方式比较通用,适合查询任何表。第二种是根据查询结果中包含的列,创建相对的实体类。属性和查询结果的列对应。将查询结果自定义RowMapper、ResultSetExtractor映射为实体类对象。
现在创建新的表article_detail,存储文章内容,与article表是一对一关系。
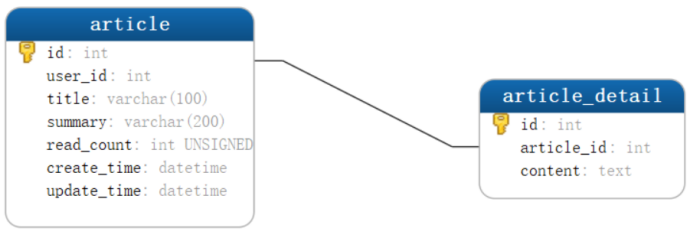
article_detail表
CREATE TABLE `article_detail` (`id` int(11) NOT NULL AUTO_INCREMENT COMMENT '注解',`article_id` int(11) NOT NULL COMMENT '文章ID',`content` text NOT NULL COMMENT '文章内容',PRIMARY KEY (`id`))
ENGINE=InnoDB AUTO_INCREMENT=1 DEFAULT CHARSET=utf8mb4;
需求:查询某个文章的全部属性,包括文章内容
step1:创建新的实体类ArticleMainPO, 将ArticlePO作为成员变量
@Data
@NoArgsConstructor
@AllArgsConstructor
public class ArticleMainPO {private Integer id;private Integer userId;private String title;private String summary;private Integer readCount;private LocalDateTime createTime;private LocalDateTime updateTime;private ArticleDetailPO articleDetail;
}
step2: 查询一对一文章
@Test
void testArticleContent() {String sql= """select m.*,d.id as detail_id, d.article_id,d.content from article m join article_detail d on  m.id = d.article_idwhere m.id=:id""";Map<String,Object> param = new HashMap<>();param.put("id", 1);List<ArticleMainPO> list = nameJdbcTemplate.query(sql, param, (rs, rowNum) -> {var id = rs.getInt("id");var userId = rs.getInt("user_id");var title = rs.getString("title");var summary = rs.getString("summary");var readCount = rs.getInt("read_count");var createTime = new Timestamp(rs.getTimestamp("create_time").getTime())
.toLocalDateTime();var updateTime = new Timestamp(rs.getTimestamp("update_time").getTime())
.toLocalDateTime();//文章详情var detailId = rs.getInt("detail_id");var content = rs.getString("content");var articleId = rs.getInt("article_id");ArticleDetailPO detail = new ArticleDetailPO();detail.setId(detailId);detail.setArticleId(articleId);detail.setContent(content);return new ArticleMainPO(id, userId, title, summary, readCount,createTime, updateTime, detail);});list.forEach(m -> {System.out.println("m.getId() = " + m.getId());System.out.println("m.getArticleDetail() = " + m.getArticleDetail());});}
总结:
JdbcTemplate的优点简单,灵活,上手快,访问多种数据库。对数据的处理控制能力比较强,RowMapper, ResultSetExtractor能够提供按需要灵活定制记录集与实体类的关系。
缺点:对SQL要求高,适合对SQL比较了解,自定义查询结果比较多,调优需求的。 JdbcTemplate对象的调整参数,比较少。可设置spring.jdbc.template.开头的配置项目,比如设置超时为10秒,spring.jdbc.template.query-timeout=10。
4.3 MyBatis
数据库访问MyBatis,MyBatis-Plus国内很常用,掌握了MyBatis,MyBatis-Plus就会了大部分了。MyBatis-Plus附加的功能需要单独学习。我们以MyBatis来自介绍Spring Boot集成ORM框架。
MyBatis使用最多的是mapper xml文件编写SQL语句。本章使用MyBatis的注解,JDK新特性文本块,以及Record完成java对象和表数据的处理。
4.3.1 单表CRUD
首先向blog数据库的article表添加新的文章,以及修改,查询文章。在新工程Lession10-MyBatis集成MyBatis框架。项目包名com.bjpowernode.orm。依赖需要mysql驱动、mybatis依赖,Lombok。
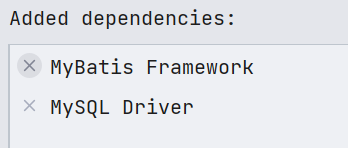
step1: Maven依赖
<dependencies><dependency><groupId>org.mybatis.spring.boot</groupId><artifactId>mybatis-spring-boot-starter</artifactId><version>3.0.0</version></dependency><dependency><groupId>com.mysql</groupId><artifactId>mysql-connector-j</artifactId><scope>runtime</scope></dependency><dependency><groupId>org.projectlombok</groupId><artifactId>lombok</artifactId><optional>true</optional></dependency><dependency><groupId>org.springframework.boot</groupId><artifactId>spring-boot-starter-test</artifactId><scope>test</scope></dependency>
</dependencies>
step2:创建实体类
//PO:Persistent Object
@Data
public class ArticlePO {private Integer id;private Integer userId;private String title;private String summary;private Integer readCount;private LocalDateTime createTime;private LocalDateTime updateTime;
}
step3: 创建Mapper接口
public interface ArticleMapper {String field_list="id,user_id,title,summary,read_count,create_time,update_time";@Insert("""insert into article(user_id,title,summary,read_count,create_time,update_time) \values(#{userId},#{title},#{summary},#{readCount},#{createTime},#{updateTime})""")int insertArticle(ArticlePO article);@Update("""update article set read_count=#{num} where id=#{id}""")int updateReadCount(Integer id,Integer num);@Delete("""delete from article where id=#{id}""")int deleteById(Integer id);@Select("select " + field_list + " from article where id=#{articleId}")@Results({@Result(id = true,column = "id",property = "id"),@Result(column = "user_id",property = "userId"),@Result(column = "read_count",property = "readCount"),@Result(column = "create_time",property = "createTime"),@Result(column = "update_time",property = "updateTime"),})ArticlePO selectById(@Param("articleId") Integer id);}
@Results部分为结果映射(XML中的<ResultMap>), 或者用MyBatis的驼峰命名也能实现默认的映射关系。
application.properties
#驼峰,下划线命名
mybatis.configuration.map-underscore-to-camel-case=true
step4: 启动类加入扫描注解
@MapperScan({"com.bjpowernode.orm.repository"})
@SpringBootApplication
public class Lession10MyBatisApplication {public static void main(String[] args) {SpringApplication.run(Lession10MyBatisApplication.class, args);}
}
@MapperScan是扫描注解,参数是Mapper接口所在的包名。参数是数组,可以指定多个包位置。
step5: 配置数据源
application.properties或yml都可以
spring.datasource.driver-class-name=com.mysql.cj.jdbc.Driver
spring.datasource.url=jdbc:mysql://localhost:3306/blog?serverTimezone=Asia/Shanghai&useUnicode=true&characterEncoding=utf8&autoReconnect=true&useSSL=false
spring.datasource.username=root
spring.datasource.password=123456#驼峰,下划线命名
mybatis.configuration.map-underscore-to-camel-case=true
step6:单元测试
@SpringBootTest
class Lession10MyBatisApplicationTests {
@Autowiredprivate ArticleMapper articleMapper;@Testvoid testInsert() {ArticlePO article = new ArticlePO();article.setTitle("什么时候用微服务");article.setSummary("微服务优缺点");article.setUserId(219);article.setReadCount(560);article.setCreateTime(LocalDateTime.now());article.setUpdateTime(LocalDateTime.now());articleMapper.insertArticle(article);}@Test void testUpdate() {int rows = articleMapper.updateReadCount(1, 230);System.out.println("修改的记录数量:" + rows);}@Testvoid testDelete(){int rows = articleMapper.deleteById(11);System.out.println("删除记录的数量 " + rows);}@Testvoid testSelect(){ArticlePO articlePO = articleMapper.selectById(3);System.out.println("查询到的文章:" + articlePO);}
}
4.3.2 ResultMap
查询操作得到包含多个列的集合,将列值转为对象属性使用结果映射的功能,注解@Results,@ResultMap能够帮助我们完成此功能。
@Results用于定义结果映射,每个列和Java对象属性的一一对应。
@ResultMap 指定使用哪个结果映射,两种方式可以使用@Results,另一种XML文件。
需求:执行多个select语句,使用结果映射转换数据库记录为Java Object。
step1:创建新的Mapper对象。
public interface ArticleDao {//定义mapper, id表示唯一名称@Select("")@Results(id = "BaseMapper", value = {@Result(id = true, column = "id", property = "id"),@Result(column = "user_id", property = "userId"),@Result(column = "read_count", property = "readCount"),@Result(column = "create_time", property = "createTime"),@Result(column = "update_time", property = "updateTime"),})ArticlePO articleMapper();@Select("""select id,user_id,title,summary,read_count,create_time,update_timefrom article where user_id=${userId}""")@ResultMap("BaseMapper")List<ArticlePO> selectList(Integer userId);@Select("""select id,user_id,title,summary,read_count,create_time,update_timefrom article where id=#{articleId}""")@ResultMap("BaseMapper")ArticlePO selectById(@Param("articleId") Integer id);
}
@Results的id定义当前结果映射的唯一名称, 后面内容是列和属性的一一映射说明。
其他的查询方法@ResultMap引用@Results的id。使用BaseMapper的映射规则处理查询结果。
step2: 单元测试
@SpringBootTest
public class ArticleDaoTest {@Autowiredprivate ArticleDao articleDao;@Testvoid testSelectList() {List<ArticlePO> poList = articleDao.selectList(219);poList.forEach(po -> {System.out.println("po = " + po);});}@Testvoid testSelect(){ArticlePO articlePO = articleDao.selectById(1);System.out.println("查询到的文章:" + articlePO);}
}
另一种方法在xml中定义<resultMap>标签,在@ResultMap注解引用。 这种方式首先创建xml。在resources目录下创建自定义的mapper目录。 新建ArticleMapper.xml 。
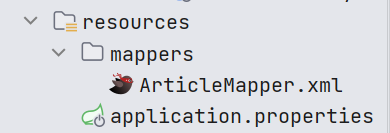
ArticleMapper.xml 代码清单:
<?xml version="1.0" encoding="UTF-8" ?>
<!DOCTYPE mapperPUBLIC "-//mybatis.org//DTD Mapper 3.0//EN""https://mybatis.org/dtd/mybatis-3-mapper.dtd">
<mapper namespace="com.bjpowernode.orm.repository.ArticleDao"><resultMap id="ArticleMapper" type="com.bjpowernode.orm.po.ArticlePO"><id column="id" property="id"/><result column="user_id" property="userId" /><result column="read_count" property="readCount" /><result column="create_time" property="createTime" /><result column="update_time" property="updateTime" /></resultMap>
</mapper>
step2:修改application.properties配置mapper文件的路径
mybatis.mapper-locations:自定义mapper xml 文件保存路径。
spring.datasource.driver-class-name=com.mysql.cj.jdbc.Driver
spring.datasource.url=jdbc:mysql://localhost:3306/blog?serverTimezone=Asia/Shanghai&useUnicode=true&characterEncoding=utf8&autoReconnect=true&useSSL=false
spring.datasource.username=root
spring.datasource.password=123456#驼峰命名
#mybatis.configuration.map-underscore-to-camel-case=truemybatis.mapper-locations=classpath:/mappers/**/*.xml
step3:修改ArticleDao的查询方法上面的@ResultMap。
@Select("""select id,user_id,title,summary,read_count,create_time,update_timefrom article where id=#{articleId}""")
//@ResultMap("BaseMapper")
@ResultMap("ArticleMapper")
ArticlePO selectById(@Param("articleId") Integer id);
在重复执行单元测试代码。
4.3.3 SQL提供者
我们能在方法上面直接编写SQL语句。使用Text Block编写长的语句。方法上编写SQL显的不够简洁。MyBatis提供了SQL提供者的功能。将SQL以方法的形式定义在单独的类中。 Mapper接口通过引用SQL提供者中的方法名称,表示要执行的SQL。
SQL提供者有四类@SelectProvider,@InsertProvider,@UpdateProvider,@DeleteProvider。
SQL提供者首先创建提供者类,自定义的。类中声明静态方法,方法体是SQL语句并返回SQL。例如:
public static String selectById() {return "SELECT * FROM users WHERE id = #{id}";
}
其次Mapper接口的方法上面,应用@SelectProvider(type = 提供者类.class, method = "方法名称")
step1: 创建SQL提供者
public class SqlProvider {public static String selectArticle(){return """select id,user_id,title,summary,read_count,create_time,update_timefrom article where id=#{articleId}""";}public static String updateTime(){return """update article set update_time=#{newTime}  where id=#{id}""";}
}
step2: 创建mapper接口
public interface ArticleRepository {@Select("")@Results(id = "BaseMapper", value = {@Result(id = true, column = "id", property = "id"),@Result(column = "user_id", property = "userId"),@Result(column = "read_count", property = "readCount"),@Result(column = "create_time", property = "createTime"),@Result(column = "update_time", property = "updateTime"),})ArticlePO articleMapper();//查询@ResultMap("BaseMapper")@SelectProvider(type = SqlProvider.class,method = "selectArticle")ArticlePO selectById(Integer id);//更新@UpdateProvider(type = SqlProvider.class,method = "updateTime")int updateTime(Integer id, LocalDateTime newTime);
}
其他注解@InsertProvider,@DeleteProvider类似的使用方式
step3:单元测试
@SpringBootTest
public class ArticleRepositoryTest {@Autowiredprivate ArticleRepository articleRepository;@Testvoid testSelect() {Integer id = 2;ArticlePO article = articleRepository.selectById(id);System.out.println("article = " + article);}@Testvoid testUpdate() {int rows = articleRepository.updateTime(3, LocalDateTime.now());    System.out.println("更新的记录数量 = " + rows);}
}
我们可以分别创建 Insert的提供者, Update提供者,Delete提供者,Select查询者。 每个查询者只提供一种操作。Select提供者的方法只提供Select语句。
4.3.4 @One一对一查询
MyBatis支持一对一,一对多,多对多查询。 XML文件和注解都能实现关系的操作。我们使用注解表示article和article_detail的一对一关系。 MyBatis维护这个关系, 开发人员自己也可以维护这种关系。
@One: 一对一
@Many: 一对多
关系表一个article有一个article_detail 文章内容。
step1: 创建两个表的实体
@Data
public class Article {private Integer id;private Integer userId;private String title;private String summary;private Integer readCount;private LocalDateTime createTime;private LocalDateTime updateTime;private ArticleDetail articleDetail;
}@Datapublic class ArticleDetail {private Integer id;private Integer articleId;private String content;
}
Article 声明了ArticleDetail 对象。表示文章内容。
step2:创建Mapper查询接口
public interface ArticleOneToOneMapper {@Select("""select id,article_id,content from article_detailwhere article_id = #{articleId}""")@Results({@Result(id = true, column = "id", property = "id"),@Result(column = "article_id", property = "articleId"),@Result(column = "content", property = "content")})ArticleDetail queryContent(Integer articleId);@Select("""select id,user_id,title,summary,read_count,create_time,update_timefrom article where id = #{id}""")@Results({@Result(id = true, column = "id", property = "id"),@Result(column = "user_id", property = "userId"),@Result(column = "read_count", property = "readCount"),@Result(column = "create_time", property = "createTime"),@Result(column = "update_time", property = "updateTime"),@Result(column = "id", property = "articleDetail",one = @One(select = "com.bjpowernode.orm.repository.ArticleOneToOneMapper.queryContent",
fetchType = FetchType.LAZY))})Article queryAllArticle(Integer id);
}
step3:单元测试
@SpringBootTest
public class OneToOneTest {@Autowiredprivate ArticleOneToOneMapper articleOneToOneMapper;@Testvoid testOne() {Article article = articleOneToOneMapper.queryAllArticle(1);System.out.println("article = " + article);}
}
4.3.5 @Many一对多查询
一对多查询使用@Many注解,步骤与一对一基本相同。
准备环境,新建comment评论表。article与comment存在一对多关系。一篇文章多个评论。
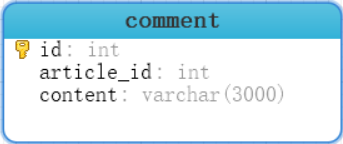
step1:创建CommentPO实体
@Data
public class CommentPO {private Integer id;private Integer articleId;private String content;
}
step2:创建新的文章聚合实体
@Data
public class ArticleEntity {private Integer id;private Integer userId;private String title;private String summary;private Integer readCount;private LocalDateTime createTime;private LocalDateTime updateTime;private List<CommentPO> comments; //评论的集合
}
step3:新建Mapper接口
public interface ArticleOneToManyMapper {@Select("""select id,article_id,content from commentwhere article_id = #{articleId}""")@Results(id="CommentMapper",value = {@Result(id = true, column = "id", property = "id"),@Result(column = "article_id", property = "articleId"),@Result(column = "content", property = "content")})List<CommentPO> queryComments(Integer articleId);@Select("""select id, user_id,title,summary,read_count,create_time,update_timefrom article where id = #{id}""")@Results(id="ArticleBaseMapper",value={@Result(id = true, column = "id", property = "id"),@Result(column = "user_id", property = "userId"),@Result(column = "read_count", property = "readCount"),@Result(column = "create_time", property = "createTime"),@Result(column = "update_time", property = "updateTime"),@Result(column = "id", property = "comments",many = @Many(select = "com.bjpowernode.orm.repository.ArticleOneToManyMapper.queryComments", fetchType = FetchType.LAZY))})ArticleEntity queryArticleAndComments(Integer id);}
step4:单元测试
@SpringBootTest
public class OneToManyTest {@Autowiredprivate ArticleOneToManyMapper articleOneToManyMapper;@Testvoid testOnetoMany() {ArticleEntity article = articleOneToManyMapper.queryArticleAndComments(1);System.out.println("ArticleEntity = " + article);}}
4.3.6 常用配置参数
MyBatis的项设置,在application文件中“mybatis”开头进行设置。
全部设置参考:https://mybatis.org/mybatis-3/zh/configuration.html#settings
常用设置:
#驼峰命名
mybatis.configuration.map-underscore-to-camel-case=true
#mapper xml文件位置
mybatis.mapper-locations=classpath:/mappers/**/*.xml
#启用缓存
mybatis.configuration.cache-enabled=true
#延迟加载mybatis.configuration.lazy-loading-enabled=true
#mybatis主配置文件,按需使用
mybatis.config-location=classpath:/sql-config.xml
上述设置内容比较多时,可以将设置放到MyBatis主配置文件,mybatis.config-location 加载主配置文件。
sql-config.xml
<?xml version="1.0" encoding="UTF-8" ?>
<!DOCTYPE configurationPUBLIC "-//mybatis.org//DTD Config 3.0//EN""https://mybatis.org/dtd/mybatis-3-config.dtd">
<configuration><settings><setting name="cacheEnabled" value="true"/><setting name="lazyLoadingEnabled" value="true"/><setting name="mapUnderscoreToCamelCase" value="true"/></settings><typeAliases><package name="com.bjpowernode.po"/></typeAliases></configuration>
4.3.7 MybatisAutoConfiguration
MyBatis框架的在Spring Boot的自动配置类MybatisAutoConfiguration.class

imports文件中定义了org.mybatis.spring.boot.autoconfigure.MybatisAutoConfiguration 自动配置类
@Configuration
@ConditionalOnClass({SqlSessionFactory.class, SqlSessionFactoryBean.class})
@ConditionalOnSingleCandidate(DataSource.class)
@EnableConfigurationProperties({MybatisProperties.class})
@AutoConfigureAfter({DataSourceAutoConfiguration.class, MybatisLanguageDriverAutoConfiguration.class})
public class MybatisAutoConfiguration implements InitializingBean {private static final Logger logger =
LoggerFactory.getLogger(MybatisAutoConfiguration.class);  private final MybatisProperties properties;.....
}
关注:
MybatisProperties.class
DataSourceAutoConfiguration.class , DataSourceProperties.class
SqlSessionFactory.class
SqlSessionTemplate.class
@Bean
@ConditionalOnMissingBean
public SqlSessionFactory sqlSessionFactory(DataSource dataSource) throws Exception {SqlSessionFactoryBean factory = new SqlSessionFactoryBean();factory.setDataSource(dataSource);....
}@Bean
@ConditionalOnMissingBean
public SqlSessionTemplate sqlSessionTemplate(SqlSessionFactory sqlSessionFactory) {ExecutorType executorType = this.properties.getExecutorType();return executorType != null ? new SqlSessionTemplate(sqlSessionFactory, executorType) : new SqlSessionTemplate(sqlSessionFactory);
}
SqlSessionTemplate是线程安全的,MyBatis为了与Spring继承。 提供的由Spring管理的Bean。这个SqlSesionTemplate实现了SqlSession接口, 能够由Spring事务管理器使用。提供Spring的事务处理。同时管理SqlSession的创建,销毁。
4.4 适合的连接池
HikariCP连接池
https://github.com/brettwooldridge/HikariCP/wiki
连接池配置:
https://github.com/brettwooldridge/HikariCP/wiki/About-Pool-Sizing
MySQL连接池配置建议
https://github.com/brettwooldridge/HikariCP/wiki/MySQL-Configuration
prepStmtCacheSize
这将设置 MySQL 驱动程序将缓存每个连接的预准备语句数。默认值为保守的 25。我们建议将其设置为 250-500 之间。prepStmtCacheSqlLimit
这是驱动程序将缓存的准备好的 SQL 语句的最大长度。MySQL 默认值为 256。根据我们的经验,特别是对于像Hibernate这样的ORM框架,这个默认值远低于生成的语句长度的阈值。我们推荐的设置为 2048。cachePrepStmts
如果缓存实际上被禁用,则上述参数都没有任何影响,因为默认情况下是禁用的。必须将此参数设置为 。trueuseServerPrepStmts:较新版本的MySQL支持服务器端准备语句,这可以提供实质性的性能提升。将此属性设置为 。true
application.yml
spring:datasource:type: com.zaxxer.hikari.HikariDataSourcedriver-class-name: com.mysql.cj.jdbc.Driverurl: jdbc:mysql://localhost:3306/blog?serverTimezone=Asia/Shanghaiusername: rootpassword: 123456hikari:auto-commit: true# # connections = ((cpu核心数 * 2) + 磁盘数量) 近似值。 默认10maximum-pool-size: 10#最小连接数,默认10,不建议设置。默认与maximum-pool-size一样大小。推荐使用固定大小的连接池minimum-idle: 10#获取连接时,检测语句connection-test-query: select 1#### 连接超时,默认30秒。# 控制客户端在获取池中 Connection 的等待时间,# 如果没有连接可用的情况下超过该时间,则抛出 SQLException 异常,###connection-timeout: 20000#其他属性data-source-properties:cachePrepStmts: truedataSource.cachePrepStmtst: truedataSource.prepStmtCacheSize: 250dataSource.prepStmtCacheSqlLimit: 2048dataSource.useServerPrepStmts: true
4.5 声明式事务
事务分为全局事务与本地事务,本地事务是特定于资源的,例如与JDBC连接关联的事务。本地事务可能更容易使用,但有一个显著的缺点:它们不能跨多个事务资源工作。比如在方法中处理连接多个数据库的事务,本地事务是无效的。
Spring解决了全局和本地事务的缺点。它允许应用程序开发人员在任何环境中使用一致的编程模型。只需编写一次代码,就可以从不同环境中的不同事务管理策略中获益。Spring框架同时提供声明式和编程式事务管理。推荐声明式事务管理。
Spring事务抽象的关键是事务策略的概念,org.springframework.transaction.PlatformTransactionManager接口定义了事务的策略。
事务控制的属性:
- Propagation : 传播行为。代码可以继续在现有事务中运行(常见情况),也可以暂停现有事务并创建新事务
- Isolation: 隔离级别。此事务与其他事务的工作隔离的程度。例如,这个事务能看到其他事务未提交的写吗?
- Timeout超时时间:该事务在超时和被底层事务基础结构自动回滚之前运行的时间。
- Read-only只读状态:当代码读取但不修改数据时,可以使用只读事务。在某些情况下,例如使用Hibernate时,只读事务可能是一种有用的优化。
AOP:
Spring Framework的声明式事务管理是通过Spring面向方面编程(AOP)实现的。事务方面的代码以样板的方式使用,及时不了解AOP概念,仍然可以有效地使用这些代码。事务使用AOP的环绕通知(TransactionInterceptor)。
声明式事务的方式:
- XML配置文件:全局配置
- @Transactional注解驱动 :和代码一起提供,比较直观。和代码的耦合比较高。【Spring团队建议您只使用@Transactional注释具体类(以及具体类的方法),而不是注释接口。当然,可以将@Transactional注解放在接口(或接口方法)上,但这只有在使用基于接口的代理时才能正常工作】
方法的可见性:
公共(public)方法应用@Transactional主机。如果使用@Transactional注释了受保护的、私有的或包可见的方法,则不会引发错误,但注释的方法不会显示配置的事务设置,事务不生效。如果需要受保护的、私有的方法具有事务考虑使用AspectJ。而不是基于代理的机制。
4.5.1.1 准备事务演示环境
在新的Spring Boot项目演示事务处理。新项目Lession011-Trans 。 添加MyBatis, MySQL, Lombok依赖。使用之前blog库的article , article_detail 表。
需求:某个作者发布了新的文章,article,article_detail两个表同时添加记录。需要事务控制两个表的insert操作。 step1: 创建实体类
@Data
public class ArticlePO {private Integer id;private Integer userId;private String title;private String summary;private Integer readCount;private LocalDateTime createTime;private LocalDateTime updateTime;
}//PO:Persistent Object
@Data
public class ArticleDetailPO {private Integer id;private Integer articleId;private String content;
}
step2:创建Mapper接口,创建两个方法,添加文章属性,文章内容
public interface ArticleMapper {@Insert("""insert into article(user_id,title,summary,read_count,create_time,update_time) \values(#{userId},#{title},#{summary},#{readCount},#{createTime},#{updateTime})""")@Options(useGeneratedKeys = true,keyColumn = "id",keyProperty = "id")int insertArticle(ArticlePO article);@Insert("""insert into article_detail(article_id,content)values(#{articleId},#{content})""")int insertArticleContent(ArticleDetailPO detail);
}
step3:创建Service接口,声明发布文章的方法
public interface ArticleService {boolean postNewArticle(ArticlePO article,String content);
}@Service
public class ArticleServiceImpl implements ArticleService {@Autowiredprivate ArticleMapper articleMapper;@Overridepublic boolean postNewArticle(ArticlePO article, String content) {//新增文章articleMapper.insertArticle(article);//新增文章内容ArticleDetailPO detail = new ArticleDetailPO();detail.setArticleId(article.getId());detail.setContent(content);articleMapper.insertArticleContent(detail);return true;}
}
step4:启动类
@MapperScan(basePackages = "com.bjpowernode.trans.repository")
@SpringBootApplicationpublic class Lession11TransApplication {public static void main(String[] args) {SpringApplication.run(Lession11TransApplication.class, args);}
}
step5:编写配置文件
spring:datasource:type: com.zaxxer.hikari.HikariDataSourcedriver-class-name: com.mysql.cj.jdbc.Driverurl: jdbc:mysql://localhost:3306/blog?serverTimezone=Asia/Shanghaiusername: rootpassword: 123456hikari:auto-commit: true# # connections = ((cpu核心数 * 2) + 磁盘数量) 近似值。 默认10maximum-pool-size: 10#获取连接时,检测语句connection-test-query: select 1mybatis:configuration:log-impl: org.apache.ibatis.logging.stdout.StdOutImpl
step6:单元测试
@SpringBootTest
class Lession11TransApplicationTests {@Autowiredprivate ArticleService articleService;@Testvoid testAddArticle() {ArticlePO article = new ArticlePO();article.setTitle("Spring事务管理");article.setSummary("Spring事务属性,事务实现");article.setUserId(2001);article.setReadCount(0);article.setCreateTime(LocalDateTime.now());article.setUpdateTime(LocalDateTime.now());boolean add = articleService.postNewArticle(article, "Spring 统一事务管理。事务管理器管理本地事务");System.out.println("add = " + add);}
}
现在业务方法正常执行,添加数据到两个表,但是事务没有Spring参与。 postNewArticle()方法没有事务管理。
4.5.1.2 添加事务注解
step1:修改postNewArticle()方法添加@Transactional
@Transactional
@Overridepublic boolean postNewArticle(ArticlePO article, String content) {//新增文章articleMapper.insertArticle(article);if( article.getReadCount() <  1) {throw new RuntimeException("已读数量不能 < 1 ");}//新增文章内容ArticleDetailPO detail = new ArticleDetailPO();detail.setArticleId(article.getId());detail.setContent(content);articleMapper.insertArticleContent(detail);return true;
}
@Transactional可在类上,接口,方法上声明。 表示方法需要事务管理。 Spring对public方法添加事务处理。
step2:启动类
@EnableTransactionManagement
@MapperScan(basePackages = "com.bjpowernode.trans.repository")
@SpringBootApplication
public class Lession11TransApplication {public static void main(String[] args) {SpringApplication.run(Lession11TransApplication.class, args);}
}
step3:单元测试
@Test
void testAddArticle() {ArticlePO article = new ArticlePO();article.setTitle("Spring事务管理111");article.setSummary("Spring事务属性,事务实现111");article.setUserId(2202);article.setReadCount(0);article.setCreateTime(LocalDateTime.now());article.setUpdateTime(LocalDateTime.now());boolean add = articleService.postNewArticle(article, "Spring 统一事务管理。事务管理器管理本地事务111");System.out.println("add = " + add);
}
添加数据失败, 在事务中抛出运行时异常。Spring默认回滚事务。
4.5.1.3 无效事务1
Spring事务处理是AOP的环绕通知,只有通过代理对象调用具有事务的方法才能生效。类中有A方法,调用带有事务的B方法。 调用A方法事务无效。当然protected, private方法默认是没有事务功能的。
step1: 接口中增加方法managerArticles
接口中增加方法
boolean managerArticle(String action,ArticlePO article,String content);实现类方法:
@Override
public boolean managerArticle(String action, ArticlePO article, String content) {return postNewArticle(article,content);
}
step2:单元测试,readCount为0
@Test
void testAddArticle2() {ArticlePO article = new ArticlePO();article.setTitle("Spring事务管理222");article.setSummary("Spring事务属性,事务实现222");article.setUserId(2202);article.setReadCount(0);article.setCreateTime(LocalDateTime.now());article.setUpdateTime(LocalDateTime.now());boolean add = articleService.managerArticle("add",article, "222 Spring 统一事务管理。事务管理器管理本地事务");System.out.println("add = " + add);
}
测试发现,事务不起作用。aritcleService是代理对象,managerArticle方法不是事务方法。事务无效。
4.5.1.4 无效事务2
方法在线程中运行的,在同一线程中方法具有事务功能, 新的线程中的代码事务无效。
step1:修改接口方法的实现
@Transactional
@Override
public boolean postNewArticle(ArticlePO article, String content)  {System.out.println("Start 父线程:" + Thread.currentThread().threadId());Thread thread = new Thread(() -> {System.out.println("子线程:" + Thread.currentThread().threadId());//新增文章articleMapper.insertArticle(article);if (article.getReadCount() < 1) {throw new RuntimeException("===已读数量不能 < 1 ");}//新增文章内容ArticleDetailPO detail = new ArticleDetailPO();detail.setArticleId(article.getId());detail.setContent(content);articleMapper.insertArticleContent(detail);});//线程启动thread.start();try{//等他thread执行完成,在继续后面的代码thread.join();}catch (Exception e){e.printStackTrace();}System.out.println("End 父线程:" + Thread.currentThread().threadId());return true;
}
step2: 单元测试
@Test
void testAddArticle() throws InterruptedException {ArticlePO article = new ArticlePO();article.setTitle("Spring事务管理555");article.setSummary("Spring事务属性,事务实现555");article.setUserId(2203);article.setReadCount(0);article.setCreateTime(LocalDateTime.now());article.setUpdateTime(LocalDateTime.now());boolean add = articleService.postNewArticle(article, "Spring 统一事务管理。事务管理器管理本地事务");System.out.println("add = " + add);
}
4.5.1.5 事务回滚规则
- RuntimeException的实例或子类时回滚事务
- Error会导致回滚
- 已检查异常不会回滚。默认提交事务
@Transactional注解的属性控制回滚
- rollbackFor
- noRollbackFor
- rollbackForClassName
- noRollbackForClassName
相关文章:
动力节点王鹤SpringBoot3学习笔记——第四章 访问数据库
目录 第四章 访问数据库 4.1 DataSource 4.2 轻量的JdbcTemplate 4.2.1 准备环境 4.2.1.1 准备数据库和表脚本 4.2.1.2 创建Spring Boot工程 4.2.2 JdbcTemplate访问MySQL 4.2.3 NamedParameterJdbcTemplate 4.2.4 多表查询 4.3 MyBatis 4.3.1 单表CRUD 4.3…...
)
segno.helpers.make_mecard(Python)
制作名片二维码的,浅浅的mark一下参数的东西。 官方文档是这么写的: segno.helpers.make_mecard(name, readingNone, emailNone, phoneNone, videophoneNone, memoNone, nicknameNone, birthdayNone, urlNone, poboxNone, roomnoNone, housenoNone, ci…...
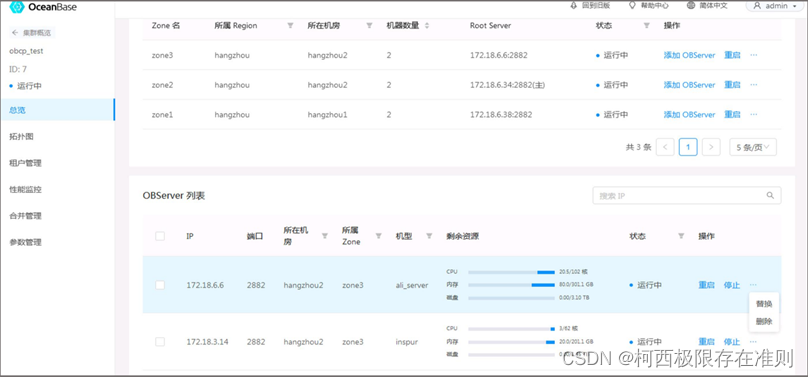
OBCP第八章 OB运维、监控与异常处理-日常运维操作
白屏: 集群、Zone、Observer 常用运维操作 常用运维操作 运维场景步骤时钟同步 OceanBase从Partition的多个副本中选出主对外提供服务。为避免Paxos的活锁问题,OceanBase 采用一种基于时钟的选举算法选主 检查 NTP 状态:运行 ntpstat 检查 N…...

springboot-gateway注册nacos失败,控制台没有报错
目录 前言现象描述前言 最近springboot的gateway注册到nacos上,没有注册成功 现象描述 我是在common里面引入了nacos的依赖,依赖如下: <dependency><groupId>com.alibaba.cloud</groupId><artifactId>spring-cloud-starter-alibaba-nacos-confi…...
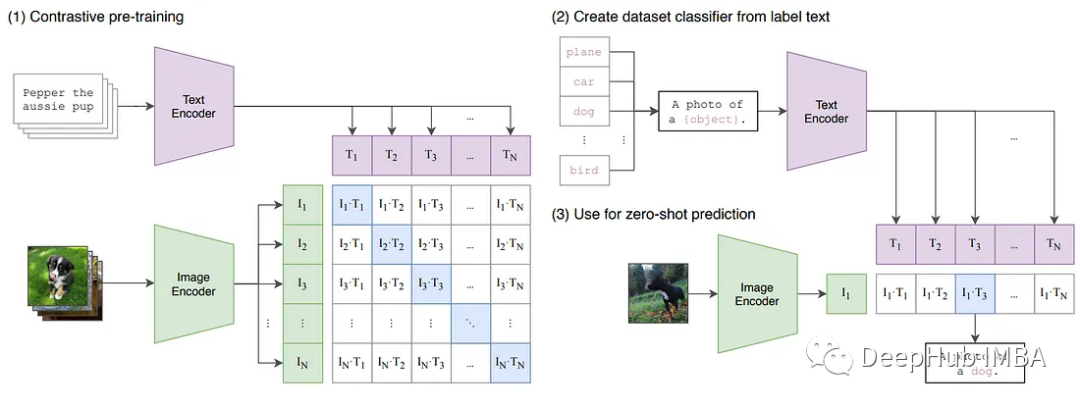
CLIP:语言-图像表示之间的桥梁
最近GPT4的火爆覆盖了一个新闻:midjourney v5发布,DALLE2,midjourney都可以从文本中生成图像,这种模型要求人工智能同时理解语言和图像数据。 传统的基于人工智能的模型很难同时理解语言和图像。因为自然语言处理和计算机视觉一直…...

failed: open /etc/resolv.conf: no such file or directory“ cause k8s init failed
kubeadm init报错 kubeadm init --config /etc/kubernetes/kubeadm.conf -v 4 --skip-phasesaddon/kube-proxyThis can take up to 4m0s", “[kubelet-check] Initial timeout of 40s passed.”, “”, “\tUnfortunately, an error has occurred:”, “\t\ttimed out wa…...

「科普」如何评价供应商的MES系统
随着制造业的数字化转型,MES系统作为生产信息化的重要组成部分,正在被越来越多的企业采用。然而,在选择供应商时,如何评价供应商的MES系统,成为了制造企业需要面对的一个难题。 首先,评价供应商的MES系统需…...
海康3D轮廓仪调试详细步骤
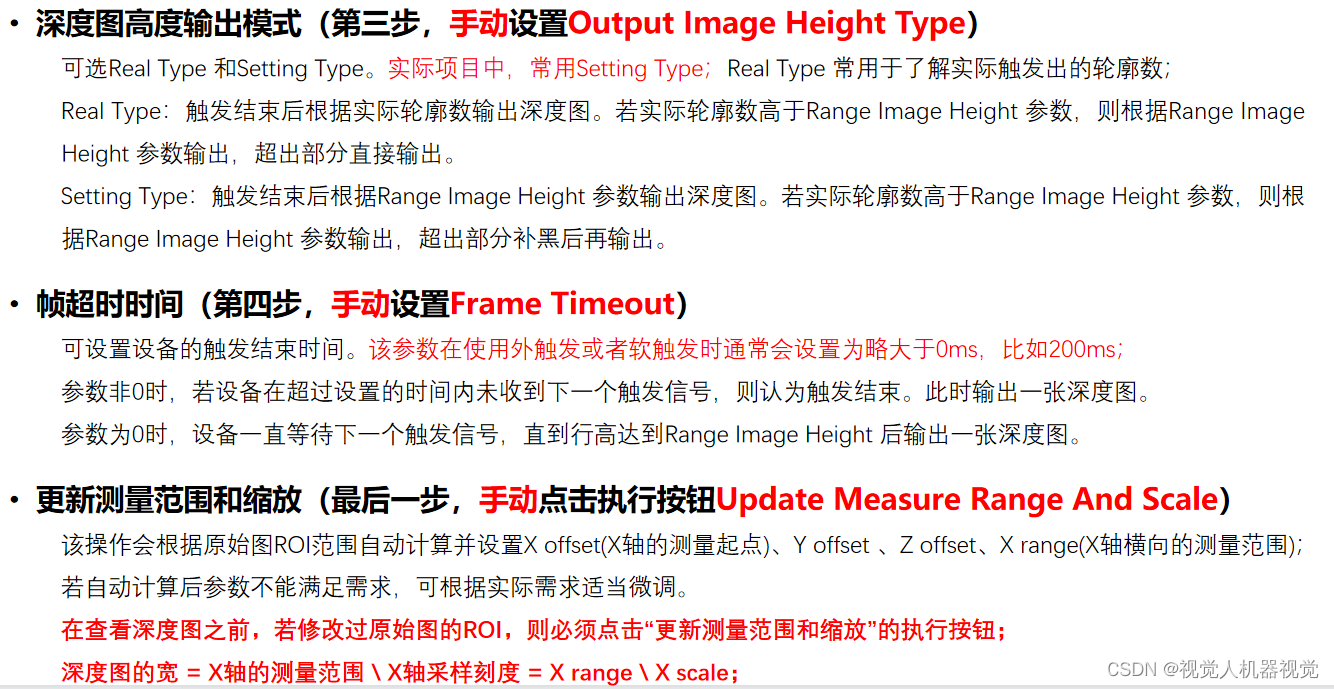
激光三角测量法 3D激光轮廓仪是基于激光三角测量法(laser triangulation)来重建三维场景。向被测物表面投射激光平面(光片,sheet of light) ,通过使用CMOS相机接收其反射光的变化,可以非接触方式测量高度、高度差、宽度等轮廓(截面…...

【Linux】PCB(进程控制块)
进程控制块PBC-描述进程号进程状态内存指针PBC-描述 我们知道,进程就是运行起来的代码,而操作系统就是通过对进程进行描述,然后将所有的进程使用双向链表串联到一起,实现对计算机软硬件资源的管理的。 那么,PCB到底是…...
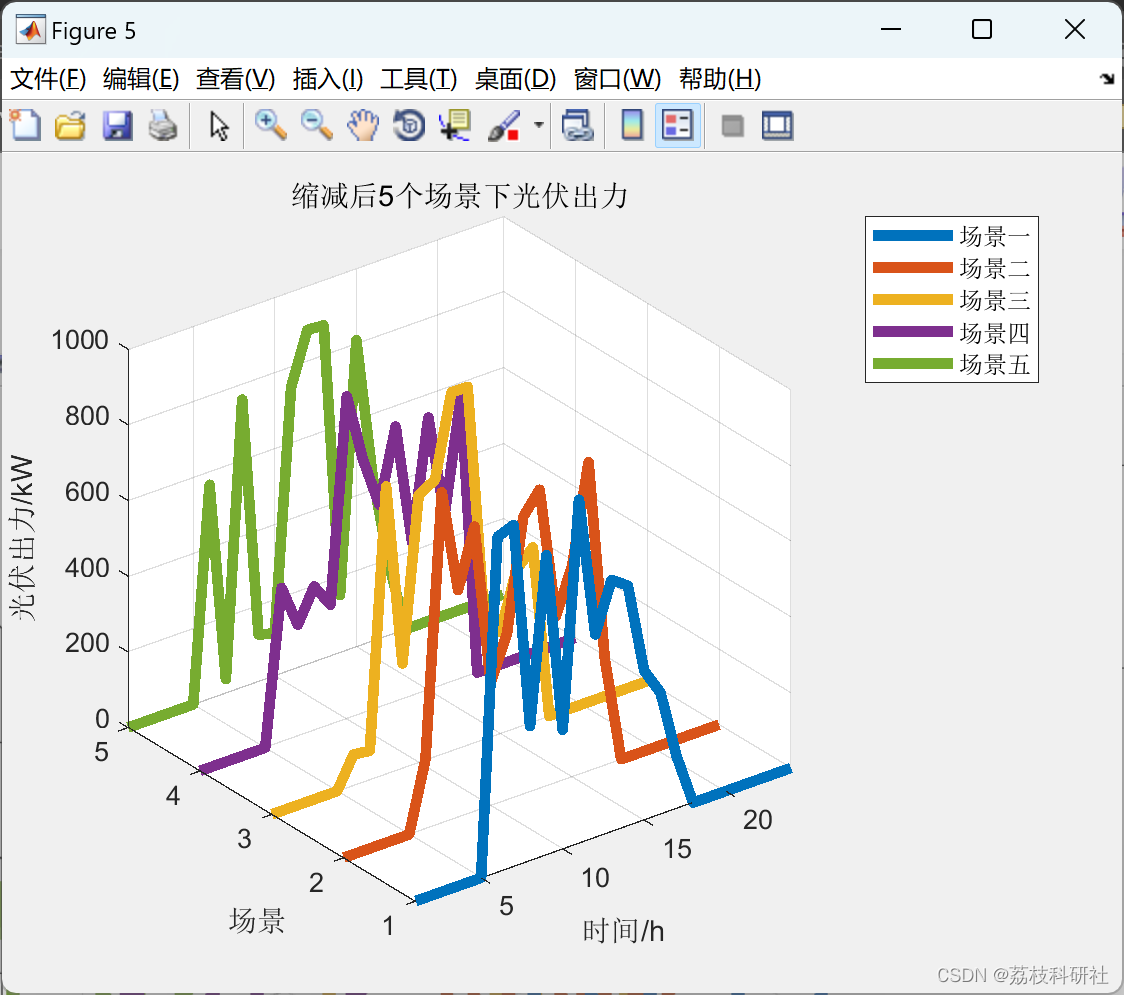
风电的Weibull分布及光电的Beta分布组合研究(Matlab代码实现)
💥💥💞💞欢迎来到本博客❤️❤️💥💥 🏆博主优势:🌞🌞🌞博客内容尽量做到思维缜密,逻辑清晰,为了方便读者。 ⛳️座右铭&a…...

《Effective Objective-C 2.0 》 阅读笔记 item11
第11条:理解objc_msgSend的作用 1. 动态语言特性 在Objective-C中,如果向某对象传递消息,那就会使用动态绑定机制来决定需要调用的方法。在底层,所有方法都是普通的C语言函数,然而对象收到消息之后,究竟该…...
)
Python常见装饰器使用(实用向)
目录1.staticmethod2.classmethod3、classmethod 与staticmethod比较4. property5.abstractmethod6.wraps7.lru_cache8.timeout9.retrystaticmethod:将一个方法转换为静态方法,可以在不创建类实例的情况下调用。classmethod:将一个方法转换为…...
单列集合接口Set及具体子类HashSet、TreeSet)
集合详解之(三)单列集合接口Set及具体子类HashSet、TreeSet
文章目录🐒个人主页🏅JavaSE系列专栏📖前言:🎀Set集合接口🎀HashSet实现类🎀TreeSet实现类🪅HashSet类常用方法:🪅TreeSet类常用方法:ὁ…...
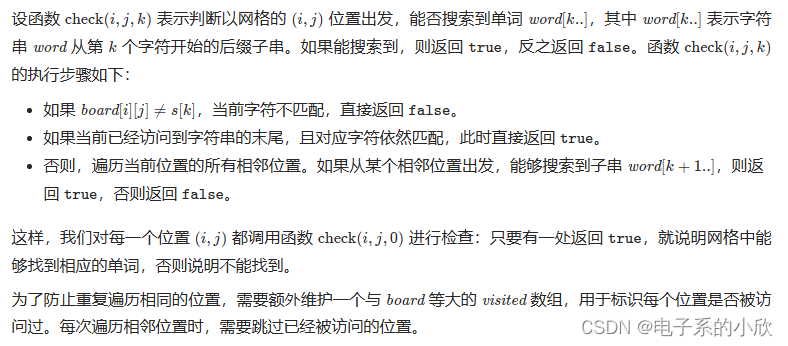
力扣刷题笔记22—— 矩阵中的路径(回溯)/pair的学习
矩阵中的路径(回溯)/pair的学习问题分析示例代码pair学习问题 来自力扣: 给定一个 m x n 二维字符网格 board 和一个字符串单词 word 。如果 word 存在于网格中,返回 true ;否则,返回 false 。 单词必须按…...

Spring学习1
一、Spring简介 Spring翻译过来就是春天的意思,其实也就是给软件行业带来了春天2002年,首次推出Spring框架的雏形,interface21框架Spring框架就是以interface21框架为基础,经过重新设计,并不断丰富,在2004年…...

Keep再闯IPO,三年亏损16亿,会员留存率跌破70%
“运动科技第一股”来了? 3月28日,线上健身平台的运营方、北京卡路里科技有限公司(下称“Keep”)更新招股书,再次闯关港股IPO。 Keep是一家在线健身平台,主要产品包括在线健身内容、智能健身设备和配套运…...
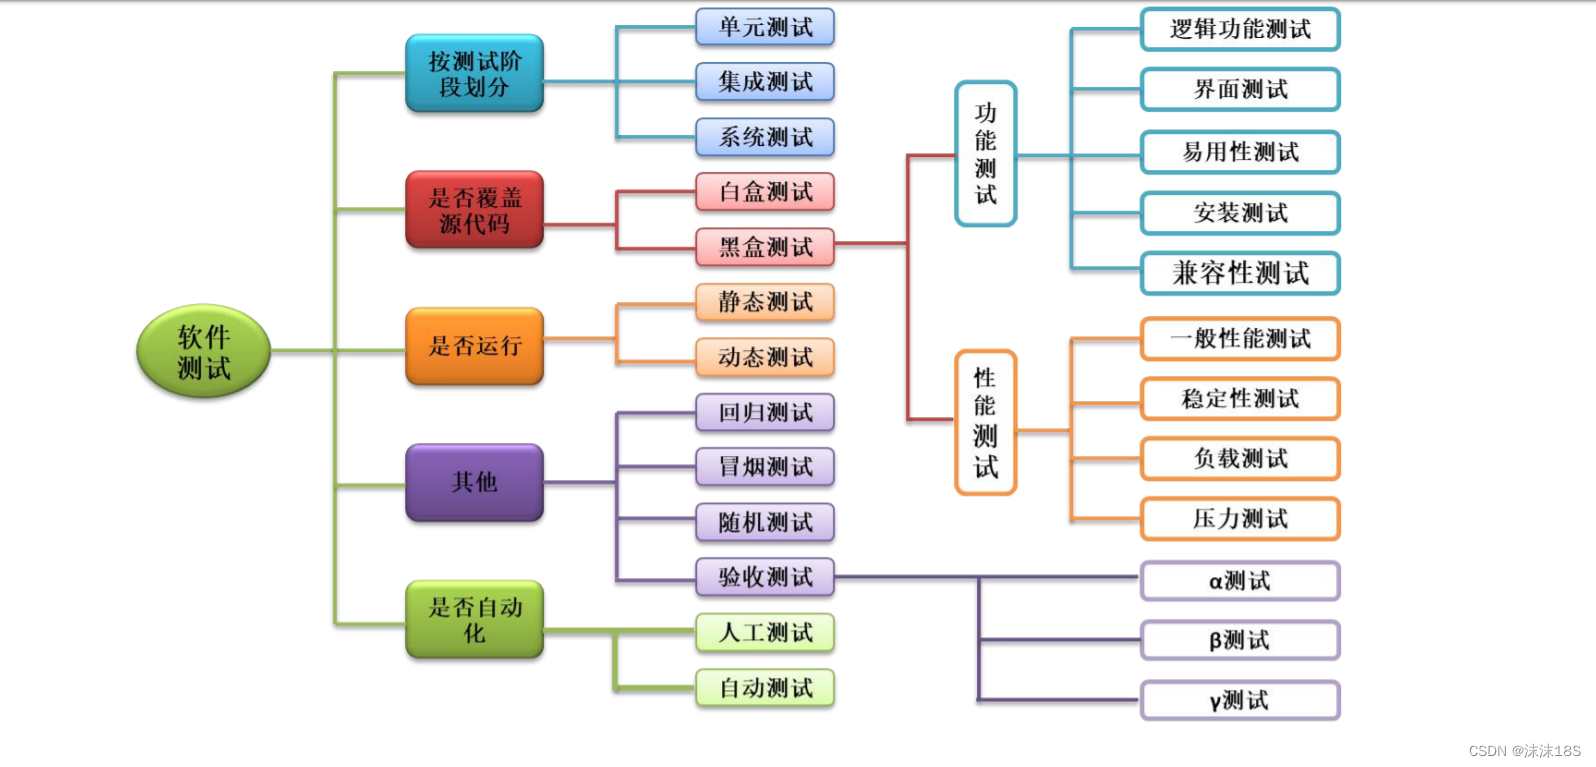
软件测试分类详解
一图看清软件测试分类 一、按测试技术分(是否查看代码) **1. 黑盒测试**:软件功能是否正常使用【功能的测试】 **2. 白盒测试**:代码逻辑是否正确【结构的测试】 **3. 灰盒测试**:介于两者之间的测试,也…...

网站怎么优化出排名
网站怎么优化出排名,独立站SEO优化应该怎么做?#独立站#推广优化#SEO优化 今天跟大家聊一下独立站的SEO,是指个人或者小型的企业对独立站进行一个优化,以提高他在搜索引擎中的排名和流量,从而吸引更多的这个客户和用户。…...

h5|web页面嵌套iframe传参给cocosCreator
h5|web页面嵌套iframe传参给cocosCreator 目录 一、快速浏览 二、详细实现与项目代码 三、安全性评估——iframe 实现效果: 一、快速浏览 在h5页面中,使用JavaScript获取需要传递的参数,如下: var token ZHESHINIDETOKEN; var phone 11…...
阿里云安全产品Web应用防火墙是什么?有什么作用?
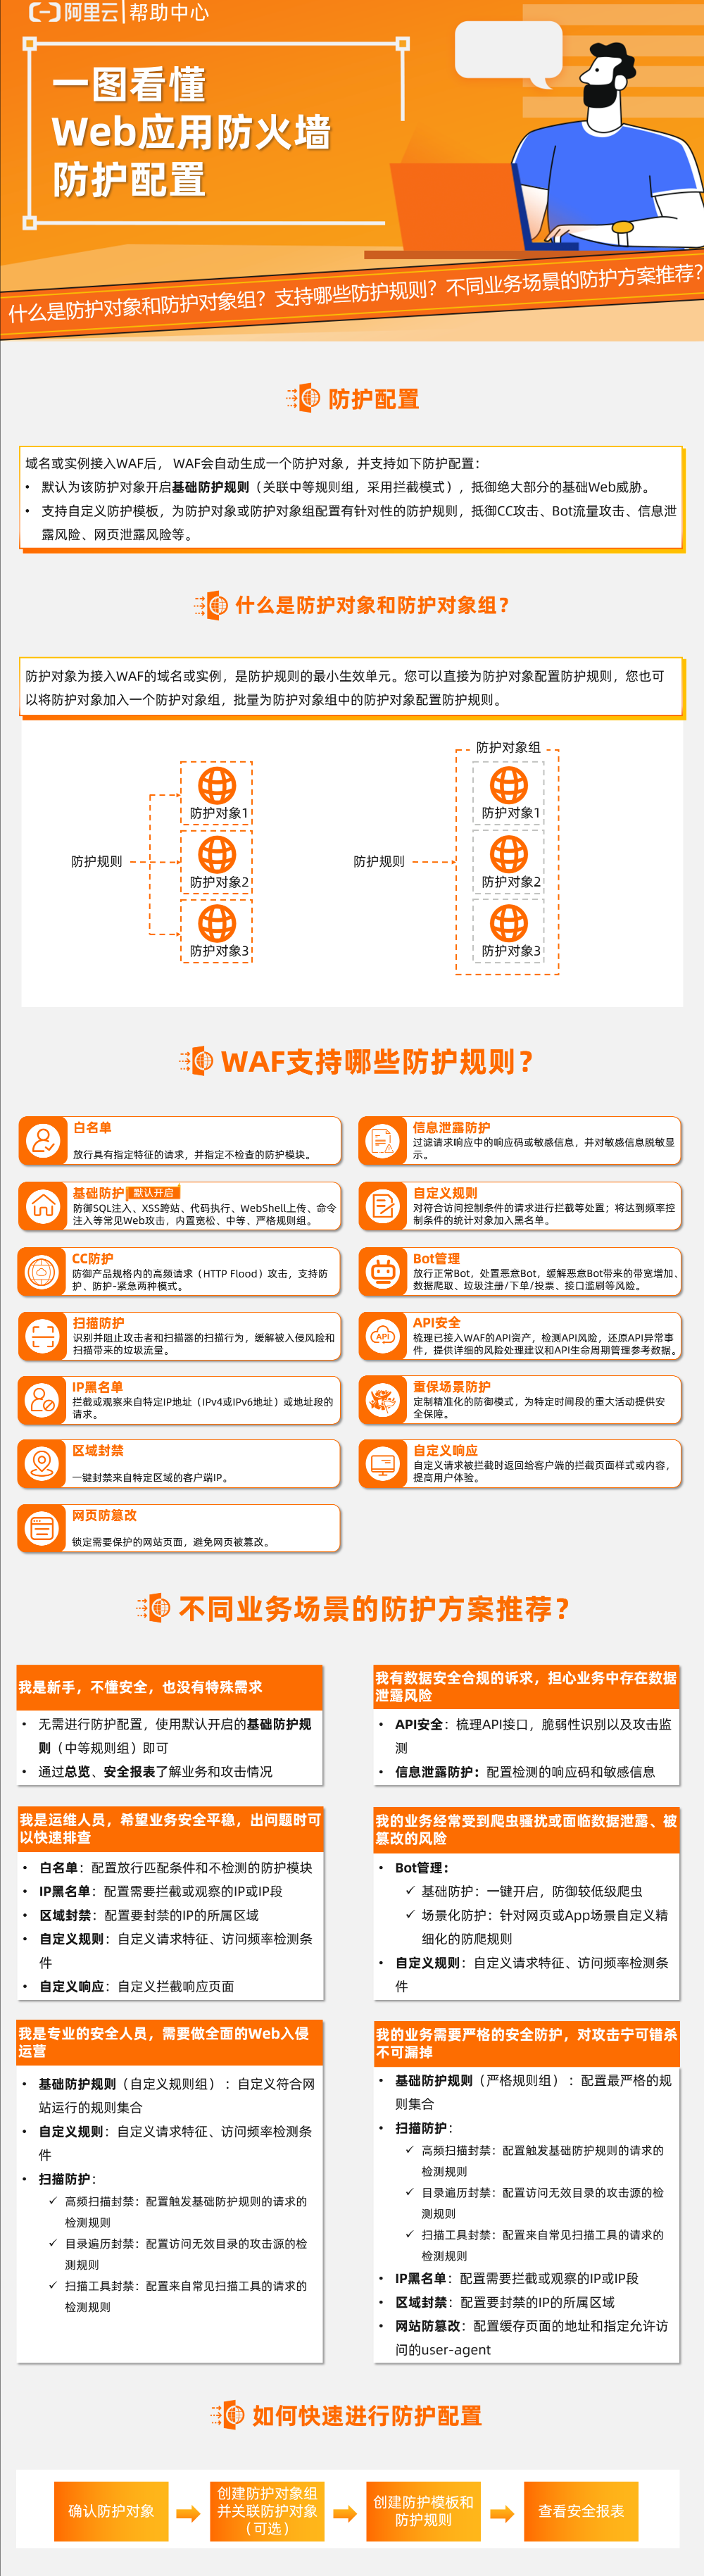
Web应用防火墙是一款网站Web应用安全的防护产品,拦截针对您网站发起的Web通用攻击(如SQL注入、XSS跨站等)或是应用资源消耗型攻击(CC),同时也可以满足您网站从流量管理角度来防御业务风险,例如B…...

别再只会复制代码了!用CubeMX配置STM32F407的PWM驱动TB6612,从原理到实战一次搞懂
从零构建PWM电机控制系统:STM32F407与TB6612的深度实践指南 引言:为什么你需要摆脱复制粘贴的陷阱 在实验室里,我见过太多学生面对电机控制项目时的第一反应——打开搜索引擎,寻找"STM32 PWM驱动电机代码",然…...

Photoshop AI绘画终极指南:用中文轻松驾驭Stable Diffusion插件
Photoshop AI绘画终极指南:用中文轻松驾驭Stable Diffusion插件 【免费下载链接】Auto-Photoshop-StableDiffusion-Plugin A user-friendly plug-in that makes it easy to generate stable diffusion images inside Photoshop using either Automatic or ComfyUI a…...

Label Studio 视频标注实战:解决动态追踪、效率低下的5个进阶策略
Label Studio 视频标注实战:解决动态追踪、效率低下的5个进阶策略 【免费下载链接】label-studio Label Studio is a multi-type data labeling and annotation tool with standardized output format 项目地址: https://gitcode.com/GitHub_Trending/la/label-st…...

【Unity 贪吃蛇大作战模板】高并发IO游戏怎么做?拆解Snake Warz核心架构
Snake Warz IO 是一个基于 Photon Fusion v2 构建的多人在线贪吃蛇游戏完整模板。它不仅提供了可直接上线的游戏内容,还涵盖了完整的多人联机框架、AI系统、UI流程以及跨平台适配能力。该插件支持最多 10 名真实玩家与 30 个 AI 同场竞技,并提供多种游戏…...

Comsol 薄板声辐射响应优化:激励位置与频率的协同效应
1. 薄板声辐射响应基础原理 当你用手指轻轻敲击一块金属薄板时,会听到清脆的声响。这个看似简单的现象背后,隐藏着复杂的声学原理。在Comsol仿真中,我们可以精确模拟这种声辐射响应,为声学设备设计提供科学依据。 薄板声辐射的本质…...

WebRTC信令交换实战:从Socket.io到RTCPeerConnection的完整流程解析
1. WebRTC信令交换的核心逻辑 第一次接触WebRTC时,我被它"点对点直接通信"的特性吸引,但很快发现真正的难点在于如何让两个设备找到彼此——这就是信令交换要解决的问题。信令交换就像两个陌生人交换电话号码的过程,只不过这里交换…...

EF Core与SQLite实战:从零构建轻量级数据库应用
1. 为什么选择EF Core与SQLite这对黄金组合 如果你正在开发一个需要本地数据存储的移动应用或桌面小工具,SQLite绝对是你的首选数据库。这个只有几百KB的小家伙,不需要任何服务器配置,直接读写单个文件就能完成所有数据库操作。而EF Core作为…...

C语言实现进程调度系统:优先级与时间片轮转
基于C语言的进程调度系统设计与实现1. 项目概述1.1 系统功能本系统实现了一个基于优先数调度和先来先服务算法的进程调度模拟器,主要功能包括:进程控制块(PCB)管理动态优先级调度时间片轮转执行进程状态跟踪文件操作模拟1.2 设计目标模拟操作系统进程调度…...

技术深度解析:ER-Save-Editor如何实现跨平台艾尔登法环存档编辑
技术深度解析:ER-Save-Editor如何实现跨平台艾尔登法环存档编辑 【免费下载链接】ER-Save-Editor Elden Ring Save Editor. Compatible with PC and Playstation saves. 项目地址: https://gitcode.com/GitHub_Trending/er/ER-Save-Editor 艾尔登法环存档编辑…...

实时数据流处理实战:从滑动窗口算法到Docker部署
用 Python 造一个轻量级流处理引擎,顺便把 Git、Docker、CI/CD 全串起来 前言 你是否有过这样的需求:统计过去 5 秒内 API 的请求次数、监控传感器数据的突变、或者对直播间的弹幕进行限流?这些场景都离不开实时数据流处理。而流处理的核心&…...