Ubuntu系统配置SonarQube + cppcheck + Jenkins
SonarQube
- 1. postgresql安装及配置
- 1.1 安装postgresql
- 1.2 创建sonarqube用户
- 1.3 设置数据库
- 2. 安装sonarqube
- 2.1 设置sonarqube
- 2.2 修改sonarqube目录权限
- 2.3 sonar.properties
- 2.4 设置systemd管理sonarqube
- 2.5 web
- 3. 配置sonarscanner
- 3.1 下载
- 3.2 配置
- 4. 配置cppcheck
- 4.1 下载安装cppcheck
- 4.2 遇到的问题
- 4.3 配置sonarqube
- 4.4 测试
- 5. 配置gitlab
- 5.1 搭建私人gitlab
- 5.2 获取gitlab信息
- 6. 配置jenkins
- 6.1 安装jenkins
- 6.2 配置
- 6.3 创建项目
- 6.4 运行
- 6.5 查看报告
在ubuntu 20.04搭建SonarQube
我们需要安装或配置的服务包括:
- postgresql
- sonarqube
- sonarscanner
- cppcheck
- gitlab
- jenkins
由于笔者在公司服务器进行搭建,该服务器除了配置好网络之外,其他内容都没有配置
- 配置域名解析
csmp@csmp-OptiPlex-7090:/etc/postgresql/12/main$ cat /etc/resolv.conf
nameserver 8.8.8.8
nameserver 114.114.114.114
- 更新资源
apt-get update
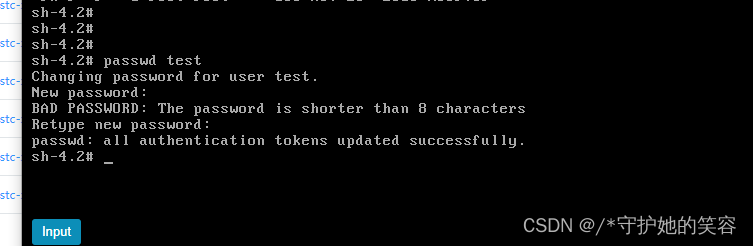
- 重置root密码
csmp@csmp-OptiPlex-7090:/etc/postgresql/12/main$ sudo passwd
新的 密码:
重新输入新的 密码:
passwd:已成功更新密码
csmp@csmp-OptiPlex-7090:/etc/postgresql/12/main$ su
密码:
root@csmp-OptiPlex-7090:/etc/postgresql/12/main#
1. postgresql安装及配置
1.1 安装postgresql
sudo apt install -y  postgresql
systemctl start postgresql
systemctl status postgresql
systemctl enable postgresql
1.2 创建sonarqube用户
# sudo ln -s  sonarqube-9.5.0.56709 sonarqube
# groupadd -g 2023 -o -r sonarqube
# useradd -M -N -g sonarqube -o -r -d /opt/sonarqube -s /bin/false -c "sonarqube server" -u 2023  sonarqube
1.3 设置数据库
链接数据库
csmp@csmp-OptiPlex-7090:/etc/postgresql/12/main$ sudo -u postgres psql
[sudo] csmp 的密码:
psql (12.14 (Ubuntu 12.14-0ubuntu0.20.04.1))
Type "help" for help.postgres=#
创建数据库sonar
postgres=# create database sonar;     # 创建数据库
CREATE DATABASE
postgres=# create user sonar with encrypted password 'sonar';  # 创建用户并设置密码
CREATE ROLE
postgres=# grant all privileges on database sonar to sonar;  # 授权用户
GRANT
postgres=# alter database sonar owner to sonar;   # 执行变更
ALTER DATABASE
查看数据库sonar
postgres=# \l sonar;List of databasesName  | Owner | Encoding |   Collate   |    Ctype    | Access privileges
-------+-------+----------+-------------+-------------+-------------------sonar | sonar | UTF8     | zh_CN.UTF-8 | zh_CN.UTF-8 | =Tc/sonar        +|       |          |             |             | sonar=CTc/sonar
(1 row)
连接数据库sonar
root@csmp-OptiPlex-7090:/etc/postgresql/12/main# su - postgres -c " psql -U sonar -d sonar  -h 127.0.0.1 -p 5432 "
Password for user sonar:
psql (12.14 (Ubuntu 12.14-0ubuntu0.20.04.1))
SSL connection (protocol: TLSv1.3, cipher: TLS_AES_256_GCM_SHA384, bits: 256, compression: off)
Type "help" for help.sonar=>
2. 安装sonarqube
下载sonarqube
# wget https://binaries.sonarsource.com/Distribution/sonarqube/sonarqube-9.9.0.65466.zip
2.1 设置sonarqube
解压sonarqube
# unzip sonarqube-9.9.0.65466.zip -d /data/apps/sonarqube
# ln -sv /data/apps/sonarqube/sonarqube-9.9.0.65466.zip/ /opt/sonarqube
2.2 修改sonarqube目录权限
root@csmp-OptiPlex-7090:/opt# chown -R sonarqube.sonarqube sonarqube
root@csmp-OptiPlex-7090:/opt# ll
...
lrwxrwxrwx  1 sonarqube sonarqube   21 4月   4 11:30 sonarqube -> sonarqube-9.5.0.56709/
...
2.3 sonar.properties
创建数据目录
root@csmp-OptiPlex-7090:/opt# mkdir -p /data/apps/sonarqube
root@csmp-OptiPlex-7090:/opt# chown -R sonarqube.sonarqube /data/apps/sonarqube
mkdir /data/apps/sonarqube/{data,temp}
修改配置文件
egrep -v "^$|^#" /opt/sonarqube/conf/sonar.propertiessonar.jdbc.username=sonar
sonar.jdbc.password=sonar
sonar.jdbc.url=jdbc:postgresql://127.0.0.1/sonar
sonar.path.data=/data/apps/sonarqube/data
sonar.path.temp=/data/apps/sonarqube/temp
sonar.search.port=9001
sonar.web.port=9000
2.4 设置systemd管理sonarqube
在/lib/systemd/system中添加sonarqube.service
[Unit]
Description=SonarQube service
After=syslog.target network.target[Service]
Type=simple
User=sonarqube
Group=sonarqube
PermissionsStartOnly=true
ExecStart=/usr/bin/nohup /usr/bin/java -Xms512m -Xmx512m -Djava.net.preferIPv4Stack=true -jar /opt/sonarqube/lib/sonar-application-9.5.0.56709.jar
StandardOutput=syslog
LimitNOFILE=131072
LimitNPROC=8192
TimeoutStartSec=5
Restart=always
SuccessExitStatus=143[Install]
WantedBy=multi-user.target
root@csmp-OptiPlex-7090:/lib/systemd/system# systemctl daemon-reload
root@csmp-OptiPlex-7090:/lib/systemd/system# systemctl start sonarqube.service
root@csmp-OptiPlex-7090:/lib/systemd/system# systemctl status sonarqube.service
● sonarqube.service - SonarQube serviceLoaded: loaded (/lib/systemd/system/sonarqube.service; disabled; vendor preset: enabled)Active: active (running) since Tue 2023-04-04 13:35:45 CST; 105ms agoMain PID: 1302734 (java)Tasks: 21 (limit: 38126)Memory: 29.6MCGroup: /system.slice/sonarqube.service└─1302734 /usr/bin/java -Xms512m -Xmx512m -Djava.net.preferIPv4Stack=true -jar /opt/sonarqube/lib/sonar-application-9.5.0.56>4月 04 13:35:45 csmp-OptiPlex-7090 systemd[1]: Started SonarQube service.
root@csmp-OptiPlex-7090:/lib/systemd/system# systemctl enable sonarqube.service
发现起来之后,又挂了,修改如下内容
sysctl.conf
# echo "vm.max_map_count=524288" >> /etc/sysctl.conf
# echo "fs.file-max=131072" >> /etc/sysctl.conf
# sysctl -p
limits.conf
# echo "sonarqube   -   nofile   131072" >> /etc/security/limits.conf
# echo "sonarqube   -   nproc    8192" >> /etc/security/limits.conf
如果sonarqube启动正常,但是无法链接网页,则可以查看/opt/sonarqube/logs/web文件
例如,数据库无法链接,或者es无法由root启动等等问题
Caused by: org.postgresql.util.PSQLException: Connection to 192.168.72.119:5432 refused. Check that the hostname and port are correct and that the postmaster is accepting TCP/IP connections.at org.postgresql.core.v3.ConnectionFactoryImpl.openConnectionImpl(ConnectionFactoryImpl.java:319)at org.postgresql.core.ConnectionFactory.openConnection(ConnectionFactory.java:49)at org.postgresql.jdbc.PgConnection.<init>(PgConnection.java:223)at org.postgresql.Driver.makeConnection(Driver.java:400)at org.postgresql.Driver.connect(Driver.java:259)at org.apache.commons.dbcp2.DriverConnectionFactory.createConnection(DriverConnectionFactory.java:52)at org.apache.commons.dbcp2.PoolableConnectionFactory.makeObject(PoolableConnectionFactory.java:374)at org.apache.commons.dbcp2.BasicDataSource.validateConnectionFactory(BasicDataSource.java:106)at org.apache.commons.dbcp2.BasicDataSource.createPoolableConnectionFactory(BasicDataSource.java:649)... 56 common frames omitted
Caused by: java.net.ConnectException: 拒绝连接 (Connection refused)at java.base/java.net.PlainSocketImpl.socketConnect(Native Method)at java.base/java.net.AbstractPlainSocketImpl.doConnect(AbstractPlainSocketImpl.java:412)at java.base/java.net.AbstractPlainSocketImpl.connectToAddress(AbstractPlainSocketImpl.java:255)at java.base/java.net.AbstractPlainSocketImpl.connect(AbstractPlainSocketImpl.java:237)at java.base/java.net.SocksSocketImpl.connect(SocksSocketImpl.java:392)at java.base/java.net.Socket.connect(Socket.java:609)at org.postgresql.core.PGStream.createSocket(PGStream.java:241)at org.postgresql.core.PGStream.<init>(PGStream.java:98)at org.postgresql.core.v3.ConnectionFactoryImpl.tryConnect(ConnectionFactoryImpl.java:109)at org.postgresql.core.v3.ConnectionFactoryImpl.openConnectionImpl(ConnectionFactoryImpl.java:235)... 64 common frames omitted
2.5 web
sonarqube的web登录账号密码为admin/admin
修改为admin/passwd(密码自定义)
3. 配置sonarscanner
3.1 下载
下载地址:
https://docs.sonarqube.org/latest/analyzing-source-code/scanners/sonarscanner/
下载,上传到服务器,解压到指定目录,笔者这里是/usr/share/sonar-scanner
3.2 配置
root@csmp-OptiPlex-7090:/usr/share/jenkins/workspace/test_sda# cat /usr/share/sonar-scanner/conf/sonar-scanner.properties
#Configure here general information about the environment, such as SonarQube server connection details for example
#No information about specific project should appear here#----- Default SonarQube server
#sonar.host.url=http://localhost:9000#----- Default source code encoding
#sonar.sourceEncoding=UTF-8
sonar.host.url=http://192.168.70.202:32069
sonar.sourceEncoding=UTF-8
[root@dbc-server-554 sonar-scanner-4.7.0.2747-linux]# sonar-scanner -h
INFO:
INFO: usage: sonar-scanner [options]
INFO:
INFO: Options:
INFO:  -D,--define <arg>     Define property
INFO:  -h,--help             Display help information
INFO:  -v,--version          Display version information
INFO:  -X,--debug            Produce execution debug output
当看到sonar-scanner的帮助信息,说明已经部署成功
4. 配置cppcheck
4.1 下载安装cppcheck
https://sourceforge.net/projects/cppcheck/files/
tar -zxvf cppcheck-2.10.tar.gzcd cppcheck-2.10/make CFGDIR=/usr/share/cppcheck-2.10/cfg/sudo make install$ which cppcheck
/usr/bin/cppcheck
4.2 遇到的问题
- 如果提示
cppcheck报错 Makefile322: *** FILESDIR must be set!,则需要配置几个参数的环境变量
root@csmp-OptiPlex-7090:/usr/share/cppcheck# tail -3 /etc/profile
export FILESDIR=/src
export DESTDIR=/
export PREFIX=usr
root@csmp-OptiPlex-7090:/usr/share/cppcheck# source /etc/profile
- 问题:
cppcheck: Failed to load library configuration file 'std.cfg'. File not found
解决:
① 先把make文件清除 make clean
② 添加后重新编译:make CFGDIR=/usr/share/cppcheck-2.10/cfg/
③ 安装:sudo make install
4.3 配置sonarqube
https://github.com/SonarQubeCommunity/sonar-cppcheck
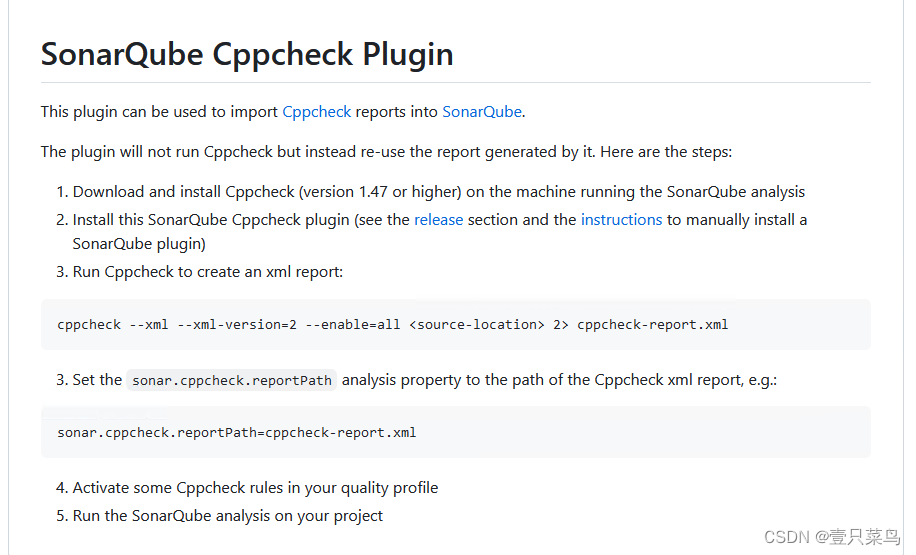
在sonarqube的配置文件修改
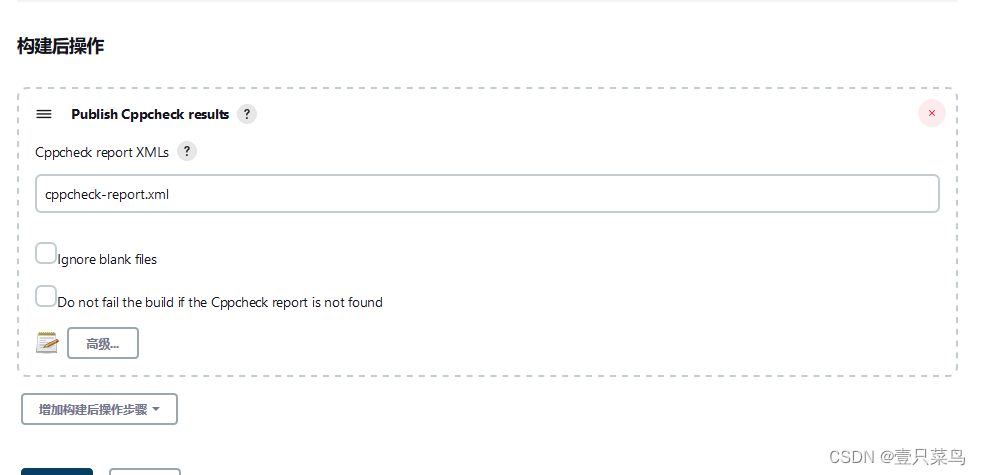
sonar.cxx.cppcheck.reportPath=cppcheck-report.xml
这样cppcheck就配置好了
4.4 测试
试试效果
root@csmp-OptiPlex-7090:/usr/share/jenkins/workspace/test_sda# cppcheck --xml --xml-version=2 --enable=all ./ 2> cppcheck-report.xml
Checking DelBkArea.cpp ...
root@csmp-OptiPlex-7090:/usr/share/jenkins/workspace/test_sda# cat cppcheck-report.xml
<?xml version="1.0" encoding="UTF-8"?>
<results version="2"><cppcheck version="2.10"/><errors><error id="variableScope" severity="style" msg="The scope of the variable 'area' can be reduced." verbose="The scope of the variable 'area' can be reduced. Warning: Be careful when fixing this message, especially when there are inner loops. Here is an example where cppcheck will write that the scope for 'i' can be reduced:\012void f(int x)\012{\012 int i = 0;\012 if (x) {\012 // it's safe to move 'int i = 0;' here\012 for (int n = 0; n < 10; ++n) {\012 // it is possible but not safe to move 'int i = 0;' here\012 do_something(&i);\012 }\012 }\012}\012When you see this message it is always safe to reduce the variable scope 1 level." cwe="398" file0="DelBkArea.cpp"><location file="DelBkArea.cpp" line="188" column="11"/><symbol>area</symbol>
...
5. 配置gitlab
5.1 搭建私人gitlab
当然,在公司的gitlab,可以直接打tag,代码下载等等操作,而不必搭建私人gitlab
3.2.1 搭建gitlab服务器(使用官方镜像搭建)
5.2 获取gitlab信息
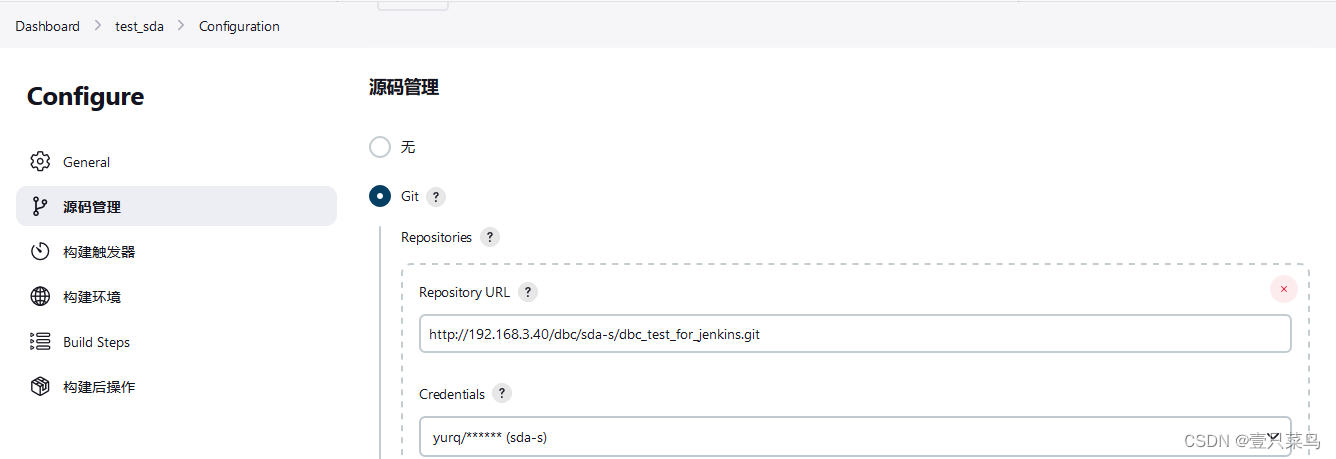
获取的代码分支,例如
http://***/dbc_test_for_jenkins.git
获取能下载代码的账号及密码,当然也可以使用密钥对,主要用于配置jenkins
6. 配置jenkins
6.1 安装jenkins
CHAPTER 1 Jenkins部署与基础配置
安装插件,包括但不限于:
Git plugin
SonarQube Scanner for Jenkins
SSH Agent Plugin
Cppcheck
加节点,加凭据参考前文吧,这里不展开了
6.2 配置
-
系统管理>Configure System>
Jenkins Location
Jenkins URL
http://192.168.70.202:30351/
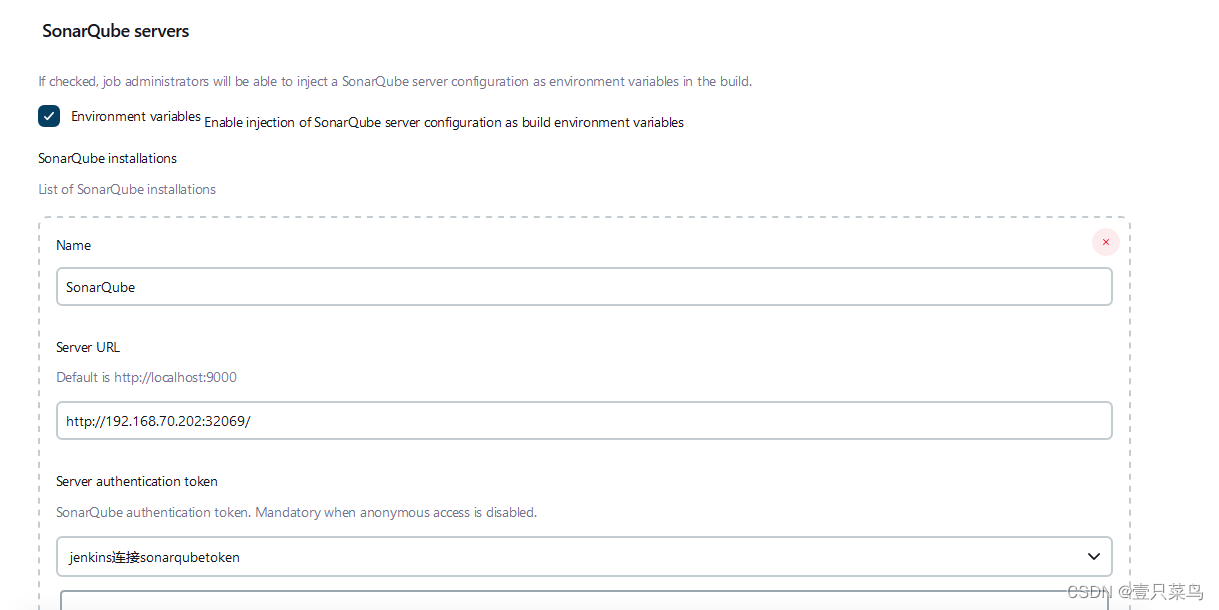
这里改成socket,默认的jenkins.local需要改域名 -
sonarqube设置
可以参考CHAPTER 5 Jenkins & SonarQube
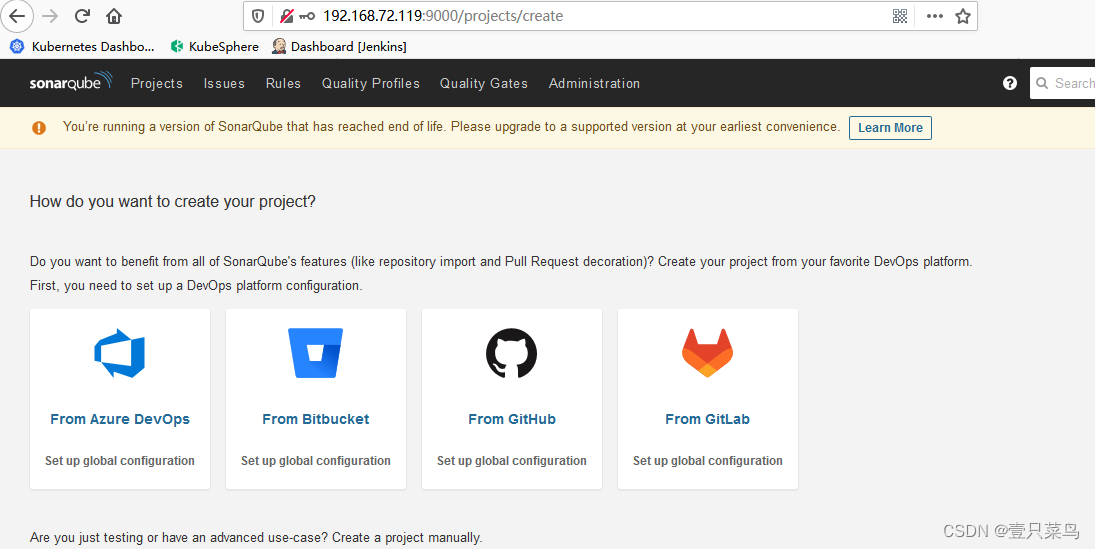
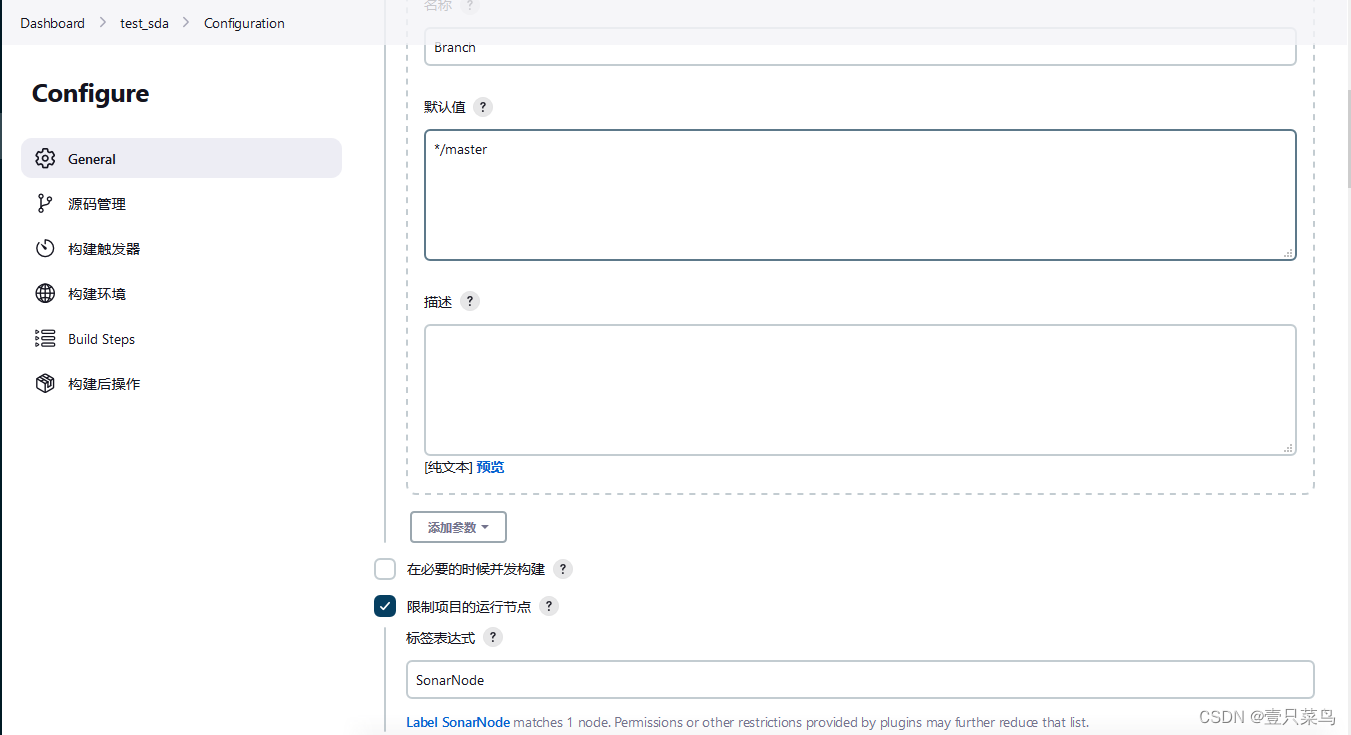
6.3 创建项目
General部分:
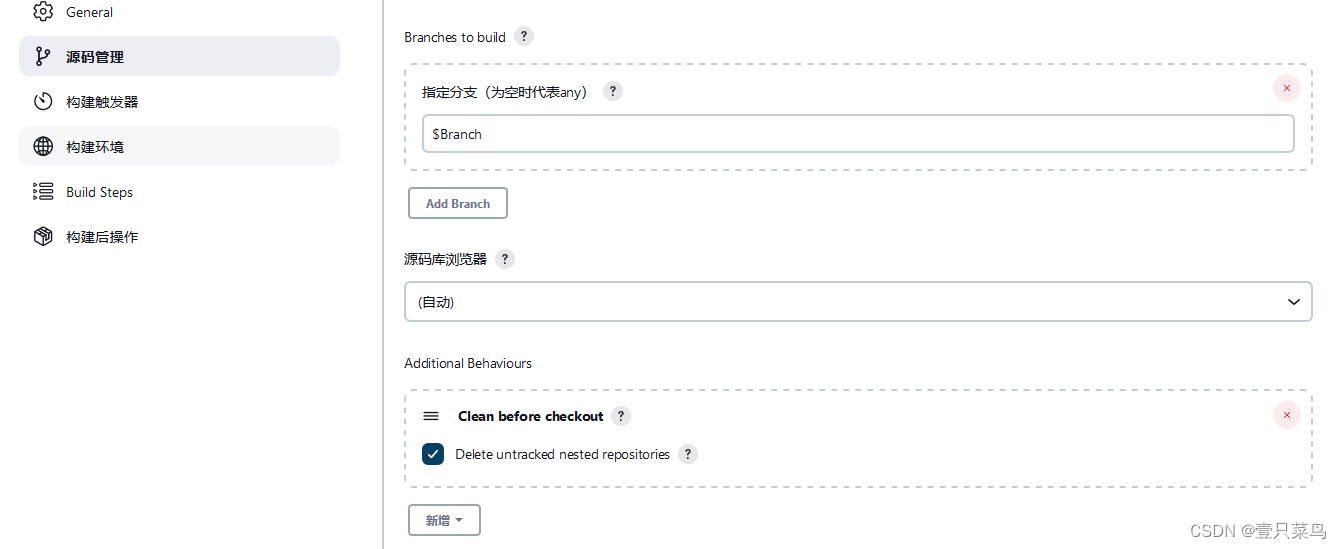
添加参数,用于添加代码的tag或者branch
限制运行节点,选择节点
源码管理部分:这里有必要选择高级行为里的clean before checkout
构建部分:
添加cppcheck

添加sonar扫描
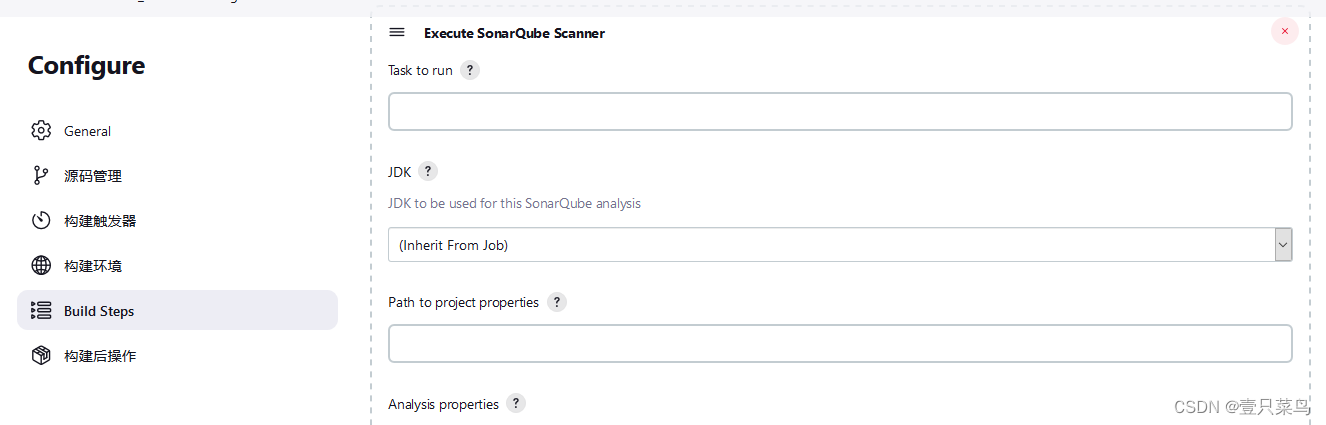
配置信息(Analysis properties):
# sonar平台中项目的标识(从项目信息中获取)
sonar.projectKey = ###
# sonar 平台中对应项目的名字
sonar.projectName = ###
# sonar 平台中对应项目的版本号
sonar.projectVersion=1.0  # sonar 检测的源文件目录,‘.’表示当前根目录下的所有文件
sonar.sources=.
# sonar 检测的语言种类
sonar.language=cxx
sonar.cxx.file.suffixes=.h,.cpp,.c
# sonar 平台中对应项目的编码格式
sonar.sourceEncoding=UTF-8
#排除文件,或文件夹
# sonar.exclusions= # sonar服务的地址
sonar.host.url=http://192.168.70.202:32069
# sonar令牌(向管理员索要令牌)
sonar.login=squ_8a3df4a82bdaa8fc4909653195e2eeb95ed4ae26sonar.scm.disabled=true
sonar.java.binaries=target/classes
sonar.cfamily.build-wrapper-output=build_wrapper_output_directory  # 配置本地扫描软件生成的报告路径,结合实际使用的软件进行配置,以下例子为cppcheck软件的内容,如需使用去掉前面的注释标识(#)
sonar.cxx.cppcheck.reportPaths=cppcheck-report.xml  #Cppcheck检查报告在根目录的上一级目录下
sonar.cxx.includeDirectories=/
添加发布cppcheck结果
6.4 运行
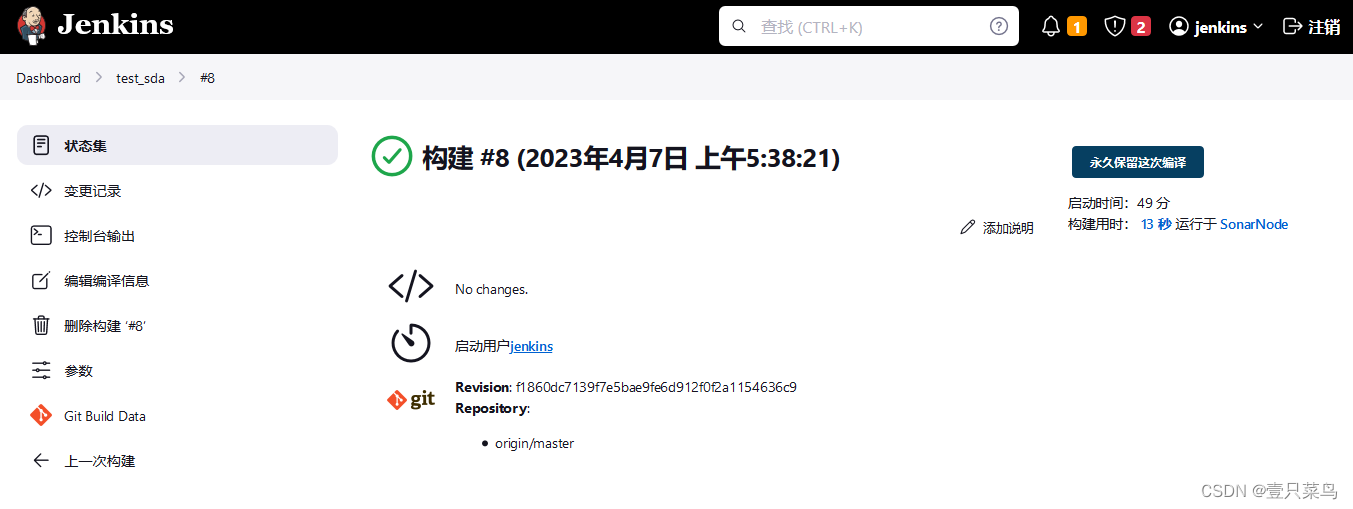
控制台输出:
Started by user jenkins
Running as SYSTEM
Building remotely on SonarNode (node sonarqube : 72.119,run) in workspace /usr/share/jenkins/workspace/test_sda
The recommended git tool is: NONE
...
INFO: Analysis total time: 10.086 s
INFO: ------------------------------------------------------------------------
INFO: EXECUTION SUCCESS
INFO: ------------------------------------------------------------------------
INFO: Total time: 11.269s
INFO: Final Memory: 18M/100M
INFO: ------------------------------------------------------------------------
Finished: SUCCESS
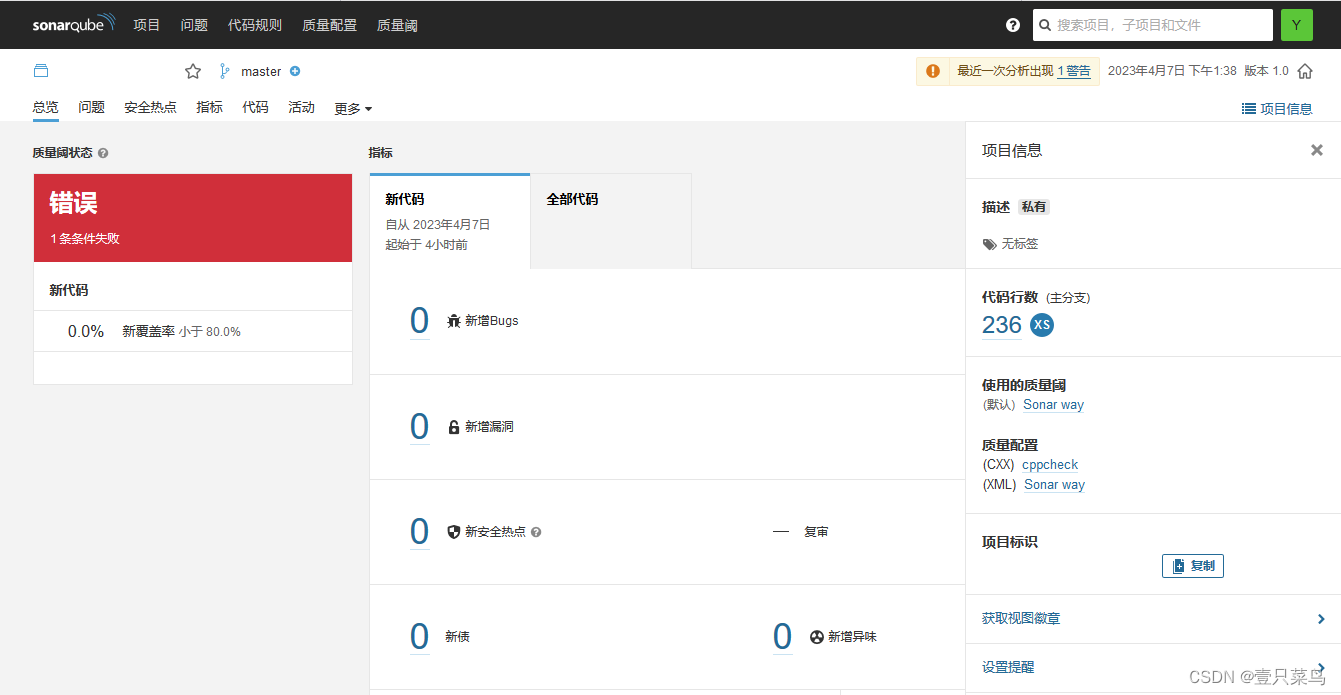
6.5 查看报告
登录sonar的web界面,查看报告
相关文章:
Ubuntu系统配置SonarQube + cppcheck + Jenkins
SonarQube1. postgresql安装及配置1.1 安装postgresql1.2 创建sonarqube用户1.3 设置数据库2. 安装sonarqube2.1 设置sonarqube2.2 修改sonarqube目录权限2.3 sonar.properties2.4 设置systemd管理sonarqube2.5 web3. 配置sonarscanner3.1 下载3.2 配置4. 配置cppcheck4.1 下载…...

Spring @Valid 不生效 问题记录
校验的简单使用: 在Spring中,我们可以使用Valid注解对实体进行校验。在Controller的方法参数中添加Valid注解,然后在实体类的属性上添加校验注解,例如NotNull、Size等。例如: RestController public class UserContr…...

五步教你如何注册一个公司网站
在今天的数字化时代,每个公司都需要一个强大的线上存在感。注册一个公司网站是实现这一目标的第一步。但是,对于许多公司而言,这个过程可能有些困难。因此,在本文中,我将介绍一个五步计划,让您轻松注册一个…...

CSS绘制气泡对话框样式(有边框)
1、效果图 2、难点和思路 难点:上面那个带边框的小三角不好实现 思路:画两个不同大小的div,使其基本重叠(两个大小不同,不完全重叠,让红色的露出一点边边),让白色div放到最上层&…...
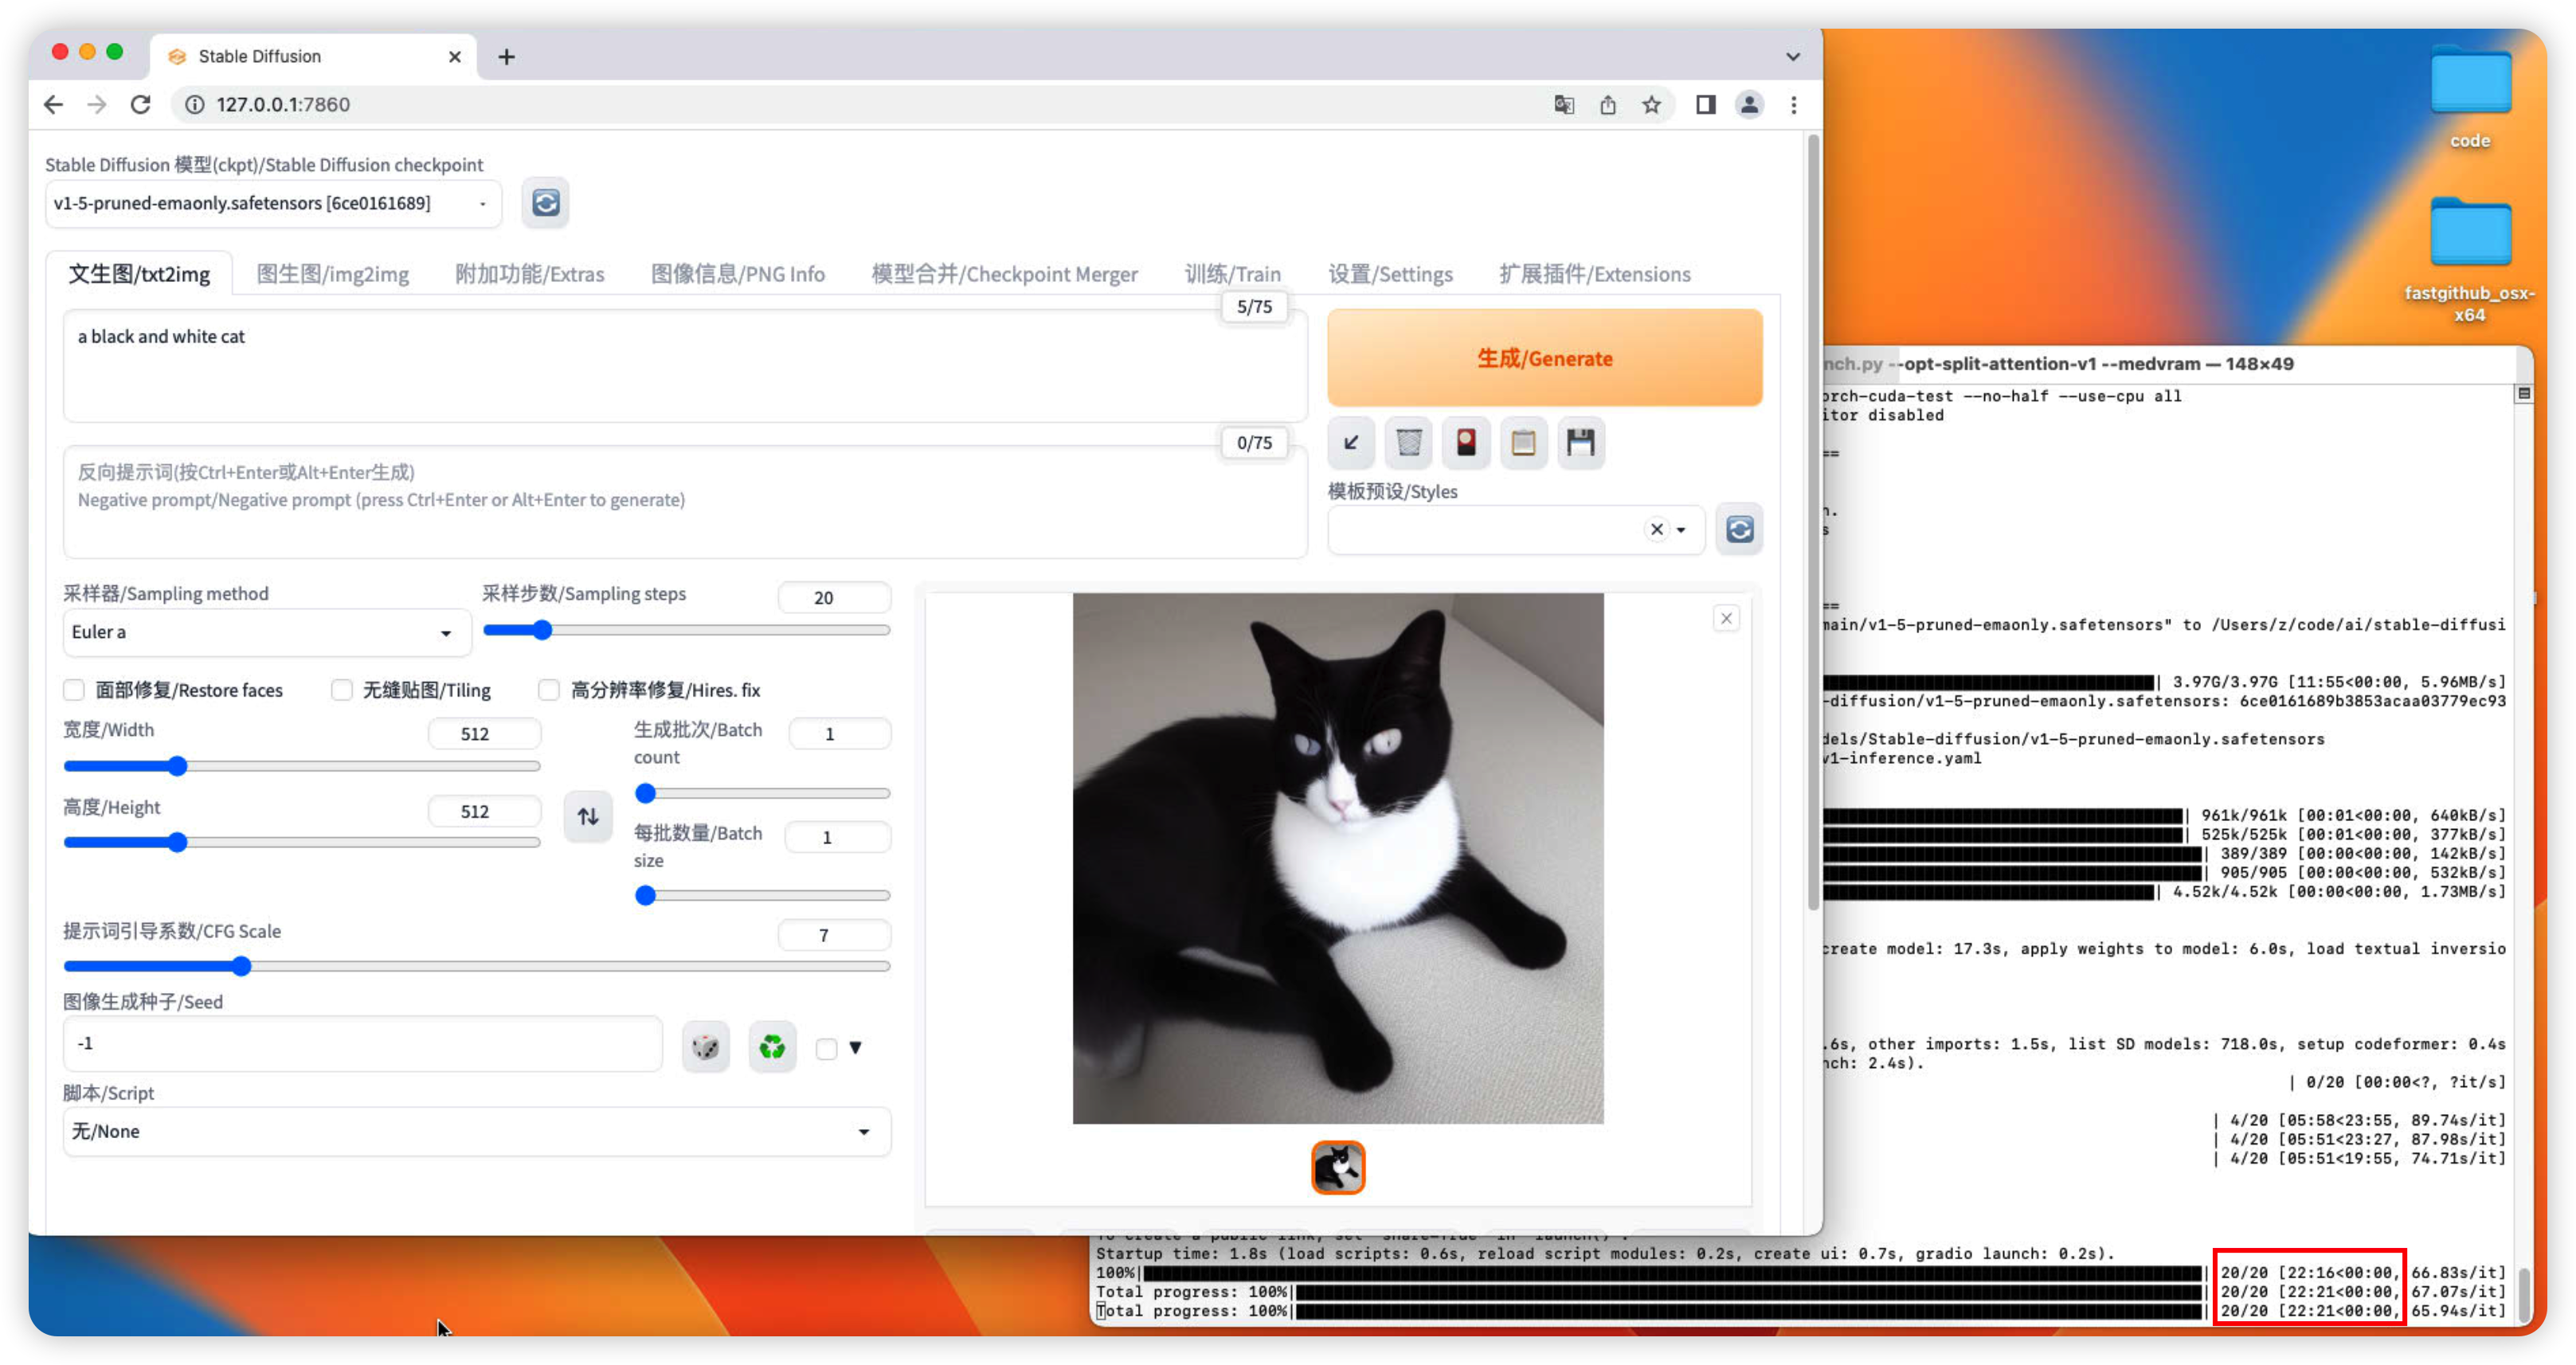
12款 Macmini A1347 跑 Stable Diffusion,20多分钟一张图
设备 2012款 Macmini A1347 12款 mini A1347 跑 Stable Diffusion 要20多分钟一张图 来欣赏一下20分钟画出来的图片 a black and white cat 环境:...
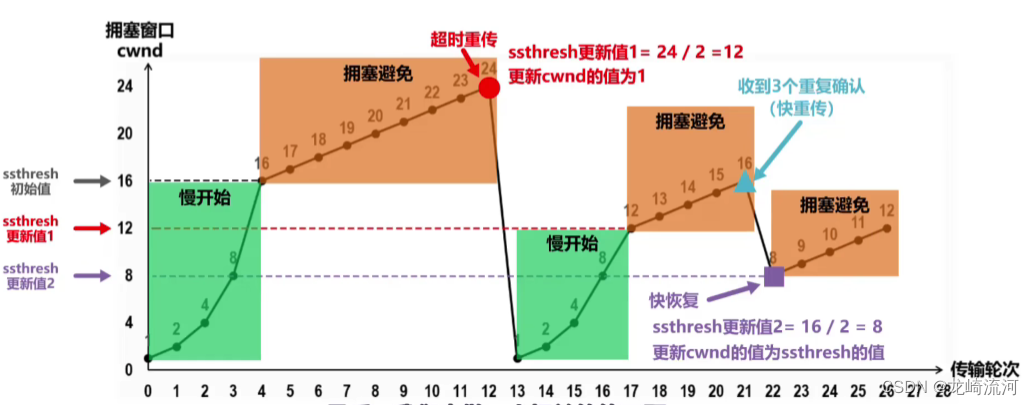
流量控制和拥塞控制的原理和区别
文章目录先介绍下重传机制和滑动窗口超时重传快速重传SACK方法Duplicate SACK滑动窗口发送方缓存窗口接收方缓存窗口流量控制小结拥塞控制慢开始算法拥塞避免算法快重传快恢复先介绍下重传机制和滑动窗口 超时重传 重传机制的其中一个方式,就是发送数据时…...

金融机构断卡行动中外部数据
“断卡行动”,近几年逐渐走入大众视野,是国家在从根源上整治网络及金融犯罪层面的重大举措。相信很多朋友在日常生活中已经有所体会了,比如我们在办理电话卡及银行卡的时候要经过很多审核机制,同时发卡后还会限制卡片的一些转账等…...

携程总监的单元测试是怎么样写的?
大家都知道,开发软件的时候为代码编写单元测试是很好的。但实际上,光有测试还不够,还要编写好的测试,这同样重要。 要做到这一点,考虑遵循一些固执的原则,对测试代码给予一些关爱: 1. 保持测试…...
算法每日一题:P2089 烤鸡 -DFS练习
😚一个不甘平凡的普通人,日更算法学习和打卡,期待您的关注和认可,陪您一起学习打卡!!!😘😘😘 🤗专栏:每日算法学习 💬个人…...

Spring中的循环依赖是什么?如何解决它?
循环依赖是指两个或多个Bean之间相互依赖,导致它们无法被正确地初始化。在Spring中,当两个或多个Bean之间存在循环依赖时,Spring容器无法决定哪个Bean应该先初始化,因此会抛出BeanCurrentlyInCreationException异常,从…...
不良事件报告系统源码,PHP医院安全(不良)事件报告系统源码,在大型医院稳定运行多年
PHP医院安全(不良)事件报告系统源码,不良事件系统源码,有演示,在大型医院稳定运行多年。 系统技术说明 技术架构:前后端分离,仓储模式 开发语言:PHP 开发工具:VSco…...
——排序 order by)
MySQL 查询常用操作(3)——排序 order by
MySQL中常用的查询操作,首先是能直接从表中直接取出数据,接着能对查询结果做一些简单的处理,比如去重等,然后是根据条件查询数据,包括精准查询、模糊查询以及按照数据的某个范围或者指定多个指标进行查询,值…...
)
Android Jetpack 从使用到源码深耕【数据库注解Room 从实践到原理 】(二)
上文,我们通过一个简单的sqlite应用实例,引入了Room,知道了Room使用的便捷和好处。然后用Room的方式,重新实现了应用实例中的场景,在这个过程中,我们结合自己已有的知识体系,从使用代码入手,对Room的实现原理,进行了猜想和简单的验证。 Room实现原理,是否真如我们猜想…...
传统企业如何实现数字化转型?
近年来,围绕新产品新模式新业态,国家重点部署了7个方向,包括数字化管理、平台化设计、智能化生产、网络化协同、个性化定制、服务化延伸、新型智能产品等,均为市场价值大、发展潜力深、示范效应强的代表性、引领性领域。 因此&am…...
Linux修改密码报错Authentication token manipulation error的终极解决方法
文章目录报错说明解决思路流程排查特殊权限有没有上锁查看根目录和关闭selinux/etc/pam.d/passwd文件/etc/pam.d/system-auth文件终极办法,手动定义密码passwd: Have exhausted maximum number of retries for servic、ssh用普通用户登录输入密码正确但是登录时却提…...
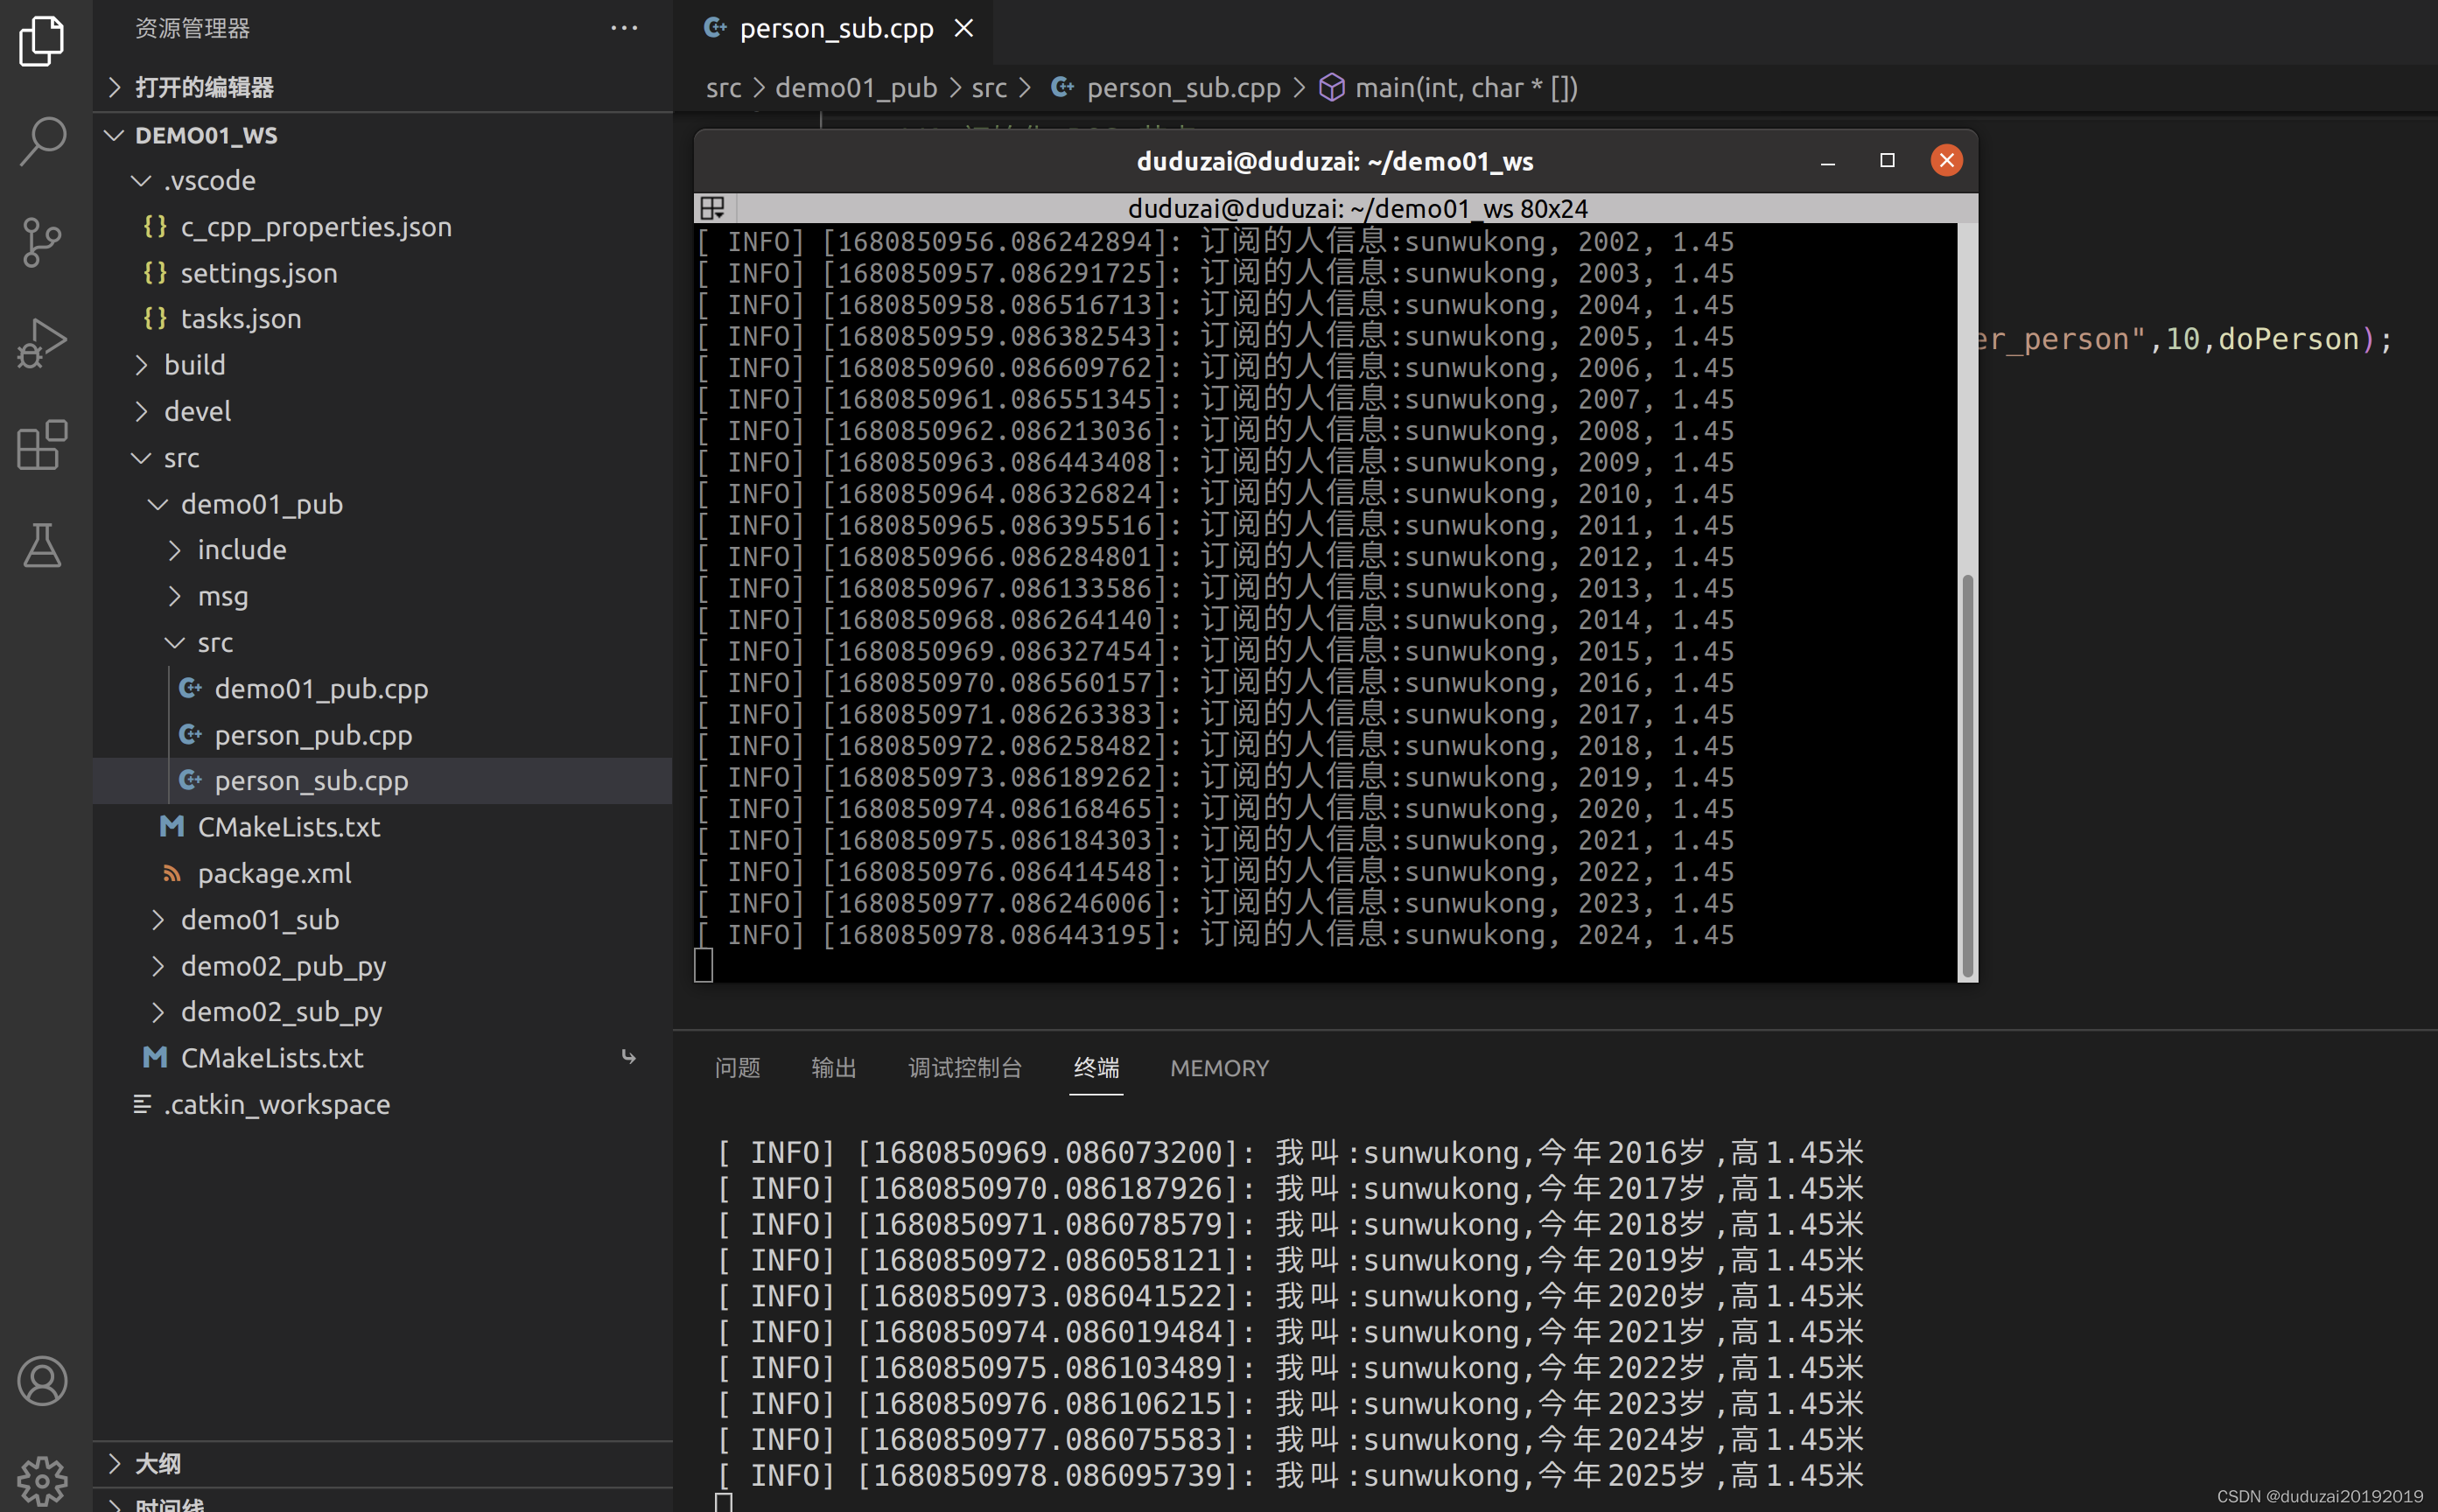
ROS实践06 自定义消息类型
文章目录运行环境:思路:1.1 定义.msg文件1)功能包下新建 msg 目录,添加文件 Person.msg2)修改package.xml3)修改CMakeLists.txt2.1 自定义消息调用(C)1)编译后修改includePath2)发布方实现2.1修改CMakeLists.txt2.3运行…...
《剑指offer》——从尾到头打印链表
首先,拿到题之后,我们还是先从题目入手,只有掌握题干的意思,才能进行接下来的解题操作。 示例1 输入 : {1,2,3} 返回值:[3,2,1] 示例2 输入 :{67,0,24,58} 返回值:[58,24,0,67] 解题方法…...
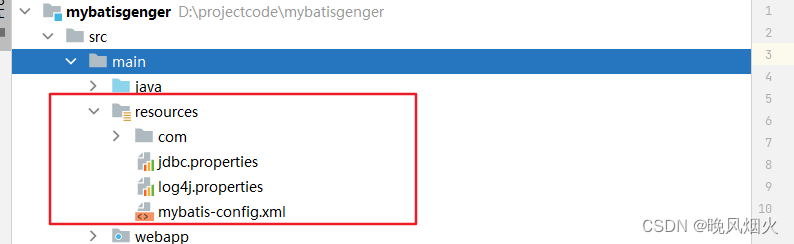
Javaweb基础配置模板(mybatis+javaweb)
1.大纲规划图 本配置涉及的技术:mybatis,javaweb,json转换,分页查询等 2.导入相关的配置文件pom.xml 2.1 依赖文件 <dependencies> <!-- 测试依赖--><dependency><groupId>junit</groupId><artifactId>junit</artifact…...
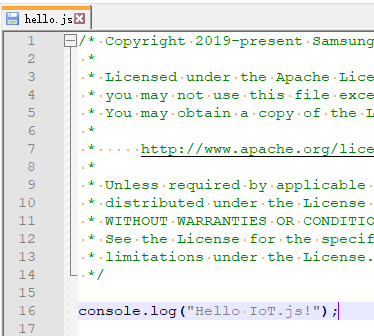
物联网 JS 前端框架开发 - 执行 js 程序
前言 此篇文章主要讲解如何在物联网操作系统OneOS上运行高级语言JS脚本程序。想想还是有点意思的,毕竟在IOT设备上,我们的固有想法是,他们性能很羸弱,可能就跑跑一些简单的C应用程序,没想到已经可以运行高级语言JS脚本…...

区块链概论
目录 1.概述 2.密码学原理 2.1.hash函数 2.2.签名 3.数据结构 3.1.区块结构 3.2.hash pointer 3.3.merkle tree 3.3.1.概述 3.3.2.证明数据存在 3.3.3.证明数据不存在 4.比特币的共识协议 4.1.概述 4.2.验证有效性 4.2.1.验证交易有效性 4.2.2.验证节点有效性 …...

从零构建高性能技术博客:SSG选型、自动化部署与SEO优化实战
1. 项目概述:一个技术博客的诞生与演进“wangtunan/blog”,这看起来只是一个简单的GitHub仓库名,背后却是一个技术人持续输出、构建个人知识体系的完整实践。它不仅仅是一个存放Markdown文件的代码库,更是一个集成了现代前端技术栈…...

制造业数字鸿沟的终结者:零依赖STL到STEP转换引擎的技术突破与应用实践
制造业数字鸿沟的终结者:零依赖STL到STEP转换引擎的技术突破与应用实践 【免费下载链接】stltostp Convert stl files to STEP brep files 项目地址: https://gitcode.com/gh_mirrors/st/stltostp 在数字化制造与工业4.0的浪潮中,制造业企业面临着…...

Agent OS:AI智能体开发的操作系统级解决方案
1. 项目概述:一个为AI智能体而生的操作系统最近在AI智能体开发圈子里,一个名为“Agent OS”的项目热度持续攀升。它来自Rivet.dev团队,定位非常清晰:一个专为构建、运行和管理AI智能体而设计的操作系统。如果你正在尝试将大语言模…...

Zotero插件市场:三步快速上手的插件管理神器
Zotero插件市场:三步快速上手的插件管理神器 【免费下载链接】zotero-addons Zotero Add-on Market | Zotero插件市场 | Browsing, installing, and reviewing plugins within Zotero 项目地址: https://gitcode.com/gh_mirrors/zo/zotero-addons 想象一下&a…...

AutoCut终极指南:如何用文本编辑器快速剪辑100个视频
AutoCut终极指南:如何用文本编辑器快速剪辑100个视频 【免费下载链接】autocut 用文本编辑器剪视频 项目地址: https://gitcode.com/GitHub_Trending/au/autocut 还在为手动剪辑视频而烦恼吗?AutoCut项目让你告别复杂的视频编辑软件,通…...

如何在10分钟内搭建个人游戏流媒体服务器:Sunshine跨平台游戏串流完全指南
如何在10分钟内搭建个人游戏流媒体服务器:Sunshine跨平台游戏串流完全指南 【免费下载链接】Sunshine Self-hosted game stream host for Moonlight. 项目地址: https://gitcode.com/GitHub_Trending/su/Sunshine 您是否梦想过在任何设备上畅玩PC游戏&#x…...

高性能键盘映射与SOCD清理架构解析:解决游戏输入冲突的技术方案
高性能键盘映射与SOCD清理架构解析:解决游戏输入冲突的技术方案 【免费下载链接】socd Key remapper for epic gamers 项目地址: https://gitcode.com/gh_mirrors/so/socd 在竞技游戏和高速动作游戏中,键盘输入的处理方式直接影响玩家的操作精度和…...

通用框架操作系统:统一异构应用框架的运行时与治理平台
1. 项目概述:一个面向未来的通用框架操作系统最近在开源社区里,一个名为TELLEBO/universal-framework-os的项目引起了我的注意。乍一看这个标题,可能会觉得有点“大词”堆砌的感觉——“通用”、“框架”、“操作系统”,每一个词单…...

qmcdump终极指南:三步解锁QQ音乐加密音频文件
qmcdump终极指南:三步解锁QQ音乐加密音频文件 【免费下载链接】qmcdump 一个简单的QQ音乐解码(qmcflac/qmc0/qmc3 转 flac/mp3),仅为个人学习参考用。 项目地址: https://gitcode.com/gh_mirrors/qm/qmcdump 还在为QQ音乐下…...

如何3秒破解百度网盘提取码难题:开源工具baidupankey的技术解析与实战指南
如何3秒破解百度网盘提取码难题:开源工具baidupankey的技术解析与实战指南 【免费下载链接】baidupankey 项目地址: https://gitcode.com/gh_mirrors/ba/baidupankey 你是否曾在寻找百度网盘资源时,被一个小小的提取码卡住,不得不花费…...