YOLOv7+单目测距(python)
YOLOv7+单目测距(python)
- 1. 相关配置
- 2. 测距原理
- 3. 相机标定
- 3.1:标定方法1
- 3.2:标定方法2
- 4. 相机测距
- 4.1 测距添加
- 4.2 主代码
- 5. 实验效果
相关链接
1. YOLOV5 + 单目测距(python)
2. YOLOV5 + 单目跟踪(python)
3. YOLOV7 + 单目跟踪(python)
4. YOLOV5 + 双目测距(python)
5. YOLOV7 + 双目测距(python)
6. 具体实现效果已在Bilibili发布,点击跳转
本篇博文工程源码下载
链接1:https://download.csdn.net/download/qq_45077760/87708470
链接2:https://github.com/up-up-up-up/yolov7_Monocular_ranging
文章结构前三章节和 YOLOV5 + 单目测距 这篇博文一样,如看过该博文,直接跳转第四章节
1. 相关配置
系统:win 10
YOLO版本:yolov7
拍摄视频设备:安卓手机
电脑显卡:NVIDIA 2080Ti(CPU也可以跑,GPU只是起到加速推理效果)
2. 测距原理
单目测距原理相较于双目十分简单,无需进行立体匹配,仅需利用下边公式线性转换即可:
D = (F*W)/P
其中D是目标到摄像机的距离, F是摄像机焦距(焦距需要自己进行标定获取), W是目标的宽度或者高度(行人检测一般以人的身高为基准), P是指目标在图像中所占据的像素

了解基本原理后,下边就进行实操阶段
3. 相机标定
3.1:标定方法1
可以参考张学友标定法获取相机的焦距
3.2:标定方法2
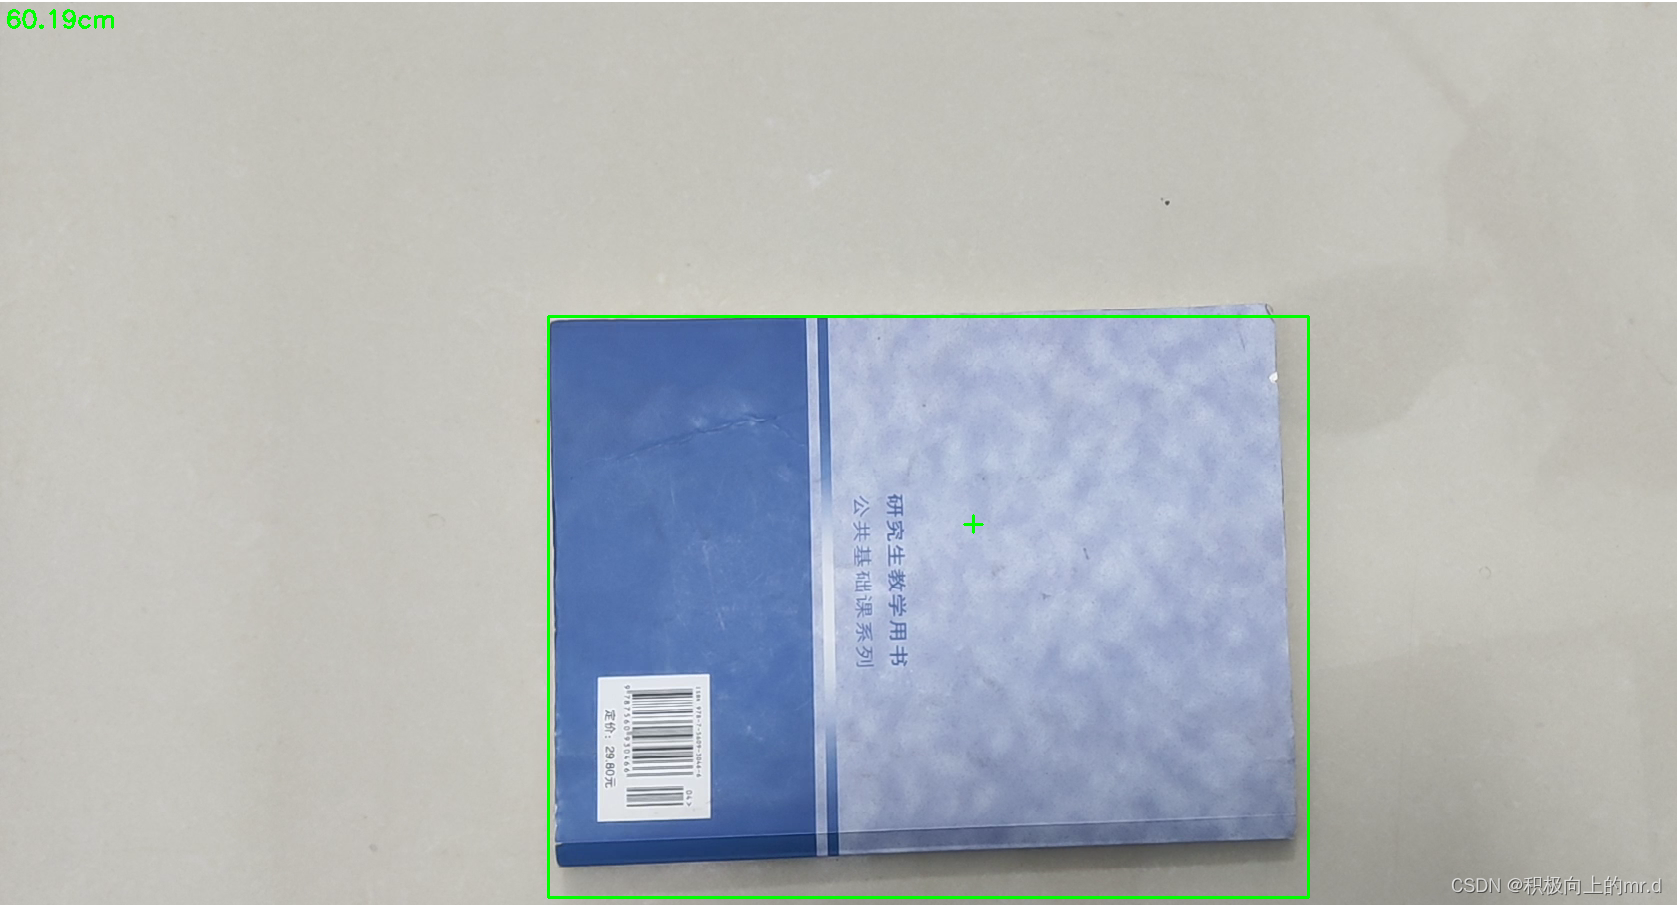
直接使用代码获得焦距,需要提前拍摄一个矩形物体,拍摄时候相机固定,距离被拍摄物体自行设定,并一直保持此距离,背景为纯色,不要出现杂物;最后将拍摄的视频用以下代码检测:
import cv2win_width = 1920
win_height = 1080
mid_width = int(win_width / 2)
mid_height = int(win_height / 2)foc = 1990.0       # 根据教程调试相机焦距
real_wid = 9.05   # A4纸横着的时候的宽度,视频拍摄A4纸要横拍,镜头横,A4纸也横
font = cv2.FONT_HERSHEY_SIMPLEX
w_ok = 1capture = cv2.VideoCapture('5.mp4')
capture.set(3, win_width)
capture.set(4, win_height)while (True):ret, frame = capture.read()# frame = cv2.flip(frame, 1)if ret == False:breakgray = cv2.cvtColor(frame, cv2.COLOR_BGR2GRAY)gray = cv2.GaussianBlur(gray, (5, 5), 0)ret, binary = cv2.threshold(gray, 140, 200, 60)    # 扫描不到纸张轮廓时,要更改阈值,直到方框紧密框住纸张kernel = cv2.getStructuringElement(cv2.MORPH_RECT, (3, 3))binary = cv2.dilate(binary, kernel, iterations=2)contours, hierarchy = cv2.findContours(binary, cv2.RETR_TREE, cv2.CHAIN_APPROX_SIMPLE)# cv2.drawContours(frame, contours, -1, (0, 255, 0), 2)    # 查看所检测到的轮框for c in contours:if cv2.contourArea(c) < 1000:  # 对于矩形区域,只显示大于给定阈值的轮廓,所以一些微小的变化不会显示。对于光照不变和噪声低的摄像头可不设定轮廓最小尺寸的阈值continuex, y, w, h = cv2.boundingRect(c)  # 该函数计算矩形的边界框if x > mid_width or y > mid_height:continueif (x + w) < mid_width or (y + h) < mid_height:continueif h > w:continueif x == 0 or y == 0:continueif x == win_width or y == win_height:continuew_ok = wcv2.rectangle(frame, (x + 1, y + 1), (x + w_ok - 1, y + h - 1), (0, 255, 0), 2)dis_inch = (real_wid * foc) / (w_ok - 2)dis_cm = dis_inch * 2.54# os.system("cls")# print("Distance : ", dis_cm, "cm")frame = cv2.putText(frame, "%.2fcm" % (dis_cm), (5, 25), font, 0.8, (0, 255, 0), 2)frame = cv2.putText(frame, "+", (mid_width, mid_height), font, 1.0, (0, 255, 0), 2)cv2.namedWindow('res', 0)cv2.namedWindow('gray', 0)cv2.resizeWindow('res', win_width, win_height)cv2.resizeWindow('gray', win_width, win_height)cv2.imshow('res', frame)cv2.imshow('gray', binary)c = cv2.waitKey(40)if c == 27:    # 按退出键esc关闭窗口breakcv2.destroyAllWindows()
反复调节 ret, binary = cv2.threshold(gray, 140, 200, 60)这一行里边的三个参数,直到线条紧紧包裹住你所拍摄视频的物体,然后调整相机焦距直到左上角距离和你拍摄视频时相机到物体的距离接近为止
然后将相机焦距写进测距代码distance.py文件里,这里行人用高度表示,根据公式 D = (F*W)/P,知道相机焦距F、行人的高度66.9(单位英寸→170cm/2.54)、像素点距离 h,即可求出相机到物体距离D。 这里用到h-2是因为框的上下边界像素点不接触物体
foc = 1990.0        # 镜头焦距
real_hight_person = 66.9   # 行人高度
real_hight_car = 57.08      # 轿车高度# 自定义函数,单目测距
def person_distance(h):dis_inch = (real_hight_person * foc) / (h - 2)dis_cm = dis_inch * 2.54dis_cm = int(dis_cm)dis_m = dis_cm/100return dis_mdef car_distance(h):dis_inch = (real_hight_car * foc) / (h - 2)dis_cm = dis_inch * 2.54dis_cm = int(dis_cm)dis_m = dis_cm/100return dis_m
4. 相机测距
4.1 测距添加
主要是把测距部分加在了画框附近,首先提取边框的像素点坐标,然后计算边框像素点高度,在根据 公式 D = (F*W)/P 计算目标距离
for *xyxy, conf, cls in reversed(det):if save_txt: # Write to filexywh = (xyxy2xywh(torch.tensor(xyxy).view(1, 4)) / gn).view(-1).tolist() # normalized xywhline = (cls, *xywh, conf) if opt.save_conf else (cls, *xywh) # label formatwith open(txt_path + '.txt', 'a') as f:f.write(('%g ' * len(line)).rstrip() % line + '\n')if save_img or view_img: # Add bbox to imagex1 = int(xyxy[0]) # 获取四个边框坐标y1 = int(xyxy[1])x2 = int(xyxy[2])y2 = int(xyxy[3])h = y2 - y1label = f'{names[int(cls)]} {conf:.2f}'if label is not None:if (label.split())[0] == 'person':dis_m = person_distance(h) # 调用函数,计算行人实际距离label += f' {dis_m}m' # 将行人距离显示写在标签后plot_one_box(xyxy, im0, label=label, color=colors[int(cls)], line_thickness=1)if (label.split())[0] == 'car' or (label.split())[0] == 'truck':dis_m = car_distance(h) # 调用函数,计算行人实际高度label += f' {dis_m}m' # 将行人距离显示写在标签后plot_one_box(xyxy, im0, label=label, color=colors[int(cls)], line_thickness=1)
4.2 主代码
import argparse
import time
from pathlib import Pathimport cv2
import torch
import torch.backends.cudnn as cudnn
from numpy import randomfrom models.experimental import attempt_load
from utils.datasets import LoadStreams, LoadImages
from utils.general import check_img_size, check_requirements, check_imshow, non_max_suppression, apply_classifier, \scale_coords, xyxy2xywh, strip_optimizer, set_logging, increment_path
from utils.plots import plot_one_box
from utils.torch_utils import select_device, load_classifier, time_synchronized, TracedModel
from distance import person_distance,car_distancedef detect(save_img=False):source, weights, view_img, save_txt, imgsz, trace = opt.source, opt.weights, opt.view_img, opt.save_txt, opt.img_size, not opt.no_tracesave_img = not opt.nosave and not source.endswith('.txt')  # save inference imageswebcam = source.isnumeric() or source.endswith('.txt') or source.lower().startswith(('rtsp://', 'rtmp://', 'http://', 'https://'))# Directoriessave_dir = Path(increment_path(Path(opt.project) / opt.name, exist_ok=opt.exist_ok))  # increment run(save_dir / 'labels' if save_txt else save_dir).mkdir(parents=True, exist_ok=True)  # make dir# Initializeset_logging()device = select_device(opt.device)half = device.type != 'cpu'  # half precision only supported on CUDA# Load modelmodel = attempt_load(weights, map_location=device)  # load FP32 modelstride = int(model.stride.max())  # model strideimgsz = check_img_size(imgsz, s=stride)  # check img_sizeif trace:model = TracedModel(model, device, opt.img_size)if half:model.half()  # to FP16# Second-stage classifierclassify = Falseif classify:modelc = load_classifier(name='resnet101', n=2)  # initializemodelc.load_state_dict(torch.load('weights/resnet101.pt', map_location=device)['model']).to(device).eval()# Set Dataloadervid_path, vid_writer = None, Noneif webcam:view_img = check_imshow()cudnn.benchmark = True  # set True to speed up constant image size inferencedataset = LoadStreams(source, img_size=imgsz, stride=stride)else:dataset = LoadImages(source, img_size=imgsz, stride=stride)# Get names and colorsnames = model.module.names if hasattr(model, 'module') else model.namescolors = [[random.randint(0, 255) for _ in range(3)] for _ in names]# Run inferenceif device.type != 'cpu':model(torch.zeros(1, 3, imgsz, imgsz).to(device).type_as(next(model.parameters())))  # run onceold_img_w = old_img_h = imgszold_img_b = 1t0 = time.time()for path, img, im0s, vid_cap in dataset:img = torch.from_numpy(img).to(device)img = img.half() if half else img.float()  # uint8 to fp16/32img /= 255.0  # 0 - 255 to 0.0 - 1.0if img.ndimension() == 3:img = img.unsqueeze(0)# Warmupif device.type != 'cpu' and (old_img_b != img.shape[0] or old_img_h != img.shape[2] or old_img_w != img.shape[3]):old_img_b = img.shape[0]old_img_h = img.shape[2]old_img_w = img.shape[3]for i in range(3):model(img, augment=opt.augment)[0]# Inferencet1 = time_synchronized()with torch.no_grad():   # Calculating gradients would cause a GPU memory leakpred = model(img, augment=opt.augment)[0]t2 = time_synchronized()# Apply NMSpred = non_max_suppression(pred, opt.conf_thres, opt.iou_thres, classes=opt.classes, agnostic=opt.agnostic_nms)t3 = time_synchronized()# Apply Classifierif classify:pred = apply_classifier(pred, modelc, img, im0s)# Process detectionsfor i, det in enumerate(pred):  # detections per imageif webcam:  # batch_size >= 1p, s, im0, frame = path[i], '%g: ' % i, im0s[i].copy(), dataset.countelse:p, s, im0, frame = path, '', im0s, getattr(dataset, 'frame', 0)p = Path(p)  # to Pathsave_path = str(save_dir / p.name)  # img.jpgtxt_path = str(save_dir / 'labels' / p.stem) + ('' if dataset.mode == 'image' else f'_{frame}')  # img.txtgn = torch.tensor(im0.shape)[[1, 0, 1, 0]]  # normalization gain whwhif len(det):# Rescale boxes from img_size to im0 sizedet[:, :4] = scale_coords(img.shape[2:], det[:, :4], im0.shape).round()# Print resultsfor c in det[:, -1].unique():n = (det[:, -1] == c).sum()  # detections per classs += f"{n} {names[int(c)]}{'s' * (n > 1)}, "  # add to string# Write resultsfor *xyxy, conf, cls in reversed(det):if save_txt:  # Write to filexywh = (xyxy2xywh(torch.tensor(xyxy).view(1, 4)) / gn).view(-1).tolist()  # normalized xywhline = (cls, *xywh, conf) if opt.save_conf else (cls, *xywh)  # label formatwith open(txt_path + '.txt', 'a') as f:f.write(('%g ' * len(line)).rstrip() % line + '\n')if save_img or view_img:  # Add bbox to imagex1 = int(xyxy[0])  # 获取四个边框坐标y1 = int(xyxy[1])x2 = int(xyxy[2])y2 = int(xyxy[3])h = y2 - y1label = f'{names[int(cls)]} {conf:.2f}'if label is not None:if (label.split())[0] == 'person':dis_m = person_distance(h)  # 调用函数,计算行人实际高度label += f'  {dis_m}m'  # 将行人距离显示写在标签后plot_one_box(xyxy, im0, label=label, color=colors[int(cls)], line_thickness=1)if (label.split())[0] == 'car' or (label.split())[0] == 'truck':dis_m = car_distance(h)  # 调用函数,计算行人实际高度label += f'  {dis_m}m'  # 将行人距离显示写在标签后plot_one_box(xyxy, im0, label=label, color=colors[int(cls)], line_thickness=1)# Print time (inference + NMS)print(f'{s}Done. ({(1E3 * (t2 - t1)):.1f}ms) Inference, ({(1E3 * (t3 - t2)):.1f}ms) NMS')# Stream resultsif view_img:cv2.imshow(str(p), im0)cv2.waitKey(1)  # 1 millisecond# Save results (image with detections)if save_img:if dataset.mode == 'image':cv2.imwrite(save_path, im0)print(f" The image with the result is saved in: {save_path}")else:  # 'video' or 'stream'if vid_path != save_path:  # new videovid_path = save_pathif isinstance(vid_writer, cv2.VideoWriter):vid_writer.release()  # release previous video writerif vid_cap:  # videofps = vid_cap.get(cv2.CAP_PROP_FPS)w = int(vid_cap.get(cv2.CAP_PROP_FRAME_WIDTH))h = int(vid_cap.get(cv2.CAP_PROP_FRAME_HEIGHT))else:  # streamfps, w, h = 30, im0.shape[1], im0.shape[0]save_path += '.mp4'vid_writer = cv2.VideoWriter(save_path, cv2.VideoWriter_fourcc(*'mp4v'), fps, (w, h))vid_writer.write(im0)if save_txt or save_img:s = f"\n{len(list(save_dir.glob('labels/*.txt')))} labels saved to {save_dir / 'labels'}" if save_txt else ''#print(f"Results saved to {save_dir}{s}")print(f'Done. ({time.time() - t0:.3f}s)')if __name__ == '__main__':parser = argparse.ArgumentParser()parser.add_argument('--weights', nargs='+', type=str, default='yolov7.pt', help='model.pt path(s)')parser.add_argument('--source', type=str, default='inference/images/2.mp4', help='source')  # file/folder, 0 for webcamparser.add_argument('--img-size', type=int, default=640, help='inference size (pixels)')parser.add_argument('--conf-thres', type=float, default=0.25, help='object confidence threshold')parser.add_argument('--iou-thres', type=float, default=0.45, help='IOU threshold for NMS')parser.add_argument('--device', default='', help='cuda device, i.e. 0 or 0,1,2,3 or cpu')parser.add_argument('--view-img', action='store_true', help='display results')parser.add_argument('--save-txt', action='store_true', help='save results to *.txt')parser.add_argument('--save-conf', action='store_true', help='save confidences in --save-txt labels')parser.add_argument('--nosave', action='store_true', help='do not save images/videos')parser.add_argument('--classes', nargs='+', type=int, help='filter by class: --class 0, or --class 0 2 3')parser.add_argument('--agnostic-nms', action='store_true', help='class-agnostic NMS')parser.add_argument('--augment', action='store_true', help='augmented inference')parser.add_argument('--update', action='store_true', help='update all models')parser.add_argument('--project', default='runs/detect', help='save results to project/name')parser.add_argument('--name', default='exp', help='save results to project/name')parser.add_argument('--exist-ok', action='store_true', help='existing project/name ok, do not increment')parser.add_argument('--no-trace', action='store_true', help='don`t trace model')opt = parser.parse_args()print(opt)#check_requirements(exclude=('pycocotools', 'thop'))with torch.no_grad():if opt.update:  # update all models (to fix SourceChangeWarning)for opt.weights in ['yolov7.pt']:detect()strip_optimizer(opt.weights)else:detect()
5. 实验效果
由于yolov7和yolov5机制问题,yolov7推理时间相较于yolov5较长,实验效果如下
更多有关测距的代码见我博客主页
相关文章:
YOLOv7+单目测距(python)
YOLOv7单目测距(python) 1. 相关配置2. 测距原理3. 相机标定3.1:标定方法13.2:标定方法2 4. 相机测距4.1 测距添加4.2 主代码 5. 实验效果 相关链接 1. YOLOV5 单目测距(python) 2. YOLOV5 单目跟踪&…...
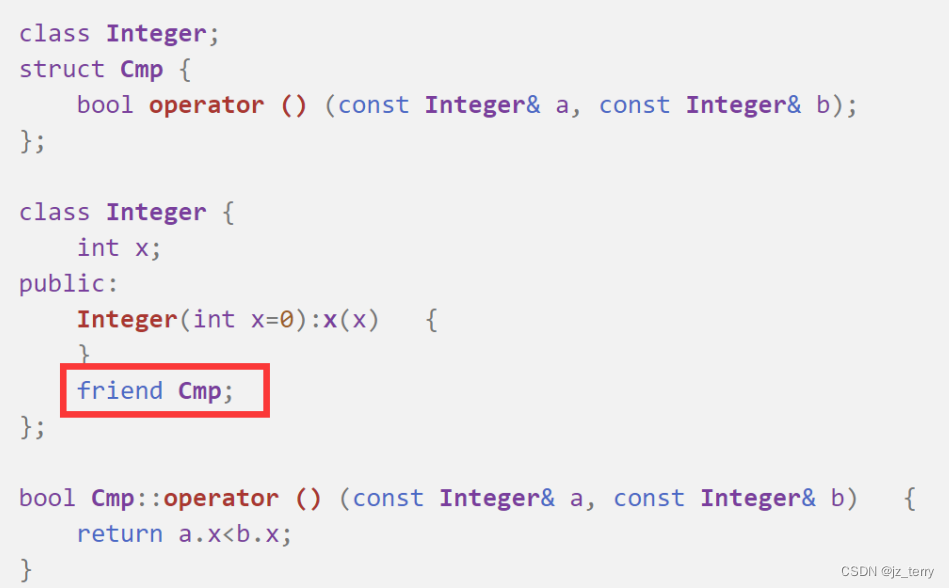
SYSU程设c++(第九周)函数对象、友元函数、友元类
函数对象: 如果一个类定义了operator()运算符函数,则可以使用该类的对象名为函数名调用这个函数. 函数对象是一个对象,但调用形式和普通函数调用一样,因此取名叫函数对象 (注意operator()先有个括号,接着才是括号(参数…...

Target品质审核零容忍问题点——上篇
【Target品质审核零容忍问题点——上篇】 Target品质验厂审核过程中共有110多个问题点,其中包含零容忍问题12项,审核当天如果出现任何零容忍项或出现很多扣分项,将直接影响最后的结果,极容易导致验厂不通过。建议工厂在遇到Target…...
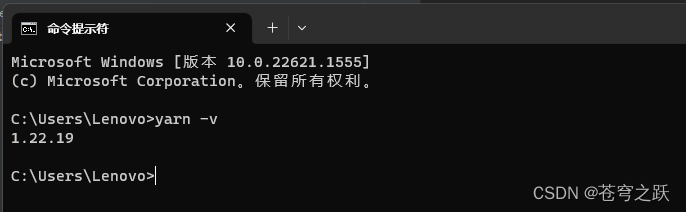
使用node版本管理器gnvm
目录 一、官网 二、下载 三、查看本机node安装地址 四、将gnvm放到node安装目录 五、安装其他版本node(以管理员身份打开CMD) 六、使用指定版本(以管理员身份打开CMD) 七、查看当前版本(以管理员身份打开CMD&…...
SpringBoot中使用redis事务
本文基于SpringBoot 2.X 事务在关系型数据库的开发中经常用到,其实非关系型数据库,比如redis也有对事务的支持,本文主要探讨在SpringBoot中如何使用redis事务。 事务的相关介绍可以参考: 0、起因 在一次线上事故中,我们…...
2023全网汇总PMP备考攻略(附答题技巧)
一,多复习和学习新版考纲 01《PMBOK》看三遍 这边建议看三遍《PMBOK》,更有利于我们巩固知识,查缺补漏。 第一遍 第一遍是老师带着我们去看。这个时候一定要非常专心,千万不要上课走神或者玩手机。因为这一遍老师会告诉我们&a…...

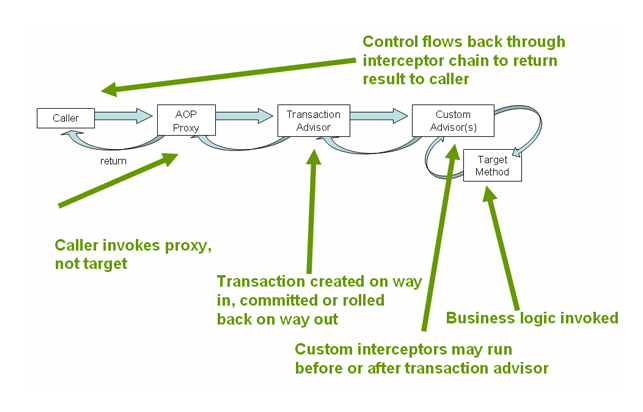
lightdb/pg reload guc 参数机制
lightdb/pg reload guc 参数机制 本文主要讲述调用pg_reload_conf 后,到guc被真正修改之间发送的故事。(基于pg13) pg_reload_conf 函数实现如下: Datum pg_reload_conf(PG_FUNCTION_ARGS) {if (kill(PostmasterPid, SIGHUP)){ereport(WARNING,(errms…...
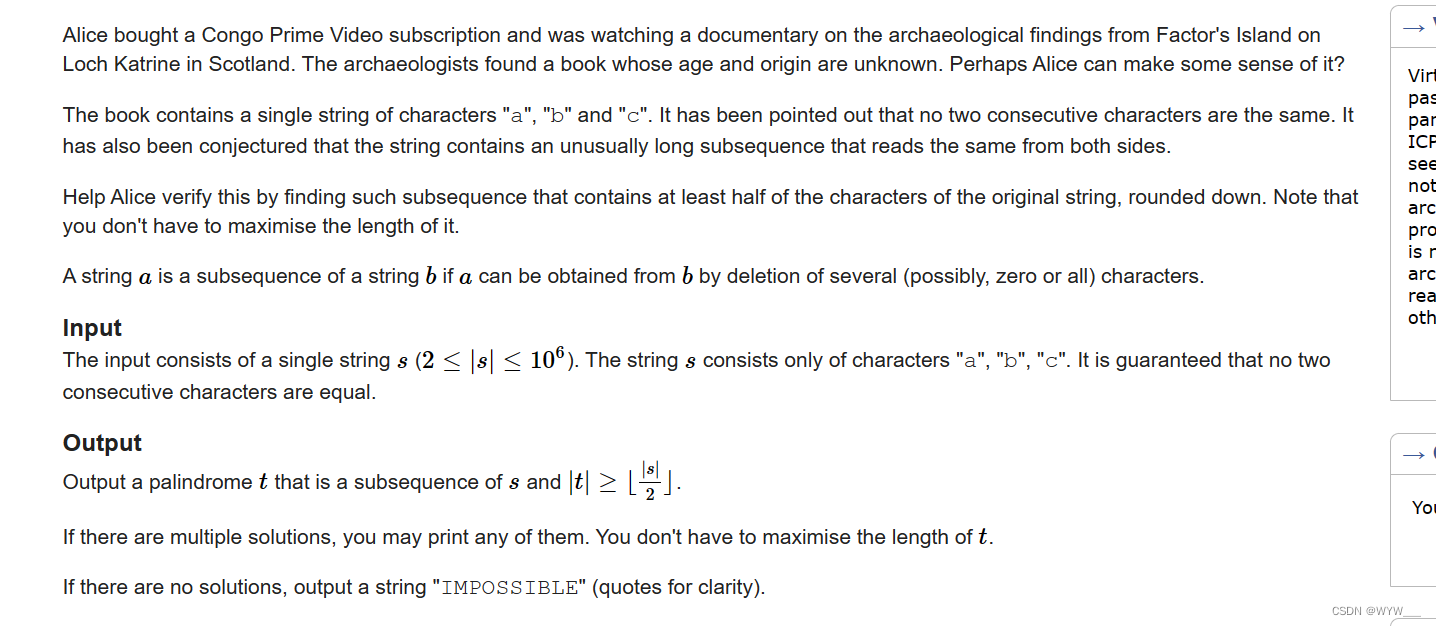
E. Archaeology(纯思维)
Problem - E - Codeforces 爱丽丝买了一个刚果总理视频的订阅,正在看一部关于苏格兰卡特林湖的因子岛的考古发现的纪录片。考古学家发现了一本书,其年代和来源都不明。也许爱丽丝可以对它进行一些解释? 这本书包含一串字符 "a"、&…...
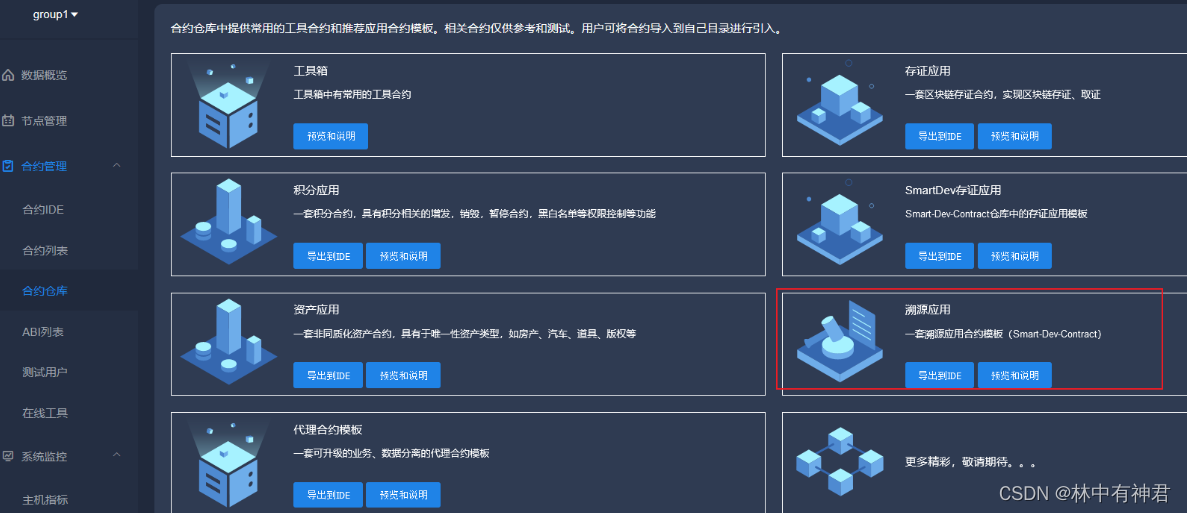
FISCO BCOS(三十四)———商品溯源(智能合约+后端)
FISCO BCOS(三十四)———商品溯源(智能合约+后端) 一、智能合约函数调用流程 注:智能合约来源(官网的合约仓库中) 但是TraceabilityFactory合约有问题,我已经做了修改,可以看原版与我的,只有一个函数不同。 官网上这套合约在TraceabilityFactory这个合约上缺少getGo…...

ts体操训练
1 实现pick type MyPick<T, K extends keyof T> {[P in K]: T[P] }2 实现readonly 让interface中所有属性变为可读 type MyReadonly<T> {readonly [K in keyof T]: T[K] }3 TupleToObject 将元组类型转换为对象类型 type tupleToObject<T extends any[]&…...

int指令
格式: int n,n为中断类型码,它的功能是引发中断过程 CPU执行过程 取中断类型码n;标志寄存器入栈,IF0,TF0;CS,IP入栈;(IP)(n4)&…...

Cycling 74 Max for Mac:音乐可视化编程软件
Cycling 74 Max是一款音乐、视觉、互动艺术等领域中广泛使用的编程语言和应用软件,它允许用户创作和控制实时音频和视频效果、交互式应用程序和媒体艺术品等。 Max将程序设计和可视化编程相结合,通过简单的拖拽和连接方式,用户可以将各种功能…...
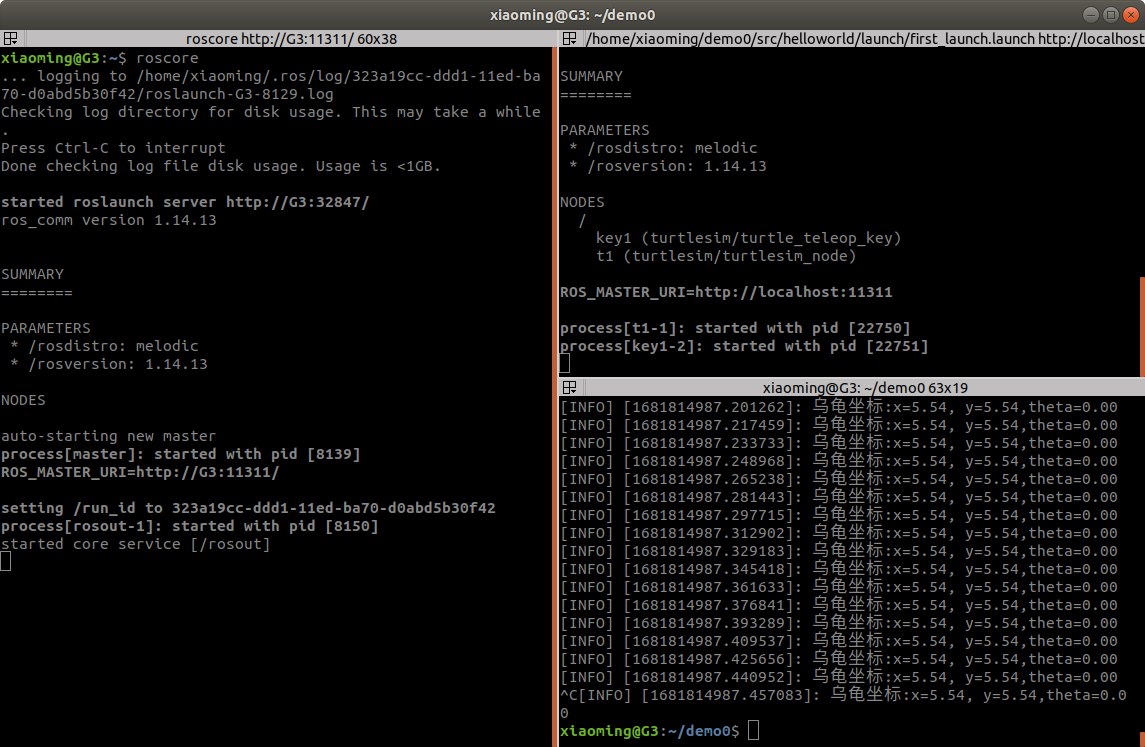
ROS学习第十二节——话题通信控制小乌龟
1.基操一下 首先打开小乌龟程序和键盘控制程序 rosrun turtlesim turtlesim_node rosrun turtlesim turtle_teleop_key 查看话题列表 rostopic list 打开计算图查看具体是那个话题在起作用 rqt_graph 从上图可以看到两个节点之间的话题是 /turtle1/cmd_vel 使用以下命令获…...
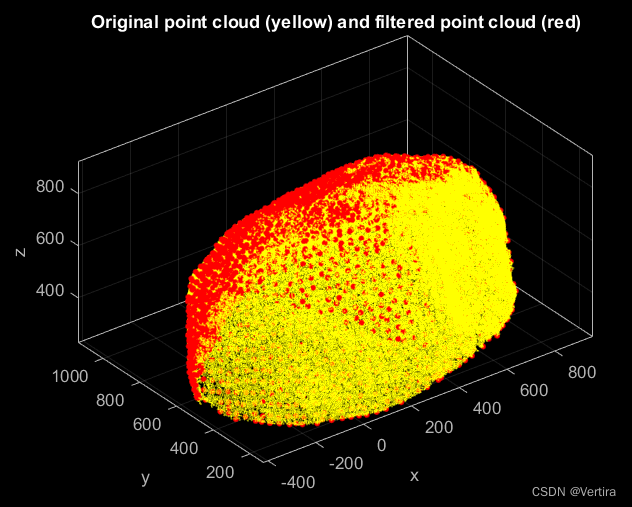
matlab点云的可视化-源码复制粘贴即可(一)
一、导入并可视化一个无属性的点云 clc; clear; close; % clear everything% Import a point cloud from a plain text file (run type(Lion.xyz) to see the contents of the file) pc pointCloud(Lion.xyz);% Generate a z-colored view of the point cloud pc.plot;% Set …...
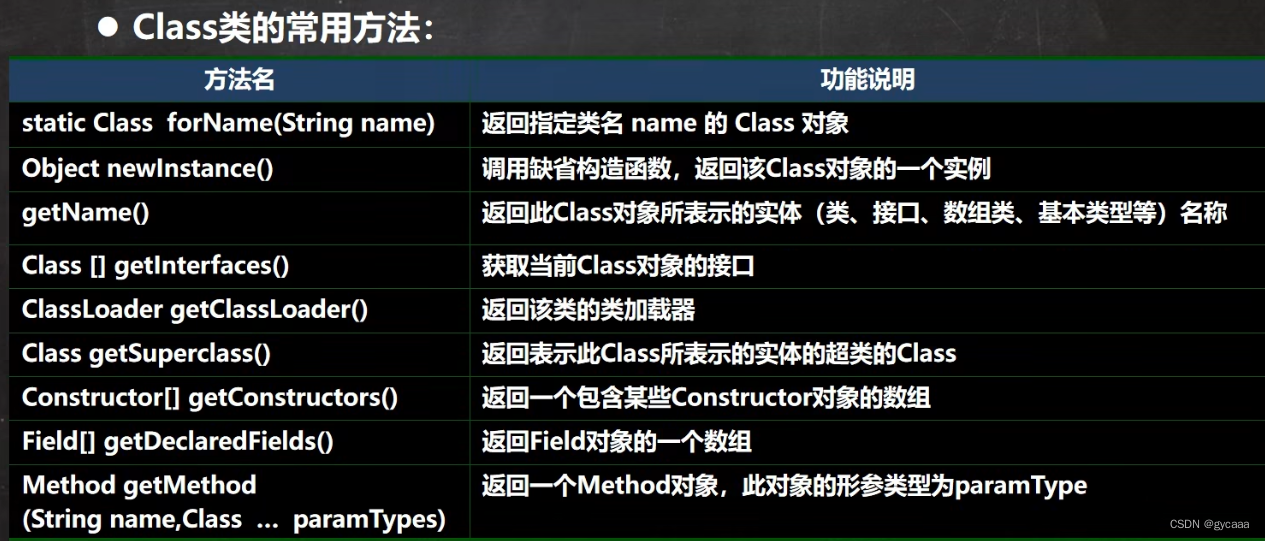
反射-Class类分析
反射相关的主要类 java.lang.Class:代表一个类,Class对象表示某个类加载后在堆中的对象java.lang.reflect.Method:代表类的方法,Method对象表示某个类的方法java.lang.reflect.Field:代表类的成员变量,Fie…...

Let’s Make C++ Great Again——string与常用字符处理函数
文章目录 string使用string类的例子,统计一个字符串中单词的个数:在算法模拟题中翻转字符串:判断回文字符串:字符串查找:字符串替换: 常用字符处理函数strlen()strcpy()strcat()strcmp()toupper() 和 tolow…...

〖Python网络爬虫实战⑰〗- 网页解析利器parsel实战
订阅:新手可以订阅我的其他专栏。免费阶段订阅量1000 python项目实战 Python编程基础教程系列(零基础小白搬砖逆袭) 说明:本专栏持续更新中,目前专栏免费订阅,在转为付费专栏前订阅本专栏的,可以免费订阅付…...

中电金信:生成式AI热潮下,文本智能走向何方?
突破通用人工智能场景,生成式AI正在向全行业应用进攻。 一个脑筋急转弯,几个月前ChatGPT是这样回答的: 然而,仅仅几个月的迭代,它的回答却让人出乎意料。 看似调侃的对比背后实则是无数次模型训练的支撑。基于数据的激…...

探索Linux设备树:硬件描述与驱动程序的桥梁
目录标题 引言:Linux设备树简介 | Introduction: Linux Device Tree Overviewa. 设备树的背景与发展 | Background and Development of Device Treeb. 设备树的作用与意义 | The Role and Significance of Device Tree 设备树语法与结构 | Device Tree Syntax and S…...

UNION ALL用法 以及 UNION ALL和UNION的区别
部分参考自文章: https://blog.csdn.net/a200822146085/article/details/119545374(CC 4.0 BY-SA版权协议)CSDN「我心依依旧」 https://www.1keydata.com/cn/sql/sql-unionall.php SQL Union All SQL指令 UNION ALL用法 UNION ALL 这个指令的目的也是要将两个 SQL 语…...

替代CM108|替代CM108B|替代HS100|SSS1629代理商|中文说明书|台湾鑫创
SSS1623,SSS1629全面兼容与替代台湾骅讯c-mediaCM108/CM108B/CM108AH/CM118B/CM119/CM119A/HS100/CM6120/CM6317A/CM6400/CM6200等型号, 全面兼容与替代台湾创舰Isoft IS817/IS821/IS828/IS820/IS807等型号,完美替代市面上所有主流USB耳机IC,USB喇叭IC, USB音箱IC, USB游戏耳机…...
)
用Manim做中文数学微课?先搞定MathTex颜色分染和ctex包配置(保姆级教程)
Manim中文数学微课实战:从零实现公式染色与中文混排 当你在B站刷到那些将复杂数学公式演绎成动画的艺术品时,是否好奇过它们是如何制作的?作为教育视频创作者,我最初被Manim的数学可视化能力吸引,却在尝试制作中文微课…...

Ostrakon-VL-8B部署指南:快速搭建支持图片问答的智能系统
Ostrakon-VL-8B部署指南:快速搭建支持图片问答的智能系统 1. 系统概述 Ostrakon-VL-8B是一款专为零售和餐饮场景优化的多模态视觉理解系统。它能像人类一样"看懂"图片内容,并回答与图片相关的各种问题。 这个系统基于Qwen3-VL-8B模型微调而…...

告别手动配置:用快马AI生成openclaw自动化安装与环境管理脚本
作为一名经常需要配置各种开发环境的程序员,我深刻体会到手动安装工具的繁琐。最近在搭建一个爬虫项目时需要用到openclaw,发现传统安装方式存在几个明显的效率痛点: 版本查找耗时:需要反复在官网和文档间切换,确认最…...

COMSOL多场耦合地应力平衡开挖与衬砌支护案例:带衬砌与钢衬支护的实践研究
COMSOL 地应力平衡后开挖及衬砌支护案例(带衬砌、钢衬)隧道开挖模拟最头疼的就是初始地应力场的平衡问题。前些天用COMSOL折腾了个带衬砌支护的案例,今天把关键步骤拆开说说。咱们直接从地应力平衡开始,到开挖后钢衬安装一气呵成。…...

Agent--多轮对话系统设计6道高频考题解析
去年面试某大厂AI岗位,多轮对话这块被追问了好几道题,有些问题当时答得磕磕绊绊,回来后我把相关知识点重新梳理了一遍。这次复盘把面试中遇到的核心问题分享出来,希望对准备面试的同学有点帮助。真题现场: 面试刚开始&…...

Sora走了,PixVerse V6来了!AI视频空间时间处理能力大增,延时拍摄、慢动作都能搞
西风 发自 凹非寺量子位 | 公众号 QbitAISora前脚刚被叫停,国内AI视频玩家后脚立刻续上新模型。这回不搞“能生成视频就行”那套了,直接给你整出感官级沉浸式体验。有多沉浸?一句话让你get电影《功夫小蝇》同款视角,小蜜蜂误闯人类…...

c语言基础实战:通过快马ai生成银行账户管理系统练手项目
今天想和大家分享一个用C语言实现的银行账户管理系统小项目。这个项目非常适合用来巩固C语言的基础知识,特别是结构体、指针和文件操作这些核心概念。我自己在学习过程中发现,通过实际项目练习,能更好地理解这些抽象的概念。 项目需求分析 …...

3分钟上手PCL2-CE:打造专属Minecraft启动环境的完整指南
3分钟上手PCL2-CE:打造专属Minecraft启动环境的完整指南 PCL2-CE社区版是一款开源游戏配置工具,致力于为Minecraft玩家提供高效、灵活的游戏环境管理方案。通过智能化配置和模块化设计,让玩家告别繁琐设置,轻松掌控游戏入口&…...

Linux下载加速:Qwen2.5-32B-Instruct优化方案
Linux下载加速:Qwen2.5-32B-Instruct优化方案 如果你经常在Linux系统上下载软件包、模型权重或者大型数据集,肯定遇到过下载速度慢、连接不稳定、甚至中途断掉需要重来的情况。特别是下载几十GB的大模型文件时,那种看着进度条半天不动的感觉…...