igh主站搭建过程(e1000e 网卡/ generic网卡)
1、下载igh源码
gary@jxes:~$ git clone https://gitlab.com/etherlab.org/ethercat.git
2、配置(可参考官方文档)
gary@jxes:~/Xenomai/xenomai-v3.2.1$ sudo cp …/…/ethercat/ . -r
gary@jxes:~/Xenomai/xenomai-v3.2.1/ethercat$ sudo ./bootstrap
- touch ChangeLog
- mkdir -p m4
- autoreconf -i
libtoolize: putting auxiliary files in AC_CONFIG_AUX_DIR, ‘autoconf’.
libtoolize: copying file ‘autoconf/ltmain.sh’
libtoolize: putting macros in AC_CONFIG_MACRO_DIRS, ‘m4’.
libtoolize: copying file ‘m4/libtool.m4’
libtoolize: copying file ‘m4/ltoptions.m4’
libtoolize: copying file ‘m4/ltsugar.m4’
libtoolize: copying file ‘m4/ltversion.m4’
libtoolize: copying file ‘m4/lt~obsolete.m4’
configure.ac:58: installing ‘autoconf/ar-lib’
configure.ac:57: installing ‘autoconf/compile’
configure.ac:61: installing ‘autoconf/config.guess’
configure.ac:61: installing ‘autoconf/config.sub’
configure.ac:42: installing ‘autoconf/install-sh’
configure.ac:42: installing ‘autoconf/missing’
examples/dc_user/Makefile.am: installing ‘autoconf/depcomp’
配置可以参考官方配置文档,比如–with-module-dir即指定内核源码路径,需要查看当前系统的module是什么:
gary@jxes:~/Xenomai/xenomai-v3.2.1/ethercat$ ls /lib/modules
5.13.0-30-generic 5.13.0-40-generic 5.13.0xenomai 5.15.0-60-generic 5.15.0-69-generic 5.15.106-xenomai3.2.1
下面是本人的配置,具体视情况而定:
gary@jxes:~/Xenomai/xenomai-v3.2.1/ethercat$ sudo ./configure --with-module-dir=/lib/modules/5.15.106-xenomai3.2.1 --enable-generic --enable-8139too=no --enable-e1000e --enable-cycles --enable-hrtimer --prefix=/opt/etherlab --with-xenomai-dir=/home/gary/Xenomai/xenomai-v3.2.1
如果在刚开始配置的时候没有动–prefix选项,默认是安装在/opt/下的,可以查看在/opt/路径下多了一个etherlab文件夹。
以上./configure执行失败如下:
checking for kernel for e1000e driver… configure: error: kernel 5.15 not available for e1000e driver!
原因是网卡与内核版本不匹配。
下载e100e网卡:
https://www.intel.cn/content/www/cn/zh/download/14611/15817/intel-network-adapter-driver-for-pcie-intel-gigabit-ethernet-network-connections-under-linux-final-release.html?
具体安装方法参考:
https://www.intel.cn/content/www/cn/zh/support/articles/000005480/ethernet-products.html
下载后编译安装,编译时遇到错误,是与内核版本匹配问题。
综合上面,这里只是演示下igh的源码编译,所以将e1000e网卡去掉。
sudo ./configure --with-module-dir=/lib/modules/5.15.106-xenomai3.2.1 --enable-generic --enable-8139too=no --enable-cycles --enable-hrtimer --prefix=/opt/etherlab --with-xenomai-dir=/home/gary/Xenomai/xenomai-v3.2.1
这样就配置成功,生成Makefile。
为了验证,于是重新下载了版本igh(带有E100E网卡):
https://gitlab.com/etherlab.org/ethercat/-/tree/e1000e-5.10?ref_type=heads
步骤与上面一样:
gary@jxes:~/Xenomai/xenomai-v3.2.1$ sudo cp ~/Downloads/ethercat-e1000e-5.10 . -r
gary@jxes:~/Xenomai/xenomai-v3.2.1$ cd ethercat-e1000e-5.10/
gary@jxes:~/Xenomai/xenomai-v3.2.1/ethercat-e1000e-5.10$ sudo ./bootstrap
- touch ChangeLog
- mkdir -p m4
- autoreconf -i
libtoolize: putting auxiliary files in AC_CONFIG_AUX_DIR, ‘autoconf’.
libtoolize: copying file ‘autoconf/ltmain.sh’
libtoolize: putting macros in AC_CONFIG_MACRO_DIRS, ‘m4’.
libtoolize: copying file ‘m4/libtool.m4’
libtoolize: copying file ‘m4/ltoptions.m4’
libtoolize: copying file ‘m4/ltsugar.m4’
libtoolize: copying file ‘m4/ltversion.m4’
libtoolize: copying file ‘m4/lt~obsolete.m4’
configure.ac:58: installing ‘autoconf/ar-lib’
configure.ac:57: installing ‘autoconf/compile’
configure.ac:60: installing ‘autoconf/config.guess’
configure.ac:60: installing ‘autoconf/config.sub’
configure.ac:44: installing ‘autoconf/install-sh’
configure.ac:44: installing ‘autoconf/missing’
examples/dc_user/Makefile.am: installing ‘autoconf/depcomp’
gary@jxes:~/Xenomai/xenomai-v3.2.1/ethercat-e1000e-5.10$ sudo ./configure --with-module-dir=/lib/modules/5.15.106-xenomai3.2.1 --enable-generic --enable-8139too=no --enable-e1000e --enable-cycles --enable-hrtimer --prefix=/opt/etherlab --with-xenomai-dir=/home/gary/Xenomai/xenomai-v3.2.1
这样配置还是失败,原来还是内核不匹配,从igh官网下载带e1000e网卡可知,它适配的是5.10内核,所以目前只能作罢,需要重新制一个基于linux5.10版本的内核,编译时间太久了(电脑有点肉),于是乎,只得放弃e1000e网卡的使用。
经验告诉我,制作xenomai实时系统+开源ethercat,需要事先将各软件版本的对应关系搞清楚,否则中途会像我上面一样。
3、编译
gary@jxes:~/Xenomai/xenomai-v3.2.1/ethercat$ sudo make #编译
gary@jxes:~/Xenomai/xenomai-v3.2.1/ethercat$ sudo make modules #编译模块
gary@jxes:~/Xenomai/xenomai-v3.2.1/ethercat$ sudo make install #安装
gary@jxes:~/Xenomai/xenomai-v3.2.1/ethercat$ sudo make modules_install #安装模块
最终在安装目录有如下内容:
gary@jxes:~/Xenomai/xenomai-v3.2.1/ethercat-e1000e-5.10$ ls /opt/etherlab/
bin etc include lib sbin share
gary@jxes:~/Xenomai/xenomai-v3.2.1/ethercat-e1000e-5.10$ sudo cp /opt/etherlab/etc/sysconfig/ethercat /etc/sysconfig/
gary@jxes:~/Xenomai/xenomai-v3.2.1/ethercat-e1000e-5.10$ sudo cp /opt/etherlab/etc/init.d/ethercat /etc/init.d/
gary@jxes:~/Xenomai/xenomai-v3.2.1/ethercat-e1000e-5.10$ ls /opt/etherlab/bin/
ethercat
gary@jxes:~/Xenomai/xenomai-v3.2.1/ethercat-e1000e-5.10$ ls /opt/etherlab/etc/
ethercat.conf init.d sysconfig
gary@jxes:~/Xenomai/xenomai-v3.2.1/ethercat-e1000e-5.10$ ls /opt/etherlab/etc/init.d/
ethercat
gary@jxes:~/Xenomai/xenomai-v3.2.1/ethercat-e1000e-5.10$ ls /opt/etherlab/etc/sysconfig/
ethercat
gary@jxes:~/Xenomai/xenomai-v3.2.1/ethercat-e1000e-5.10$ ls /opt/etherlab/lib/
cmake libethercat.a libethercat.la libethercat.so libethercat.so.1 libethercat.so.1.1.0 pkgconfig
gary@jxes:~/Xenomai/xenomai-v3.2.1/ethercat-e1000e-5.10$ ls /opt/etherlab/sbin/
ethercatctl
gary@jxes:~/Xenomai/xenomai-v3.2.1/ethercat-e1000e-5.10$ ls /opt/etherlab/share/
bash-completion
gary@jxes:~/Xenomai/xenomai-v3.2.1/ethercat-e1000e-5.10$ ls /opt/etherlab/share/bash-completion/
completions
gary@jxes:~/Xenomai/xenomai-v3.2.1/ethercat-e1000e-5.10$ ls /opt/etherlab/share/bash-completion/completions/
ethercat
gary@jxes:~/Xenomai/xenomai-v3.2.1/ethercat-e1000e-5.10$
4、配置
sudo mkdir /etc/sysconfig #创建文件夹
sudo cp /opt/etherlab/etc/sysconfig/ethercat /etc/sysconfig/ #复制配置文件
sudo cp /opt/etherlab/etc/init.d/ethercat /etc/init.d/ #复制启动脚本
sudo chmod a+x /etc/init.d/ethercat
sudo update-rc.d ethercat defaults
使能
sudo ln -s /opt/etherlab/bin/ethercat /usr/local/bin/ethercat
配置用户权限
sudo gedit /etc/udev/rules.d/99-EtherCAT.rules
输入下列内容
KERNEL==“EtherCAT[0-9]*”, MODE=“0664”, GROUP=“users”
把相关模块放进系统目录,如果使用通用网卡是这样的
sudo cp devices/ec_generic.ko /lib/modules/ ( u n a m e − r ) s u d o c p m a s t e r / e c m a s t e r . k o / l i b / m o d u l e s / (uname -r) sudo cp master/ec_master.ko /lib/modules/ (uname−r)sudocpmaster/ecmaster.ko/lib/modules/(uname -r)
这边用的是专用网卡
sudo cp devices/e1000e/ec_e1000e.ko /lib/modules/ ( u n a m e − r ) s u d o c p m a s t e r / e c m a s t e r . k o / l i b / m o d u l e s / (uname -r) sudo cp master/ec_master.ko /lib/modules/ (uname−r)sudocpmaster/ecmaster.ko/lib/modules/(uname -r)
执行
sudo depmod
查看网卡MAC地址和类型
ifconfig
得到ethercat通信的地址为
enp3s0: flags=4163<UP,BROADCAST,RUNNING,MULTICAST> mtu 1500
inet6 fe80::fbe:4e35:95d4:4056 prefixlen 64 scopeid 0x20
ether 00:e8:4c:68:30:de txqueuelen 1000 (Ethernet)
RX packets 0 bytes 0 (0.0 B)
RX errors 0 dropped 0 overruns 0 frame 0
TX packets 19 bytes 3183 (3.1 KB)
TX errors 0 dropped 0 overruns 0 carrier 0 collisions 0
device interrupt 19 memory 0xf7d00000-f7d20000
配置网卡
sudo gedit /etc/sysconfig/ethercat
在大约27行和60行处填入自己的网卡信息
MASTER0_DEVICE=“00:e8:4c:68:30:de” # mac 地址
DEVICE_MODULES=“e1000e” # 通用网卡填generic
启动主站
sudo /etc/init.d/ethercat start
这里只能用通用网卡演示:(e1000e网卡不存在)
gary@jxes:~/Xenomai/xenomai-v3.2.1/ethercat-e1000e-5.10$ sudo /etc/init.d/ethercat start
Starting EtherCAT master 1.5.2 done
主站启动成功表示安装成功。
查看帮助 或者 pdo信息
ethercat 工具可以用帮助查看如下:
gary@jxes:~/Xenomai/xenomai-v3.2.1/ethercat-e1000e-5.10$ sudo ethercat --h
Usage: ethercat [OPTIONS] [ARGUMENTS]
Commands (can be abbreviated):
alias Write alias addresses.
config Show slave configurations.
crc CRC error register diagnosis.
cstruct Generate slave PDO information in C language.
data Output binary domain process data.
debug Set the master’s debug level.
domains Show configured domains.
download Write an SDO entry to a slave.
eoe Display Ethernet over EtherCAT statictics.
foe_read Read a file from a slave via FoE.
foe_write Store a file on a slave via FoE.
graph Output the bus topology as a graph.
master Show master and Ethernet device information.
pdos List Sync managers, PDO assignment and mapping.
reg_read Output a slave’s register contents.
reg_write Write data to a slave’s registers.
rescan Rescan the bus.
sdos List SDO dictionaries.
sii_read Output a slave’s SII contents.
sii_write Write SII contents to a slave.
slaves Display slaves on the bus.
soe_read Read an SoE IDN from a slave.
soe_write Write an SoE IDN to a slave.
states Request application-layer states.
upload Read an SDO entry from a slave.
version Show version information.
xml Generate slave information XML.
Global options:
–master -m Comma separated list of masters
to select, ranges are allowed.
Examples: ‘1,3’, ‘5-7,9’, ‘-3’.
Default: ‘-’ (all).
–force -f Force a command.
–quiet -q Output less information.
–verbose -v Output more information.
–help -h Show this help.
Numerical values can be specified either with decimal (no
prefix), octal (prefix ‘0’) or hexadecimal (prefix ‘0x’) base.
Call ‘ethercat --help’ for command-specific help.
Send bug reports to fp@igh-essen.com.
gary@jxes:~/Xenomai/xenomai-v3.2.1/ethercat-e1000e-5.10$ ethercat pdos
这里没有接任何ethercat设备,所以查看不到。
5、让应用程序可以使用到ethercat库
确认ethercat没有问题后,配置系统,让应用程序可以使用 /opt/etherlab/lib 到你的 /etc/ld.so.conf(/opt/ethercatlab前缀实在前面配置ethercat是选定的,默认是/opt/ethercatlab)
sudo gedit /etc/ld.so.conf
添加
/opt/etherlab/lib
执行
sudo ldconfig
测试是否安装,若成功,最后一行会显示 libethercat.so.1 -> libethercat.so.1.1.0
sudo ldconfig -v | grep libether*
gary@jxes:~/Xenomai/xenomai-v3.2.1/ethercat-e1000e-5.10$ sudo ldconfig -v | grep libether*
/sbin/ldconfig.real: Can’t stat /usr/local/lib/x86_64-linux-gnu: No such file or directory
/sbin/ldconfig.real: Path /usr/lib/x86_64-linux-gnu' given more than once /sbin/ldconfig.real: Path /usr/lib32’ given more than once
/sbin/ldconfig.real: Path /usr/libx32' given more than once /sbin/ldconfig.real: Path /lib/x86_64-linux-gnu’ given more than once
/sbin/ldconfig.real: Path /usr/lib/x86_64-linux-gnu' given more than once /sbin/ldconfig.real: Path /usr/lib’ given more than once
/sbin/ldconfig.real: /lib/x86_64-linux-gnu/ld-2.31.so is the dynamic linker, ignoring
/sbin/ldconfig.real: /lib32/ld-2.31.so is the dynamic linker, ignoring
libethercat.so.1 -> libethercat.so.1.1.0
gary@jxes:~/Xenomai/xenomai-v3.2.1/ethercat-e1000e-5.10$
=======================================================
重新制作基于通用网卡的Igh主站,其实前面第一次下载的ethercat默认就是通用网卡的,
编译过程同上。因为目前没有实时环境和ethercat设备,所以下面这个基于通用网卡的主站比较适合我。
git clone http://gitlab.com/etherlab.org/ethercat.git
cd ethercat/
./bootstrap
./configure --enable-8139too=no
sudo make
sudo make modules
sudo make install
sudo make modules_install
ifconfig
cd /opt/etherlab
sudo cp etc/sysconfig/ethercat /etc/sysconfig/
sudo ln -s /opt/etherlab/etc/init.d/ethercat /etc/init.d/
sudo gedit /etc/sysconfig/ethercat
MASTER0_DEVICE=“08:00:27:7c:5d:e8”
DEVICE_MODULES=“generic”
gedit ~/.bashrc
PATH=$PATH:/opt/etherlab/bin
source ~/.bashrc
sudo depmod
gary@jxes:/opt/etherlab$ sudo ethercat slave
Failed to obtain number of masters: ioctl() version magic is differing: /dev/EtherCAT0: 30, ethercat tool: 37
主站编译安装配置完成后,需要重启ubuntu就OK了。
在下次启动ubuntu时,扫描不到网卡:
gary@jxes:~$ ethercat slave
Failed to obtain number of masters: Failed to open master device /dev/EtherCAT0: No such file or directory
需要启动ethercat主站:
gary@jxes:~$ sudo /etc/init.d/ethercat start
[sudo] password for gary:
Starting EtherCAT master 1.5.2 done
gary@jxes:~$ ls /dev/EtherCAT0
/dev/EtherCAT0
gary@jxes:~$
gary@jxes:~$ ethercat slave
gary@jxes:~$ sudo ethercat slaves
[sudo] password for gary:
gary@jxes:~$ ls /dev/EtherCAT0
/dev/EtherCAT0
gary@jxes:~$ sudo ethercat slave
gary@jxes:~$
相关文章:
)
igh主站搭建过程(e1000e 网卡/ generic网卡)
1、下载igh源码 garyjxes:~$ git clone https://gitlab.com/etherlab.org/ethercat.git 2、配置(可参考官方文档) garyjxes:~/Xenomai/xenomai-v3.2.1$ sudo cp …/…/ethercat/ . -r garyjxes:~/Xenomai/xenomai-v3.2.1/ethercat$ sudo ./bootstrap to…...

K8S第一讲 Kubernetes之Secret详解
Secret详解 secret用来保存小片敏感数据的k8s资源,例如密码,token,或者秘钥。这类数据当然也可以存放在Pod或者镜像中,但是放在Secret中是为了更方便的控制如何使用数据,并减少暴露的风险。 用户可以创建自己的secre…...

每周一算法:高精度减法
高精度减法 高精度减法是采用模拟算法对上百位甚至更多位的整数进行减法运算,其基本思想是模拟竖式计算,一般分为下面几步: 首先,使用数组存储大整数的每一个位然后,判断被减数和减数的大小关系: 如果被减数大于等于减数,结果为非负数,直接计算差否则,结果为负数,先…...
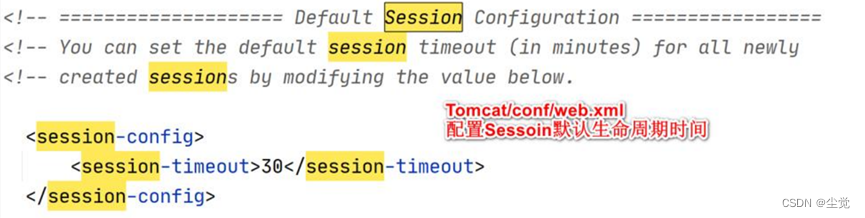
Session使用和原理分析图与实现原理-- 代码演示说明 Session 的生命周期和读取的机制代码分析
目录 Web 开发会话技术 -Session —session 技术 session 基本原理 Session 可以做什么 如何理解 Session Session 的基本使用 session 底层实现机制 原理分析图 代码演示 CreateSession.java 测试 Session 创的机制, 注意抓包分析编辑 ReadSession.j…...

在win10系统中安装anaconda
1、 Anaconda的下载 你可以根据你的操作系统是32位还是64位选择对应的版本到官网下载,但是官网下载龟速。 建议到清华大学镜像站下载 :Index of /anaconda/archive/ | 清华大学开源软件镜像站 | Tsinghua Open Source MirrorIndex of /anaconda/archiv…...
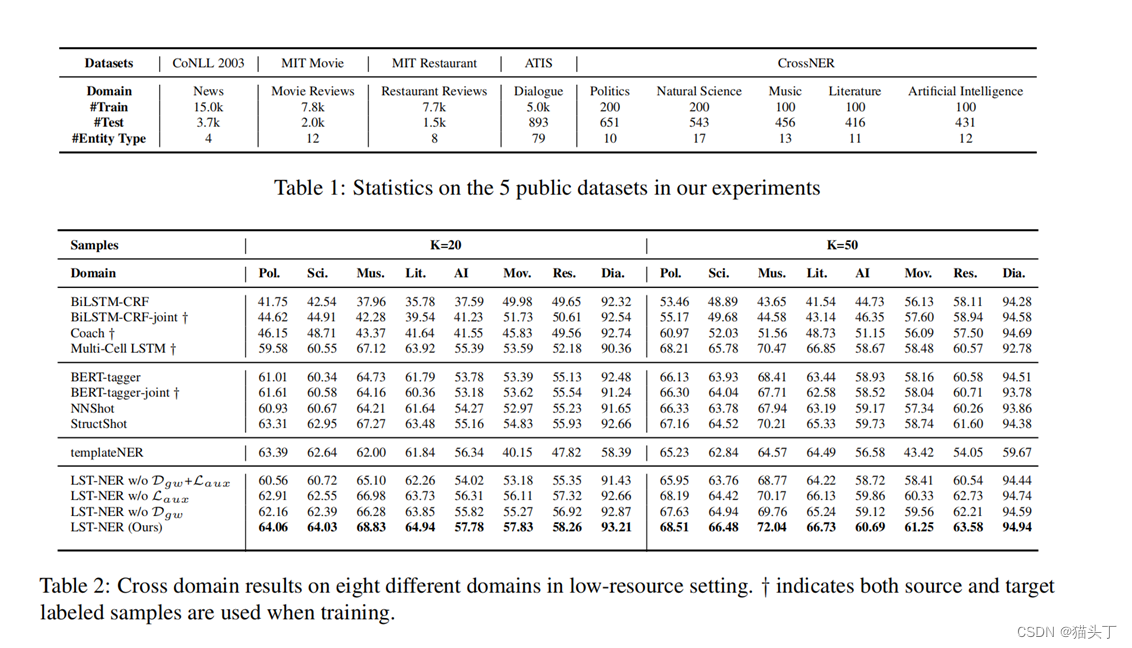
【菜鸡读论文】Cross-domain Named Entity Recognition via Graph Matching
【菜鸡读论文】Cross-domain Named Entity Recognition via Graph Matching 最近到了研一下学期,很多身边的同学也开始有了成果,但本菜鸡一点成果都没有【大哭】所以也没什么好写的。虽然菜鸡口头上不说,但内心也感受到非常之焦虑。最近读论…...

代码随想录算法训练营第三十五天|860.柠檬水找零、406.根据身高重建队列、452. 用最少数量的箭引爆气球
文章目录 860.柠檬水找零406.根据身高重建队列452. 用最少数量的箭引爆气球:star: 860.柠檬水找零 链接:代码随想录 5美元相当滴珍贵 解题思路: 情况一:账单是5,直接收下。 情况二:账单是10,消耗一个5,增加…...

爬虫为什么需要多线程
多线程爬虫是一种同时运行多个线程来提高爬取速度的爬虫方式。通过将大量的工作分配给不同的线程,可以减少爬虫的运行时间,提高效率。不过需要注意的是,在爬取过程中需要合理的管理线程数,以避免对被爬取的网站造成过大的负荷。 …...

下一代智能座舱风口下,“超级”Tier 1强势崛起
智能座舱进入全新周期,强者愈强的趋势会快速显现。 可以观察到,智能座舱功能日趋多元化。从多屏互动到舱内全场景多元交互,到更多娱乐平台的上线,智能座舱已经从最初的重多功能转变成重体验。 从架构层面来看,各个功…...
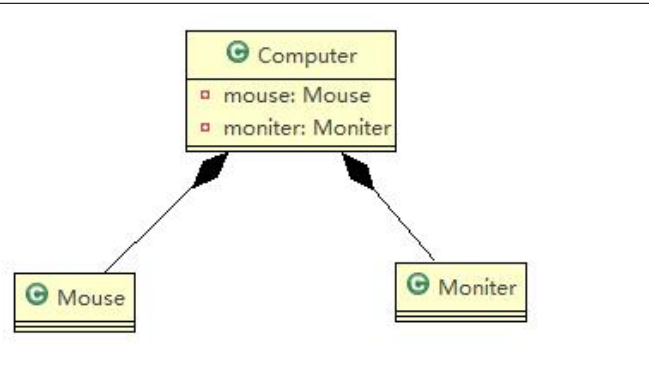
第 三 章 UML 类图
文章目录 前言一、依赖关系(虚线箭头)二、泛化关系:继承(实线空心箭头)三、实现关系(虚线空心箭头)四、关联关系(一对一为实线箭头,一对多为实线)五、聚合关系…...
java版工程项目管理系统 Spring Cloud+Spring Boot+Mybatis+Vue+ElementUI+前后端分离 功能清单
Java版工程项目管理系统 Spring CloudSpring BootMybatisVueElementUI前后端分离 功能清单如下: 首页 工作台:待办工作、消息通知、预警信息,点击可进入相应的列表 项目进度图表:选择(总体或单个)项目显示…...
内网穿透实现在外远程连接RabbitMQ服务
文章目录 前言1.安装erlang 语言2.安装rabbitMQ3. 内网穿透3.1 安装cpolar内网穿透(支持一键自动安装脚本)3.2 创建HTTP隧道 4. 公网远程连接5.固定公网TCP地址5.1 保留一个固定的公网TCP端口地址5.2 配置固定公网TCP端口地址 转载自远控源码文章:无公网IPÿ…...

抖音数字人主播app
抖音数字人主播app是指一款利用计算机生成的虚拟数字人,在抖音平台上进行实时音视频传输和互动的应用程序。该软件可以让用户创建自己的虚拟数字人,并在抖音平台上进行实时互动和交流。 抖音数字人主播app通常需要包含以下功能: 3D建…...

亚马逊平台使用API接口通过关键字搜索商品
亚马逊公司(Amazon,简称亚马逊;NASDAQ:AMZN),2022年营收为5140亿美元, 是美国最大的一家网络电子商务公司,位于华盛顿州的西雅图。是网络上最早开始经营电子商务的公司之一ÿ…...

《花雕学AI》用ChatGPT创造猫娘角色:人工智能角色扮演聊天对话的风险与对策
出于好奇心,我以“ChatGPT,调教猫娘”为题,开始了解ChatGPT角色扮演提示语的用法。ChatGPT给出的介绍是,调教猫娘是一种利用ChatGPT的角色扮演功能,让模型模仿一种类似猫的拟人化生物的行为和语言的活动,并…...
软件测试常规测试过程模型——V模型与X模型
一、V模型简单介绍及讲解 V模型是软件测试过程模型中最广为人知的模型,尽管很多富有实际经验的测试人员还是不太熟悉V模型,或者其它的模型。V模型中的过程从左到右,描述了基本的开发过程和测试行为。V模型的价值在于它非常明确地标明了测试过…...

feign-starter
使用说明 功能 自动装配 设置客户端不主动重试日志打印客户端负载均衡json 转换使用 JacksonUtil 如何引入 com.hete.support xx-feign-starter 如何配置 超时时间 ⚠️ 默认值比较大,需要手动根据实际场景设置 feign: client: config: # 默认配置,…...

FVM初启,Filecoin生态爆发着力点在哪?
Filecoin 小高潮 2023年初,Filecoin发文分享了今年的三项重大变更,分别是FVM、数据计算和检索市场的更新,这些更新消息在发布后迅速吸引了市场的广泛关注。 特别是在3月14日,Filecoin正式推出了FVM,这一变革使得Filec…...

对比度亮度调整与通道分离合并
对比度亮度调整与通道分离合并 对比度亮度调整: 1)原理介绍: g’ g * Mult Add ⚫ g 表示原图像像素 ⚫ g’ 表示输出图像像素 ⚫ Mult 被称为增益(gain), 通常用来控制图像的对比度 ⚫ Add 通常被称为偏置(bias), 通常用来控制图像的亮度 g’(i,j) Mult * g(i,j) Add …...

Java终止线程
1、正常运行结束 程序运行结束,线程自动结束。 2、使用stop方法强制终止 不安全,不建议使用: 调用 stop() 方法会立刻停止 run() 方法中剩余的全部任务,包括在 catch 或 finally 语句中的,并抛出ThreadDeath异常&a…...

26-cv-2777、26-cv-2964、26-cv-3022、26-cv-3949、26-cv-4062、26-cv-5488 Winnie Rosaline Kan 版权画维权!
案号:26-cv-2777、26-cv-2964、26-cv-3022、26-cv-3949、26-cv-4062、26-cv-5488原告品牌:Winnie Rosaline Kan 版权画品牌方:Casetagram Limited起诉地:美国伊利诺伊州代理律所:Keith起诉时间:2026年03月1…...

SAP 报SNAP_NO_NEW_ENTY错误【DB2 LOGSECOND参数】
1、在AI的指导下,备份并删除sapprd.snap db2 > create table sapqas.snap_bak_20250101 as (select * from sapqas.snap) with data; DB21034E The command was processed as an SQL statement because it was not a valid Command Line Processor command. D…...
)
达达主义AI艺术正在消失?深度起底平台内容审核算法对“无意义美学”的误判逻辑(含绕过策略与伦理边界声明)
更多请点击: https://intelliparadigm.com 第一章:达达主义AI艺术正在消失? 达达主义以反逻辑、反美学、拥抱偶然性为内核,而当代AI艺术生成工具却日益依赖确定性提示词工程、风格迁移约束与商业审美对齐——这种张力正悄然消解达…...

告别‘不是内部或外部命令’:手把手配置MsBuild.exe环境变量与命令行编译实战
1. 为什么命令行找不到MsBuild.exe? 刚装完系统或者新配置开发环境时,很多朋友都会遇到这个经典错误:在命令行输入msbuild后,系统提示"不是内部或外部命令"。这就像你拿着钥匙却找不到锁孔一样让人抓狂。其实这个问题90…...

学妹问降AI率工具选哪个性价比最高?4款降AI软件1万字花多少过AIGC检测
学妹问降AI率工具选哪个性价比最高?4款降AI软件1万字花多少过AIGC检测 学妹的具体问题 3 月 23 号晚上学妹问我:「学姐我送知网测了 AI 率 65%——市面降 AI 工具一堆我怎么选性价比最高的?预算 300 元以内」。 「性价比最高」是用户最常问…...
)
保姆级教程:用PyTorch复现DLA-34分割模型(含可变形卷积版DLAseg)
深度解析DLA-34分割模型:从理论到PyTorch实战 在计算机视觉领域,特征融合一直是提升模型性能的关键技术。Deep Layer Aggregation(DLA)作为CVPR 2018提出的创新架构,通过独特的树状连接机制实现了跨层级的深度特征融合…...

Linux系统变更追踪工具whatdiditdo:实现文件级监控与审计
1. 项目概述:一个追踪系统变更的“时光机”最近在排查一个线上服务故障,问题最终定位到是某个依赖库在几天前的一次静默升级上。为了搞清楚到底是谁、在什么时候、改了什么东西,我不得不翻遍了近一周的服务器操作日志、CI/CD流水线记录和版本…...

cliclick 开发者指南:从源码编译到自定义Action开发
cliclick 开发者指南:从源码编译到自定义Action开发 【免费下载链接】cliclick macOS CLI tool for emulating mouse and keyboard events 项目地址: https://gitcode.com/gh_mirrors/cl/cliclick cliclick 是一款强大的 macOS 命令行工具,用于模…...

Go语言模板方法模式:算法骨架
Go语言模板方法模式:算法骨架 1. 模板方法实现 type AbstractClass struct{}func (a *AbstractClass) TemplateMethod() {a.Step1()a.Step2()a.Step3() }func (a *AbstractClass) Step1() {} func (a *AbstractClass) Step2() {} func (a *AbstractClass) Step3() {…...

吃透护网面试!HVV 行动全套面试题目及答案,网安新人入门进阶必备
本文全面整理网络安全面试题,涵盖HVV、OWASP Top 10漏洞原理与修复方法。详细讲解内网渗透技术、权限维持方法、Windows/Linux系统提权技巧,以及渗透测试流程和应急响应策略。还包含红蓝对抗概念、漏洞挖掘经验、常见中间件漏洞和安全基础知识࿰…...