Android InputChannel事件发送接收系统分析
本文基于Android12。
InputChannel表示其他进程通过文件描述符传递输入事件到View的通道,因为需要跨进程传输,实现了Parcelable序列化接口,所以也能够理解Java层的InputChannel后面为什么使用copyTo()方法初始化。
输入事件的接收方是View,所以InputChannel的创建肯定和View的创建流程有关,关于View的创建流程参考:https://blog.csdn.net/qq_36063677/article/details/129908973。
一、InputChannel初始化
ViewRootImpl在setView()方法实例化了Java层的InputChannle对象,但是正如ViewRootImpl创建的mSurface对象一样,这只是一个引用,一个“空的”对象,后续在WindowManagerService经过实际的初始化,再通过copyTo()方法拷贝到InputChannel引用中。
// ViewRootImpl.javapublic void setView(View view, WindowManager.LayoutParams attrs, View panelParentView,int userId) {// 1.创建 inputChannel引用。InputChannel inputChannel = null;if ((mWindowAttributes.inputFeatures& WindowManager.LayoutParams.INPUT_FEATURE_NO_INPUT_CHANNEL) == 0) {inputChannel = new InputChannel();}// 2.传递引用给mWindowSession,inputChannel在WMS中被初始化,并通过copyTo()全拷贝到inputChannel引用。res = mWindowSession.addToDisplayAsUser(mWindow, mWindowAttributes,getHostVisibility(), mDisplay.getDisplayId(), userId,mInsetsController.getRequestedVisibilities(), inputChannel, mTempInsets,mTempControls, attachedFrame, sizeCompatScale);// 3.通过inputChannel创建WindowInputEventReceiver对象,接收处理输入事件。ALOOPER_EVENT_INPUTif (inputChannel != null) {mInputEventReceiver = new WindowInputEventReceiver(inputChannel,Looper.myLooper());}}
setView()方法中关于InputChannel的操作主要有3步:
- 创建 inputChannel引用。就是实例化InputChannel引用,InputChannel构造方法是个空方法,所以什么实际操作都没有做。
- 传递引用给mWindowSession,inputChannel在WMS中被初始化,并通过copyTo()全拷贝到inputChannel引用。
- 通过inputChannel创建WindowInputEventReceiver对象,接收处理输入事件。
我们从第2步开始分析。
1.1 openInputChannle
mWindowSession将inputChannel引用传递给WMS.addWindow()方法:
// WindowManagerService.java public int addWindow(Session session, IWindow client, LayoutParams attrs, int viewVisibility,int displayId, int requestUserId, InsetsVisibilities requestedVisibilities,InputChannel outInputChannel, InsetsState outInsetsState,InsetsSourceControl[] outActiveControls, Rect outAttachedFrame,float[] outSizeCompatScale) {final WindowState win = new WindowState(this, session, client, token, parentWindow,appOp[0], attrs, viewVisibility, session.mUid, userId,session.mCanAddInternalSystemWindow);final boolean openInputChannels = (outInputChannel != null&& (attrs.inputFeatures & INPUT_FEATURE_NO_INPUT_CHANNEL) == 0);if (openInputChannels) {win.openInputChannel(outInputChannel);}}
addWindow()创建了WindowState对象,调用其openInputChannel(outInputChannel)方法。
// WindowState.java void openInputChannel(InputChannel outInputChannel) {if (mInputChannel != null) {String name = getName();mInputChannel = mWmService.mInputManager.createInputChannel(name);if (outInputChannel != null) {mInputChannel.copyTo(outInputChannel);}}}
WindowState通过InputMangerService创建InputChannel,经过NativeInputManagerService类的native方法createInputChannel(name),最终到InputDispatcher::createInputChannel(name)方法实际创建。
1.1.1 InputDispatcher::createInputChannel
// InputDispatcher.h // All registered connections mapped by input channel token.std::unordered_map<sp<IBinder>, sp<Connection>, StrongPointerHash<IBinder>> mConnectionsByTokenGUARDED_BY(mLock);// InputDispatcher.cppResult<std::unique_ptr<InputChannel>> InputDispatcher::createInputChannel(const std::string& name) {std::unique_ptr<InputChannel> serverChannel;std::unique_ptr<InputChannel> clientChannel;// 1.通过CPP层的InputChannel创建serverChannel,clientChannelstatus_t result = InputChannel::openInputChannelPair(name, serverChannel, clientChannel);{std::scoped_lock _l(mLock);const sp<IBinder>& token = serverChannel->getConnectionToken();// 2.得到serverChannel的文件描述符 fdint fd = serverChannel->getFd();// 3.将connection对象添加到 mConnectionsByToken管理sp<Connection> connection =new Connection(std::move(serverChannel), false /*monitor*/, mIdGenerator);mConnectionsByToken.emplace(token, connection);std::function<int(int events)> callback = std::bind(&InputDispatcher::handleReceiveCallback,this, std::placeholders::_1, token);mGlobalMonitorsByDisplay[displayId].emplace_back(serverChannel, pid);// 4.监听serverChannel的文件描述符 fd,当有事件发生时,回调callbackmLooper->addFd(fd, 0, ALOOPER_EVENT_INPUT, new LooperEventCallback(callback), nullptr);}// 5.唤醒mLoopermLooper->wake();return clientChannel;}
InputDispatcher主要做了5件事:
- 通过CPP层的InputChannel创建serverChannel,clientChannel,最后返回clientChannel给Java层的InputChannel,到这里Java层InputChannel才被初始化完成,返回创建WindowInputEventReceiver对象。
- 得到serverChannel的文件描述符 fd。
- 将connection对象添加到 mConnectionsByToken管理,mConnectionsByToken定义在InputDispatcher.h文件,管理所有连接的InputChannel对象,map的key是token,又是使用Binder对象作为token。inputflinger文章中(https://blog.csdn.net/qq_36063677/article/details/130475299)4.3.3小节InputDispatcher在分发事件时就是通过这个mConnectionsByToken获取到具体的connection,发送事件。
- 监听serverChannel的文件描述符 fd,ALOOPER_EVENT_INPUT表示为要监听的文件类型,当有事件发生时,回调callback方法handleEvent(),也就是InputDispatcher::handleReceiveCallback()。LooperEventCallback继承了LooperCallback类,LooperCallback是Looper监听文件描述符回调方法的标准类,当文件描述符fd上有事件到来时,LooperCallback的handleEvent()方法会被执行,关于Looper->addFd()更多细节参考:https://blog.csdn.net/chwan_gogogo/article/details/46953563
- 唤醒mLooper,mLooper在InputDispatcher构造方法中被初始化,mLooper = new Looper(false);。
查看cpp层InputChannel::openInputChannelPair()具体细节:
1.1.2 InputChannel::openInputChannelPair
// InputTransport.cppstatus_t InputChannel::openInputChannelPair(const std::string& name,std::unique_ptr<InputChannel>& outServerChannel,std::unique_ptr<InputChannel>& outClientChannel) {int sockets[2];if (socketpair(AF_UNIX, SOCK_SEQPACKET, 0, sockets)) {outServerChannel.clear();outClientChannel.clear();return result;}int bufferSize = SOCKET_BUFFER_SIZE;setsockopt(sockets[0], SOL_SOCKET, SO_SNDBUF, &bufferSize, sizeof(bufferSize));setsockopt(sockets[0], SOL_SOCKET, SO_RCVBUF, &bufferSize, sizeof(bufferSize));setsockopt(sockets[1], SOL_SOCKET, SO_SNDBUF, &bufferSize, sizeof(bufferSize));setsockopt(sockets[1], SOL_SOCKET, SO_RCVBUF, &bufferSize, sizeof(bufferSize));sp<IBinder> token = new BBinder();std::string serverChannelName = name + " (server)";android::base::unique_fd serverFd(sockets[0]);outServerChannel = InputChannel::create(serverChannelName, std::move(serverFd), token);std::string clientChannelName = name + " (client)";android::base::unique_fd clientFd(sockets[1]);outClientChannel = InputChannel::create(clientChannelName, std::move(clientFd), token);return OK;}std::unique_ptr<InputChannel> InputChannel::create(const std::string& name,android::base::unique_fd fd, sp<IBinder> token) {const int result = fcntl(fd, F_SETFL, O_NONBLOCK);return std::unique_ptr<InputChannel>(new InputChannel(name, std::move(fd), token));}InputChannel::InputChannel(const std::string name, android::base::unique_fd fd, sp<IBinder> token): mName(std::move(name)), mFd(std::move(fd)), mToken(std::move(token)) {}
- InputChannel使用socket通信,openInputChannelPair()方法创建两个socke对象,一个client,一个server。socketpair()函数用于创建一对无名的、相互连接的套接子。如果函数成功,则返回0,创建好的套接字分别是sv[0]和sv[1],所以outServerChannel和outClientChannel这两个socket在创建的时候就是相互连接的,之后只需要在各自的fd中通过send()发送数据就好。
- setsockopt()设置socket属性,在<sys/socket.h>头文件中声明,实例化一个BBinder()对象作为token使用,这里outServerChannel和outClientChannel都使用的是同一个token。
- InputChannel::create()通过fcntl()设置socket为非阻塞类型,fcntl()方法可以改变已打开的文件性质。
- 封装InputChannel对象。
InputChannel初始化过程终于结束了,那么1.1.1小节中mLooper监听的serverChannel的文件描述符 fd什么时候会触发呢?
答案在上一篇inputflinger文章中(https://blog.csdn.net/qq_36063677/article/details/130475299)4.3.3小节。
二、InputChannel发送事件
InputDispatcher在接收到事件后,InputDispatcher::dispatchEventLocked()从mConnectionsByToken变量中通过token获取到Connection对象,最终在4.3.4.2 小节startDispatchCycleLocked()方法调用
connection->inputPublisher.publishMotionEvent()发送输入事件,这里还是以Motion事件为例:
// InputTransport.cppstatus_t InputPublisher::publishMotionEvent(uint32_t seq, int32_t eventId, int32_t deviceId, int32_t source, int32_t displayId,std::array<uint8_t, 32> hmac, int32_t action, int32_t actionButton, int32_t flags,int32_t edgeFlags, int32_t metaState, int32_t buttonState,MotionClassification classification, const ui::Transform& transform, float xPrecision,float yPrecision, float xCursorPosition, float yCursorPosition,const ui::Transform& rawTransform, nsecs_t downTime, nsecs_t eventTime,uint32_t pointerCount, const PointerProperties* pointerProperties,const PointerCoords* pointerCoords) {InputMessage msg;msg.header.type = InputMessage::Type::MOTION;msg.header.seq = seq;msg.body.motion.eventId = eventId;msg.body.motion.deviceId = deviceId;msg.body.motion.source = source;//.......return mChannel->sendMessage(&msg);}
mChannel是之前创建的InputChannel对象serverChannel,查看sendMessage(&msg)方法:
// InputTransport.cppstatus_t InputChannel::sendMessage(const InputMessage* msg) {const size_t msgLength = msg->size();InputMessage cleanMsg;msg->getSanitizedCopy(&cleanMsg);ssize_t nWrite;do {nWrite = ::send(getFd(), &cleanMsg, msgLength, MSG_DONTWAIT | MSG_NOSIGNAL);} while (nWrite == -1 && errno == EINTR);return OK;}
调用socket的send()函数发送数据。
至此输入事件通过socket发送出去了,InputDispatcher执行回调LooperEventCallback,那么事件又是如何被接收的呢?
三、InputEventReceiver
ViewRootImpl在setView()方法实例化InputChannel后,作为参数初始化WindowInputEventReceiver对象,WindowInputEventReceiver继承InputEventReceiver类。
3.1 WindowInputEventReceiver
WindowInputEventReceiver也在ViewRootImpl中定义:
// ViewRootImpl.javafinal class WindowInputEventReceiver extends InputEventReceiver {public WindowInputEventReceiver(InputChannel inputChannel, Looper looper) {super(inputChannel, looper);} @Overridepublic void onInputEvent(InputEvent event) {Trace.traceBegin(Trace.TRACE_TAG_VIEW, "processInputEventForCompatibility");List<InputEvent> processedEvents;try {processedEvents =mInputCompatProcessor.processInputEventForCompatibility(event);} finally {Trace.traceEnd(Trace.TRACE_TAG_VIEW);}if (processedEvents != null) {if (processedEvents.isEmpty()) {// InputEvent consumed by mInputCompatProcessorfinishInputEvent(event, true);} else {for (int i = 0; i < processedEvents.size(); i++) {enqueueInputEvent(processedEvents.get(i), this,QueuedInputEvent.FLAG_MODIFIED_FOR_COMPATIBILITY, true);}}} else {enqueueInputEvent(event, this, 0, true);}}}// InputEventReceiver.javapublic InputEventReceiver(InputChannel inputChannel, Looper looper) {mInputChannel = inputChannel;mMessageQueue = looper.getQueue();mReceiverPtr = nativeInit(new WeakReference<InputEventReceiver>(this),mInputChannel, mMessageQueue);mCloseGuard.open("InputEventReceiver.dispose");}
WindowInputEventReceiver构造方法中将参数传递给了父类InputEventReceiver,实现了onInput()方法,后续接收到事件后通过这个方法处理Java层的分发逻辑,Eventlooper是ViewRoolImpl的当前线程Looper.myLooper(),也就是主线程,InputEventReceiver调用nativeInit()继续下一步操作,创建NativeInputEventReceiver。
3.2 NativeInputEventReceiver
NativeInputEventReceiver定义在JNI文件中,方便后续回调JAVA方法。
// android_view_InputEventReceiver.cppstatic jlong nativeInit(JNIEnv* env, jclass clazz, jobject receiverWeak,jobject inputChannelObj, jobject messageQueueObj) {// 获取InputChannelstd::shared_ptr<InputChannel> inputChannel =android_view_InputChannel_getInputChannel(env, inputChannelObj); // 获取messageQueuesp<MessageQueue> messageQueue = android_os_MessageQueue_getMessageQueue(env, messageQueueObj);// 1. 实例化NativeInputEventReceiversp<NativeInputEventReceiver> receiver = new NativeInputEventReceiver(env,receiverWeak, inputChannel, messageQueue);// 2. receiver->initialize()status_t status = receiver->initialize(); receiver->incStrong(gInputEventReceiverClassInfo.clazz); // retain a reference for the objectreturn reinterpret_cast<jlong>(receiver.get())}
nativeInit()主要做了两件事,实例化NativeInputEventReceiver,并且调用其initialize()方法。
3.2.1 NativeInputEventReceiver实例化
// android_view_InputEventReceiver.cppNativeInputEventReceiver::NativeInputEventReceiver(JNIEnv* env, jobject receiverWeak, const std::shared_ptr<InputChannel>& inputChannel,const sp<MessageQueue>& messageQueue): mReceiverWeakGlobal(env->NewGlobalRef(receiverWeak)),mInputConsumer(inputChannel),mMessageQueue(messageQueue),mBatchedInputEventPending(false),mFdEvents(0) {}
NativeInputEventReceiver构造方法中持有Java层InputEventRecevier对象的引用mReceiverWeakGlobal, 将inputChannel作为参数实例化mInputConsumer对象。
InputConsumer类定义在InputTransport.h头文件,从InputChannel消费事件。
// InputTransport.cppInputConsumer::InputConsumer(const std::shared_ptr<InputChannel>& channel): mResampleTouch(isTouchResamplingEnabled()), mChannel(channel), mMsgDeferred(false) {}
client端的inputChannel被赋值给InputConsumer的mChannel变量。
回到NativeInputEventReceiver初始化流程中。
3.2.2 NativeInputEventReceiver::initialize
// android_view_InputEventReceiver.cppstatus_t NativeInputEventReceiver::initialize() {setFdEvents(ALOOPER_EVENT_INPUT);return OK;}void NativeInputEventReceiver::setFdEvents(int events) {if (mFdEvents != events) {mFdEvents = events;int fd = mInputConsumer.getChannel()->getFd();if (events) {mMessageQueue->getLooper()->addFd(fd, 0, events, this, nullptr);} else {mMessageQueue->getLooper()->removeFd(fd);}}}
initialize()监听client InputChannel的文件描述符 fd,文件类型文件类型和发送端一样,也是ALOOPER_EVENT_INPUT。在上述1.1.1小节中我们知道后续会回调LooperCallback的handleEvent()方法,NativeInputEventReceiver也继承了LooperCallback类,实现了自己的handleEvent():
3.3 handleEvent
// android_view_InputEventReceiver.cppint NativeInputEventReceiver::handleEvent(int receiveFd, int events, void* data) {if (events & ALOOPER_EVENT_INPUT) {JNIEnv* env = AndroidRuntime::getJNIEnv();status_t status = consumeEvents(env, false /*consumeBatches*/, -1, nullptr);mMessageQueue->raiseAndClearException(env, "handleReceiveCallback");return status == OK || status == NO_MEMORY ? KEEP_CALLBACK : REMOVE_CALLBACK;}if (events & ALOOPER_EVENT_OUTPUT) {const status_t status = processOutboundEvents();if (status == OK || status == WOULD_BLOCK) {return KEEP_CALLBACK;} else {return REMOVE_CALLBACK;}}return KEEP_CALLBACK;}
handleEvent只是对事件类型进行区分,如果是ALOOPER_EVENT_INPUT类型,详细具体到处理流程在consumeEvents()方法。
3.4 consumeEvents
status_t NativeInputEventReceiver::consumeEvents(JNIEnv* env,bool consumeBatches, nsecs_t frameTime, bool* outConsumedBatch) {for (;;) {uint32_t seq;// 1.InputConsumer从socket读取封装事件InputEvent* inputEvent;status_t status = mInputConsumer.consume(&mInputEventFactory,consumeBatches, frameTime, &seq, &inputEvent);// 2.区分事件类型,封装为Java层的InputEvent对象jobject inputEventObj;switch (inputEvent->getType()) {case AINPUT_EVENT_TYPE_KEY:inputEventObj = android_view_KeyEvent_fromNative(env,static_cast<KeyEvent*>(inputEvent));break;case AINPUT_EVENT_TYPE_MOTION: {MotionEvent* motionEvent = static_cast<MotionEvent*>(inputEvent);if ((motionEvent->getAction() & AMOTION_EVENT_ACTION_MOVE) && outConsumedBatch) {*outConsumedBatch = true;}inputEventObj = android_view_MotionEvent_obtainAsCopy(env, motionEvent);break;}}// 3.调用Java层InputEventReceiver对象的dispatchInputEvent方法,参数为seq,inputEventObjif (inputEventObj) {env->CallVoidMethod(receiverObj.get(),gInputEventReceiverClassInfo.dispatchInputEvent, seq, inputEventObj);env->DeleteLocalRef(inputEventObj);}}}
consumeEvents()处理了事件接收的主要流程:
- 启动一个死循环,不断从InputConsumer获取事件,赋值到inputEvent引用,InputConsumer持有客户端InputChannel的引用,从客户端socket读取数据,将数据解析封装成InputEvent对象。
- 将InputEvent类型进行区分,具体共有AINPUT_EVENT_TYPE_KEY,AINPUT_EVENT_TYPE_MOTION,AINPUT_EVENT_TYPE_FOCUS,AINPUT_EVENT_TYPE_CAPTURE,AINPUT_EVENT_TYPE_DRAG,AINPUT_EVENT_TYPE_TOUCH_MODE六种类型,对于Motion事件,封装成Java层的MotionEvent对象。
- receiverObj指向NativeInputEventReceiver实例化时传递过来的Java层InputEventReceiver引用,调用Java层InputEventReceiver对象的dispatchInputEvent方法,参数为seq,inputEventObj,至此回到了Java层的处理流程。
在分析Java层的处理流程之前,先看下InputConsumer是如何读取socket数据解析成InputEvent对象的。
3.4.1 InputConsumer.consume
// InputTransport.cppstatus_t InputConsumer::consume(InputEventFactoryInterface* factory, bool consumeBatches,nsecs_t frameTime, uint32_t* outSeq, InputEvent** outEvent) {while (!*outEvent) {status_t result = mChannel->receiveMessage(&mMsg);switch (mMsgmMsg.header.type) {case InputMessage::Type::KEY: {KeyEvent* keyEvent = factory->createKeyEvent();if (!keyEvent) return NO_MEMORY;initializeKeyEvent(keyEvent, &mMsg);*outSeq = mMsg.header.seq;*outEvent = keyEvent;break;}case InputMessage::Type::MOTION: {MotionEvent* motionEvent = factory->createMotionEvent();if (!motionEvent) return NO_MEMORY;updateTouchState(mMsg);initializeMotionEvent(motionEvent, &mMsg);*outSeq = mMsg.header.seq;*outEvent = motionEvent;break;}}}return OK;}
mChannel是NativeInputEventReceiver传递过去的客户端InputChannel对象,InputConsumer从mChannel读取消息,在上述第二小节:InputChannel发送事件 可知,发送的InputMessage对象封装了mMsg.header.type等事件类型消息,这里通过事件类型消息进行区分,封装成具体对应的输入事件,如KeyEvent,MotionEvent等,赋值给outEvent。
InputChannel通过recv()方法接收socket消息:
// InputTransport.cppstatus_t InputChannel::receiveMessage(InputMessage* msg) {ssize_t nRead;do {nRead = ::recv(getFd(), msg, sizeof(InputMessage), MSG_DONTWAIT);} while (nRead == -1 && errno == EINTR);}
3.4.2 dispatchInputEvent
事件的读取解析流程到此结束了,接下来看看InputReceiver是如何分发事件的。
// InputEventReceiver.java// Called from native code.@SuppressWarnings("unused")@UnsupportedAppUsage(maxTargetSdk = Build.VERSION_CODES.R, trackingBug = 170729553)private void dispatchInputEvent(int seq, InputEvent event) {mSeqMap.put(event.getSequenceNumber(), seq);onInputEvent(event);}
InputEventReceiver调用onInputEvent(event)开始处理事件的分发流程,上述3.1小节可知,onInputEvent方法在WindowInputEventReceiver类中被覆盖。Java层的事件分发流程参考:https://editor.csdn.net/md/?articleId=130476234
相关文章:

Android InputChannel事件发送接收系统分析
本文基于Android12。 InputChannel表示其他进程通过文件描述符传递输入事件到View的通道,因为需要跨进程传输,实现了Parcelable序列化接口,所以也能够理解Java层的InputChannel后面为什么使用copyTo()方法初始化。 输入事件的接收方是View&…...
-- LocalDate()类)
Java时间类(五)-- LocalDate()类
目录 引言: 1. LocalDate的概述: 2. LocalDate的常用方法: 引言: (1)Date存在的缺陷: 如果不格式化,打印出的日期可读性差://获取当前时间Date date = new Date();System.out.println("date = " + date); //date = Wed May 03 22:30:24 CST...
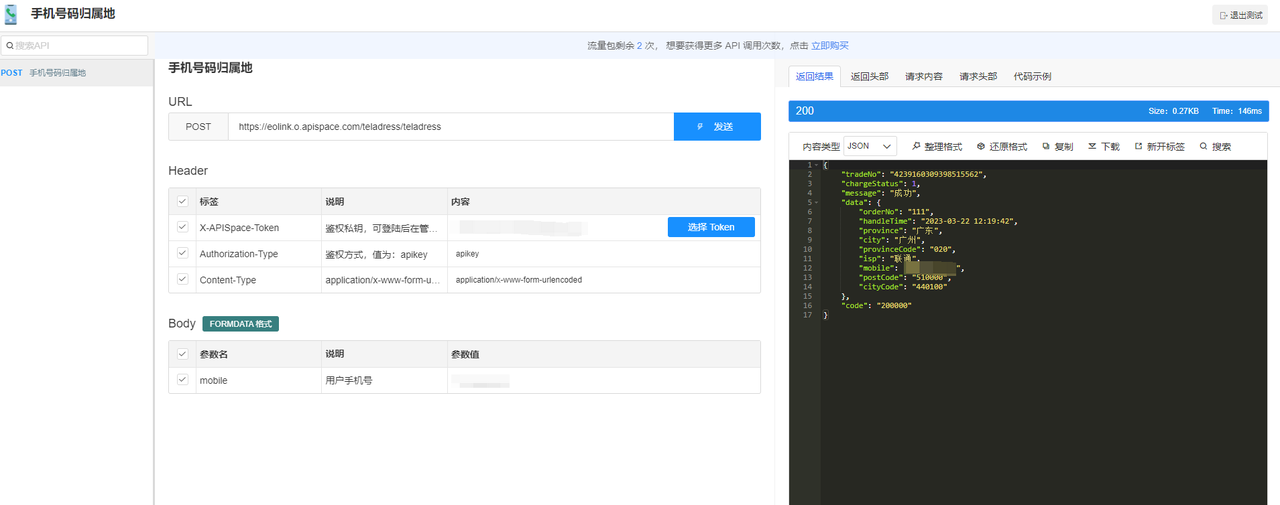
用手机号码归属地 API 开发的应用推荐
引言 手机号码归属地 API是一种提供手机号码归属地信息的接口,通过该接口,可以获取手机号码所属的省份、城市、运营商等信息。它可以帮助企业更好地了解客户,为个性化推荐和精准广告投放提供数据支持。作为一种数据服务,手机号码…...
测试从业第 3 年,我看到了终点......
先说明,今天的内容,是写给想成为高级测试开发、自动化测试专家的人看的,因为,它可能颠覆你的认知。 众所周知,如今无论是大厂还是中小厂,自动化测试基本是标配了,毕竟像双11、618 这种活动中庞…...

结巴分词原理分析
结巴分词器工作原理 结巴分词是一款python写成的开源中文分词器,分词过程大致如下: 首先,结巴使用正则表达式将输入文本切割成若干中文块,接着对每个中文块B做处理,将B转成有向无环图(DAG)。DAG是以{key:list[i,j...…...

JavaEE 第三-四周
计算机Z20-第3-4周作业 总分:100分 得分:74.2分 1 . 填空题 简单 5分 在web.xml文件中,<url-pattern>/xxxxServlet</url-pattern>中的第一个‘/’表示__________。 学生答案 当前web应用程序的根目录 2 . 填空题 简…...
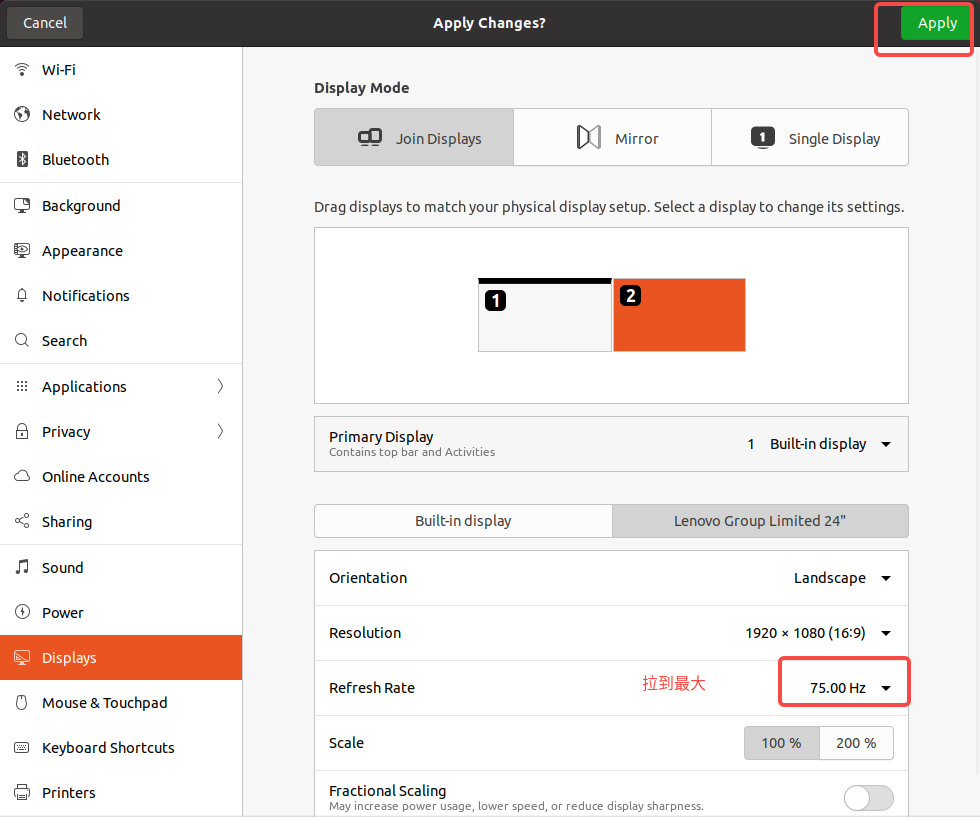
Ububtu20.04 无法连接外屏(显卡驱动问题导致)
Ububtu20.04 无法显示第二个屏幕(显卡驱动问题) Ububtu20.04 无法显示第二个屏幕(显卡驱动问题) Ububtu20.04 无法显示第二个屏幕(显卡驱动问题) 1. 问题描述2. 解决方案 1. 问题描述 一开始我的ububt…...
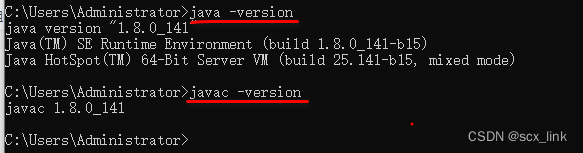
配置JDK环境变量
文章目录 查看电脑系统下载及安装JavaSE配置系统环境变量测试环境变量配置是否成功。 查看电脑系统 运行输入框中输入:control 下载及安装JavaSE 这个从网上下载就行,jdk-8u141-windows-x64.exe,不提供下载方式了。 主要讲解安装过程&a…...

保护移动设备免受恶意软件侵害优秀方法
几天前,移动恶意软件攻击增加了500%显然,我们大多数人都不知道不能很好地保护我们的手机下面小编揭秘有效保护移动设备免受恶意软件侵害的最佳方法。 1、使用移动反恶意软件 恶意软件很容易感染智能手机和平板电脑,因此在设备上安装可靠的…...

一个人在家怎么赚钱?普通人如何通过网络实现在家就能赚钱
近年来,随着互联网的飞速发展,嗅觉敏锐的人只要使用互联网就可以快乐地赚钱。一般来说,网上赚钱的投资较少,有时有一台能上网的电脑或手机就够了,所以大家有时称其为“无成本或低成本网赚”。今天就分享一个人在家如何…...
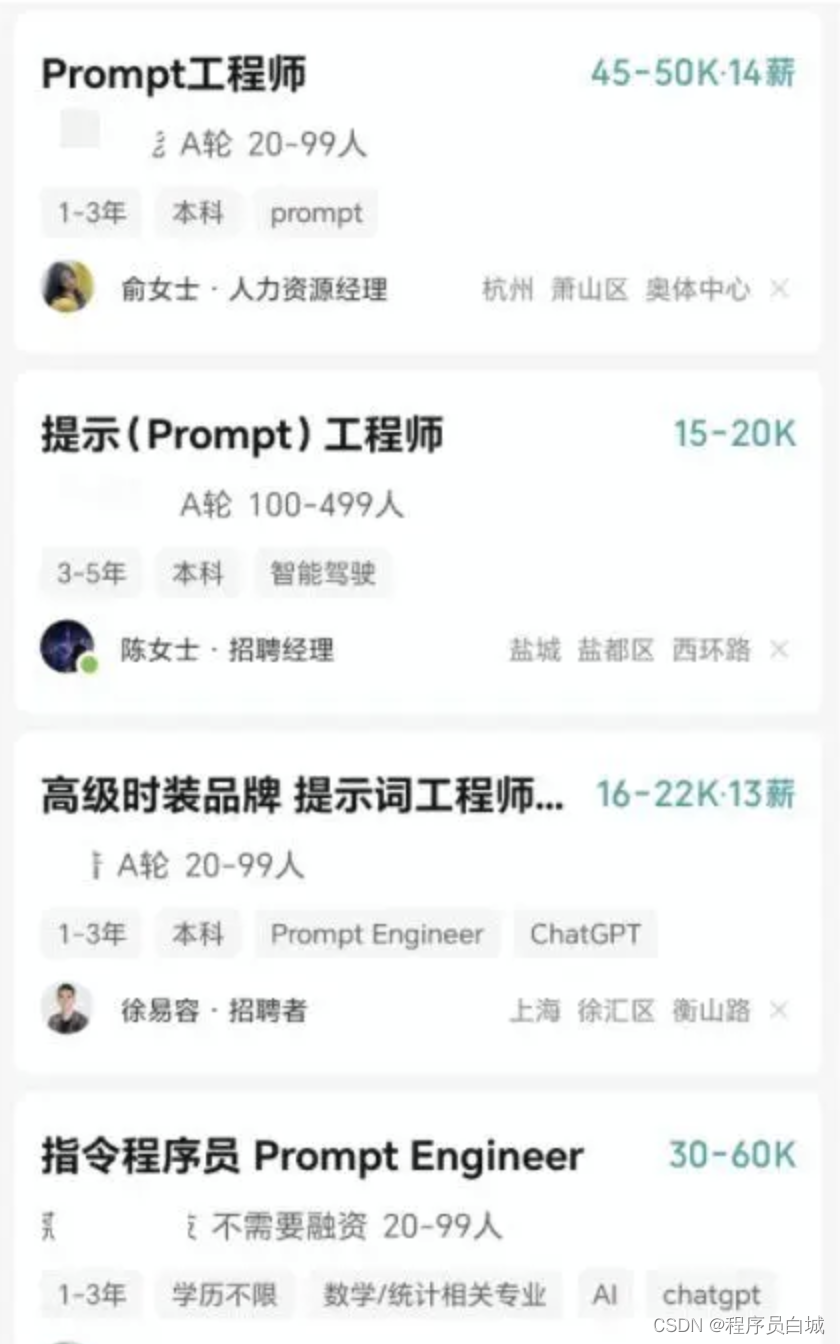
ChatGPT诞生的新岗位:提示工程师(Prompt Engineer)
ChatGPT诞生的新岗位:提示工程师(Prompt Engineer) Prompt 工程师是什么? 是识别人工智能的错误和隐藏功能,以便开发者可以对这些发现进行处理。 如果你正在寻找科技领域最热门的工作,你可以尝试了解如何与AI聊天机…...

机器学习笔记 使用PPOCRLabel标注自己的OCR数据集
一、PPOCRLabel的安装 最简单的方式就是直接pip安装,如下命令。 pip install PPOCRLabel -i https://pypi.douban.com/simple/ 运行的时候,直接激活安装了PPOCRLabel的环境后,输入PPOCRLabel回车即可运行,不过PPOCRLabel依赖PyQt5,所以会要求安装PyQt5,按要求安装或者提前…...

【C++初阶】类和对象(二)
📝个人主页:Sherry的成长之路 🏠学习社区:Sherry的成长之路(个人社区) 📖专栏链接:C初阶 🎯长路漫漫浩浩,万事皆有期待 上一篇博客:【C初阶】…...

深入探讨Java、Spring和Dubbo的SPI机制
在Java开发领域中,SPI(Service Provider Interface)是一种用于实现框架扩展的机制。Java本身提供了SPI机制,Spring和Dubbo也都有自己的SPI机制。本文将介绍Java、Spring、Dubbo三者SPI机制的原理和区别。 一、Java SPI机制 Java…...
使用机器人为无线传感器网络提供服务(Matlab代码实现)
目录 💥1 概述 📚2 运行结果 🎉3 参考文献 👨💻4 Matlab代码 💥1 概述 无线传感器网络是一种无线网络,包括大量循环的、自定向的、微小的、低功耗的设备,称为传感器节点&…...

QT自制软键盘 最完美、最简单、跟自带虚拟键盘一样
QT自制软键盘 最完美、最简单、跟自带虚拟键盘一样 [1] QT自制软键盘 最完美、最简单、跟自带虚拟键盘一样一、本自制虚拟键盘特点二、windows打开系统自带软键盘三、让键盘界面保持在最上方、不改变底层界面焦点四、长按按键重复输入键盘内容五、模拟键盘点击事件完成虚拟键盘…...

优思学院|8D和DMAIC两种方法应如何选择?
在现代的商业环境中,客户投诉是一个非常常见的问题。当客户不满意产品或服务时,他们往往会向企业发出投诉。质量管理部门是一个负责处理这些投诉的重要部门,因为它们需要确保产品和服务的质量满足客户的期望。改善方法是质量管理部门用来解决…...

回归预测 | MATLAB实现MLR多元线性回归预测(多指标评价)
回归预测 | MATLAB实现MLR多元线性回归预测(多指标评价) 目录 回归预测 | MATLAB实现MLR多元线性回归预测(多指标评价)预测效果基本介绍模型描述程序设计参考资料预测效果 基本介绍 回归预测 | MATLAB实现MLR多元线性回归预测(多指标评价) 模型描述 多元线性回归(Multip…...

PHP 二维数组相关函数:二维数组指定key排序,二维数组转一维数组,两个二维数组取差集,对象转数组,判断元素是否在多维数组中
目录 一、二维数组转一维数组 二、对二维数组进行指定key排序 三、二维数组转一维数组 四、两个二维数组取差集 五、对象转数组 六、判断元素是否在多维数组中 PHP 二维数组相关函数:二维数组转一维数组,二维数组指定key排序,两个二维数…...

演出剧院门票售票预约小程序开发制作功能介绍
基于微信小程序的票务预约小程序,广泛适用于演出主办方、剧院、艺术中心、活动中心售票、景区门票售票、儿童游乐园售票、会务签到、展会售票签到、教育培训报名预约、健身预约功能。 多场景售票支持: 售票软件支持多种场景的售票,支持选座、…...
)
从USB3.2到PCIe 5.0:我的高速串行链路阻抗匹配踩坑实录(附Sigrity仿真文件)
从USB3.2到PCIe 5.0:我的高速串行链路阻抗匹配踩坑实录 去年负责一款数据中心加速卡的设计时,我遇到了职业生涯中最棘手的高速信号完整性问题。这块板卡需要同时支持PCIe 5.0 x16和四个USB3.2 Gen2x2接口,当第一批工程样机回来进行信号测试时…...

从零到一:联想小新Air14 2020锐龙版Windows 10重装实战指南
1. 为什么需要重装系统? 最近有不少朋友跟我吐槽,说用了两年的联想小新Air14 2020锐龙版越来越卡,开机要等半天,打开个文档都要转圈圈。这种情况我太熟悉了,作为一个帮朋友修过不下20台同款机型的老司机,我…...

对立统一的物理本质:黑洞视界动力学
粒子极微黑洞模型将对立统一规律从抽象的哲学辩证法还原为具体的物理动力学过程,其物理本体、动力学根源与几何载体正是全域嵌套的拓扑黑洞结构及其视界动力学。核心在于,黑洞视界本身就是一个天然的、动态的二元对立统一体。1. 对立统一:黑洞…...

FanControl风扇识别故障排查指南:从零开始解决“风扇隐身“问题
FanControl风扇识别故障排查指南:从零开始解决"风扇隐身"问题 【免费下载链接】FanControl.Releases This is the release repository for Fan Control, a highly customizable fan controlling software for Windows. 项目地址: https://gitcode.com/G…...

如何快速提升英雄联盟游戏体验:League-Toolkit智能工具完全指南
如何快速提升英雄联盟游戏体验:League-Toolkit智能工具完全指南 【免费下载链接】League-Toolkit An all-in-one toolkit for LeagueClient. Gathering power 🚀. 项目地址: https://gitcode.com/gh_mirrors/le/League-Toolkit 英雄联盟作为全球最…...
)
告别重启!IDEA里用JRebel插件实现Java代码秒级热更新(附最新激活与配置避坑指南)
告别重启!IDEA里用JRebel插件实现Java代码秒级热更新(附最新激活与配置避坑指南) 作为一名长期与Java打交道的开发者,你是否经历过这样的痛苦循环:修改一行代码 → 保存 → 等待漫长的Tomcat重启 → 验证修改 → 发现…...

SDR++终极指南:如何快速掌握跨平台软件定义无线电
SDR终极指南:如何快速掌握跨平台软件定义无线电 【免费下载链接】SDRPlusPlus Cross-Platform SDR Software 项目地址: https://gitcode.com/GitHub_Trending/sd/SDRPlusPlus SDR软件定义无线电是一款开源的跨平台SDR软件,以其轻量级架构和直观界…...

QML WebEngine与ECharts联袂:打造高性能实时数据可视化桌面应用
1. 为什么选择QMLWebEngineECharts组合? 在开发桌面端实时数据可视化应用时,我们常常面临一个关键选择:是使用原生绘图方案还是Web技术栈?我经过多个工业监控项目的实战验证,发现QMLWebEngineECharts的组合堪称黄金搭…...

半导体行业成本管理:从学习曲线到EDA工具链的实战策略
1. 行业成本与价格压力的永恒博弈在半导体这个行当里干了十几年,我越来越觉得,我们这行最核心的生存法则,不是什么高深莫测的量子物理,而是一个看似简单、实则残酷的算术题:一边是不断上涨的原材料、设备和设计成本&am…...
:全面战争模组制作的终极利器)
Rusted PackFile Manager (RPFM):全面战争模组制作的终极利器
Rusted PackFile Manager (RPFM):全面战争模组制作的终极利器 【免费下载链接】rpfm Rusted PackFile Manager (RPFM) is a... reimplementation in Rust and Qt6 of PackFile Manager (PFM), one of the best modding tools for Total War Games. 项目地址: http…...