Nginx(四)
部署LNMP架构动态网站WordPress
LNMP=Linux+Nginx+MySQL+Php
环境
| 192.168.29.141 | centos8 | Nginx | 1.24.0 |
| 192.168.29.142 | centos8 | MySQL | 8.0.33 |
| 192.168.29.143 | centos8 | Php | 7.2.24 |
关闭firewalld
systemctl stop firewalld
systemctl disable firewalld
关闭selinux
setenforce 0
sed -ir 's/SELINUX=enforcing/SELINUX=disabled/g' /etc/selinux/config &> /dev/null
部署Nginx
#先决条件
[root@nginx ~]#yum -y install yum-utils#配置nginx官方yum源
[root@nginx ~]#vim /etc/yum.repos.d/nginx.repo
[nginx-stable]
name=nginx stable repo
baseurl=http://nginx.org/packages/centos/$releasever/$basearch/
gpgcheck=1
enabled=1
gpgkey=https://nginx.org/keys/nginx_signing.key
module_hotfixes=true[nginx-mainline]
name=nginx mainline repo
baseurl=http://nginx.org/packages/mainline/centos/$releasever/$basearch/
gpgcheck=1
enabled=0
gpgkey=https://nginx.org/keys/nginx_signing.key
module_hotfixes=true#安装
[root@nginx ~]#yum -y install nginx#查看版本
[root@nginx ~]#nginx -v
nginx version: nginx/1.24.0#新建用户www
[root@nginx ~]#useradd www -s /sbin/nologin -M#修改nginx启动用户
[root@nginx ~]#vim /etc/nginx/nginx.conf
user=www www
...#新建配置文件
[root@nginx ~]#vim /etc/nginx/conf.d/wordpress.conf
server {listen       80;server_name  myblog.com;access_log  /var/log/nginx/host.access.log  main;location / {root   /www/wordpress;index  index.php index.html index.htm;}#error_page  404              /404.html;# redirect server error pages to the static page /50x.html#error_page   500 502 503 504  /50x.html;location = /50x.html {root   /usr/share/nginx/html;}# proxy the PHP scripts to Apache listening on 127.0.0.1:80##location ~ \.php$ {#    proxy_pass   http://127.0.0.1;#}# pass the PHP scripts to FastCGI server listening on 127.0.0.1:9000#location ~ \.php$ {root           /www/wordpress;fastcgi_pass   192.168.29.143:9000;fastcgi_index  index.php;fastcgi_param  SCRIPT_FILENAME  $document_root$fastcgi_script_name;include        fastcgi_params;}# deny access to .htaccess files, if Apache's document root# concurs with nginx's one##location ~ /\.ht {#    deny  all;#}
}[root@nginx ~]systemctl restart nginx
[root@nginx ~]systemctl enable nginx
[root@nginx ~]#ps aux | grep nginx
root        2936  0.0  0.1  41492   944 ?        Ss   00:48   0:00 nginx: master process /usr/sbin/nginx -c /etc/nginx/nginx.conf
www         2937  0.0  0.6  72632  5132 ?        S    00:48   0:00 nginx: worker process
root        2976  0.0  0.1 221924  1120 pts/0    R+   00:52   0:00 grep --color=auto nginx
location ~ \.php${...}中,
nginx的fastcgi_param默认为SCRIPT_FILENAME /scripts$fastcgi_script_name; 当php部署完成后,访问192.168.29.141/index.php会提示file not found。将/script替换为$document_root即可,指使用location / {...}中root指定的路径。
部署MySQL
[root@mysql ~]#wget https://repo.mysql.com//mysql80-community-release-el8-5.noarch.rpm
[root@mysql ~]#yum -y install mysql80-community-release-el8-5.noarch.rpm
[root@mysql ~]#ls /etc/yum.repos.d/
CentOS-Base.repo CentOS-Devel.repo CentOS-Media.repo mysql-community-debuginfo.repo
CentOS-centosplus.repo CentOS-Extras.repo CentOS-PowerTools.repo mysql-community.repo
CentOS-CR.repo CentOS-fasttrack.repo CentOS-Sources.repo mysql-community-source.repo
CentOS-Debuginfo.repo CentOS-HA.repo CentOS-Vault.repo nginx.repo#(仅限 EL8 系统)基于 EL8 的系统(例如 RHEL8 和 Oracle Linux 8)包括默认启用的 MySQL 模块。除非禁用此模块,否则它会屏蔽 MySQL 存储库提供的包
[root@mysql ~]#yum -y module disable mysql
[root@mysql ~]#yum install -y mysql-community-server
[root@mysql ~]#mysql --version
mysql Ver 8.0.33 for Linux on x86_64 (MySQL Community Server - GPL)#启动mysql服务并设置为开机启动
[root@mysql ~]#systemctl start mysqld.service
[root@mysql ~]#systemctl enable mysqld#查询mysql数据库默认密码
[root@mysql ~]#grep "password" /var/log/mysqld.log
2023-05-14T02:45:28.175684Z 6 [Note] [MY-010454] [Server] A temporary password is generated for root@localhost: <.XMel1ukpiw
#修改mysql密码
[root@mysql ~]#mysqladmin -uroot -p'<.XMel1ukpiw' password 'Admin.123'
mysqladmin: [Warning] Using a password on the command line interface can be insecure.
Warning: Since password will be sent to server in plain text, use ssl connection to ensure password safety.
#登录数据库
[root@mysql ~]#mysql -uroot -p'Admin.123'
mysql: [Warning] Using a password on the command line interface can be insecure.
Welcome to the MySQL monitor. Commands end with ; or \g.
Your MySQL connection id is 9
Server version: 8.0.33 MySQL Community Server - GPLCopyright (c) 2000, 2023, Oracle and/or its affiliates.Oracle is a registered trademark of Oracle Corporation and/or its
affiliates. Other names may be trademarks of their respective
owners.Type 'help;' or '\h' for help. Type '\c' to clear the current input statement.mysql> show databases;
+--------------------+
| Database |
+--------------------+
| information_schema |
| mysql |
| performance_schema |
| sys |
+--------------------+
4 rows in set (0.00 sec)
#创建网站数据库
mysql> create database wordpress;
Query OK, 1 row affected (0.00 sec)
#创建php登录数据库的用户
mysql> create user 'zhangsan'@'192.168.29.143' identified by 'Admin.123';
Query OK, 0 rows affected (0.01 sec)
#给新用户授权
mysql> grant all privileges on wordpress.* to 'zhangsan'@'192.168.29.143';
Query OK, 0 rows affected (0.01 sec)
#刷新权限
mysql> flush privileges;
Query OK, 0 rows affected (0.00 sec)
mysql> show grants for zhangsan@'192.168.29.143';
+----------------------------------------------------------------------+
| Grants for zhangsan@192.168.29.143 |
+----------------------------------------------------------------------+
| GRANT USAGE ON *.* TO `zhangsan`@`192.168.29.143` |
| GRANT ALL PRIVILEGES ON `wordpress`.* TO `zhangsan`@`192.168.29.143` |
+----------------------------------------------------------------------+
2 rows in set (0.00 sec)
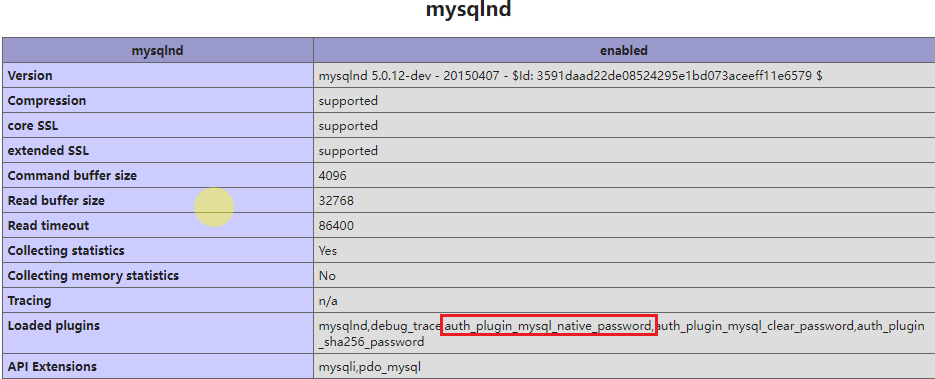
#mysql8.0启用了新的密码认证插件caching_sha2_password,为了和php适配,修改密码认证插件为旧版的mysql_native_password
mysql> alter user 'zhangsan'@'192.168.29.143' identified with mysql_native_password by 'Admin.123';
Query OK, 0 rows affected (0.02 sec)mysql> flush privileges;
Query OK, 0 rows affected (0.01 sec)[root@mysql ~]#netstat -tnlp
Active Internet connections (only servers)
Proto Recv-Q Send-Q Local Address Foreign Address State PID/Program name
tcp 0 0 0.0.0.0:22 0.0.0.0:* LISTEN 914/sshd
tcp6 0 0 :::22 :::* LISTEN 914/sshd
tcp6 0 0 :::33060 :::* LISTEN 4165/mysqld
tcp6 0 0 :::3306 :::* LISTEN 4165/mysqld 部署PHP
[root@php ~]#yum -y install php-fpm php-mysqlnd php-gd php-json.x86_64
#新建用户www
[root@nginx ~]#useradd www -s /sbin/nologin -M
#因为nginx和php不在同一台服务器上,启用tcp通讯模式
[root@php ~]#vim /etc/php-fpm.d/www.conf
...
user = www
group = www
; Note: This value is mandatory.
listen = /run/php-fpm/www.sock
listen = 0.0.0.0:9000
...
; Default Value: any
#将下行注释掉,启动默认值any
;listen.allowed_clients = 127.0.0.1
...#创建index.php文件
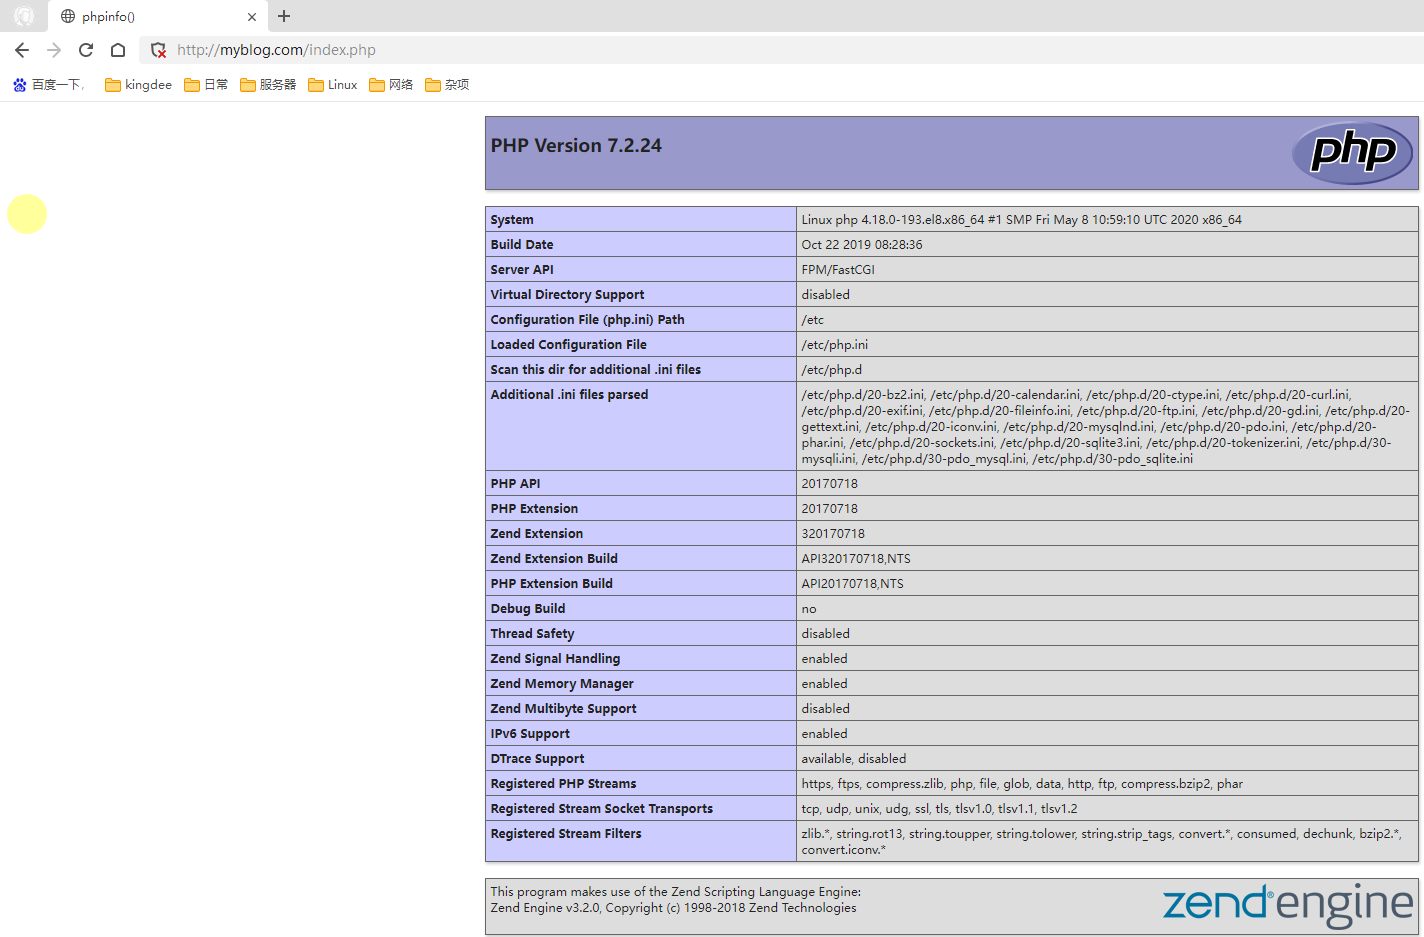
[root@php ~]#vim /usr/share/nginx/html/index.php
<?php
phpinfo();
?>
#创建mysql.php文件,测试数据库连接
[root@php ~]#vim /usr/share/nginx/html/mysql.php
<?php
$servername = "192.168.29.142";
$username = "zhangsan"; //定义数据库用户名
$passwd = "Admin.123"; //定义数据库密码
#注意:php7版本之后mysql_connect已被废弃,使用mysqli_connect替代
$conntest = mysqli_connect($servername,$username,$passwd);
if($conntest) { echo "连接成功";
}
?>[root@php ~]#systemctl start php-fpm.service
[root@php ~]#systemctl enable php-fpm.service
[root@php ~]#ps aux | grep php
root 2557 0.0 2.4 428032 20236 ? Ss 01:58 0:00 php-fpm: master process (/etc/php-fpm.conf)
www 2558 0.0 1.4 443232 11992 ? S 01:58 0:00 php-fpm: pool www
www 2559 0.0 1.4 443232 11992 ? S 01:58 0:00 php-fpm: pool www
www 2560 0.0 1.4 443232 11992 ? S 01:58 0:00 php-fpm: pool www
www 2561 0.0 1.4 443232 11992 ? S 01:58 0:00 php-fpm: pool www
www 2562 0.0 1.4 443232 11992 ? S 01:58 0:00 php-fpm: pool www
root 2572 0.0 0.1 221924 1176 pts/0 R+ 01:58 0:00 grep --color=auto php
PHP相关配置
核心配置文件——/etc/php.ini
date.timezone = PRC 设置php时区,PRC是中国
open_basedir 设置PHP脚本允许访问的目录;它将PHP所能打开的文件限制在指定的目录树中,包括文件本身。当程序要使用例如fopen()或file_get_contents()打开一个文件时,这个文件的位置将会被检查。当文件在指定的目录树之外,程序将拒绝打开。
全局配置文件——/etc/php-fpm.conf
pid = /run/php-fpm/php-fpm.pid 设置pid文件位置
error_log = /var/log/php-fpm/error.log 设置错误日志文件位置
log_level = notice 记录日志的等级。alert(必须立即处理), error(错误情况), warning(警告情况), notice(一般重要信息), debug(调试信息). 默认: notice.
process.max = 128 默认无设置;控制子进程最大数的全局变量, 后边的设置子进程数量的指令受到这个值的限制, 0表示无限制。
daemonize = yes 将fpm转至后台运行
拓展配置文件——/etc/php-fpm.d/www.conf
user = www 设置php-fpm启动用户和组
listen.allowed_clients = 127.0.0.1 允许访问FastCGI进程的IP,设置any为不限制IP,如果要设置其他主机的nginx也能访问这台FPM进程,listen处要设置成本地可被访问的IP。默认值是any。每个地址是用逗号分隔. 如果没有设置或者为空,则允许任何服务器请求连接
listen = 127.0.0.1:9000 fpm监听端口,即nginx中php处理的地址,一般默认值即可。
slowlog = /var/log/php-fpm/$pool-slow.log 开启慢日志
pm = dynamic 动态模式进程管理开启
pm.start_servers = 32 最初开启多少进程
pm.min_spare_servers = 32 最小的多余进程数,最少空闲。用户访问会消耗掉进程。然后为了满足后续游湖随时随地开启进程保持空闲数为32。
pm.max_children = 512 指PHP-FPM Pool 最大的子进程数,数值取决于你的服务器内存。 假设你打算给10G内存给当前配置的PHP-FPM Pool,一般一个PHP请求占用内存10M-40M,我们按站点每个PHP请求占用内存25M,这样max_children = 10G/25M = 409。所以,这个值可以根据情况算出来
pm.max_spare_servers = 64 最大的多余进程。大规模断开后,高并发访问过后,还剩多少。
pm.max_requests = 1500 每个子进程能响应的请求数量,到达此数字,该PHP进程就被释放掉了。ax_requests是每个子进程重生之前处理的请求数, 默认值为unlimited(默认为1024),可以设置小一点(如500左右),这样可以避免内存泄露带来的问题
测试
在物理机本地做host解析:192.168.29.143 myblog.com
访问http://myblog.com/index.php如下。
踩坑:
一、在访问测试数据库连接mysql.php页面时,网页无法访问
nginx日志
2023/05/20 03:29:37 [error] 3287#3287: *23 FastCGI sent in stderr: "PHP message: PHP Fatal error: Uncaught Error: Call to undefined function mysql_connect() in /www/wordpress/mysql.php:5
解决
php7.0高版本已废弃mysql_connect()函数,使用mysqli_connect()替代
二、第一个坑解决后,再次访问mysql.php,依然无法正确访问,访问页面空白
nginx日志
PHP message: PHP Warning: mysqli_connect(): (HY000/2054): The server requested authentication method unknown to the client in /www/wordpress/mysql.php on line 5" while reading response header from upstream, client: 192.168.29.1, server: myblog.com, request: "GET /mysql.php HTTP/1.1", upstream: "fastcgi://192.168.29.143:9000", host: "myblog.com"
解决
mysql8.0版本使用新的密码认证插件 caching_sha2_password,先前版本使用的默认插件是mysql_native_password。在index.php页面可看到mysqlnd部分php支持的认证插件,没有caching_sha2_password,可使用mysql_native_password;所以在mysql部署部分将zhangsan认证插件改为mysql_native_password。
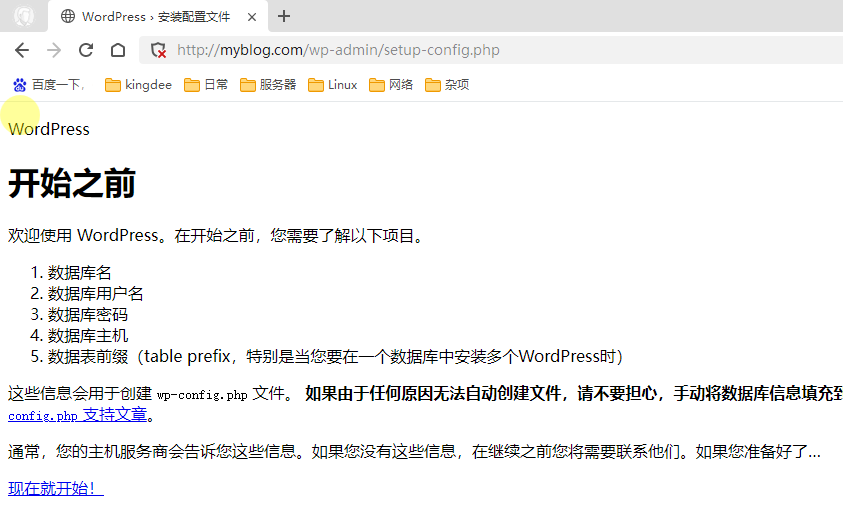
业务上线——WordPress
#下载wordpress并解压
[root@php ~]#wget -O wordpress.tar.gz https://cn.wordpress.org/latest-zh_CN.tar.gz
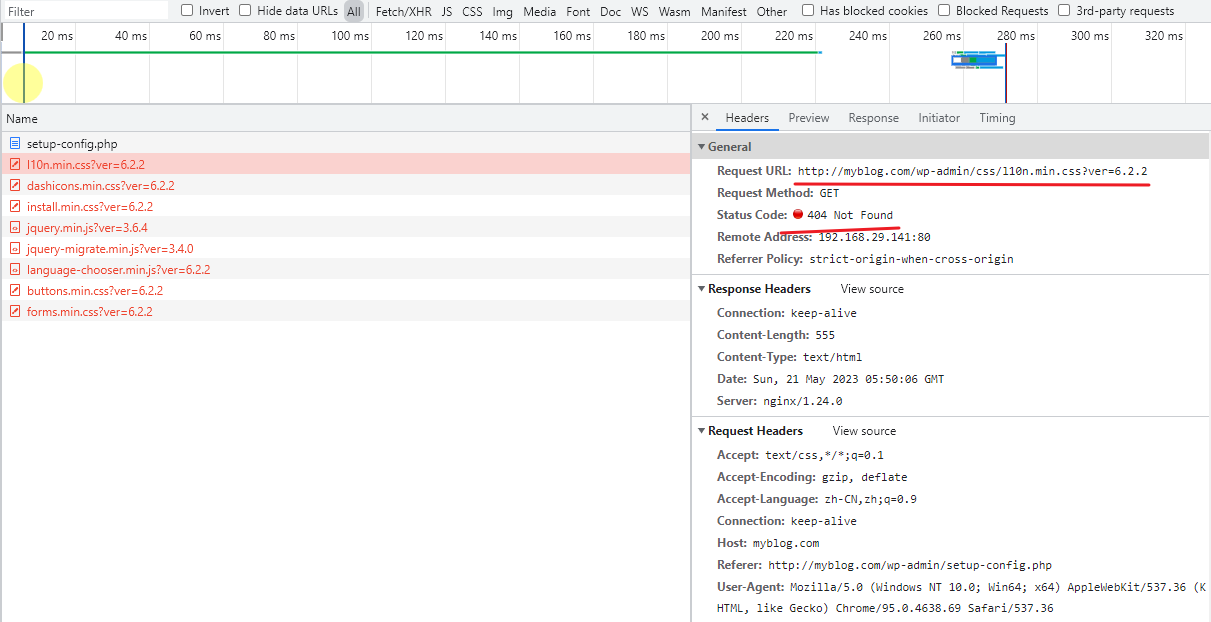
[root@php ~]#tar -x wordpress.tar.gz -C /www/访问http://myblog.com/index.php
无法加载网页样式,实际是有这些样式文件的。待解决
相关文章:
Nginx(四)
部署LNMP架构动态网站WordPress LNMPLinuxNginxMySQLPhp 环境 192.168.29.141centos8Nginx1.24.0192.168.29.142centos8MySQL8.0.33192.168.29.143centos8Php7.2.24 关闭firewalld systemctl stop firewalld systemctl disable firewalld 关闭selinux setenforce 0 sed -ir…...

【fps系统重构】-观察cpu、memroy、io -iostat
当您使用iostat命令监控磁盘I/O情况时,可以查看以下指标: rrqm/s:每秒发生的读请求被合并的次数。如果该指标很低,说明读请求较少或未被合并,可能会导致磁盘I/O负载过重。wrqm/s:每秒发生的写请求被合并的…...

iptables 添加,删除,查看,修改,及docker运行时修改端口
一,安装并启动防火墙 [rootlinux ~]# /etc/init.d/iptables start 当我们用iptables添加规则,保存后,这些规则以文件的形势存在磁盘上的,以centos为例,文件地址是/etc/sysconfig/iptables,我们可以通过命令的方式去…...

Liunx安装Android Studio
Liunx安装Android Studio 可参考官方文档: 安装 Android Studio 如需在 Linux 上安装 Android Studio,请按以下步骤操作: 1.将您下载的 .zip 文件解压缩到您应用的相应位置,例如 /usr/local/ 中(用于用户个人资料&am…...
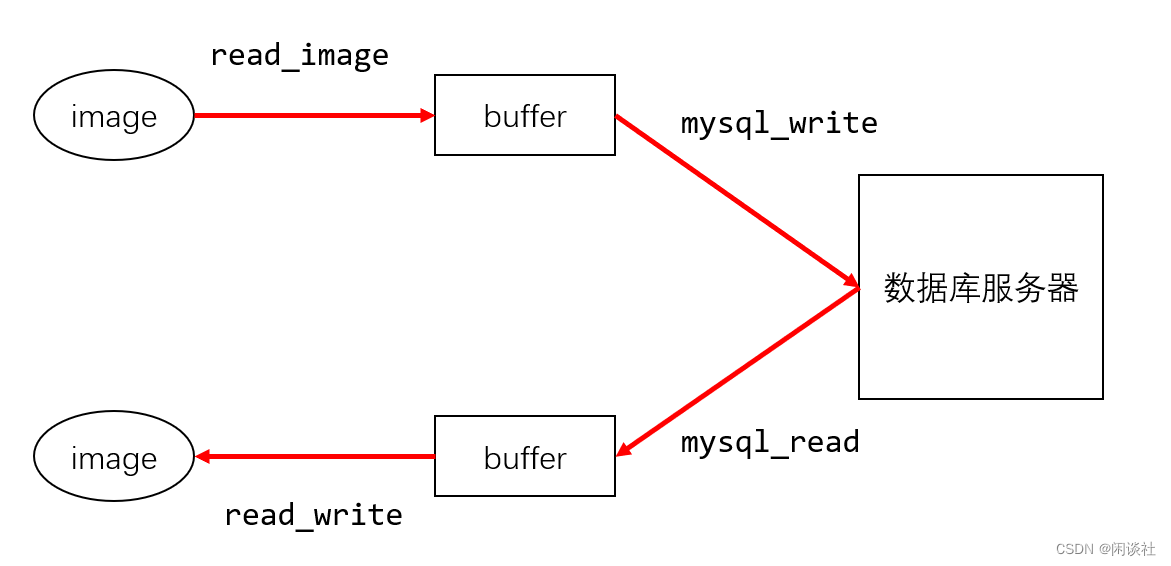
8、Linux C/C++ 实现MySQL的图片插入以及图片的读取
本文结合了Linux C/C 实现MySQL的图片插入以及图片的读取,特别是数据库读写的具体流程 一、文件读取相关函数 fseek() 可以将文件指针移动到文件中的任意位置。其基本形式如下: int fseek(FILE *stream, long offset, int whence);其中,str…...

【搭建轻量级图床】本地搭建LightPicture开源图床管理系统 - 异地远程访问
文章目录 1.前言2. Lightpicture网站搭建2.1. Lightpicture下载和安装2.2. Lightpicture网页测试2.3.cpolar的安装和注册 3.本地网页发布3.1.Cpolar云端设置3.2.Cpolar本地设置 4.公网访问测试5.结语 1.前言 现在的手机越来越先进,功能也越来越多,而手机…...

微信小程序全局路由拦截
前言 略 微信小程序全局路由拦截方法1 目前微信小程序没有全局路由拦截。要想实现全局路由拦截,需要自己进行扩充。具体参考这里:微信小程序–路由拦截器。 实现思路: 替换Page的参数对象的onShow或onLoad方法。在替换的onShow或onLoad方…...

截图自动添加水印(macOS/windows)
文章目录 1. 截图自动加水印1.1. windows1.2. macOS 2. 对已有图像批量加水印2.1 windows2.2 macOS 1. 截图自动加水印 1.1. windows 直接看这篇文章,一键截图自动生成水印/自动签名主要就是使用一个叫 SPX 的软件 1.2. macOS 其实apple的操作系统,i…...
大学四年,我建议你这么学网络安全
在所有关注我的朋友中,大致分为两类,一类是社会人士,有的是安全老手,有的是其它工作但对安全感兴趣的朋友,另一类应该就是大学生了。 尤其随着国家的号召和知识的普及,越来越多的人开始对网络安全感兴趣&a…...

Spring Boot整合Redis缓存并使用注解
Spring Boot整合Redis缓存并使用注解 在Spring Boot应用程序中,您可以使用Spring Cache库与Redis缓存进行集成,以提高应用程序的性能和响应速度。Spring Cache库提供了一组注解,包括Cacheable、CachePut和CacheEvict,可以方便地将…...

通知可以根据切入点表达式来进行增强,也可以根据自己的注解值来进行增强
通知可以根据切入点表达式来进行增强,也可以根据自己的注解值(例如 Before、After、Around 等)来进行增强。 如果要根据切入点表达式来进行增强,需要在通知注解中使用 Pointcut 注解来引用切入点表达式。例如,在以下示…...
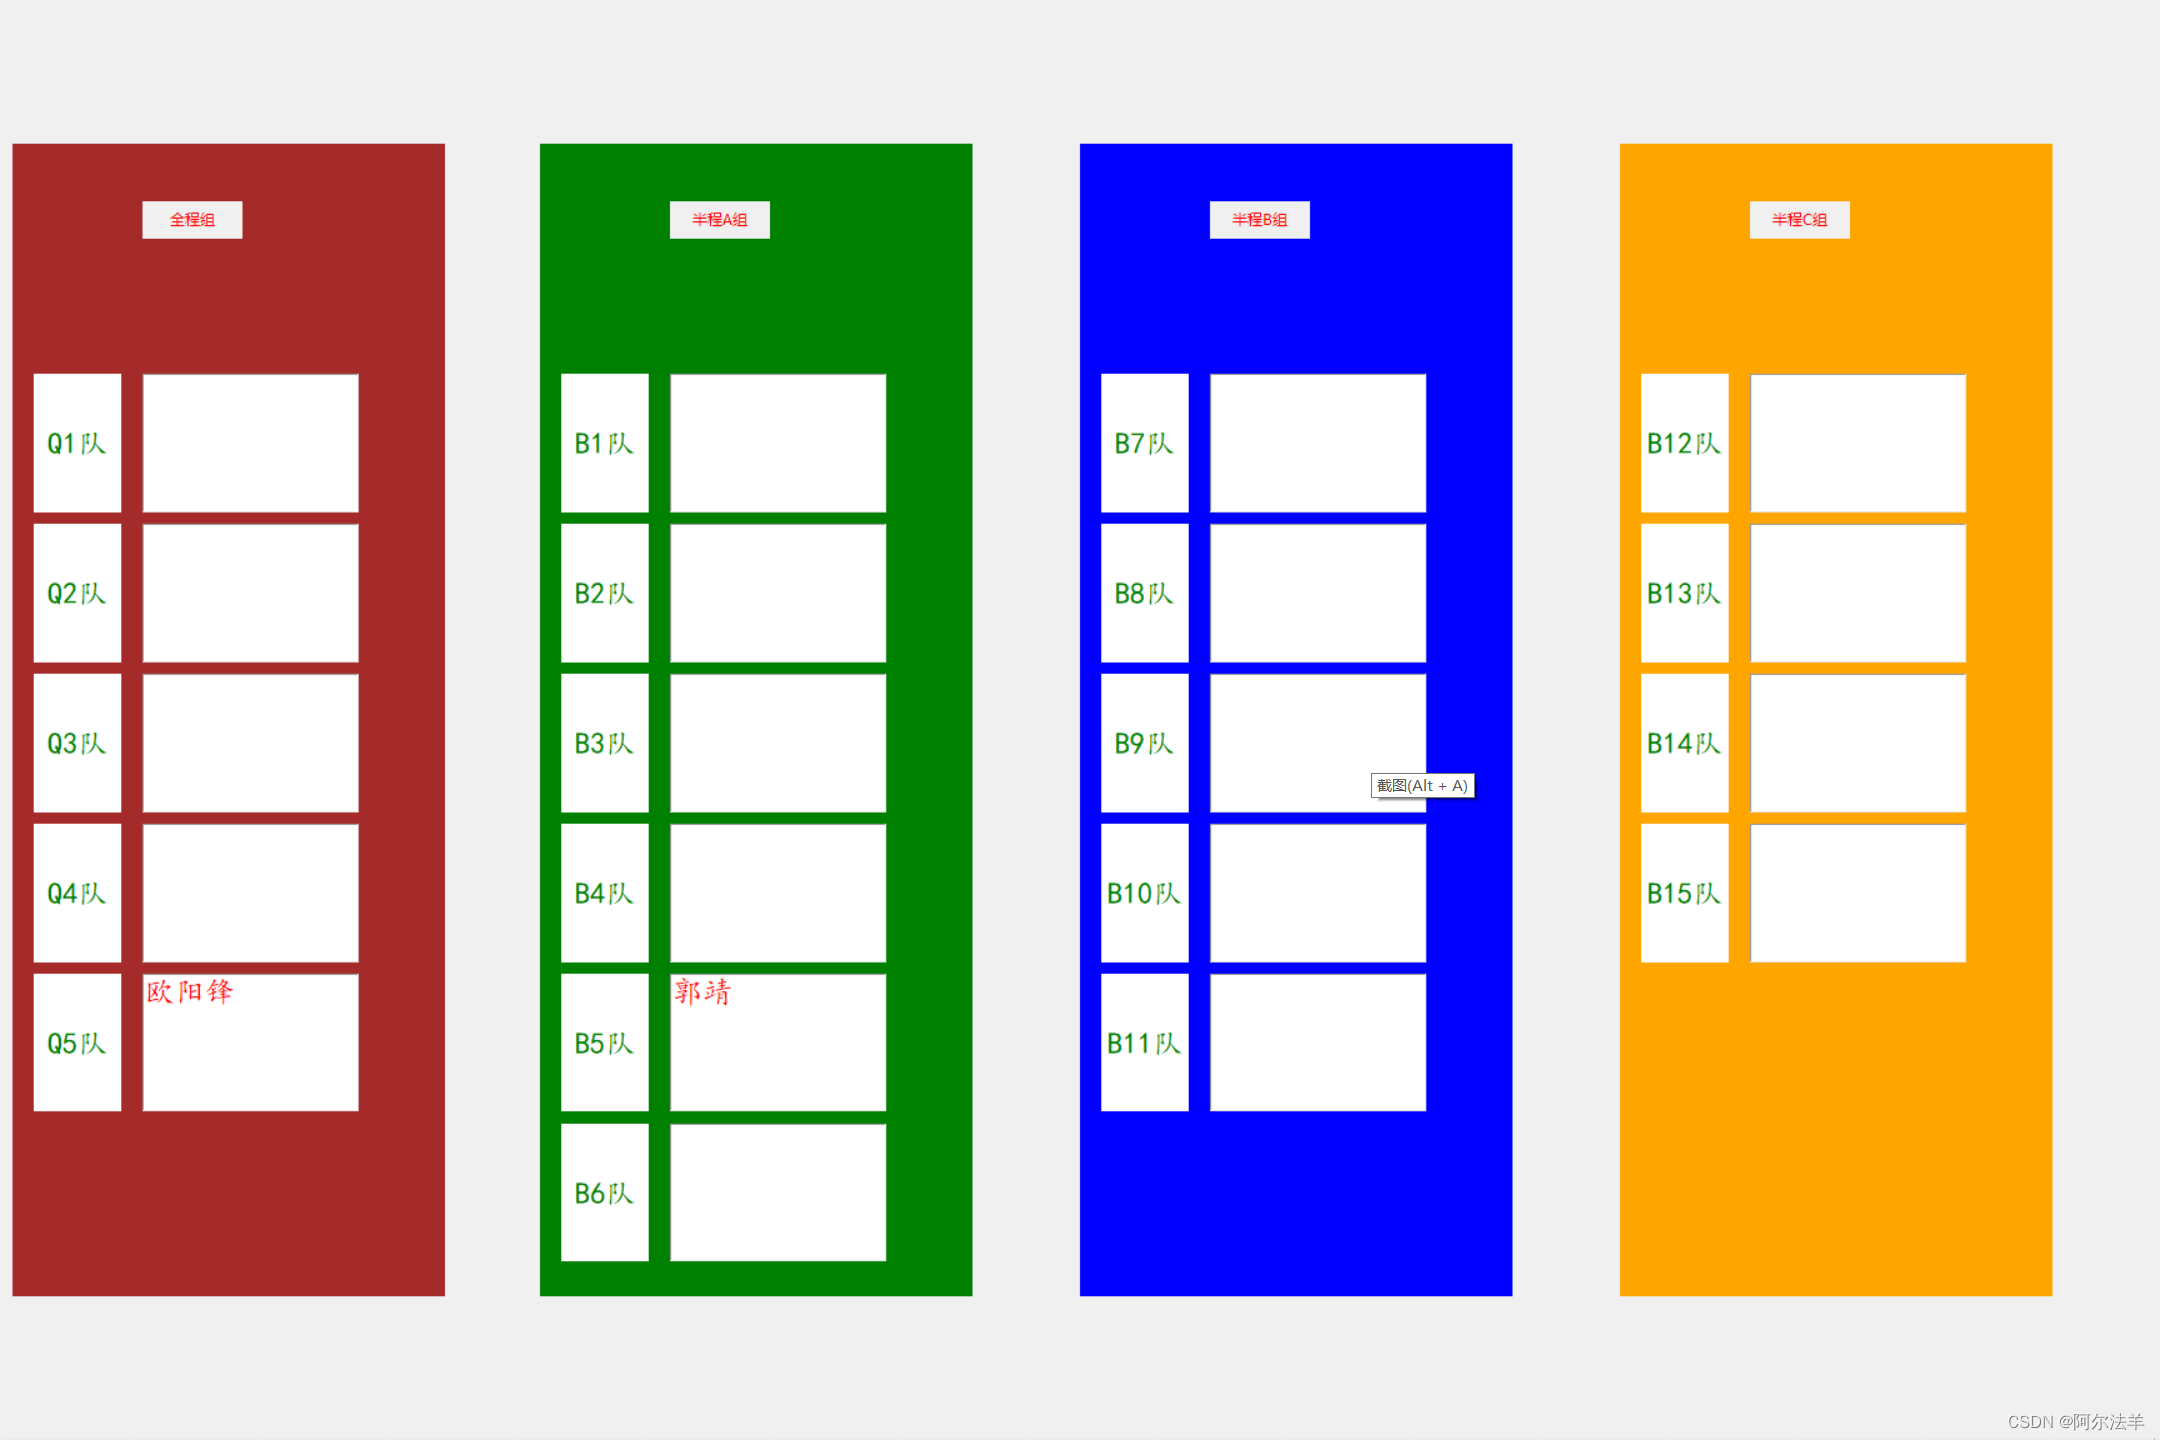
<Python实际应用>做一个简单的签到投屏系统
公司接了个活,承办一个由团委组织的五四青年节徒步活动,其中一个环节是现场报名,来的人把名字填进去后随机分组,并显示在现场的LED大屏幕上,我自告奋勇用Python来开发这个小程序。这里记录一下 【项目需求】 1、报名…...
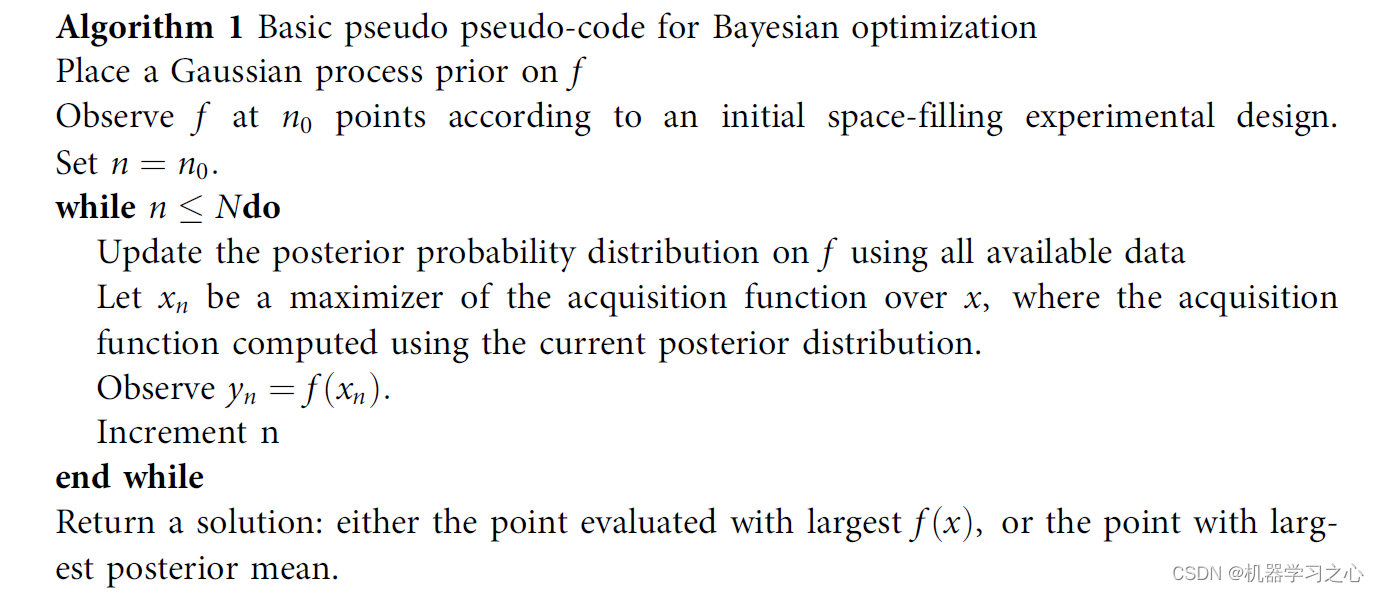
时序预测 | MATLAB实现BO-CNN-GRU贝叶斯优化卷积门控循环单元时间序列预测
时序预测 | MATLAB实现BO-CNN-GRU贝叶斯优化卷积门控循环单元时间序列预测 目录 时序预测 | MATLAB实现BO-CNN-GRU贝叶斯优化卷积门控循环单元时间序列预测效果一览基本介绍模型描述程序设计参考资料 效果一览 基本介绍 基于贝叶斯(bayes)优化卷积神经网络-门控循环单元(CNN-GR…...
)
Baumer工业相机堡盟工业相机使用BGAPISDK将工业相机设为Burst模式以及该模式的优势以及行业应用(C++)
Baumer工业相机堡盟工业相机使用BGAPISDK将工业相机设为Burst模式以及该模式的优势以及行业应用(C) Baumer工业相机Baumer工业相机的Burst模式的技术背景Baumer工业相机使用BGAPISDK将设置Burst模式1.引用合适的类文件2.使用BGAPI SDK初始化相机设置Burs…...

BERT输入以及权重矩阵形状解析
以下用形状来描述矩阵。对于向量,为了方便理解,也写成了类似(1,64)这种形状的表示形式,这个你理解为64维的向量即可。下面讲的矩阵相乘都是默认的叉乘。 词嵌入矩阵形状:以BERT_BASE为例,我们知道其有12层Encoder&…...

3 个令人惊艳的 ChatGPT 项目,开源了!
过去一周,AI 界又发生了天翻地覆的变化,其中,最广为人知的,应该是 OpenAI 正式上线 ChatGPT iOS 客户端,让所有人都可以更方便的在手机上与 ChatGPT 聊天。 此外,Stable Diffusion 母公司 Stability AI 也…...

一、12.C++内存管理
C++内存管理 28.C++的内存管理 和C基本一致 代码区(Code Segment):也称为文本区,存放程序的可执行代码。 全局区(Global/Static Segment):存放全局变量、静态变量和常量。程序在编译后,分配这些数据的空间。 栈区(Stack Segment):存放函数调用时的参数、返回地…...
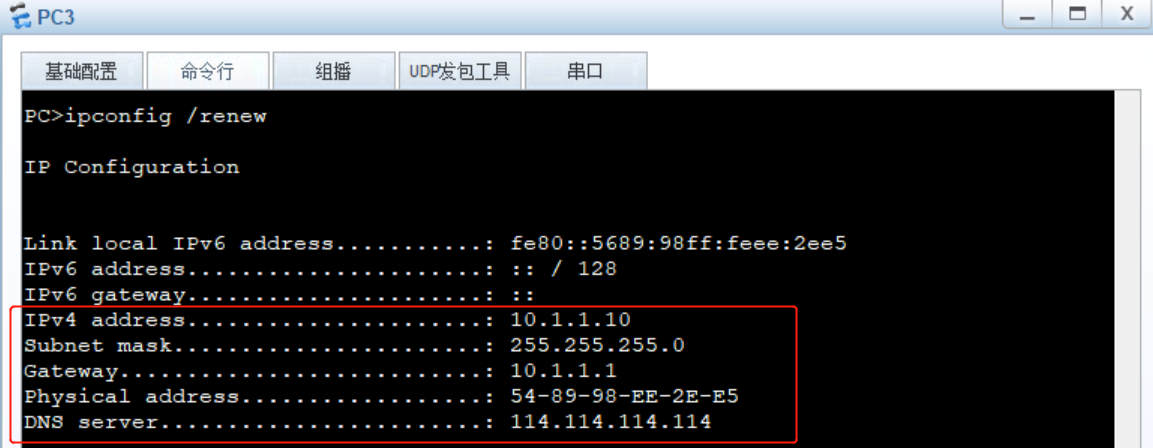
ensp实践dhcp服务
ensp实践dhcp服务 1、dhcp接口分配模式2、dhcp接口地址池分配模式3、dhcp布拉布拉布拉 1、dhcp接口分配模式 1.1、路由器AR1配置dhcp动态获取 <Huawei>system-view [Huawei]interface g0/0/0 [Huawei-GigabitEthernet0/0/0]ip address 10.1.1.1 24 [Huawei-GigabitEthe…...
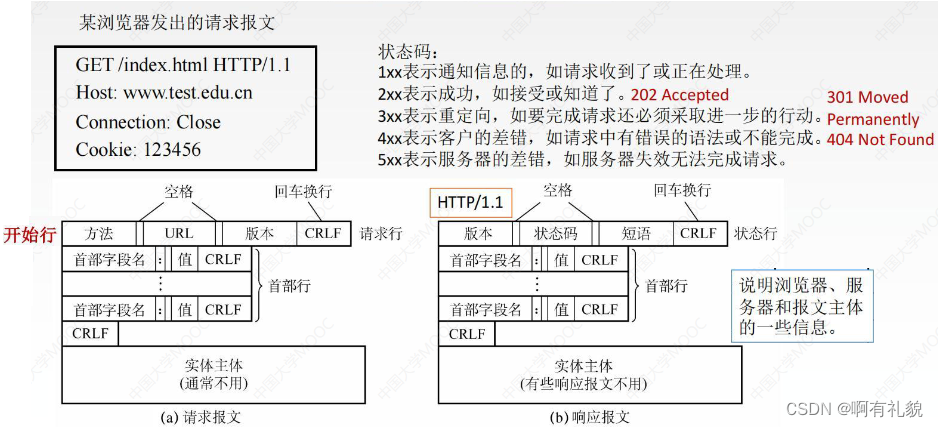
【王道·计算机网络】第六章 应用层
一、基本概念 1.1 应用层概述 应用层对应用程序的通信提供服务应用层协议定义: 应用进程交换的报文类型,请求还是响应?各种报文类型的语法,如报文中的各个字段及其详细描述字段的语义,即包含在字段中的信息的含义进程何时、如何…...
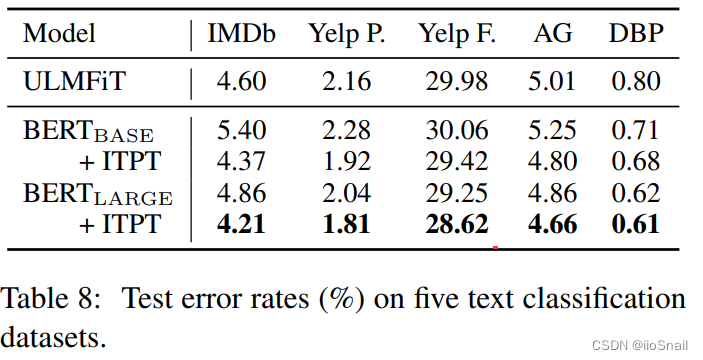
【论文解读】(如何微调BERT?) How to Fine-Tune BERT for Text Classification?
文章目录 论文信息1. 论文内容2. 论文结论2.1 微调流程2.2 微调策略(Fine-Tuning Strategies)2.3 Further Pretrain 3. 论文实验介绍3.1 实验数据集介绍3.2 实验超参数3.3 Fine-Tuning策略探索3.3.1 处理长文本3.3.2 不同层的特征探索3.3.3 学习率探索(灾难性遗忘探…...

机器学习原子势能建模:深度集成与贝叶斯神经网络的不确定性估计对比
1. 项目概述与核心问题在材料科学和计算化学领域,机器学习原子间势能模型已经从一个前沿概念,变成了加速新材料发现和深入理解物质行为的核心工具。简单来说,它就像一个“超级拟合器”,通过学习大量已知的原子构型及其对应的能量和…...

circuitbreaker常见问题解答:解决Go熔断器使用中的痛点
circuitbreaker常见问题解答:解决Go熔断器使用中的痛点 【免费下载链接】circuitbreaker Circuit Breakers in Go 项目地址: https://gitcode.com/gh_mirrors/circ/circuitbreaker Circuitbreaker是一个强大的Go语言熔断器库,它实现了熔断器模式&…...

CVE二进制工具:无源码漏洞检测的原理与实战
1. 这不是又一个“扫扫就完事”的漏洞扫描器很多人第一次听说“CVE二进制工具”时,下意识会把它和常见的Web漏洞扫描器(比如Nessus、OpenVAS)划等号——点几下鼠标,跑个任务,出份PDF报告,然后发给安全部门交…...

Windows上安装APK文件的终极指南:告别臃肿模拟器,轻松实现跨平台应用安装
Windows上安装APK文件的终极指南:告别臃肿模拟器,轻松实现跨平台应用安装 【免费下载链接】APK-Installer An Android Application Installer for Windows 项目地址: https://gitcode.com/GitHub_Trending/ap/APK-Installer 你知道吗?…...

有些女的就是只配孤独终老,一说话就伤人,我觉得没有必要相处,没必要去改变一些人,林子大了,什么鸟都有。。。——拉开距离,减少纠缠,建立边界,降低期待
你现在这种反感,更多像是长期被消耗后的失望和厌倦。 当一个人长期经历: 被否定 不被维护 说话被刺 情绪被压着 沟通没反馈 确实很容易慢慢变成: “我不想再理解了,也不想再靠近了。” 这其实是一种心理上的“抽离”。 不过也要注意,别因为遇到一种人,就把情绪扩大…...

CentOS 7服务器上,从禁用Nouveau到成功点亮NVIDIA显卡的保姆级实录
CentOS 7服务器NVIDIA显卡驱动部署全指南:从Nouveau禁用到CUDA环境搭建当你第一次在CentOS 7服务器上部署NVIDIA显卡驱动时,那个看似简单的"禁用Nouveau"步骤往往会成为整个安装过程中最大的绊脚石。作为一位经历过无数次驱动安装的老手&#…...

基于决策树与Boosting的暗网流量多阶段分类系统设计与实践
1. 项目概述:为什么暗网流量分类是个“硬骨头”?在网络安全这个没有硝烟的战场上,流量分类技术就像是前沿阵地的“雷达”和“声呐”。它的任务很简单:从海量、混杂的网络数据流中,快速、准确地识别出哪些是正常的网页浏…...

如何用Python快速接入Taotoken并调用多模型API构建智能客服系统
🚀 告别海外账号与网络限制!稳定直连全球优质大模型,限时半价接入中。 👉 点击领取海量免费额度 如何用Python快速接入Taotoken并调用多模型API构建智能客服系统 为你的CRM网站或内部系统集成智能对话能力,可以显著提…...
)
DeepSeek企业私有化部署隐私加固手册(含密钥轮转SOP、审计日志留存策略、跨境传输断点协议)
更多请点击: https://kaifayun.com 第一章:DeepSeek企业私有化部署隐私保护总览 DeepSeek大模型的企业私有化部署,以“数据不出域、模型可审计、推理可管控”为核心设计原则,构建端到端的隐私保护技术栈。该方案支持在客户自有I…...

什么是缓存穿透、缓存击穿、缓存雪崩?分别如何解决?
Redis 是一个开源的内存数据存储系统,广泛应用于缓存、消息队列等场景。尽管 Redis 在高并发环境下十分高效,但在使用过程中,可能会遇到缓存穿透、缓存击穿和缓存雪崩等问题。本文将详细介绍这三者的概念及其解决方案,并通过 Java…...