基于Javaweb+Vue3实现淘宝卖鞋前后端分离项目
前端技术栈:HTML+CSS+JavaScript+Vue3
后端技术栈:JavaSE+MySQL+JDBC+JavaWeb
文章目录
- 前言
- 1️⃣登录功能
- 登录后端
- 登录前端
- 2️⃣商家管理
- 查询商家
- 查询商家后端
- 查询商家前端
- 增加商家
- 增加商家后端
- 增加商家前端
- 删除商家
- 删除商家后端
- 删除商家前端
- 修改商家
- 修改商家后端
- 修改商家前端
- 3️⃣鞋子管理
- 查询鞋子
- 查询鞋子后端
- 查询鞋子前端
- 增加鞋子
- 增加鞋子后端
- 增加鞋子前端
- 删除鞋子
- 删除鞋子后端
- 删除鞋子前端
- 修改鞋子
- 修改鞋子后端
- 修改鞋子前端
前言
本文项目或许不符合现实生活,无所谓,那是博主给自己做的笔记
如果认真的跟着敲了,发现有问题,欢迎私信或评论区讨论
数据库和Dao层代码采用基于JavaSE的淘宝卖鞋后端管理系统的设计与实现
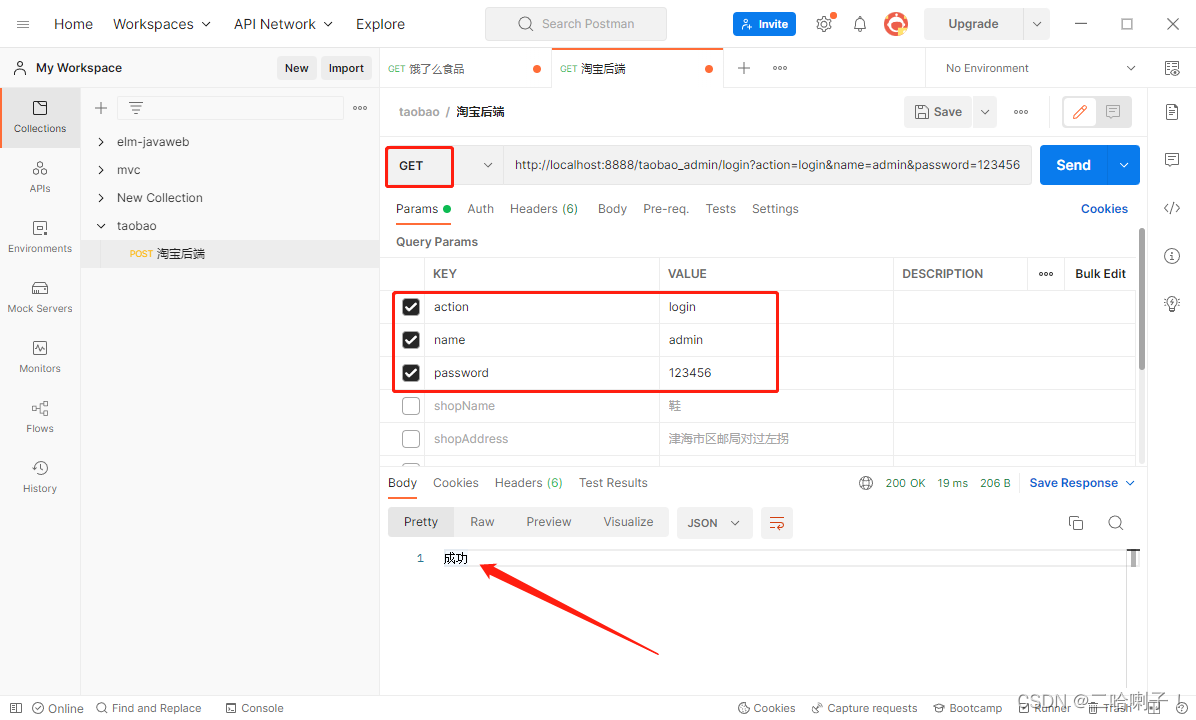
【易错点】:?action的值要与postman后端匹配
1️⃣登录功能
登录后端
在这里实体类和数据库不再重复写
一、dao包
其实就是个查询,登录的查询关注的是查没查到 ,返回值是布尔类型
public class AdminDao {public boolean login(Admin admin) {boolean result = false;Connection connection = null;PreparedStatement statement = null;ResultSet resultSet = null;connection = JdbcUtil.createConnection();try {statement = connection.prepareStatement("select * from admin where name=? and password=?");// 给? 赋值statement.setString(1, admin.getName());statement.setString(2,admin.getPassword());// 执行resultSet = statement.executeQuery();if (resultSet.next()) {result = true;}} catch (SQLException e) {// TODO 自动生成的 catch 块e.printStackTrace();} finally {JdbcUtil.close(resultSet, statement, connection);}return result;}
}
二、service包的AdminService
public class AdminService {private AdminDao dao = new AdminDao();public String login(Admin admin) {return dao.login(admin)?"成功":"失败";}
三、是controller包的LoginServlet
1、继承HttpServlet
2、加WebServlet注解,写路径
3、重新 doXXX方法
@WebServlet("/login")
public class LoginServlet extends HttpServlet{// 重写AdminService代码private AdminService service = new AdminService();@Overrideprotected void doGet(HttpServletRequest req, HttpServletResponse resp) throws ServletException, IOException {// 获取请求发来的名字和密码String name = req.getParameter("name");String password = req.getParameter("password");// 封装Admin admin = new Admin();admin.setName(name);admin.setPassword(password);// 调用service方法String result = service.login(admin);// 发送响应数据PrintWriter writer = resp.getWriter();writer.print(result);}}
后端写完后用Postman测试:
登录前端
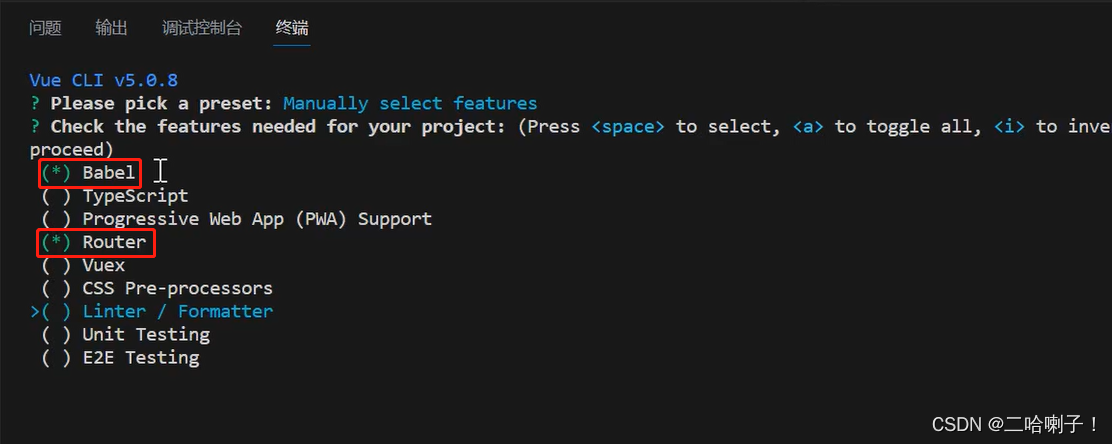
新建一个前端项目,在创建时勾选上Router选项,因为有跳转
创建好项目后分别安装 font-awesome框架、axios和qs框架
npm i font-awesome
npm i axios
npm i qs
在main.js文件中导入一个css文件用于在页面中加图标
// 图标导入
import 'font-awesome/css/font-awesome.min.css'
同时还要加个路由守卫
路由守卫目的是除了登录视图外,其他视图的访问必须是登录过的用户,如果未登录,则跳转到登录页;
如果已登录,则正常进行路由跳转。
//路由守卫
//在路由实例上调用 beforeEach 方法,用于在导航之前进行拦截
router.beforeEach((to,from,next)=>{//获取当前用户是否已经登陆的状态let login = sessionStorage.getItem('login')//判断用户登录状态是否存在或者将要进入的路径为根目录if (login!=null || to.path=='/') {//如果用户已经登录或将要进入的是根目录,则正常进行导航next()} else {//如果用户未登录则强制跳转到根目录router.push('/')}
})
下一步清空项目中生成的无用代码和组件
在根组件中只留一个路由出口
<template><router-view></router-view>
</template>
在views文件夹中生成IndexView和LoginView两个视图
下一步在index.js文件中导入两个视图及路由配置
import LoginView from '@/views/LoginView'
import IndexView from '@/views/IndexView'
const routes = [{// 默认访问视图path: '/',name: 'login',component: LoginView},{path: '/index',name: 'index',component: IndexView,}//  下面配置子路由
]
在 index.html 中加点样式 style,让他撑满整个整个父标记
html,body,#app{width: 100%;height: 100%;margin: 0;}
在登录视图中:
<template><div class="wrapper"><div class="login"><i class="fa fa-user-o"></i><input type="text" v-model="name"> <br><i class="fa fa-lock"></i><input type="password" v-model="password"> <br><button @click="login">登录</button></div></div>
</template>
然后加点样式
<style scoped>
.wrapper {width: 100%;height: 100%;background: linear-gradient(rgba(0, 0, 0, 0.6), rgba(0, 0, 0, 0.6)), url(../assets/bg.jpeg); /* 使用渐变遮罩来增强背景图的视觉效果 */background-repeat: no-repeat;background-size: cover;background-position: center center;padding: 50px 0; /* 增加上下内边距来让内容与背景之间有一定的间隔感 */display: flex;justify-content: center;align-items: center;
}.login {max-width: 400px; /* 按实际情况增加登录框的最大宽度 */margin: 0 auto; /* 让登录框居中对齐 */padding: 30px; /* 调整上下左右内边距让内容与边缘之间有更多的间距 */box-shadow: 5px 5px 15px rgba(0, 0, 0, 0.3); /* 调整阴影效果的参数来产生更自然的视觉效果 */
}input[type="text"], input[type="password"] {margin-bottom: 10px; /* 拉开间距 */margin-left: 10px; /* 拉开间距 */border-radius: 20px; /* 使用更大的圆角半径增强输入框的圆润感 */border: none; /* 取消边框使输入框看起来更为简洁 */background-color: rgba(255, 255, 255, 0.9); /* 使用透明度来让背景色渐变过渡,增强美感 */height: 50px; /* 增加输入框的高度让文字更加易读 */font-size: 18px; /* 调整字体大小 */padding: 0 20px; /* 调整左右内边距增加输入框内部空间 */box-shadow: 5px 5px 15px rgba(0, 0, 0, 0.1); /* 添加输入框的轻微阴影效果 */
}button {width: 100%;height: 50px; /* 增加按钮的高度 */border: none;background-color: #4CAF50; /* 使用绿色来增强按钮的视觉效果 */color: #fff;font-size: 18px;border-radius: 20px; /* 使用更大的圆角半径来增强按钮的圆润感 */cursor: pointer;transition: all 0.2s ease-in-out; /* 添加按钮的渐变动画效果 */
}button:hover {background-color: #3e8e41; /* 鼠标悬停时,按钮背景色变为深绿色 */box-shadow: 5px 5px 15px rgba(0, 0, 0, 0.3); /* 鼠标悬停时,添加更明显的阴影效果 */
}</style>
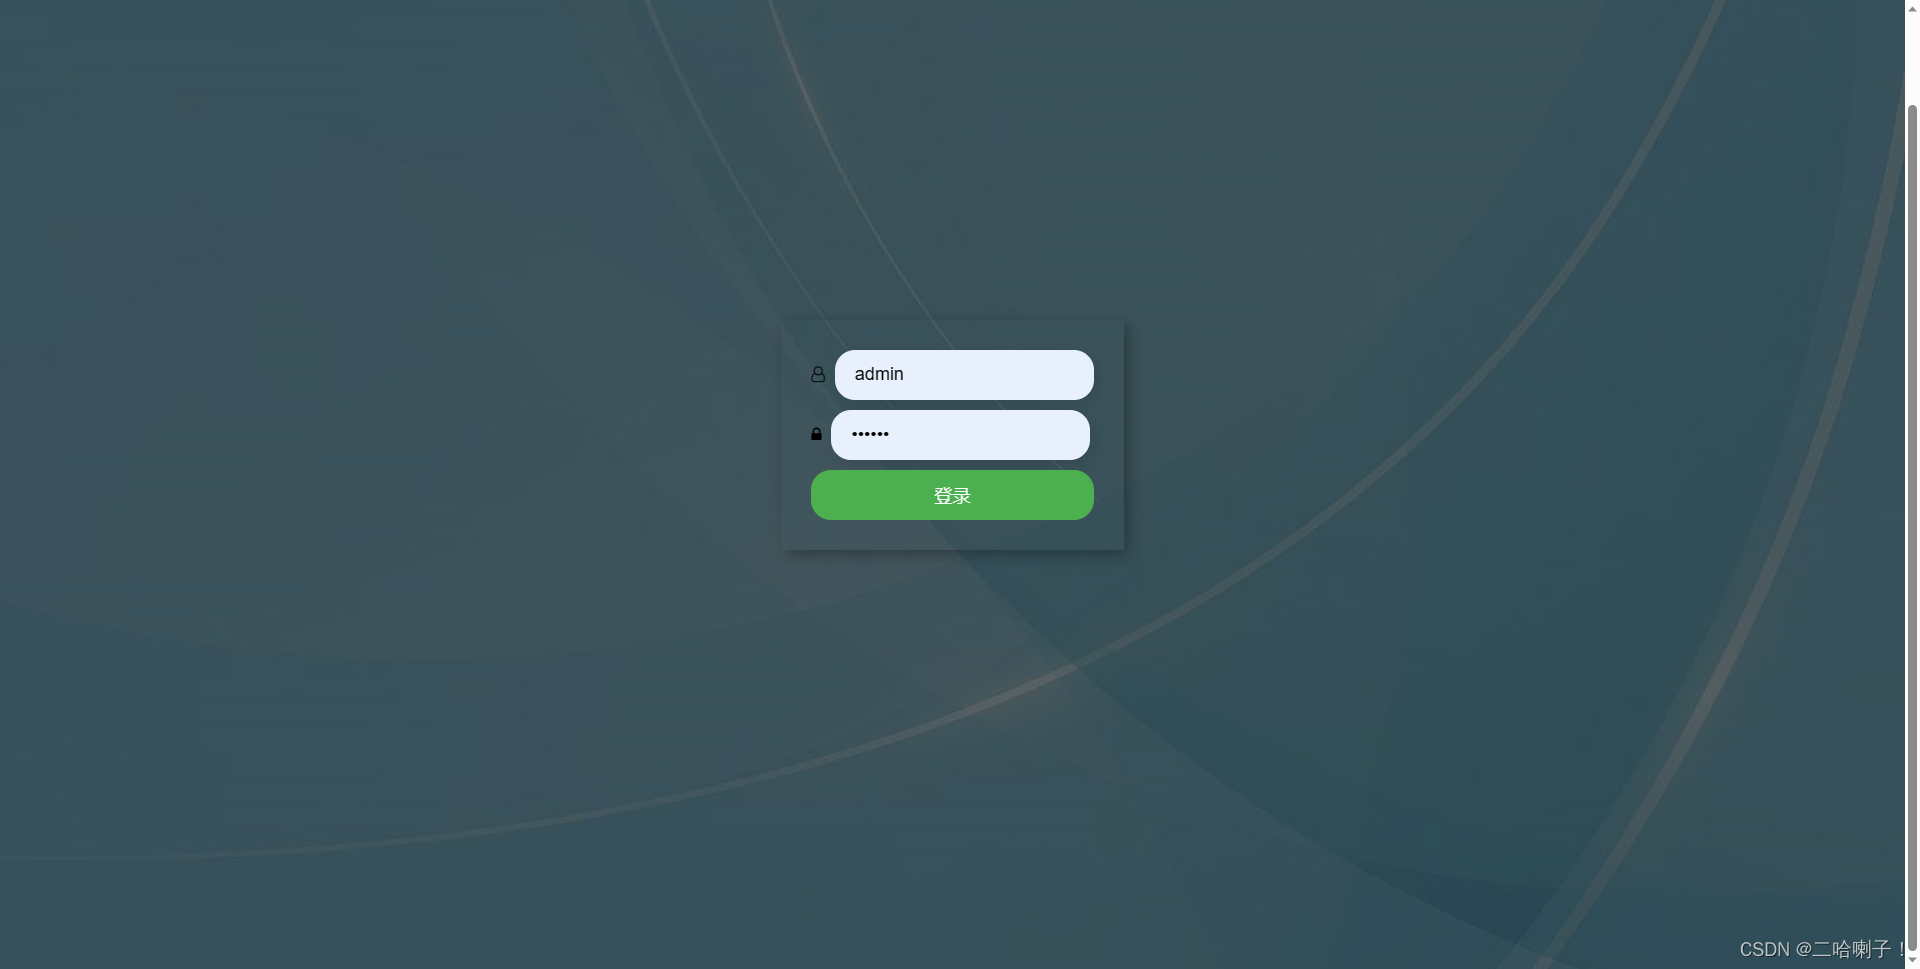
接下来在data 配置 v-model 的两个数据(name和password)
data () {return {// 默认为空naem: '',password: '',}},
完成绑定后后编写login方法加在methods,用 login 发请求,发请求就要导包axios
qs包是发送 get 请求,get 请求数据是拼接在地址里,所以暂不需要
import axios from 'axios';//.....methods: {login(){axios.get(`http://localhost:8888/taobao_admin/login?name=${this.name}&password=${this.password}`)// 生成响应.then((resp)=>{// 做个弹窗alert(resp.data)})}},
输入正确的用户名和密码后点击登录,在页面上方弹出提示框提示成功,否则是提示失败
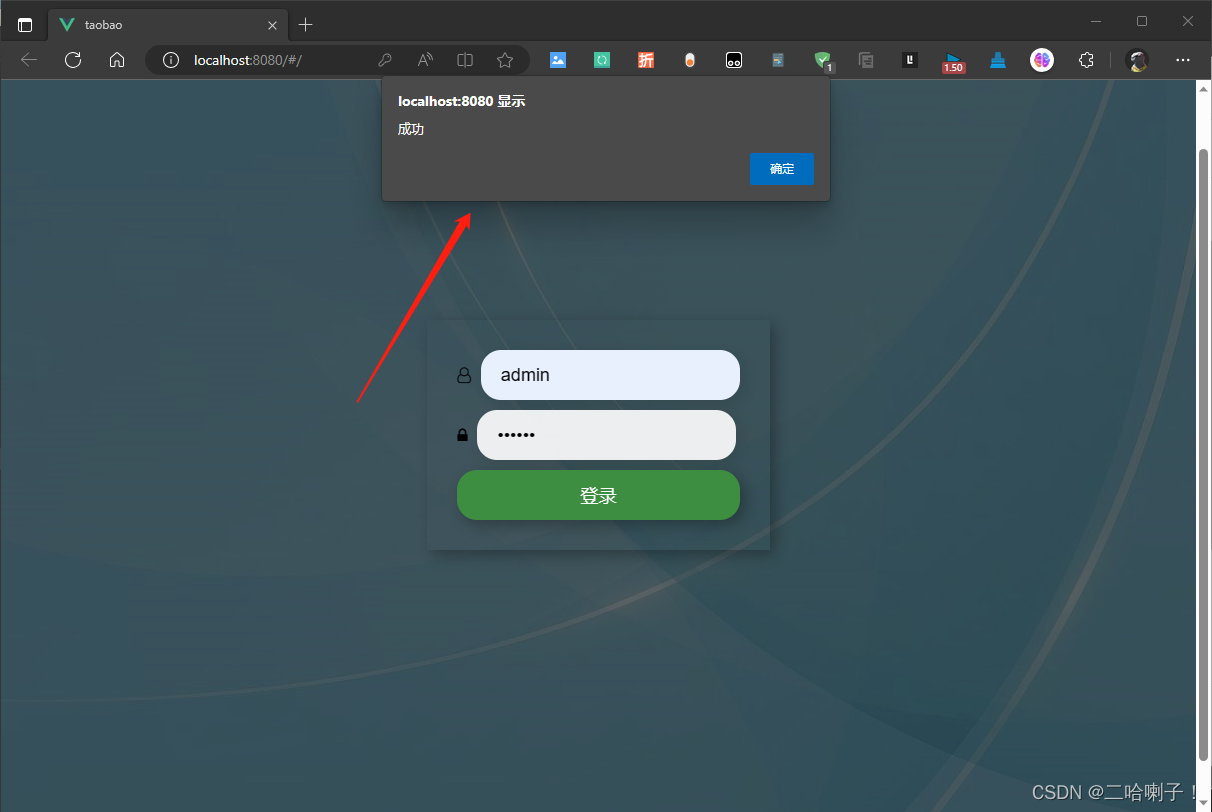
如果显示成功要完成到首页的跳转,如果失败那就接着跳转
methods: {login(){axios.get(`http://localhost:8888/taobao_admin/login?name=${this.name}&password=${this.password}`)// 生成响应.then((resp)=>{// 做个弹窗// alert(resp.data)if (resp.data=='成功') {sessionStorage.setItem('login',this.name)this.$router.push('index')} else {this.isErr = true,this.name = '',this.password = ''}})}},
【代码解释】:
当输入用户名和密码后,点击登录按钮,就会触发 login 函数。该函数使用 axios 库发送一个 GET 请求到指定的 URL,其中包含用户名和密码,等待服务器响应。如果响应返回了“成功”,就将用户名存储在浏览器的 sessionStorage 中,然后将用户重定向到“index”页面。如果响应返回其他内容,则表示登录失败,将清空用户名和密码,并将 isErr设置为 true,以便在界面上显示错误消息。
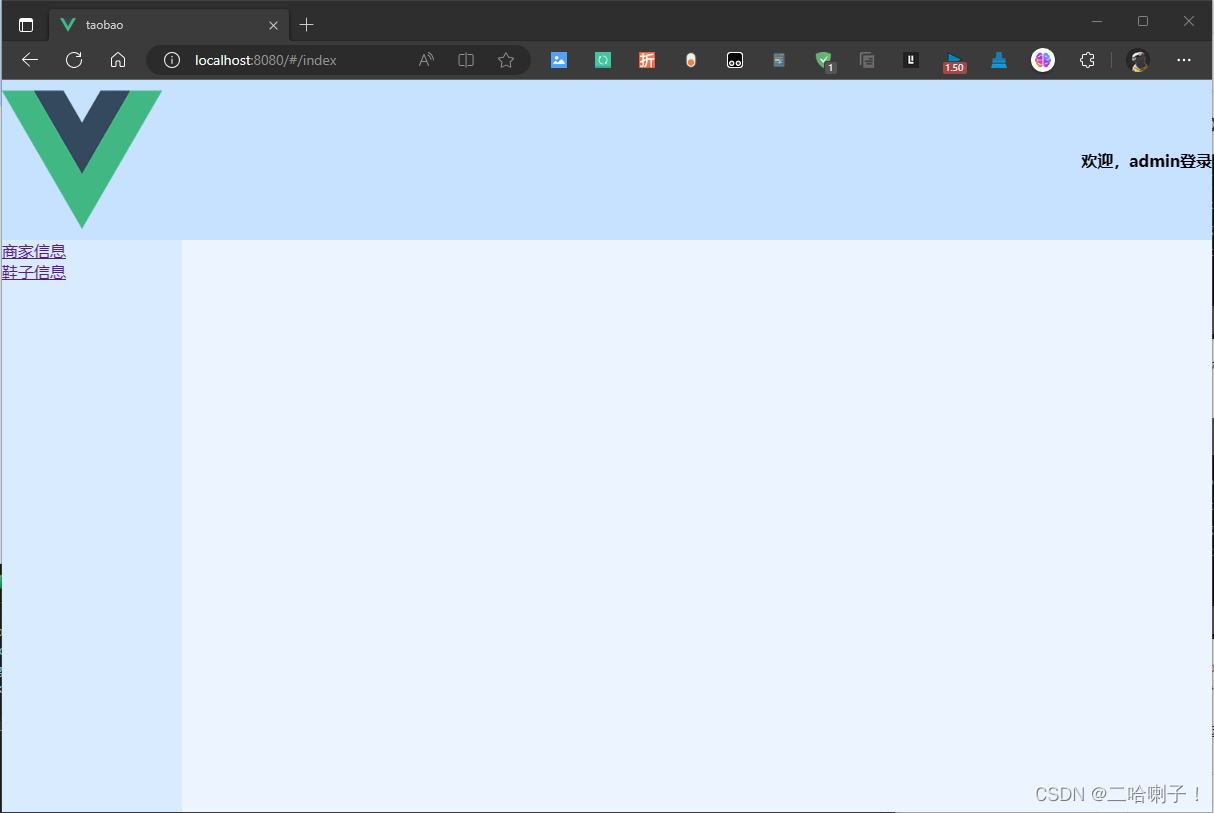
首页视图代码:
<template><div class="wrapper"><header><img src="../assets/logo.png" alt=""><!-- 从会话中取出的名字 --><h4>欢迎,{{ name }}登录</h4></header><div class="main"><aside><router-link to="">商家信息</router-link> <br><router-link to="">鞋子信息</router-link> <br></aside><section><router-view></router-view></section></div></div>
</template>
随后加上样式代码
<style scoped>
.wrapper{width: 100%;height: 100%;display: flex;flex-direction: column;
}header{width: 100%;flex: 0 0 100px;background-color: #c6e2ff;display: flex;justify-content: space-between;align-items: center;
}header img{width: 160px;
}.main{width: 100%;flex: 1;display: flex;
}aside{flex: 0 0 180px;height: 100%;background-color: #d9ecff;
}section{flex: 1;height: 100%;background-color: #ecf5ff;
}
</style>
插值语法中是个 name,需要在data中做个配置
data () {return {name: ''}},
name 从会话存储中获取到的,需要写到挂载完成的钩子函数里面,挂载完毕取出会话里的数据赋值给 name
mounted () {this.name = sessionStorage.getItem('login')}
随后登陆成功
2️⃣商家管理
对于后端增删改查这里只写(按顺序)dao、service、controller
查看代码注解
查询商家
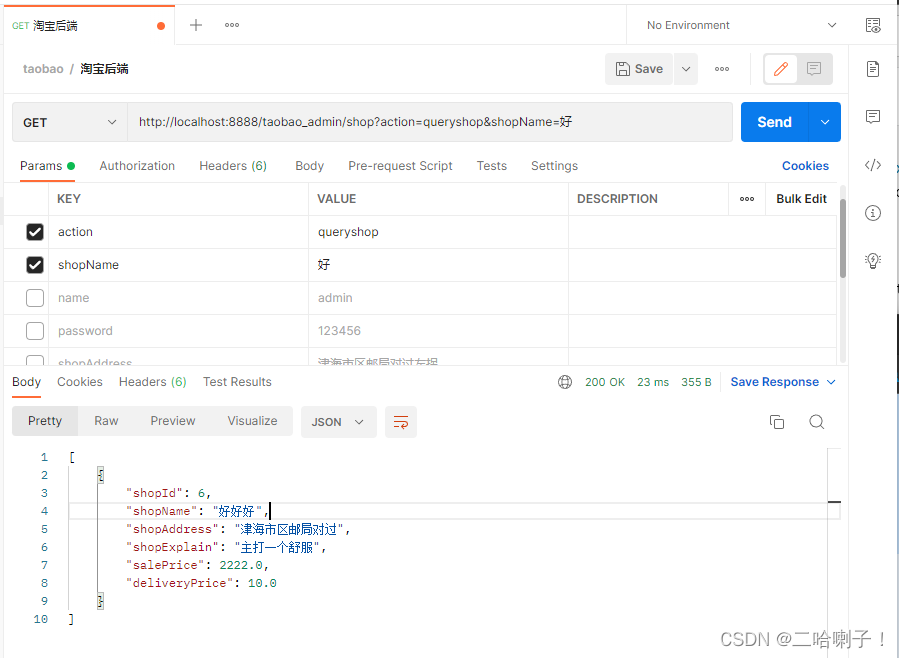
查询商家后端
这里查询方法名字的是 queryshop
dao包:
// 模糊查询public ArrayList<Shop> queryshop(String shopName){ArrayList<Shop> list = new ArrayList<>();Connection connection = null;PreparedStatement statement = null;ResultSet resultSet = null;connection = JdbcUtil.createConnection();try {statement = connection.prepareStatement("select * from shop where shopName like ?");statement.setString(1, "%"+shopName+"%");resultSet = statement.executeQuery();while (resultSet.next()) {Shop shop = new Shop();shop.setShopId(resultSet.getInt("shopId"));shop.setShopName(resultSet.getString("shopName"));shop.setShopAddress(resultSet.getString("shopAddress"));shop.setShopExplain(resultSet.getString("shopExplain"));shop.setSalePrice(resultSet.getDouble("salePrice"));shop.setDeliveryPrice(resultSet.getDouble("deliveryPrice"));list.add(shop);}} catch (SQLException e) {// TODO 自动生成的 catch 块e.printStackTrace();} finally {JdbcUtil.close(resultSet, statement, connection);}return list;}
service包:
对于查询、添加、修改有多个数据,这里写个dao类封装
//调用dao,提前创建dao对象private ShopDao dao = new ShopDao();public String queryshop(String shopName) {ArrayList<Shop> list = dao.queryshop(shopName);Gson gson = new Gson();return gson.toJson(list);}
controller包:
@WebServlet("/shop")
public class ShopController extends HttpServlet{private ShopService service = new ShopService();//	req请求     resp响应@Overrideprotected void service(HttpServletRequest req, HttpServletResponse resp) throws ServletException, IOException {String action = req.getParameter("action");PrintWriter writer = resp.getWriter();if (action.equals("queryshop")){String shopName = req.getParameter("shopName");String result = service.queryshop(shopName);writer.print(result);} 	}
}
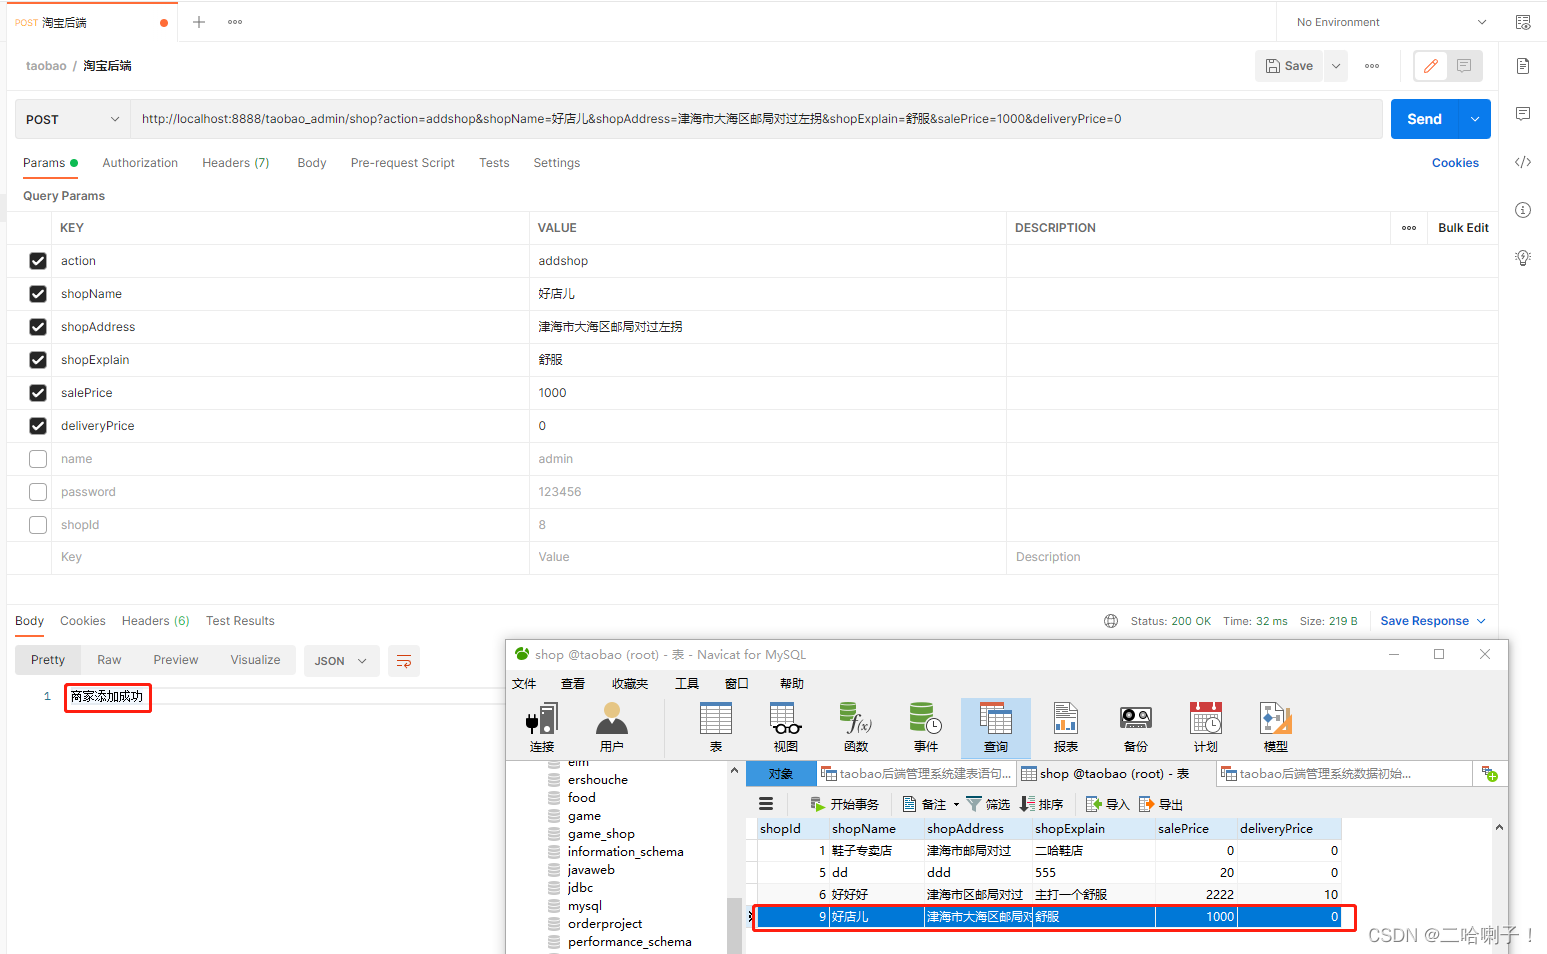
postman 测试:
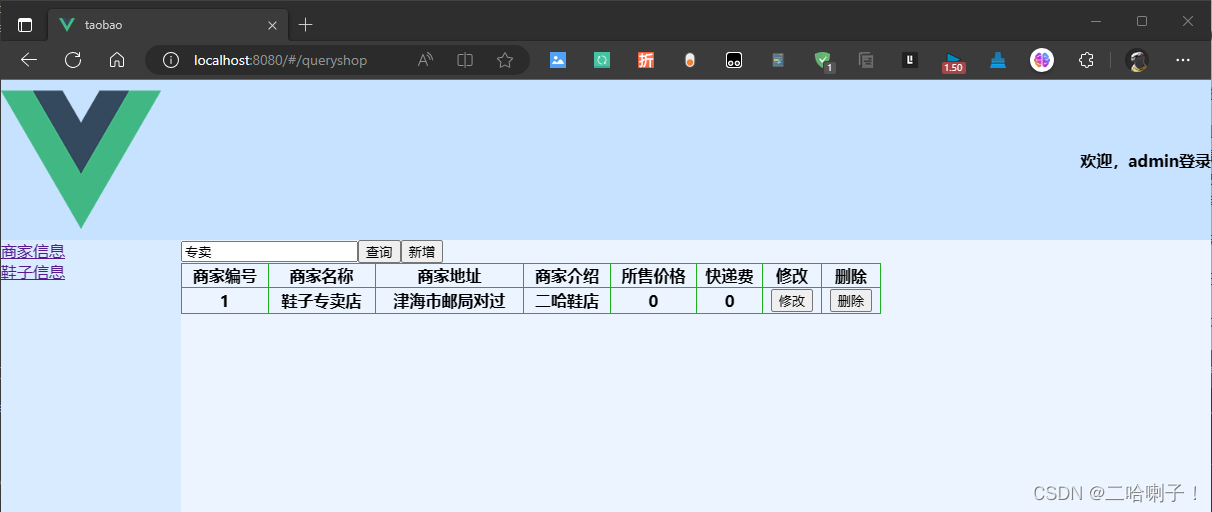
查询商家前端
在前端视图文件夹下新建文件夹shop,在里面新建视图ShopQueryView
首先在首页配置下加上查询商家的配置路由对象
{path: '/index',name: 'index',component: IndexView,// 下面配置子路由children: [{path: '/queryshop',name: 'queryshop',component: () => import('@/views/shop/ShopQueryView')},]},
然后
<template><div><input type="text" v-model="shopName" /><button @click="queryshop">查询</button><button @click="addshop">新增</button><table><tr><th>商家编号</th><th>商家名称</th><th>商家地址</th><th>商家介绍</th><th>所售价格</th><th>快递费</th><th>修改</th><th>删除</th></tr><tr v-for="(shop, index) in items" :key="index"><th>{{ shop.shopId }}</th><th>{{ shop.shopName }}</th><th>{{ shop.shopAddress }}</th><th>{{ shop.shopExplain }}</th><th>{{ shop.salePrice }}</th><th>{{ shop.deliveryPrice }}</th><th><button @click="updateshop(index)">修改</button></th><th><button @click="delshop(index)">删除</button></th></tr></table></div>
</template><script>
import axios from 'axios'
export default {data() {return {shopName: '',items: []}},methods: {queryshop() {axios.get(`http://localhost:8888/taobao_admin/shop?action=queryshop&shopName=${this.shopName}`).then((resp) => {this.items = resp.data})},},components: {},computed: {},watch: {},mounted() { }
}
</script>
增加商家
增加商家后端
这里的方法用的是 addshop
dao包:
// 新增商家public int insertShop(Shop shop) {int result = 0;Connection connection = null;PreparedStatement statement = null;connection = JdbcUtil.createConnection();try {statement = connection.prepareStatement("insert into shop(shopName,shopAddress,shopExplain,salePrice,deliveryPrice) values(?,?,?,?,?)");statement.setString(1, shop.getShopName());statement.setString(2, shop.getShopAddress());statement.setString(3, shop.getShopExplain());statement.setDouble(4, shop.getSalePrice());statement.setDouble(5, shop.getDeliveryPrice());result = statement.executeUpdate();} catch (SQLException e) {// TODO 自动生成的 catch 块e.printStackTrace();} finally {JdbcUtil.close(statement, connection);}return result;}
service包:
public String addshop(Shop shop) {return dao.insertShop(shop)>0?"商家添加成功":"商家添加失败";}
controller包:
@WebServlet("/shop")
public class ShopController extends HttpServlet{private ShopService service = new ShopService();//	req请求     resp响应@Overrideprotected void service(HttpServletRequest req, HttpServletResponse resp) throws ServletException, IOException {String action = req.getParameter("action");PrintWriter writer = resp.getWriter();if (action.equals("addshop")) {String shopName = req.getParameter("shopName");String shopAddress = req.getParameter("shopAddress");String shopExplain = req.getParameter("shopExplain");String salePrice = req.getParameter("salePrice");String deliveryPrice = req.getParameter("deliveryPrice");Shop shop = new Shop();shop.setShopName(shopName);shop.setShopAddress(shopAddress);shop.setShopExplain(shopExplain);shop.setSalePrice(Double.parseDouble(salePrice));shop.setDeliveryPrice(Double.parseDouble(deliveryPrice));String result = service.addshop(shop);writer.print(result);}}
}
后端测试:
增加商家前端
首先在 index.js 中加上配置的子路由
{path: '/addshop',name: 'addshop',component: () => import('@/views/shop/ShopAddView')}
回到插入视图,在 methods 内 push 上地址:addshop
addshop() {this.$router.push('./addshop')},
然后新建视图 ShopAddView,在视图里加一些输入框
这里的数据是跟controller类中的取数据的名字一致
v-model 是绑定到一个对象里的几个属性
<template><div>商家名称:<input type="text" v-model="shop.shopName"> <br>商家地址:<input type="text" v-model="shop.shopAddress"> <br>商家介绍:<input type="text" v-model="shop.shopExplain"> <br>商品价格:<input type="text" v-model="shop.salePrice"> <br>快递费: <input type="text" v-model="shop.deliveryPrice"> <br><button @click="addshop">新增</button></div>
</template>
在 data 中加入要添加的内容
data () {return {shop: {shopName:'',shopAddress: '',shopExplain: '',salePrice:'',deliveryPrice:'',action: 'addshop'},}},
然后导入 qs 和 axios 框架,
import qs from 'qs'
import axios from 'axios'
接下来在 methods 内编写 addshop 方法,这里的名字与前面添加按钮事件中名字一样
methods: {addshop(){// v-model是绑定到shop对象里的几个属性 简化axios.post('http://localhost:8888/taobao_admin/shop',qs.stringify(this.shop)).then( (response)=>{// 增加弹窗alert(response.data) } )},},
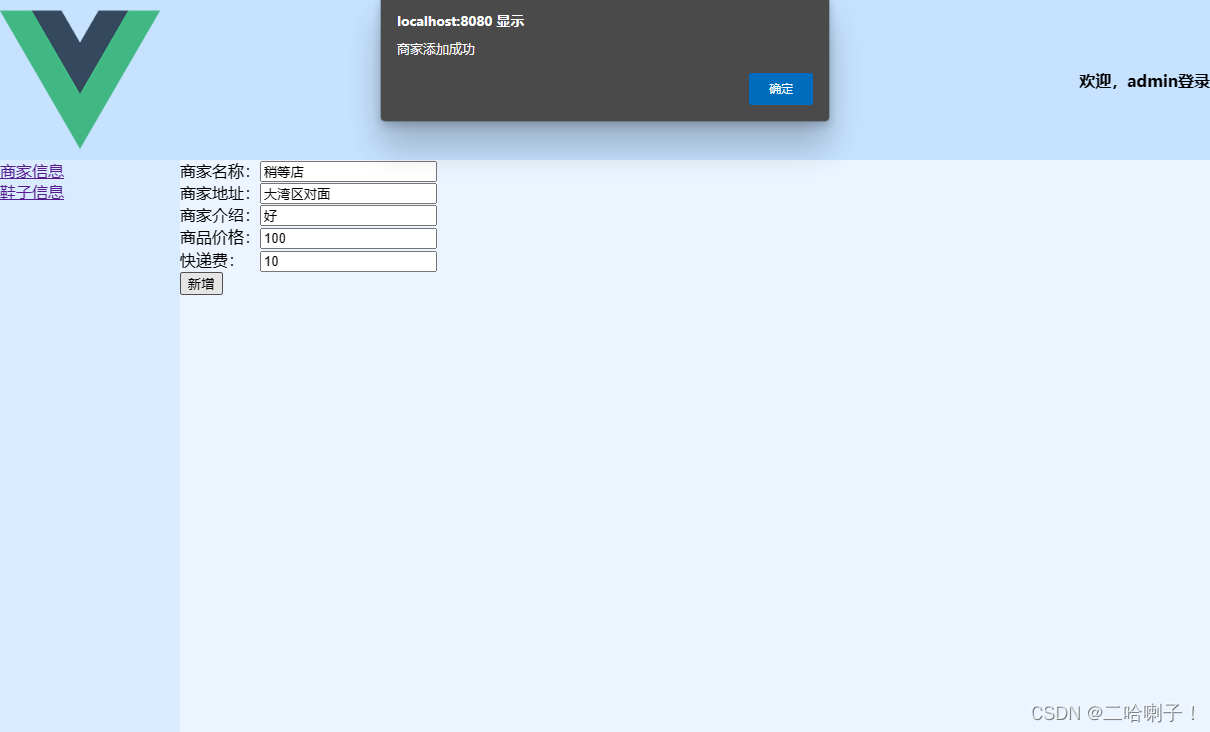
回答查询页面会发现多了条刚才添加的数据
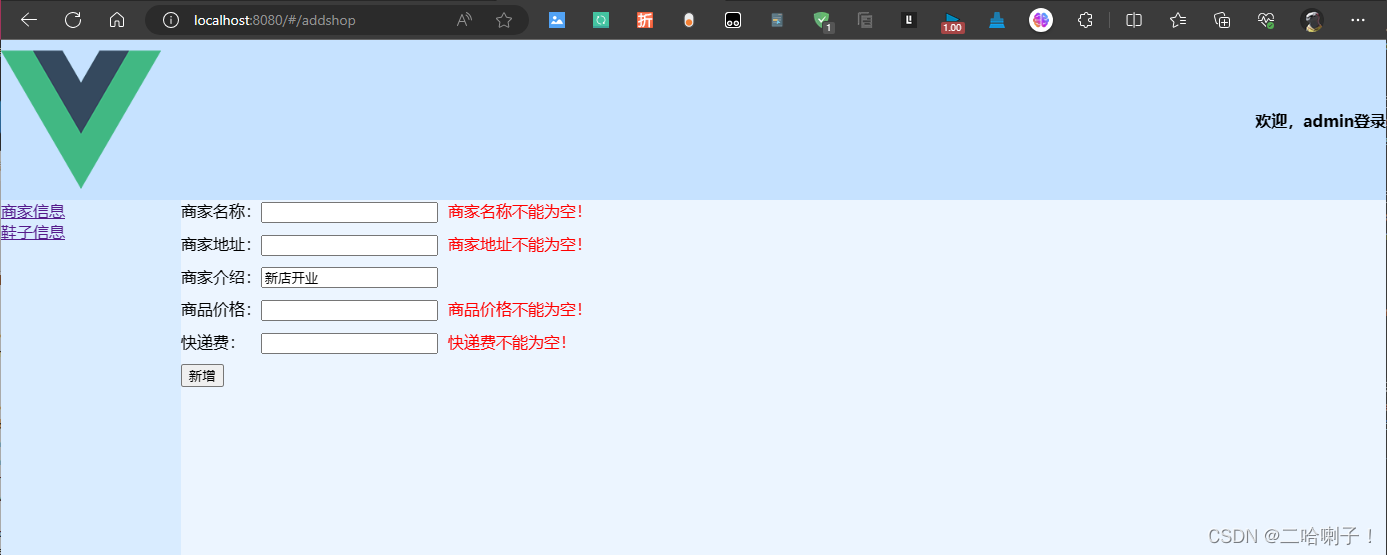
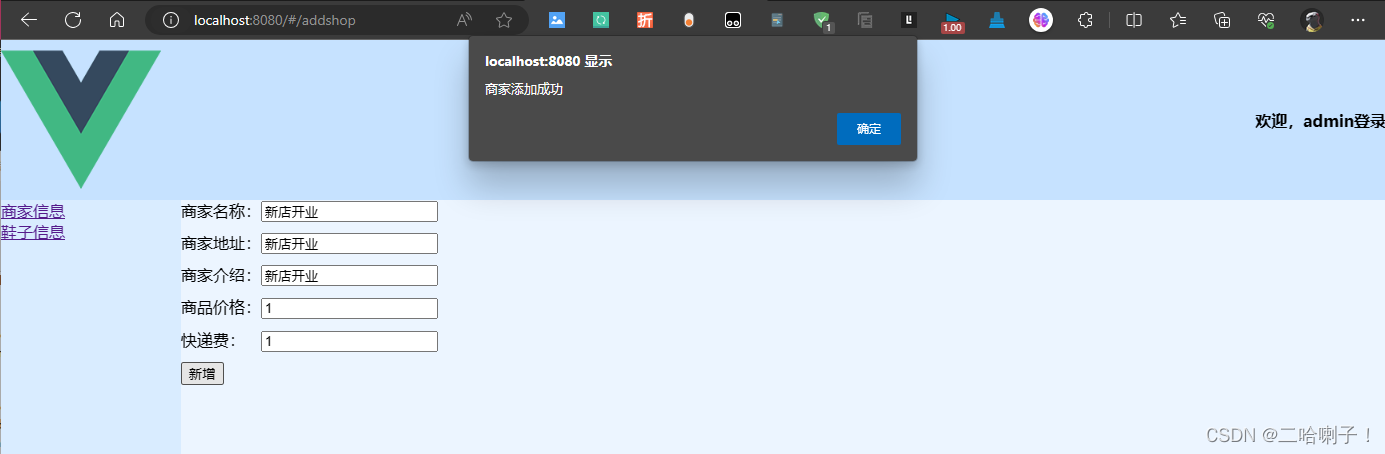
下面给添加商家加点样式,进行表单校验,检查添加的输入框是否为空。如果有任意一个输入框为空,则会展示相应的提示消息,同时不会发送请求。
<template><div><div class="form-group"><label for="shopName">商家名称:</label><input type="text" id="shopName" v-model.trim="shop.shopName"><span v-if="!shop.shopName" class="error-msg">商家名称不能为空!</span></div><div class="form-group"><label for="shopAddress">商家地址:</label><input type="text" id="shopAddress" v-model.trim="shop.shopAddress"><span v-if="!shop.shopAddress" class="error-msg">商家地址不能为空!</span></div><div class="form-group"><label for="shopExplain">商家介绍:</label><input type="text" id="shopExplain" v-model.trim="shop.shopExplain"><span v-if="!shop.shopExplain" class="error-msg">商家介绍不能为空!</span></div><div class="form-group"><label for="salePrice">商品价格:</label><input type="text" id="salePrice" v-model.number="shop.salePrice"><span v-if="!shop.salePrice" class="error-msg">商品价格不能为空!</span></div><div class="form-group"><label for="deliveryPrice">快递费: </label><input type="text" id="deliveryPrice" v-model.number="shop.deliveryPrice"><span v-if="!shop.deliveryPrice" class="error-msg">快递费不能为空!</span></div><button @click="addshop">新增</button><p v-if="errorMsg" class="error-msg">{{errorMsg}}</p></div>
</template><script>
import qs from 'qs'
import axios from 'axios'
export default {data() {return {shop: {shopName: '',shopAddress: '',shopExplain: '',salePrice: '',deliveryPrice: '',action: 'addshop'},errorMsg: ''}},methods: {addshop() { if (!this.shop.shopName) {//商家名称不能为空this.errorMsg = '商家名称不能为空!'} else if (!this.shop.shopAddress) {//商家地址不能为空this.errorMsg = '商家地址不能为空!'} else if (!this.shop.shopExplain) {//商家介绍不能为空this.errorMsg = '商家介绍不能为空!'} else if (!this.shop.salePrice) {//商品价格不能为空this.errorMsg = '商品价格不能为空!'} else if (!this.shop.deliveryPrice) {//快递费不能为空this.errorMsg = '快递费不能为空!'} else {axios.post('http://localhost:8888/taobao_admin/shop', qs.stringify(this.shop)).then(response => {alert(response.data);})}}},components: {},computed: {},watch: {},mounted() {}
}
</script><style scoped>
.form-group {margin-bottom: 10px;
}.error-msg {color: red;margin-left: 10px;
}
</style>输出效果:
删除商家
删除商家后端
删除方法用的是delshop
dao包下:
// 删除商家public int deleteShopId(int shopId) {int result = 0;Connection connection = JdbcUtil.createConnection();PreparedStatement statement = null;try {statement = connection.prepareStatement("delete from shop where shopId = ?");statement.setInt(1, shopId);result = statement.executeUpdate();} catch (SQLException e) {// TODO 自动生成的 catch 块e.printStackTrace();} finally {JdbcUtil.close(statement, connection);}return result;}
service包:
public String remove(int shopId) {return dao.deleteShopId(shopId)>0?"商家删除成功":"商家删除失败";}
controller包:
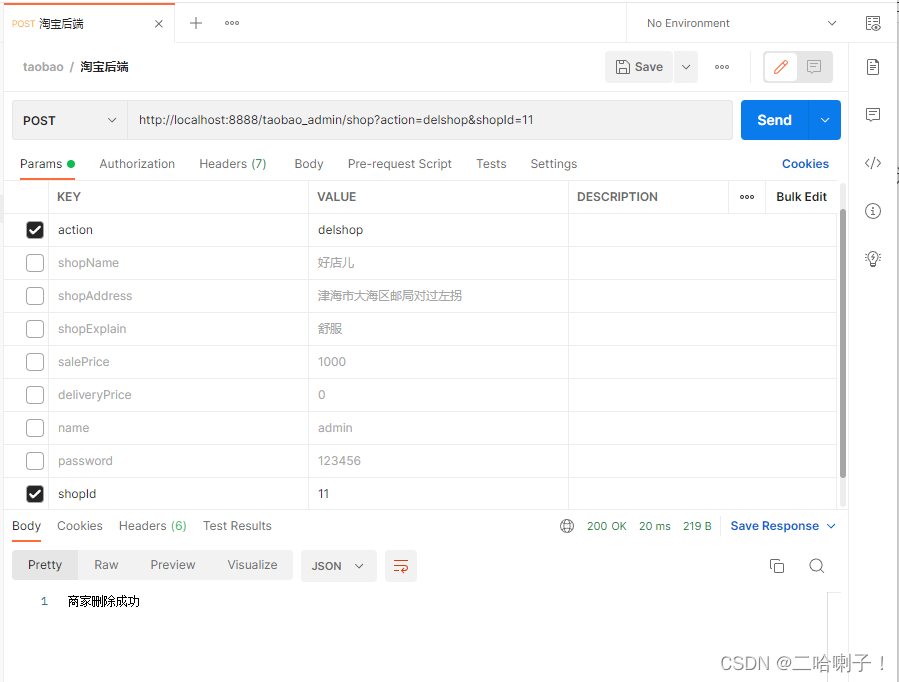
else if (action.equals("delshop")) {String shopId = req.getParameter("shopId");String result = service.remove(Integer.parseInt(shopId));writer.print(result);
后端测试:
删除商家前端
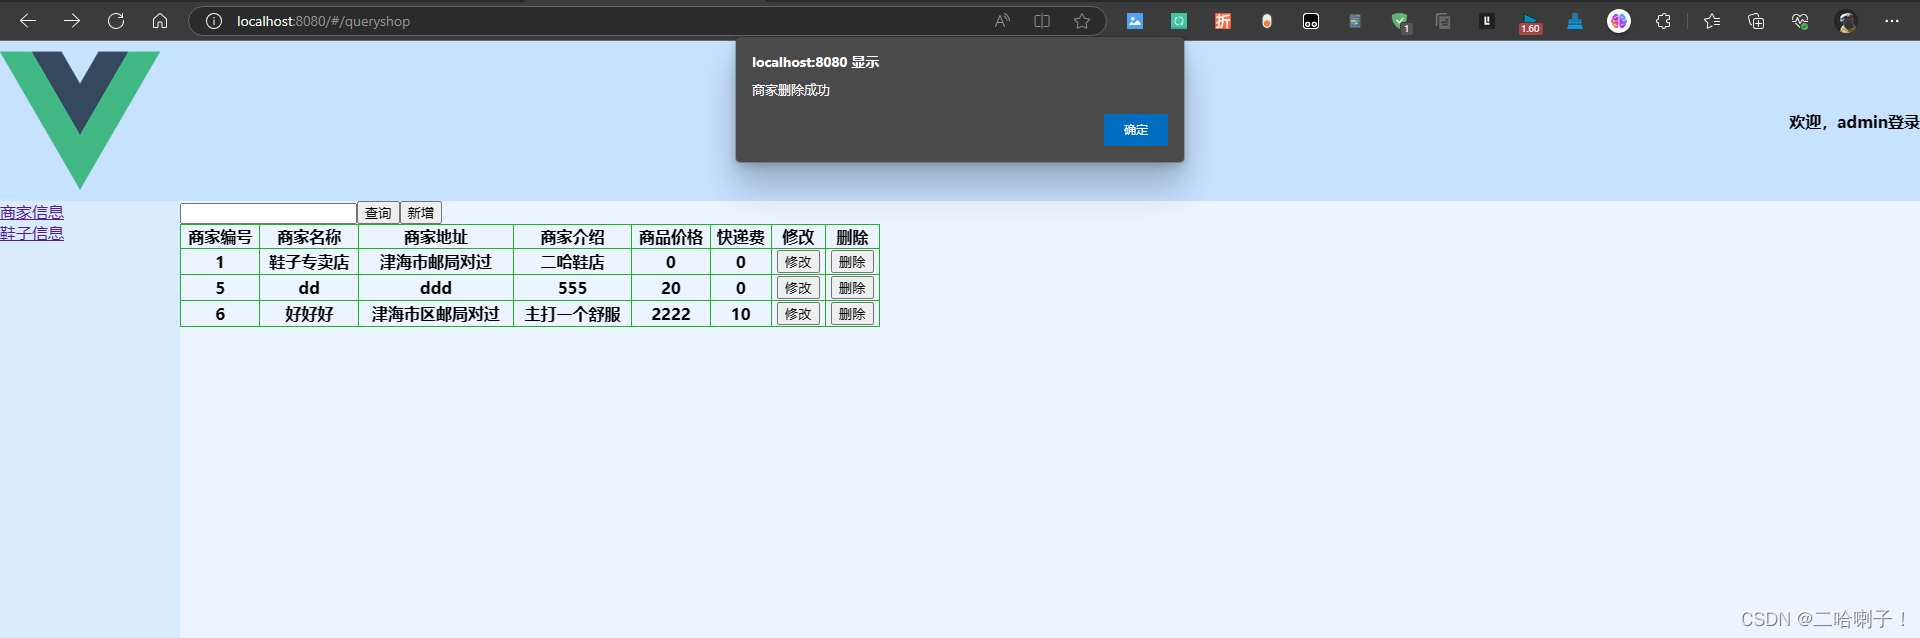
在查询视图下
// i:下标delshop(i){// alert(this.items[i].shopId)axios.post('http://localhost:8888/taobao_admin/shop',qs.stringify({action: 'delshop',shopId: this.items[i].shopId})).then((response)=>{alert(response.data)// 查询删完后的结果this.queryshop()})}
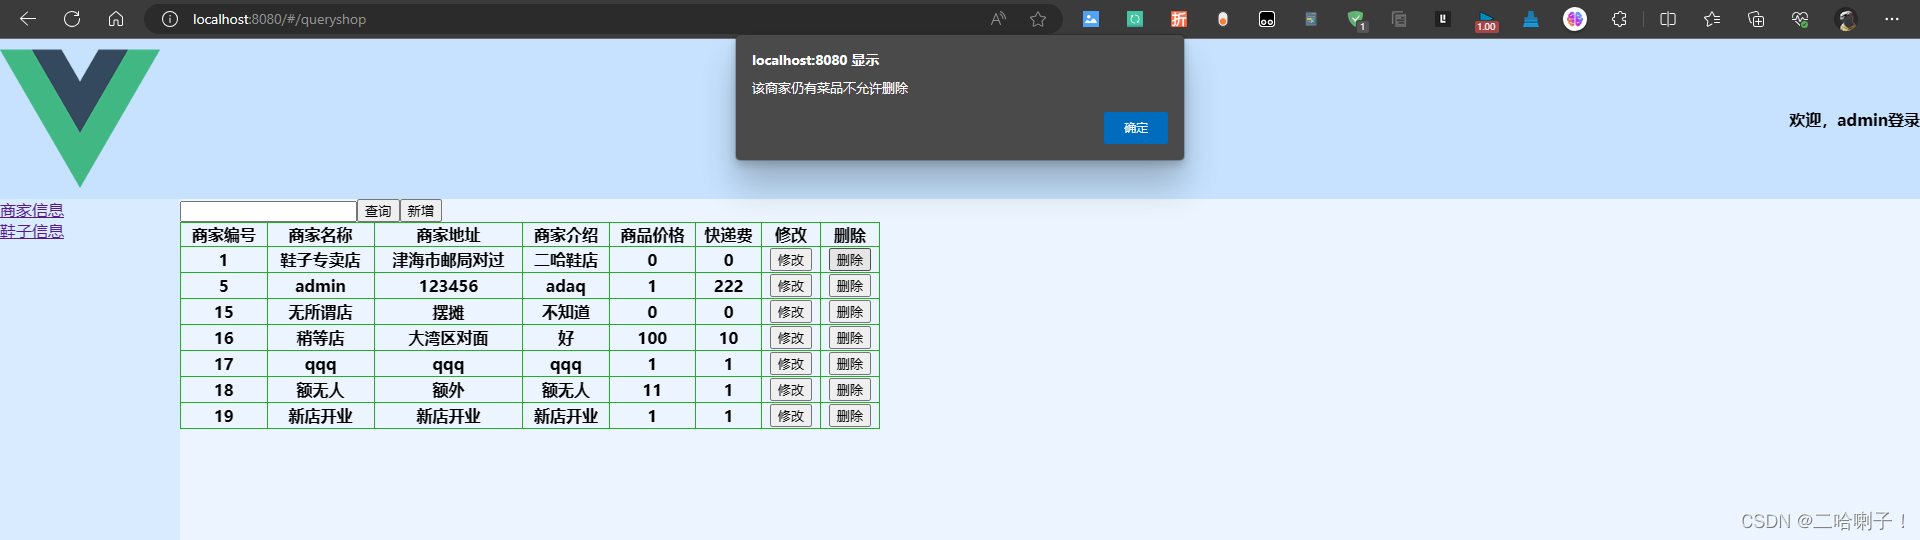
接下来给删除商家功能加点小样式:当商家仍有商品在出售时,不可以删除
首先在后端service包内,删除功能改成:
public String remove(int shopId) {return dao.deleteShopId(shopId)>0?"商家删除成功":"该商家仍有菜品不允许删除";}
先在食品表中查商家ID,然后到商家表中删商家ID
dao包代码:
// 删除商家public int deleteShopId(int shopId) {int result = 0;Connection connection = JdbcUtil.createConnection();PreparedStatement statement = null;try {statement = connection.prepareStatement("delete from shop where shopId = ?");statement.setInt(1, shopId);result = statement.executeUpdate();} catch (SQLException e) {// TODO 自动生成的 catch 块e.printStackTrace();} finally {JdbcUtil.close(statement, connection);}return result;}
controller包代码:
else if (action.equals("delshop")) {String shopId = req.getParameter("shopId");String result = service.remove(Integer.parseInt(shopId));writer.print(result);}
前端代码:
// i:下标delshop(i){// alert(this.items[i].shopId)axios.post('http://localhost:8888/taobao_admin/shop',qs.stringify({action: 'delshop',shopId: this.items[i].shopId})).then((response)=>{alert(response.data)// 查询删完后的结果this.queryshop()})}
回头来写
修改商家
方法用的是:updateshop
修改商家后端
dao层:
// 更新商家public int UpdateShop(Shop shop) {int result = 0;Connection connection = null;PreparedStatement statement = null;connection = JdbcUtil.createConnection();try {statement = connection.prepareStatement("update shop set shopName=?,shopAddress=?,shopExplain=?,salePrice=?,deliveryPrice=? where shopId=?");statement.setString(1, shop.getShopName());statement.setString(2, shop.getShopAddress());statement.setString(3, shop.getShopExplain());statement.setDouble(4, shop.getSalePrice());statement.setDouble(5, shop.getDeliveryPrice());statement.setInt(6, shop.getShopId());result = statement.executeUpdate();} catch (SQLException e) {// TODO 自动生成的 catch 块e.printStackTrace();} finally {JdbcUtil.close(statement, connection);}return result;}
service层:
public String remove(int shopId) {return dao.deleteShopId(shopId)>0?"商家删除成功":"该商家仍有菜品不允许删除";}
controller层:
else if (action.equals("updateshop")) {String shopId = req.getParameter("shopId");String shopName = req.getParameter("shopName");String shopAddress = req.getParameter("shopAddress");String shopExplain = req.getParameter("shopExplain");String salePrice = req.getParameter("salePrice");String deliveryPrice = req.getParameter("deliveryPrice");Shop shop = new Shop();shop.setShopId(Integer.parseInt(shopId));shop.setShopName(shopName);shop.setShopAddress(shopAddress);shop.setShopExplain(shopExplain);shop.setSalePrice(Double.parseDouble(salePrice));shop.setDeliveryPrice(Double.parseDouble(deliveryPrice));String result = service.updateshop(shop);writer.print(result);}
修改商家前端
index.js文件夹下
{path: '/updateshop',name: 'updateshop',component: () => import('@/views/shop/ShopUpdateView')}
查询视图
updateshop(i) {this.$router.push({path: './updateshop',// query方式传参query: this.items[i]})},
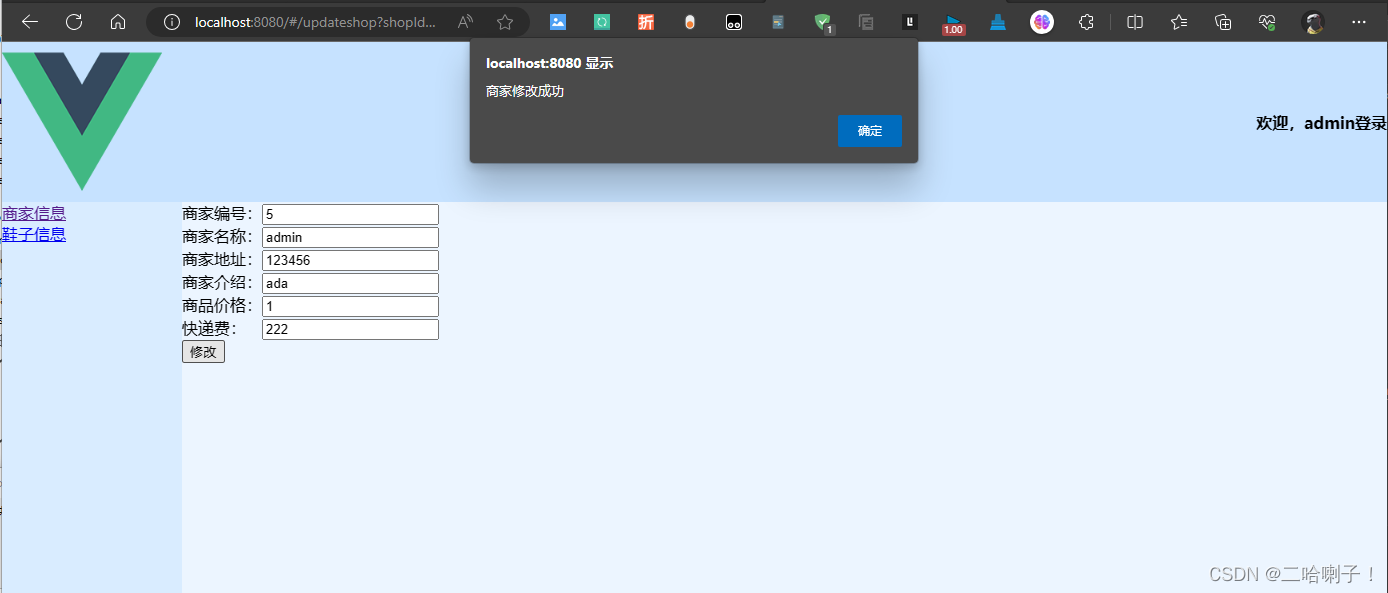
修改视图:ShopUpdateView
<template><div>商家编号:<input type="text" readonly v-model="shop.shopId"> <br>商家名称:<input type="text" v-model="shop.shopName"> <br>商家地址:<input type="text" v-model="shop.shopAddress"> <br>商家介绍:<input type="text" v-model="shop.shopExplain"> <br>商品价格:<input type="text" v-model="shop.salePrice"> <br>快递费:  <input type="text" v-model="shop.deliveryPrice"> <br><button @click="updateshop">修改</button></div>
</template><script>
import axios from 'axios'
import qs from 'qs'
export default {data () {return {shop:{shopId:this.$route.query.shopId,shopName:this.$route.query.shopName,shopAddress:this.$route.query.shopAddress,shopExplain:this.$route.query.shopExplain,salePrice:this.$route.query.salePrice,deliveryPrice:this.$route.query.deliveryPrice,action: 'update'}}},methods: {// 发请求,1.导入 2.处理响应 .then resp:响应信息updateshop(){axios.post('http://localhost:8888/taobao_admin/shop?action=updateshop',qs.stringify( this.shop )).then( (resp)=>{ alert( resp.data )})}},components: {},computed: {},watch: {},mounted () {}
}
</script>
<style scoped>
</style>
提示:以下是项目另一组增删改查,下面代码可供参考
3️⃣鞋子管理
首先在主页面视图中让他有个跳转
<router-link to="querygoods">鞋子信息</router-link> <br>
在 index.js 文件中配置子路由
{path: '/querygoods',name: 'querygoods',component: () => import('@/views/goods/GoodsQueryView')}
查询鞋子
这里是希望同一个查询按钮既能查到鞋子名字,又能查到他所属商家名字
查询鞋子后端
dao类代码:
// 鞋子名模糊查询,这里用到多表连接public ArrayList<Goods> nameQuery(String name) {Connection connection = JdbcUtil.createConnection();PreparedStatement statement = null;ResultSet resultSet = null;ArrayList<Goods> list = new ArrayList<>();try {statement = connection.prepareStatement("select goods.goodsId,goods.goodsName,goods.goodsExplain,goods.goodsPrice,goods.shopId,shop.shopName from goods,shop where shop.shopName=? and goods.shopId=shop.shopId");statement.setString(1, name);resultSet = statement.executeQuery();while(resultSet.next()) {Goods f =new Goods();f.setGoodsId( resultSet.getInt("goodsId") );f.setGoodsName( resultSet.getString("goodsName"));f.setGoodsExplain( resultSet.getString("goodsExplain"));f.setGoodsPrice( resultSet.getDouble("goodsPrice"));f.setShopId(resultSet.getInt("shopId"));f.setShopName( resultSet.getString("shopName"));list.add(f);}} catch (SQLException e) {e.printStackTrace();} finally {JdbcUtil.close(resultSet, statement, connection);}return list;}public ArrayList<Goods> goodsQuery(Goods goods){ArrayList<Goods> list = new ArrayList<>();Connection connection = JdbcUtil.createConnection();PreparedStatement statement=null;ResultSet resultSet=null;try {StringBuilder sql = new StringBuilder();sql.append(" select goods.goodsId,goods.goodsName,goods.goodsExplain,goods.goodsPrice,goods.shopId,shop.shopName");sql.append(" from goods,shop");sql.append(" where goods.shopId=shop.shopId");if ( goods.getGoodsName()!=null ) {sql.append(" and goods.goodsName like ?" );}if ( goods.getShopName()!=null ) {sql.append(" and shop.shopName like ?");}if ( goods.getShopId()!= null) {sql.append(" and goods.shopId=?");}statement = connection.prepareStatement(sql.toString());int index=1;if ( goods.getGoodsName()!=null ) {statement.setString(index++, "%"+goods.getGoodsName()+"%");}if ( goods.getShopName()!=null ) {statement.setString(index++, "%"+goods.getShopName()+"%");}if ( goods.getShopId()!=null ) {statement.setInt(index++, goods.getShopId());}resultSet = statement.executeQuery();while ( resultSet.next() ) {Goods f =new Goods();f.setGoodsId( resultSet.getInt("goodsId") );f.setGoodsName( resultSet.getString("goodsName"));f.setGoodsExplain( resultSet.getString("goodsExplain"));f.setGoodsPrice( resultSet.getDouble("goodsPrice"));f.setShopId(resultSet.getInt("shopId"));f.setShopName( resultSet.getString("shopName"));list.add(f);}} catch (SQLException e) {e.printStackTrace();}finally {JdbcUtil.close(resultSet, statement, connection);}return list;}
service代码:
public String query(Goods goods) {return new Gson().toJson(dao.goodsQuery(goods));}public String nameQuery(String name) {return new Gson().toJson(dao.nameQuery(name));}
controller类代码:
if (action.equals("query")) {Goods goods = new Goods();String goodsName = req.getParameter("goodsName");String shopName = req.getParameter("shopName");String shopId = req.getParameter("shopId");goods.setGoodsName(goodsName);goods.setShopName(shopName);if (!shopId.isEmpty()) { goods.setShopId(Integer.parseInt(shopId)); }String result = service.query(goods);writer.print(result);}else if (action.equals("queryS")) {String name = req.getParameter("name");String result = service.nameQuery(name);writer.print(result);}
查询鞋子前端
<template><div><h1>鞋子查询页面</h1><select v-model="id"><option value="">店铺名称</option><option v-for="(shop, index) in shopes" :value="shop.shopId" :key="index">{{ shop.shopName }}</option></select>鞋子名字:<input type="text" v-model="goodsName" />所属商家:<input type="text" v-model="shopName" /><button @click="querynames">查询</button><button @click="addgoods">新增</button> <br><table><tr><th>鞋子编号</th><th>鞋子名称</th><th>鞋子介绍</th><th>鞋子价格</th><th>所属商家编号</th><th>所属商家名字</th><th>修改</th><th>删除</th></tr><tr v-for="(goods, index) in goodses" :key="index"><th>{{ goods.goodsId }}</th><th>{{ goods.goodsName }}</th><th>{{ goods.goodsExplain }}</th><th>{{ goods.goodsPrice }}</th><th>{{ goods.shopId }}</th><th>{{ goods.shopName }}</th><th><button @click="gotoSession(index)">修改</button></th><th><button @click="delgoods(index)">删除</button></th></tr></table></div>
</template><script>
import axios from 'axios'
import qs from 'qs'
export default {data() {return {goodsName: '',goodses: [],shopes: [],shopName: '',id: ''}},methods: {querynames() {axios.get(`http://localhost:8888/taobao_admin/goods?action=query&goodsName=${this.goodsName}&shopName=${this.shopName}&shopId=${this.id}`).then((resp) => {this.goodses = resp.data})},},components: {},computed: {},watch: {},mounted() {axios.get(`http://localhost:8888/taobao_admin/shop?shopName=&action=queryshop`).then((resp) => {this.shopes = resp.data})},
}
</script><style scoped>
table {width: 700px;border: 1px solid #1fb121;border-collapse: collapse;
}th {border: 1px solid #1f5eb1;
}
</style>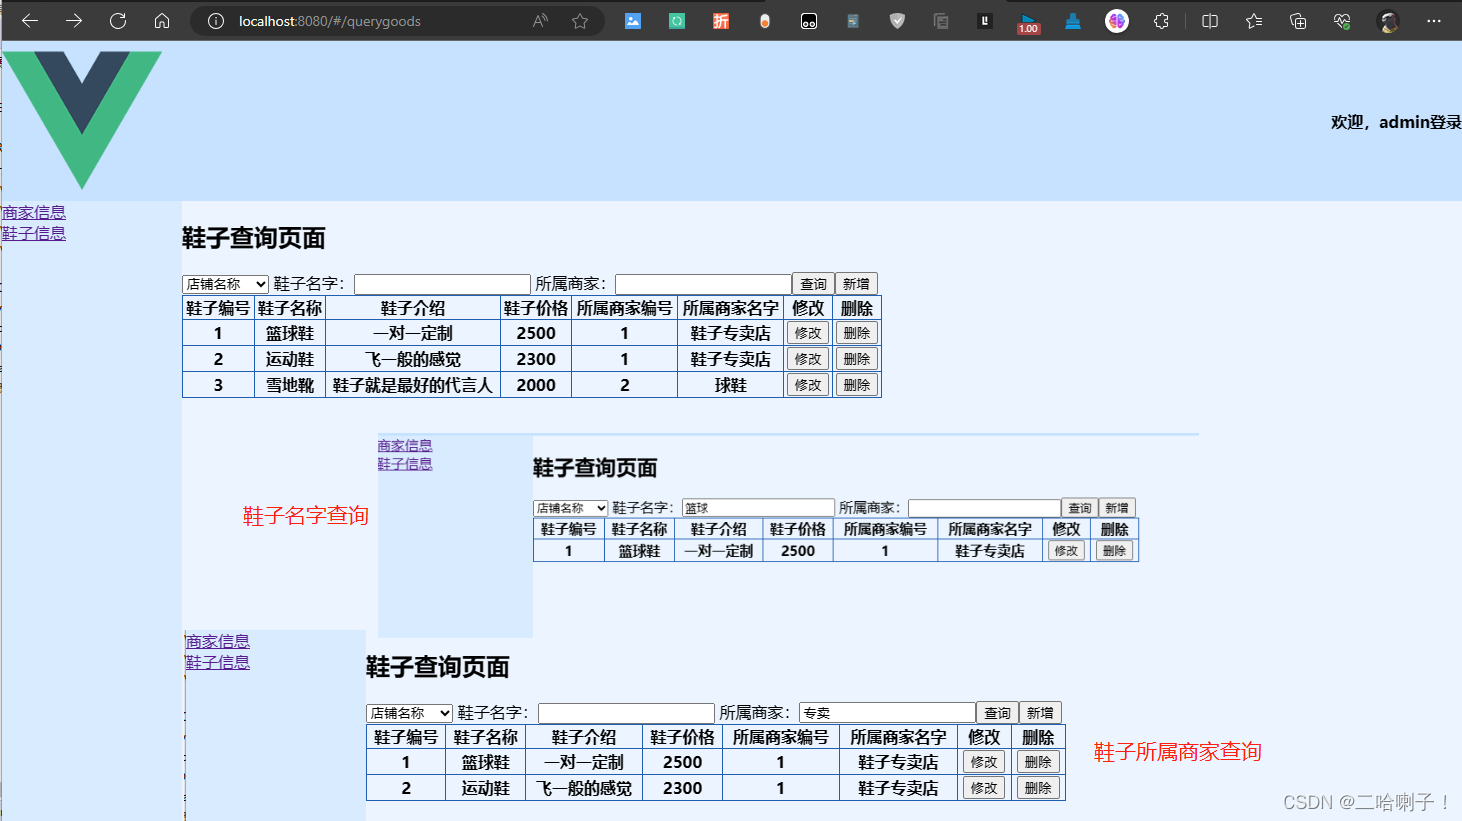
增加鞋子
这里做了个下拉框显示商家名字,在点击新增按钮的时候,可以选择商家
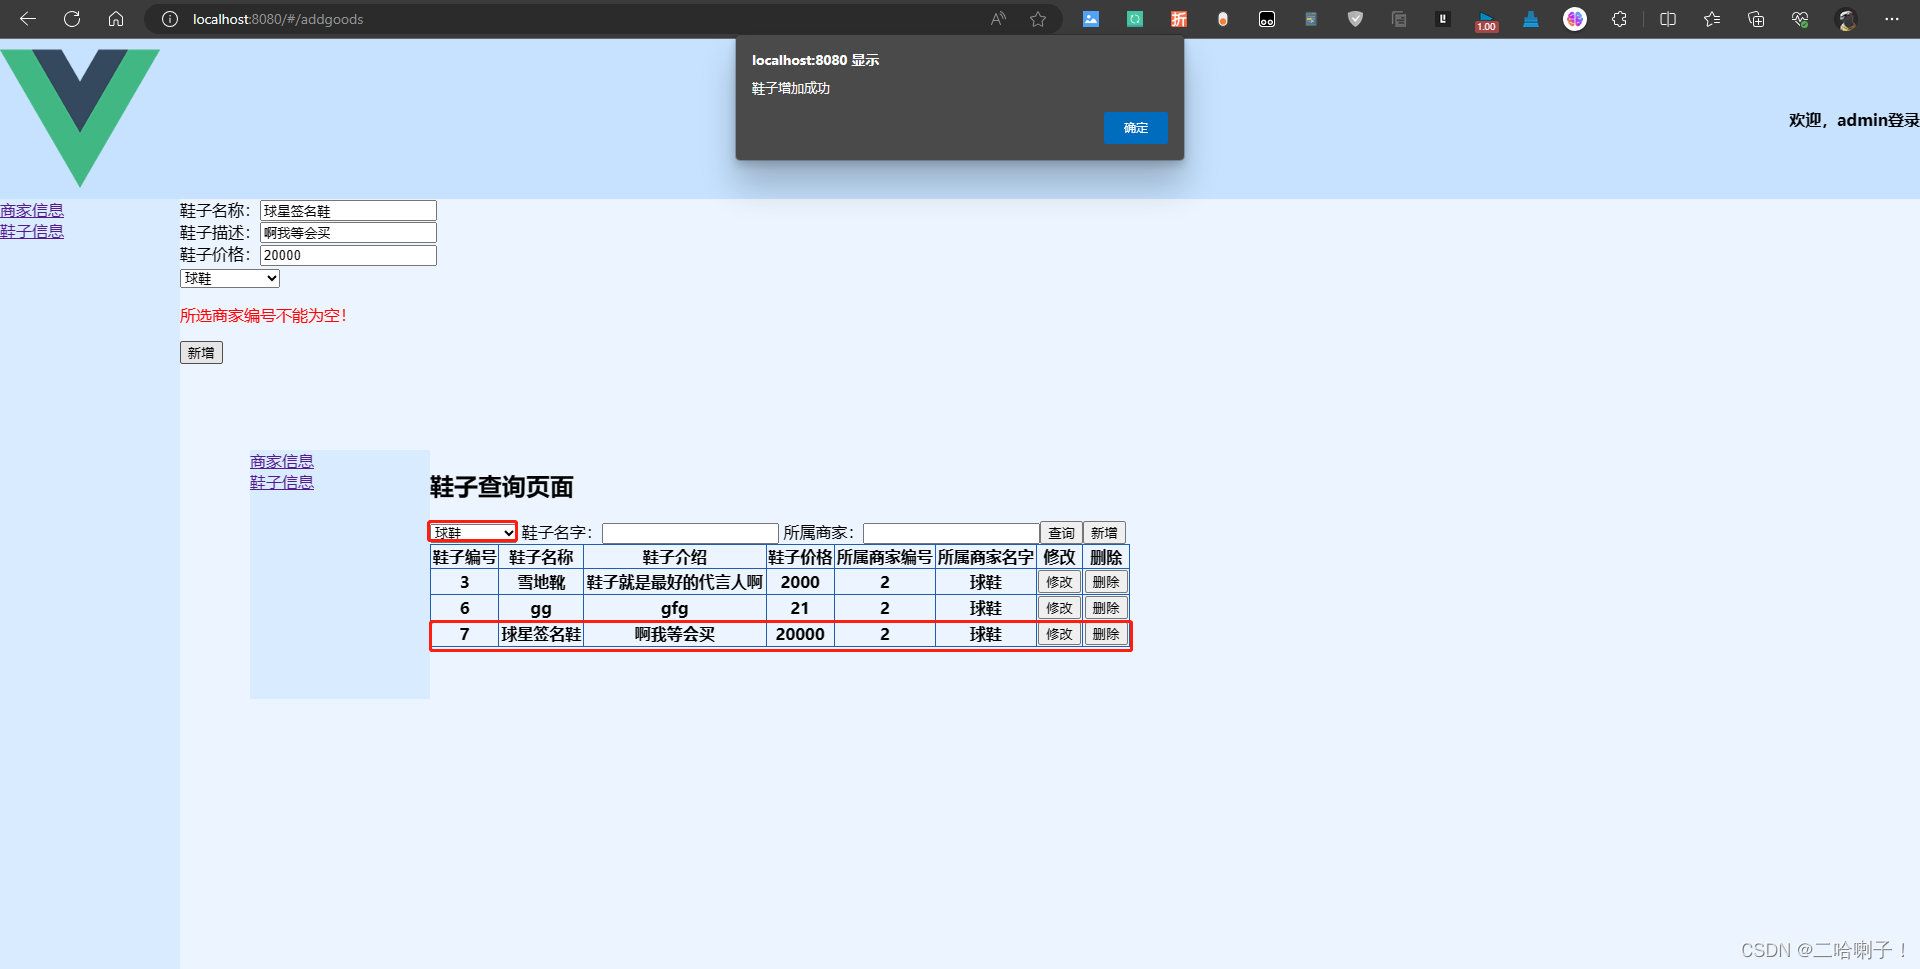
addgoods方法
增加鞋子后端
dao包:
public int InsertGoods(Goods goods) { int result = 0;Connection connection = null; PreparedStatement statement = null;connection = JdbcUtil.createConnection(); try {statement = connection.prepareStatement("insert into goods (goodsName,goodsExplain,goodsPrice,shopId) values (?,?,?,?)"); // 给? 赋值,用setXXX方法statement.setString(1, goods.getGoodsName()); statement.setString(2, goods.getGoodsExplain()); statement.setDouble(3, goods.getGoodsPrice()); statement.setInt(4, goods.getShopId()); result = statement.executeUpdate(); } catch (SQLException e) {// TODO try/catch 包围e.printStackTrace();} finally {JdbcUtil.close(statement, connection); }return result; }
service包:
public String addgoods(Goods goods) {return dao.InsertGoods(goods) > 0 ? "鞋子增加成功" : "鞋子增加失败";}
controller包:
else if (action.equals("addgoods")) { String goodsName = req.getParameter("goodsName");String goodsExplain = req.getParameter("goodsExplain");String goodsPrice = req.getParameter("goodsPrice");String shopId = req.getParameter("shopId");Goods goods = new Goods();goods.setGoodsName(goodsName);goods.setGoodsExplain(goodsExplain);goods.setGoodsPrice(Double.parseDouble(goodsPrice)); goods.setShopId(Integer.parseInt(shopId));String result = service.addgoods(goods);writer.print(result);}
增加鞋子前端
之前查询的时候已经导入的 qs框架,所以这里不必重复
在查询视图下的 methods 内加上:addgoods方法
addgoods() {this.$router.push('/addgoods')},
新建GoodsAddView视图,在 index.js文件内加上路由配置
{path: '/addgoods',name: 'addgoods',component: () => import('@/views/goods/GoodsAddView')}
GoodsAddView视图:
<template><div>鞋子名称:<input type="text" v-model="goods.goodsName" required> <br><p v-show="!goods.goodsName" class="err">输入鞋子名称不能为空!</p>鞋子描述:<input type="text" v-model="goods.goodsExplain" required> <br><p v-show="!goods.goodsExplain" class="err">输入鞋子描述不能为空!</p>鞋子价格:<input type="text" v-model="goods.goodsPrice" required> <br><p v-show="!goods.goodsPrice" class="err">输入鞋子价格不能为空!</p><select v-model="goods.shopId"><option value="">所属商家编号</option><option :value="this.shopes[index].shopId" v-for="(shop, index) in shopes" :key="index">{{ shop.shopName }}</option></select><p class="err">所选商家编号不能为空!</p><button @click="addgoods">新增</button></div>
</template><script>
import axios from 'axios'
import qs from 'qs'export default {data () {return {goods: {goodsName: '',goodsExplain: '',goodsPrice: '',shopId: '',// postman后端匹配  action前是?action: 'addgoods'  },shopes: [],}},methods: {addgoods () {axios.post('http://localhost:8888/taobao_admin/goods', qs.stringify(this.goods)).then((resp)=>{alert(resp.data)})}},components: {},computed: {},watch: {},mounted() {axios.get(`http://localhost:8888/taobao_admin/shop?action=queryshop&shopName`).then((resp) => {this.shopes = resp.datathis.goods.shopId = this.shopes[0].shopId})},
}
</script><style scoped>
.err{color: red;
}
</style>
删除鞋子
delgoods 方法
删除鞋子后端
dao包代码:
// 删除指定鞋子信息 按照主键删除public int DeleteGoodsId(int goodsId) {int result = 0; Connection connection = null; PreparedStatement statement = null; connection = JdbcUtil.createConnection(); try {statement = connection.prepareStatement("delete from goods where goodsId=?"); statement.setInt(1, goodsId); result = statement.executeUpdate(); } catch (SQLException e) {e.printStackTrace();} finally {JdbcUtil.close(statement, connection); }return result; }
service包:
public String remove(int goodsId) {return dao.DeleteGoodsId(goodsId) > 0 ? "鞋子删除成功" : "鞋子删除失败";}
controller包:
else if (action.equals("delgoods")) {String goodsId = req.getParameter("goodsId");String result = service.remove(Integer.parseInt(goodsId));writer.print(result);}
删除鞋子前端
在查询视图下加上 delgoods 方法(在写查询时已经定义此方法)
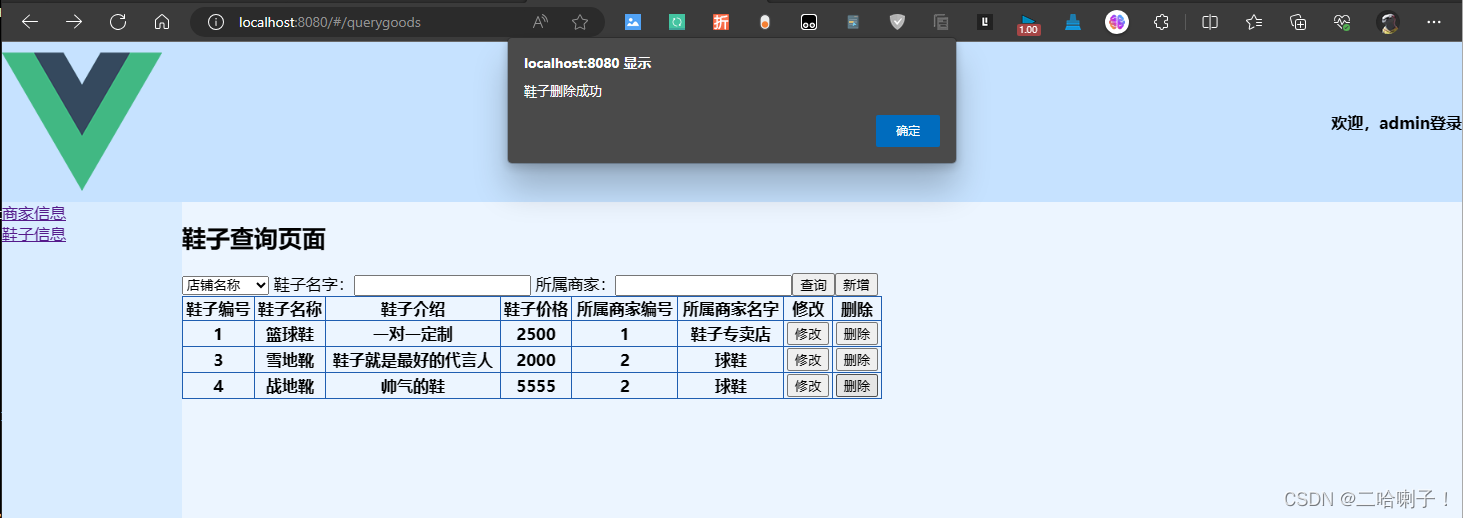
delgoods(i) {axios.post('http://localhost:8888/taobao_admin/goods', qs.stringify({action: 'delgoods',goodsId: this.goodses[i].goodsId})).then((resp) => {alert(resp.data)this.querynames()})}
修改鞋子
用session方法修改
修改鞋子后端
dao 包代码:
// 修改鞋子信息public int UpdateGoods(Goods goods) { int result = 0; Connection connection = null; PreparedStatement statement = null; connection = JdbcUtil.createConnection(); try {statement = connection.prepareStatement("update goods set goodsName=?,goodsExplain=?,goodsPrice=?,shopId=? where goodsId=?"); // 给? 赋值statement.setString(1,goods.getGoodsName()); statement.setString(2,goods.getGoodsExplain()); statement.setDouble(3,goods.getGoodsPrice()); statement.setInt(4,goods.getShopId()); statement.setInt(5,goods.getGoodsId());result = statement.executeUpdate(); } catch (SQLException e) {// TODO 自动生成的 catch 块e.printStackTrace();} finally {JdbcUtil.close(statement, connection); }return result; }
service 包代码:
public String update(Goods goods) {return dao.UpdateGoods(goods) > 0 ? "鞋子修改成功" : "鞋子修改失败";}
controller包代码:
} else if (action.equals("updategoods")) {String goodsId = req.getParameter("goodsId");String goodsName = req.getParameter("goodsName");String goodsExplain = req.getParameter("goodsExplain");String goodsPrice = req.getParameter("goodsPrice");String shopId = req.getParameter("shopId");Goods goods = new Goods();goods.setGoodsId(Integer.parseInt(goodsId));goods.setGoodsName(goodsName);goods.setGoodsExplain(goodsExplain);goods.setGoodsPrice(Double.parseDouble(goodsPrice));goods.setShopId(Integer.parseInt(shopId));String result = service.update(goods);writer.print(result);}
修改鞋子前端
在查询页面中加上 gotoSession 方法
gotoSession(i) {sessionStorage.setItem('goods',JSON.stringify(this.goodses[i]))this.$router.push('/session')},
新建视图:GoodsUpdateSessionView
在 index.js 文件中配置路由
{path: '/session',name: 'session',component: () => import('@/views/goods/GoodsUpdateSessionView')}
修改视图页面:
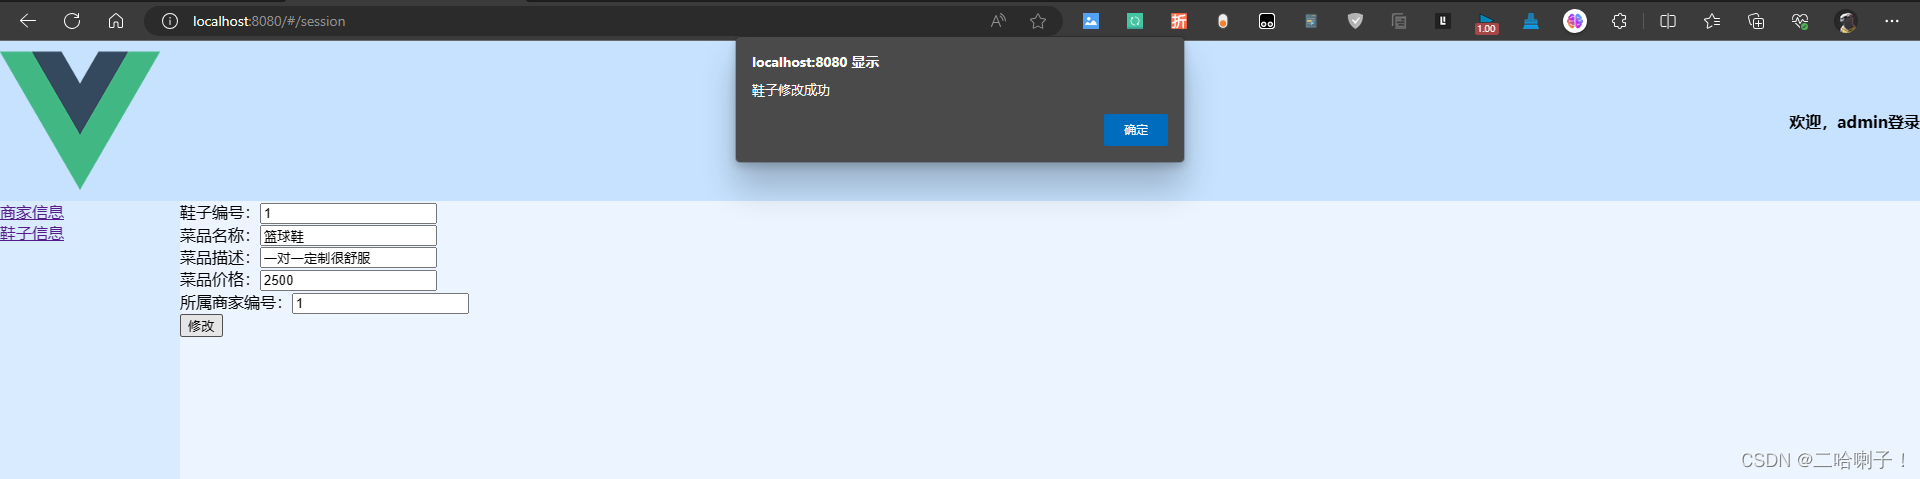
<template><div>鞋子编号:<input type="text" readonly v-model="goods.goodsId"> <br>菜品名称:<input type="text" v-model="goods.goodsName"> <br>菜品描述:<input type="text" v-model="goods.goodsExplain"> <br>菜品价格:<input type="text" v-model="goods.goodsPrice"> <br>所属商家编号:<input type="text" readonly v-model="goods.shopId"> <br><button @click="updategoods">修改</button></div>
</template><script>
import axios from 'axios'
import qs from 'qs'
export default {data() {return {goods: {}}},methods: {// 发请求,1.导入  2.处理响应 .then   resp:响应信息// action与后端对应  controllerupdategoods() {this.goods['action'] = 'updategoods'axios.post('http://localhost:8888/taobao_admin/goods', qs.stringify(this.goods)).then((resp) => {alert(resp.data)})}},components: {},computed: {},watch: {},mounted() {let goods = sessionStorage.getItem('goods')goods = JSON.parse(goods)this.goods = goods}
}
</script>
<style scoped></style>
接下来可以改改样式
相关文章:
基于Javaweb+Vue3实现淘宝卖鞋前后端分离项目
前端技术栈:HTMLCSSJavaScriptVue3 后端技术栈:JavaSEMySQLJDBCJavaWeb 文章目录 前言1️⃣登录功能登录后端登录前端 2️⃣商家管理查询商家查询商家后端查询商家前端 增加商家增加商家后端增加商家前端 删除商家删除商家后端删除商家前端 修改商家修改…...

bat一键批量、有序启动jar
将脚本文件后缀改为 bat,脚本文件和 jar 包放在同一个目录 echo offstart cmd /c "java -jar register.jar " ping 192.0.2.2 -n 1 -w 10000 > nulstart cmd /c "java -jar admin.jar " ping 192.0.2.2 -n 1 -w 30000 > nulstart cmd /c…...

centos7安装mysql数据库详细教程及常见问题解决
mysql数据库详细安装步骤 1.在root身份下输入执行命令: yum -y update 2.检查是否已经安装MySQL,输入以下命令并执行: mysql -v 如出现-bash: mysql: command not found 则说明没有安装mysql 也可以输入rpm -qa | grep -i mysql 查看是否已…...

C++ STL sort函数的底层实现
C STL sort函数的底层实现 sort函数的底层用到的是内省式排序以及插入排序,内省排序首先从快速排序开始,当递归深度超过一定深度(深度为排序元素数量的对数值)后转为堆排序。 先来回顾一下以上提到的3中排序方法: 快…...

ICP算法和优化问题详细公式推导
1. 介绍 ICP(Iterative Closest Point):求一组平移和旋转使得两个点云之间重合度尽可能高。 2. 算法流程 找最近邻关联点,求解 R , t R , t R , t R , t R,tR,tR,tR,t R,tR,tR,tR,t,如此反复直到重合程度足够高。 3. 数学描述 X { x 1 ,…...
【安全狗】linux免费服务器防护软件安全狗详细安装教程
在费用有限的基础上,复杂密码云服务器基础防护常见端口替换安全软件,可以防护绝大多数攻击 第一步:下载服务器安全狗Linux版(下文以64位版本为例) 官方提供了两个下载方式,本文采用的是 方式2 wget安装 方…...

【iOS】自定义字体
文章目录 前言一、下载字体二、添加字体三、检查字体四、使用字体 前言 在设计App的过程中我们常常会想办法去让我们的界面变得美观,使用好看的字体是我们美化界面的一个方法。接下来笔者将会讲解App中添加自定义字体 一、下载字体 我们要使用自定义字体&#x…...

WPF实战学习笔记06-设置待办事项界面
设置待办事项界面 创建待办待办事项集合并初始化 TodoViewModel: using Mytodo.Common.Models; using Prism.Commands; using Prism.Mvvm; using System; using System.Collections.Generic; using System.Collections.ObjectModel; using System.Linq; using Sy…...

推荐几个不错的免费配色工具网站
1. Paletton专业的配色套件,提供色轮理论及调色功能。可查看配色预览效果。 网站:http://paletton.com 2. Colormind一个基于机器学习的智能配色工具。可以一键生成配色方案。 网站:http://colormind.io 3. Adobe ColorAdobe官方的配色工具,可以从图片中取色,也可以随机生成配色…...

gitee page发布的静态网站,无法播放目录中的mp4视频
起因是希望在gitee上部署静态网站,利用three.js VideoTexture 环境贴图播放视频。 但是试了多几次 mp4均提示404,资源无法获取; 找了很多方案,最后发现将视频转为ogv 就可以完美适配了; mp4转ogv 附threejs使用ogv进…...
opencv-26 图像几何变换04- 重映射-函数 cv2.remap()
什么是重映射? 重映射(Remapping)是图像处理中的一种操作,用于将图像中的像素从一个位置映射到另一个位置。重映射可以实现图像的平移、旋转、缩放和透视变换等效果。它是一种基于像素级的图像变换技术,可以通过定义映…...
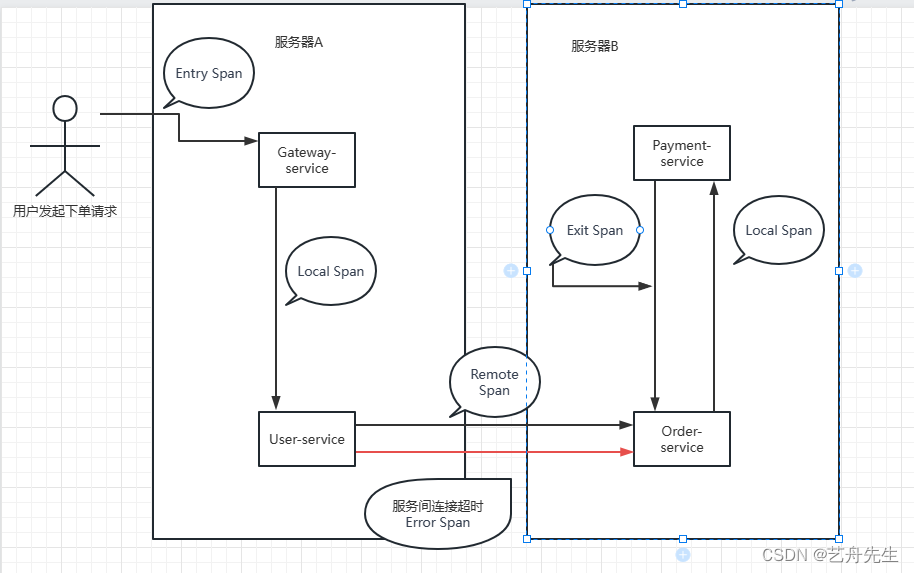
SkyWalking链路追踪中span全解
基本概念 在SkyWalking链路追踪中,Span(跨度)是Trace(追踪)的组成部分之一。Span代表一次调用或操作的单个组件,可以是一个方法调用、一个HTTP请求或者其他类型的操作。 每个Span都包含了一些关键的信息&am…...
——Redux的简介)
【前端知识】React 基础巩固(三十一)——Redux的简介
React 基础巩固(三十一)——Redux 一、Redux是个纯函数 概念 纯函数(确定的输入一定产生确定的输出,函数在执行过程中不产生副作用): 在程序设计中,若一个函数符合以下条件,那么这个函数就被称为纯函数…...

拦截Bean使用之前各个时机的Spring组件
拦截Bean使用之前各个时机的Spring组件 之前使用过的BeanPostProcessor就是在Bean实例化之后,注入属性值之前的时机。 Spring Bean的生命周期本次演示的是在Bean实例化之前的时机,使用BeanFactoryPostProcessor进行验证,以及在加载Bean之前进…...
RT thread 之 Nand flash 读写过程分析
文章目录 前言:什么是Nand Flash?1、Nand Flash 读取步骤2、从主存读到Cache2.1 在标准spi接口下读取过程2.2 测试时序(SPI频率30MHz) 3.从Cache读取数据3.1在标准spi接口读取过程测试时序 前言:什么是Nand Flash&…...

独立站最全出单营销指南,新手卖家赶紧学起来吧!
这是一个需要投入大量时间和精力的挑战,但只有经过筛选在众多品牌和渠道中找到最适合自己的营销策略,才能成功。 新手商家经常会发现自己有很多可以改进的地方:品牌的颜色、字体以及其他一些细节。但真正走向成熟的商家会意识到,…...
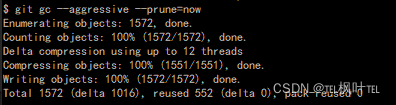
Git移除commit过的大文件
前言:在提交推送本地更改至仓库时,误将大文件给提交了,导致push时报错文件过大,因此需要将已经commit的大文件移除后再push 若已知要删除的文件或文件夹路径,则可以从第4步开始 1.对仓库进行gc操作 $ git gc 2.查询…...
再见 Spring Boot 1.X ,Spring Boot 2.X 走向舞台中心
2019年8月6日,Spring 官方在其博客宣布,Spring Boot 1.x 停止维护,Spring Boot 1.x 生命周期正式结束。 其实早在2018年7月30号,Spring 官方就已经在博客进行过预告,Spring Boot 1.X 将维护到2019年8月1日。 1.5.x 将会…...

Jsonp劫持
JSONP 介绍 jsonp是一种协议,准确的说,他是json的一种使用模式,为了解决Json受同源策略限制的问题。 基本语法 JSONP的基本语法为:callback({“name”:”test”, “msg”:”success”}) 常见的例子包括函数调用(如…...
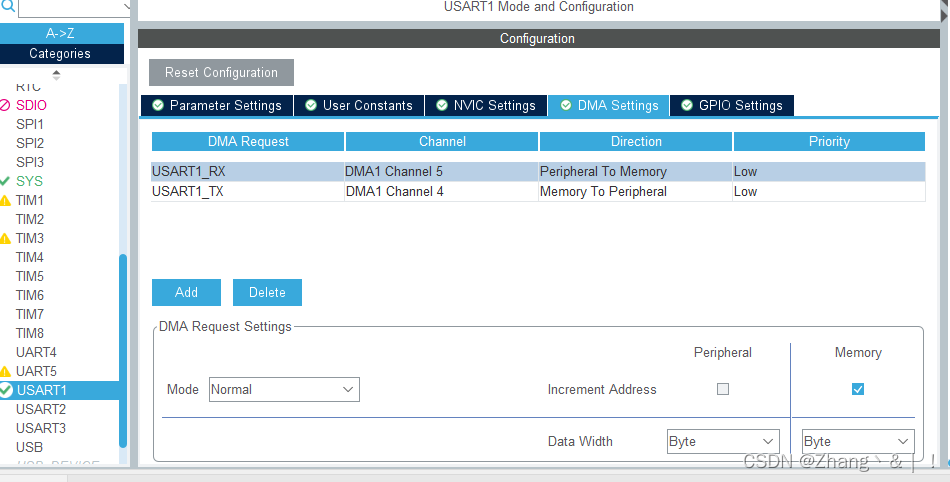
STM32CubeIDE(串口)
目录 一、轮询模式 1.1 配置USART2为异步模式 1.2 500ms发送一次消息 1.3 通信结果 1.4 串口控制LED 二、中断收发 2.1 开启中断 2.2 中断发送接收 2.2.1 中断发送只需要调用接口 2.2.2 中断接收 2.3 实验结果 三、DMA模式与收发不定长数据 3.1 DMA通道配置 3.2 DMA…...

2026年HR招聘偏好白皮书:这5项附加技能出现频率暴涨
2026 年的招聘市场,正在从“看你会什么岗位技能”,转向“看你能不能把岗位做得更智能”。HR筛简历时,越来越关注候选人的AI应用能力、数据化思维和业务落地能力。人社部近年发布的新职业中,已经出现生成式人工智能系统应用员、人工…...

雪球网md5__1038参数逆向解析与Node.js复现
1. 这不是“破解”,而是对前端加密逻辑的常规逆向还原你打开雪球网任意一只股票详情页,F12 打开开发者工具,切到 Network 面板,刷新页面——很快就能在 XHR 请求里捕获到类似这样的接口:https://xueqiu.com/stock/cube…...

金融合规审核为何人力堆积却仍漏洞百出?2026年RegTech演进与Agent全链路闭环解决方案
在2026年的金融监管环境下,合规审核已不再是简单的“查漏补缺”,而是演变为一场高强度的算力与逻辑博弈。尽管金融机构在合规成本上的投入逐年攀升,甚至不惜以“人海战术”填补流程断点,但监管罚单的数额与频率却并未显著下降。这…...

Windows终极PDF处理工具:3步免费安装Poppler完整指南
Windows终极PDF处理工具:3步免费安装Poppler完整指南 【免费下载链接】poppler-windows Download Poppler binaries packaged for Windows with dependencies 项目地址: https://gitcode.com/gh_mirrors/po/poppler-windows 你是否曾经为在Windows上处理PDF文…...

Godot4 2D游戏开发避坑指南:TileMap绘制、节点顺序与相机设置的三个常见问题
Godot4 2D游戏开发避坑指南:TileMap绘制、节点顺序与相机设置的三个常见问题当你第一次用Godot4完成一个2D场景搭建时,那种成就感往往会被几个突如其来的bug瞬间击碎——角色神秘消失、背景纹丝不动、屏幕边缘出现诡异黑边。这些问题看似简单,…...

2026 文章代码高亮方案选型
将基于 Prism.js 或 Highlight.js 的传统高亮方案与基于 Shiki 的现代化高亮方案进行对比,其核心区别在于底层解析原理的不同(正则表达式 vs. TextMate 语法树)。 以下是两种方案的底层原理、各自优缺点、核心对比矩阵以及适用场景的详细分析…...
适合全体毕业生)
口碑最好的AI论文写作工具推荐(从文献整理到论文成稿全流程)适合全体毕业生
还在为选题方向纠结、文献资料翻找耗时、开题报告无从下手、论文框架反复修改、查重率居高不下、降重过程痛苦不堪,甚至答辩PPT还要临时抱佛脚?作为学术新手、应届生或本科硕士毕业生,面对论文写作的重重关卡,流程复杂、操作门槛高…...

基于SMD与贝壳的微型音频装置:从电路设计到嵌入式开发的完整实践
1. 项目概述:一个藏在贝壳里的声音世界你小时候有没有捡起一个海螺壳,把它贴在耳边,然后听到里面传来“呜呜”的海风声?那个瞬间,仿佛整个海洋都被装进了小小的贝壳里。今天这个项目,就是把那个童年的魔法&…...

深度解析:JetBrains IDE试用期重置机制的技术实现
深度解析:JetBrains IDE试用期重置机制的技术实现 【免费下载链接】ide-eval-resetter 项目地址: https://gitcode.com/gh_mirrors/id/ide-eval-resetter 在软件开发工作流中,JetBrains IDE试用期管理是一个常见的技术挑战,尤其是在多…...

第5章 薪资重构——AI时代的程序员价值重估
第5章 薪资重构——AI时代的程序员价值重估 核心问题:AI时代,程序员的薪资会发生怎样的变化?哪些人在涨薪?哪些人在降薪? 5.1 问题定义:薪资分化的真相是什么? 5.1.1 一个令人震惊的数据 2026年第一季度,一个对比让整个技术圈哗然: 同一家公司内部: - 一个AI方向…...