C#windows窗体人脸识别
一、创建一个数据库,名为TestFaceDB
里面有一张表就OK了,表名Users,表里面有几个字段我说明一下:
id--------------------bigint----------------------编号
name--------------varchar(50)-----------------用户名
phone--------------varchar(50)----------------电话
password--------------varchar(50)------------密码
address--------------varchar(50)--------------地址
picture--------------varchar(50)---------------脸的图片
数据库脚本:
USE [master]
GO
/****** Object:  Database [TestFaceDB]    Script Date: 2017-11-30 22:09:36 ******/
CREATE DATABASE [TestFaceDB]CONTAINMENT = NONEON  PRIMARY
( NAME = N'TestFaceDB', FILENAME = N'E:\DB\TestFaceDB.mdf' , SIZE = 5120KB , MAXSIZE = UNLIMITED, FILEGROWTH = 1024KB )LOG ON
( NAME = N'TestFaceDB_log', FILENAME = N'E:\DB\TestFaceDB_log.ldf' , SIZE = 2048KB , MAXSIZE = 2048GB , FILEGROWTH = 10%)
GO
ALTER DATABASE [TestFaceDB] SET COMPATIBILITY_LEVEL = 110
GO
IF (1 = FULLTEXTSERVICEPROPERTY('IsFullTextInstalled'))
begin
EXEC [TestFaceDB].[dbo].[sp_fulltext_database] @action = 'enable'
end
GO
ALTER DATABASE [TestFaceDB] SET ANSI_NULL_DEFAULT OFF
GO
ALTER DATABASE [TestFaceDB] SET ANSI_NULLS OFF
GO
ALTER DATABASE [TestFaceDB] SET ANSI_PADDING OFF
GO
ALTER DATABASE [TestFaceDB] SET ANSI_WARNINGS OFF
GO
ALTER DATABASE [TestFaceDB] SET ARITHABORT OFF
GO
ALTER DATABASE [TestFaceDB] SET AUTO_CLOSE OFF
GO
ALTER DATABASE [TestFaceDB] SET AUTO_CREATE_STATISTICS ON
GO
ALTER DATABASE [TestFaceDB] SET AUTO_SHRINK OFF
GO
ALTER DATABASE [TestFaceDB] SET AUTO_UPDATE_STATISTICS ON
GO
ALTER DATABASE [TestFaceDB] SET CURSOR_CLOSE_ON_COMMIT OFF
GO
ALTER DATABASE [TestFaceDB] SET CURSOR_DEFAULT  GLOBAL
GO
ALTER DATABASE [TestFaceDB] SET CONCAT_NULL_YIELDS_NULL OFF
GO
ALTER DATABASE [TestFaceDB] SET NUMERIC_ROUNDABORT OFF
GO
ALTER DATABASE [TestFaceDB] SET QUOTED_IDENTIFIER OFF
GO
ALTER DATABASE [TestFaceDB] SET RECURSIVE_TRIGGERS OFF
GO
ALTER DATABASE [TestFaceDB] SET  DISABLE_BROKER
GO
ALTER DATABASE [TestFaceDB] SET AUTO_UPDATE_STATISTICS_ASYNC OFF
GO
ALTER DATABASE [TestFaceDB] SET DATE_CORRELATION_OPTIMIZATION OFF
GO
ALTER DATABASE [TestFaceDB] SET TRUSTWORTHY OFF
GO
ALTER DATABASE [TestFaceDB] SET ALLOW_SNAPSHOT_ISOLATION OFF
GO
ALTER DATABASE [TestFaceDB] SET PARAMETERIZATION SIMPLE
GO
ALTER DATABASE [TestFaceDB] SET READ_COMMITTED_SNAPSHOT OFF
GO
ALTER DATABASE [TestFaceDB] SET HONOR_BROKER_PRIORITY OFF
GO
ALTER DATABASE [TestFaceDB] SET RECOVERY FULL
GO
ALTER DATABASE [TestFaceDB] SET  MULTI_USER
GO
ALTER DATABASE [TestFaceDB] SET PAGE_VERIFY CHECKSUM
GO
ALTER DATABASE [TestFaceDB] SET DB_CHAINING OFF
GO
ALTER DATABASE [TestFaceDB] SET FILESTREAM( NON_TRANSACTED_ACCESS = OFF )
GO
ALTER DATABASE [TestFaceDB] SET TARGET_RECOVERY_TIME = 0 SECONDS
GO
EXEC sys.sp_db_vardecimal_storage_format N'TestFaceDB', N'ON'
GO
USE [TestFaceDB]
GO
/****** Object:  Table [dbo].[Users]    Script Date: 2017-11-30 22:09:36 ******/
SET ANSI_NULLS ON
GO
SET QUOTED_IDENTIFIER ON
GO
SET ANSI_PADDING ON
GO
CREATE TABLE [dbo].[Users]([id] [bigint] NOT NULL,[name] [varchar](50) NULL,[age] [int] NULL,[phone] [varchar](50) NULL,[password] [varchar](50) NULL,[address] [varchar](50) NULL,[picture] [varchar](max) NULL,CONSTRAINT [PK_Users] PRIMARY KEY CLUSTERED
([id] ASC
)WITH (PAD_INDEX = OFF, STATISTICS_NORECOMPUTE = OFF, IGNORE_DUP_KEY = OFF, ALLOW_ROW_LOCKS = ON, ALLOW_PAGE_LOCKS = ON) ON [PRIMARY]
) ON [PRIMARY] TEXTIMAGE_ON [PRIMARY]GO
SET ANSI_PADDING OFF
GO
USE [master]
GO
ALTER DATABASE [TestFaceDB] SET  READ_WRITE
GO
二、引入一个AForgeDLL文件库
C#(Winform)通过添加AForge添加并使用系统摄像机-CSDN博客
三、在vs里面新建个项目 Name: Camtest
在新建个sqlhelper,这个文件是用来操作数据库的,主要是人脸注册和认证以及登陆的时候用。
using System;
using System.Collections.Generic;
using System.Data;
using System.Data.SqlClient;
using System.Linq;
using System.Text;
using System.Threading.Tasks;
using System.Data.SqlClient;
using System.Configuration;
using System.Data;namespace face
{/// <summary>/// 数据库工具类/// </summary>public class SqlHelper{#region 获取数据库连接private static string GetConnectionString{get{return "Data Source=.;Initial Catalog=TestFaceDB;Persist Security Info=True;User ID=sa;Password=171268"; //转换成string类型}}#endregion#region 查询多条记录/// <summary>/// 查询多条记录/// params SqlParameter  param  表示既可以传过来数组  也可以传过来单个值/// </summary>/// <param name="sql"></param>/// <param name="type"></param>/// <param name="param"></param>/// <returns></returns>public static SqlDataReader ExcuteReader(string sql, CommandType type, params SqlParameter[] param){SqlConnection conn = new SqlConnection(GetConnectionString);SqlCommand cmd = new SqlCommand(sql, conn);PreaPareCommand(sql, conn, cmd, type, param);//参数是关闭连接return cmd.ExecuteReader(CommandBehavior.CloseConnection);}#endregion#region DataSetpublic static DataSet ExexuteDataset(string sql, CommandType type, params SqlParameter[] param){using (SqlConnection conn = new SqlConnection(GetConnectionString)){SqlCommand cmd = new SqlCommand(sql, conn);PreaPareCommand(sql, conn, cmd, type, param);SqlDataAdapter sda = new SqlDataAdapter(cmd);DataSet ds = new DataSet();sda.Fill(ds);return ds;}}#endregion#region 查询返回一条记录/// <summary>/// 查询返回一条记录/// </summary>/// <param name="sql"></param>/// <param name="type"></param>/// <param name="param"></param>/// <returns></returns>public static Object ExecuteScalar(string sql, CommandType type, params SqlParameter[] param){using (SqlConnection conn = new SqlConnection(GetConnectionString)){SqlCommand cmd = new SqlCommand(sql, conn);PreaPareCommand(sql, conn, cmd, type, param);return cmd.ExecuteScalar();}}#endregion#region 命令对象装配//命令对象装配private static void PreaPareCommand(string sql, SqlConnection conn, SqlCommand cmd, CommandType type, params SqlParameter[] param){if (conn.State != ConnectionState.Open){conn.Close();conn.Open();}cmd.CommandType = type;if (param != null){foreach (SqlParameter p in param){cmd.Parameters.Add(p);}}}#endregion#region 增删改public static int ExecuteNonQuery(string sql, CommandType type, params SqlParameter[] param){using (SqlConnection conn = new SqlConnection(GetConnectionString)){SqlCommand cmd = new SqlCommand(sql, conn);PreaPareCommand(sql, conn, cmd, type, param);return cmd.ExecuteNonQuery();}}#endregion}
}
再新建一个实体类,命名为:Users
using System;
using System.Collections.Generic;
using System.Linq;
using System.Text;
using System.Threading.Tasks;namespace Camtest
{public class Users{//编号public long id { get; set; }//姓名public string name { get; set; }//密码public string password { get; set; }//年龄public int age { get; set; }//电话public string phone { get; set; }//地址public string address { get; set; }//脸public string picture { get; set; }}
}
四、人脸检测

空间组成:
1. videoSourcePlayer,所在的dll是Aforge.Controls.Video这个里面,名称是videoSourcePlayer1
2. groupBox控件,名称是groupBox1
3.comboBox控件,名称是comboBoxCameras和picsize
4.button控件,名称是button2和close
5. label控件,名称是(左边从上到下)label3,label6,label8,label10,label12,label14。右边从上到下:label4,label5,label7,label9,label11,label13
6窗体,名称是facedetection
1.加载窗体的时候先检测一遍我们的摄像头:
// 刷新可用相机的列表videoDevices = new FilterInfoCollection(FilterCategory.VideoInputDevice);comboBoxCameras.Items.Clear();for (int i = 0; i < videoDevices.Count; i++){comboBoxCameras.Items.Add(videoDevices[i].Name.ToString());}if (comboBoxCameras.Items.Count > 0)comboBoxCameras.SelectedIndex = 0;picsize.SelectedIndex = 0;2.打开摄像头的方法
/// <summary>/// 打开摄像头/// </summary>public void openCan(){selectedPICIndex = picsize.SelectedIndex;selectedDeviceIndex = comboBoxCameras.SelectedIndex;//连接摄像头。videoSource = new VideoCaptureDevice(videoDevices[selectedDeviceIndex].MonikerString);videoSource.VideoResolution = videoSource.VideoCapabilities[selectedDeviceIndex];// 枚举所有摄像头支持的像素,设置拍照为1920*1080foreach (VideoCapabilities capab in videoSource.VideoCapabilities){if (selectedPICIndex == 0){if (capab.FrameSize.Width == 1920 && capab.FrameSize.Height == 1080){videoSource.VideoResolution = capab;break;}if (capab.FrameSize.Width == 1280 && capab.FrameSize.Height == 720){videoSource.VideoResolution = capab;break;}}else{if (capab.FrameSize.Width == 1280 && capab.FrameSize.Height == 720){videoSource.VideoResolution = capab;break;}}}videoSourcePlayer1.VideoSource = videoSource;// set NewFrame event handlervideoSourcePlayer1.Start();}
3.保存人脸成一张图片,顺便调用人脸检测库:
//保存图片private void button2_Click(object sender, EventArgs e){if (videoSource == null)return;Bitmap bitmap = videoSourcePlayer1.GetCurrentVideoFrame();//图片名称,年月日时分秒毫秒.jpgstring fileName = DateTime.Now.ToString("yyyyMMddHHmmssff") + ".jpg";//获取项目的根目录String path = AppDomain.CurrentDomain.BaseDirectory;//将图片保存在服务器里面bitmap.Save(path + "\\picture\\" + fileName, ImageFormat.Jpeg);bitmap.Dispose();//进行面部特征识别facemodel facem = face_test.FaceDetect(path + "\\picture\\" + fileName);this.label4.Text = facem.age; //年龄this.label5.Text = facem.beauty; //漂亮度string expression = facem.expression;//表情if (expression.Equals("0")){this.label7.Text = "不笑";}else if (expression.Equals("1")){this.label7.Text = "微笑";}else if (expression.Equals("2")){this.label7.Text = "大笑";}string gender = facem.gender;//性别if (gender.Equals("male")){this.label9.Text = "男";}else{this.label9.Text = "女";}string glasses = facem.glasses;//是否戴眼镜if (glasses.Equals("0")){this.label11.Text = "无眼镜";}else if (glasses.Equals("1")){this.label11.Text = "普通眼镜";}else{this.label11.Text = "墨镜";}string race = facem.race;//人种if (race.Equals("yellow")){this.label13.Text = "黄人";}else if (race.Equals("white")){this.label13.Text = "白人";}else if (race.Equals("black")){this.label13.Text = "黑人";}else if (race.Equals("arabs")){this.label13.Text = "棕人";}}
4.解析json的类
using face;
using Newtonsoft.Json;
using Newtonsoft.Json.Linq;
using System;
using System.Collections.Generic;
using System.IO;
using System.Linq;
using System.Text;
using System.Threading.Tasks;namespace Camtest
{public class face_test{public static string Api_Key = "你的Api_Key";public static string Secret_Key = "你的Secret_Key";/// <summary>/// 脸部比对/// </summary>/// <param name="img"></param>/// <returns></returns>public static facemodel FaceDetect(String img){var client = new Baidu.Aip.Face.Face(Api_Key, Secret_Key);var image = File.ReadAllBytes(img);var options = new Dictionary<string, object>(){{"face_fields", "age,beauty,expression,gender,glasses,race"}};string result = client.FaceDetect(image, options).ToString();//解析json数据return json_test(result.ToString());}/// <summary>/// 解析json数据/// </summary>/// <param name="json"></param>public static facemodel json_test(string json){//得到根节点JObject jo_result = (JObject)JsonConvert.DeserializeObject(json.ToString());//得到result节点JArray jo_age = (JArray)JsonConvert.DeserializeObject(jo_result["result"].ToString());//查找某个字段与值facemodel facem = new facemodel();foreach (var val in jo_age){facem.age = ((JObject)val)["age"].ToString();facem.beauty = ((JObject)val)["beauty"].ToString();facem.expression = ((JObject)val)["expression"].ToString();facem.gender = ((JObject)val)["gender"].ToString();facem.glasses = ((JObject)val)["glasses"].ToString();facem.race = ((JObject)val)["race"].ToString();}return facem;}}
}
5.人脸检测的model类facemodel
using System;
using System.Collections.Generic;
using System.Linq;
using System.Text;
using System.Threading.Tasks;namespace face
{public class facemodel{//年龄public string age { get; set; }//美丑public string beauty { get; set; }//表情public string expression { get; set; }//性别public string gender { get; set; }//是否戴眼镜public string glasses { get; set; }//人种public string race { get; set; }}
}
6.人脸检测源代码
using System;
using System.Collections.Generic;
using System.ComponentModel;
using System.Data;
using System.Drawing;
using System.Drawing.Imaging;
using System.Linq;
using System.Text;
using System.Threading.Tasks;
using System.Windows.Forms;
using AForge;
using AForge.Controls;
using AForge.Imaging;
using AForge.Video;
using AForge.Video.DirectShow;
using face;namespace Camtest
{public partial class facedetection : Form{/// <summary>/// 人脸检测/// </summary>public facedetection(){InitializeComponent();//启动默认在屏幕中间this.StartPosition = System.Windows.Forms.FormStartPosition.CenterScreen;}FilterInfoCollection videoDevices;VideoCaptureDevice videoSource;public int selectedDeviceIndex = 0;public int selectedPICIndex = 0;/// <summary>/// 加载窗体/// </summary>/// <param name="sender"></param>/// <param name="e"></param>private void Form1_Load(object sender, EventArgs e){// 刷新可用相机的列表videoDevices = new FilterInfoCollection(FilterCategory.VideoInputDevice);comboBoxCameras.Items.Clear();for (int i = 0; i < videoDevices.Count; i++){comboBoxCameras.Items.Add(videoDevices[i].Name.ToString());}if (comboBoxCameras.Items.Count > 0)comboBoxCameras.SelectedIndex = 0;picsize.SelectedIndex = 0;this.label4.Text = this.label5.Text = this.label7.Text = this.label9.Text = this.label11.Text = this.label13.Text = "正在识别";this.label4.ForeColor = Color.Red;this.label5.ForeColor = Color.Red;this.label7.ForeColor = Color.Red;this.label9.ForeColor = Color.Red;this.label11.ForeColor = Color.Red;this.label13.ForeColor = Color.Red;openCan();}//关闭窗体private void Form1_FormClosing(object sender, FormClosingEventArgs e){DialogResult r = MessageBox.Show("确定要退出程序?", "操作提示", MessageBoxButtons.OKCancel, MessageBoxIcon.Question);if (r != DialogResult.OK){e.Cancel = true;}videoSourcePlayer1.Stop();//停止摄像头videoSourcePlayer1.Dispose();}//实时显示照片private void videoSourcePlayer1_Click(object sender, EventArgs e){}/// <summary>/// 打开摄像头/// </summary>public void openCan(){selectedPICIndex = picsize.SelectedIndex;selectedDeviceIndex = comboBoxCameras.SelectedIndex;//连接摄像头。videoSource = new VideoCaptureDevice(videoDevices[selectedDeviceIndex].MonikerString);videoSource.VideoResolution = videoSource.VideoCapabilities[selectedDeviceIndex];// 枚举所有摄像头支持的像素,设置拍照为1920*1080foreach (VideoCapabilities capab in videoSource.VideoCapabilities){if (selectedPICIndex == 0){if (capab.FrameSize.Width == 1920 && capab.FrameSize.Height == 1080){videoSource.VideoResolution = capab;break;}if (capab.FrameSize.Width == 1280 && capab.FrameSize.Height == 720){videoSource.VideoResolution = capab;break;}}else{if (capab.FrameSize.Width == 1280 && capab.FrameSize.Height == 720){videoSource.VideoResolution = capab;break;}}}videoSourcePlayer1.VideoSource = videoSource;// set NewFrame event handlervideoSourcePlayer1.Start();}//保存图片private void button2_Click(object sender, EventArgs e){if (videoSource == null)return;Bitmap bitmap = videoSourcePlayer1.GetCurrentVideoFrame();//图片名称,年月日时分秒毫秒.jpgstring fileName = DateTime.Now.ToString("yyyyMMddHHmmssff") + ".jpg";//获取项目的根目录String path = AppDomain.CurrentDomain.BaseDirectory;//将图片保存在服务器里面bitmap.Save(path + "\\picture\\" + fileName, ImageFormat.Jpeg);bitmap.Dispose();//进行面部特征识别facemodel facem = face_test.FaceDetect(path + "\\picture\\" + fileName);this.label4.Text = facem.age;      //年龄this.label5.Text = facem.beauty;  //漂亮度string expression = facem.expression;//表情if (expression.Equals("0")){this.label7.Text = "不笑";}else if (expression.Equals("1")){this.label7.Text = "微笑";}else if (expression.Equals("2")){this.label7.Text = "大笑";}string gender = facem.gender;//性别if (gender.Equals("male")){this.label9.Text = "男";}else{this.label9.Text = "女";}string glasses = facem.glasses;//是否戴眼镜if (glasses.Equals("0")){this.label11.Text = "无眼镜";}else if (glasses.Equals("1")){this.label11.Text = "普通眼镜";}else{this.label11.Text = "墨镜";}string race = facem.race;//人种if (race.Equals("yellow")){this.label13.Text = "黄人";}else if (race.Equals("white")){this.label13.Text = "白人";}else if (race.Equals("black")){this.label13.Text = "黑人";}else if (race.Equals("arabs")){this.label13.Text = "棕人";}}//取消的按钮private void close_Click(object sender, EventArgs e){//停止摄像头videoSourcePlayer1.Stop();this.Close();welcome we = new welcome();we.Show();}}
}
五、人脸注册
新建一个窗体,名称是:faceregiste

1.调用的是百度的API,所以需要Api_Key和Secret_Key,关于这两个,大家可以自行百度。
//Api_Keypublic static string Api_Key = "这里是你的Api_Key";//Secret_Keypublic static string Secret_Key = "这里是你的Secret_Key ";2.刷新可用摄像头列表
//加载项目private void faceregiste_Load(object sender, EventArgs e){// 刷新可用相机的列表videoDevices = new FilterInfoCollection(FilterCategory.VideoInputDevice);comboBoxCameras.Items.Clear();for (int i = 0; i < videoDevices.Count; i++){comboBoxCameras.Items.Add(videoDevices[i].Name.ToString());}if (comboBoxCameras.Items.Count > 0)comboBoxCameras.SelectedIndex = 0;picsize.SelectedIndex = 0;//打开摄像头openCamera();}3..打开摄像头
//打开摄像头public void openCamera() {selectedPICIndex = picsize.SelectedIndex;selectedDeviceIndex = comboBoxCameras.SelectedIndex;//连接摄像头。videoSource = new VideoCaptureDevice(videoDevices[selectedDeviceIndex].MonikerString);videoSource.VideoResolution = videoSource.VideoCapabilities[selectedDeviceIndex];// 枚举所有摄像头支持的像素,设置拍照为1920*1080foreach (VideoCapabilities capab in videoSource.VideoCapabilities){if (selectedPICIndex == 0){if (capab.FrameSize.Width == 1920 && capab.FrameSize.Height == 1080){videoSource.VideoResolution = capab;break;}if (capab.FrameSize.Width == 1280 && capab.FrameSize.Height == 720){videoSource.VideoResolution = capab;break;}}else{if (capab.FrameSize.Width == 1280 && capab.FrameSize.Height == 720){videoSource.VideoResolution = capab;break;}}}videoSourcePlayer1.VideoSource = videoSource;// set NewFrame event handlervideoSourcePlayer1.Start();}4.点击注册执行的方法
//注册的按钮private void register_Click(object sender, EventArgs e){Users user = new Users();user.name = this.name.Text;user.id = DateTime.Now.Ticks / 10000;user.password = this.password.Text;user.phone = this.phone.Text;user.age =(int)this.age.Value;user.address = this.address.Text;user.picture = SavePicture() ;//注册人脸通过的话进去if (FaceRegister(user)){int rel = AddUsers(user);//添加信息if (rel > 0){MessageBox.Show("注册成功", "提示信息");}else{MessageBox.Show("添加失败", "提示信息");}}}
5.保存图片方法
/// <summary>/// 保存图片/// </summary>public string SavePicture() {if (videoSource == null){return null;}Bitmap bitmap = videoSourcePlayer1.GetCurrentVideoFrame();//图片名称,年月日时分秒毫秒.jpgstring fileName = DateTime.Now.ToString("yyyyMMddHHmmssff") + ".jpg";//获取项目的根目录string path = AppDomain.CurrentDomain.BaseDirectory;string picture = path + "\\picture\\" + fileName;//将图片保存在服务器里面bitmap.Save(picture, ImageFormat.Jpeg);bitmap.Dispose();return picture;}6.取消按钮方法
//取消的按钮private void close_Click(object sender, EventArgs e){//停止摄像头videoSourcePlayer1.Stop();this.Close();welcome we = new welcome();we.Show();}7..用户注册的方法
/// <summary>/// 用户注册/// </summary>/// <param name="users"></param>/// <returns></returns>public int AddUsers(Users users){int rel = 0;string sql = "insert INTO Users VALUES(@id,@name,@age,@phone,@password,@address,@picture)";SqlParameter[] param = {new SqlParameter("@id",users.id),new SqlParameter("@name",users.name),new SqlParameter("@age",users.age),new SqlParameter("@phone",users.phone),new SqlParameter("@password",users.password),new SqlParameter("@address",users.address),new SqlParameter("@picture",users.picture)};rel = SqlHelper.ExecuteNonQuery(sql, CommandType.Text, param);return rel;}8.人脸注册方法
/// <summary>/// 人脸注册/// </summary>/// <param name="picture"></param>public static bool FaceRegister(Users user){var client = new Baidu.Aip.Face.Face(Api_Key, Secret_Key);//当前毫秒数可能是负数,取绝对值var image1 = File.ReadAllBytes(user.picture);var result = client.User.Register(image1, user.id.ToString(), user.name, new[] { "gr_test" });//得到根节点JObject jo_result = (JObject)JsonConvert.DeserializeObject(result.ToString());if ((string)jo_result["error_msg"] != null){MessageBox.Show("对不起,请把脸放上!","提示",MessageBoxButtons.OK,MessageBoxIcon.Stop);return false;}return true;}9.关闭窗体方法
//关闭窗体private void faceregiste_FormClosing(object sender, FormClosingEventArgs e){DialogResult r = MessageBox.Show("确定要退出程序?", "操作提示", MessageBoxButtons.OKCancel, MessageBoxIcon.Question);if (r != DialogResult.OK){e.Cancel = true;}videoSourcePlayer1.Stop();//停止摄像头videoSourcePlayer1.Dispose();}10、人脸注册源代码
using System;
using System.Collections.Generic;
using System.ComponentModel;
using System.Data;
using System.Drawing;
using System.Linq;
using System.Text;
using System.Threading.Tasks;
using System.Windows.Forms;
using AForge;
using AForge.Controls;
using AForge.Imaging;
using AForge.Video;
using AForge.Video.DirectShow;
using face;
using System.Data.SqlClient;
using System.Drawing.Imaging;
using System.IO;
using Newtonsoft.Json.Linq;
using Newtonsoft.Json;namespace Camtest
{public partial class faceregiste : Form{//Api_Keypublic static string Api_Key = "OVYw5Ok0y9U8n6CfVPYt0wfZ";//Secret_Keypublic static string Secret_Key = "aCN3lupCarq3rC9G8Rylqz1d36Towp8G";public faceregiste(){InitializeComponent();//启动默认在屏幕中间this.StartPosition = System.Windows.Forms.FormStartPosition.CenterScreen;}FilterInfoCollection videoDevices;VideoCaptureDevice videoSource;public int selectedDeviceIndex = 0;public int selectedPICIndex = 0;//加载项目private void faceregiste_Load(object sender, EventArgs e){// 刷新可用相机的列表videoDevices = new FilterInfoCollection(FilterCategory.VideoInputDevice);comboBoxCameras.Items.Clear();for (int i = 0; i < videoDevices.Count; i++){comboBoxCameras.Items.Add(videoDevices[i].Name.ToString());}if (comboBoxCameras.Items.Count > 0)comboBoxCameras.SelectedIndex = 0;picsize.SelectedIndex = 0;//打开摄像头openCamera();}//打开摄像头public void openCamera() {selectedPICIndex = picsize.SelectedIndex;selectedDeviceIndex = comboBoxCameras.SelectedIndex;//连接摄像头。videoSource = new VideoCaptureDevice(videoDevices[selectedDeviceIndex].MonikerString);videoSource.VideoResolution = videoSource.VideoCapabilities[selectedDeviceIndex];// 枚举所有摄像头支持的像素,设置拍照为1920*1080foreach (VideoCapabilities capab in videoSource.VideoCapabilities){if (selectedPICIndex == 0){if (capab.FrameSize.Width == 1920 && capab.FrameSize.Height == 1080){videoSource.VideoResolution = capab;break;}if (capab.FrameSize.Width == 1280 && capab.FrameSize.Height == 720){videoSource.VideoResolution = capab;break;}}else{if (capab.FrameSize.Width == 1280 && capab.FrameSize.Height == 720){videoSource.VideoResolution = capab;break;}}}videoSourcePlayer1.VideoSource = videoSource;// set NewFrame event handlervideoSourcePlayer1.Start();}//注册的按钮private void register_Click(object sender, EventArgs e){Users user = new Users();user.name = this.name.Text;user.id = DateTime.Now.Ticks / 10000;user.password = this.password.Text;user.phone = this.phone.Text;user.age =(int)this.age.Value;user.address = this.address.Text;user.picture = SavePicture() ;//注册人脸通过的话进去if (FaceRegister(user)){int rel = AddUsers(user);//添加信息if (rel > 0){MessageBox.Show("注册成功", "提示信息");}else{MessageBox.Show("添加失败", "提示信息");}}}/// <summary>/// 保存图片/// </summary>public string SavePicture() {if (videoSource == null){return null;}Bitmap bitmap = videoSourcePlayer1.GetCurrentVideoFrame();//图片名称,年月日时分秒毫秒.jpgstring fileName = DateTime.Now.ToString("yyyyMMddHHmmssff") + ".jpg";//获取项目的根目录string path = AppDomain.CurrentDomain.BaseDirectory;string picture = path + "\\picture\\" + fileName;//将图片保存在服务器里面bitmap.Save(picture, ImageFormat.Jpeg);bitmap.Dispose();return picture;}//取消的按钮private void close_Click(object sender, EventArgs e){//停止摄像头videoSourcePlayer1.Stop();this.Close();welcome we = new welcome();we.Show();}/// <summary>/// 用户注册/// </summary>/// <param name="users"></param>/// <returns></returns>public int AddUsers(Users users){int rel = 0;string sql = "insert INTO Users VALUES(@id,@name,@age,@phone,@password,@address,@picture)";SqlParameter[] param = {new SqlParameter("@id",users.id),new SqlParameter("@name",users.name),new SqlParameter("@age",users.age),new SqlParameter("@phone",users.phone),new SqlParameter("@password",users.password),new SqlParameter("@address",users.address),new SqlParameter("@picture",users.picture)};rel = SqlHelper.ExecuteNonQuery(sql, CommandType.Text, param);return rel;}//关闭窗体private void faceregiste_FormClosing(object sender, FormClosingEventArgs e){DialogResult r = MessageBox.Show("确定要退出程序?", "操作提示", MessageBoxButtons.OKCancel, MessageBoxIcon.Question);if (r != DialogResult.OK){e.Cancel = true;}videoSourcePlayer1.Stop();//停止摄像头videoSourcePlayer1.Dispose();}/// <summary>/// 人脸注册/// </summary>/// <param name="picture"></param>public static bool FaceRegister(Users user){var client = new Baidu.Aip.Face.Face(Api_Key, Secret_Key);//当前毫秒数可能是负数,取绝对值var image1 = File.ReadAllBytes(user.picture);var result = client.User.Register(image1, user.id.ToString(), user.name, new[] { "gr_test" });//得到根节点JObject jo_result = (JObject)JsonConvert.DeserializeObject(result.ToString());if ((string)jo_result["error_msg"] != null){MessageBox.Show("对不起,请把脸放上!","提示",MessageBoxButtons.OK,MessageBoxIcon.Stop);return false;}return true;}}
}
六、人脸登录


1. 窗体加载刷新摄像头列表:
//窗体加载private void faceIdentify_Load(object sender, EventArgs e){//显示为正在检测this.label1.Text = this.label2.Text = this.label6.Text = this.label9.Text = "正在识别";// 刷新可用相机的列表videoDevices = new FilterInfoCollection(FilterCategory.VideoInputDevice);comboBoxCameras.Items.Clear();for (int i = 0; i < videoDevices.Count; i++){comboBoxCameras.Items.Add(videoDevices[i].Name.ToString());}if (comboBoxCameras.Items.Count > 0)comboBoxCameras.SelectedIndex = 0;picsize.SelectedIndex = 0;//打开摄像头openCamera();}2.打开摄像头:
//打开摄像头public void openCamera(){selectedPICIndex = picsize.SelectedIndex;selectedDeviceIndex = comboBoxCameras.SelectedIndex;//连接摄像头。videoSource = new VideoCaptureDevice(videoDevices[selectedDeviceIndex].MonikerString);videoSource.VideoResolution = videoSource.VideoCapabilities[selectedDeviceIndex];// 枚举所有摄像头支持的像素,设置拍照为1920*1080foreach (VideoCapabilities capab in videoSource.VideoCapabilities){if (selectedPICIndex == 0){if (capab.FrameSize.Width == 1920 && capab.FrameSize.Height == 1080){videoSource.VideoResolution = capab;break;}if (capab.FrameSize.Width == 1280 && capab.FrameSize.Height == 720){videoSource.VideoResolution = capab;break;}}else{if (capab.FrameSize.Width == 1280 && capab.FrameSize.Height == 720){videoSource.VideoResolution = capab;break;}}}videoSourcePlayer1.VideoSource = videoSource;// set NewFrame event handlervideoSourcePlayer1.Start();}3.点击确定的按钮,(人脸登陆):
/// <summary>/// 点击确定的按钮/// </summary>/// <param name="sender"></param>/// <param name="e"></param>private void button2_Click(object sender, EventArgs e){//先获取用户名//然后在提取图片//先查询用户名,看看有没有该用户名//有该用户名的话继续判断人脸对应不,没有的话提示没有该用户string name = this.textBox1.Text;Users user = QueryUsersByName(name);if (((string)(user.name))!=""){//有该用户,判断摄入的人脸和人脸库中的对比FaceVerify(SavePicture(),user);}else { //说明没有该用户,提示用户重新输入用户名MessageBox.Show("对不起,检测到没有该用户,请重新输入", "操作提示", MessageBoxButtons.OK, MessageBoxIcon.Stop);}}4.人脸认证【登陆】:
/// <summary>/// 人脸认证【登陆】/// </summary>public void FaceVerify(string filename,Users users){var client = new Baidu.Aip.Face.Face(Api_Key ,Secret_Key);var image1 = File.ReadAllBytes(filename);var result = client.User.Verify(image1,(users.id).ToString(), new[] { "gr_test" }, 1);//先判断脸是不是在上面,在继续看有匹配的没,否则提示放上脸//得到根节点JObject jo_result = (JObject)JsonConvert.DeserializeObject(result.ToString());if ((string)jo_result["error_msg"] != null){MessageBox.Show("对不起,请把脸放上!", "提示", MessageBoxButtons.OK, MessageBoxIcon.Stop);}else{//检测到脸//得到result节点JArray jo_age = (JArray)JsonConvert.DeserializeObject(jo_result["result"].ToString());string resu = jo_age.ToString();int num1 = resu.IndexOf("\n") + 2;int num2 = resu.LastIndexOf("]") - 8;string ids = resu.Substring(num1, num2);if (ids != null || !ids.Equals("")){double scores_num = double.Parse(ids);if (scores_num > 80){MessageBox.Show("登陆成功,已检测到您的信息", "操作提示", MessageBoxButtons.OK, MessageBoxIcon.Information);}else{MessageBox.Show("对不起,脸与账户不对应,请换张脸试试", "操作提示", MessageBoxButtons.OK, MessageBoxIcon.Stop);}}}}5.根据编号查询用户信息:
/// <summary>/// 根据编号查询用户信息/// </summary>/// <param name="id"></param>/// <returns></returns>public static Users QueryUsersByName(string name){Users user = new Users();string sql = "select * from users where name = @name";using (SqlDataReader reader = SqlHelper.ExcuteReader(sql, CommandType.Text, new SqlParameter("@name", name))){if (reader.Read()){user.id = long.Parse(reader[0].ToString());user.name = reader[1].ToString();user.age = Convert.ToInt32(reader[2]);user.phone = reader[3].ToString();user.password = reader[4].ToString();user.address = reader[5].ToString();user.picture = reader[6].ToString();}}return user;}6..保存图片:
/// <summary>/// 保存图片/// </summary>public string SavePicture(){if (videoSource == null){return null;}Bitmap bitmap = videoSourcePlayer1.GetCurrentVideoFrame();//图片名称,年月日时分秒毫秒.jpgstring fileName = DateTime.Now.ToString("yyyyMMddHHmmssff") + ".jpg";//获取项目的根目录string path = AppDomain.CurrentDomain.BaseDirectory;string picture = path + "\\picture\\" + fileName;//将图片保存在服务器里面bitmap.Save(picture, ImageFormat.Jpeg);bitmap.Dispose();return picture;}7.人脸登录facelogin
using AForge.Video.DirectShow;
using face;
using Newtonsoft.Json;
using Newtonsoft.Json.Linq;
using System;
using System.Collections.Generic;
using System.ComponentModel;
using System.Data;
using System.Data.SqlClient;
using System.Drawing;
using System.Drawing.Imaging;
using System.IO;
using System.Linq;
using System.Text;
using System.Threading.Tasks;
using System.Windows.Forms;namespace Camtest
{public partial class facelogin : Form{//Api_Keypublic static string Api_Key = "OVYw5Ok0y9U8n6CfVPYt0wfZ";//Secret_Keypublic static string Secret_Key = "aCN3lupCarq3rC9G8Rylqz1d36Towp8G";public facelogin(){InitializeComponent();//启动默认在屏幕中间this.StartPosition = System.Windows.Forms.FormStartPosition.CenterScreen;}FilterInfoCollection videoDevices;VideoCaptureDevice videoSource;public int selectedDeviceIndex = 0;public int selectedPICIndex = 0;//窗体加载private void facelogin_Load(object sender, EventArgs e){// 刷新可用相机的列表videoDevices = new FilterInfoCollection(FilterCategory.VideoInputDevice);comboBoxCameras.Items.Clear();for (int i = 0; i < videoDevices.Count; i++){comboBoxCameras.Items.Add(videoDevices[i].Name.ToString());}if (comboBoxCameras.Items.Count > 0)comboBoxCameras.SelectedIndex = 0;picsize.SelectedIndex = 0;//打开摄像头openCamera();}//打开摄像头public void openCamera(){selectedPICIndex = picsize.SelectedIndex;selectedDeviceIndex = comboBoxCameras.SelectedIndex;//连接摄像头。videoSource = new VideoCaptureDevice(videoDevices[selectedDeviceIndex].MonikerString);videoSource.VideoResolution = videoSource.VideoCapabilities[selectedDeviceIndex];// 枚举所有摄像头支持的像素,设置拍照为1920*1080foreach (VideoCapabilities capab in videoSource.VideoCapabilities){if (selectedPICIndex == 0){if (capab.FrameSize.Width == 1920 && capab.FrameSize.Height == 1080){videoSource.VideoResolution = capab;break;}if (capab.FrameSize.Width == 1280 && capab.FrameSize.Height == 720){videoSource.VideoResolution = capab;break;}}else{if (capab.FrameSize.Width == 1280 && capab.FrameSize.Height == 720){videoSource.VideoResolution = capab;break;}}}videoSourcePlayer1.VideoSource = videoSource;// set NewFrame event handlervideoSourcePlayer1.Start();}/// <summary>/// 点击确定的按钮/// </summary>/// <param name="sender"></param>/// <param name="e"></param>private void button2_Click(object sender, EventArgs e){//先获取用户名//然后在提取图片//先查询用户名,看看有没有该用户名//有该用户名的话继续判断人脸对应不,没有的话提示没有该用户string name = this.textBox1.Text;Users user = QueryUsersByName(name);if (((string)(user.name))!=""){//有该用户,判断摄入的人脸和人脸库中的对比FaceVerify(SavePicture(),user);}else { //说明没有该用户,提示用户重新输入用户名MessageBox.Show("对不起,检测到没有该用户,请重新输入", "操作提示", MessageBoxButtons.OK, MessageBoxIcon.Stop);}}/// <summary>/// 人脸认证【登陆】/// </summary>public  void FaceVerify(string filename,Users users){var client = new Baidu.Aip.Face.Face(Api_Key ,Secret_Key);var image1 = File.ReadAllBytes(filename);var result = client.User.Verify(image1,(users.id).ToString(), new[] { "gr_test" }, 1);//先判断脸是不是在上面,在继续看有匹配的没,否则提示放上脸//得到根节点JObject jo_result = (JObject)JsonConvert.DeserializeObject(result.ToString());if ((string)jo_result["error_msg"] != null){MessageBox.Show("对不起,请把脸放上!", "提示", MessageBoxButtons.OK, MessageBoxIcon.Stop);}else{//检测到脸//得到result节点JArray jo_age = (JArray)JsonConvert.DeserializeObject(jo_result["result"].ToString());string resu = jo_age.ToString();int num1 = resu.IndexOf("\n") + 2;int num2 = resu.LastIndexOf("]") - 8;string ids = resu.Substring(num1, num2);if (ids != null || !ids.Equals("")){double scores_num = double.Parse(ids);if (scores_num > 80){MessageBox.Show("登陆成功,已检测到您的信息", "操作提示", MessageBoxButtons.OK, MessageBoxIcon.Information);}else{MessageBox.Show("对不起,脸与账户不对应,请换张脸试试", "操作提示", MessageBoxButtons.OK, MessageBoxIcon.Stop);}}}}/// <summary>/// 根据编号查询用户信息/// </summary>/// <param name="id"></param>/// <returns></returns>public static Users QueryUsersByName(string name){Users user = new Users();string sql = "select * from users where name = @name";using (SqlDataReader reader = SqlHelper.ExcuteReader(sql, CommandType.Text, new SqlParameter("@name", name))){if (reader.Read()){user.id = long.Parse(reader[0].ToString());user.name = reader[1].ToString();user.age = Convert.ToInt32(reader[2]);user.phone = reader[3].ToString();user.password = reader[4].ToString();user.address = reader[5].ToString();user.picture = reader[6].ToString();}}return user;}/// <summary>/// 保存图片/// </summary>public string SavePicture(){if (videoSource == null){return null;}Bitmap bitmap = videoSourcePlayer1.GetCurrentVideoFrame();//图片名称,年月日时分秒毫秒.jpgstring fileName = DateTime.Now.ToString("yyyyMMddHHmmssff") + ".jpg";//获取项目的根目录string path = AppDomain.CurrentDomain.BaseDirectory;string picture = path + "\\picture\\" + fileName;//将图片保存在服务器里面bitmap.Save(picture, ImageFormat.Jpeg);bitmap.Dispose();return picture;}/// <summary>/// 取消的按钮/// </summary>/// <param name="sender"></param>/// <param name="e"></param>private void close_Click(object sender, EventArgs e){//停止摄像头videoSourcePlayer1.Stop();this.Close();welcome we = new welcome();we.Show();}}
}
相关文章:
C#windows窗体人脸识别
一、创建一个数据库,名为TestFaceDB 里面有一张表就OK了,表名Users,表里面有几个字段我说明一下: id--------------------bigint----------------------编号 name--------------varchar(50)-----------------用户名 phone--------------v…...
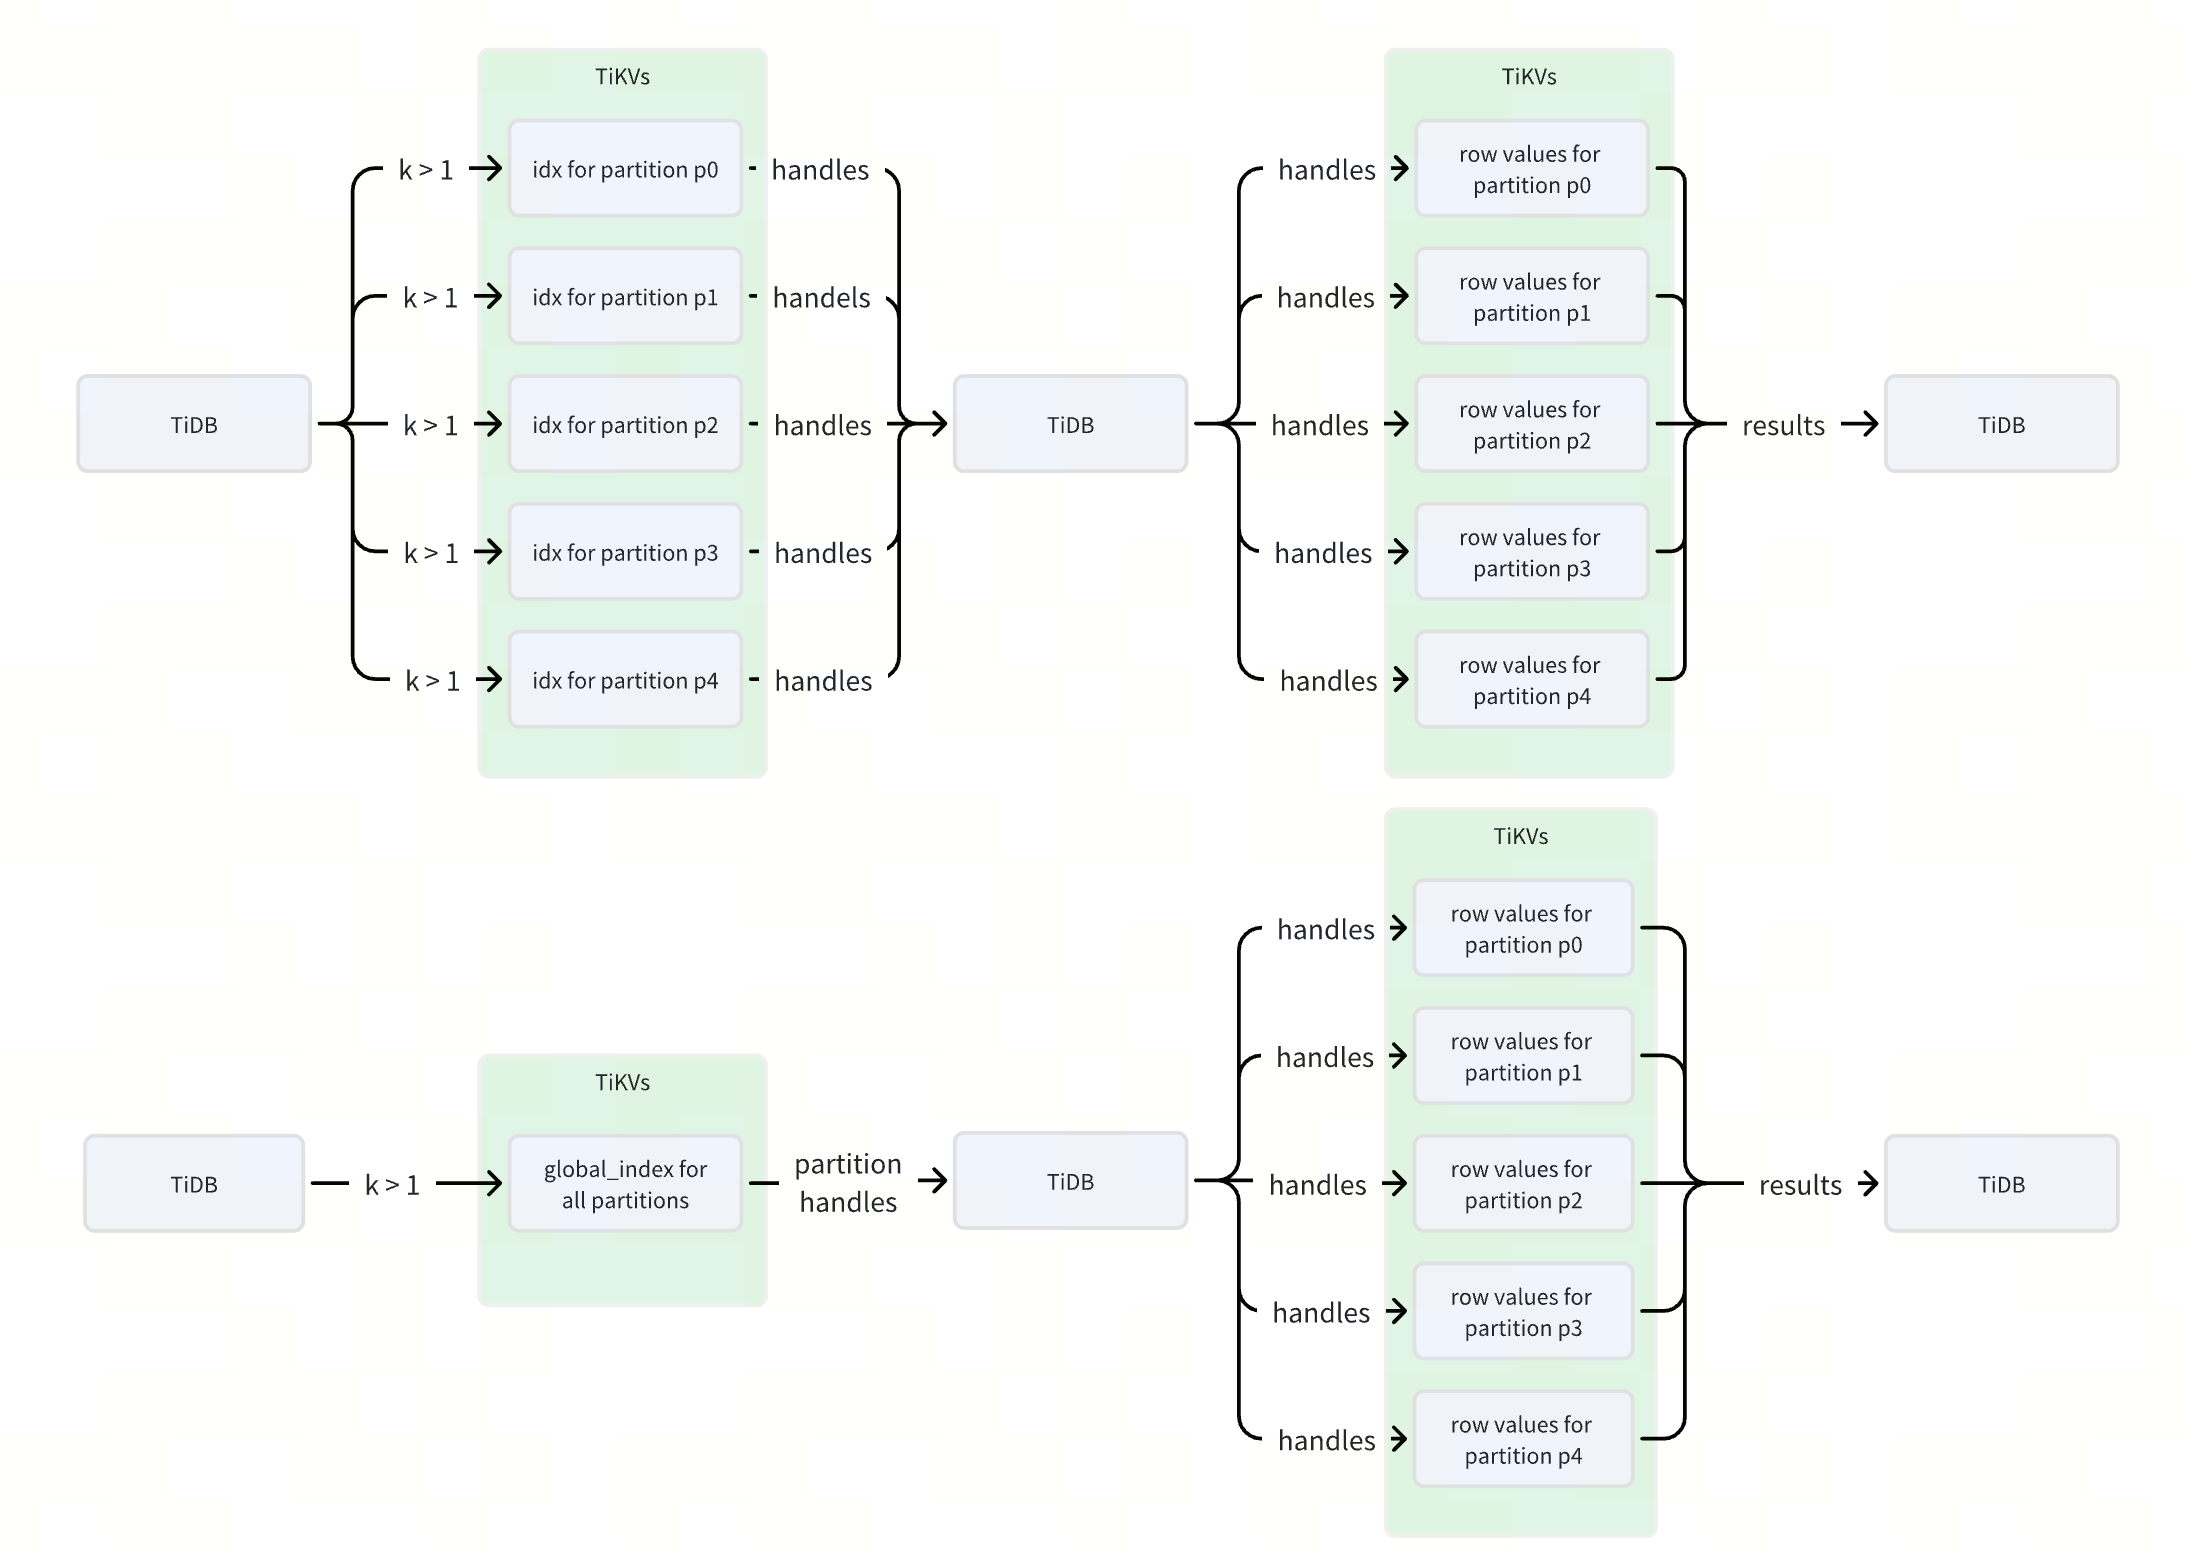
53倍性能提升!TiDB 全局索引如何优化分区表查询?
作者: Defined2014 原文来源: https://tidb.net/blog/7077577f 什么是 TiDB 全局索引 在 TiDB 中,全局索引是一种定义在分区表上的索引类型,它允许索引分区与表分区之间建立一对多的映射关系,即一个索引分区可以对…...

vue字符串的常用方法,截取字符串,获取字符串长度,检索字符串
1.使用substr方法截取字符串 let str "12345"; let part str.substr(0, 3); // 截取从索引0开始到索引3的子字符串 console.log(part); // "123" 2.获取字符串长度 JavaScript中的字符串有一个 length属性,该属性可以用在VUE获取字符串的长度…...

Neo4j集群学习
文章目录 官方指导文档Neo4j因果集群核心服务器只读副本因果一致性 Neo4j集群搭建Neo4j企业版下载集群简介虚拟机准备jdk安装实施搭建访问neo4j Web服务 集群添加Core节点 官方指导文档 Neo4j 5 ClusterNeo4j 5 Basic Cluster Neo4j因果集群 集群是Neo4企业版中所提供的功能…...

【人工智能】深度学习中的梯度检查:原理详解与Python实现
《Python OpenCV从菜鸟到高手》带你进入图像处理与计算机视觉的大门! 解锁Python编程的无限可能:《奇妙的Python》带你漫游代码世界 梯度检查是深度学习模型开发中至关重要的一步,它能够验证反向传播的梯度计算是否正确,从而确保模型训练的稳定性和准确性。在本文中,我们…...
接口)
Kotlin 2.1.0 入门教程(十七)接口
接口 接口可以包含抽象方法的声明,也可以包含方法的实现。 接口与抽象类的不同之处在于,接口无法存储状态。接口可以拥有属性,但这些属性要么必须是抽象的,要么就得提供访问器的实现。 接口使用 interface 关键字来定义&#x…...
)
了解i2c_check_functionality()
i2c_check_functionality()用来检查设备适配器支持的标志是否要求。 打开“include/linux/i2c.h” /* Return the functionality mask */ static inline u32 i2c_get_functionality(struct i2c_adapter *adap) { return adap->algo->functionality(adap); //返回该…...

Retrieval-Augmented Generation for LargeLanguage Models: A Survey
标题:Retrieval-Augmented Generation for Large Language Models: A Survey 作者:Yunfan Gaoa , Yun Xiongb , Xinyu Gaob , Kangxiang Jiab , Jinliu Panb , Yuxi Bic , Yi Daia , Jiawei Suna , Meng Wangc , and Haofen Wang 1. By referencing ext…...

C#多线程异步连接MySQL与SQLserver数据库
C#多线程异步连接MySQL与SQLserver数据库 一、前言二、多线程异步连接数据库代码2.1代码块2.2代码说明 参考文档 一、前言 当编写代码连接多台设备上的数据库时,如果采用同步逐个连接的方式,在网络畅通的情况下连接速度尚可,但当其中一台设备…...

try learning-git-branching
文章目录 mergerebase分离 HEAD相对引用利用父节点branch -f 撤销变更cherry-pick交互式 rebase只取一个提交记录提交的技巧rebase 在上一次提交上amendcherry-pick 在上一次提交上 amend tag多分支 rebase两个parent节点纠缠不清的分支偏离的提交历史锁定的Main learning git …...

代码随想录算法【Day46】
Day46 647. 回文子串 class Solution { public:int countSubstrings(string s) {vector<vector<bool>> dp(s.size(), vector<bool>(s.size(), false));int result 0;for (int i s.size() - 1; i > 0; i--) { // 注意遍历顺序for (int j i; j < s…...

flutter本地推送 flutter_local_notifications的使用记录
flutter_local_notifications 效果 安卓配置(AndroidManifest.xml) <uses-permission android:name"com.android.alarm.permission.SET_ALARM"/> <uses-permission android:name"android.permission.SCHEDULE_EXACT_ALARM" /> <us…...
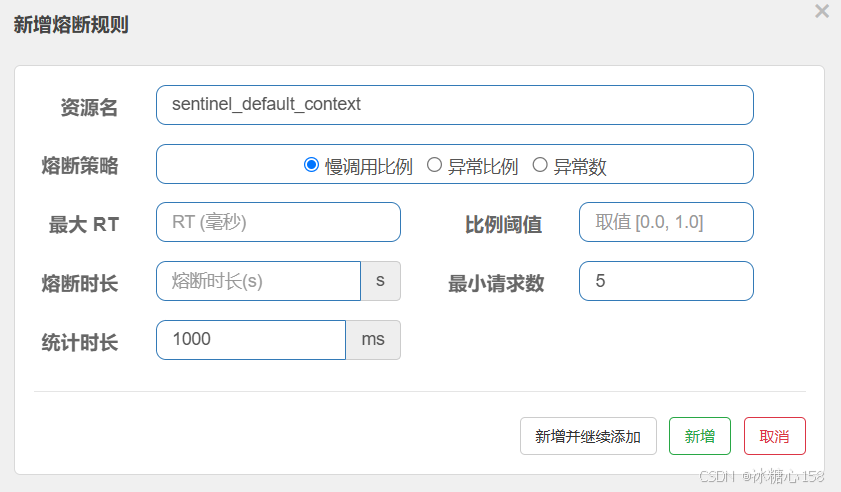
Springboot 中如何使用Sentinel
在 Spring Boot 中使用 Sentinel 非常方便,Spring Cloud Alibaba 提供了 spring-cloud-starter-alibaba-sentinel 组件,可以快速将 Sentinel 集成到你的 Spring Boot 应用中,并利用其强大的流量控制和容错能力。 下面是一个详细的步骤指南 …...

AI Agent 有哪些痛点问题
AI Agent 有哪些痛点问题 目录 AI Agent 有哪些痛点问题身份安全问题数据安全问题模型安全问题可靠性问题伦理和合规问题身份安全问题 身份界定模糊:AI代理既非完全意义上的人类,也不同于传统的机器,现有的身份管理工具难以准确对其进行定位和管理,导致在权限分配、责任追溯…...

一个让Stable Diffusion更稳定、更易用的Github开源项目
2023除了ChatGPT大火,Stable Diffusion同样也是非常火热,Stable Diffusion是一个Github开源项目,很多爱好者都会本地安装,但面对一些初学者来说,在安装、配置和使用过程中还是会经常出现很多问题,特别不了解…...

Docker+Jenkins自动化部署SpringBoot项目【详解git,jdk,maven,ssh配置等各种配置,附有示例+代码】
文章目录 DockerJenkins部署SpringBoot项目一.准备工作1.1安装jdk111.2安装Maven 二.Docker安装Jenkins2.1安装Docker2.2 安装Jenkins2.3进入jenkins 三.Jenkins设置3.1安装jenkins插件3.2全局工具配置全局配置jdk全局配置maven全局配置git 3.3 系统配置安装 Publish Over SSH …...

.NET SixLabors.ImageSharp v1.0 图像实用程序控制台示例
使用 C# 控制台应用程序示例在 Windows、Linux 和 MacOS 机器上处理图像,包括创建散点图和直方图,以及根据需要旋转图像以便正确显示。 这个小型实用程序库需要将 NuGet SixLabors.ImageSharp包(版本 1.0.4)添加到.NET Core 3.1/ …...

【机器学习】线性回归与一元线性回归
线性回归与一元线性回归 V1.1线性回归问题线性方程的最优解一元线性回归一元线性回归的方程一元线性回归距离衡量方法一元线性回归的最优化求解一元线性回归的最小二乘法解法 V1.1 线性回归问题 线性回归问题就是找一条线或超平面,并使用线或超平面来描述数据分布…...

soular基础教程-使用指南
soular是TikLab DevOps工具链的统一帐号中心,今天来介绍如何使用 soular 配置你的组织、工作台,快速入门上手。  1. 账号管理 可以对账号信息进行多方面管理,包括分配不同的部门、用户组等,从而确保账号权限和职责…...

《Spring实战》(第6版)第1章 Spring起步
第1部分 Spring基础 第1章 Spring起步 1.1 什么是Spring Spring的核心是提供一个容器(container)。 称为Spring应用上下文(Spring application context)。 创建和管理应用的组件(bean),与上下文装配在一起。 Bean装配通过依赖注入(Dependency Injection,DI)。…...

PAT乙级真题 — 1084 外观数列(java)
外观数列是指具有以下特点的整数序列: d, d1, d111, d113, d11231, d112213111, ...它从不等于 1 的数字 d 开始,序列的第 n1 项是对第 n 项的描述。比如第 2 项表示第 1 项有 1 个 d,所以就是 d1;第 2 项是 1 个 d(对…...

I.MX6ull 看门狗
一、看门狗介绍 WatchDog是为了能够防止程序跑飞而使用的一种硬件模块。如果你的程序没有跑飞,那么你的程序会 定时的去喂看门狗;如果你的程序跑飞了,那么就不会再去喂狗了,如果超过了喂狗的时间,那么狗就会 自己生成一个信号来重…...

鲸鱼算法优化Transformer+KAN网络并应用于时序预测任务
😊😊😊欢迎来到本博客😊😊😊 本次博客内容将聚焦于深度学习的相关知识与实践 🎉作者简介:⭐️⭐️⭐️主要研究方向涵盖深度学习、计算机视觉等方向。 📝目前更新&#x…...

一维差分算法篇:高效处理区间加减
那么在正式介绍我们的一维差分的原理前,我们先来看一下一维差分所应用的一个场景,那么假设我们现在有一个区间为[L,R]的一个数组,那么我要在这个数组中的某个子区间比如[i,m] (L<i<m<R)进行一个加k值或者减去k值的一个操作ÿ…...

export关键字
注意点: 使用 export 和 import 时,确保你的JavaScript环境支持ES6模块 在JavaScript中,export 关键字主要用于模块化编程,允许你将代码的不同部分导出,使得其他模块可以通过 import 关键字来引入这些部分。这是ES6&a…...

【C++】基础入门(详解)
🌟 Hello,我是egoist2023! 🌍 种一棵树最好是十年前,其次是现在! 目录 输入&输出 缺省参数(默认参数) 函数重载 引用 概念及定义 特性及使用 const引用 与指针的关系 内联inline和nullptr in…...

【快速入门】Unity 常用组件(功能块)
欢迎关注 、订阅专栏 【unity 新手教程】谢谢你的支持!💜💜 文章目录 Unity 常用组件(功能块):Transform - 变换:坐标、朝向、大小Mesh Filter - 加载网格数据Mesh Renderer- 渲染网格Camera - …...

Nessus 工具使用全攻略
目录 一、Nessus:网络安全的坚固防线 二、Nessus 安装指南 (一)获取安装包 (二)安装流程 三、初次配置:开启 Nessus 的第一步 (一)账号注册 (二)激活 …...

1441. 用栈操作构建数组 中等
1441. 用栈操作构建数组 给你一个数组 target 和一个整数 n。每次迭代,需要从 list { 1 , 2 , 3 ..., n } 中依次读取一个数字。 请使用下述操作来构建目标数组 target : "Push":从 list 中读取一个新元素, 并将其推入…...

【Springboot知识】从零开始配置springfox
文章目录 配置过程1. 添加依赖2. 创建Swagger配置类3. 配置Swagger UI4. 自定义Swagger配置(可选)4.1 添加全局请求参数4.2 配置响应消息 5. 运行项目并访问Swagger UI6. 其他注意事项7. 使用Springfox 3.x(可选)总结 忽略登录验证…...