Vue-Flow绘制流程图(Vue3+ElementPlus+TS)简单案例
本文是vue3+Elementplus+ts框架编写的简单可拖拽绘制案例。
1.效果图:
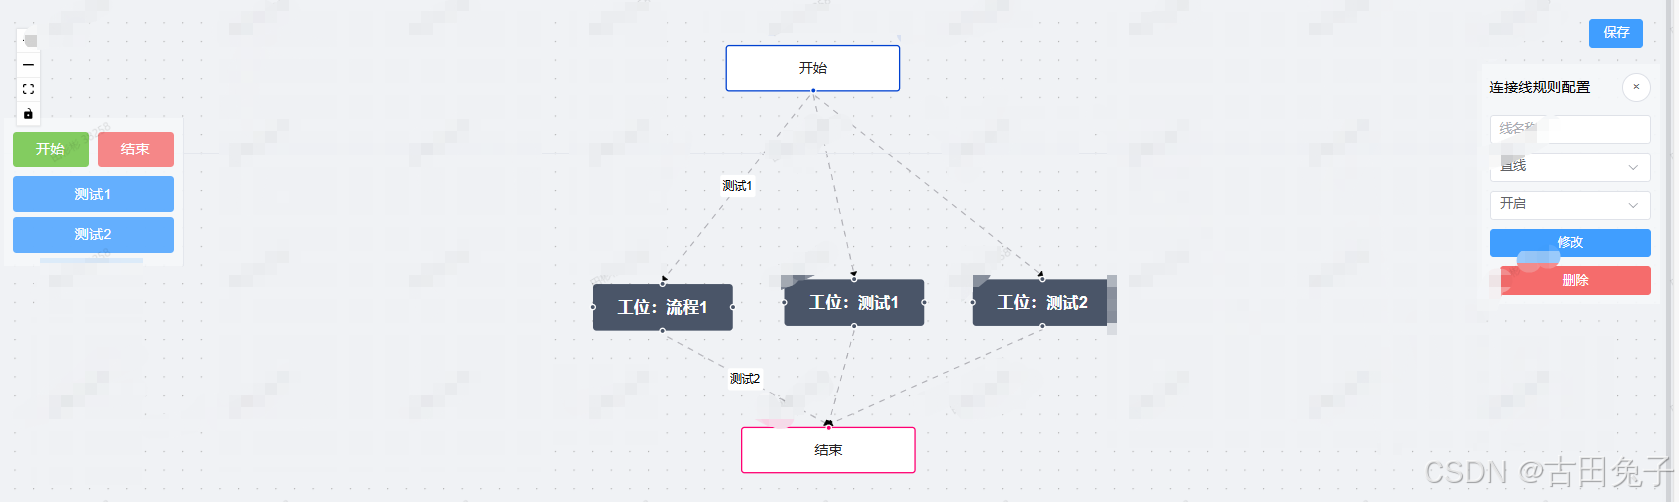
2.Index.vue主代码:
<script lang="ts" setup>
import { ref, markRaw } from "vue";
import {VueFlow,useVueFlow,MarkerType,type Node,type Edge
} from "@vue-flow/core";
import { Background } from "@vue-flow/background";
import { Controls } from "@vue-flow/controls";
import { MiniMap } from "@vue-flow/minimap";
import "@vue-flow/core/dist/style.css";
import "@vue-flow/core/dist/theme-default.css";
import CustomNode from "./components/CusInfoNode.vue";
import {ElMessageBox,ElNotification,ElButton,ElRow,ElCol,ElScrollbar,ElInput,ElSelect,ElOption
} from "element-plus";const {onInit,onNodeDragStop,onConnect,addEdges,getNodes,getEdges,setEdges,setNodes,screenToFlowCoordinate,onNodesInitialized,updateNode,addNodes
} = useVueFlow();const defaultEdgeOptions = {type: "smoothstep", // 默认边类型animated: true, // 是否启用动画markerEnd: {type: MarkerType.ArrowClosed, // 默认箭头样式color: "black"}
};// 节点
const nodes = ref<Node[]>([{id: "5",type: "input",data: { label: "开始" },position: { x: 235, y: 100 },class: "round-start"},{id: "6",type: "custom", // 使用自定义类型data: { label: "工位:流程1" },position: { x: 200, y: 200 },class: "light"},{id: "7",type: "output",data: { label: "结束" },position: { x: 235, y: 300 },class: "round-stop"}
]);const nodeTypes = ref({custom: markRaw(CustomNode) // 注册自定义节点类型
});// 线
const edges = ref<Edge[]>([{id: "e4-5",type: "straight",source: "5",target: "6",sourceHandle: "top-6",label: "测试1",markerEnd: {type: MarkerType.ArrowClosed, // 使用闭合箭头color: "black"}},{id: "e4-6",type: "straight",source: "6",target: "7",sourceHandle: "bottom-6",label: "测试2",markerEnd: {type: MarkerType.ArrowClosed, // 使用闭合箭头color: "black"}}
]);onInit(vueFlowInstance => {vueFlowInstance.fitView();
});onNodeDragStop(({ event, nodes, node }) => {console.log("Node Drag Stop", { event, nodes, node });
});onConnect(connection => {addEdges(connection);
});const pointsList = ref([{ name: "测试1" }, { name: "测试2" }]);
const updateState = ref("");
const selectedEdge = ref<{id: string;type?: string;label?: string;animated?: boolean;
}>({ id: "", type: undefined, label: undefined, animated: undefined });const onEdgeClick = ({ event, edge }) => {selectedEdge.value = edge; // 选中边updateState.value = "edge";console.log("选中的边:", selectedEdge.value);
};function updateEdge() {// 获取当前所有的边const allEdges = getEdges.value;// 切换边类型:根据当前类型来切换const newType =selectedEdge.value.type === "smoothstep" ? null : "smoothstep";// 更新选中边的类型setEdges([...allEdges.filter(e => e.id !== selectedEdge.value.id), // 移除旧的边{...selectedEdge.value,type: selectedEdge.value.type,label: selectedEdge.value.label} as Edge // 更新边的类型]);
}function removeEdge() {ElMessageBox.confirm("是否要删除该连线?", "删除连线", {confirmButtonText: "确定",cancelButtonText: "取消",type: "warning"}).then(() => {const allEdges = getEdges.value;setEdges(allEdges.filter(e => e.id !== selectedEdge.value.id));ElNotification({type: "success",message: "连线删除成功"});updateState.value = null;selectedEdge.value = { id: "", type: undefined, label: undefined };});
}const selectedNode = ref<{id: string;data: { label: string };type: string;position: { x: number; y: number };class: string;
}>({id: "",data: { label: "" },type: "",position: { x: 0, y: 0 },class: ""
});const onNodeClick = ({ event, node }) => {selectedNode.value = node; // 更新选中的节点updateState.value = "node";console.log("选中的节点:", node);
};function removeNode() {ElMessageBox.confirm("是否要删除该点位?", "删除点位", {confirmButtonText: "确定",cancelButtonText: "取消",type: "warning"}).then(() => {const allNodes = getNodes.value;setNodes(allNodes.filter(e => e.id !== selectedNode.value.id));const allEdges = getEdges.value;setEdges(allEdges.filter(e =>e.source !== selectedNode.value.id &&e.target !== selectedNode.value.id));ElNotification({type: "success",message: "点位删除成功"});updateState.value = null;selectedNode.value = {id: "",data: { label: "" },type: "",position: { x: 0, y: 0 },class: ""};});
}const dragItem = ref<Node>(null);// 拖拽开始时设置拖拽的元素
function onDragStart(event, state) {dragItem.value = {id: `node-${Date.now()}`, // 动态生成唯一 iddata: {label:state === "开始" ? "开始" : state === "结束" ? "结束" : "工位:" + state},type: state === "开始" ? "input" : state === "结束" ? "output" : "custom",position: { x: event.clientX, y: event.clientY },class:state === "开始"? "round-start": state === "结束"? "round-stop": "light"};
}// 拖拽结束时清除状态
function onDragEnd() {dragItem.value = null;
}// 拖拽目标画布区域时允许放置
function onDragOver(event) {console.log("onDragOver事件:", event);event.preventDefault();
}function onDrop(event) {console.log("onDrop事件:", event);const position = screenToFlowCoordinate({x: event.clientX,y: event.clientY});const newNode = {...dragItem.value,position};const { off } = onNodesInitialized(() => {updateNode(dragItem.value?.id, node => ({position: {x: node.position.x - node.dimensions.width / 2,y: node.position.y - node.dimensions.height / 2}}));off();});// 更新节点数据dragItem.value = null;addNodes(newNode); //这里是画布上增加updateNodeData(newNode); //更新后端数据console.log("新节点:", newNode);console.log("新节点后List", nodes.value);
}const saveFlow = () => {console.log("保存数据nodes:", nodes.value);console.log("保存数据edges", edges.value);
};function updateNodeData(node: Node) {//更新后端数据console.log("更新后端数据:", node);nodes.value.push(node);
}
</script><template><div class="flow-container"><VueFlow:nodes="nodes":edges="edges":default-viewport="{ zoom: 1 }":min-zoom="0.2":max-zoom="4"@node-click="onNodeClick"@edge-click="onEdgeClick"@drop="onDrop"@dragover="onDragOver":node-types="nodeTypes":default-edge-options="defaultEdgeOptions":connect-on-click="true"><Background pattern-color="#aaa" :gap="16" /><MiniMap /></VueFlow><div class="top-container"><Controls class="controls" /><div class="save-btn"><ElButton type="primary" class="mr-2" @click="saveFlow">保存</ElButton></div></div><div class="left-panel"><div class="drag-items"><ElRow :gutter="10"><ElCol :span="12"><divclass="drag-item start-node"draggable="true"@dragstart="onDragStart($event, '开始')"@dragend="onDragEnd"><span>开始</span></div></ElCol><ElCol :span="12"><divclass="drag-item end-node"draggable="true"@dragstart="onDragStart($event, '结束')"@dragend="onDragEnd"><span>结束</span></div></ElCol></ElRow><ElScrollbar height="75%"><divclass="drag-item custom-node"draggable="true"@dragstart="onDragStart($event, item.name)"@dragend="onDragEnd"v-for="(item, index) in pointsList":key="index"><span>{{ item.name }}</span></div></ElScrollbar></div></div><div class="right-panel" v-if="updateState"><div class="panel-header"><span>{{updateState === "edge" ? "连接线规则配置" : "点位规则配置"}}</span><ElButton circle class="close-btn" @click="updateState = ''">×</ElButton></div><div class="panel-content" v-if="updateState === 'edge'"><ElInput v-model="selectedEdge.label" placeholder="线名称" clearable /><ElSelect v-model="selectedEdge.type" placeholder="线类型"><ElOption label="折线" value="smoothstep" /><ElOption label="曲线" value="default" /><ElOption label="直线" value="straight" /></ElSelect><ElSelect v-model="selectedEdge.animated" placeholder="线动画"><ElOption label="开启" :value="true" /><ElOption label="关闭" :value="false" /></ElSelect><ElButton type="primary" @click="updateEdge">修改</ElButton><ElButton type="danger" @click="removeEdge">删除</ElButton></div><div class="panel-content" v-else><ElInputv-model="selectedNode.data.label"placeholder="点位名称"clearable/><ElButton type="danger" @click="removeNode">删除</ElButton></div></div></div>
</template><style scoped>
.flow-container {position: relative;height: 100vh;
}.top-container {position: absolute;top: 0;width: 100%;display: flex;justify-content: space-between;padding: 10px;border-bottom: 1px solid #e4e7ed;
}.left-panel {position: absolute;left: 0;top: 120px;width: 200px;padding: 10px;background: rgba(245, 247, 250, 0.9);border-right: 1px solid #e4e7ed;
}.right-panel {position: absolute;right: 0;top: 60px;width: 200px;padding: 10px;background: rgba(245, 247, 250, 0.9);border-left: 1px solid #e4e7ed;
}.drag-item {padding: 8px;margin: 5px 0;border-radius: 4px;text-align: center;cursor: move;
}.start-node {background-color: rgba(103, 194, 58, 0.8);color: white;
}.end-node {background-color: rgba(245, 108, 108, 0.8);color: white;
}.custom-node {background-color: rgba(64, 158, 255, 0.8);color: white;
}.panel-header {display: flex;justify-content: space-between;align-items: center;margin-bottom: 15px;
}.panel-content {display: grid;gap: 10px;
}.controls {position: relative;top: -4px;left: -10px;
}
</style>
3. CusInfoNode.vue自定义客户Node
<script setup lang="ts">
import { defineProps } from "vue";
import { Handle, Position } from "@vue-flow/core";defineProps({id: String,data: Object
});
</script><template><div class="custom-node"><div class="node-header">{{ data.label }}</div><!-- Handle 定义 --><Handletype="source":position="Position.Top":id="'top-' + id":style="{ background: '#4a5568' }"/><Handletype="source":position="Position.Left":id="'left-' + id":style="{ background: '#4a5568' }"/><Handletype="source":position="Position.Right":id="'right-' + id":style="{ background: '#4a5568' }"/><Handletype="source":position="Position.Bottom":id="'bottom-' + id":style="{ background: '#4a5568' }"/></div>
</template><style scoped>
.custom-node {width: 120px;height: 40px;border-radius: 3px;background-color: #4a5568;color: white;position: relative;display: flex;justify-content: center;align-items: center;
}.node-header {font-size: 14px;font-weight: bold;
}
</style>
相关文章:
Vue-Flow绘制流程图(Vue3+ElementPlus+TS)简单案例
本文是vue3Elementplusts框架编写的简单可拖拽绘制案例。 1.效果图: 2.Index.vue主代码: <script lang"ts" setup> import { ref, markRaw } from "vue"; import {VueFlow,useVueFlow,MarkerType,type Node,type Edge } fro…...

PDF文件转换为PNG图像
要实现将PDF文件转换为PNG图像,可以使用Python的pdf2image库。pdf2image是一个基于poppler和Pillow(PIL)的库,可以将PDF页面转换为图像。 首先,需要安装必要的库: pip install pdf2image在安装pdf2image时…...

c++中的静态多态和动态多态简介
在 C 中,多态性(Polymorphism) 分为 静态多态(Static Polymorphism) 和 动态多态(Dynamic Polymorphism),二者通过不同的机制实现代码的灵活性。以下是详细对比和核心要点࿱…...

如何通过 LlamaIndex 将数据导入 Elasticsearch
作者:来自 Elastic Andre Luiz 逐步介绍如何使用 RAG 和 LlamaIndex 提取数据并进行搜索。 在本文中,我们将使用 LlamaIndex 来索引数据,从而实现一个常见问题搜索引擎。 Elasticsearch 将作为我们的向量数据库,实现向量搜索&am…...

Boosting
Boosting 学习目标 知道boosting集成原理和实现过程知道bagging和boosting集成的区别知道AdaBoost集成原理 Boosting思想 Boosting思想图 每一个训练器重点关注前一个训练器不足的地方进行训练通过加权投票的方式,得出预测结果串行的训练方式 1 什么是boosting 随着…...

【通俗讲解电子电路】——从零开始理解生活中的电路(一)
导言:电子电路为什么重要? ——看不见的“魔法”,如何驱动你的生活? 清晨,当你的手机闹钟响起时,你可能不会想到,是电子电路在精准控制着时间的跳动;当你用微波炉加热早餐时&#…...
LeetCode72编辑距离(动态规划)
给你两个单词 word1 和 word2, 请返回将 word1 转换成 word2 所使用的最少操作数 。 你可以对一个单词进行如下三种操作: 插入一个字符 删除一个字符 替换一个字符 示例 1: 输入:word1 “horse”, word2 “ros” 输出…...
)
rabbitmq单向ssl认证配置与最佳实践(适用于各大云厂商)
背景 这里后补直接上代码 最佳实践 主要从两个方面保证消息不丢失 RabbitMQ方面 创建队列时开启持久化创建交换器时开启持久化创建镜像队列(可选)开启延迟队列(可选) 代码层面 开启生产者到交换器回调参数开启交换器到队列…...

【K8S】Kubernetes 基本架构、节点类型及运行流程详解(附架构图及流程图)
Kubernetes 架构 k8s 集群 多个 master node 多个 work nodeMaster 节点(主节点):负责集群的管理任务,包括调度容器、维护集群状态、监控集群、管理服务发现等。Worker 节点(工作节点):实际运…...

Windows版FFmpeg使用及B站视频下载示例python源码
Windows版FFmpeg使用及B站视频下载示例python源码 FFmpeg介绍和下载 FFmpeg 是一个功能强大、灵活且广泛使用的多媒体处理工具,无论是在专业领域还是日常使用中,都能满足各种多媒体处理需求。FFmpeg 是一个开源项目,遵循 LGPL 或 GPL 许可。…...

飞书考勤Excel导入到自己系统
此篇主要用于记录Excel一行中,单条数据的日期拿取,并判断上下班打卡情况。代码可能满足不了大部分需求,目前只够本公司用,如果需要,可以参考。 需要把飞书月度汇总的考勤表导入系统中可以参考下。 下图为需要获取的年…...

【leetcode hot 100 560】和为K的子数组
解法一:用左右指针寻找字串,如果和>k,则减少一个数(left);如果和<k,则加上一个数(right)。 class Solution {public int subarraySum(int[] nums, int k) {int nu…...

EGO-Planner的无人机视觉选择(yolov5和yolov8)
EGO-Planner的无人机视觉选择(yolov5和yolov8) 效果 yolov5检测效果 yolov8检测效果 一、YOLOv8 vs YOLOv5:关键差异解析 1. 训练效率:为何YOLOv8更快? 架构轻量化 YOLOv8采用C2f模块(Cross Stage Partia…...

C++ | 面向对象 | 类
👻类 👾语法格式 class className{Access specifiers: // 访问权限DataType variable; // 变量returnType functions() { } // 方法 };👾访问权限 class className {public:// 公有成员protected:// 受保护成员private:// 私有成员 }…...

性能测试分析和调优
步骤 性能调优的步骤 性能调优的步骤: 1.确定问题:根据性能测试的结果来分析确定bug。–测试人员职责 2.分析原因:分析问题产生的原因。----开发人员职责 3.给出解决方案:可以是修改软件配置、增加硬件资源配置、修改代码等----…...

阿里云oss文件上传springboot若依java
一、第一步 引入依赖 <!-- 阿里云OSS --> <dependency><groupId>com.aliyun.oss</groupId><artifactId>aliyun-sdk-oss</artifactId> </dependency> 二、第二步 application.yml #阿里云oss服务配置 aliyun:oss:endpoint: …...

【自学笔记】Oracle基础知识点总览-持续更新
提示:文章写完后,目录可以自动生成,如何生成可参考右边的帮助文档 文章目录 Oracle 数据库基础知识点总览1. 数据库安装与配置2. SQL基础3. PL/SQL基础4. 数据库管理5. 高级主题 总结 Oracle 数据库基础知识点总览 1. 数据库安装与配置 安装…...

使用create_sql_query_chain工具根据自然语言问题生成SQL查询,踩坑版
1. 开启调试模式 from langchain import debugdebug True # 启用调试模式说明: 这里从 langchain 库中导入了一个名为 debug 的变量(或模块),然后将它设置为 True。这通常用来启用调试模式,方便开发者在程序运行时看…...

PyInstaller 打包python 程序 成 可执行文件
pyinstaller --onefile --name my_project --add-data "config/config.json:config" main.py 要将整个 Python 项目打包成一个可执行文件,可以使用 PyInstaller 来完成这个任务。以下是如何将整个项目打包成可执行文件的步骤: 1. 安装 PyIns…...

生鲜行业智能化供应链解决方案技术白皮书
行业痛点与技术挑战 损耗控制难题 行业平均损耗率达18%-25%,需构建动态定价模型与智能分拣系统 冷链管理复杂度 全程温控数据采集点超过23个/车次,异常响应延迟需压缩至90秒内 供需预测偏差 传统模式预测准确率不足65%,亟需AI驱动需求预测体…...

preg_replace 与 str_replace 的比较与选择
preg_replace 与 str_replace 的比较与选择 ——PHP字符串处理的核心工具深度解析 一、核心功能定位 在PHP的字符串处理中,str_replace和preg_replace是两种最常用的替换函数,但其设计目标和应用场景存在本质差异: str_replace 简单字符串替…...

无人机自主导航与避障技术!
自主导航的实现 环境感知:通过传感器(如摄像头、激光雷达、超声波传感器等)获取周围环境信息。 地图构建:利用SLAM(同步定位与地图构建)技术,实时生成环境地图并确定无人机的位置。 路径规划…...

密码学(哈希函数)
4.1 Hash函数与数据完整性 数据完整性: 检测传输消息(加密或未加密)的修改。 密码学Hash函数: 构建某些数据的简短“指纹”;如果数据被篡改,则该指纹(以高概率)不再有效。Hash函数…...

深入探索 STM32 微控制器:从基础到实践
一、引言 在当今的嵌入式系统领域,STM32 系列微控制器凭借其高性能、低功耗、丰富的外设以及广泛的应用场景,成为了众多开发者的首选。无论是在工业控制、智能家居、医疗设备,还是在消费电子等领域,STM32 都展现出了强大的生命力…...

React 常见面试题及答案
记录面试过程 常见问题,如有错误,欢迎批评指正 1. 什么是虚拟DOM?为什么它提高了性能? 虚拟DOM是React创建的一个轻量级JavaScript对象,表示真实DOM的结构。当状态变化时,React会生成新的虚拟DOM…...

SpringSecurity 实现token 认证
配置类 Configuration EnableWebSecurity EnableGlobalMethodSecurity(prePostEnabledtrue) public class SpringSecurityConfig extends WebSecurityConfigurerAdapter { Bean Override public AuthenticationManager authenticationManagerBean() throws Exception {return s…...

【详解 | 辨析】“单跳多跳,单天线多天线,单信道多信道” 之间的对比
文章目录 1. 单跳 & 多跳2. 单天线 & 多天线3. 单信道 & 多信道4. 小区内通信 & 小区间通信5. 更多辨析5.1 无线Mesh网络,Ad Hoc网络,无线传感器网络(MSN)5.2 “单天线/多天线”与“单信道/多信道”的区别 6. 工业…...
嵌入式开发工程师笔试面试指南-HR面试常见问题汇总
在嵌入式领域的招聘面试中,HR 通过一系列精心设计的问题,全面考察候选人的综合素质、专业能力以及与岗位的匹配度。以下从多个关键方面汇总了 HR 在嵌入式面试中常见的问题。 ** 一、语言表达方面 请简单介绍一下你自己这是面试开场常见问题,旨在让候选人做一个自我展示,…...
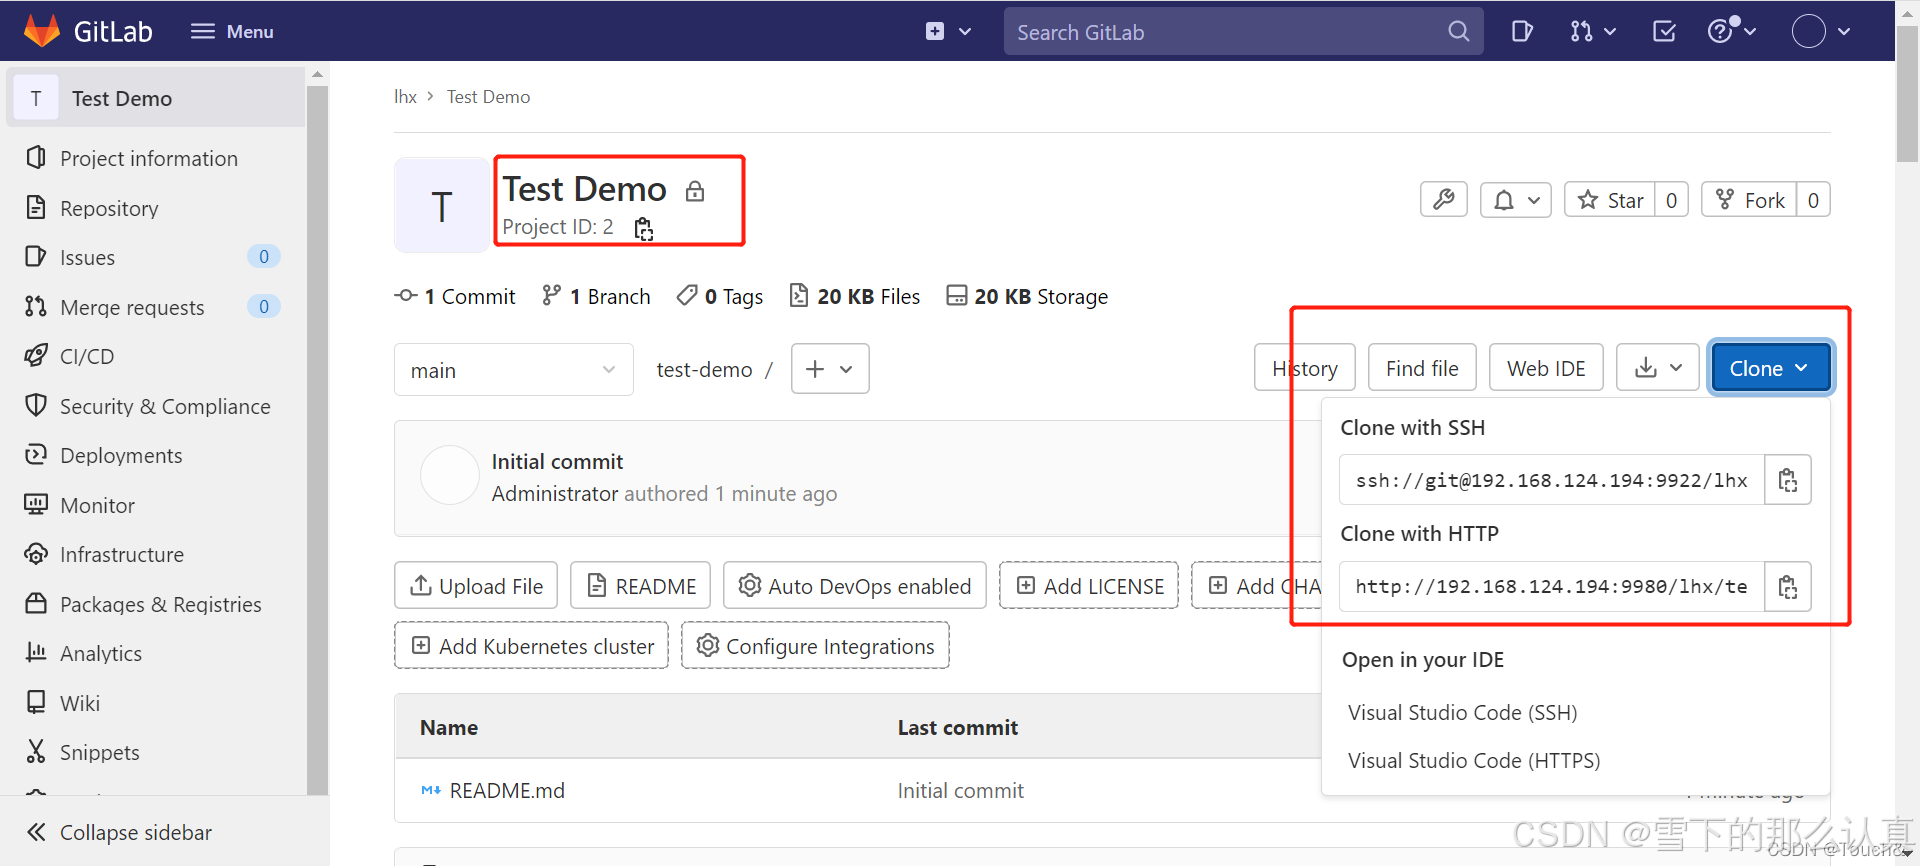
Docker 搭建 Gitlab 服务器 (完整详细版)
参考 Docker 搭建 Gitlab 服务器 (完整详细版)_docker gitlab-CSDN博客 Docker 安装 (完整详细版)_docker安装-CSDN博客 Docker 日常命令大全(完整详细版)_docker命令-CSDN博客 1、Gitlab镜像 # 查找Gitlab镜像 docker search gitlab # 拉取Gitlab镜像 docker pull gitlab/g…...

MongoDB安全管理
MongoDB如何鉴权 保证数据的安全性是数据库的重大职责之一。与大多数数据库一样,MongoDB内部提供了一套完整的权限防护机制。如下例所示: mongo --host 127.0.0.1 --port 27017 --username someone --password errorpass --authenticationDatabasestor…...