《网络管理》实践环节03:snmp服务器上对网络设备和服务器进行初步监控
兰生幽谷,不为莫服而不芳;
君子行义,不为莫知而止休。
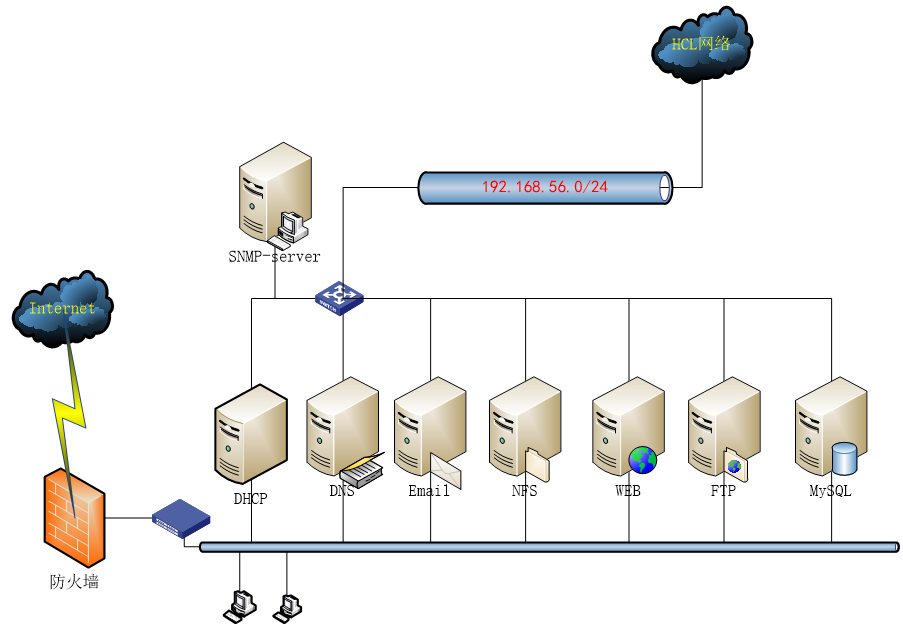
应用拓扑图
3.0准备工作
所有Linux服务器上(服务器和Agent端)安装下列工具
| yum -y install net-snmp net-snmp-utils |
保证所有的HCL网络设备和服务器相互间能够连通。
为了方便辨识,服务器对HCL的一台路由器、一台Centos7.9服务器进行管理:
| 角色 | ip | 操作系统 | |
| SNMP 服务器 | 192.168.56.220 | OpenEuler22.03sp4 | |
| SNMP agent | 192.168.56.22 | CentOS7.9 | |
| R1路由器 | 192.168.56.11 | H3C Comware |
3.1 读取参数
华三网络设备就按缺省配置。其他snmp agent端需要配置一下。红色部分是需要添加或更改的:
| [root@cts-zbxagt ~]# vi /etc/snmp/snmpd.conf …… rwcommunity private 192.168.56.0/24 //定义读写community及网段 rwcommunity public 192.168.56.0/24 com2sec writeAccess 192.168.56.0/24 private com2sec writeAccess 192.168.56.0/24 public rwuser snmpuser auth -V 2c //不同版本应用 …… #view systemview included .1.3.6.1.2.1.1 #view systemview included .1.3.6.1.2.1.25.1.1 view systemview included .1 …… ############################################################################### # System contact information # It is also possible to set the sysContact and sysLocation system # variables through the snmpd.conf file: syslocation Building No.7 7907 //定义设备所在位置 syscontact Wu Zhengzhong <1531036898@qq.com> //定义设备管理联系方式 …… |
保存后,重启snmp:systemctl restart snmpd
下面我们将按照MIB-2结构逐一读取HCL网络设备和Linux服务器的相关信息。
在上一章,我们已经在HCL里面对路由器R1进行了SNMP-AGENT设置,下面我们将按照MIB-2的体系,读取HCL网络设备R1和Linux服务器信息
3.1.1 读取Mib-2 1系统system功能组数据
1)读取HCL路由器
前面服务器上已经安装snmp工具,可以直接在服务器上读取、管理网络设备的相关参数。
| [root@zbx624oe2203 ~]# snmpbulkwalk -v 2c -c wuzhengzhong 192.168.56.11 .1.3.6.1.2.1.1 SNMPv2-MIB::sysDescr.0 = STRING: H3C Comware Platform Software, Software Version 7.1.064, Release 0427P22 H3C MSR36-20 Copyright (c) 2004-2021 New H3C Technologies Co., Ltd. All rights reserved. SNMPv2-MIB::sysObjectID.0 = OID: SNMPv2-SMI::enterprises.25506 DISMAN-EVENT-MIB::sysUpTimeInstance = Timeticks: (286073) 0:47:40.73 SNMPv2-MIB::sysContact.0 = STRING: Dr. Wu-Tel:15523242551 SNMPv2-MIB::sysName.0 = STRING: r1 SNMPv2-MIB::sysLocation.0 = STRING: Lab. Building No.7907 SNMPv2-MIB::sysServices.0 = INTEGER: 78=1111000 //ISO七层结构里面提供了哪些服务 |
2)读取Linux服务器信息
| [root@zbx624oe2203 ~]# snmpbulkwalk -v 2c -c public 192.168.56.22 system.1 SNMPv2-MIB::sysDescr.0 = STRING: Linux cts-zbxagt 3.10.0-1160.119.1.el7.x86_64 #1 SMP Tue Jun 4 14:43:51 UTC 2024 x86_64 [root@zbx624oe2203 ~]# snmpbulkwalk -v 2c -c public 192.168.56.22 system.2 SNMPv2-MIB::sysObjectID.0 = OID: NET-SNMP-MIB::netSnmpAgentOIDs.10 [root@zbx624oe2203 ~]# snmpbulkwalk -v 2c -c public 192.168.56.22 system.3 DISMAN-EVENT-MIB::sysUpTimeInstance = Timeticks: (15969) 0:02:39.69 [root@zbx624oe2203 ~]# snmpbulkwalk -v 2c -c public 192.168.56.22 system.4 SNMPv2-MIB::sysContact.0 = STRING: Wu Zhengzhong <1531036898@qq.com> [root@zbx624oe2203 ~]# snmpbulkwalk -v 2c -c public 192.168.56.22 system.5 SNMPv2-MIB::sysName.0 = STRING: WuSnmpAgent [root@zbx624oe2203 ~]# snmpbulkwalk -v 2c -c public 192.168.56.22 system.6 SNMPv2-MIB::sysLocation.0 = STRING: Building No.7 7907 [root@zbx624oe2203 ~]# snmpbulkwalk -v 2c -c public 192.168.56.22 system.7 SNMPv2-MIB::sysServices = No Such Instance currently exists at this OID |
辨析题:从上面读取的HCL路由器和Linux服务器数据看出了什么结果?
| 王东在snmp服务器上分别读取了华三路由器192.168.56.11和Linux服务器192.168.56.22的系统功能组system.7的数据,分别得到如下数据: [root@zbx624oe2203 ~]# snmpbulkwalk -v 2c -c public 192.168.56.22 system.7 SNMPv2-MIB::sysServices = No Such Instance currently exists at this OID [root@zbx624oe2203 ~]# snmpbulkwalk -v 2c -c wuzhengzhong 192.168.56.11 system.7 SNMPv2-MIB::sysServices.0 = INTEGER: 78 回答下面问题:
2. 该参数是什么意思?路由器该参数为78表示什么意思? |
3.1.2 读取Mib-2 2接口if功能组数据
接口功能组一共有22参数。我们选择性的看看2、3和7的数据
1)读取HCL路由器
| [root@zbx624oe2203 ~]# snmpbulkwalk -v 2c -c wuzhengzhong 192.168.56.11 ifEntry.2 IF-MIB::ifDescr.1 = STRING: GigabitEthernet0/0 …… IF-MIB::ifDescr.131 = STRING: Register-Tunnel0 [root@zbx624oe2203 ~]# snmpbulkwalk -v 2c -c wuzhengzhong 192.168.56.11 ifEntry.3 IF-MIB::ifType.1 = INTEGER: ethernetCsmacd(6) …… IF-MIB::ifType.4 = INTEGER: ppp(23) …… IF-MIB::ifType.8 = INTEGER: ethernetCsmacd(6) …… IF-MIB::ifType.129 = INTEGER: other(1) IF-MIB::ifType.130 = INTEGER: softwareLoopback(24) IF-MIB::ifType.131 = INTEGER: other(1) [root@zbx624oe2203 ~]# snmpbulkwalk -v 2c -c wuzhengzhong 192.168.56.11 ifEntry.7 IF-MIB::ifAdminStatus.1 = INTEGER: up(1) …… IF-MIB::ifAdminStatus.131 = INTEGER: up(1) |
2)读取Linux服务器信息
| [root@zbx624oe2203 ~]# snmpbulkwalk -v 2c -c public 192.168.56.22 ifEntry.2 IF-MIB::ifDescr.1 = STRING: lo IF-MIB::ifDescr.2 = STRING: ens33 IF-MIB::ifDescr.3 = STRING: ens36 IF-MIB::ifDescr.4 = STRING: ens37 IF-MIB::ifDescr.5 = STRING: ens38 [root@zbx624oe2203 ~]# snmpbulkwalk -v 2c -c public 192.168.56.22 ifEntry.3 IF-MIB::ifType.1 = INTEGER: softwareLoopback(24) IF-MIB::ifType.2 = INTEGER: ethernetCsmacd(6) IF-MIB::ifType.3 = INTEGER: ethernetCsmacd(6) IF-MIB::ifType.4 = INTEGER: ethernetCsmacd(6) IF-MIB::ifType.5 = INTEGER: ethernetCsmacd(6) [root@zbx624oe2203 ~]# snmpbulkwalk -v 2c -c public 192.168.56.22 ifEntry.7 IF-MIB::ifAdminStatus.1 = INTEGER: up(1) IF-MIB::ifAdminStatus.2 = INTEGER: up(1) IF-MIB::ifAdminStatus.3 = INTEGER: up(1) IF-MIB::ifAdminStatus.4 = INTEGER: up(1) IF-MIB::ifAdminStatus.5 = INTEGER: up(1) |
3.1.3 读取Mib-2 3地址转换at功能组数据
1)读取HCL路由器
| [root@zbx624oe2203 ~]# snmpbulkwalk -v 2c -c wuzhengzhong 192.168.56.11 at Timeout: No Response from 192.168.56.11 |
2)读取Linux服务器信息
| [root@zbx624oe2203 ~]# snmpbulkwalk -v 2c -c public 192.168.56.22 at UCD-SNMP-MIB::laIndex.1 = INTEGER: 1 UCD-SNMP-MIB::laIndex.2 = INTEGER: 2 UCD-SNMP-MIB::laIndex.3 = INTEGER: 3 UCD-SNMP-MIB::laNames.1 = STRING: Load-1 UCD-SNMP-MIB::laNames.2 = STRING: Load-5 UCD-SNMP-MIB::laNames.3 = STRING: Load-15 UCD-SNMP-MIB::laLoad.1 = STRING: 0.00 UCD-SNMP-MIB::laLoad.2 = STRING: 0.01 UCD-SNMP-MIB::laLoad.3 = STRING: 0.05 UCD-SNMP-MIB::laConfig.1 = STRING: 12.00 UCD-SNMP-MIB::laConfig.2 = STRING: 14.00 UCD-SNMP-MIB::laConfig.3 = STRING: 14.00 UCD-SNMP-MIB::laLoadInt.1 = INTEGER: 0 UCD-SNMP-MIB::laLoadInt.2 = INTEGER: 1 UCD-SNMP-MIB::laLoadInt.3 = INTEGER: 5 UCD-SNMP-MIB::laLoadFloat.1 = Opaque: Float: 0.000000 UCD-SNMP-MIB::laLoadFloat.2 = Opaque: Float: 0.010000 UCD-SNMP-MIB::laLoadFloat.3 = Opaque: Float: 0.050000 UCD-SNMP-MIB::laErrorFlag.1 = INTEGER: noError(0) UCD-SNMP-MIB::laErrorFlag.2 = INTEGER: noError(0) UCD-SNMP-MIB::laErrorFlag.3 = INTEGER: noError(0) UCD-SNMP-MIB::laErrMessage.1 = STRING: UCD-SNMP-MIB::laErrMessage.2 = STRING: UCD-SNMP-MIB::laErrMessage.3 = STRING: |
3.1.4 读取Mib-2 4 IP功能组数据
ip组一共23个值,分别读取节选值如下
1)读取HCL路由器
| [root@zbx624oe2203 ~]# snmpbulkwalk -v 2c -c wuzhengzhong 192.168.56.11 ip.1 IP-MIB::ipForwarding.0 = INTEGER: forwarding(1) [root@zbx624oe2203 ~]# snmpbulkwalk -v 2c -c wuzhengzhong 192.168.56.11 ip.2 IP-MIB::ipDefaultTTL.0 = INTEGER: 255 [root@zbx624oe2203 ~]# snmpbulkwalk -v 2c -c wuzhengzhong 192.168.56.11 ip.6 IP-MIB::ipForwDatagrams.0 = Counter32: 5 [root@zbx624oe2203 ~]# snmpbulkwalk -v 2c -c wuzhengzhong 192.168.56.11 ip.21 IP-MIB::ip.21.1.1.0.0.0.0 = IpAddress: 0.0.0.0 IP-MIB::ip.21.1.1.21.21.21.0 = IpAddress: 21.21.21.0 …… IP-MIB::ip.21.1.13.255.255.255.255 = OID: SNMPv2-SMI::zeroDotZero [root@zbx624oe2203 ~]# snmpbulkwalk -v 2c -c wuzhengzhong 192.168.56.11 ip.20 IP-MIB::ipAdEntAddr.21.21.21.1 = IpAddress: 21.21.21.1 //IP地址和mac地址对应 [root@zbx624oe2203 ~]# snmpbulkwalk -v 2c -c wuzhengzhong 192.168.56.11 ip.22 IP-MIB::ipNetToMediaIfIndex.1.192.168.56.1 = INTEGER: 1 IP-MIB::ipNetToMediaIfIndex.1.192.168.56.220 = INTEGER: 1 IP-MIB::ipNetToMediaPhysAddress.1.192.168.56.1 = STRING: a:0:27:0:0:d IP-MIB::ipNetToMediaPhysAddress.1.192.168.56.220 = STRING: 0:c:29:ea:d2:35 IP-MIB::ipNetToMediaNetAddress.1.192.168.56.1 = IpAddress: 192.168.56.1 IP-MIB::ipNetToMediaNetAddress.1.192.168.56.220 = IpAddress: 192.168.56.220 IP-MIB::ipNetToMediaType.1.192.168.56.1 = INTEGER: dynamic(3) IP-MIB::ipNetToMediaType.1.192.168.56.220 = INTEGER: dynamic(3) |
2)读取Linux服务器信息
| [root@zbx624oe2203 ~]# snmpbulkwalk -v 2c -c public 192.168.56.22 ip.20 IP-MIB::ipAdEntAddr.127.0.0.1 = IpAddress: 127.0.0.1 …… IP-MIB::ipAdEntIfIndex.127.0.0.1 = INTEGER: 1 IP-MIB::ipAdEntIfIndex.192.168.0.22 = INTEGER: 2 IP-MIB::ipAdEntIfIndex.192.168.56.22 = INTEGER: 5 IP-MIB::ipAdEntIfIndex.192.168.100.22 = INTEGER: 3 IP-MIB::ipAdEntIfIndex.202.112.113.22 = INTEGER: 4 IP-MIB::ipAdEntNetMask.127.0.0.1 = IpAddress: 255.0.0.0 IP-MIB::ipAdEntNetMask.192.168.0.22 = IpAddress: 255.255.255.0 IP-MIB::ipAdEntNetMask.192.168.56.22 = IpAddress: 255.255.255.0 IP-MIB::ipAdEntNetMask.192.168.100.22 = IpAddress: 255.255.255.0 IP-MIB::ipAdEntNetMask.202.112.113.22 = IpAddress: 255.255.255.0 IP-MIB::ipAdEntBcastAddr.127.0.0.1 = INTEGER: 0 IP-MIB::ipAdEntBcastAddr.192.168.0.22 = INTEGER: 1 IP-MIB::ipAdEntBcastAddr.192.168.56.22 = INTEGER: 1 IP-MIB::ipAdEntBcastAddr.192.168.100.22 = INTEGER: 1 IP-MIB::ipAdEntBcastAddr.202.112.113.22 = INTEGER: 1 [root@zbx624oe2203 ~]# snmpbulkwalk -v 2c -c public 192.168.56.22 ip.21 IP-MIB::ip.21.1.1.0.0.0.0 = IpAddress: 0.0.0.0 IP-MIB::ip.21.1.1.192.168.0.0 = IpAddress: 192.168.0.0 IP-MIB::ip.21.1.1.192.168.56.0 = IpAddress: 192.168.56.0 IP-MIB::ip.21.1.1.192.168.100.0 = IpAddress: 192.168.100.0 IP-MIB::ip.21.1.1.202.112.113.0 = IpAddress: 202.112.113.0 IP-MIB::ip.21.1.2.0.0.0.0 = INTEGER: 2 IP-MIB::ip.21.1.2.192.168.0.0 = INTEGER: 2 IP-MIB::ip.21.1.2.192.168.56.0 = INTEGER: 5 IP-MIB::ip.21.1.2.192.168.100.0 = INTEGER: 3 IP-MIB::ip.21.1.2.202.112.113.0 = INTEGER: 4 IP-MIB::ip.21.1.3.0.0.0.0 = INTEGER: 1 IP-MIB::ip.21.1.3.192.168.0.0 = INTEGER: 0 IP-MIB::ip.21.1.3.192.168.56.0 = INTEGER: 0 IP-MIB::ip.21.1.3.192.168.100.0 = INTEGER: 0 IP-MIB::ip.21.1.3.202.112.113.0 = INTEGER: 0 IP-MIB::ip.21.1.7.0.0.0.0 = IpAddress: 192.168.0.1 IP-MIB::ip.21.1.7.192.168.0.0 = IpAddress: 0.0.0.0 IP-MIB::ip.21.1.7.192.168.56.0 = IpAddress: 0.0.0.0 IP-MIB::ip.21.1.7.192.168.100.0 = IpAddress: 0.0.0.0 IP-MIB::ip.21.1.7.202.112.113.0 = IpAddress: 0.0.0.0 IP-MIB::ip.21.1.8.0.0.0.0 = INTEGER: 4 IP-MIB::ip.21.1.8.192.168.0.0 = INTEGER: 3 IP-MIB::ip.21.1.8.192.168.56.0 = INTEGER: 3 IP-MIB::ip.21.1.8.192.168.100.0 = INTEGER: 3 IP-MIB::ip.21.1.8.202.112.113.0 = INTEGER: 3 IP-MIB::ip.21.1.9.0.0.0.0 = INTEGER: 2 IP-MIB::ip.21.1.9.192.168.0.0 = INTEGER: 2 IP-MIB::ip.21.1.9.192.168.56.0 = INTEGER: 2 IP-MIB::ip.21.1.9.192.168.100.0 = INTEGER: 2 IP-MIB::ip.21.1.9.202.112.113.0 = INTEGER: 2 IP-MIB::ip.21.1.11.0.0.0.0 = IpAddress: 0.0.0.0 IP-MIB::ip.21.1.11.192.168.0.0 = IpAddress: 255.255.255.0 IP-MIB::ip.21.1.11.192.168.56.0 = IpAddress: 255.255.255.0 IP-MIB::ip.21.1.11.192.168.100.0 = IpAddress: 255.255.255.0 IP-MIB::ip.21.1.11.202.112.113.0 = IpAddress: 255.255.255.0 IP-MIB::ip.21.1.13.0.0.0.0 = OID: SNMPv2-SMI::zeroDotZero IP-MIB::ip.21.1.13.192.168.0.0 = OID: SNMPv2-SMI::zeroDotZero IP-MIB::ip.21.1.13.192.168.56.0 = OID: SNMPv2-SMI::zeroDotZero IP-MIB::ip.21.1.13.192.168.100.0 = OID: SNMPv2-SMI::zeroDotZero IP-MIB::ip.21.1.13.202.112.113.0 = OID: SNMPv2-SMI::zeroDotZero |
3.1.5 读取Mib-2 5 ICMP功能组数据
ICMP一共26个值
1)读取HCL路由器
| [root@zbx624oe2203 ~]# snmpbulkwalk -v 2c -c wuzhengzhong 192.168.56.11 icmp IP-MIB::icmpInMsgs.0 = Counter32: 1 IP-MIB::icmpInErrors.0 = Counter32: 0 IP-MIB::icmpInDestUnreachs.0 = Counter32: 0 IP-MIB::icmpInTimeExcds.0 = Counter32: 0 IP-MIB::icmpInParmProbs.0 = Counter32: 0 IP-MIB::icmpInSrcQuenchs.0 = Counter32: 0 IP-MIB::icmpInRedirects.0 = Counter32: 0 IP-MIB::icmpInEchos.0 = Counter32: 1 IP-MIB::icmpInEchoReps.0 = Counter32: 0 IP-MIB::icmpInTimestamps.0 = Counter32: 0 IP-MIB::icmpInTimestampReps.0 = Counter32: 0 IP-MIB::icmpInAddrMasks.0 = Counter32: 0 IP-MIB::icmpInAddrMaskReps.0 = Counter32: 0 IP-MIB::icmpOutMsgs.0 = Counter32: 1 IP-MIB::icmpOutErrors.0 = Counter32: 0 IP-MIB::icmpOutDestUnreachs.0 = Counter32: 0 IP-MIB::icmpOutTimeExcds.0 = Counter32: 0 IP-MIB::icmpOutParmProbs.0 = Counter32: 0 IP-MIB::icmpOutSrcQuenchs.0 = Counter32: 0 IP-MIB::icmpOutRedirects.0 = Counter32: 0 IP-MIB::icmpOutEchos.0 = Counter32: 0 IP-MIB::icmpOutEchoReps.0 = Counter32: 1 IP-MIB::icmpOutTimestamps.0 = Counter32: 0 IP-MIB::icmpOutTimestampReps.0 = Counter32: 0 IP-MIB::icmpOutAddrMasks.0 = Counter32: 0 IP-MIB::icmpOutAddrMaskReps.0 = Counter32: 0 …… |
2)读取Linux服务器信息
| [root@zbx624oe2203 ~]# snmpbulkwalk -v 2c -c public 192.168.56.22 icmp IP-MIB::icmpInMsgs.0 = Counter32: 3028 IP-MIB::icmpInErrors.0 = Counter32: 1402 IP-MIB::icmpInDestUnreachs.0 = Counter32: 3022 IP-MIB::icmpInTimeExcds.0 = Counter32: 0 IP-MIB::icmpInParmProbs.0 = Counter32: 0 IP-MIB::icmpInSrcQuenchs.0 = Counter32: 0 IP-MIB::icmpInRedirects.0 = Counter32: 0 IP-MIB::icmpInEchos.0 = Counter32: 5 IP-MIB::icmpInEchoReps.0 = Counter32: 1 IP-MIB::icmpInTimestamps.0 = Counter32: 0 IP-MIB::icmpInTimestampReps.0 = Counter32: 0 IP-MIB::icmpInAddrMasks.0 = Counter32: 0 IP-MIB::icmpInAddrMaskReps.0 = Counter32: 0 IP-MIB::icmpOutMsgs.0 = Counter32: 3008 IP-MIB::icmpOutErrors.0 = Counter32: 0 IP-MIB::icmpOutDestUnreachs.0 = Counter32: 3002 IP-MIB::icmpOutTimeExcds.0 = Counter32: 0 IP-MIB::icmpOutParmProbs.0 = Counter32: 0 IP-MIB::icmpOutSrcQuenchs.0 = Counter32: 0 IP-MIB::icmpOutRedirects.0 = Counter32: 0 IP-MIB::icmpOutEchos.0 = Counter32: 1 IP-MIB::icmpOutEchoReps.0 = Counter32: 5 IP-MIB::icmpOutTimestamps.0 = Counter32: 0 IP-MIB::icmpOutTimestampReps.0 = Counter32: 0 IP-MIB::icmpOutAddrMasks.0 = Counter32: 0 IP-MIB::icmpOutAddrMaskReps.0 = Counter32: 0 …… |
3.1.6 读取Mib-2 6 TCP功能组数据
TCP一共15个值
1)读取HCL路由器
| [root@zbx624oe2203 ~]# snmpbulkwalk -v 2c -c wuzhengzhong 192.168.56.11 tcp TCP-MIB::tcpRtoAlgorithm.0 = INTEGER: vanj(4) TCP-MIB::tcpRtoMin.0 = INTEGER: 1000 milliseconds TCP-MIB::tcpRtoMax.0 = INTEGER: 64000 milliseconds TCP-MIB::tcpMaxConn.0 = INTEGER: -1 TCP-MIB::tcpActiveOpens.0 = Counter32: 0 TCP-MIB::tcpPassiveOpens.0 = Counter32: 0 TCP-MIB::tcpAttemptFails.0 = Counter32: 0 TCP-MIB::tcpEstabResets.0 = Counter32: 0 TCP-MIB::tcpCurrEstab.0 = Gauge32: 0 TCP-MIB::tcpInSegs.0 = Counter32: 0 TCP-MIB::tcpOutSegs.0 = Counter32: 0 TCP-MIB::tcpRetransSegs.0 = Counter32: 0 TCP-MIB::tcpConnState.0.0.0.0.23.0.0.0.0.0 = INTEGER: listen(2) TCP-MIB::tcpConnLocalAddress.0.0.0.0.23.0.0.0.0.0 = IpAddress: 0.0.0.0 TCP-MIB::tcpConnLocalPort.0.0.0.0.23.0.0.0.0.0 = INTEGER: 23 TCP-MIB::tcpConnRemAddress.0.0.0.0.23.0.0.0.0.0 = IpAddress: 0.0.0.0 TCP-MIB::tcpConnRemPort.0.0.0.0.23.0.0.0.0.0 = INTEGER: 0 TCP-MIB::tcpInErrs.0 = Counter32: 0 TCP-MIB::tcpOutRsts.0 = Counter32: 0 IPV6-TCP-MIB::ipv6TcpConnState.'................'.23.'................'.0.0 = INTEGER: listen(2) TCP-MIB::tcpListenerProcess.ipv4."0.0.0.0".23 = Gauge32: 10911 TCP-MIB::tcpListenerProcess.ipv6."00:00:00:00:00:00:00:00:00:00:00:00:00:00:00:00".23 = Gauge32: 10911 |
2)读取Linux服务器信息
| [root@zbx624oe2203 ~]# snmpbulkwalk -v 2c -c public 192.168.56.22 tcp TCP-MIB::tcpRtoAlgorithm.0 = INTEGER: other(1) TCP-MIB::tcpRtoMin.0 = INTEGER: 200 milliseconds TCP-MIB::tcpRtoMax.0 = INTEGER: 120000 milliseconds TCP-MIB::tcpMaxConn.0 = INTEGER: -1 TCP-MIB::tcpActiveOpens.0 = Counter32: 1440 TCP-MIB::tcpPassiveOpens.0 = Counter32: 14 TCP-MIB::tcpAttemptFails.0 = Counter32: 1394 TCP-MIB::tcpEstabResets.0 = Counter32: 8 TCP-MIB::tcpCurrEstab.0 = Gauge32: 4 TCP-MIB::tcpInSegs.0 = Counter32: 11052 TCP-MIB::tcpOutSegs.0 = Counter32: 11081 TCP-MIB::tcpRetransSegs.0 = Counter32: 1458 TCP-MIB::tcpConnState.0.0.0.0.22.0.0.0.0.0 = INTEGER: listen(2) TCP-MIB::tcpConnState.0.0.0.0.3306.0.0.0.0.0 = INTEGER: listen(2) TCP-MIB::tcpConnState.0.0.0.0.10050.0.0.0.0.0 = INTEGER: listen(2) TCP-MIB::tcpConnState.127.0.0.1.25.0.0.0.0.0 = INTEGER: listen(2) TCP-MIB::tcpConnState.127.0.0.1.199.0.0.0.0.0 = INTEGER: listen(2) TCP-MIB::tcpConnState.192.168.56.22.22.192.168.56.1.58070 = INTEGER: established(5) TCP-MIB::tcpConnState.192.168.56.22.22.192.168.56.1.58080 = INTEGER: established(5) TCP-MIB::tcpConnState.192.168.56.22.22.192.168.56.1.62954 = INTEGER: established(5) TCP-MIB::tcpConnState.192.168.56.22.22.192.168.56.1.62960 = INTEGER: established(5) TCP-MIB::tcpConnLocalAddress.0.0.0.0.22.0.0.0.0.0 = IpAddress: 0.0.0.0 TCP-MIB::tcpConnLocalAddress.0.0.0.0.3306.0.0.0.0.0 = IpAddress: 0.0.0.0 TCP-MIB::tcpConnLocalAddress.0.0.0.0.10050.0.0.0.0.0 = IpAddress: 0.0.0.0 TCP-MIB::tcpConnLocalAddress.127.0.0.1.25.0.0.0.0.0 = IpAddress: 127.0.0.1 TCP-MIB::tcpConnLocalAddress.127.0.0.1.199.0.0.0.0.0 = IpAddress: 127.0.0.1 TCP-MIB::tcpConnLocalAddress.192.168.56.22.22.192.168.56.1.58070 = IpAddress: 192.168.56.22 TCP-MIB::tcpConnLocalAddress.192.168.56.22.22.192.168.56.1.58080 = IpAddress: 192.168.56.22 TCP-MIB::tcpConnLocalAddress.192.168.56.22.22.192.168.56.1.62954 = IpAddress: 192.168.56.22 TCP-MIB::tcpConnLocalAddress.192.168.56.22.22.192.168.56.1.62960 = IpAddress: 192.168.56.22 TCP-MIB::tcpConnLocalPort.0.0.0.0.22.0.0.0.0.0 = INTEGER: 22 TCP-MIB::tcpConnLocalPort.0.0.0.0.3306.0.0.0.0.0 = INTEGER: 3306 TCP-MIB::tcpConnLocalPort.0.0.0.0.10050.0.0.0.0.0 = INTEGER: 10050 TCP-MIB::tcpConnLocalPort.127.0.0.1.25.0.0.0.0.0 = INTEGER: 25 TCP-MIB::tcpConnLocalPort.127.0.0.1.199.0.0.0.0.0 = INTEGER: 199 TCP-MIB::tcpConnLocalPort.192.168.56.22.22.192.168.56.1.58070 = INTEGER: 22 TCP-MIB::tcpConnLocalPort.192.168.56.22.22.192.168.56.1.58080 = INTEGER: 22 TCP-MIB::tcpConnLocalPort.192.168.56.22.22.192.168.56.1.62954 = INTEGER: 22 TCP-MIB::tcpConnLocalPort.192.168.56.22.22.192.168.56.1.62960 = INTEGER: 22 TCP-MIB::tcpConnRemAddress.0.0.0.0.22.0.0.0.0.0 = IpAddress: 0.0.0.0 TCP-MIB::tcpConnRemAddress.0.0.0.0.3306.0.0.0.0.0 = IpAddress: 0.0.0.0 TCP-MIB::tcpConnRemAddress.0.0.0.0.10050.0.0.0.0.0 = IpAddress: 0.0.0.0 TCP-MIB::tcpConnRemAddress.127.0.0.1.25.0.0.0.0.0 = IpAddress: 0.0.0.0 TCP-MIB::tcpConnRemAddress.127.0.0.1.199.0.0.0.0.0 = IpAddress: 0.0.0.0 TCP-MIB::tcpConnRemAddress.192.168.56.22.22.192.168.56.1.58070 = IpAddress: 192.168.56.1 TCP-MIB::tcpConnRemAddress.192.168.56.22.22.192.168.56.1.58080 = IpAddress: 192.168.56.1 TCP-MIB::tcpConnRemAddress.192.168.56.22.22.192.168.56.1.62954 = IpAddress: 192.168.56.1 TCP-MIB::tcpConnRemAddress.192.168.56.22.22.192.168.56.1.62960 = IpAddress: 192.168.56.1 TCP-MIB::tcpConnRemPort.0.0.0.0.22.0.0.0.0.0 = INTEGER: 0 TCP-MIB::tcpConnRemPort.0.0.0.0.3306.0.0.0.0.0 = INTEGER: 0 TCP-MIB::tcpConnRemPort.0.0.0.0.10050.0.0.0.0.0 = INTEGER: 0 TCP-MIB::tcpConnRemPort.127.0.0.1.25.0.0.0.0.0 = INTEGER: 0 TCP-MIB::tcpConnRemPort.127.0.0.1.199.0.0.0.0.0 = INTEGER: 0 TCP-MIB::tcpConnRemPort.192.168.56.22.22.192.168.56.1.58070 = INTEGER: 58070 TCP-MIB::tcpConnRemPort.192.168.56.22.22.192.168.56.1.58080 = INTEGER: 58080 TCP-MIB::tcpConnRemPort.192.168.56.22.22.192.168.56.1.62954 = INTEGER: 62954 TCP-MIB::tcpConnRemPort.192.168.56.22.22.192.168.56.1.62960 = INTEGER: 62960 TCP-MIB::tcpInErrs.0 = Counter32: 0 TCP-MIB::tcpOutRsts.0 = Counter32: 21 TCP-MIB::tcpConnectionState.ipv4."192.168.56.22".22.ipv4."192.168.56.1".58070 = INTEGER: established(5) TCP-MIB::tcpConnectionState.ipv4."192.168.56.22".22.ipv4."192.168.56.1".58080 = INTEGER: established(5) TCP-MIB::tcpConnectionState.ipv4."192.168.56.22".22.ipv4."192.168.56.1".62954 = INTEGER: established(5) TCP-MIB::tcpConnectionState.ipv4."192.168.56.22".22.ipv4."192.168.56.1".62960 = INTEGER: established(5) TCP-MIB::tcpConnectionProcess.ipv4."192.168.56.22".22.ipv4."192.168.56.1".58070 = Gauge32: 4541 TCP-MIB::tcpConnectionProcess.ipv4."192.168.56.22".22.ipv4."192.168.56.1".58080 = Gauge32: 4543 TCP-MIB::tcpConnectionProcess.ipv4."192.168.56.22".22.ipv4."192.168.56.1".62954 = Gauge32: 4298 TCP-MIB::tcpConnectionProcess.ipv4."192.168.56.22".22.ipv4."192.168.56.1".62960 = Gauge32: 4300 TCP-MIB::tcpListenerProcess.ipv4."0.0.0.0".22 = Gauge32: 1135 TCP-MIB::tcpListenerProcess.ipv4."0.0.0.0".3306 = Gauge32: 1407 TCP-MIB::tcpListenerProcess.ipv4."0.0.0.0".10050 = Gauge32: 1160 TCP-MIB::tcpListenerProcess.ipv4."127.0.0.1".25 = Gauge32: 1507 TCP-MIB::tcpListenerProcess.ipv4."127.0.0.1".199 = Gauge32: 4488 TCP-MIB::tcpListenerProcess.ipv6."00:00:00:00:00:00:00:00:00:00:00:00:00:00:00:00".22 = Gauge32: 1135 TCP-MIB::tcpListenerProcess.ipv6."00:00:00:00:00:00:00:00:00:00:00:00:00:00:00:01".25 = Gauge32: 1507 |
3.1.7 读取Mib-2 7 UDP功能组数据
1)读取HCL路由器
| [root@zbx624oe2203 ~]# snmpbulkwalk -v 2c -c wuzhengzhong 192.168.56.11 udp UDP-MIB::udpInDatagrams.0 = Counter32: 36 UDP-MIB::udpNoPorts.0 = Counter32: 19 UDP-MIB::udpInErrors.0 = Counter32: 0 UDP-MIB::udpOutDatagrams.0 = Counter32: 31 UDP-MIB::udpLocalAddress.0.0.0.0.161 = IpAddress: 0.0.0.0 UDP-MIB::udpLocalAddress.0.0.0.0.520 = IpAddress: 0.0.0.0 UDP-MIB::udpLocalAddress.0.0.0.0.4992 = IpAddress: 0.0.0.0 UDP-MIB::udpLocalPort.0.0.0.0.161 = INTEGER: 161 UDP-MIB::udpLocalPort.0.0.0.0.520 = INTEGER: 520 UDP-MIB::udpLocalPort.0.0.0.0.4992 = INTEGER: 4992 IPV6-UDP-MIB::ipv6UdpIfIndex.'................'.161.0 = INTEGER: 0 UDP-MIB::udpEndpointProcess.ipv4."0.0.0.0".161.ipv4."0.0.0.0".0.2565952204 = Gauge32: 10910 UDP-MIB::udpEndpointProcess.ipv4."0.0.0.0".520.ipv4."0.0.0.0".0.15749836 = Gauge32: 10908 UDP-MIB::udpEndpointProcess.ipv4."0.0.0.0".4992.ipv4."0.0.0.0".0.3371455180 = Gauge32: 10910 UDP-MIB::udpEndpointProcess.ipv6."00:00:00:00:00:00:00:00:00:00:00:00:00:00:00:00".161.ipv6."00:00:00:00:00:00:00:00:00:00:00:00:00:00:00:00".0.821252812 = Gauge32: 10910 |
2)读取Linux服务器信息
| [root@zbx624oe2203 ~]# snmpbulkwalk -v 2c -c public 192.168.56.22 udp UDP-MIB::udpInDatagrams.0 = Counter32: 937 UDP-MIB::udpNoPorts.0 = Counter32: 2 UDP-MIB::udpInErrors.0 = Counter32: 0 UDP-MIB::udpOutDatagrams.0 = Counter32: 1232 UDP-MIB::udpLocalAddress.0.0.0.0.161 = IpAddress: 0.0.0.0 UDP-MIB::udpLocalAddress.127.0.0.1.323 = IpAddress: 127.0.0.1 UDP-MIB::udpLocalPort.0.0.0.0.161 = INTEGER: 161 UDP-MIB::udpLocalPort.127.0.0.1.323 = INTEGER: 323 UDP-MIB::udpEndpointProcess.ipv4."0.0.0.0".161.ipv4."0.0.0.0".0.989713 = Gauge32: 4488 UDP-MIB::udpEndpointProcess.ipv4."127.0.0.1".323.ipv4."0.0.0.0".0.18115 = Gauge32: 689 UDP-MIB::udpEndpointProcess.ipv6."00:00:00:00:00:00:00:00:00:00:00:00:00:00:00:01".323.ipv6."00:00:00:00:00:00:00:00:00:00:00:00:00:00:00:00".0.18116 = Gauge32: 689 |
3.1.8 读取Mib-2 8 EGP功能组数据
(暂时没时间设置,所以读不出数据来。以后有时间再完善)
1)读取HCL路由器
2)读取Linux服务器信息
3.1.9 读取Mib-2 9传输Dot 3功能组数据
1)读取HCL路由器
| [root@zbx624oe2203 ~]# snmpbulkwalk -v 2c -c wuzhengzhong 192.168.56.11 Dot 3 EtherLike-MIB::dot3StatsIndex.1 = INTEGER: 1 …… EtherLike-MIB::dot3StatsAlignmentErrors.1 = Counter32: 0 …… EtherLike-MIB::dot3StatsFCSErrors.1 = Counter32: 0 …… EtherLike-MIB::dot3StatsSingleCollisionFrames.1 = Counter32: 0 …… EtherLike-MIB::dot3StatsSQETestErrors.1 = Counter32: 0 …… EtherLike-MIB::dot3StatsDeferredTransmissions.1 = Counter32: 0 …… EtherLike-MIB::dot3StatsLateCollisions.1 = Counter32: 0 …… EtherLike-MIB::dot3StatsExcessiveCollisions.1 = Counter32: 0 …… EtherLike-MIB::dot3StatsInternalMacTransmitErrors.1 = Counter32: 0 …… EtherLike-MIB::dot3StatsCarrierSenseErrors.1 = Counter32: 0 …… EtherLike-MIB::dot3StatsFrameTooLongs.1 = Counter32: 0 …… EtherLike-MIB::dot3StatsInternalMacReceiveErrors.1 = Counter32: 0 …… EtherLike-MIB::dot3StatsEtherChipSet.1 = OID: SNMPv2-SMI::zeroDotZero …… EtherLike-MIB::dot3StatsSymbolErrors.1 = Counter32: 0 …… EtherLike-MIB::dot3StatsDuplexStatus.1 = INTEGER: unknown(1) …… EtherLike-MIB::dot3StatsRateControlAbility.1 = INTEGER: false(2) …… EtherLike-MIB::dot3StatsRateControlStatus.1 = INTEGER: unknown(3) …… EtherLike-MIB::dot3CollFrequencies.1.1 = Counter32: 0 …… EtherLike-MIB::dot3CollFrequencies.2.1 = Counter32: 0 …… EtherLike-MIB::dot3CollFrequencies.3.1 = Counter32: 0 …… EtherLike-MIB::dot3CollFrequencies.8.1 = Counter32: 0 …… EtherLike-MIB::dot3CollFrequencies.9.1 = Counter32: 0 …… EtherLike-MIB::dot3CollFrequencies.10.1 = Counter32: 0 …… EtherLike-MIB::dot3CollFrequencies.11.1 = Counter32: 0 …… EtherLike-MIB::dot3ControlFunctionsSupported.1 = BITS: 00 …… EtherLike-MIB::dot3ControlInUnknownOpcodes.1 = Counter32: 0 …… EtherLike-MIB::dot3HCControlInUnknownOpcodes.1 = Counter64: 0 …… EtherLike-MIB::dot3PauseAdminMode.1 = INTEGER: disabled(1) …… EtherLike-MIB::dot3PauseOperMode.1 = INTEGER: disabled(1) …… EtherLike-MIB::dot3InPauseFrames.1 = Counter32: 0 …… EtherLike-MIB::dot3OutPauseFrames.1 = Counter32: 0 …… EtherLike-MIB::dot3HCInPauseFrames.1 = Counter64: 0 …… EtherLike-MIB::dot3HCInPauseFrames.11 = Counter64: 0 …… EtherLike-MIB::dot3HCStatsAlignmentErrors.1 = Counter64: 0 …… EtherLike-MIB::dot3HCStatsFCSErrors.1 = Counter64: 0 …… EtherLike-MIB::dot3HCStatsInternalMacTransmitErrors.1 = Counter64: 0 …… EtherLike-MIB::dot3HCStatsFrameTooLongs.1 = Counter64: 0 …… EtherLike-MIB::dot3HCStatsInternalMacReceiveErrors.1 = Counter64: 0 …… EtherLike-MIB::dot3HCStatsSymbolErrors.1 = Counter64: 0 …… |
2)读取Linux服务器信息
| [root@zbx624oe2203 ~]# snmpbulkwalk -v 2c -c public 192.168.56.22 Dot 3 EtherLike-MIB::dot3StatsIndex.2 = INTEGER: 2 …… EtherLike-MIB::dot3StatsAlignmentErrors.2 = Counter32: 0 …… EtherLike-MIB::dot3StatsFCSErrors.2 = Counter32: 0 …… EtherLike-MIB::dot3StatsSingleCollisionFrames.2 = Counter32: 0 …… EtherLike-MIB::dot3StatsMultipleCollisionFrames.2 = Counter32: 0 …… EtherLike-MIB::dot3StatsDeferredTransmissions.2 = Counter32: 0 …… EtherLike-MIB::dot3StatsLateCollisions.2 = Counter32: 0 …… EtherLike-MIB::dot3StatsInternalMacTransmitErrors.2 = Counter32: 0 …… EtherLike-MIB::dot3StatsCarrierSenseErrors.2 = Counter32: 0 …… EtherLike-MIB::dot3StatsFrameTooLongs.2 = Counter32: 0 …… EtherLike-MIB::dot3StatsInternalMacReceiveErrors.2 = Counter32: 0 …… EtherLike-MIB::dot3StatsDuplexStatus.2 = INTEGER: fullDuplex(3) …… |
3.2 服务器设置agent
一)更改HCL网络设备名称
snmpset -v 1 -c wuzhengzhong 192.168.56.11 .1.3.6.1.2.1.1.5.0 s wusR1
| [root@zbx624oe2203 ~]# snmpset -v 1 -c wuzhengzhong 192.168.56.11 .1.3.6.1.2.1.1.5.0 s wusR1 SNMPv2-MIB::sysName.0 = STRING: wusR1 [root@zbx624oe2203 ~]# snmpget -v 1 -c wuzhengzhong 192.168.56.11 .1.3.6.1.2.1.1.5.0 SNMPv2-MIB::sysName.0 = STRING: wusR1 |
到HCL平台上的客户端验证
| [r1]save The current configuration will be written to the device. Are you sure? [Y/N]:y Please input the file name(*.cfg)[flash:/startup.cfg] (To leave the existing filename unchanged, press the enter key): flash:/startup.cfg exists, overwrite? [Y/N]:y Validating file. Please wait... Configuration is saved to device successfully. [wusR1]display current-configuration | include sysname sysname wusR1 |
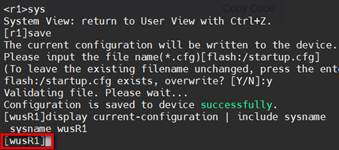
图3- 1
二)更改Linux服务器名称
确保在snmp客户端(192.168.56.22)上配置可写
| #修改配置文件 …… rwcommunity private com2sec writeAccess 192.168.56.0/24 private rwuser snmpuser auth -V 2c …… |
重启systemctl restart snmpd
在服务器端(192.168.56.220)更改agent系统名称
| [root@zbx624oe2203 ~]# snmpset -v 1 -c private 192.168.56.22 .1.3.6.1.2.1.1.5.0 s WuSnmpAgent SNMPv2-MIB::sysName.0 = STRING: WuSnmpAgent |
到agent客户端验证
| [root@cts-zbxagt ~]# snmpget -v 2c -c private 192.168.56.22 1.3.6.1.2.1.1.5.0 SNMPv2-MIB::sysName.0 = STRING: WuSnmpAgent |
![]()
图3- 2
相关文章:

《网络管理》实践环节03:snmp服务器上对网络设备和服务器进行初步监控
兰生幽谷,不为莫服而不芳; 君子行义,不为莫知而止休。 应用拓扑图 3.0准备工作 所有Linux服务器上(服务器和Agent端)安装下列工具 yum -y install net-snmp net-snmp-utils 保证所有的HCL网络设备和服务器相互间能…...
ubuntu中使用安卓模拟器
本文这里介绍 使用 android studio Emulator , 当然也有 Anbox (Lightweight), Waydroid (Best for Full Android Experience), 首先确保自己安装了 android studio ; sudo apt update sudo apt install openjdk-11-jdk sudo snap install…...
构造函数创建列表时元素 T的默认值)
【Qt】QList<T> list(n)构造函数创建列表时元素 T的默认值
Qt 6支持。 在 Qt 中,当使用 QList<T> list(n); 构造函数创建列表时,元素 T 的默认值取决于其类型的默认构造函数或值初始化规则。以下是常见数据类型的默认值分析: 1. 基本数据类型(POD 类型,Plain Old Data&a…...
py数据结构day3
思维导图: 代码1(完成双向循环链表的判空、尾插、遍历、尾删): class Node:def __init__(self, data):self.data dataself.next Noneself.prev Noneclass DoubleCycleLink:def __init__(self):self.head Noneself.tail None…...

STM32单片机入门学习——第8节: [3-4] 按键控制LED光敏传感器控制蜂鸣器
写这个文章是用来学习的,记录一下我的学习过程。希望我能一直坚持下去,我只是一个小白,只是想好好学习,我知道这会很难,但我还是想去做! 本文写于:2025.04.02 STM32开发板学习——第8节: [3-4] 按键控制LED&光敏传感器控制蜂鸣器 前言开…...

【JavaScript】十三、事件监听与事件类型
文章目录 1、事件监听1.1 案例:击关闭顶部广告1.2 案例:随机点名1.3 事件监听的版本 2、事件类型2.1 鼠标事件2.1.1 语法2.1.2 案例:轮播图主动切换 2.2 焦点事件2.2.1 语法2.2.2 案例:模拟小米搜索框 2.3 键盘事件2.3.1 语法2.3.…...
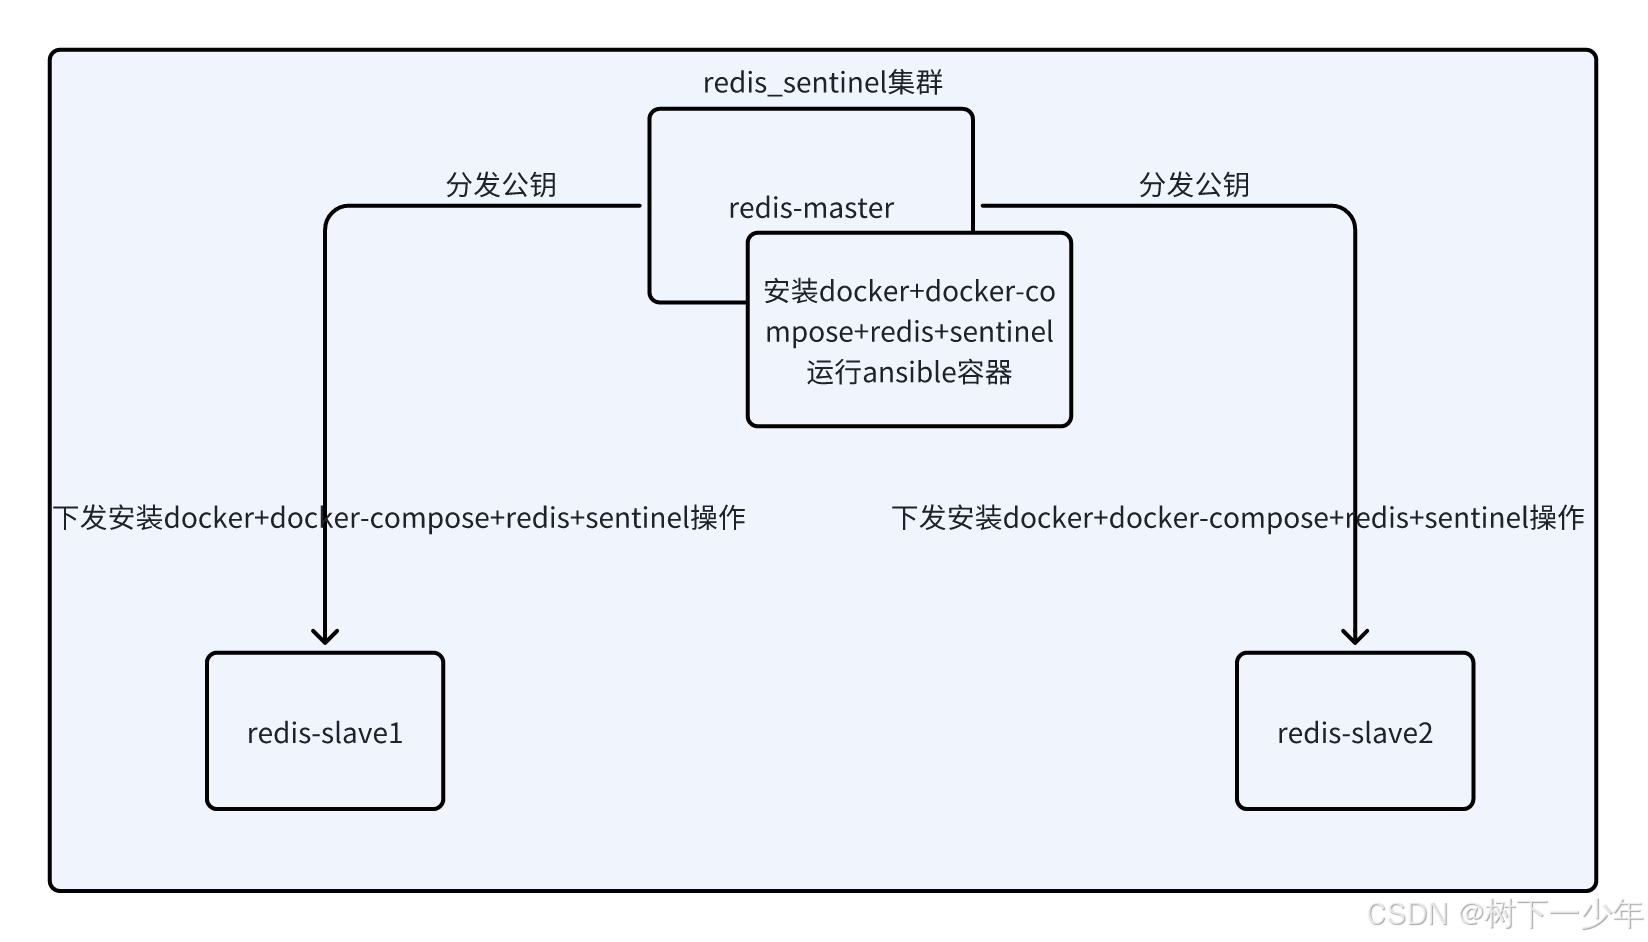
通过ansible+docker-compose快速安装一主两从redis+三sentinel
目录 示例主机列表 架构参考 文件内容 安装脚本 ansible变量,需修改 ansible配置文件和主机清单,需修改 运行方式 验证故障转移master 涉及redis镜像和完整的脚本文件 示例主机列表 架构参考 文件内容 安装脚本 #!/bin/bashset -e export pa…...

前端和AI怎么高度融合
前端工程师和人工智能(AI)结合可以创造出更加智能和交互式的用户体验。以下是一些前端工程师可以与AI结合的方式: AI聊天机器人:前端工程师可以开发基于AI的聊天机器人,用于与用户交互并提供实时帮助和支持。 个性化推…...

mysql docker容器启动遇到的问题整理
好几个月没折腾mysql的部署,弄了下,又遇到不少问题 问题一:Access denied for user ‘root‘‘172.18.0.1‘ docker容器启动后,本地navicat 连接报这个错误 查到两个方案,一个貌似是要让root用户能在任意ip地址&…...

HTTP keepalive 详解
一、简介 HTTP协议早期版本,比如1.0,默认是不使用持久连接的,也就是每个请求/响应之后都会关闭TCP连接。这样的话,每次请求都需要重新建立连接,增加了延迟和资源消耗。Keep-Alive的作用是保持连接,让多个请…...

长短期记忆神经网络(LSTM)基础学习与实例:预测序列的未来
目录 1. 前言 2. LSTM的基本原理 2.1 LSTM基本结构 2.2 LSTM的计算过程 3. LSTM实例:预测序列的未来 3.1 数据准备 3.2 模型构建 3.3 模型训练 3.4 模型预测 3.5 完整程序预测序列的未来 4. 总结 1. 前言 在深度学习领域,循环神经网络&…...

青少年编程与数学 02-015 大学数学知识点 01课题、概要
青少年编程与数学 02-015 大学数学知识点 01课题、概要 一、线性代数二、概率论与数理统计三、微积分四、优化理论五、离散数学六、数值分析七、信息论 《青少年编程与数学》课程要求,在高中毕业前,尽量完成大部分大学数学知识的学习。一般可以通过线上课…...

C++多继承
可以用多个基类来派生一个类。 格式为: class 类名:类名1,…, 类名n { private: … ; //私有成员说明; public: … ; //公有成员说明; protected: … ; //保护的成员说明; }; class D: public A, protected B, private C { …//派…...

【深度学习新浪潮】DeepSeek近期的技术进展及未来动向
一、近期技术进展 模型迭代与性能提升 DeepSeek-V3-0324版本更新:2025年3月24日发布,作为V3的小版本升级,参数规模达6850亿,采用混合专家(MoE)架构,激活参数370亿。其代码能力接近Claude 3.7,数学推理能力显著提升,且在开源社区(如Hugging Face)上线。DeepSeek-R1模…...

工业4.0时代下的人工智能新发展
摘要:随着德国工业4.0时代以及中国制造2025的提出,工业智能化的改革的时代正逐渐到来,然而我国整体工业水平仍然处于工业2.0水平。围绕工业4.0中智能工厂、智能生产、智能物流这三大主题,结合国内外研究现状,对人工智能…...

监控易一体化运维:高性能与易扩展,赋能运维新高度
在当今数字化时代,云技术、大数据、智慧城市等前沿科技蓬勃发展,企业和城市对 IT 基础设施的依赖程度与日俱增。在这样的大环境下,运维系统的高性能与易扩展性对于保障业务稳定运行和推动发展的关键意义。今天,为大家深入剖析监控…...
机器学习stats_linregress
import numpy as np from scipy import stats# r stats.linregress(xs, ys) 是一个用于执行简单线性回归的函数,通常来自 scipy.stats 库。# 具体含义如下:# stats.linregress:执行线性回归分析,拟合一条最佳直线来描述两个变量 …...
Linux系统01---指令
目录 学习的方法 Linux 系统介绍 2.1 Unix 操作系统(了解) 2.2 Linux 操作系统(了解) 2.3 Linux 操作系统的主要特性(重点) 2.4 Linux 与 Unix 的区别与联系 2.5 GUN 与 GPL(了解&#…...
【蓝桥杯14天冲刺课题单】Day 8
1.题目链接:19714 数字诗意 这道题是一道数学题。 先考虑奇数,已知奇数都可以表示为两个相邻的数字之和,2k1k(k1) ,那么所有的奇数都不会被计入。 那么就需要考虑偶数什么情况需要被统计。根据打表,其实可以发现除了…...

23.6 CharGLM多模态API实战:24k上下文角色一致性优化全解析
CharGLM多模态API实战:24k上下文角色一致性优化全解析 关键词:多模态大模型, CharGLM API 调用, 角色一致性控制, 上下文感知, 对话系统优化 演示 CharGLM 的对话效果 CharGLM 作为支持 24k 上下文窗口的多模态对话模型,在角色扮演场景中展现出强大的交互能力。本节通过实…...

DeepSeek 开源的 3FS 如何?
DeepSeek 3FS(Fire-Flyer File System)是一款由深度求索(DeepSeek)于2025年2月28日开源的高性能并行文件系统,专为人工智能训练和推理任务设计。以下从多个维度详细解析其核心特性、技术架构、应用场景及行业影响&…...

基于 Three.js 实现 3D 数学欧拉角
大家好!我是 [数擎AI],一位热爱探索新技术的前端开发者,在这里分享前端和Web3D、AI技术的干货与实战经验。如果你对技术有热情,欢迎关注我的文章,我们一起成长、进步! 开发领域:前端开发 | AI 应…...

AI Agent成为行业竞争新焦点:技术革新与商业重构的双重浪潮
近年来,AI Agent(人工智能代理)凭借其自主感知、决策与执行能力,迅速成为全球科技与商业领域的核心竞争赛道。无论是互联网巨头、初创企业,还是传统行业,均在加速布局这一领域,试图在智能化浪潮…...
Hive聚合函数深度解析:从基础统计到多维聚合的12个生产级技巧)
大数据(4.5)Hive聚合函数深度解析:从基础统计到多维聚合的12个生产级技巧
目录 背景一、Hive聚合函数分类与语法1. 基础聚合函数2. 高级聚合函数 二、6大核心场景与案例场景1:基础统计(SUM/COUNT)场景2:多维聚合(GROUPING SETS)场景3:层次化聚合(ROLLUP&…...
:一文读懂短距离无线通信技术)
无线通信技术(四):一文读懂短距离无线通信技术
目录 一.技术介绍 1.1 Wi-Fi 1.2 蓝牙 1.3 ZigBee 1.4 IrDA 1.5 NFC 1.6 UWB 二.技术对比 三.未来趋势与挑战 3.1 技术融合 3.2 标准化难题 3.3 新兴应用 短距离无线通信技术是物联网、智能家居、移动支付等领域的核心支撑。这些技术通过不同频段、传输方式和场景…...

SqlServer整库迁移至Oracle
import pandas as pd from sqlalchemy import create_engine, text import cx_Oracle from sqlalchemy.exc import DatabaseError import traceback# SQL Server 配置 sql_server_conn_str mssqlpyodbc://用户名:密码数据库地址:端口/库名?driverODBCDriver11forSQLServer sq…...

通过 Docker Swarm 集群探究 Overlay 网络跨主机通信原理
什么是Overlay网络, 用于解决什么问题 ? Overlay网络通过在现有网络之上创建一个虚拟网络层, 解决不同主机的容器之间相互通信的问题 如果没有Overlay网络,实现跨主机的容器通信通常需要以下方法: 端口映射使用宿主机网络模式 这些方法牺牲了容器网络…...

HarmonyOS NEXT开发进阶(十四):HarmonyOS应用开发者基础认证试题集汇总及答案解析
文章目录 一、前言二、判断题(134道)三、单选题(210道)四、多选题(123道)五、拓展阅读 一、前言 鸿蒙原生技能学习阶段,通过官方认证的资格十分有必要,在项目实战前掌握基础开发理论…...
linux shell 删除空行(remove empty lines)
命令行 grep -v ^$ file sed /^$/d file 或 sed -n /./p file awk /./ {print} file 或 awk {if($0!" ") print} tr -s "n"vim交互 %s/^n//g...
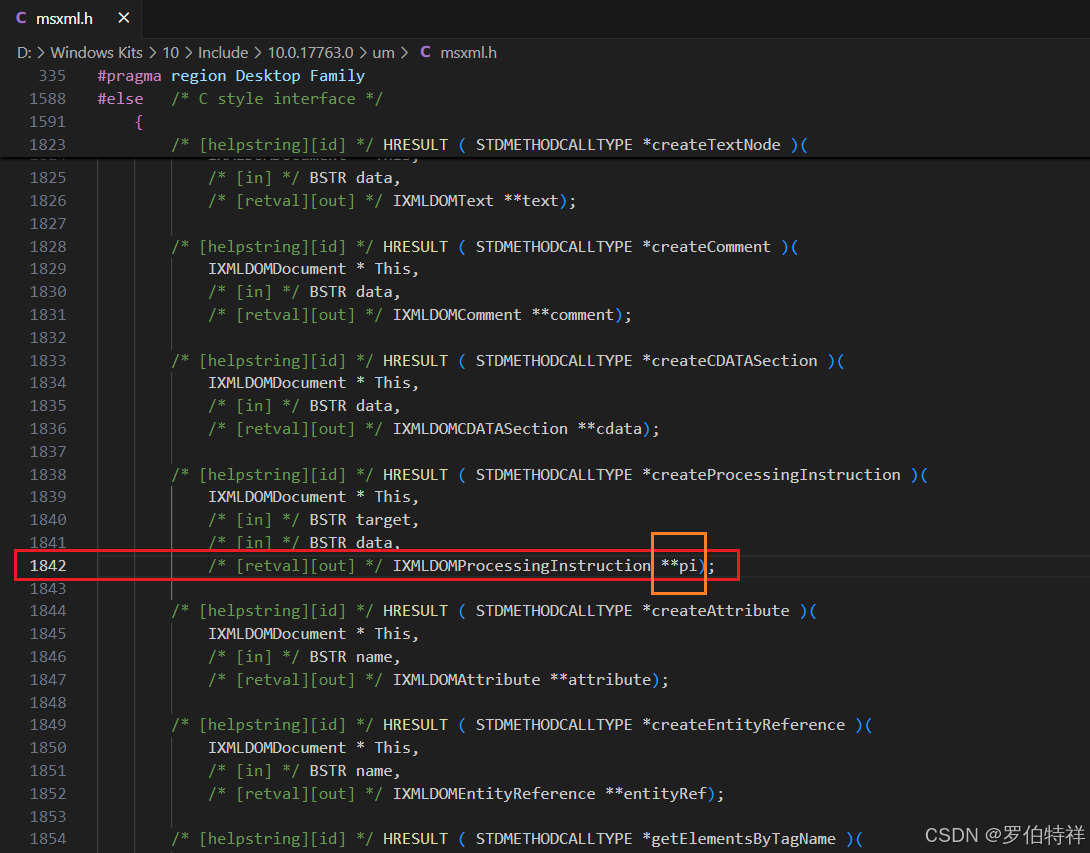
MSVC编译遇到C2059、C2143、C2059、C2365、C2059等错误的解决方案
MSVC编译时,遇到如下错误: c:\program files (x86)\windows kits\10\include\10.0.18362.0\um\msxml.h(1842): error C2059: 语法错误:“常数” [D:\jenkins_home\workspace\xxx.vcxproj] c:\program files (x86)\windows kits\10\include\10.0.18362.0…...