MNIST 数据集 与 TFOD API
此处给出我在进行毕业设计过程中写的三份脚本,作为demo 展示模型的预处理,输出信息提取和TFOD API的应用。
script1
加载本地的MNIST模型,对本地的手写数字进行推理
# test the validation of the saved file and the camera
import cv2
import tensorflow as tf
import numpy as np
import matplotlib.pyplot as plt# 1. 加载训练好的模型
model = tf.keras.models.load_model("/home/ncut/models/myMNIST_Model.keras")'''
# 2. 从摄像头捕获一张图片
cap = cv2.VideoCapture(0)  # 0 表示默认摄像头
if not cap.isOpened():print("无法打开摄像头")exit()ret, frame = cap.read()
cap.release()
if not ret:print("无法捕获摄像头图像")exit()
'''frame = cv2.imread("~/code_garden/testcase_folder/five.png")
# 3. 预处理图像
gray = cv2.cvtColor(frame, cv2.COLOR_BGR2GRAY)  # 转换为灰度图
img_resized = cv2.resize(gray, (28, 28))  # 调整大小到 28x28
img_normalized = 1.0 - (img_resized.astype("float32") / 255.0)
img_input = img_normalized.reshape(1, 28, 28, 1)  # 展平以匹配模型输入格式plt.imshow(img_input[0, :, :, 0], cmap='gray')
plt.title("image after preprocess")
plt.axis("off")
plt.show()# 4. 进行推理
predictions = model.predict(img_input)
print("预测概率:", predictions)
predicted_class = np.argmax(predictions)
print("预测类别:", predicted_class)
confidence = np.max(predictions)
print("confidence value:", confidence)# 5. 可视化结果
plt.figure(figsize=(10, 4))# 左侧显示原始摄像头拍摄的彩色图像
plt.subplot(1, 3, 1)
plt.imshow(cv2.cvtColor(frame, cv2.COLOR_BGR2RGB))  # OpenCV 读取的 BGR 需转换为 RGB
plt.title("The original color photo")
plt.axis("off")# 中间显示处理后的灰度图
plt.subplot(1, 3, 2)
plt.imshow(img_normalized, cmap="gray")
plt.title("gray map(28x28)")
plt.axis("off")# 右侧显示推理结果
plt.subplot(1, 3, 3)
plt.title("inference result")
plt.text(0.1, 0.6, f"predicition class: {predicted_class}", fontsize=14)
plt.text(0.1, 0.4, f"confidence: {confidence:.4f}", fontsize=14)
#plt.text(0.1, 0.2, f"Loss: {loss_value:.4f}", fontsize=14)
plt.axis("off")plt.tight_layout()
plt.show()
Scripts2
实际使用的脚本,用类进行封装,同样是对本地图片的读取。这里使用了 @staticmethod 修饰器,类似 C++ 中的 static method,独立于类的实例而存在。在主函数调用时,睡眠三秒,方便使用者为接下来的摄像头数据读取做准备。
import argparse
import cv2
import tensorflow as tf
import numpy as np
import os
import matplotlib.pyplot as plt
import timeclass MNISTProcessor:def __init__(self, model_path="/home/ncut/models/myMNIST_Model.keras"):"""初始化模型"""self.model = tf.keras.models.load_model(model_path)def process_image(self, input_path="/home/ncut/Pictures/five.png", output_path=None):"""完整处理流程入口:param input_path: 输入图像路径:param output_path: 输出图像路径 (可选):return: 处理后的结果图像"""# 1. 加载图像image = self._load_image(input_path)if image is None:raise FileNotFoundError(f"图像文件 {input_path} 不存在或无法读取")# 2. 执行推理predicted_class, confidence, processed_image = self.predict(image)if output_path is None:output_path = f"/dev/shm/mnist_result_{int(time.time())}.png"# 3. 绘制,保存结果self.draw_results_save(image.copy(), predicted_class, confidence, processed_image, output_path)return True;def predict(self, image):"""执行推理"""gray = cv2.cvtColor(image, cv2.COLOR_BGR2GRAY)img_resized = cv2.resize(gray, (28, 28), interpolation=cv2.INTER_CUBIC)    # resize the width and heightimg_normalized = 1.0 - (img_resized.astype("float32") / 255.0)img_input = img_normalized.reshape(1, 28, 28, 1)    # reshape can change the dimensionpredictions = self.model.predict(img_input)predicted_class = np.argmax(predictions)    # pick out the largest element of the arrayconfidence = np.max(predictions)return predicted_class, confidence, img_normalizeddef draw_results_save(self, image, predicted_class, confidence, img_normalized, output_path):"""在图像上绘制检测结果"""plt.figure(figsize=(10, 4))# 左侧显示原始摄像头拍摄的彩色图像plt.subplot(1, 3, 1)plt.imshow(cv2.cvtColor(image, cv2.COLOR_BGR2RGB))  # OpenCV 读取的 BGR 需转换为 RGBplt.title("The original color photo")plt.axis("off")# 中间显示处理后的灰度图plt.subplot(1, 3, 2)plt.imshow(img_normalized, cmap="gray")plt.title("gray map(28x28)")plt.axis("off")# 右侧显示推理结果plt.subplot(1, 3, 3)plt.title("inference result")plt.text(0.1, 0.6, f"predicition class: {predicted_class}", fontsize=14)plt.text(0.1, 0.4, f"confidence: {confidence:.4f}", fontsize=14)#plt.text(0.1, 0.2, f"Loss: {loss_value:.4f}", fontsize=14)plt.axis("off")plt.tight_layout()#plt.show()plt.savefig(output_path, bbox_inches="tight", pad_inches=0)plt.close()@staticmethoddef _load_image(path):"""加载图像"""if not os.path.exists(path):return Nonereturn cv2.imread(path)@staticmethoddef _save_cvimage(image, path):"""保存图像到指定路径"""cv2.imwrite(path, image)def main():# 命令行参数解析parser = argparse.ArgumentParser(description='MNIST 处理器')parser.add_argument('--input', required=True, help='输入图像路径')parser.add_argument('--output', help='输出图像路径 (可选)')args = parser.parse_args()print("parse succeed")# 创建处理器实例processor = MNISTProcessor()try:# 执行处理流程result_bool = processor.process_image(args.input, args.output)# 可选:显示结果(调试时使用)if os.environ.get('DEBUG_SHOW'):plt.imshow(cv2.cvtColor(cv2.imread(args.output), cv2.COLOR_BGR2RGB))plt.axis('off')plt.show()except Exception as e:print(f"处理失败: {str(e)}")exit(1)if __name__ == "__main__":print("sleep for 3 seconds")time.sleep(3)main()
Script3
能在虚拟机资源受限环境下实现的模型训练和推理,简单的训练模型demo。
import numpy as np
import matplotlib.pyplot as plt
import tensorflow as tf# ==============================================
# 1. 加载本地 MNIST 数据集
# ==============================================
def load_local_mnist(path='./datasets/mnist.npz'):with np.load(path, allow_pickle=True) as f:x_train = f['x_train']y_train = f['y_train']x_test = f['x_test']y_test = f['y_test']return (x_train, y_train), (x_test, y_test)# 从本地路径加载数据
local_mnist_path = '/home/ncut/.keras/datasets/mnist.npz'  # 修改为你的实际路径
(x_train, y_train), (x_test, y_test) = load_local_mnist(local_mnist_path)# ==============================================
# 2. 数据预处理
# ==============================================
# 归一化像素值到 [0,1] 并展平图像(可选)
x_train = x_train.reshape(-1, 28*28).astype('float32') / 255.0
x_test = x_test.reshape(-1, 28*28).astype('float32') / 255.0# ==============================================
# 3. 可视化前 25 张训练集图片
# ==============================================
def plot_mnist_samples(images, labels, num_samples=25):plt.figure(figsize=(10, 10))for i in range(num_samples):plt.subplot(5, 5, i+1)plt.imshow(images[i].reshape(28, 28), cmap='gray')  # 若已展平,需 reshape 回 28x28plt.title(f"Label: {labels[i]}")plt.axis('off')plt.tight_layout()plt.show()# 调用可视化函数(使用原始未展平的图像数据)
_, (x_train_original, _) = load_local_mnist(local_mnist_path)  # 重新加载未展平的数据用于可视化
plot_mnist_samples(x_train_original, y_train)# ==============================================
# 4. 训练模型(基于展平数据)
# ==============================================
model = tf.keras.Sequential([tf.keras.layers.Dense(128, activation='relu', input_shape=(784,)),tf.keras.layers.Dropout(0.2),tf.keras.layers.Dense(10, activation='softmax')
])model.compile(optimizer='adam',loss='sparse_categorical_crossentropy',metrics=['accuracy']
)history = model.fit(x_train, y_train,epochs=5,validation_split=0.2,verbose=1
)# ==============================================
# 5. 评估测试集
# ==============================================
test_loss, test_acc = model.evaluate(x_test, y_test)
print(f'\nTest accuracy: {test_acc:.4f}')
Script4
训练模型,此处使用了数据增强和缓存,是自己在 Google colab上训练时的脚本。
import tensorflow as tf
import numpy as np
from sklearn.utils import class_weight# 1. 加载 MNIST 数据
(x_train, y_train), (x_test, y_test) = tf.keras.datasets.mnist.load_data()# 2. 基本预处理:归一化 & 扩展通道维度
x_train = x_train.astype('float32') / 255.0
x_test  = x_test.astype('float32') / 255.0
x_train = np.expand_dims(x_train, axis=-1)  # (28,28) -> (28,28,1)
x_test  = np.expand_dims(x_test, axis=-1)# 3. 定义数据增强层
data_augmentation = tf.keras.Sequential([tf.keras.layers.RandomRotation(0.1),tf.keras.layers.RandomZoom(0.1),tf.keras.layers.RandomTranslation(0.1, 0.1),tf.keras.layers.Lambda(lambda x: tf.image.random_brightness(x, max_delta=0.1)),  # 加入随机亮度调整tf.keras.layers.RandomContrast(0.1)  # 加入随机对比度调整
])# 4. 定义数据增强函数
def augment(image, label):# image 的 shape 是 (28,28,1),直接传入数据增强层即可image = data_augmentation(image, training=True)return image, label# 5. 构建训练和验证数据集
train_dataset = tf.data.Dataset.from_tensor_slices((x_train, y_train))
train_dataset = train_dataset.shuffle(buffer_size=1024)
train_dataset = train_dataset.map(augment, num_parallel_calls=tf.data.AUTOTUNE)
train_dataset = train_dataset.batch(64)
train_dataset = train_dataset.cache()  # 缓存数据,避免重复处理
train_dataset = train_dataset.prefetch(tf.data.AUTOTUNE)val_dataset = tf.data.Dataset.from_tensor_slices((x_test, y_test))
val_dataset = val_dataset.batch(64)
val_dataset = val_dataset.cache()
val_dataset = val_dataset.prefetch(tf.data.AUTOTUNE)# 6. 计算 class_weight
# 这里使用原始的 y_train 数据计算类别权重
cw = class_weight.compute_class_weight(class_weight='balanced',classes=np.unique(y_train),y=y_train
)
class_weights = dict(enumerate(cw))
print("Class weights:", class_weights)# 7. 构建 CNN 模型
model = tf.keras.Sequential([tf.keras.layers.Conv2D(32, (3, 3), activation='relu', input_shape=(28, 28, 1)),tf.keras.layers.MaxPooling2D((2, 2)),tf.keras.layers.Dropout(0.3),tf.keras.layers.Flatten(),tf.keras.layers.Dense(128, activation='relu'),tf.keras.layers.Dropout(0.3),tf.keras.layers.Dense(10, activation='softmax')
])# 8. 编译模型
model.compile(optimizer='adam',loss='sparse_categorical_crossentropy',metrics=['accuracy']
)# 9. 训练模型,同时传入 class_weight
history = model.fit(train_dataset,epochs=15,validation_data=val_dataset,class_weight=class_weights
)# 保存和加载模型
model.save("myMNIST_Model.keras")
reconstructed_model = tf.keras.models.load_model("myMNIST_Model.keras")# 10. 评估模型
test_loss1, test_acc1 = model.evaluate(x_test, y_test)
test_loss2, test_acc2 = reconstructed_model.evaluate(x_test, y_test)
print("Test loss1:", test_loss1)
print(f"Test accuracy1: {test_acc1:.4f}")
print("Test loss2:", test_loss2)
print(f"Test accuracy2: {test_acc2:.3f}%")
additon
上述的四份脚本作为四份独立的脚本存储于我的虚拟机中,但它们的共通之处:模型的加载、数据的预处理、对模型检测结果的信息提取没有在此处体现。放任四份脚本中的共同之处不管而着急地对各个脚本进行处理,是一种放任思维的、不负责任的表现。
这份博客会在后面进行修改,提取出公共部分,对独立的部分进行描述说明。
相关文章:

MNIST 数据集 与 TFOD API
此处给出我在进行毕业设计过程中写的三份脚本,作为demo 展示模型的预处理,输出信息提取和TFOD API的应用。 script1 加载本地的MNIST模型,对本地的手写数字进行推理 # test the validation of the saved file and the camera import cv2 i…...

SpringSecurity6.0 通过JWTtoken进行认证授权
之前写过一个文章,从SpringSecurity 5.x升级到6.0,当时是为了配合公司的大版本升级做的,里面的各项配置都是前人留下来的,其实没有花时间进行研究SpringSecurity的工作机制。现在新东家有一个简单的系统要搭建,用户的认…...
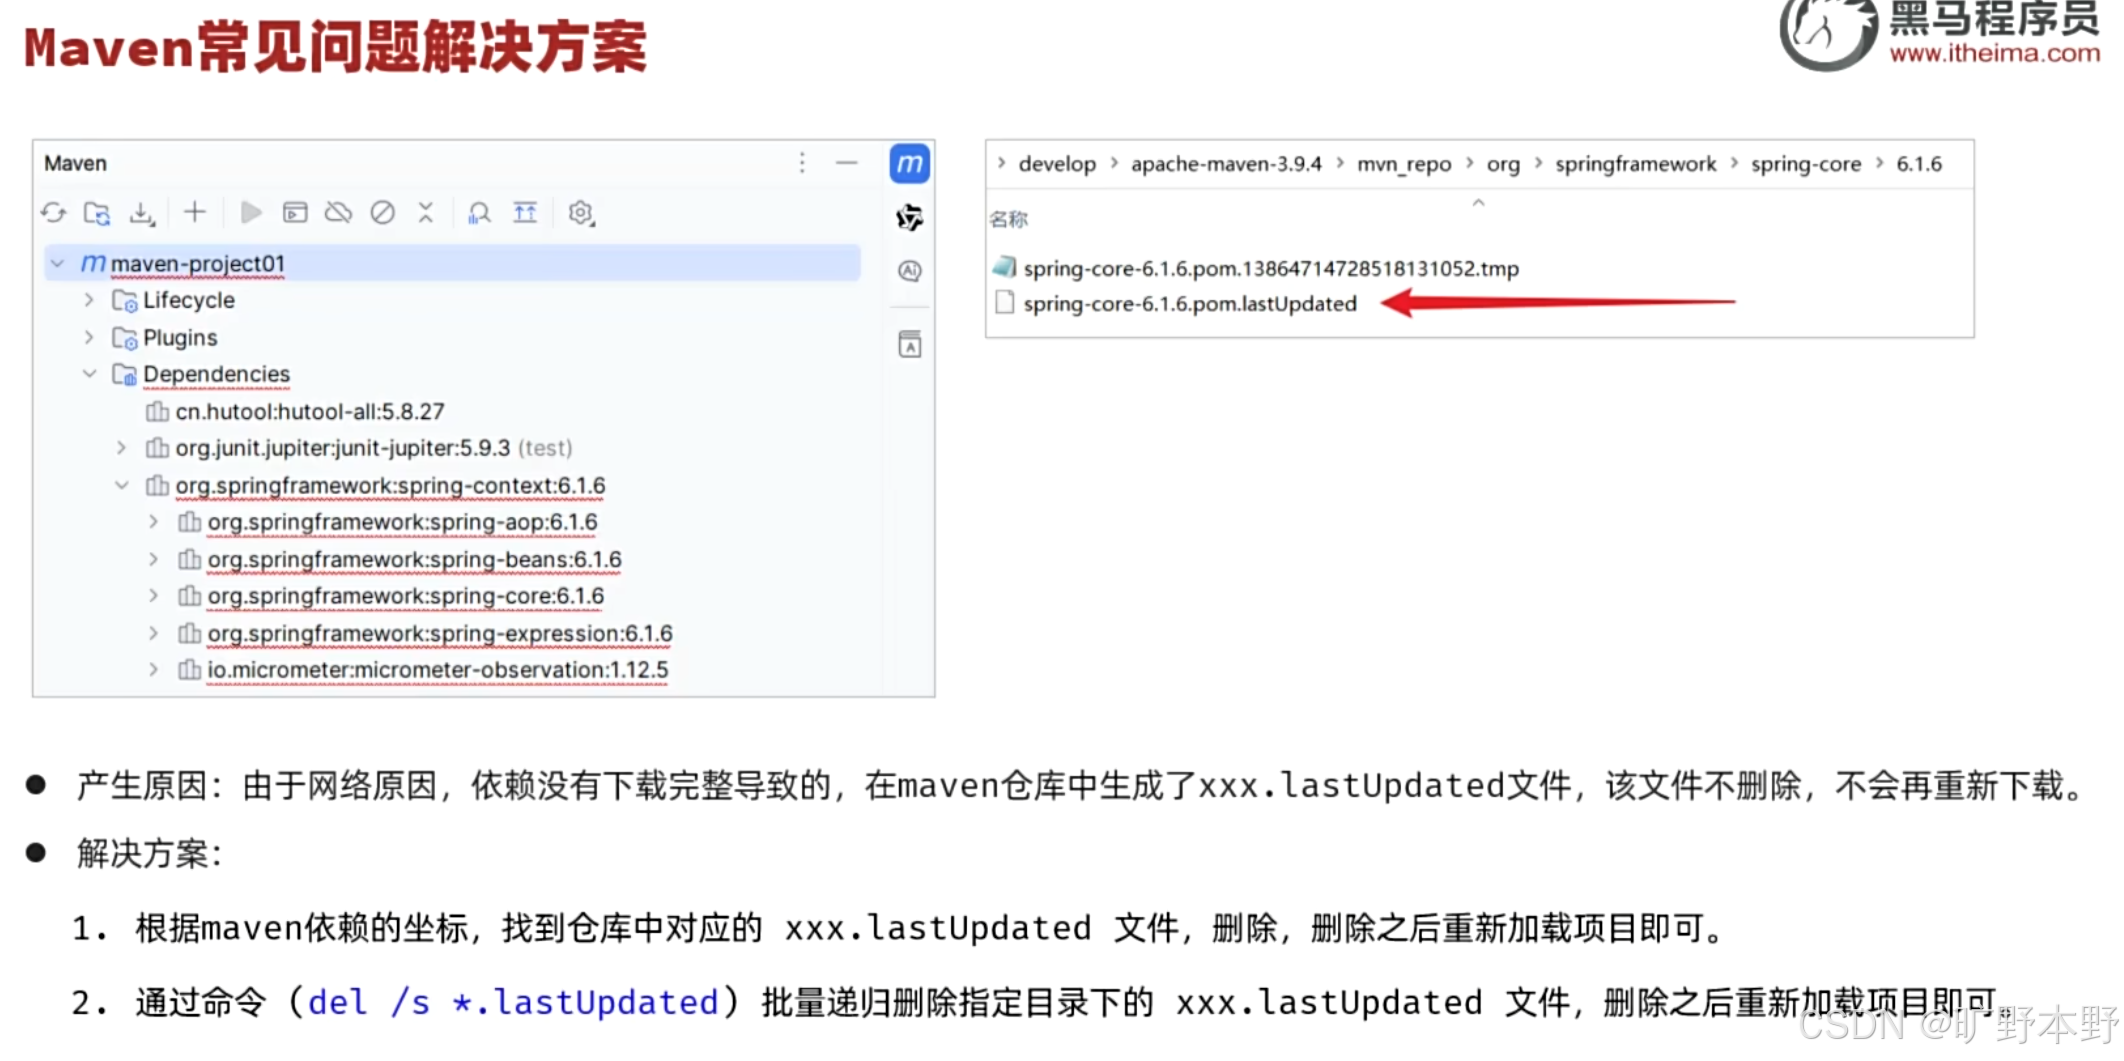
【Java】Maven
一、概念 是一个项目管理和构建工具,它基于项目对象模型(POM)的概念,通过一小段描述信息来管理项目的构建。 二、Maven坐标 <groupId>com.itheima</groupId><artifactId>maven-project01</artifactId>&…...

第十五届蓝桥杯PythonC组题解
A题:拼正方形 问题描述 给定一定数量的 22 和 11 的方块,求能拼出的最大正方形边长。 解题思路 二分法:将奇数和偶数边长分开处理,通过二分法寻找最大满足条件的边长。面积验证:总方块面积需大于等于目标正方形面积…...

MATLAB中plot函数的详细参数表
LineSpec - 线型、标记和颜色 线型说明-实线--虚线:点线-.点划线 标记说明o圆圈加号*星号.点x叉号_水平线条|垂直线条s方形d菱形^上三角v下三角>右三角<左三角p五角形h六角形 颜色说明 y 黄色 m 品红色 c 青蓝色 r 红色 g 绿色 b 蓝色 w 白色 k 黑色 MarkerFaceColor…...
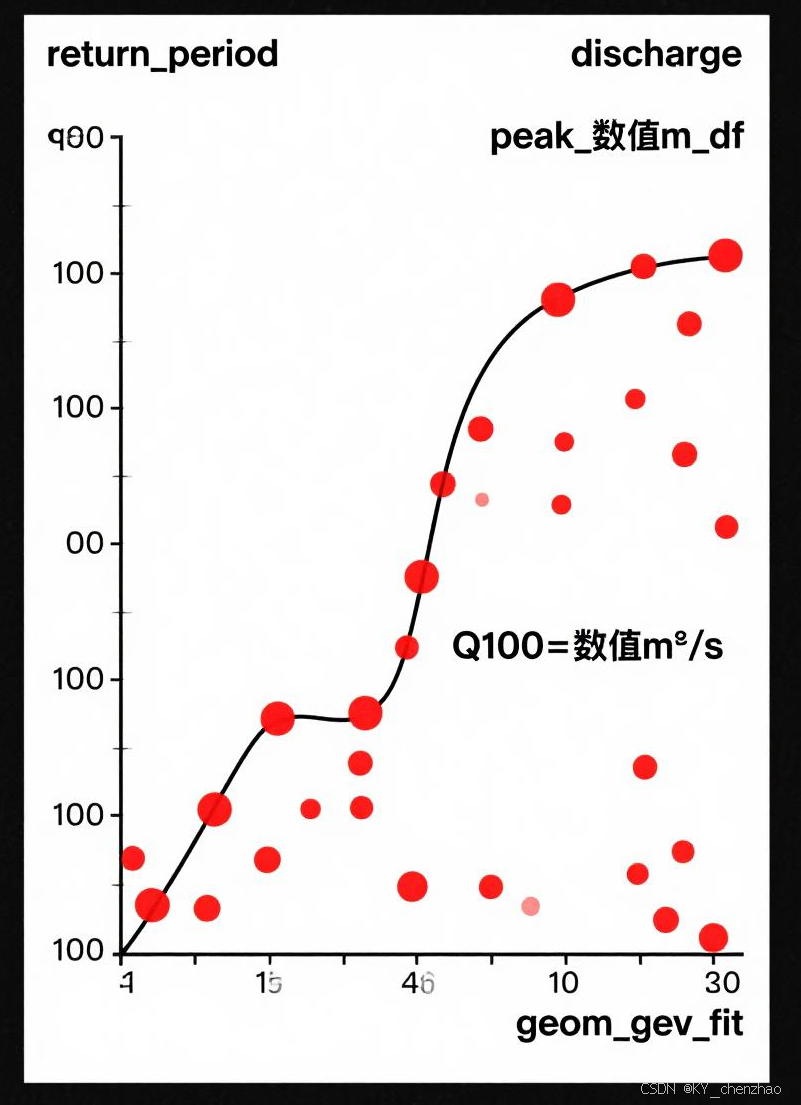
R语言赋能气象水文科研:从多维数据处理到学术级可视化
全球气候变化加剧了极端天气与水文事件的复杂性,气象卫星、雷达、地面观测站及水文传感器每天产生TB级时空异质数据。传统研究常面临四大瓶颈: 数据清洗低效:缺失值、异常值处理耗时;时空分析模型构建复杂࿱…...

虚拟试衣间-云尚衣橱小程序-衣橱管理实现
衣橱管理实现 目标 (Goal): 用户 (User): 能通过 UniApp 小程序上传衣服图片。 后端 (Backend): 接收图片,存到云存储,并将图片信息(URL、用户ID等)存入数据库。 用户 (User): 能在小程序里看到自己上传的所有衣服图片列表。 技术栈细化 (Refined Tech Stack for this Pha…...
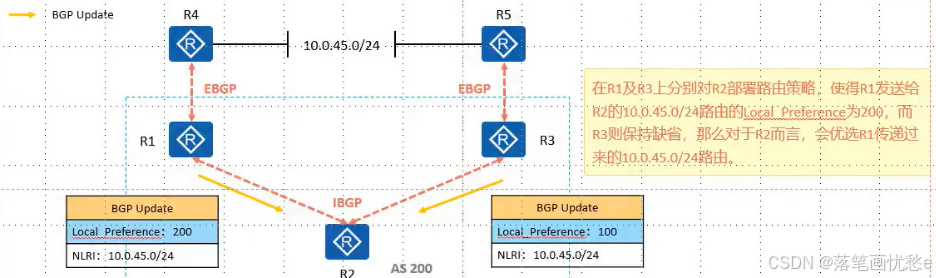
BGP路由协议之属性2
Orgin 起源 公认必遵属性 起源名称标记描述IGPi如果路由是由始发的 BGP 路由器使用 network 命令注入到 BGP 的,那么该 BGP 路由的 origin 属性为 IGPEGPe如果路由是通过 EGP 学习到的,那么该 BGP 路由的 Origin 属性为 EGPIncomplete?如果路由是通过…...

纯个人整理,蓝桥杯使用的算法模板day2(0-1背包问题),手打个人理解注释,超全面,且均已验证成功(附带详细手写“模拟流程图”,全网首个
算法索引 01背包优化前空间优化版(使用一维数组)优化后的模拟流程图为何优化后,j不能使用正序遍历模拟流程图 代码对应实现案例 01背包 优化前 /*** 0-1背包问题解法(与下方代码表格示例对应,已模拟验证)*…...
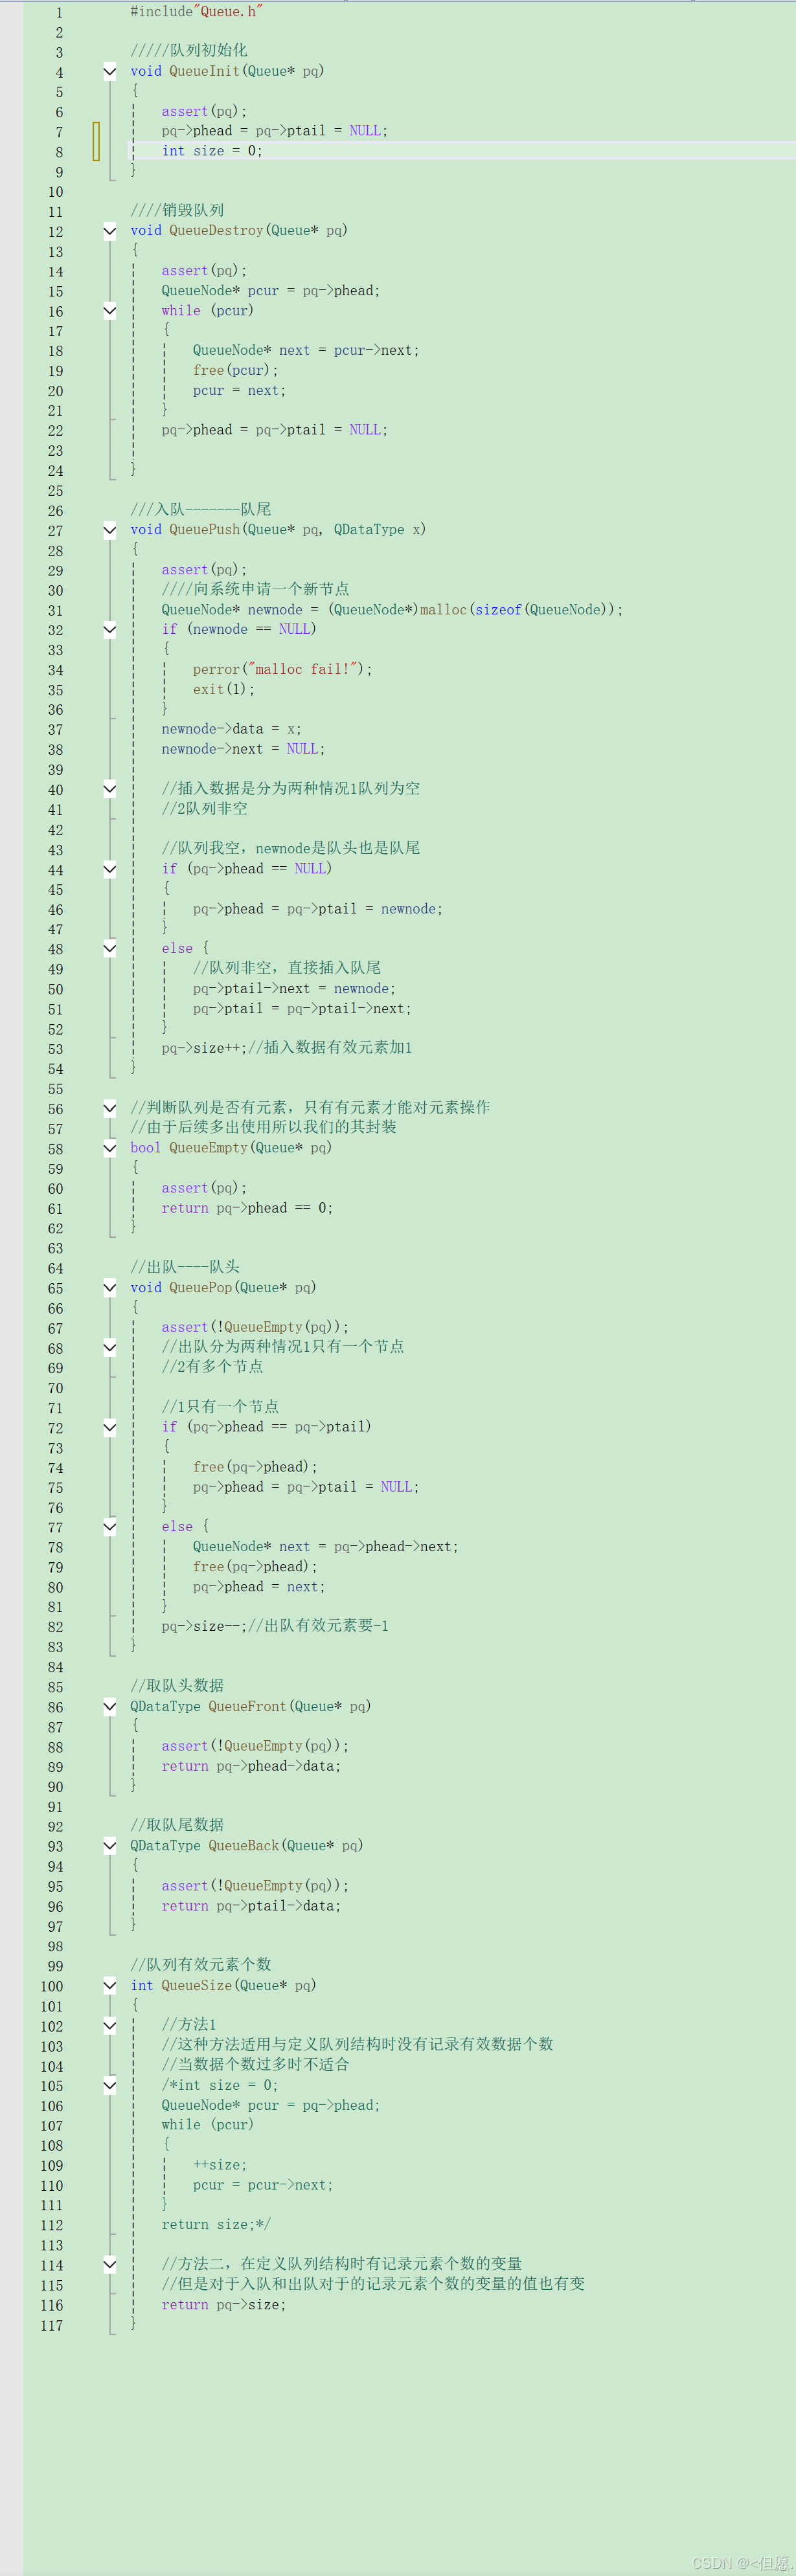
算法与数据结构线性表之栈和队列
Hello大家好! 很高兴与大家见面! 给生活添点快乐,开始今天的编程之路。 我的博客:<但愿. 我的专栏:C语言、题目精讲、算法与数据结构、C 欢迎点赞,关注 一 栈 1概念:栈是⼀种特殊的线性表,其只允许…...
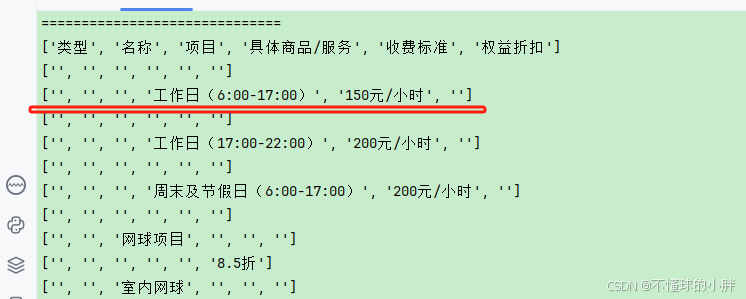
python应用之使用pdfplumber 解析pdf文件内容
目录标题 一. 通过 pdfplumber.open() 解析复杂PDF:1-2. 报错:V2 : 1-3. v3 使用tk 库,弹框选择文件运行环境准备完整代码保存运行测试步骤方式二:命令行方式(适用于自动化) 测试用例示例常见问…...

laravel update报In PackageManifest.php line 122:Undefined index: name 错误的解决办法
用 composer 更新 laravel依赖包时报错 > Illuminate\Foundation\ComposerScripts::postAutoloadDump > Illuminate\Foundation\ComposerScripts::postAutoloadDump > php artisan package:discover --ansiIn PackageManifest.php line 122:Undefined index: nameScr…...
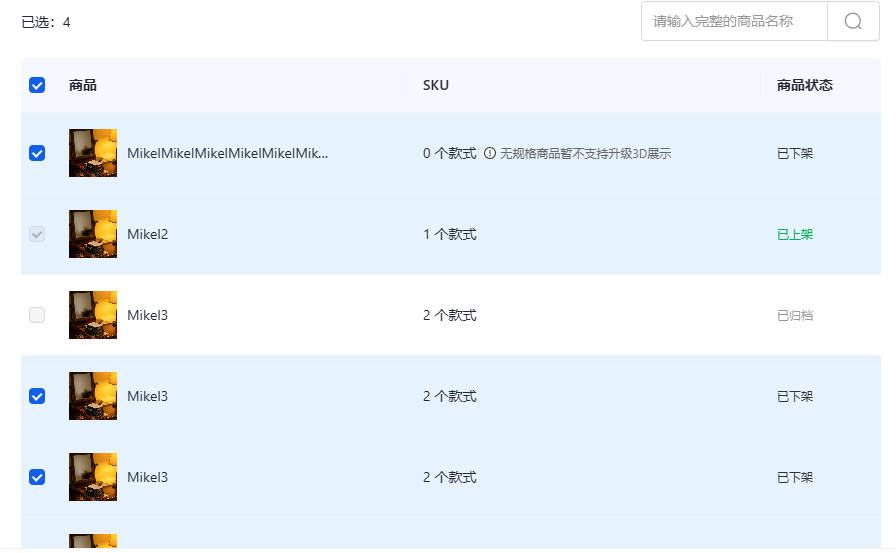
Vue中使用antd-table组件实现数据选择、禁用、已选择禁用-demo
实现案例 实现过程 表格代码 关键代码 :row-selection="rowSelection" <div><div class="flex items-center justify-between pt-[24px] pb-[16px]"><p>已选:{{ keysNum }}</p><a-input-search v-model:value="productN…...
C语言--统计输入字符串中的单词个数
输入 输入:大小写字母以及空格,单词以空格分隔 输出:单词个数 代码 如果不是空格且inWord0说明是进入单词的第一个字母,则单词总数加一。 如果是空格,证明离开单词,inWord 0。 #include <stdio.h&g…...
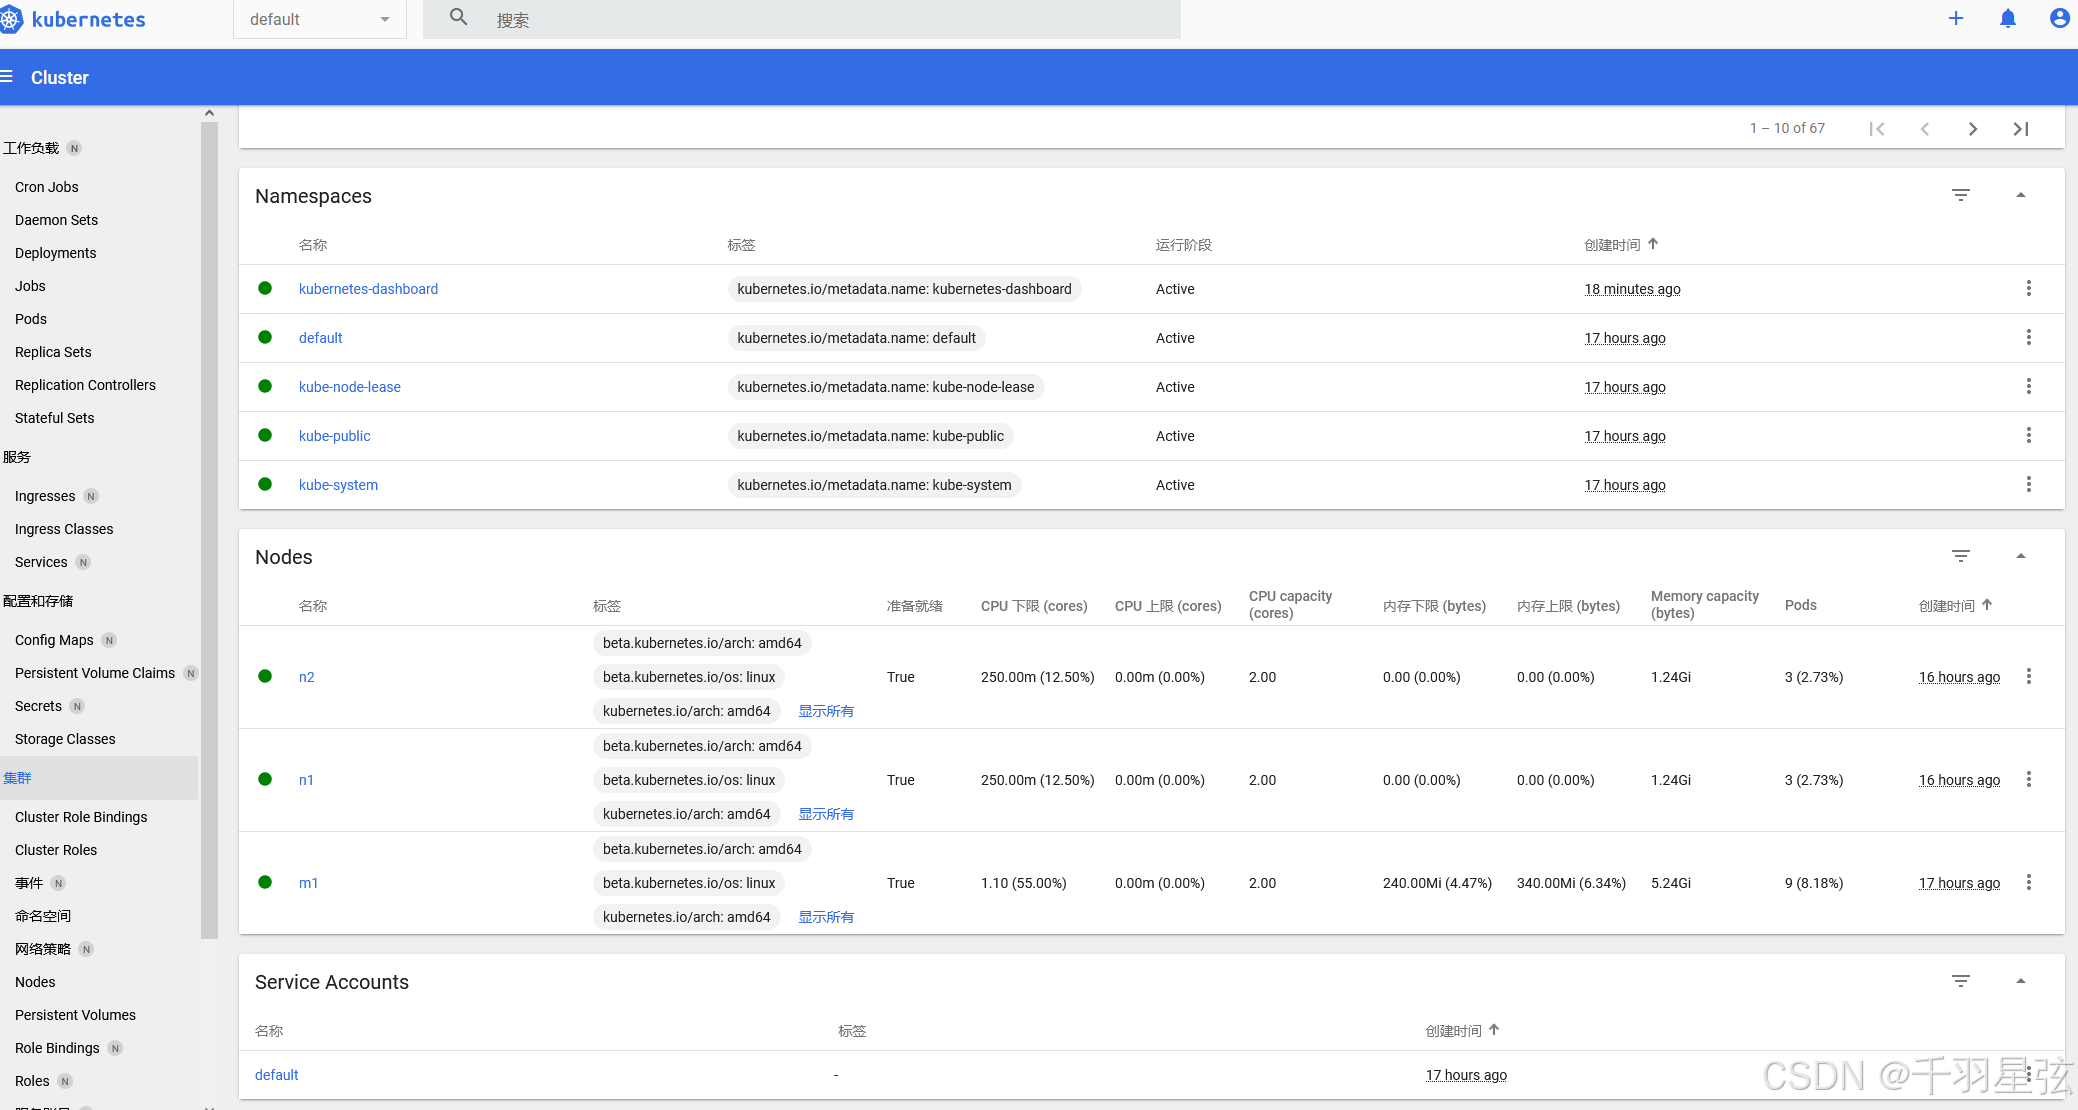
Kubernetes 集群搭建(三):使用dashboard用户界面(需要访问外网获取yaml)
(一)简介 K8s Dashboard是Kubernetes提供的一种基于Web的用户界面工具,用于可视化地管理和监控Kubernetes集群 主要功能: 资源查看与管理: 查看Kubernetes集群中的各种资源,如节点、Pod、服务、部署等。 对…...
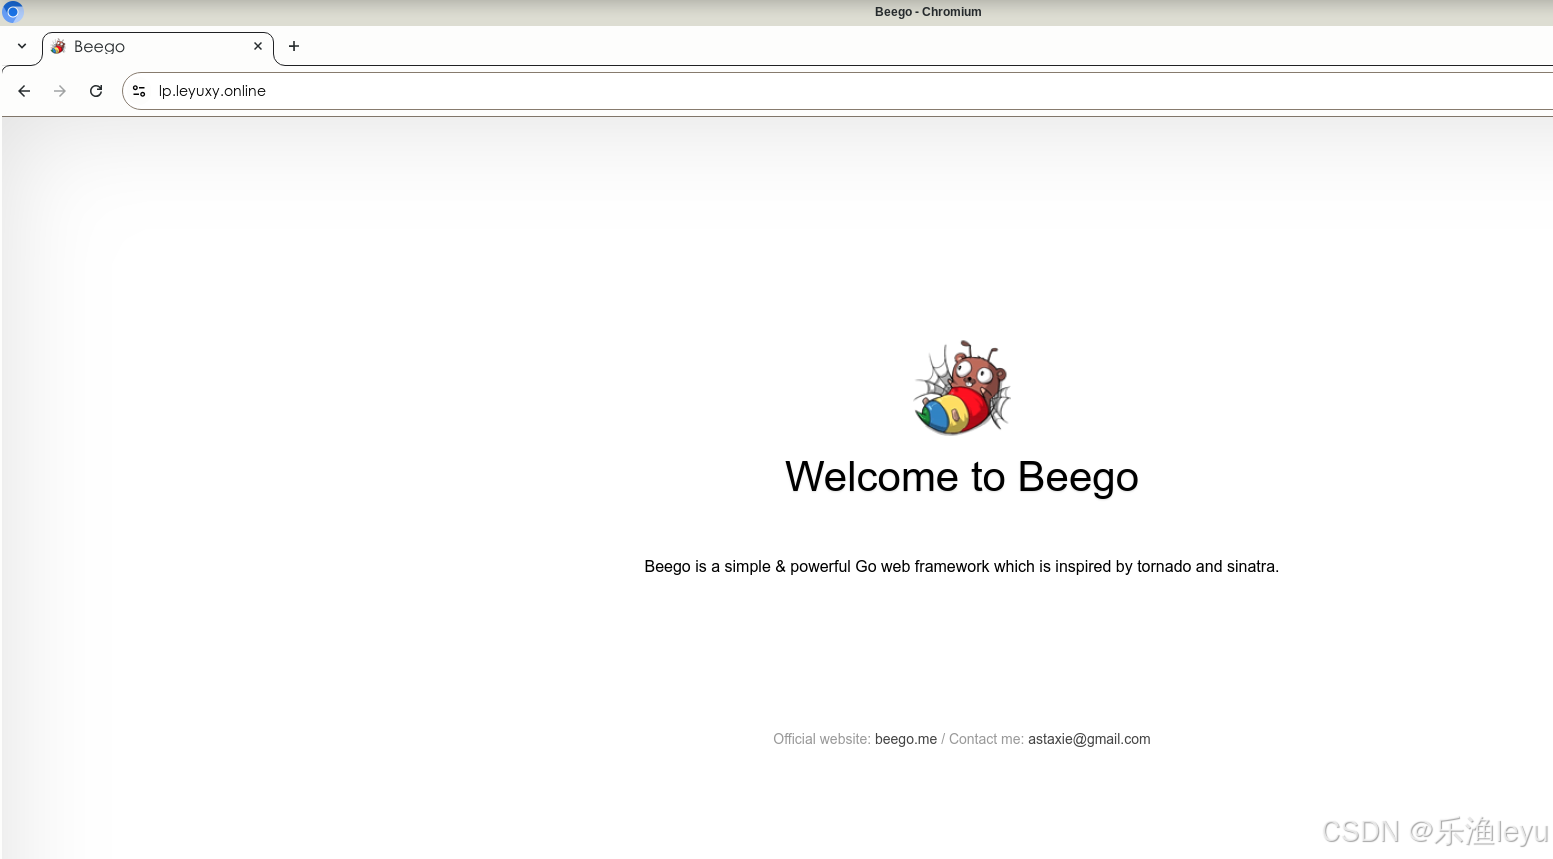
Debian 12 服务器搭建Beego环境
一、Debian 12系统准备 1.更新系统 #apt update && apt upgrade -y 2.安装基础工具 #apt install -y git curl wget make gcc 二、安装Go环境 Go语言的镜像官网:https://golang.google.cn/ 1.下载go最新版 #cd /usr/local/src #wget -o https://golang.go…...

游戏引擎学习第208天
运行游戏并回顾我们的情况 今天,我们将继续完成之前中断的调试输出工作。最近的工作偏离了一些,展示了如何进行元编程的实践,主要涉及了一个小的解析器。尽管这个解析器本身是一个玩具,但它展示了如何完成一个完整的循环…...

【在校课堂笔记】Python 第 7 节课 总结
- 第 85 篇 - Date: 2025 - 04 - 06 Author: 郑龙浩/仟墨 【Python 在校课堂笔记】 南山-第 7 节课 上课时间: 2025-03-27 文章目录 南山-第 7 节课一 99乘法表 –> 三角二 函数1 已接触的函数,部分举例2 自定函数的定义与使用自定义函数:举例 3 带参数的4 阶乘…...

评价区动态加载是怎么实现的?
淘宝商品评价区的动态加载是通过一系列前端技术和后端接口实现的,其核心目的是提升用户体验和页面性能。以下是其实现原理和关键技术的详细解析: 1. 前端实现:AJAX 和 JavaScript 淘宝利用 AJAX(Asynchronous JavaScript and XM…...
【 <二> 丹方改良:Spring 时代的 JavaWeb】之 Spring Boot 中的监控:使用 Actuator 实现健康检查
<前文回顾> 点击此处查看 合集 https://blog.csdn.net/foyodesigner/category_12907601.html?fromshareblogcolumn&sharetypeblogcolumn&sharerId12907601&sharereferPC&sharesourceFoyoDesigner&sharefromfrom_link <今日更新> 一、引子&…...

蓝桥杯—数字接龙(dfs+减枝)
一.题目 二.思路 一看就是迷宫问题的变种,从左上角到达右下角,要解决 1.8个方向的方向向量,用dx,dy数组代表方向向量 2.要按照一个规律的数值串进行搜索0,1,2,k-1,0,1…...
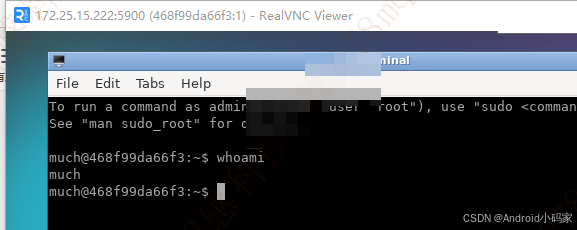
Docker与VNC的使用
https://hub.docker.com/r/dorowu/ubuntu-desktop-lxde-vnc 下载nvc 客户端 https://downloads.realvnc.com/download/file/viewer.files/VNC-Viewer-7.12.0-Windows.exe 服务端 docker pull dorowu/ubuntu-desktop-lxde-vnc#下载成功 docker pull dorowu/ubuntu-desktop-l…...
C++——清明
#include <iostream> #include <cstring> #include <cstdlib> #include <unistd.h> #include <sstream> #include <vector> #include <memory> #include <ctime>using namespace std;class Weapon; // 前置声明class Hero{ pr…...

Unity ViewportConstraint
一、组件功能概述 ViewportConstraint是一个基于世界坐标的UI边界约束组件,主要功能包括: 将UI元素限制在父容器范围内支持自定义内边距(padding)可独立控制水平和垂直方向的约束 二、实现原理 1. 边界计算(世界坐…...

Gin、Echo 和 Beego三个 Go 语言 Web 框架的核心区别及各自的优缺点分析,结合其设计目标、功能特性与适用场景
1. Gin 核心特点 高性能:基于 Radix 树路由,无反射设计,性能接近原生 net/http,适合高并发场景。轻量级:仅提供路由、中间件、请求响应处理等基础功能,依赖少。易用性:API 设计简洁直观&#…...

ffmpeg视频转码相关
ffmpeg视频转码相关 简介参数 实战举栗子获取视频时长视频转码mp4文件转为hls m3u8 ts等文件图片转视频抽取视频第一帧获取基本信息 转码日志输出详解转码耗时测试 简介 FFmpeg 是领先的多媒体框架,能够解码、编码、 转码、复用、解复用、流、过滤和播放 几乎所有人…...

手搓多模态-06 数据预处理
前情回顾 我们目前实现了视觉模型的编码器部分,然而,我们所做的是把一张图片编码嵌入成了许多个上下文相关的嵌入向量,然而我们期望的是一张图片用一个向量来表示,从而与文字的向量做点积形成相似度(参考手搓多模态-01…...
HCIP【路由过滤技术(详解)】
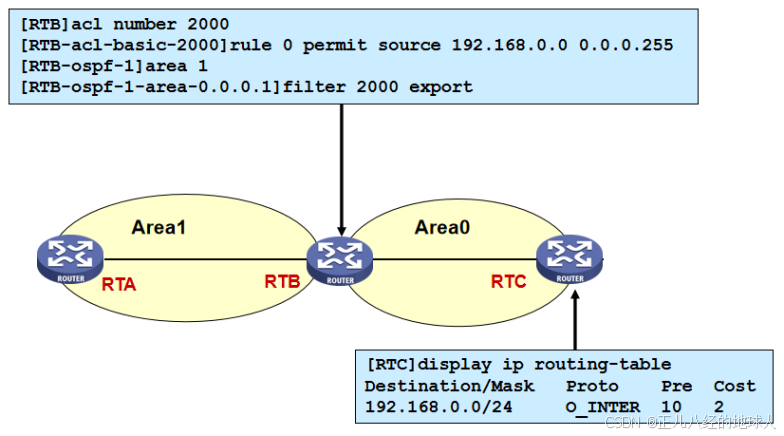
目录 1 简介 2 路由过滤方法 3 路由过滤工具 3.1 静默接口 3.2 ACL 3.3 地址前缀列表 3.4 filter-policy 3.4.1 filter-policy过滤接收路由(以RIP为例) 3.4.2 filter-policy过滤接收路由(以OSPF为例) 1 简介 路由过滤技术…...
)
【Kafka基础】topics命令行操作大全:高级命令解析(2)
1 强制删除主题 /export/home/kafka_zk/kafka_2.13-2.7.1/bin/kafka-topics.sh --delete \--zookeeper 192.168.10.33:2181 \--topic mytopic \--if-exists 参数说明: --zookeeper:直接连接Zookeeper删除(旧版本方式)--if-exists&…...

【AI插件开发】Notepad++ AI插件开发实践(代码篇):从Dock窗口集成到功能菜单实现
一、引言 上篇文章已经在Notepad的插件开发中集成了选中即问AI的功能,这一篇文章将在此基础上进一步集成,支持AI对话窗口以及常见的代码功能菜单: 显示AI的Dock窗口,可以用自然语言向 AI 提问或要求执行任务选中代码后使用&…...