【Netty4核心原理④】【简单实现 Tomcat 和 RPC框架功能】
文章目录
- 一、前言
- 二、 基于 Netty 实现 Tomcat
- 1. 基于传统 IO 重构 Tomcat
- 1.1 创建 MyRequest 和 MyReponse 对象
- 1.2 构建一个基础的 Servlet
- 1.3 创建用户业务代码
- 1.4 完成web.properties 配置
- 1.5 创建 Tomcat 启动类
- 2. 基于 Netty 重构 Tomcat
- 2.1 创建 NettyRequest和 NettyResponse 对象
- 2.2 构建一个基础的 Servlet
- 2.3 创建业务底代码
- 2.4 完成web.properties 配置
- 2.5 创建业务逻辑处理类
- 2.6 创建 Tomcat 启动类
- 三、基于 Netty 重构 RPC 框架
- 1. API 模块
- 1.1 定义 RPC API 接口
- 1.2 自定义传输协议
- 2. Provider 模块
- 2.1 实现 HelloService
- 2.2 自定义 Netty 消息处理器
- 2.3 服务端启动
- 3. Consumer 模块
- 3.1 自定义 Netty 消息处理器
- 3.2 实现消费者端的代理调用
- 3.3 消费者调用
- 四、参考内容
一、前言
本系列内容为阅读《Netty4 核心原理》一书内容总结,内容存在个人删改,仅做个人笔记使用。
本篇涉及内容 :第四章 基于 Netty 手写 Tomcat、第五章 基于 Netty 重构 RPC 框架
本系列内容基于 Netty 4.1.73.Final 版本,如下:
<dependency><groupId>io.netty</groupId><artifactId>netty-all</artifactId><version>4.1.73.Final</version></dependency>
系列文章目录:
TODO
二、 基于 Netty 实现 Tomcat
Netty 作为底层通信框架,也可以用于实现 Web 容器。
Tomcat 时基于 J2EE规范的 Web 容器,主要入口是 web.xml 文件。web.xml 文件中主要配置 Servlet、Filter、Listener 等,而 Servlet、Filter、Listener 在 J2EE 中只是抽象的实现,具体业务逻辑由开发者实现。
下面用传统 IO 和 Netty 的方式分别简单实现 Tomcat 的功能
至此为止准备工作就已经就绪,下面我们按照传统 IO 和 Netty 的方式分别实现 Tomcat 的功能。
1. 基于传统 IO 重构 Tomcat
1.1 创建 MyRequest 和 MyReponse 对象
@Slf4j
@Getter
public class MyRequest {private String uri;private String method;public MyRequest(InputStream inputStream) throws IOException {BufferedReader bufferedReader =new BufferedReader(new InputStreamReader(inputStream, StandardCharsets.UTF_8));String line = bufferedReader.readLine();if (StringUtils.isNotBlank(line)) {String[] split = line.split("\\s");this.method = split[0];this.uri = split[1].split("\\?")[0];}}
}public class MyResponse {private OutputStream outputStream;public MyResponse(OutputStream outputStream) {this.outputStream = outputStream;}public void write(String content) throws IOException {//按照HTTP响应报文的格式写入String httpResponse = "HTTP/1.1 200 OK\n" +"Content-Type:text/html\n" +"\r\n" +content;outputStream.write(httpResponse.getBytes());}
}
1.2 构建一个基础的 Servlet
public abstract class MyServlet {public void service(MyRequest request, MyResponse response) throws Exception {if(request.getMethod().equals("GET")){doGet(request, response);}else if(request.getMethod().equals("POST")){doPost(request, response);}}public abstract void doGet(MyRequest request, MyResponse response) throws Exception;public abstract void doPost(MyRequest request, MyResponse response) throws Exception;
}
1.3 创建用户业务代码
public class FirstServlet extends MyServlet {@Overridepublic void doGet(MyRequest request, MyResponse response) throws Exception {this.doPost(request, response);}@Overridepublic void doPost(MyRequest request, MyResponse response) throws Exception {response.write("FirstServlet");}
}public class SecondServlet extends MyServlet {@Overridepublic void doGet(MyRequest request, MyResponse response) throws Exception {this.doPost(request, response);}@Overridepublic void doPost(MyRequest request, MyResponse response) throws Exception {response.write("SecondServlet");}
}
1.4 完成web.properties 配置
这里为了简化操作,使用 web.properties 来替代 web.xml 文件,如下:
servlet.one.url=/firstServlet.do
servlet.one.className=com.kingfish.netty.unit4.tomcat.FirstServletservlet.two.url=/secondServlet.do
servlet.two.className=com.kingfish.netty.unit4.tomcat.SecondServlet
1.5 创建 Tomcat 启动类
@Slf4j
public class MyTomcat {private int port = 8080;private ServerSocket server;private Map<String, MyServlet> servletMap = Maps.newHashMap();private Properties webxml = new Properties();@SneakyThrowsprivate void init() {String webInf = Objects.requireNonNull(this.getClass().getResource("/")).getPath();webxml.load(this.getClass().getResourceAsStream("/web.properties"));for (Object k : webxml.keySet()) {final String key = k.toString();if (key.endsWith(".url")) {String serverName = key.replaceAll("\\.url", "");String url = webxml.getProperty(key);String className = webxml.getProperty(serverName + ".className");MyServlet servlet = (MyServlet) Class.forName(className).newInstance();servletMap.put(url, servlet);}}}@SneakyThrowspublic void start() {// 1. 初始化。加载配置,初始化 servletMapinit();// 初始化服务server = new ServerSocket(port);System.out.println("服务启动成功, 端口 : " + port);// 等待客户端连接while (!Thread.interrupted()) {// TODO : 实际要改为多线程process(server.accept());}}/*** 请求处理** @param client* @throws Exception*/private void process(Socket client) throws Exception {try (InputStream inputStream = client.getInputStream();OutputStream outputStream = client.getOutputStream();) {MyRequest request = new MyRequest(inputStream);MyResponse response = new MyResponse(outputStream);String uri = request.getUri();if (servletMap.containsKey(uri)) {servletMap.get(uri).service(request, response);} else {response.write("404 - Not Found");}outputStream.flush();} catch (Exception e) {log.error("[请求异常]", e);} finally {client.close();}}public static void main(String[] args) {new MyTomcat().start();}
}
通过请求 http://localhost:8080/firstServlet.do 和 http://localhost:8080/sencondServlet.do 可以得到相应结果。如下:
2. 基于 Netty 重构 Tomcat
2.1 创建 NettyRequest和 NettyResponse 对象
public class NettyRequest {private ChannelHandlerContext ctx;private HttpRequest request;public NettyRequest(ChannelHandlerContext ctx, HttpRequest request) {this.ctx = ctx;this.request = request;}public String getUri() {return request.uri();}public String getMethod() {return request.method().name();}public Map<String, List<String>> getParameters() {QueryStringDecoder decoder = new QueryStringDecoder(getUri());return decoder.parameters();}public String getParameter(String name) {final List<String> params = getParameters().get(name);return params == null ? null : params.get(0);}
}public class NettyResponse {private ChannelHandlerContext ctx;private HttpRequest request;public NettyResponse(ChannelHandlerContext ctx, HttpRequest request) {this.ctx = ctx;this.request = request;}public void write(String out) {try {if (out == null || out.length() == 0){return;}// 设置 HTTP 以及请求头信息DefaultFullHttpResponse response = new DefaultFullHttpResponse(// 设置版本为 HTTP 1.1HttpVersion.HTTP_1_1,// 设置响应状态码 200HttpResponseStatus.OK,// 设置输出内容编码格式 UTF-8Unpooled.wrappedBuffer(out.getBytes(StandardCharsets.UTF_8)));response.headers().set("Content-Type", "text/html;");ctx.write(response);} finally {ctx.flush();ctx.close();}}
}
2.2 构建一个基础的 Servlet
public abstract class NettyServlet {public void service(NettyRequest request, NettyResponse response) throws Exception {if(request.getMethod().equals("GET")){doGet(request, response);}else if(request.getMethod().equals("POST")){doPost(request, response);}}public abstract void doGet(NettyRequest request, NettyResponse response) throws Exception;public abstract void doPost(NettyRequest request, NettyResponse response) throws Exception;}
2.3 创建业务底代码
public class FirstServlet extends NettyServlet {@Overridepublic void doGet(NettyRequest request, NettyResponse response) throws Exception {doPost(request, response);}@Overridepublic void doPost(NettyRequest request, NettyResponse response) throws Exception {response.write("FirstServlet");}
}
2.4 完成web.properties 配置
这里为了简化操作,使用 web.properties 来替代 web.xml 文件,如下:
servlet.one.url=/firstServlet.do
servlet.one.className=com.kingfish.netty.unit4.netty.FirstServlet
2.5 创建业务逻辑处理类
public class TomcatHandler extends ChannelInboundHandlerAdapter {private Map<String, NettyServlet> servletMap;public TomcatHandler(Map<String, NettyServlet> servletMap) {this.servletMap = servletMap;}@Overridepublic void channelRead(ChannelHandlerContext ctx, Object msg) throws Exception {if (msg instanceof HttpRequest) {HttpRequest httpRequest = (HttpRequest) msg;NettyRequest request = new NettyRequest(ctx, httpRequest);NettyResponse response = new NettyResponse(ctx, httpRequest);String uri = request.getUri();if (servletMap.containsKey(uri)) {servletMap.get(uri).service(request, response);} else {response.write("404 - Not Found");}}}@Overridepublic void exceptionCaught(ChannelHandlerContext ctx, Throwable cause) throws Exception {cause.printStackTrace();ctx.close();}
}
2.6 创建 Tomcat 启动类
@Slf4j
public class NettyTomcat {private int port = 8080;private Map<String, NettyServlet> servletMap = Maps.newHashMap();private Properties webxml = new Properties();@SneakyThrowsprivate void init() {webxml.load(this.getClass().getResourceAsStream("/web.properties"));for (Object k : webxml.keySet()) {final String key = k.toString();if (key.endsWith(".url")) {String serverName = key.replaceAll("\\.url", "");String url = webxml.getProperty(key);String className = webxml.getProperty(serverName + ".className");NettyServlet servlet = (NettyServlet) Class.forName(className).newInstance();servletMap.put(url, servlet);}}}@SneakyThrowspublic void start() {// 1. 初始化。加载配置,初始化 servletMapinit();// 2. 创建 boss 和 worker 线程NioEventLoopGroup bossGroup = new NioEventLoopGroup();NioEventLoopGroup workerGroup = new NioEventLoopGroup();try {ServerBootstrap bootstrap = new ServerBootstrap();bootstrap.group(bossGroup, workerGroup)// 主线程处理类.channel(NioServerSocketChannel.class)// 子线程处理类.childHandler(new ChannelInitializer<SocketChannel>() {// 客户端初始化@Overrideprotected void initChannel(SocketChannel client) throws Exception {// Netty 对 Http 的封装,对顺序有要求// HttpResponseEncoder 解码器client.pipeline().addLast(new HttpResponseEncoder());// HttpRequestDecoder 编码器client.pipeline().addLast(new HttpRequestDecoder());// 业务逻辑处理client.pipeline().addLast(new TomcatHandler(servletMap));}})// 针对主线程配置 : 分配线程数量最大 128.option(ChannelOption.SO_BACKLOG, 128)// 针对子线程配置 保持长连接.childOption(ChannelOption.SO_KEEPALIVE, true);// 启动服务ChannelFuture channelFuture = bootstrap.bind(port).sync();System.out.println("服务启动成功, 端口 : " + port);// 阻塞主线程,防止直接执行 finally 中语句导致服务关闭,当有关闭事件到来时才会放行channelFuture.channel().closeFuture().sync();} finally {// 关闭线程池bossGroup.shutdownGracefully();workerGroup.shutdownGracefully();}}public static void main(String[] args) {new NettyTomcat().start();}
通过请求 http://localhost:8080/firstServlet.do 可以得到相应结果。如下:
三、基于 Netty 重构 RPC 框架
Netty 基本上是作为架构的底层存在,主要是完成高性能的网络通信。下面通过 Netty 简单实现 RPC框架的通信功能,整个项目结构如下图:
1. API 模块
1.1 定义 RPC API 接口
public interface HelloService {String sayHello(String name);
}
1.2 自定义传输协议
@Data
public class InvokerProtocol implements Serializable {/*** 类名*/private String className;/*** 方法名*/private String methodName;/*** 参数列表*/private Class<?>[] params;/*** 参数列表*/private Object[] values;
}
2. Provider 模块
2.1 实现 HelloService
public class HelloServiceImpl implements HelloService {@Overridepublic String sayHello(String name) {return name + ", Hello!";}
}
2.2 自定义 Netty 消息处理器
public class RegistryHandler extends ChannelInboundHandlerAdapter {private static Map<String, Object> registerMap = Maps.newConcurrentMap();private List<String> classNames = Lists.newArrayList();public RegistryHandler() {// 扫描指定目录下的提供者实例scannerClass("provider.provider");// 将提供者注册doRegister();}@Overridepublic void channelRead(ChannelHandlerContext ctx, Object msg) throws Exception {InvokerProtocol invokerProtocol = (InvokerProtocol) msg;Object result = new Object();// 通过协议参数获取到具体提提供者,并通过反射调用if (registerMap.containsKey(invokerProtocol.getClassName())) {Object clazz = registerMap.get(invokerProtocol.getClassName());Method method = clazz.getClass().getMethod(invokerProtocol.getMethodName(), invokerProtocol.getParams());result = method.invoke(clazz, invokerProtocol.getValues());}ctx.write(result);ctx.flush();ctx.close();}@Overridepublic void exceptionCaught(ChannelHandlerContext ctx, Throwable cause) throws Exception {cause.printStackTrace();ctx.close();}/*** 递归扫描** @param packageName*/private void scannerClass(String packageName) {URL url = this.getClass().getClassLoader().getResource(packageName.replaceAll("\\.", "/"));List<File> files = FileUtil.loopFiles(url.getFile(), pathname -> pathname.getName().endsWith(".class"));for (File file : files) {classNames.add(packageName + "." + file.getName().replace(".class", ""));}}@SneakyThrowsprivate void doRegister() {for (String className : classNames) {Class<?> clazz = Class.forName(className);Class<?> i = clazz.getInterfaces()[0];registerMap.put(i.getName(), clazz.getDeclaredConstructor().newInstance());}}
}
2.3 服务端启动
public class RpcRegister {private int port = 8090;@SneakyThrowspublic void start() {// 2. 创建 boss 和 worker 线程NioEventLoopGroup bossGroup = new NioEventLoopGroup();NioEventLoopGroup workerGroup = new NioEventLoopGroup();try {ServerBootstrap bootstrap = new ServerBootstrap();bootstrap.group(bossGroup, workerGroup)// 主线程处理类.channel(NioServerSocketChannel.class)// 子线程处理类.childHandler(new ChannelInitializer<SocketChannel>() {// 客户端初始化@Overrideprotected void initChannel(SocketChannel client) throws Exception {// 自定义协议解码器// LengthFieldBasedFrameDecoder 五个入参分别如下:// maxFrameLength : 框架的最大长度。如果帧长度大于此值,将抛出 TooLongFrameException// lengthFieldOffset : 长度属性的偏移量。即对应的长度属性在整个消息数据中的位置// lengthFieldLength : 长度属性的长度。如果长度属性是 int,那么这个值就是 4 (long 类型就是 8)// lengthAdjustment : 要添加到长度属性值的补偿值// initialBytesToStrip : 从解码帧中取出的第一个字节数。client.pipeline().addLast(new LengthFieldBasedFrameDecoder(Integer.MAX_VALUE, 0, 4, 0, 4));// 自定义协议编码器client.pipeline().addLast(new LengthFieldPrepender(4));// 对象参数类型编码器client.pipeline().addLast("encoder", new ObjectEncoder());// 对象参数类型解码器client.pipeline().addLast("decoder", new ObjectDecoder(Integer.MAX_VALUE, ClassResolvers.cacheDisabled(null)));client.pipeline().addLast(new RegistryHandler());}})// 针对主线程配置 : 分配线程数量最大 128.option(ChannelOption.SO_BACKLOG, 128)// 针对子线程配置 保持长连接.childOption(ChannelOption.SO_KEEPALIVE, true);// 启动服务ChannelFuture channelFuture = bootstrap.bind(port).sync();System.out.println("服务启动成功, 端口 : " + port);// 阻塞主线程,防止直接执行 finally 中语句导致服务关闭,当有关闭事件到来时才会放行channelFuture.channel().closeFuture().sync();} finally {// 关闭线程池bossGroup.shutdownGracefully();workerGroup.shutdownGracefully();}}public static void main(String[] args) {new RpcRegister().start();}
}
3. Consumer 模块
3.1 自定义 Netty 消息处理器
public class RpcProxyHandler extends ChannelInboundHandlerAdapter {@Getterprivate Object response;@Overridepublic void channelRead(ChannelHandlerContext ctx, Object msg) throws Exception {response = msg;}@Overridepublic void exceptionCaught(ChannelHandlerContext ctx, Throwable cause) throws Exception {cause.printStackTrace();}
}
3.2 实现消费者端的代理调用
public class RpcProxy {/*** 创建代理对象** @param clazz* @param <T>* @return*/public static <T> T create(Class<?> clazz) {Class<?>[] interfaces = clazz.isInterface() ? new Class<?>[]{clazz} : clazz.getInterfaces();return (T) Proxy.newProxyInstance(clazz.getClassLoader(), interfaces, new MethodProxy(clazz));}/*** 方法代理*/public static class MethodProxy implements InvocationHandler {private Class<?> clazz;public MethodProxy(Class<?> clazz) {this.clazz = clazz;}@Overridepublic Object invoke(Object proxy, Method method, Object[] args) throws Throwable {// 传进来的一个已实现的具体类,本次实现暂不处理该逻辑if (Object.class.equals(method.getDeclaringClass())) {return method.invoke(this, args);} else {// 如果传进来的是一个接口,则说明要进行 RPC 调用return rpcInvoke(proxy, method, args);}}/*** rpc 调用** @param proxy* @param method* @param args* @return* @throws InterruptedException*/private Object rpcInvoke(Object proxy, Method method, Object[] args) throws InterruptedException {NioEventLoopGroup group = new NioEventLoopGroup();RpcProxyHandler rpcProxyHandler = new RpcProxyHandler();try {// 传输协议封装InvokerProtocol invokerProtocol = new InvokerProtocol();invokerProtocol.setClassName(this.clazz.getName());invokerProtocol.setMethodName(method.getName());invokerProtocol.setValues(args);invokerProtocol.setParams(method.getParameterTypes());// 通过 netty 连接 服务提供者Bootstrap bootstrap = new Bootstrap();bootstrap.group(group).channel(NioSocketChannel.class).option(ChannelOption.TCP_NODELAY, true).handler(new ChannelInitializer<>() {@Overrideprotected void initChannel(Channel channel) throws Exception {// 自定义协议解码器// LengthFieldBasedFrameDecoder 五个入参分别如下:// maxFrameLength : 框架的最大长度。如果帧长度大于此值,将抛出 TooLongFrameException// lengthFieldOffset : 长度属性的偏移量。即对应的长度属性在整个消息数据中的位置// lengthFieldLength : 长度属性的长度。如果长度属性是 int,那么这个值就是 4 (long 类型就是 8)// lengthAdjustment : 要添加到长度属性值的补偿值// initialBytesToStrip : 从解码帧中取出的第一个字节数。channel.pipeline().addLast("frameDecoder", new LengthFieldBasedFrameDecoder(Integer.MAX_VALUE, 0, 4, 0, 4));// 自定义协议编码器channel.pipeline().addLast("frameEncoder", new LengthFieldPrepender(4));// 对象参数类型编码器channel.pipeline().addLast("encoder", new ObjectEncoder());// 对象参数类型解码器channel.pipeline().addLast("decoder", new ObjectDecoder(Integer.MAX_VALUE, ClassResolvers.cacheDisabled(null)));// 业务处理器channel.pipeline().addLast("handler", rpcProxyHandler);}});// 连接提供者服务并发送消息ChannelFuture future = bootstrap.connect(new InetSocketAddress("127.0.0.1", 8090)).sync();future.channel().writeAndFlush(invokerProtocol);// 阻塞主线程,防止直接执行 finally 中语句导致服务关闭,当有关闭事件到来时才会放行future.channel().closeFuture().sync();} finally {group.shutdownGracefully();}return rpcProxyHandler.getResponse();}}
}
3.3 消费者调用
public class RpcMain {public static void main(String[] args) {HelloService helloService = RpcProxy.create(HelloService.class);String hello = helloService.sayHello("张三");// 输出 hello = 张三, Hello!System.out.println("hello = " + hello);}
}
四、参考内容
- https://www.cnblogs.com/kendoziyu/articles/why-selector-always-invoke-new-event.html
- https://blog.csdn.net/wyaoyao93/article/details/114938670
- https://blog.csdn.net/woaiwojialanxi/article/details/123602000
相关文章:
【Netty4核心原理④】【简单实现 Tomcat 和 RPC框架功能】
文章目录 一、前言二、 基于 Netty 实现 Tomcat1. 基于传统 IO 重构 Tomcat1.1 创建 MyRequest 和 MyReponse 对象1.2 构建一个基础的 Servlet1.3 创建用户业务代码1.4 完成web.properties 配置1.5 创建 Tomcat 启动类 2. 基于 Netty 重构 Tomcat2.1 创建 NettyRequest和 Netty…...

C#语言的饼图
C#语言中的饼图:数据可视化的艺术 在现代软件开发中,数据可视化是一个不可或缺的重要环节。随着数据量的不断增加,仅仅依靠文本和表格来展示数据已显得不够直观。本文将以C#语言为基础,探讨如何使用C#绘制饼图,并进一…...
【AI学习】初步了解TRL
TRL(Transformer Reinforcement Learning) 是由 Hugging Face 开发的一套基于强化学习(Reinforcement Learning, RL)的训练工具,专门用于优化和微调大规模语言模型(如 GPT、LLaMA 等)。它结合了…...

打破界限:Android XML与Jetpack Compose深度互操作指南
在现有XML布局项目中逐步引入Jetpack Compose是现代Android开发的常见需求。本指南将全面介绍混合使用的最佳实践、技术细节和完整解决方案。 一、基础配置 1.1 Gradle配置 android {buildFeatures {compose true}composeOptions {kotlinCompilerExtensionVersion "1.5.3…...

ADASH VA5 Pro中的route功能
这段内容详细介绍了 ADASH VA5 Pro 设备中“Route(路线)”模块的功能、操作流程以及相关特性。以下是对这段内容的总结和分析: Route 模块的主要功能 路线测量:Route 模块用于执行路线测量任务。它允许用户创建和管理一系列测量…...
阿里云oss视频苹果端无法播放问题记录
记录一下苹果端视频不可以播放的原因. 看了一下其他视频可以正常播放,但是今天客户发来的视频无法正常播放.咨询过阿里云售后给出的原因是编码格式过高. 需要调整编码格式为:baseline, 下面记录如何使用ffmpeg修改视频的编码格式. 下载文件(可从官方下载) 配置环境变量(系统变…...

网络安全的现状与防护措施
随着数字化和信息化的迅猛发展,互联网已成为人们日常生活、工作和学习不可或缺的一部分。然而,随着网络技术的普及,网络安全问题也日益突出。近年来,数据泄露、恶意软件、网络攻击等事件层出不穷,给企业和个人带来了巨…...

Ubuntu离线安装mysql
在 Ubuntu 24.04 上离线安装 MySQL 的步骤如下(支持 MySQL 8.0 或 8.4): 一.安装方法 此次安装是按照方法一安装,其它方法供参考: 安装成功截图: 安全配置截图: sudo mysql_secure_installation 登录测试: 方法一:使用 apt-rdepends 下载依赖包(推荐) 1. 在联网…...

移动通信网络中漫游机制深度解析:归属网络与拜访网络的协同逻辑
文章目录 一、漫游基础概念与网络架构1.1 漫游的核心定义1.2 关键网络实体角色 二、漫入漫出详细流程解析2.1 漫出(Outbound Roaming)场景2.2 漫入(Inbound Roaming)场景 三、归属网络与拜访网络的信任演进3.1 各代网络的信任模型…...
IntelliJ IDEA下开发FPGA——FPGA开发体验提升__上
前言 由于Quartus写代码比较费劲,虽然新版已经有了代码补全,但体验上还有所欠缺。于是使用VS Code开发,效果如下所示,代码样式和基本的代码补全已经可以满足开发,其余工作则交由Quartus完成 但VS Code的自带的git功能&…...
-张量形状操作)
PyTorch使用(6)-张量形状操作
文章目录 1. reshape函数1.1. 功能与用法1.2. 特点 2. transpose和permute函数2.1. transpose2.2. permute2.3. 区别 3. view和contiguous函数3.1. view3.2. contiguous3.3. 特点 4. squeeze和unsqueeze函数4.1. squeeze4.2. unsqueeze 5. 应用场景6. 形状操作综合比较7. 最佳实…...

SpringBoot底层-数据源自动配置类
SpringBoot默认使用Hikari连接池,当我们想要切换成Druid连接池,底层原理是怎样呢 SpringBoot默认连接池——Hikari 在spring-boot-autoconfiguration包内有一个DataSourceConfiguraion配置类 abstract class DataSourceConfiguration {Configuration(p…...

数字内容个性化推荐引擎构建
实时数据驱动推荐优化 现代数字内容体验的核心竞争力在于系统对用户需求的即时捕捉与响应。通过实时数据流处理技术,推荐引擎能够同步采集用户点击、停留时长、交互轨迹等多维度行为数据,并借助分布式计算框架在毫秒级完成特征提取与模式识别。例如&…...
【工具】Redis管理工具推荐
【运维】Redis管理工具推荐 Another Redis Desktop Manager 🚀🚀🚀 更快、更好、更稳定的Redis桌面(GUI)管理客户端,兼容Windows、Mac、Linux,性能出众,轻松加载海量键值 AnotherRedisDesktopManager 发行版…...

【高校主办】2025年第四届信息与通信工程国际会议(JCICE 2025)
重要信息 会议网址:www.jcice.org 会议时间:2025年7月25-27日 召开地点:哈尔滨 截稿时间:2025年6月15日 录用通知:投稿后2周内 收录检索:EI,Scopus 会议简介 JCICE 2022、JCICE 2023、JCICE 2…...
【区块链安全 | 第三十一篇】合约(五)
文章目录 合约库库中的函数签名和选择器库的调用保护合约 库 库与合约类似,但它们的目的是仅在特定地址上部署一次,并通过 EVM 的 DELEGATECALL(在 Homestead 之前是 CALLCODE)功能重复使用其代码。这意味着如果调用库函数,它们的代码将在调用合约的上下文中执行,即 th…...

系统与网络安全------Windows系统安全(8)
资料整理于网络资料、书本资料、AI,仅供个人学习参考。 DNS DNS概述 为什么需要DNS系统 www.baidu.com与119.75.217.56,哪个更好记? 互联网中的114查号台/导航员 DNS(Domian Name System,域名系统)的功…...

代理模式的优缺点是什么?
什么是代理模式? 代理模式(Proxy Pattern)是一种结构型设计模式,它通过创建代理对象来控制对原始对象的访问。 这种模式在前端开发中广泛应用,特别是在需要控制对象访问、添加额外逻辑或优化性能的场景中。 核心…...
实现NL2SQL的智能检索(无需训练))
基于LangChain和通义(Tongyi)实现NL2SQL的智能检索(无需训练)
在数据驱动的时代,如何高效地从数据库中获取信息成为了一个重要的挑战。自然语言到SQL(NL2SQL)技术提供了一种便捷的解决方案,使用户能够用自然语言查询数据库,而无需深入了解SQL语法。本文将探讨如何利用LangChain和通义(Tongyi)实现NL2SQL的智能检索,具体步骤如下: …...
的完整代码及注释)
Spring Boot 集成 Redis 对哈希数据的详细操作示例,涵盖不同结构类型(基础类型、对象、嵌套结构)的完整代码及注释
以下是 Spring Boot 集成 Redis 对哈希数据的详细操作示例,涵盖不同结构类型(基础类型、对象、嵌套结构)的完整代码及注释: 1. 集成步骤 1.1 添加依赖 在 pom.xml 中添加以下依赖: <dependency><groupId&g…...
ROS云课三分钟-差动移动机器人巡逻报告如何撰写-中等报告
评语: 成绩中等(70/100),具体如下: 1. 摘要部分 问题描述: 内容空洞:摘要过于简短,仅简要概述了研究内容和实现方法,未突出研究的创新点或重要性。缺乏细节࿱…...
Java8+Spring Boot + Vue + Langchain4j 实现阿里云百炼平台 AI 流式对话对接
1. 引言 在本文中,我们将介绍如何使用 Spring Boot、Vue.js 和 Langchain4j,实现与 阿里云百炼平台 的 AI 流式对话对接。通过结合这些技术,我们将创建一个能够实时互动的 AI 聊天应用。 这是一个基于 Spring Boot Vue.js Langchain4j 的智…...
:一种轻量化的动态稀疏门控网络)
可发1区的超级创新思路(python 实现):一种轻量化的动态稀疏门控网络
首先声明,该模型为原创!原创!原创!且该思路还未有成果发表,感兴趣的小伙伴可以借鉴! 一、应用领域 视频异常检测、生成视频检测。 二、模型解析 该模型由1.关键帧动态选择机制、2.关键帧动态选择机制以及3.关键帧动态选择机制三大核心组件构成,形成端到端的视频异常…...

【Kafka基础】单机安装与配置指南,从零搭建环境
学习Kafka,掌握Kafka的单机部署是理解其分布式特性的第一步。本文将手把手带你完成Kafka单机环境的安装、配置及基础验证,涵盖常见问题排查技巧。 1 环境准备 1.1 系统要求 操作系统:CentOS 7.9依赖组件:JDK 8(Kafka …...

Scala 转义字符
Scala 转义字符 引言 Scala作为一种多范式编程语言,拥有丰富的字符处理能力。在Scala编程中,转义字符的使用非常频繁,它们可以用来处理字符串中的特殊字符,使得字符串的表示更加直观和符合预期。本文将详细探讨Scala中的转义字符…...

TCP/IP五层协议
目录 1. 五层模型结构 2. 各层核心功能与协议 (1) 应用层(Application Layer) (2) 传输层(Transport Layer) (3) 网络层(Network Layer) (4) 数据链路层(Data Link Layer) (5…...
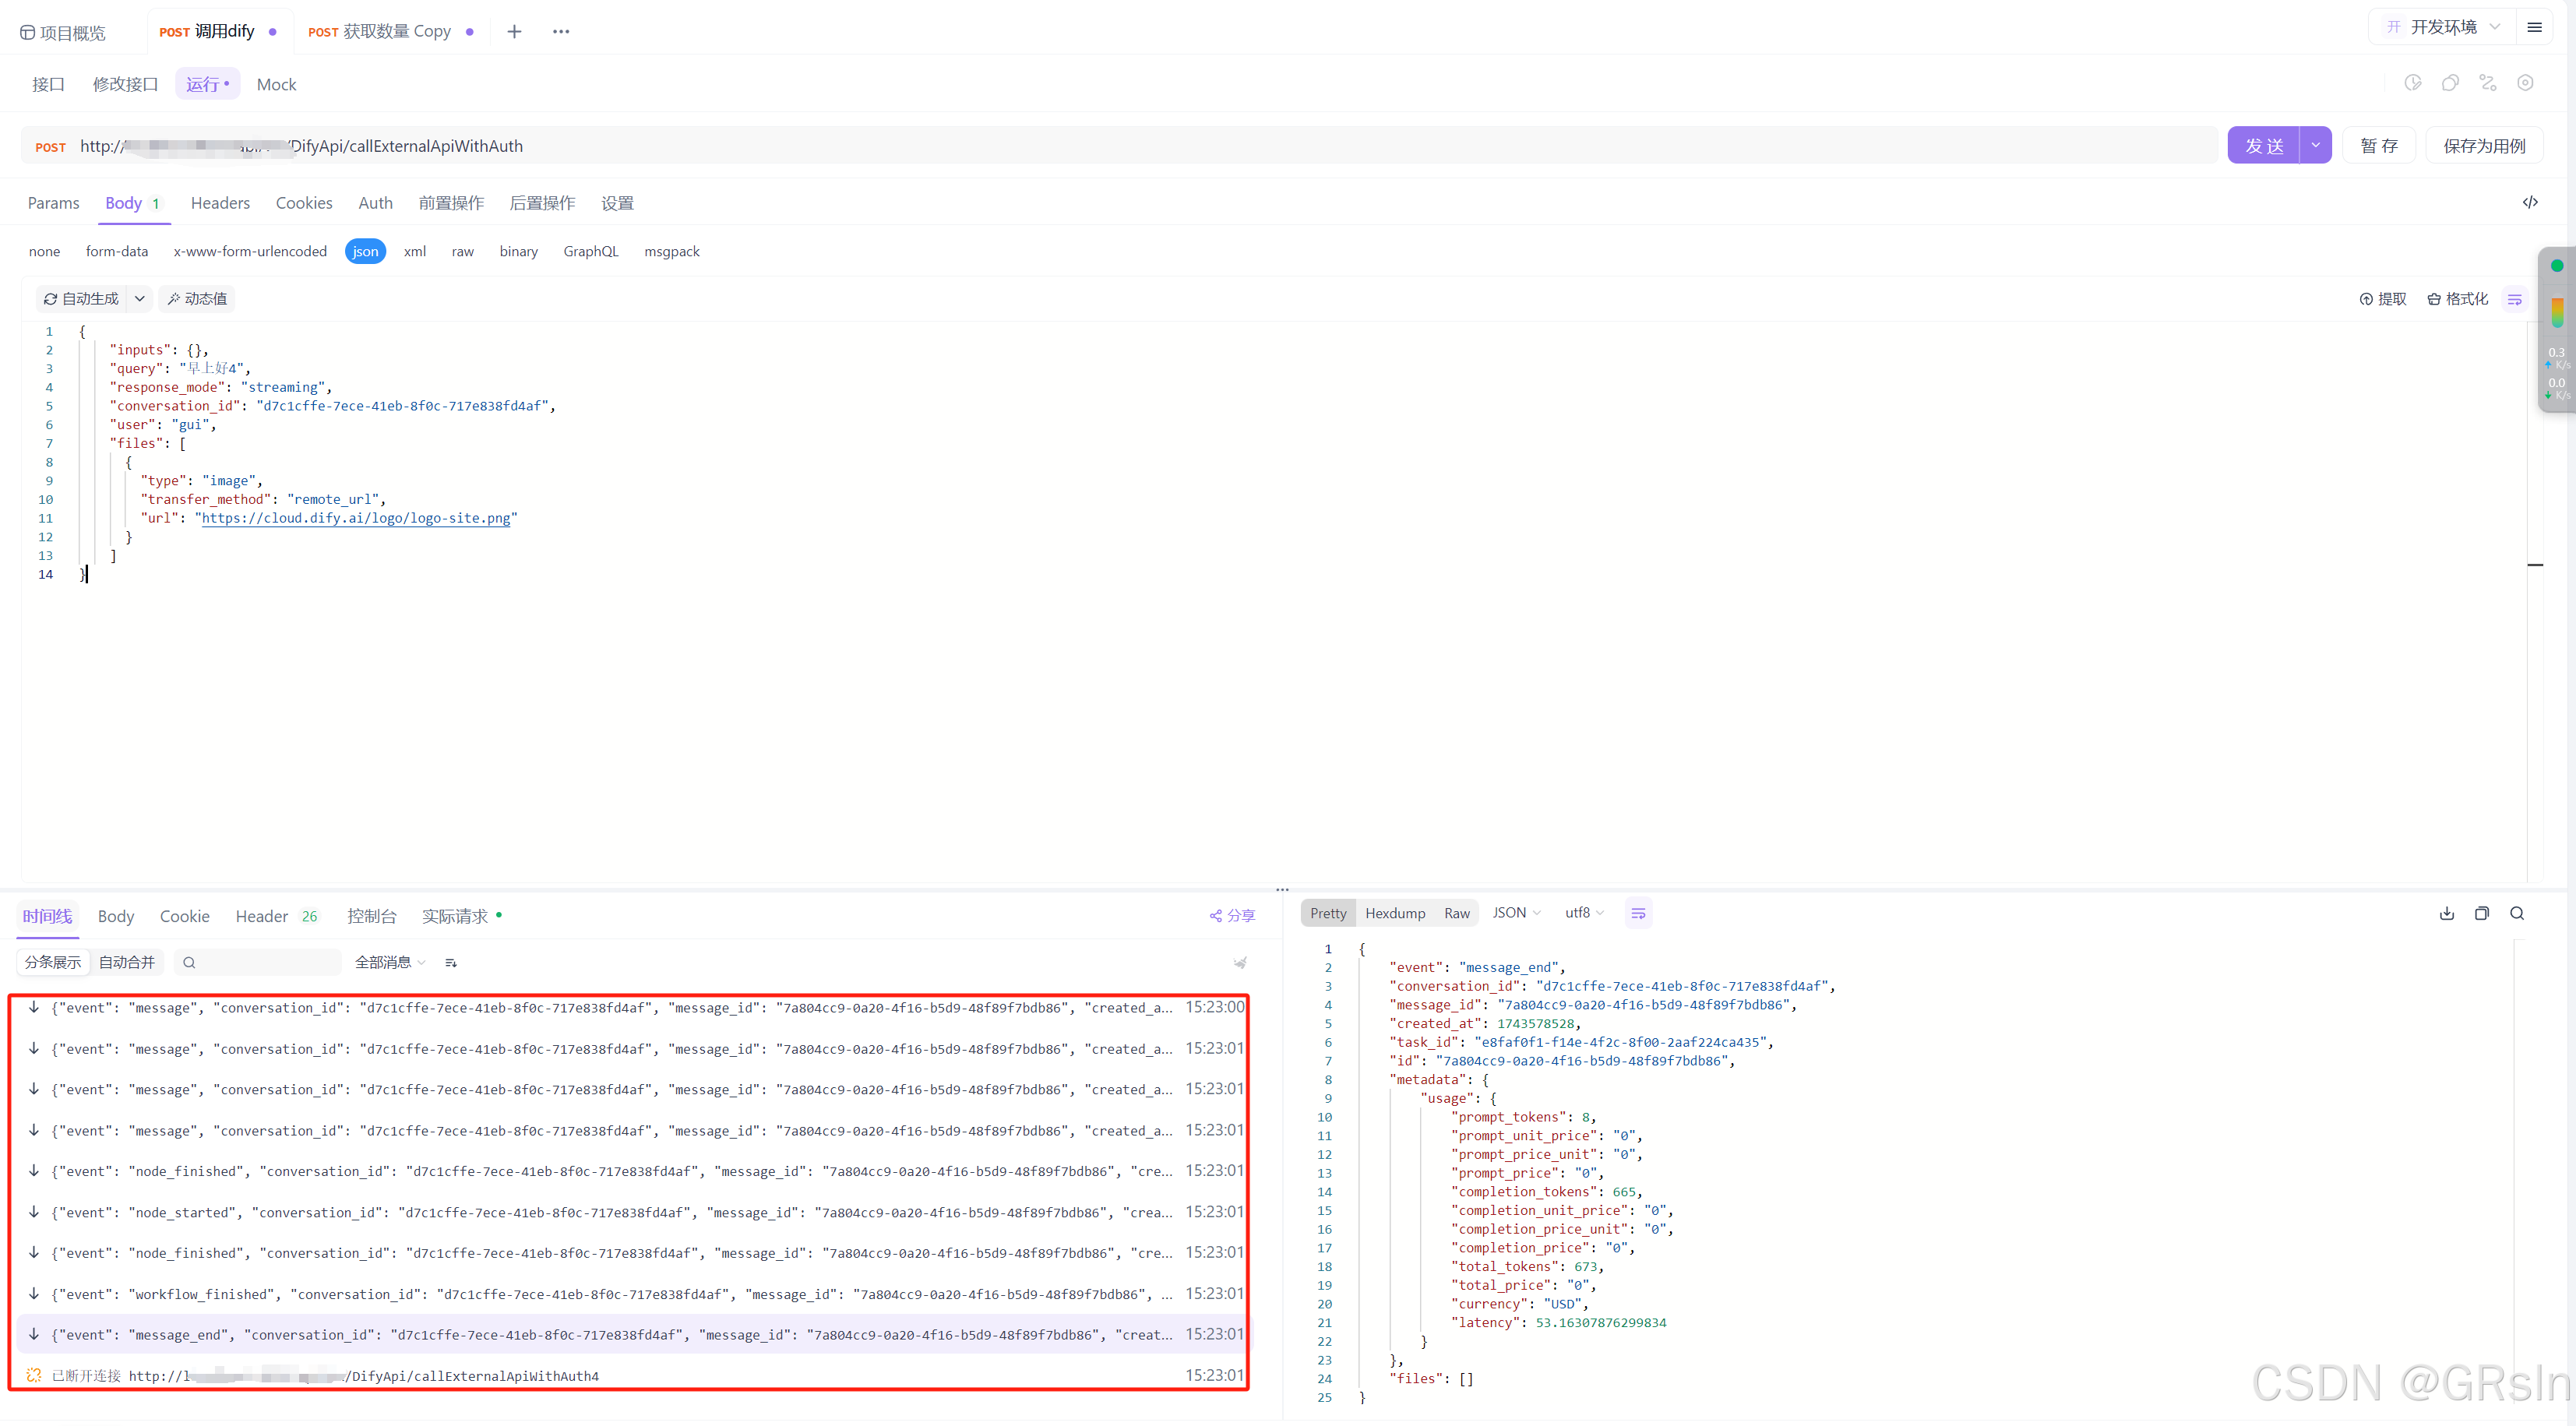
Dify接口api对接,流式接收流式返回(.net)
试了好多种方法除了Console.WriteLine()能打印出来,试了好些方法都不行,不是报错就是打印只有一行,要么就是接收完才返回...下面代码实现调用api接收流式数据,并进行流式返回给前端: using Furion.HttpRemote; using …...

微信小程序开发前端培训课程
大前端培训课程 1.HTML课程: 1.HTML标签基础 2.布局DIVspan 3.表单标签 4.多媒体标签 5.Table使用 2.CSS课程: 1.Box 盒子模型,列表布局(一行两列,一行多列) 2.单行文字,多行文字 3.文…...
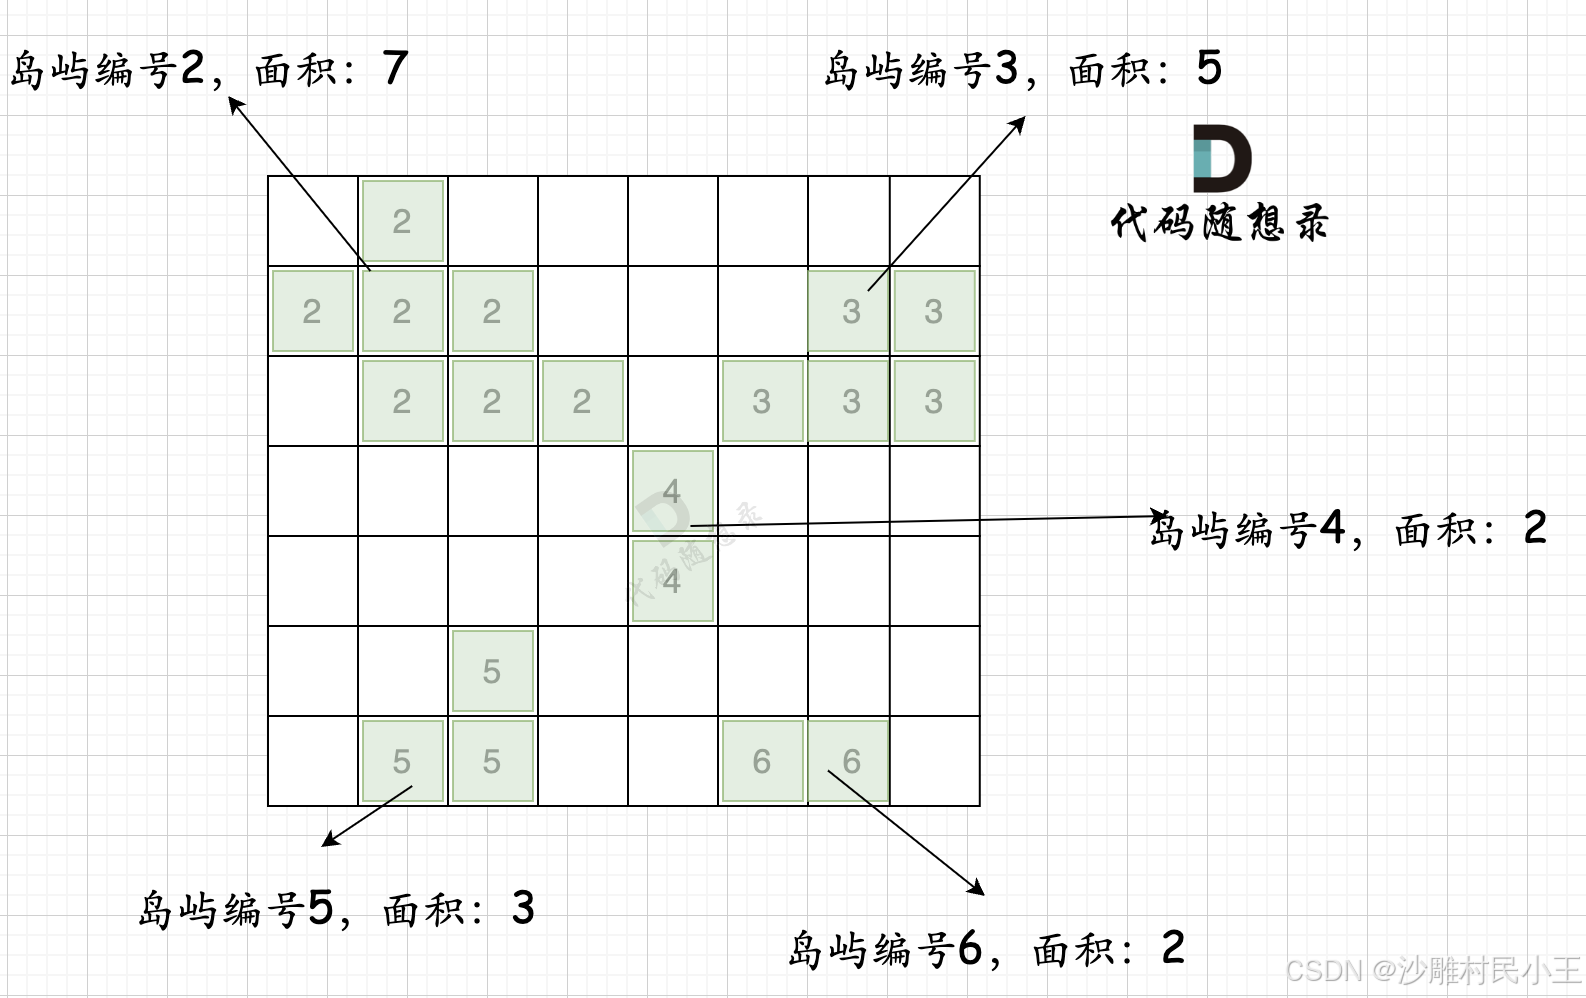
代码随想录算法训练营第五十二天|图论专题: 101. 孤岛的总面积、102. 沉没孤岛、103. 水流问题、104. 建造最大岛屿
101. 孤岛的总面积 本题要求找到不靠边的陆地面积,那么我们只要从周边找到陆地然后 通过 dfs或者bfs 将周边靠陆地且相邻的陆地都变成海洋,然后再去重新遍历地图 统计此时还剩下的陆地就可以了。 1、从左边和后边向中间遍历 2、从上边和下边向中间遍历…...
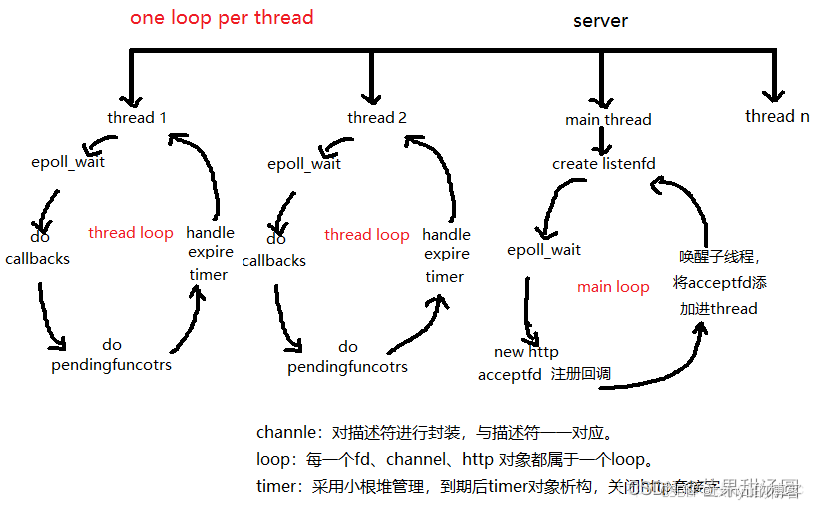
仿modou库one thread one loop式并发服务器
源码:田某super/moduo 目录 SERVER模块: Buffer模块: Socket模块: Channel模块: Connection模块: Acceptor模块: TimerQueue模块: Poller模块: EventLoop模块&a…...