【Abstract Thought】【Design Patterns】python实现所有个设计模式【下】
前言
彼岸花开一千年,花开花落不相见。 若问花开叶落故,彼岸缘起缘又灭——《我欲封天》
\;\\\;\\\;
目录
- 前言
- 简单的设计模式
- 复杂的设计模式
- 13责任链
- 14迭代器
- 15备忘录
- 16状态机
- 17模板方法
- 18访问者
- 19观察者
- 20命令Shell
- 21策略
- 22调解
- 23解释器
简单的设计模式
见上篇
\;\\\;\\\;
复杂的设计模式
13责任链
一个类跟着一个类,虽然用链表也能处理(甚至是没什么用的静态链表(数组)也行)。
但是责任链添加了处理者的类,这样实际的第三层类就不用处理set_next和handle了。
from __future__ import annotations
from abc import ABC, abstractmethod
from typing import Any, Optional#第一层处理者
class Handler(ABC):@abstractmethoddef set_next(self, handler: Handler) -> Handler:pass@abstractmethoddef handle(self, request) -> Optional[str]:pass#第2层处理者
class SomeHandler(Handler):_next_handler: Handler = Nonedef set_next(self, handler: Handler) -> Handler:self._next_handler = handlerreturn handler@abstractmethoddef handle(self, request: Any) -> str:if self._next_handler:return self._next_handler.handle(request)return None#第3层处理者
class MonkeyHandler(SomeHandler):def handle(self, request: Any) -> str:if request == "Banana":return f"Monkey: I'll eat the <{request}>"else:return super().handle(request)#第3层处理者
class SquirrelHandler(SomeHandler):def handle(self, request: Any) -> str:if request == "Nut":return f"Squirrel: I'll eat the <{request}>"else:return super().handle(request)#第3层处理者
class DogHandler(SomeHandler):def handle(self, request: Any) -> str:if request == "MeatBall":return f"Dog: I'll eat the <{request}>"else:return super().handle(request)#客户代码
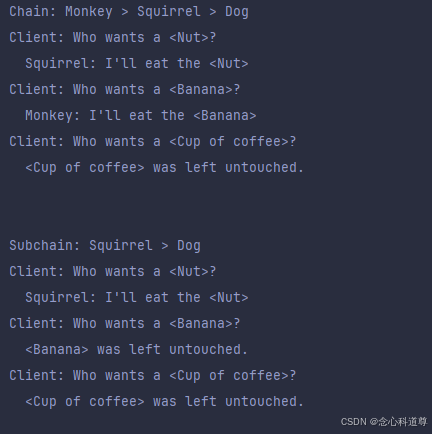
def client_code(handler: Handler) -> None:for food in ["Nut", "Banana", "Cup of coffee"]:print(f"Client: Who wants a <{food}>?")result = handler.handle(food)if result:print(f" {result}", end="\n")else:print(f" <{food}> was left untouched.", end="\n")def Main():monkey = MonkeyHandler()squirrel = SquirrelHandler()dog = DogHandler()monkey.set_next(squirrel).set_next(dog)print("Chain: Monkey > Squirrel > Dog")client_code(monkey)print("\n")print("Subchain: Squirrel > Dog")client_code(squirrel)if __name__ == "__main__":Main()
\;\\\;\\\;
14迭代器
python封装迭代器的固定写法。
from __future__ import annotations
from collections.abc import Iterable, Iterator
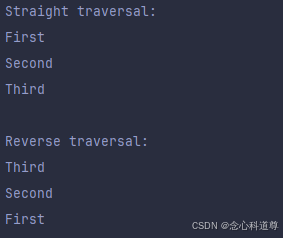
from typing import Anyclass MyIterator(Iterator):_position: int = None # 当前迭代位置_reverse: bool = False # 是否反向迭代def __init__(self, collection: WordsCollection, reverse: bool = False) -> None:self._collection = collection # 关联的可迭代对象self._reverse = reverse # 是否反向遍历self._position = -1 if reverse else 0 # 初始化位置0或-1def __next__(self) -> Any:"""获取下一个元素,如果没有则抛出 StopIteration"""try:value = self._collection[self._position] # 获取当前元素self._position += -1 if self._reverse else 1 # 移动位置,1往后易懂,-1往前易懂except IndexError:raise StopIteration() # 遍历结束时抛出 StopIterationreturn valueclass WordsCollection(Iterable):def __init__(self, collection: list[Any] | None = None) -> None:self._collection = collection or []def __getitem__(self, index: int) -> Any:return self._collection[index]def __iter__(self) -> MyIterator:return MyIterator(self)def get_reverse_iterator(self) -> MyIterator:return MyIterator(self, True)def add_item(self, item: Any) -> None:self._collection.append(item)def Main():collection = WordsCollection()collection.add_item("First")collection.add_item("Second")collection.add_item("Third")#遍历print("Straight traversal:")print("\n".join(collection))print("")#反方向遍历print("Reverse traversal:")print("\n".join(collection.get_reverse_iterator()), end="")if __name__ == "__main__":Main()
\;\\\;\\\;
15备忘录
用链表和数组什么的实现也可以,这就是内存的log。如果数据量大,这个数据就要写入文件,撤销的时候从文件中恢复。
_generate_random_string() 这个让我想起了昨天看的B站视频@epcdiy,说是windows下的勒索软件加密了文件,然后up主研究发现原理就是先随机获取16个字母,然后再拿RSA加密什么的。
from __future__ import annotations
from abc import ABC, abstractmethod
from datetime import datetime
from random import sample
from string import ascii_letters#状态持有者
class StateHolder:_state = Nonedef __init__(self, state: str) -> None:self._state = stateprint(f"StateHolder: My initial state is: {self._state}")def run(self) -> None:print("StateHolder:run -> ",end="")self._state = self._generate_random_string(30)print(f"my state has changed to: {self._state}")#获取随机字母组合的字符串,通常做密码都会用到这种函数@staticmethoddef _generate_random_string(length: int = 10) -> str:return "".join(sample(ascii_letters, length))#保存def save(self) -> Memento:return ConcreteMemento(self._state)#恢复def restore(self, memento: Memento) -> None:self._state = memento.get_state()print(f"StateHolder: My state has changed to: {self._state}")#第一层备忘录
class Memento(ABC):@abstractmethoddef get_name(self) -> str:pass@abstractmethoddef get_date(self) -> str:pass# 第2层备忘录
class ConcreteMemento(Memento):def __init__(self, state: str) -> None:self._state = stateself._date = str(datetime.now())[:19]#获取状态def get_state(self) -> str:return self._state#获取def get_name(self) -> str:return f"{self._date} / ({self._state[0:9]}...)"#获取日期def get_date(self) -> str:return self._date#管理者
#一个链表保存N个状态,每个状态中嵌套当时的时间
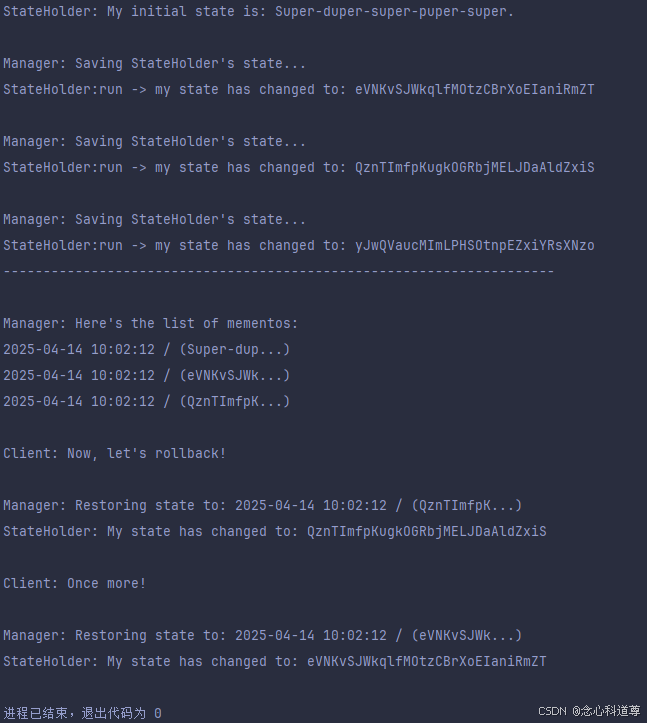
class Manager:def __init__(self, s: StateHolder) -> None:self._mementos = []self._StateHolder = s#备份def backup(self) -> None:print("\nManager: Saving StateHolder's state...")self._mementos.append(self._StateHolder.save())#撤销def undo(self) -> None:if not len(self._mementos):returnmemento = self._mementos.pop()print(f"Manager: Restoring state to: {memento.get_name()}")try:self._StateHolder.restore(memento)except Exception:self.undo()#打印历史def show_history(self) -> None:print("Manager: Here's the list of mementos:")for memento in self._mementos:print(memento.get_name())def Main():s = StateHolder("Super-duper-super-puper-super.") #最初始的状态m = Manager(s)m.backup() #备份s.run()m.backup()s.run()m.backup()s.run()print("---------------------------------------------------------------------\n")m.show_history()print("\nClient: Now, let's rollback!\n")m.undo() #撤销print("\nClient: Once more!\n")m.undo() #撤销if __name__ == "__main__":Main()
\;\\\;\\\;
16状态机
这不是一种好方法,前后两个状态,加上转换,这些固定在了代码中。如果状态和转换特别多,甚至有各自输入输出就完了。
我之前的博客有写过,状态要单独拎出来,其中不要写转换到哪。
写一个类为规则,一条规则传入两个状态就好。具体转换到哪,先遍历一条条规则,每个规则固定从前面状态转到后面状态,还要结合转换条件——Mealy状态机或者Moore状态机。
from __future__ import annotations
from abc import ABC, abstractmethod#第一层状态
class State(ABC):@propertydef Manager(self) -> Manager:return self._Manager@Manager.setterdef Manager(self, Manager: Manager) -> None:self._Manager = Manager@abstractmethoddef handle1(self) -> None:pass@abstractmethoddef handle2(self) -> None:pass#第2层状态
class ConcreteStateA(State):def handle1(self) -> None:print("ConcreteStateA:handle1")print("\twants to change the state of the Manager.")self.Manager.transition_to(ConcreteStateB())def handle2(self) -> None:print("ConcreteStateA:handle2")#第2层状态
class ConcreteStateB(State):def handle1(self) -> None:print("ConcreteStateB:handle1")def handle2(self) -> None:print("ConcreteStateB:handle2")print("\twants to change the state of the Manager.")self.Manager.transition_to(ConcreteStateA())#管理者
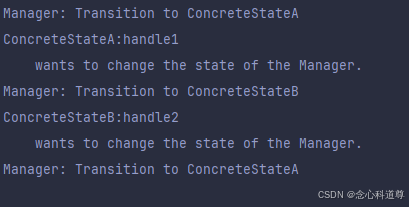
class Manager:_state = Nonedef __init__(self, state: State) -> None:self.transition_to(state)def transition_to(self, state: State):print(f"Manager: Transition to {type(state).__name__}")self._state = stateself._state.Manager = selfdef request1(self):self._state.handle1()def request2(self):self._state.handle2()def Main():m = Manager(ConcreteStateA())m.request1()m.request2()if __name__ == "__main__":Main()
\;\\\;\\\;
17模板方法
不同具体子类的执行框架,已经在父类中固定了、
from abc import ABC, abstractmethod#第一层人
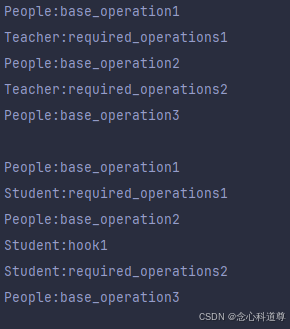
class People(ABC):def template_method(self) -> None:self.base_operation1()self.required_operations1()self.base_operation2()self.hook1()self.required_operations2()self.base_operation3()self.hook2()def base_operation1(self) -> None:print("People:base_operation1")def base_operation2(self) -> None:print("People:base_operation2")def base_operation3(self) -> None:print("People:base_operation3")#抽象方法:下面两个函数必须由子类实现@abstractmethoddef required_operations1(self) -> None:pass@abstractmethoddef required_operations2(self) -> None:pass#普通函数:下面两个函数可以由父类实现,也可以被子类覆盖def hook1(self) -> None:passdef hook2(self) -> None:pass#第二层人
class Teacher(People):def required_operations1(self) -> None:print("Teacher:required_operations1")def required_operations2(self) -> None:print("Teacher:required_operations2")#第二层人
class Student(People):def required_operations1(self) -> None:print("Student:required_operations1")def required_operations2(self) -> None:print("Student:required_operations2")def hook1(self) -> None:print("Student:hook1")#客户代码
def client_code(abstract_class: People) -> None:abstract_class.template_method()def Main():client_code(Teacher())print("")client_code(Student())if __name__ == "__main__":Main()
\;\\\;\\\;
18访问者
两棵树,一颗被访问者树,一颗访问者树。被访问者会调用访问者,即物体调用行为。
from __future__ import annotations
from abc import ABC, abstractmethod
from typing import List# 抽象角色
class Character(ABC):@abstractmethoddef accept(self, action: Action) -> None:pass# 具体角色:战士
class Warrior(Character):def accept(self, action: Action) -> None:action.visit_warrior(self)def attack(self) -> str:return "Warrior: Strong attack"def defend(self) -> str:return "Warrior: Solid defense"# 具体角色:法师
class Mage(Character):def accept(self, action: Action) -> None:action.visit_mage(self)def cast_spell(self) -> str:return "Mage: Powerful spell"def heal(self) -> str:return "Mage: Healing magic"# 抽象行为
class Action(ABC):@abstractmethoddef visit_warrior(self, character: Warrior) -> None:pass@abstractmethoddef visit_mage(self, character: Mage) -> None:pass# 具体行为:攻击行为
class AttackAction(Action):def visit_warrior(self, character: Warrior) -> None:print(f"{character.attack()} with AttackAction")def visit_mage(self, character: Mage) -> None:print(f"{character.cast_spell()} with AttackAction")# 具体行为:防御行为
class DefendAction(Action):def visit_warrior(self, character: Warrior) -> None:print(f"{character.defend()} with DefendAction")def visit_mage(self, character: Mage) -> None:print(f"{character.heal()} with DefendAction")# 客户端代码
def client_code(characters: List[Character], action: Action) -> None:for character in characters:character.accept(action)# 主函数
def main():characters = [Warrior(), Mage()]print("The client code works with all characters via the base Action interface:")attack_action = AttackAction()client_code(characters, attack_action)print("\nIt allows the same client code to work with different types of actions:")defend_action = DefendAction()client_code(characters, defend_action)if __name__ == "__main__":main()

\;\\\;\\\;
19观察者
一对多,多个观察者观察一个对象。
from __future__ import annotations
from abc import ABC, abstractmethod
from random import randrange
from typing import List#第一层交互
class Interaction(ABC):@abstractmethoddef attach(self, People: People) -> None:pass@abstractmethoddef detach(self, People: People) -> None:pass@abstractmethoddef notify(self) -> None:pass#第2层交互
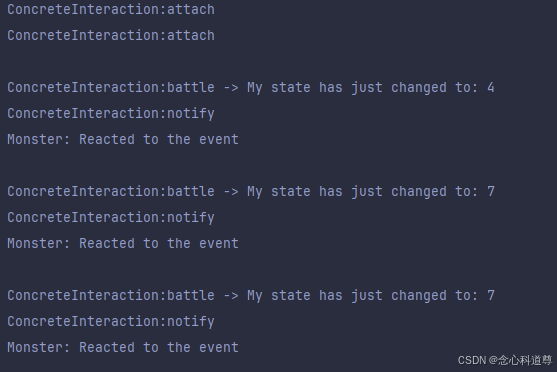
class ConcreteInteraction(Interaction):_state: int = None_Peoples: List[People] = []def attach(self, p: People) -> None:print("ConcreteInteraction:attach")self._Peoples.append(p)def detach(self, p: People) -> None:self._Peoples.remove(p)def notify(self) -> None:print("ConcreteInteraction:notify")for People in self._Peoples:People.update(self)def battle(self) -> None:print("\nConcreteInteraction:battle -> ",end="")self._state = randrange(0, 10)print(f"My state has just changed to: {self._state}")self.notify()#第一层观察者
class People(ABC):@abstractmethoddef update(self, Interaction: Interaction) -> None:pass#第2层观察者
class Player(People):def update(self, Interaction: Interaction) -> None:if Interaction._state < 3:print("Player:update")# 第2层观察者
class Monster(People):def update(self, Interaction: Interaction) -> None:if Interaction._state == 0 or Interaction._state >= 2:print("Monster: Reacted to the event")def Main():Interaction = ConcreteInteraction()#加入玩家1People_a = Player()Interaction.attach(People_a)#加入玩家2People_b = Monster()Interaction.attach(People_b)#开始战斗Interaction.battle()Interaction.battle()Interaction.detach(People_a) #移除玩家1#继续战斗Interaction.battle()if __name__ == "__main__":Main()
\;\\\;\\\;
20命令Shell
很多设计模式都是这种三方模式,一边的抽象树是被操作者,一边的抽象树是操作者,还有第三方类是管理者。
from __future__ import annotations
from abc import ABC, abstractmethod#第一层命令
class Command(ABC):@abstractmethoddef exec(self) -> None:pass# 第2层命令
class SimpleCommand(Command):def __init__(self, payload: str) -> None:self._payload = payloaddef exec(self) -> None:print(f"SimpleCommand:exec -> {self._payload}")# 第2层命令
class ComplexCommand(Command):def __init__(self, NPC: NPC, a: str, b: str) -> None:self._NPC = NPCself._a = aself._b = bdef exec(self) -> None:print("ComplexCommand:exec")self._NPC.do_something(self._a)self._NPC.do_something_else(self._b)#被操作者
class NPC:def do_something(self, a: str) -> None:print(f"\nNPC: Working on : {a}", end="")def do_something_else(self, b: str) -> None:print(f"\nNPC: Also working on : {b}", end="")#管理者
class Manager:_on_start = None_on_finish = Nonedef set_on_start(self, command: Command):self._on_start = commanddef set_on_finish(self, command: Command):self._on_finish = commanddef do_something_important(self) -> None:print("Manager:1")if isinstance(self._on_start, Command):self._on_start.exec()print("Manager:2")print("Manager:3")if isinstance(self._on_finish, Command):self._on_finish.exec()def Main():a = Manager()a.set_on_start(SimpleCommand("Say Hi!"))r = NPC()a.set_on_finish(ComplexCommand(r, "Send email", "Save report"))a.do_something_important()if __name__ == "__main__":Main()
\;\\\;\\\;
21策略
相当于C++ STL使用排序或者查找函数式,要传入的形参函数指针,根据用户实现的函数,来具体按什么属性查找,或者按什么顺序查找等操作。
from __future__ import annotations
from abc import ABC, abstractmethod
from typing import List#持有一个策略实例。这个类作用是提供一个接口,让客户端可以调用策略算法
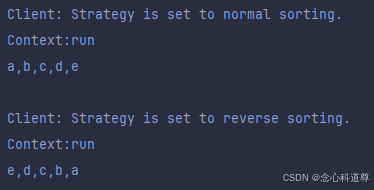
class Context():def __init__(self, strategy: Strategy) -> None:self._strategy = strategy@propertydef strategy(self) -> Strategy:return self._strategy@strategy.setterdef strategy(self, strategy: Strategy) -> None:self._strategy = strategydef run(self) -> None:print("Context:run")result = self._strategy.calc(["a", "b", "c", "d", "e"])print(",".join(result))#第一层策略
class Strategy(ABC):@abstractmethoddef calc(self, data: List):pass#第2层策略
class ConcreteStrategyA(Strategy):def calc(self, data: List) -> List:return sorted(data)#第2层策略
class ConcreteStrategyB(Strategy):def calc(self, data: List) -> List:return reversed(sorted(data))def Main():context = Context(ConcreteStrategyA())print("Client: Strategy is set to normal sorting.")context.run()print()print("Client: Strategy is set to reverse sorting.")context.strategy = ConcreteStrategyB()context.run()if __name__ == "__main__":Main()
\;\\\;\\\;
22调解
组件和调解器相互调用,这样能保证解耦,即组件之间不会相互调用。
from __future__ import annotations
from abc import ABC#第一层调解器
class Mediator(ABC):def notify(self, sender: object, event: str) -> None:pass#第2层调解器
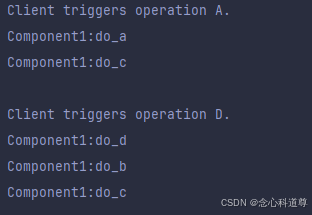
class ConcreteMediator(Mediator):def __init__(self, component1: Component1, component2: Component2) -> None:self._component1 = component1self._component1.mediator = self #关键self._component2 = component2self._component2.mediator = self #关键def notify(self, sender: object, event: str) -> None:if event == "A":self._component2.do_c() #前面执行了A,这里就会执行Celif event == "D":self._component1.do_b() #前面执行了D,这里就会执行B,Cself._component2.do_c()#第一层组件
class Component:def __init__(self, mediator: Mediator = None) -> None:self._mediator = mediator@propertydef mediator(self) -> Mediator:return self._mediator@mediator.setterdef mediator(self, mediator: Mediator) -> None:self._mediator = mediator#第2层组件
class Component1(Component):def do_a(self) -> None:print("Component1:do_a")self.mediator.notify(self, "A")def do_b(self) -> None:print("Component1:do_b")self.mediator.notify(self, "B")#第2层组件
class Component2(Component):def do_c(self) -> None:print("Component1:do_c")self.mediator.notify(self, "C")def do_d(self) -> None:print("Component1:do_d")self.mediator.notify(self, "D")def Main():c1 = Component1()c2 = Component2()mediator = ConcreteMediator(c1, c2)print("Client triggers operation A.")c1.do_a()print()print("Client triggers operation D.")c2.do_d()
if __name__ == "__main__":Main()
\;\\\;\\\;
23解释器
做编译器的时候用了好多次,原因是树太多了。表达式树,操作符树,类型值树,符号表树,,,,
from abc import ABC, abstractmethod
from typing import Dict# 抽象表达式
class Expression(ABC):@abstractmethoddef interpret(self, context: Dict[str, int]) -> int:pass# 具体表达式:变量表达式
class VariableExpression(Expression):def __init__(self, variable: str) -> None:self.variable = variabledef interpret(self, context: Dict[str, int]) -> int:return context[self.variable]# 具体表达式:常量表达式
class LiteralExpression(Expression):def __init__(self, value: int) -> None:self.value = valuedef interpret(self, context: Dict[str, int]) -> int:return self.value# 具体表达式:加法表达式
class AddExpression(Expression):def __init__(self, left: Expression, right: Expression) -> None:self.left = leftself.right = rightdef interpret(self, context: Dict[str, int]) -> int:return self.left.interpret(context) + self.right.interpret(context)# 具体表达式:减法表达式
class SubtractExpression(Expression):def __init__(self, left: Expression, right: Expression) -> None:self.left = leftself.right = rightdef interpret(self, context: Dict[str, int]) -> int:return self.left.interpret(context) - self.right.interpret(context)def Main():# 定义变量和常量x = VariableExpression("x")y = VariableExpression("y")five = LiteralExpression(5)# 定义表达式expression = AddExpression(SubtractExpression(x, y), five)# 上下文环境context = {"x": 10, "y": 3}# 解释并执行表达式result = expression.interpret(context)print(f"Result of the expression: {result}")if __name__ == "__main__":Main()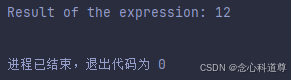
\;\\\;\\\;
相关文章:
【Abstract Thought】【Design Patterns】python实现所有个设计模式【下】
前言 彼岸花开一千年,花开花落不相见。 若问花开叶落故,彼岸缘起缘又灭——《我欲封天》 \;\\\;\\\; 目录 前言简单的设计模式复杂的设计模式13责任链14迭代器15备忘录16状态机17模板方法18访问者19观察者20命令Shell21策略22调解23解释器 简单的设计模…...

【物联网】PWM控制蜂鸣器
文章目录 一、PWM介绍1.PWM的频率2.PWM的周期 二、PWM工作原理分析三、I.MX6ull PWM介绍1.时钟信号2.工作原理3.FIFO 四、PWM重点寄存器介绍1.PWM Control Register (PWMx_PWMCR)2.PWM Counter Register (PWMx_PWMCNR)3.PWM Period Register (PWMx_PWMPR)4.PWM Sample Register…...
Python----机器学习(基于PyTorch的乳腺癌逻辑回归)
Logistic Regression(逻辑回归)是一种用于处理二分类问题的统计学习方法。它基于线性回归 模型,通过Sigmoid函数将输出映射到[0, 1]范围内,表示概率。逻辑回归常被用于预测某个实 例属于正类别的概率。 一、数据集介绍 在本例中&…...

5分钟学会接口自动化测试框架
今天,我们来聊聊接口自动化测试。 接口自动化测试是什么?如何开始?接口自动化测试框架如何搭建? 自动化测试 自动化测试,这几年行业内的热词,也是测试人员进阶的必备技能,更是软件测试未来发…...
基于FreeRTOS和LVGL的多功能低功耗智能手表(APP篇)
目录 一、简介 二、软件框架 2.1 MDK工程架构 2.2 CubeMX框架 2.3 板载驱动BSP 1、LCD驱动 2、各个I2C传感器驱动 3、硬件看门狗驱动 4、按键驱动 5、KT6328蓝牙驱动 2.4 管理函数 2.4.1 StrCalculate.c 计算器管理函数 2.4.2 硬件访问机制-HWDataAccess 2.4.3 …...
)
visual studio 常用的快捷键(已经熟悉的就不记录了)
以下是 Visual Studio 中最常用的快捷键分类整理,涵盖代码编辑、调试、导航等核心场景: 一、生成与编译 生成解决方案 Ctrl Shift B 一键编译整个解决方案,检查编译错误(最核心的生成操作)编译当前文件 Ctrl F…...

学习记录-接口自动化python数据类型
1.字符串 str "字符串" str_1 字符串1 2.列表[ ] list [1,2,3,4,5,6] list_1 ["boy","girl"] 3.字典{ } key:value 键值对 dict {"name":"小林","age":20} 4.元组( ) tuple …...

大语言模型深度思考与交互增强
总则:深度智能交互的全面升级 在主流大语言模型(LLM)与用户的每一次交互中,模型需于回应或调用工具前,展开深度、自然且无过滤的思考进程。当模型判断思考有助于提升回复质量时,必须即时进行全方位的思考与…...

<C#> 详细介绍.NET 依赖注入
在 .NET 开发中,依赖注入(Dependency Injection,简称 DI)是一种设计模式,它可以增强代码的可测试性、可维护性和可扩展性。以下是对 .NET 依赖注入的详细介绍: 1. 什么是依赖注入 在软件开发里࿰…...

布局决定终局:基于开源AI大模型、AI智能名片与S2B2C商城小程序的战略反推思维
摘要:在商业竞争日益激烈的当下,布局与终局预判成为企业成功的关键要素。本文探讨了布局与终局预判的智慧性,强调其虽无法做到百分之百准确,但能显著提升思考能力。终局思维作为重要战略工具,并非一步到位的战略部署&a…...

构建面向大模型训练与部署的一体化架构:从文档解析到智能调度
作者:汪玉珠|算法架构师 标签:大模型训练、数据集构建、GRPO、自监督聚类、指令调度系统、Qwen、LLaMA3 🧭 背景与挑战 随着 Qwen、LLaMA3 等开源大模型不断进化,行业逐渐从“能跑通”迈向“如何高效训练与部署”的阶…...

告别循环!用Stream优雅处理集合
什么是stream? 也叫Stream流,是jdk8新增的一套API(java.util.stream.*)可以用于操作集合或者数组的数据。 优势:Stream流大量的结合了Lambda语法的风格编程,提供了一种更加强大,更加简单的方式…...

Linux电源管理、功耗管理 和 发热管理 (CPUFreq、CPUIdle、RPM、thermal、睡眠 和 唤醒)
1 架构图 1.1 Linux内核电源管理的整体架构 《Linux设备驱动开发详解:基于最新的Linux4.0内核》图19.1 1.2 通用的低功耗软件栈 《SoC底层软件低功耗系统设计与实现》 1.3 低功耗系统的架构设计;图1-3 2 系统级睡眠和唤醒管理 Linux系统的待机、睡眠…...
OSCP - Proving Grounds -FunboxEasy
主要知识点 弱密码路径枚举文件上传 具体步骤 首先是nmap扫描一下,虽然只有22,80和3306端口,但是事情没那么简单 Nmap scan report for 192.168.125.111 Host is up (0.45s latency). Not shown: 65532 closed tcp ports (reset) PORT …...

探索 Go 与 Python:性能、适用场景与开发效率对比
1 性能对比:执行速度与资源占用 1.1 Go 的性能优势 Go 语言被设计为具有高效的执行速度和低资源占用。它编译后生成的是机器码,能够直接在硬件上运行,避免了 Python 解释执行的开销。 以下是一个用 Go 实现的简单循环计算代码: …...
与析构函数(Destructor))
c++:构造函数(Constructor)与析构函数(Destructor)
目录 为什么我们需要构造函数? 什么是构造函数? 🧬 本质:构造函数是“创建对象的一部分” 为什么 需要析构函数? 什么是析构函数? 析构函数的核心作用 ❗注意点 为什么我们需要构造函数?…...

三周年创作纪念日
文章目录 回顾与收获三年收获的五个维度未来的展望致谢与呼唤 亲爱的社区朋友们,大家好! 今天是 2025 年 4 月 14 日,距离我在 2022 年 4 月 14 日发布第一篇技术博客《SonarQube 部署》整整 1,095 天。在这条创作之路上,我既感慨…...
Vue 3 国际化实战:支持 Element Plus 组件和语言持久化
目录 Vue 3 国际化实战:支持 Element Plus 组件和语言持久化实现效果:效果一、中英文切换效果二、本地持久化存储效果三、element Plus国际化 vue3项目国际化实现步骤第一步、安装i18n第二步、配置i18n的en和zh第三步:使用 vue-i18n 库来实现…...

1.阿里云快速部署Dify智能应用
一、宝塔面板 宝塔面板是一款功能强大且易于使用的服务器管理软件,支持Linux和Windows系统,通过web端可视化操作,优化了建站流程,提供安全管理、计划任务、文件管理以及软件管理等功能。 1.1 宝塔面板的特点与优势 易用性 宝塔面…...

Ubuntu与windows时间同步
由于ubuntu每次重启后时间老是不对,所以使用ntp服务,让ubuntu作为客户端,去同步windows时间。 一、windows服务端配置 1、启用ntp服务 # 启动W32Time服务(若未启动) net start w32time # 配置服务为NTP模式 w32tm /…...

在pycharm配置虚拟环境和jupyter,解决jupyter运行失败问题
记录自己pycharm环境配置和解决问题的流程。 解决pycharm无法运行jupyter代码,仅运行import板块显示运行失败,但是控制台不输出任何错误信息,令人困惑。 遇到的问题是:运行代码左下角显示运行失败但是有没有任何的输出错误信息。 …...

Vue 技术解析:从核心概念到实战应用
Vue.js 是一款流行的渐进式前端框架,以其简洁的 API、灵活的组件化结构和高效的响应式数据绑定而受到开发者的广泛欢迎。本文将深入解析 Vue 技术的核心概念、原理和应用场景,帮助开发者更好地理解和使用 Vue.js。 一、Vue 的设计哲学与核心概念 &…...

Series和 DataFrame是 Pandas 库中的两种核心数据结构
Series 和 DataFrame 是 Pandas 库中的两种核心数据结构,它们各有特点和用途。理解它们之间的区别有助于更高效地进行数据分析和处理。以下是 Series 和 DataFrame 的主要区别: 1. 维度 Series:是一维的数组,可以存储任何类型的…...

关于异步消息队列的详细解析,涵盖JMS模式对比、常用组件分析、Spring Boot集成示例及总结
以下是关于异步消息队列的详细解析,涵盖JMS模式对比、常用组件分析、Spring Boot集成示例及总结: 一、异步消息核心概念与JMS模式对比 1. 异步消息核心组件 组件作用生产者发送消息到消息代理(如RabbitMQ、Kafka)。消息代理中间…...

利用 Python 进行股票数据可视化分析
在金融市场中,股票数据的可视化分析对于投资者和分析师来说至关重要。通过可视化,我们可以更直观地观察股票价格的走势、交易量的变化以及不同股票之间的相关性等。 Python 作为一种功能强大的编程语言,拥有丰富的数据处理和可视化库…...

【Docker】离线安装Docker
背景 离线安装Docker的必要性,第一,在目前数据安全升级的情况下,很多外网已经基本不好访问了。第二,如果公司有对外部署的需求,那么难免会存在对方只有内网的情况,那么我们就要做到学会离线安装。 下载安…...

kubectl命令补全以及oc命令补全
kubectl命令补全 1.安装bash-completion 如果你用的是Bash(默认情况下是),先安装补全功能支持包 sudo apt update sudo apt install bash-completion -y2.为kubectl 启用补全功能 会话中临时: source <(kubectl completion bash)持久化配置&#x…...

《 C++ 点滴漫谈: 三十三 》当函数成为参数:解密 C++ 回调函数的全部姿势
一、前言 在现代软件开发中,“解耦” 与 “可扩展性” 已成为衡量一个系统架构优劣的重要标准。而在众多实现解耦机制的技术手段中,“回调函数” 无疑是一种高效且广泛使用的模式。你是否曾经在编写排序算法时,希望允许用户自定义排序规则&a…...
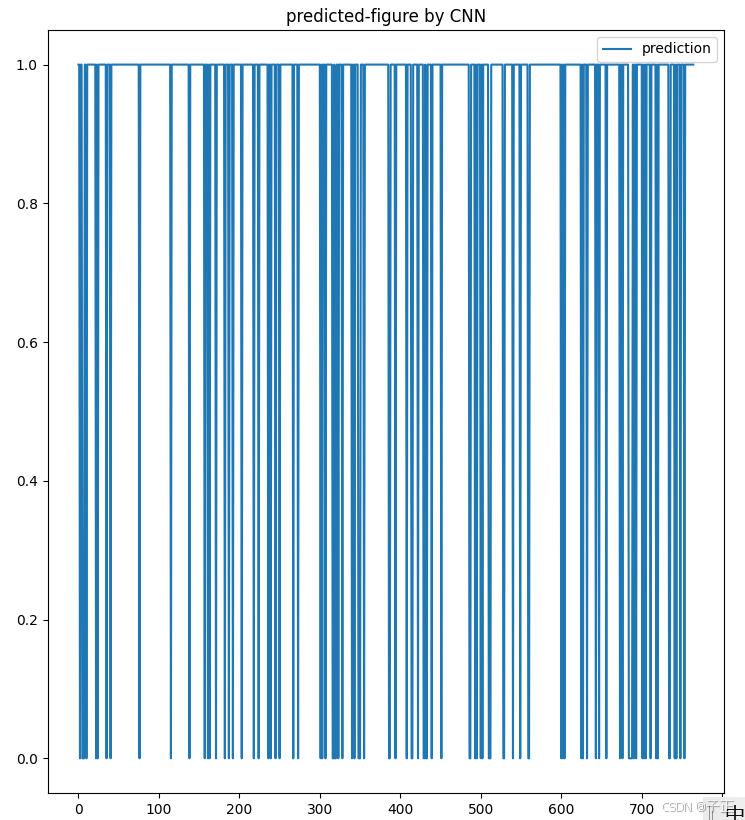
极简cnn-based手写数字识别程序
1.先看看识别效果: 这个程序识别的是0~9的一组手写数字,这是最终的识别效果,为1,代表识别成功,0为失败。 然后数据源是:ds deeplake.load(hub://activeloop/optical-handwritten-digits-train)里面是一组…...
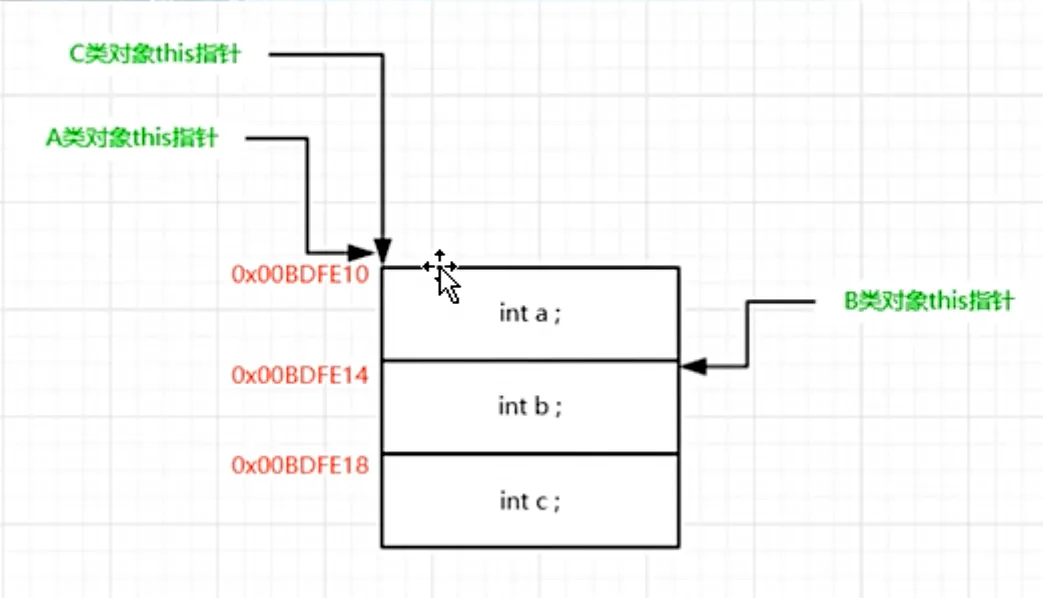
C++核心机制-this 指针传递与内存布局分析
示例代码 #include<iostream> using namespace std;class A { public:int a;A() {printf("A:A()的this指针:%p!\n", this);}void funcA() {printf("A:funcA()的this指针:%p!\n", this);} };class B { public:int b;B() {prin…...