【“星瑞” O6 评测】—NPU 部署 face parser 模型

前言
瑞莎星睿 O6 (Radxa Orion O6) 拥有高达 28.8TOPs NPU (Neural Processing Unit) 算力,支持 INT4 / INT8 / INT16 / FP16 / BF16 和 TF32 类型的加速。这里通过通过官方的工具链进行FaceParsingBiSeNet的部署
1. FaceParsingBiSeNet onnx 推理
-
首先从百度网盘 提取码 8gin,下载开源的模型:face_parsing_512x512.onnx
-
编写 onnx 的推理脚本,如下
import os
import cv2
import argparse
import numpy as np
from PIL import Image
import onnxruntime
import timedef letterbox(image, new_shape=(640, 640), color=(114, 114, 114), auto=False, scaleFill=False, scaleup=True):"""对图像进行letterbox操作,保持宽高比缩放并填充到指定尺寸:param image: 输入的图像,格式为numpy数组 (height, width, channels):param new_shape: 目标尺寸,格式为 (height, width):param color: 填充颜色,默认为 (114, 114, 114):param auto: 是否自动计算最小矩形,默认为True:param scaleFill: 是否不保持宽高比直接缩放,默认为False:param scaleup: 是否只放大不缩小,默认为True:return: 处理后的图像,缩放比例,填充大小"""shape = image.shape[:2]  # 当前图像的高度和宽度r = min(new_shape[0] / shape[0], new_shape[1] / shape[1])if not scaleup:  # 只缩小不放大(为了更好的效果)r = min(r, 1.0)new_unpad = int(round(shape[1] * r)), int(round(shape[0] * r))dw, dh = new_shape[1] - new_unpad[0], new_shape[0] - new_unpad[1]  # 计算填充尺寸if auto:  # 最小矩形dw, dh = np.mod(dw, 64), np.mod(dh, 64)  # 强制为 64 的倍数dw /= 2  # 从两侧填充dh /= 2if shape[::-1] != new_unpad:  # 缩放图像image = cv2.resize(image, new_unpad, interpolation=cv2.INTER_LINEAR)top, bottom = int(round(dh - 0.1)), int(round(dh + 0.1))left, right = int(round(dw - 0.1)), int(round(dw + 0.1))image = cv2.copyMakeBorder(image, top, bottom, left, right, cv2.BORDER_CONSTANT, value=color)  # 添加填充scale_ratio = rpad_size = (dw, dh)return image, scale_ratio, pad_sizedef preprocess_image(image, shape, bgr2rgb=True):"""图片预处理"""img, scale_ratio, pad_size = letterbox(image, new_shape=shape)if bgr2rgb:img = img[:, :, ::-1]img = img.transpose(2, 0, 1)  # HWC2CHWimg = np.ascontiguousarray(img, dtype=np.float32)return img, scale_ratio, pad_sizedef generate_mask(img, seg, outpath, scale=0.4):'分割结果可视化'color = [[255, 0,   0],[255, 85,  0],[255, 170, 0],[255, 0,   85],[255, 0,   170],[0,   255, 0],[85,  255, 0],[170, 255, 0],[0,   255, 85],[0,   255, 170],[0,   0,   255],[85,  0,   255],[170, 0,   255],[0,   85,  255],[0,   170, 255],[255, 255, 0],[255, 255, 85],[255, 255, 170],[255, 0,   255],[255, 85,  255]]img = img.transpose(1, 2, 0)  # HWC2CHWminidx = int(seg.min())maxidx = int(seg.max())color_img = np.zeros_like(img)for i in range(minidx, maxidx):if i <= 0:continuecolor_img[seg == i] = color[i]showimg = scale * img + (1 - scale) * color_imgImage.fromarray(showimg.astype(np.uint8)).save(outpath)if __name__ == '__main__':# define cmd argumentsparser = argparse.ArgumentParser()parser.add_argument('--image-path', type=str, help='path of the input image (a file)')parser.add_argument('--output-path', type=str, help='paht for saving the predicted alpha matte (a file)')parser.add_argument('--model-path', type=str, help='path of the ONNX model')args = parser.parse_args()# check input argumentsif not os.path.exists(args.image_path):print('Cannot find the input image: {0}'.format(args.image_path))exit()if not os.path.exists(args.model_path):print('Cannot find the ONXX model: {0}'.format(args.model_path))exit()ref_size = [512, 512]# read imageim = cv2.imread(args.image_path)img, scale_ratio, pad_size = preprocess_image(im, ref_size)showimg = img.copy()[::-1, ...]mean = np.asarray([0.485, 0.456, 0.406])scale = np.asarray([0.229, 0.224, 0.225])mean = mean.reshape((3, 1, 1))scale = scale.reshape((3, 1, 1))img = (img / 255 - mean) * scaleim = img[None].astype(np.float32)np.save("models/ComputeVision/Semantic_Segmentation/onnx_faceparse/datasets/calibration_data.npy", im)# Initialize session and get predictionsession = onnxruntime.InferenceSession(args.model_path, None)input_name = session.get_inputs()[0].nameoutput_name = session.get_outputs()[0].nameoutput = session.run([output_name], {input_name: im})start_time = time.perf_counter()for _ in range(5):output = session.run([output_name], {input_name: im})end_time = time.perf_counter()use_time = (end_time - start_time) * 1000fps = 1000 / use_timeprint(f"推理耗时:{use_time:.2f} ms, fps:{fps:.2f}")# refine matteseg = np.argmax(output[0], axis=1).squeeze()generate_mask(showimg, seg, args.output_path)
- 推理
python models/ComputeVision/Semantic_Segmentation/onnx_faceparse/inference_onnx.py --image-path models/ComputeVision/Semantic_Segmentation/onnx_faceparse/test_data/test_lite_face_parsing.png --output-path output/face_parsering.jpg --model-path asserts/models/bisenet/face_parsing_512x512.onnx
打印输出
推理耗时:1544.36 ms, fps:0.65
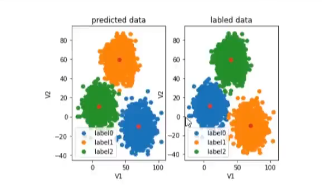
可视化效果

- 代码解释
- np.save(“models/ComputeVision/Semantic_Segmentation/onnx_faceparse/datasets/calibration_data.npy”, im)
这里是将输入保存供 NPU PTQ 量化使用.
2. FaceParsingBiSeNet NPU 推理
- 创建 cfg 配置文件,具体如下。
[Common]
mode = build[Parser]
model_type = onnx
model_name = face_parsing_512x512
detection_postprocess =
model_domain = image_segmentation
input_model = /home/5_radxa/ai_model_hub/asserts/models/bisenet/face_parsing_512x512.onnx
input = input
input_shape = [1, 3, 512, 512]
output = out
output_dir = ./[Optimizer]
output_dir = ./
calibration_data = ./datasets/calibration_data.npy
calibration_batch_size = 1
metric_batch_size = 1
dataset = NumpyDataset
quantize_method_for_weight = per_channel_symmetric_restricted_range
quantize_method_for_activation = per_tensor_asymmetric
save_statistic_info = True[GBuilder]
outputs = bisenet.cix
target = X2_1204MP3
profile = True
tiling = fps
注意: [Parser]中的 input,output 是输入,输出 tensor 的名字,可以通过 netron 打开 onnx 模型看。输入,输出名字不匹配时,会有报错:
[I] Build with version 6.1.3119
[I] Parsing model....
[I] [Parser]: Begin to parse onnx model face_parsing_512x512...
2025-04-18 11:13:53.104146: W tensorflow/stream_executor/platform/default/dso_loader.cc:64] Could not load dynamic library 'libcudart.so.11.0'; dlerror: libcudart.so.11.0: cannot open shared object file: No such file or directory; LD_LIBRARY_PATH: /root/miniconda3/envs/radxa/lib/python3.8/site-packages/cv2/../../lib64:/root/miniconda3/envs/radxa/lib/python3.8/site-packages/AIPUBuilder/simulator-lib/:/root/miniconda3/envs/radxa/lib/python3.8/site-packages/AIPUBuilder/simulator-lib
2025-04-18 11:13:53.104217: I tensorflow/stream_executor/cuda/cudart_stub.cc:29] Ignore above cudart dlerror if you do not have a GPU set up on your machine.
2025-04-18 11:13:54.266791: W tensorflow/stream_executor/platform/default/dso_loader.cc:64] Could not load dynamic library 'libcuda.so.1'; dlerror: libcuda.so.1: cannot open shared object file: No such file or directory; LD_LIBRARY_PATH: /root/miniconda3/envs/radxa/lib/python3.8/site-packages/cv2/../../lib64:/root/miniconda3/envs/radxa/lib/python3.8/site-packages/AIPUBuilder/simulator-lib/:/root/miniconda3/envs/radxa/lib/python3.8/site-packages/AIPUBuilder/simulator-lib
2025-04-18 11:13:54.266893: W tensorflow/stream_executor/cuda/cuda_driver.cc:269] failed call to cuInit: UNKNOWN ERROR (303)
2025-04-18 11:13:54.266959: I tensorflow/stream_executor/cuda/cuda_diagnostics.cc:156] kernel driver does not appear to be running on this host (chenjun): /proc/driver/nvidia/version does not exist
[E] [Parser]: Graph does not contain such a node/tensor name:output
[E] [Parser]: Parser Failed!
- 编译模型
在 x86 主机上编译模型
cd models/ComputeVision/Semantic_Segmentation/onnx_faceparse
cixbuild ./cfg/onnx_bisenet.cfg
报错: ImportError: libaipu_simulator_x2.so: cannot open shared object file: No such file or directory
解决方案
- 通过
find / -name libaipu_simulator_x2.so - 通过
export LD_LIBRARY_PATH=/root/miniconda3/envs/radxa/lib/python3.8/site-packages/AIPUBuilder/simulator-lib/libaipu_simulator_x2.so:$LD_LIBRARY_PATH添加环境变量
编译成功的打印信息
[I] Build with version 6.1.3119
[I] Parsing model....
[I] [Parser]: Begin to parse onnx model face_parsing_512x512...
2025-04-18 11:20:16.726111: W tensorflow/stream_executor/platform/default/dso_loader.cc:64] Could not load dynamic library 'libcudart.so.11.0'; dlerror: libcudart.so.11.0: cannot open shared object file: No such file or directory; LD_LIBRARY_PATH: /root/miniconda3/envs/radxa/lib/python3.8/site-packages/cv2/../../lib64:/root/miniconda3/envs/radxa/lib/python3.8/site-packages/AIPUBuilder/simulator-lib/:/root/miniconda3/envs/radxa/lib/python3.8/site-packages/AIPUBuilder/simulator-lib
2025-04-18 11:20:16.726199: I tensorflow/stream_executor/cuda/cudart_stub.cc:29] Ignore above cudart dlerror if you do not have a GPU set up on your machine.
2025-04-18 11:20:17.908202: W tensorflow/stream_executor/platform/default/dso_loader.cc:64] Could not load dynamic library 'libcuda.so.1'; dlerror: libcuda.so.1: cannot open shared object file: No such file or directory; LD_LIBRARY_PATH: /root/miniconda3/envs/radxa/lib/python3.8/site-packages/cv2/../../lib64:/root/miniconda3/envs/radxa/lib/python3.8/site-packages/AIPUBuilder/simulator-lib/:/root/miniconda3/envs/radxa/lib/python3.8/site-packages/AIPUBuilder/simulator-lib
2025-04-18 11:20:17.908267: W tensorflow/stream_executor/cuda/cuda_driver.cc:269] failed call to cuInit: UNKNOWN ERROR (303)
2025-04-18 11:20:17.908283: I tensorflow/stream_executor/cuda/cuda_diagnostics.cc:156] kernel driver does not appear to be running on this host (chenjun): /proc/driver/nvidia/version does not exist
[W] [Parser]: The output name out is not a node but a tensor. However, we will use the node Resize_161 as output node.
2025-04-18 11:20:21.229063: I tensorflow/core/platform/cpu_feature_guard.cc:151] This TensorFlow binary is optimized with oneAPI Deep Neural Network Library (oneDNN) to use the following CPU instructions in performance-critical operations:  AVX2 AVX512F FMA
To enable them in other operations, rebuild TensorFlow with the appropriate compiler flags.
[I] [Parser]: The input tensor(s) is/are: input_0
[I] [Parser]: Input input from cfg is shown as tensor input_0 in IR!
[I] [Parser]: Output out from cfg is shown as tensor Resize_161_post_transpose_0 in IR!
[I] [Parser]: 0 error(s), 1 warning(s) generated.
[I] [Parser]: Parser done!
[I] Parse model complete
[I] Simplifying float model.
[I] [IRChecker] Start to check IR: /home/5_radxa/ai_model_hub/models/ComputeVision/Semantic_Segmentation/onnx_faceparse/internal/face_parsing_512x512.txt
[I] [IRChecker] model_name: face_parsing_512x512
[I] [IRChecker] IRChecker: All IR pass (Checker Plugin disabled)
[I] [graph.cpp :1600] loading graph weight: /home/5_radxa/ai_model_hub/models/ComputeVision/Semantic_Segmentation/onnx_faceparse/./internal/face_parsing_512x512.bin size: 0x322454c
[I] Start to simplify the graph...
[I] Using fixed-point full optimization, it may take long long time ....
[I] GSim simplified result:
------------------------------------------------------------------------OpType.Eltwise:   -3OpType.Mul:   +3OpType.Tile:   -3
------------------------------------------------------------------------
略
略
略
略
略
[I] [builder.cpp:1939]     Read and Write:80.21MB
[I] [builder.cpp:1080] Reduce constants memory size: 3.477MB
[I] [builder.cpp:2411] memory statistics for this graph (face_parsing_512x512)
[I] [builder.cpp: 585] Total memory     :       0x00d52b98 Bytes ( 13.323MB)
[I] [builder.cpp: 585] Text      section:       0x00042200 Bytes (  0.258MB)
[I] [builder.cpp: 585] RO        section:       0x00006d00 Bytes (  0.027MB)
[I] [builder.cpp: 585] Desc      section:       0x0002ea00 Bytes (  0.182MB)
[I] [builder.cpp: 585] Data      section:       0x00c8b360 Bytes ( 12.544MB)
[I] [builder.cpp: 585] BSS       section:       0x0000fb38 Bytes (  0.061MB)
[I] [builder.cpp: 585] Stack            :       0x00040400 Bytes (  0.251MB)
[I] [builder.cpp: 585] Workspace(BSS)   :       0x004c0000 Bytes (  4.750MB)
[I] [builder.cpp:2427]
[I] [tools.cpp :1181]  -  compile time: 20.726 s
[I] [tools.cpp :1087] With GM optimization, DDR Footprint stastic(estimation):
[I] [tools.cpp :1094]     Read and Write:92.67MB
[I] [tools.cpp :1137]  -  draw graph time: 0.03 s
[I] [tools.cpp :1954] remove global cwd: /tmp/af3c1da8ea81cc1cf85dba1587ff72126ee96222bb098b52633050918b4c7
build success.......
Total errors: 0,  warnings: 15
- NPU 推理可视化
编写 npu 推理脚本, 可视化推理结果,统计推理耗时
import numpy as np
import cv2
import argparse
import os
import sys
import time# Define the absolute path to the utils package by going up four directory levels from the current file location
_abs_path = "/home/radxa/1_AI_models/ai_model_hub"
# Append the utils package path to the system path, making it accessible for imports
sys.path.append(_abs_path)
from utils.tools import get_file_list
from utils.NOE_Engine import EngineInferimport os
import cv2
import argparse
import numpy as np
from PIL import Imagedef letterbox(image, new_shape=(640, 640), color=(114, 114, 114), auto=False, scaleFill=False, scaleup=True):"""对图像进行letterbox操作,保持宽高比缩放并填充到指定尺寸:param image: 输入的图像,格式为numpy数组 (height, width, channels):param new_shape: 目标尺寸,格式为 (height, width):param color: 填充颜色,默认为 (114, 114, 114):param auto: 是否自动计算最小矩形,默认为True:param scaleFill: 是否不保持宽高比直接缩放,默认为False:param scaleup: 是否只放大不缩小,默认为True:return: 处理后的图像,缩放比例,填充大小"""shape = image.shape[:2]  # 当前图像的高度和宽度r = min(new_shape[0] / shape[0], new_shape[1] / shape[1])if not scaleup:  # 只缩小不放大(为了更好的效果)r = min(r, 1.0)new_unpad = int(round(shape[1] * r)), int(round(shape[0] * r))dw, dh = new_shape[1] - new_unpad[0], new_shape[0] - new_unpad[1]  # 计算填充尺寸if auto:  # 最小矩形dw, dh = np.mod(dw, 64), np.mod(dh, 64)  # 强制为 64 的倍数dw /= 2  # 从两侧填充dh /= 2if shape[::-1] != new_unpad:  # 缩放图像image = cv2.resize(image, new_unpad, interpolation=cv2.INTER_LINEAR)top, bottom = int(round(dh - 0.1)), int(round(dh + 0.1))left, right = int(round(dw - 0.1)), int(round(dw + 0.1))image = cv2.copyMakeBorder(image, top, bottom, left, right, cv2.BORDER_CONSTANT, value=color)  # 添加填充scale_ratio = rpad_size = (dw, dh)return image, scale_ratio, pad_sizedef preprocess_image(image, shape, bgr2rgb=True):"""图片预处理"""img, scale_ratio, pad_size = letterbox(image, new_shape=shape)if bgr2rgb:img = img[:, :, ::-1]img = img.transpose(2, 0, 1)  # HWC2CHWimg = np.ascontiguousarray(img, dtype=np.float32)return img, scale_ratio, pad_sizedef generate_mask(img, seg, outpath, scale=0.4):'分割结果可视化'color = [[255, 0,   0],[255, 85,  0],[255, 170, 0],[255, 0,   85],[255, 0,   170],[0,   255, 0],[85,  255, 0],[170, 255, 0],[0,   255, 85],[0,   255, 170],[0,   0,   255],[85,  0,   255],[170, 0,   255],[0,   85,  255],[0,   170, 255],[255, 255, 0],[255, 255, 85],[255, 255, 170],[255, 0,   255],[255, 85,  255]]img = img.transpose(1, 2, 0)  # HWC2CHWminidx = int(seg.min())maxidx = int(seg.max())color_img = np.zeros_like(img)for i in range(minidx, maxidx):if i <= 0:continuecolor_img[seg == i] = color[i]showimg = scale * img + (1 - scale) * color_imgImage.fromarray(showimg.astype(np.uint8)).save(outpath)if __name__ == '__main__':parser = argparse.ArgumentParser()parser.add_argument('--image-path', type=str, help='path of the input image (a file)')parser.add_argument('--output-path', type=str, help='paht for saving the predicted alpha matte (a file)')parser.add_argument('--model-path', type=str, help='path of the ONNX model')args = parser.parse_args()model = EngineInfer(args.model_path)ref_size = [512, 512]# read imageim = cv2.imread(args.image_path)img, scale_ratio, pad_size = preprocess_image(im, ref_size)showimg = img.copy()[::-1, ...]mean = np.asarray([0.485, 0.456, 0.406])scale = np.asarray([0.229, 0.224, 0.225])mean = mean.reshape((3, 1, 1))scale = scale.reshape((3, 1, 1))img = (img / 255 - mean) * scaleim = img[None].astype(np.float32)## inferinput_data = [im]# output = model.forward(input_data)[0]N = 5start_time = time.perf_counter()for _ in range(N):output = model.forward(input_data)[0]end_time = time.perf_counter()use_time = (end_time - start_time) * 1000 / Nfps = N / (end_time - start_time)print(f"包含输入量化,输出反量化,推理耗时:{use_time:.2f} ms, fps:{fps:.2f}")fps = model.get_ave_fps()use_time2 = 1000 / fpsprint(f"NPU 计算部分耗时:{use_time2:.2f} ms, fps: {fps:.2f}")# refine matteoutput = np.reshape(output, (1, 19, 512, 512))seg = np.argmax(output, axis=1).squeeze()generate_mask(showimg, seg, args.output_path)# release modelmodel.clean()
推理
source /home/radxa/1_AI_models/ai_model_hub/.venv/bin/activate
python models/ComputeVision/Semantic_Segmentation/onnx_faceparse/inference_npu.py --image-path models/ComputeVision/Semantic_Segmentation/onnx_faceparse/test_data/test_lite_face_parsing.png --output-path output/face_parsering.jpg --model-path models/ComputeVision/Semantic_Segmentation/onnx_faceparse/bisenet.cix
推理耗时
npu: noe_init_context success
npu: noe_load_graph success
Input tensor count is 1.
Output tensor count is 1.
npu: noe_create_job success
包含输入量化,输出反量化,推理耗时:379.63 ms, fps:2.63
NPU 计算部分耗时:10.70 ms, fps: 93.43
npu: noe_clean_job success
npu: noe_unload_graph success
npu: noe_deinit_context success
可以看到这里输入量化,输出反量化还是很耗时
可视化效果ok.

3. benchmark
| 序号 | 硬件 | 模型 | 输入分辨率 | 量化类型 | 执行 engine | 推理耗时/ms | fps |
|---|---|---|---|---|---|---|---|
| cpu | bisenet | 512x512 | fp32 | onnxruntime | 309.75 | 3.23 | |
| npu | bisenet | 512x512 | A8W8 | 周易 NPU | 10.70 | 93.43 |
4. 参考
- https://github.com/xlite-dev/lite.ai.toolkit?tab=readme-ov-file
- https://github.com/zllrunning/face-parsing.PyTorch
- 【“星睿O6”评测】RVM人像分割torch➡️ncnn-CPU/GPU和o6-NPU部署全过程
相关文章:
【“星瑞” O6 评测】—NPU 部署 face parser 模型
前言 瑞莎星睿 O6 (Radxa Orion O6) 拥有高达 28.8TOPs NPU (Neural Processing Unit) 算力,支持 INT4 / INT8 / INT16 / FP16 / BF16 和 TF32 类型的加速。这里通过通过官方的工具链进行FaceParsingBiSeNet的部署 1. FaceParsingBiSeNet onnx 推理 首先从百度网盘…...

56、如何快速让⼀个盒⼦⽔平垂直居中
在网页开发中,有多种方式能让一个盒子实现水平垂直居中。下面为你介绍几种常见且快速的方法。 1. 使用 Flexbox 布局 Flexbox 是一种非常便捷的布局模型,能够轻松实现元素的水平和垂直居中。 html <!DOCTYPE html> <html lang"en"&…...

互联网大厂Java面试:Spring Cloud与微服务的奇妙之旅
互联网大厂Java面试:Spring Cloud与微服务的奇妙之旅 在一家知名的互联网公司,一位严肃且专业的面试官正准备对求职者进行技术考察。而这次的应聘者,是自称拥有丰富经验但实际上却是个搞笑的水货程序员——马飞机。接下来,我们将…...

BDO分厂积极开展“五个一”安全活动
BDO分厂为规范化学习“五个一”活动主题,按照“上下联动、分头准备 、差异管理、资源共享”的原则,全面激活班组安全活动管理新模式,正在积极开展班组安全活动,以单元班组形式对每个班组每周组织一次“五个一”安全活动。 丁二醇单…...
[Redis]1-高效的数据结构P2-Set
按照惯例,先丢一个官网文档链接。 上篇我们已经了解了高效的数据结构P1-String与Hash。 这篇,我们继续来了解Redis的 Set 与 Sorted set。 目录 有序集合 Sorted set底层实现 集合 Set总结资料引用 有序集合 Sorted set Redis 有序集合是一组唯一的字符…...

在ubuntu20.04上安装ros2
1,更新系统并安装依赖 sudo apt update sudo apt upgrade sudo apt install curl gnupg2 lsb-release2,增加ROS2仓库配置 echo "deb [archamd64] https://packages.ros.org/ros2/ubuntu focal main" | sudo tee /etc/apt/sources.list.d/ros…...
用ffmpeg 实现拉取h265的flv视频转存成264的mp4 实现方案
参考文章 支持 flvh265 的ffmpeg编译安装_demuxer flvhevc异常-CSDN博客 windwos有别人编译好的 支持HEVC/H265 RTMP播放的FFMPEG/FFPLAY WINDOWS版本 但是linux没有所以得自己编译 1.需要对ffmpeg进行源码修改 这里使用 https://github.com/numberwolf/FFmpeg-QuQi-H265-…...
加密与 SQL Server 建立安全连接“问题)
解决“驱动程序无法通过使用安全套接字层(SSL)加密与 SQL Server 建立安全连接“问题
参考链接: https://blog.csdn.net/yyj12138/article/details/123073146...

[密码学实战]基于Python的国密算法与通用密码学工具箱
引言 在当今数字化浪潮中,信息安全已成为个人隐私保护与商业机密守护的核心议题。作为一位在密码学领域深耕多年的技术实践者,我深谙密码学工具在构建数字安全防线中的关键作用。正是基于这份认知与责任,我倾力打造了一款全方位、高性能的密码学工具,专为满足广大用户在日…...

论文降重GPT指令-实侧有效从98%降低到8%
步骤1:文本接收 指令: 请用户提供需要优化的文本内容。 对文本进行初步分析,识别文本的基本结构和风格。 操作: 接收并分析用户提交的文本。 步骤2:文本优化 2.1 连接词处理 指令: 删除或替换连接词&#x…...
Compose Multiplatform Android Logcat工具
一、通过adb发送指令,收集设备日志并保存 二、UI 三、代码 /*** 获取设备列表*/fun getDevices(): List<String> {val process ProcessBuilder("adb", "devices").redirectErrorStream(true).start()val output process.inputStream.…...
[渗透测试]渗透测试靶场docker搭建 — —全集
[渗透测试]渗透测试靶场docker搭建 — —全集 对于初学者来说,仅仅了解漏洞原理是不够的,还需要进行实操。对于公网上的服务我们肯定不能轻易验证某些漏洞,否则可能触犯法律。这是就需要用到靶场。 本文主要给大家介绍几种常见漏洞对应的靶场…...

JavaScript 渲染内容爬取:Puppeteer 入门
在现代网络应用中,许多网页内容是通过 JavaScript 渲染生成的,传统的爬虫工具往往难以获取这些动态内容。Puppeteer 作为一种强大的浏览器自动化工具,为这一问题提供了优雅的解决方案。本文将带你入门 Puppeteer,介绍如何安装、启…...

Ubuntu 系统下安装和使用性能分析工具 perf
在 Ubuntu 系统下安装和使用性能分析工具 perf 的步骤如下: 1. 安装 perf perf 是 Linux 内核的一部分,通常通过安装 linux-tools 包获取: # 更新软件包列表 sudo apt update# 安装 perf(根据当前内核版本自动匹配) …...

神经网络:从基础到应用,开启智能时代的大门
在当今数字化时代,神经网络已经成为人工智能领域最热门的技术之一。从语音识别到图像分类,从自然语言处理到自动驾驶,神经网络的应用无处不在。它不仅改变了我们的生活方式,还为各个行业带来了前所未有的变革。本文将带你深入了解…...
人工智能-机器学习(线性回归,逻辑回归,聚类)
人工智能概述 人工智能分为:符号学习,机器学习。 机器学习是实现人工智能的一种方法,深度学习是实现机器学习的一种技术。 机器学习:使用算法来解析数据,从中学习,然后对真实世界中是事务进行决策和预测。如垃圾邮件检…...

密码明文放在请求体是否有安全隐患?
明文密码放在请求体中是有安全隐患的,但这个问题可以被控制和缓解,关键在于是否采取了正确的安全措施。 ⚠️ 为什么明文密码有风险? 中间人攻击(MitM): 如果使用 HTTP 明文传输,攻击者可以在数…...

EMQX学习笔记
MQTT简介 MQTT是一种基于发布订阅模式的消息传输协议 消息:设备和设备之间传输的数据,或者服务和服务之间传输的数据 协议:传输数据时所遵循的规则 轻量级:MQTT协议占用的请求源较少,数据报文较小 可靠较强ÿ…...
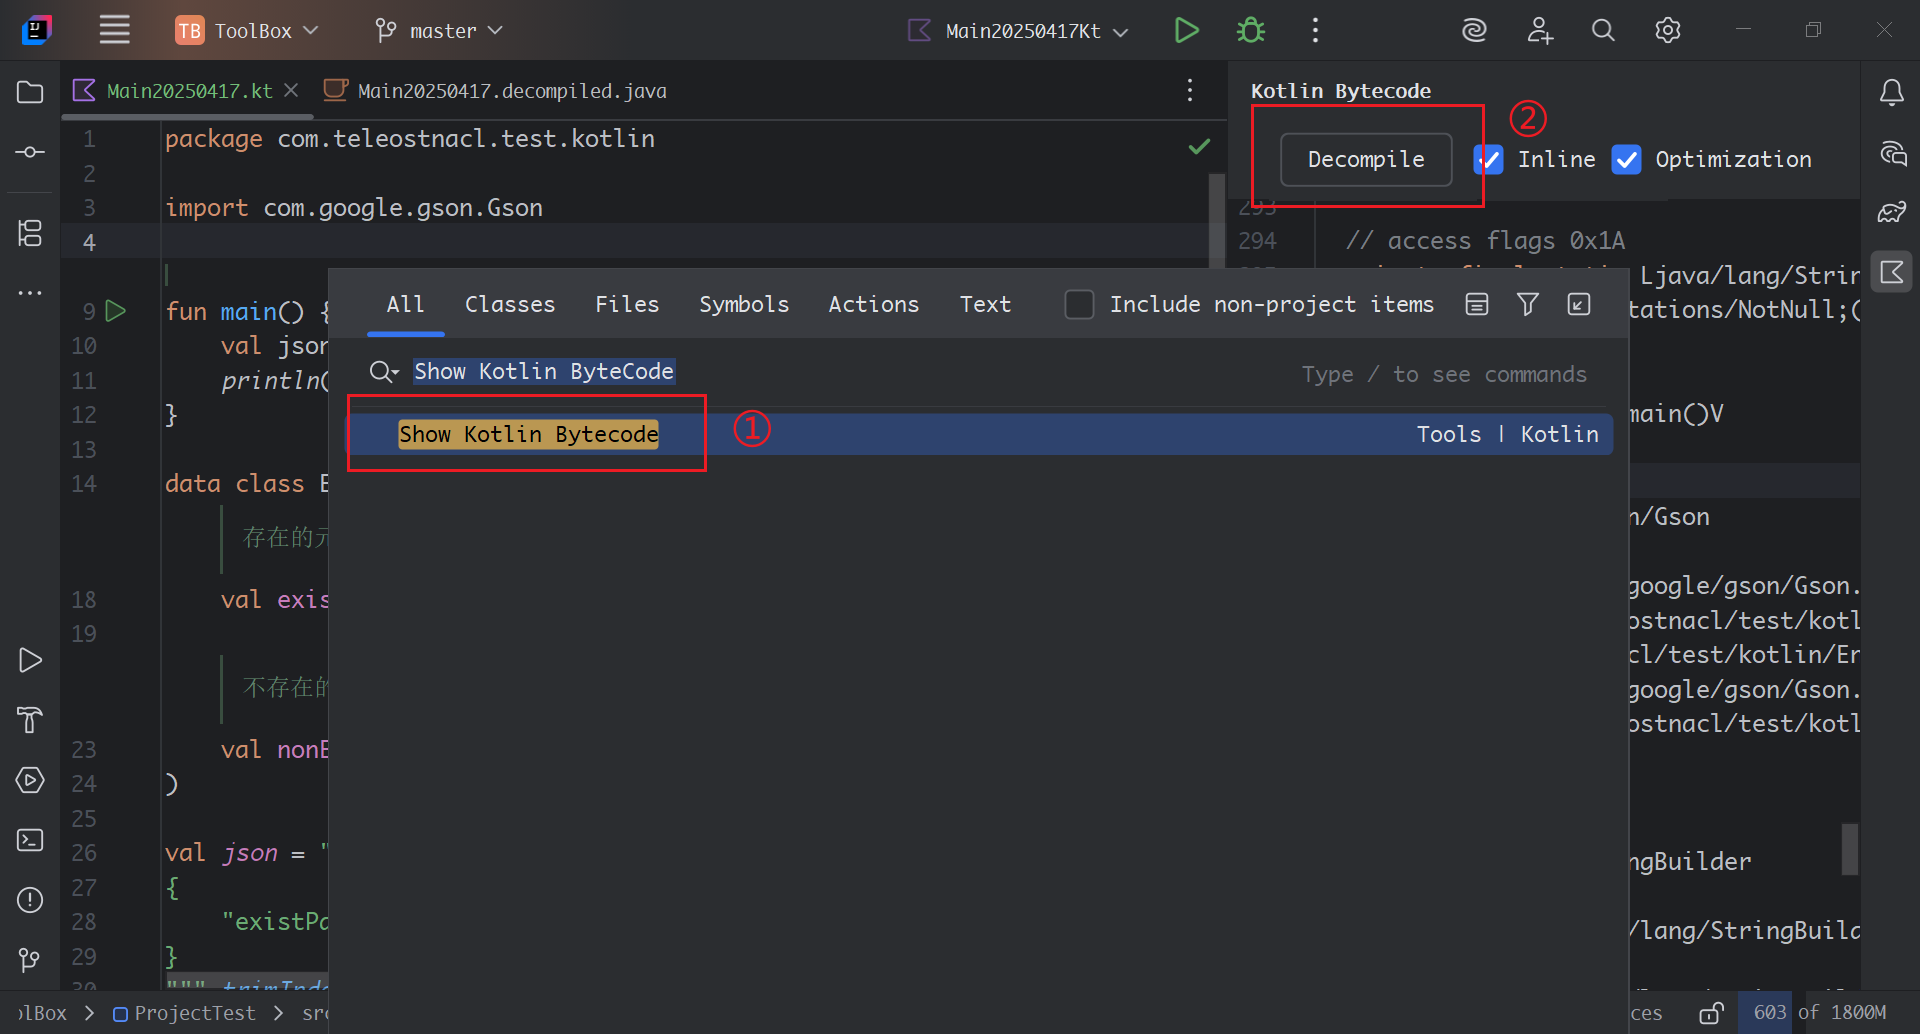
探寻Gson解析遇到不存在键值时引发的Kotlin的空指针异常的原因
文章目录 一、问题背景二、问题原因三、问题探析Kotlin空指针校验Gson.fromJson(String json, Class<T> classOfT)TypeTokenGson.fromJson(JsonReader reader, TypeToken<T> typeOfT)TypeAdapter 和 TypeAdapterFactoryReflectiveTypeAdapterFactoryRecordAdapter …...
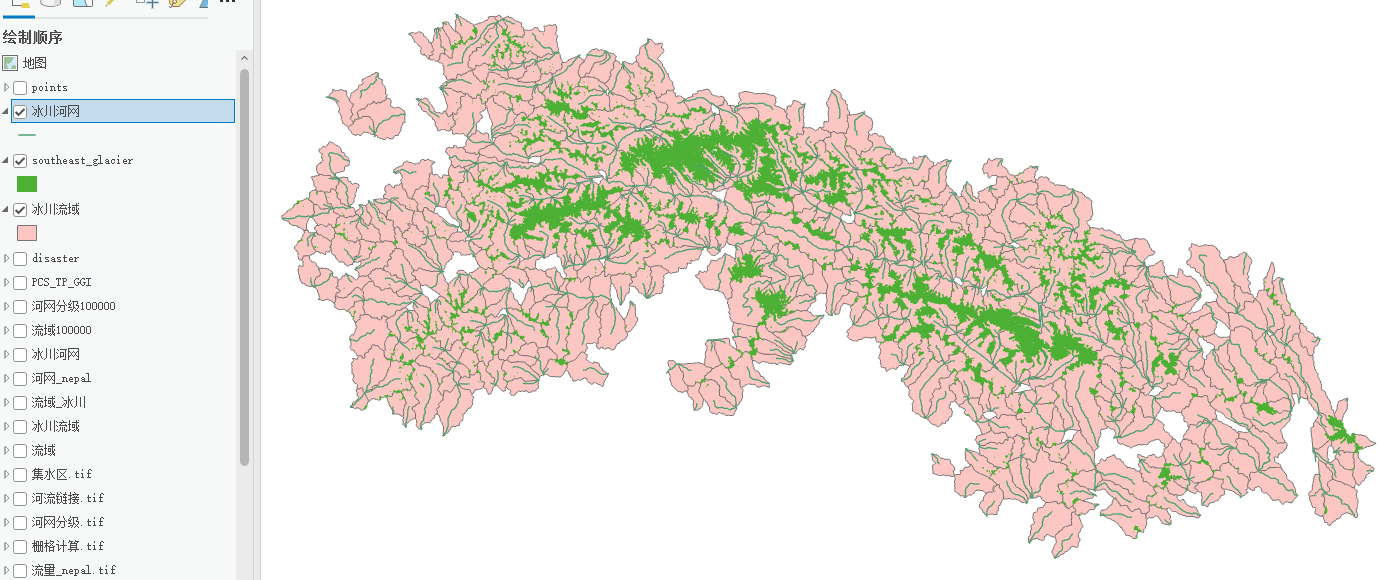
冰川流域提取分析——ArcGIS pro
一、河网提取和流域提取视频详细GIS小熊 || 6分钟学会水文分析—河网提取(以宜宾市为例)_哔哩哔哩_bilibili 首先你要生成研究区域DEM,然后依次是填洼→流向→流量→栅格计算器→河网分级→栅格河网矢量化(得到河网.shpÿ…...

wordpress 垂直越权(CVE=2021-21389)漏洞复现详细教程
关于本地化搭建vulfocus靶场的师傅可以参考我置顶文章 KALI搭建log4j2靶场及漏洞复现全流程-CSDN博客https://blog.csdn.net/2301_78255681/article/details/147286844 描述: BuddyPress 是一个用于构建社区站点的开源 WordPress 插件。在 7.2.1 之前的 5.0.0 版本的 BuddyP…...
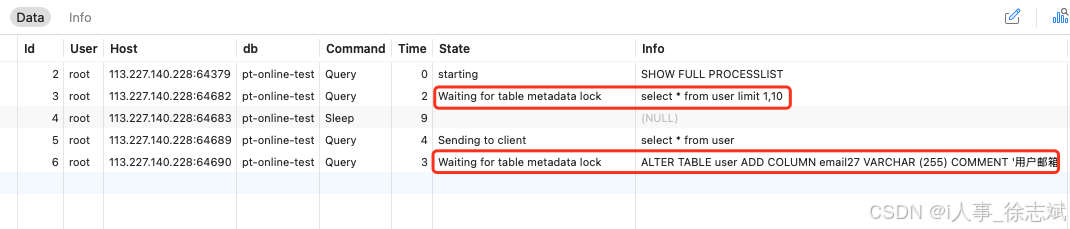
MySQL 线上大表 DDL 如何避免锁表(pt-online-schema-change)
文章目录 1、锁表问题2、pt-online-schema-change 原理3、pt-online-schema-change 实战3.1、准备数据3.2、安装工具3.3、模拟锁表3.4、解决锁表 1、锁表问题 在系统研发过程中,随着业务需求千变万化,避免不了调整线上MySQL DDL数据表的操作,…...

uni-app 状态管理深度解析:Vuex 与全局方案实战指南
uni-app 状态管理深度解析:Vuex 与全局方案实战指南 一、Vuex 使用示例 1. 基础 Vuex 配置 1.1 项目结构 src/ ├── store/ │ ├── index.js # 主入口文件 │ └── modules/ │ └── counter.js # 计数器模块 └── main.js …...
剑指offer经典题目(五)
目录 栈相关 二叉树相关 栈相关 题目一:定义栈的数据结构,请在该类型中实现一个能够得到栈中所含最小元素的 min 函数,输入操作时保证 pop、top 和 min 函数操作时,栈中一定有元素。OJ地址 图示如下。 主要思想:我们…...
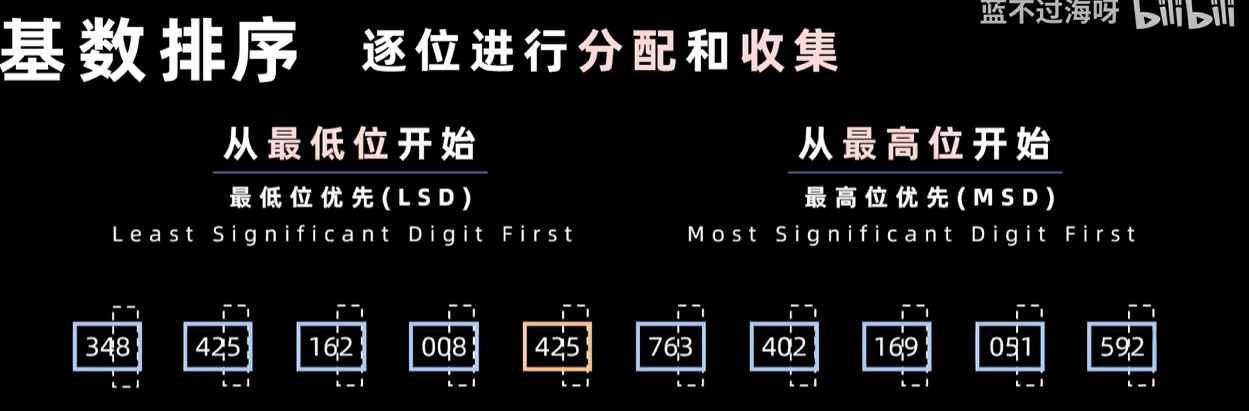
3、排序算法1---按考研大纲做的
一、插入排序 1、直接插入排序 推荐先看这个视频 1.1、原理 第一步,索引0的位置是有序区(有序区就是有序的部分,刚开始就只有第一个数据是有序的)。第二步,将第2个位置到最后一个位置的元素,依次进行排…...
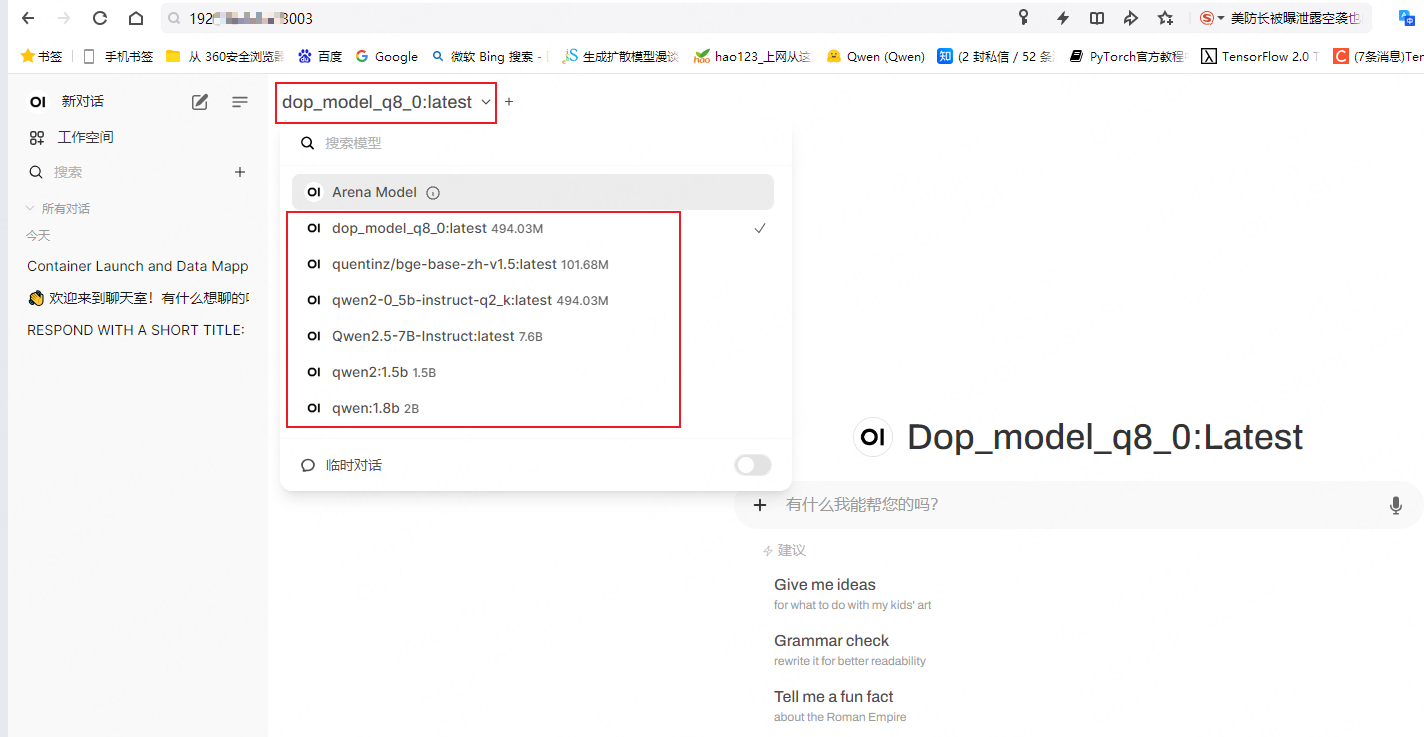
llama-webui docker实现界面部署
1. 启动ollama服务 [nlp server]$ ollama serve 2025/04/21 14:18:23 routes.go:1007: INFO server config env"map[OLLAMA_DEBUG:false OLLAMA_FLASH_ATTENTION:false OLLAMA_HOST: OLLAMA_KEEP_ALIVE:24h OLLAMA_LLM_LIBRARY: OLLAMA_MAX_LOADED_MODELS:4 OLLAMA_MAX_…...

jinjia2将后端传至前端的字典变量转换为JS变量
后端 country_dict {AE: .amazon.ae, AU: .amazon.com.au} 前端 const country_list JSON.parse({{ country_list | tojson | safe }});...

如何深入理解引用监视器,安全标识以及访问控制模型与资产安全之间的关系
一、核心概念总结 安全标识(策略决策的 “信息载体) 是主体(如用户、进程)和客体(如文件、数据库、设备)的安全属性,用于标记其安全等级、权限、访问能力或受保护级别,即用于标识其安全等级、权限范围或约束…...

Linux的Socket开发补充
是listen函数阻塞等待连接,还是accept函数阻塞等待连接? 这两个函数的名字,听起来像listen一直在阻塞监听,有连接了就accept,但其实不是的。 调用listen()后,程序会立即返回,继续执行后续代码&a…...

Flutter异常Couldn‘t find dynamic library in default locations
Flutter项目在Windows系统使用ffigen生成代码时报下面的错误: [SEVERE] : Couldnt find dynamic library in default locations. [SEVERE] : Please supply one or more path/to/llvm in ffigens config under the key llvm-path. Unhandled exception: Exception: …...