WPF之高级绑定技术
文章目录
- 引言
- 多重绑定(MultiBinding)
- 基本概念
- 实现自定义IMultiValueConverter
- MultiBinding在XAML中的应用示例
- 使用StringFormat简化MultiBinding
- 优先级绑定(PriorityBinding)
- 基本概念
- PriorityBinding示例
- 实现PriorityBinding的后台逻辑
- 异步绑定(Asynchronous Binding)
- 基本概念
- 异步绑定示例
- 异步绑定的后台实现
- 异步绑定的注意事项
- 延迟绑定(Delayed Binding)
- 基本概念
- 使用Delay属性
- 延迟绑定的实际应用示例
- 延迟绑定的ViewModel实现
- 绑定群组(BindingGroup)
- 基本概念
- BindingGroup的应用示例
- 实现PasswordMatchRule验证规则
- BindingGroup的ViewModel实现
- 绑定表达式(Binding Expressions)
- 基本概念
- 使用绑定表达式
- 绑定表达式在XAML中的应用
- 绑定表达式的ViewModel实现
- 总结
- 学习资源
可以根据Github拉取示例程序运行
GitHub程序演示地址(点击直达)
也可以在本文资源中下载
引言
WPF(Windows Presentation Foundation)的数据绑定系统是其最强大的特性之一,它允许开发者将UI元素与各种数据源无缝连接。基础绑定可以满足大多数场景需求,但在复杂应用程序开发中,我们常常需要更高级的绑定技术来解决特定问题。本文将深入探讨WPF中的高级绑定技术,包括多重绑定、优先级绑定、异步绑定等,帮助开发者充分利用WPF的数据绑定能力构建更强大、更灵活的应用程序。
多重绑定(MultiBinding)
基本概念
MultiBinding是一种将多个绑定源组合成单一值的强大技术。它通过值转换器(IMultiValueConverter)将多个源的值转换为一个可供目标属性使用的值。
实现自定义IMultiValueConverter
首先,我们需要实现IMultiValueConverter接口来定义如何将多个输入值转换为一个输出值:
using System;
using System.Globalization;
using System.Windows.Data;namespace WpfDemo.Converters
{// 将三个RGB值转换为一个颜色的转换器public class RgbToColorConverter : IMultiValueConverter{// 将多个值转换为一个值(从源到目标)public object Convert(object[] values, Type targetType, object parameter, CultureInfo culture){try{// 检查是否有足够的值if (values.Length != 3)return null;// 解析RGB值(0-255)byte r = System.Convert.ToByte(values[0]);byte g = System.Convert.ToByte(values[1]);byte b = System.Convert.ToByte(values[2]);// 创建颜色对象return new System.Windows.Media.Color(){R = r,G = g,B = b,A = 255 // 不透明};}catch (Exception){// 转换失败时,返回默认颜色return System.Windows.Media.Colors.Black;}}// 将一个值转换回多个值(从目标到源)public object[] ConvertBack(object value, Type[] targetTypes, object parameter, CultureInfo culture){var color = (System.Windows.Media.Color)value;return new object[] { color.R, color.G, color.B };}}
}
MultiBinding在XAML中的应用示例
<Window x:Class="WpfDemo.MultiBindingDemo"xmlns="http://schemas.microsoft.com/winfx/2006/xaml/presentation"xmlns:x="http://schemas.microsoft.com/winfx/2006/xaml"xmlns:conv="clr-namespace:WpfDemo.Converters"Title="MultiBinding示例" Height="300" Width="400"><Window.Resources><conv:RgbToColorConverter x:Key="RgbToColorConverter"/></Window.Resources><Grid Margin="10"><Grid.RowDefinitions><RowDefinition Height="Auto"/><RowDefinition Height="Auto"/><RowDefinition Height="Auto"/><RowDefinition Height="*"/></Grid.RowDefinitions><Grid.ColumnDefinitions><ColumnDefinition Width="Auto"/><ColumnDefinition Width="*"/></Grid.ColumnDefinitions><!-- 红色滑块 --><TextBlock Grid.Row="0" Grid.Column="0" Text="红色:" VerticalAlignment="Center"/><Slider x:Name="sliderRed" Grid.Row="0" Grid.Column="1" Minimum="0" Maximum="255" Value="128"TickFrequency="1" IsSnapToTickEnabled="True"/><!-- 绿色滑块 --><TextBlock Grid.Row="1" Grid.Column="0" Text="绿色:" VerticalAlignment="Center"/><Slider x:Name="sliderGreen" Grid.Row="1" Grid.Column="1" Minimum="0" Maximum="255" Value="128"TickFrequency="1" IsSnapToTickEnabled="True"/><!-- 蓝色滑块 --><TextBlock Grid.Row="2" Grid.Column="0" Text="蓝色:" VerticalAlignment="Center"/><Slider x:Name="sliderBlue" Grid.Row="2" Grid.Column="1" Minimum="0" Maximum="255" Value="128"TickFrequency="1" IsSnapToTickEnabled="True"/><!-- 颜色预览矩形 --><Border Grid.Row="3" Grid.Column="0" Grid.ColumnSpan="2" Margin="0,20,0,0" BorderThickness="1" BorderBrush="Black"><Border.Background><SolidColorBrush><SolidColorBrush.Color><!-- 使用MultiBinding绑定三个滑块的值 --><MultiBinding Converter="{StaticResource RgbToColorConverter}"><Binding ElementName="sliderRed" Path="Value"/><Binding ElementName="sliderGreen" Path="Value"/><Binding ElementName="sliderBlue" Path="Value"/></MultiBinding></SolidColorBrush.Color></SolidColorBrush></Border.Background><!-- 显示RGB值的文本 --><TextBlock HorizontalAlignment="Center" VerticalAlignment="Center"><TextBlock.Text><MultiBinding StringFormat="RGB({0:N0}, {1:N0}, {2:N0})"><Binding ElementName="sliderRed" Path="Value"/><Binding ElementName="sliderGreen" Path="Value"/><Binding ElementName="sliderBlue" Path="Value"/></MultiBinding></TextBlock.Text></TextBlock></Border></Grid>
</Window>
使用StringFormat简化MultiBinding
在上面的示例中,我们也展示了MultiBinding的另一个常用功能:使用StringFormat将多个值格式化为一个字符串,无需自定义转换器。
优先级绑定(PriorityBinding)
基本概念
PriorityBinding允许您指定多个绑定源,按优先级顺序尝试。当高优先级的绑定无法提供有效值或需要很长时间响应时,系统会回退到较低优先级的绑定。这对于创建响应式UI特别有用,可以先显示缓存或快速可用的数据,然后在获取到更新数据后再更新UI。
PriorityBinding示例
<Window x:Class="WpfDemo.PriorityBindingDemo"xmlns="http://schemas.microsoft.com/winfx/2006/xaml/presentation"xmlns:x="http://schemas.microsoft.com/winfx/2006/xaml"Title="PriorityBinding示例" Height="300" Width="400"><Grid Margin="20"><StackPanel><TextBlock Text="天气预报:" FontWeight="Bold" Margin="0,0,0,10"/><TextBlock><TextBlock.Text><PriorityBinding><!-- 高优先级绑定 - 从网络获取最新天气 --><Binding Path="WeatherForecast" Source="{StaticResource WeatherService}"IsAsync="True"/><!-- 中优先级绑定 - 使用缓存的天气数据 --><Binding Path="CachedWeatherForecast"Source="{StaticResource WeatherCache}"/><!-- 低优先级绑定 - 显示加载中信息 --><Binding Source="正在加载天气数据..."/></PriorityBinding></TextBlock.Text></TextBlock><Button Content="刷新天气" Margin="0,10,0,0"Command="{Binding RefreshWeatherCommand}"/></StackPanel></Grid>
</Window>
实现PriorityBinding的后台逻辑
using System;
using System.ComponentModel;
using System.Runtime.CompilerServices;
using System.Threading.Tasks;
using System.Windows.Input;namespace WpfDemo.ViewModels
{// 天气服务类public class WeatherService : INotifyPropertyChanged{private string _weatherForecast;// 实现INotifyPropertyChanged接口public event PropertyChangedEventHandler PropertyChanged;protected void OnPropertyChanged([CallerMemberName] string propertyName = null){PropertyChanged?.Invoke(this, new PropertyChangedEventArgs(propertyName));}// 天气预报属性public string WeatherForecast{get => _weatherForecast;private set{if (_weatherForecast != value){_weatherForecast = value;OnPropertyChanged();}}}// 刷新天气命令public ICommand RefreshWeatherCommand => new RelayCommand(async () => await FetchWeatherAsync());// 构造函数public WeatherService(){// 初始时为空,触发PriorityBinding回退到下一级_weatherForecast = null;}// 模拟从网络获取天气数据private async Task FetchWeatherAsync(){// 设置为null触发绑定回退WeatherForecast = null;// 模拟网络延迟await Task.Delay(3000);// 更新天气数据WeatherForecast = $"多云转晴,温度26°C,{DateTime.Now.ToString("yyyy-MM-dd HH:mm:ss")}更新";// 同时更新缓存WeatherCache.Instance.CachedWeatherForecast = WeatherForecast;}}// 天气缓存类public class WeatherCache : INotifyPropertyChanged{private static WeatherCache _instance;public static WeatherCache Instance => _instance ?? (_instance = new WeatherCache());private string _cachedWeatherForecast;public event PropertyChangedEventHandler PropertyChanged;protected void OnPropertyChanged([CallerMemberName] string propertyName = null){PropertyChanged?.Invoke(this, new PropertyChangedEventArgs(propertyName));}public string CachedWeatherForecast{get => _cachedWeatherForecast;set{if (_cachedWeatherForecast != value){_cachedWeatherForecast = value;OnPropertyChanged();}}}private WeatherCache(){// 初始缓存数据_cachedWeatherForecast = "昨日天气:晴,温度24°C (缓存数据)";}}// 简单的命令实现public class RelayCommand : ICommand{private readonly Action _execute;private readonly Func<bool> _canExecute;public RelayCommand(Action execute, Func<bool> canExecute = null){_execute = execute ?? throw new ArgumentNullException(nameof(execute));_canExecute = canExecute;}public bool CanExecute(object parameter) => _canExecute?.Invoke() ?? true;public void Execute(object parameter) => _execute();public event EventHandler CanExecuteChanged{add => CommandManager.RequerySuggested += value;remove => CommandManager.RequerySuggested -= value;}}
}
异步绑定(Asynchronous Binding)
基本概念
默认情况下,WPF数据绑定是同步的,这意味着如果数据源需要很长时间来获取值(如从数据库查询或网络请求),UI线程可能会被阻塞,导致应用程序暂时无响应。通过设置IsAsync="True",可以让绑定异步执行,避免阻塞UI线程。
异步绑定示例
<Window x:Class="WpfDemo.AsyncBindingDemo"xmlns="http://schemas.microsoft.com/winfx/2006/xaml/presentation"xmlns:x="http://schemas.microsoft.com/winfx/2006/xaml"Title="异步绑定示例" Height="300" Width="400"><Grid Margin="20"><StackPanel><TextBlock Text="数据加载示例:" FontWeight="Bold" Margin="0,0,0,10"/><!-- 异步绑定示例 --><TextBlock Text="{Binding LongRunningOperation, IsAsync=True}"FontSize="14"/><!-- 显示加载中状态 --><TextBlock Margin="0,5,0,0"><TextBlock.Style><Style TargetType="TextBlock"><Setter Property="Text" Value="数据加载中,请稍候..."/><Style.Triggers><DataTrigger Binding="{Binding LongRunningOperation, IsAsync=True}" Value="{x:Null}"><Setter Property="Visibility" Value="Visible"/></DataTrigger><DataTrigger Binding="{Binding LongRunningOperation, IsAsync=True}" Value="{x:Static x:String.Empty}"><Setter Property="Visibility" Value="Collapsed"/></DataTrigger></Style.Triggers></Style></TextBlock.Style></TextBlock><Button Content="重新加载数据" Margin="0,20,0,0"Command="{Binding ReloadDataCommand}"/></StackPanel></Grid>
</Window>
异步绑定的后台实现
using System;
using System.ComponentModel;
using System.Runtime.CompilerServices;
using System.Threading.Tasks;
using System.Windows.Input;namespace WpfDemo.ViewModels
{public class AsyncBindingViewModel : INotifyPropertyChanged{private string _longRunningOperation;public event PropertyChangedEventHandler PropertyChanged;protected void OnPropertyChanged([CallerMemberName] string propertyName = null){PropertyChanged?.Invoke(this, new PropertyChangedEventArgs(propertyName));}// 耗时操作的属性public string LongRunningOperation{get{// 首次访问时模拟耗时操作if (_longRunningOperation == null){// 这里会阻塞UI线程,但因为使用了IsAsync=True,所以不会导致UI无响应Task.Delay(3000).Wait(); // 模拟延迟_longRunningOperation = $"数据加载完成,时间:{DateTime.Now.ToString("yyyy-MM-dd HH:mm:ss")}";}return _longRunningOperation;}private set{if (_longRunningOperation != value){_longRunningOperation = value;OnPropertyChanged();}}}// 重新加载数据的命令public ICommand ReloadDataCommand => new RelayCommand(() =>{// 设置为null触发重新加载_longRunningOperation = null;OnPropertyChanged(nameof(LongRunningOperation));});}
}
异步绑定的注意事项
- FallbackValue 和 TargetNullValue: 可以设置这些属性来提供在异步加载过程中或结果为null时显示的值
- 绑定错误处理: 使用PriorityBinding可以与异步绑定结合提供更好的用户体验
- 取消异步操作: WPF不提供直接取消异步绑定的方法,需要在数据源中实现取消逻辑
- UI更新: 异步绑定完成后,更新会在UI线程上进行,无需手动调用Dispatcher
<!-- 使用FallbackValue在加载期间显示占位符 -->
<TextBlock Text="{Binding LongRunningOperation, IsAsync=True, FallbackValue='加载中...'}"FontSize="14"/>
延迟绑定(Delayed Binding)
基本概念
延迟绑定是一种优化技术,用于推迟数据绑定的更新,直到用户完成输入或交互。这对于减少在用户输入过程中频繁更新绑定源(如在TextBox中输入文本时)特别有用。
使用Delay属性
在WPF中,可以通过设置Binding.Delay属性实现延迟绑定:
<TextBox Text="{Binding SearchText, UpdateSourceTrigger=PropertyChanged, Delay=500}"/>
这会创建一个500毫秒的延迟,在用户停止输入500毫秒后才将值更新到数据源。
延迟绑定的实际应用示例
<Window x:Class="WpfDemo.DelayedBindingDemo"xmlns="http://schemas.microsoft.com/winfx/2006/xaml/presentation"xmlns:x="http://schemas.microsoft.com/winfx/2006/xaml"Title="延迟绑定示例" Height="350" Width="500"><Grid Margin="20"><Grid.RowDefinitions><RowDefinition Height="Auto"/><RowDefinition Height="Auto"/><RowDefinition Height="*"/></Grid.RowDefinitions><!-- 标题 --><TextBlock Grid.Row="0" Text="搜索示例" FontWeight="Bold" FontSize="16" Margin="0,0,0,15"/><!-- 搜索框 - 使用延迟绑定 --><StackPanel Grid.Row="1" Orientation="Horizontal"><TextBlock Text="搜索:" VerticalAlignment="Center" Margin="0,0,10,0"/><TextBox Width="300" Padding="5,3"Text="{Binding SearchText, UpdateSourceTrigger=PropertyChanged, Delay=500}"/></StackPanel><!-- 搜索结果 --><Border Grid.Row="2" BorderBrush="LightGray" BorderThickness="1" Margin="0,15,0,0" Padding="10"><StackPanel><TextBlock><Run Text="当前搜索内容: "/><Run Text="{Binding SearchText}" FontWeight="Bold"/></TextBlock><TextBlock Text="搜索结果:" FontWeight="Bold" Margin="0,10,0,5"/><ListView ItemsSource="{Binding SearchResults}" MaxHeight="150"><ListView.ItemTemplate><DataTemplate><TextBlock Text="{Binding}"/></DataTemplate></ListView.ItemTemplate></ListView><TextBlock Margin="0,10,0,0"><TextBlock.Style><Style TargetType="TextBlock"><Setter Property="Text" Value="没有搜索结果"/><Style.Triggers><DataTrigger Binding="{Binding HasResults}" Value="True"><Setter Property="Visibility" Value="Collapsed"/></DataTrigger></Style.Triggers></Style></TextBlock.Style></TextBlock></StackPanel></Border></Grid>
</Window>
延迟绑定的ViewModel实现
using System.Collections.ObjectModel;
using System.ComponentModel;
using System.Linq;
using System.Runtime.CompilerServices;namespace WpfDemo.ViewModels
{public class DelayedBindingViewModel : INotifyPropertyChanged{private string _searchText;private ObservableCollection<string> _searchResults;// 所有可能的项目private readonly string[] _allItems = new string[]{"苹果", "香蕉", "橙子", "草莓", "西瓜", "葡萄","菠萝", "桃子", "梨", "樱桃", "蓝莓", "柠檬","猕猴桃", "芒果", "石榴", "椰子", "无花果", "柿子"};public event PropertyChangedEventHandler PropertyChanged;protected void OnPropertyChanged([CallerMemberName] string propertyName = null){PropertyChanged?.Invoke(this, new PropertyChangedEventArgs(propertyName));}// 搜索文本属性public string SearchText{get => _searchText;set{if (_searchText != value){_searchText = value;OnPropertyChanged();// 当搜索文本变化时执行搜索PerformSearch();}}}// 搜索结果集合public ObservableCollection<string> SearchResults{get => _searchResults;private set{if (_searchResults != value){_searchResults = value;OnPropertyChanged();OnPropertyChanged(nameof(HasResults));}}}// 是否有搜索结果public bool HasResults => SearchResults != null && SearchResults.Count > 0;// 构造函数public DelayedBindingViewModel(){_searchText = string.Empty;_searchResults = new ObservableCollection<string>();}// 执行搜索private void PerformSearch(){// 创建新的集合避免修改现有集合导致的UI更新问题var results = new ObservableCollection<string>();// 如果搜索文本不为空if (!string.IsNullOrWhiteSpace(_searchText)){// 查找包含搜索文本的项目var filteredItems = _allItems.Where(i => i.Contains(_searchText)).OrderBy(i => i);// 添加到结果集合foreach (var item in filteredItems){results.Add(item);}}// 更新搜索结果SearchResults = results;}}
}
绑定群组(BindingGroup)
基本概念
BindingGroup是一个强大的WPF功能,它允许您将多个绑定组合在一起进行批量验证和更新。通过使用绑定群组,您可以实现以下功能:
- 对相关联的多个字段进行一次性验证
- 批量提交或取消多个绑定的更改
- 实现事务性数据更新
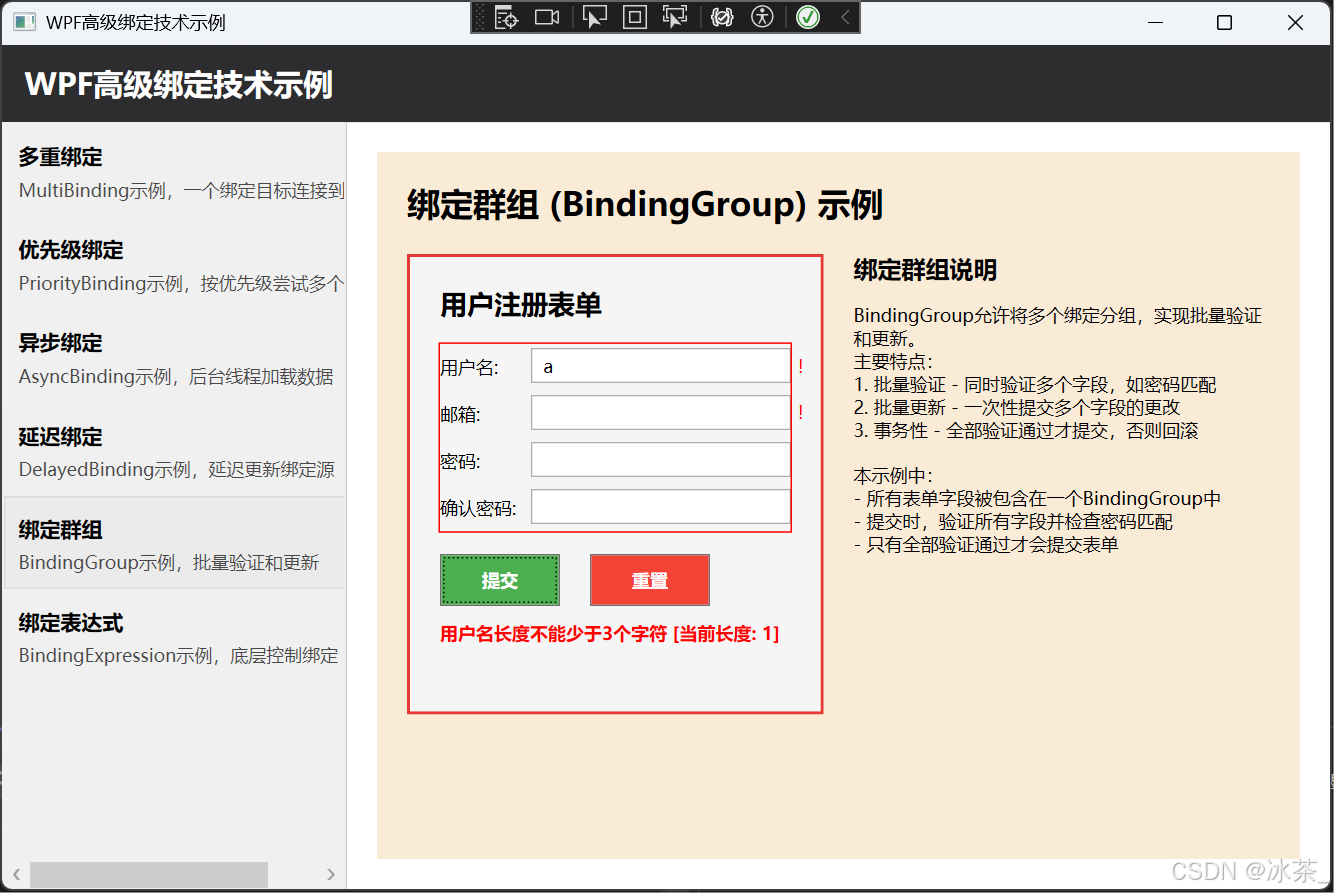
BindingGroup的应用示例
<Window x:Class="WpfDemo.BindingGroupDemo"xmlns="http://schemas.microsoft.com/winfx/2006/xaml/presentation"xmlns:x="http://schemas.microsoft.com/winfx/2006/xaml"Title="绑定群组示例" Height="400" Width="500"><Window.Resources><!-- 定义验证规则 --><ControlTemplate x:Key="ValidationTemplate"><StackPanel Orientation="Horizontal"><AdornedElementPlaceholder/><TextBlock Foreground="Red" Margin="5,0,0,0" Text="!" VerticalAlignment="Center"ToolTip="{Binding/ErrorContent}"/></StackPanel></ControlTemplate></Window.Resources><Grid Margin="20"><Grid.RowDefinitions><RowDefinition Height="Auto"/><RowDefinition Height="*"/><RowDefinition Height="Auto"/></Grid.RowDefinitions><!-- 标题 --><TextBlock Grid.Row="0" Text="用户注册表单" FontWeight="Bold" FontSize="16" Margin="0,0,0,15"/><!-- 表单区域 --><Grid Grid.Row="1"><!-- 创建绑定群组 --><Grid.BindingGroup><BindingGroup Name="RegistrationForm" NotifyOnValidationError="True"><BindingGroup.ValidationRules><!-- 自定义验证规则 - 密码匹配验证 --><local:PasswordMatchRule ValidatesOnTargetUpdated="True"/></BindingGroup.ValidationRules></BindingGroup></Grid.BindingGroup><Grid.RowDefinitions><RowDefinition Height="Auto"/><RowDefinition Height="Auto"/><RowDefinition Height="Auto"/><RowDefinition Height="Auto"/><RowDefinition Height="Auto"/></Grid.RowDefinitions><Grid.ColumnDefinitions><ColumnDefinition Width="Auto"/><ColumnDefinition Width="*"/></Grid.ColumnDefinitions><!-- 用户名 --><TextBlock Grid.Row="0" Grid.Column="0" Text="用户名:" Margin="0,5,10,5"VerticalAlignment="Center"/><TextBox Grid.Row="0" Grid.Column="1" Margin="0,5"Validation.ErrorTemplate="{StaticResource ValidationTemplate}"Text="{Binding User.Username, UpdateSourceTrigger=PropertyChanged}"/><!-- 电子邮箱 --><TextBlock Grid.Row="1" Grid.Column="0" Text="电子邮箱:" Margin="0,5,10,5"VerticalAlignment="Center"/><TextBox Grid.Row="1" Grid.Column="1" Margin="0,5"Validation.ErrorTemplate="{StaticResource ValidationTemplate}"Text="{Binding User.Email, UpdateSourceTrigger=PropertyChanged}"/><!-- 密码 --><TextBlock Grid.Row="2" Grid.Column="0" Text="密码:" Margin="0,5,10,5"VerticalAlignment="Center"/><PasswordBox x:Name="passwordBox" Grid.Row="2" Grid.Column="1" Margin="0,5"/><!-- 确认密码 --><TextBlock Grid.Row="3" Grid.Column="0" Text="确认密码:" Margin="0,5,10,5"VerticalAlignment="Center"/><PasswordBox x:Name="confirmPasswordBox" Grid.Row="3" Grid.Column="1" Margin="0,5"/><!-- 验证错误消息 --><TextBlock Grid.Row="4" Grid.Column="0" Grid.ColumnSpan="2" Foreground="Red" Margin="0,10,0,0"Text="{Binding ValidationError}"/></Grid><!-- 按钮区域 --><StackPanel Grid.Row="2" Orientation="Horizontal" Margin="0,15,0,0" HorizontalAlignment="Right"><Button Content="重置" Width="80" Margin="0,0,10,0"Command="{Binding ResetCommand}"/><Button Content="提交" Width="80" Command="{Binding SubmitCommand}"CommandParameter="{Binding BindingGroup, RelativeSource={RelativeSource FindAncestor, AncestorType=Grid}}"/></StackPanel></Grid>
</Window>
实现PasswordMatchRule验证规则
using System;
using System.Globalization;
using System.Windows.Controls;
using System.Windows.Data;namespace WpfDemo
{// 密码匹配验证规则public class PasswordMatchRule : ValidationRule{public override ValidationResult Validate(object value, CultureInfo cultureInfo){// 获取绑定组var bindingGroup = value as BindingGroup;if (bindingGroup == null)return new ValidationResult(false, "无效的绑定组");// 获取密码框的值var passwordBox = bindingGroup.Owner.FindName("passwordBox") as PasswordBox;var confirmPasswordBox = bindingGroup.Owner.FindName("confirmPasswordBox") as PasswordBox;if (passwordBox == null || confirmPasswordBox == null)return new ValidationResult(false, "无法找到密码框");// 获取密码string password = passwordBox.Password;string confirmPassword = confirmPasswordBox.Password;// 验证密码长度if (string.IsNullOrEmpty(password))return new ValidationResult(false, "密码不能为空");if (password.Length < 6)return new ValidationResult(false, "密码长度不能少于6个字符");// 验证密码匹配if (password != confirmPassword)return new ValidationResult(false, "两次输入的密码不匹配");// 验证通过return ValidationResult.ValidResult;}}
}
BindingGroup的ViewModel实现
using System;
using System.ComponentModel;
using System.Runtime.CompilerServices;
using System.Windows;
using System.Windows.Controls;
using System.Windows.Input;namespace WpfDemo.ViewModels
{public class BindingGroupViewModel : INotifyPropertyChanged{private UserModel _user;private string _validationError;public event PropertyChangedEventHandler PropertyChanged;protected void OnPropertyChanged([CallerMemberName] string propertyName = null){PropertyChanged?.Invoke(this, new PropertyChangedEventArgs(propertyName));}// 用户模型public UserModel User{get => _user;set{if (_user != value){_user = value;OnPropertyChanged();}}}// 验证错误消息public string ValidationError{get => _validationError;set{if (_validationError != value){_validationError = value;OnPropertyChanged();}}}// 提交命令public ICommand SubmitCommand => new RelayCommand<BindingGroup>(SubmitForm);// 重置命令public ICommand ResetCommand => new RelayCommand(ResetForm);// 构造函数public BindingGroupViewModel(){_user = new UserModel();_validationError = string.Empty;}// 提交表单private void SubmitForm(BindingGroup bindingGroup){try{// 清除之前的错误ValidationError = string.Empty;// 验证绑定组bool isValid = bindingGroup.ValidateWithoutUpdate();if (isValid){// 提交更改bindingGroup.CommitEdit();// 获取密码框的值var passwordBox = bindingGroup.Owner.FindName("passwordBox") as PasswordBox;string password = passwordBox?.Password ?? string.Empty;// 处理注册逻辑MessageBox.Show($"注册成功!\n用户名: {User.Username}\n邮箱: {User.Email}", "注册成功", MessageBoxButton.OK, MessageBoxImage.Information);}else{// 显示验证错误ValidationError = "表单验证失败,请检查输入";}}catch (Exception ex){ValidationError = $"提交表单出错: {ex.Message}";}}// 重置表单private void ResetForm(){User = new UserModel();ValidationError = string.Empty;// 重置密码框(需要在代码后台处理)}}// 用户模型public class UserModel : INotifyPropertyChanged{private string _username;private string _email;public event PropertyChangedEventHandler PropertyChanged;protected void OnPropertyChanged([CallerMemberName] string propertyName = null){PropertyChanged?.Invoke(this, new PropertyChangedEventArgs(propertyName));}public string Username{get => _username;set{if (_username != value){_username = value;OnPropertyChanged();}}}public string Email{get => _email;set{if (_email != value){_email = value;OnPropertyChanged();}}}public UserModel(){_username = string.Empty;_email = string.Empty;}}
}
绑定表达式(Binding Expressions)
基本概念
在WPF中,每个绑定都由一个BindingExpression对象表示,它提供了对绑定的底层控制。通过访问和操作BindingExpression,开发者可以实现更高级的绑定功能,如:
- 手动触发绑定更新
- 获取绑定的错误信息
- 清除绑定错误
- 强制重新评估绑定
使用绑定表达式
using System.Windows;
using System.Windows.Controls;
using System.Windows.Data;namespace WpfDemo
{public partial class BindingExpressionDemo : Window{public BindingExpressionDemo(){InitializeComponent();}// 手动更新源private void UpdateSourceButton_Click(object sender, RoutedEventArgs e){// 获取TextBox的绑定表达式TextBox textBox = nameTextBox;BindingExpression bindingExpression = textBox.GetBindingExpression(TextBox.TextProperty);// 如果绑定存在,手动更新源if (bindingExpression != null){// 将TextBox的当前值推送到绑定源bindingExpression.UpdateSource();// 可以检查验证错误if (Validation.GetHasError(textBox)){var errors = Validation.GetErrors(textBox);MessageBox.Show($"验证错误: {errors[0].ErrorContent}");}}}// 手动更新目标private void UpdateTargetButton_Click(object sender, RoutedEventArgs e){TextBox textBox = nameTextBox;BindingExpression bindingExpression = textBox.GetBindingExpression(TextBox.TextProperty);if (bindingExpression != null){// 从绑定源获取最新值,更新到TextBoxbindingExpression.UpdateTarget();}}// 清除验证错误private void ClearErrorsButton_Click(object sender, RoutedEventArgs e){TextBox textBox = nameTextBox;// 移除所有验证错误Validation.ClearInvalid(textBox.GetBindingExpression(TextBox.TextProperty));}}
}
绑定表达式在XAML中的应用
<Window x:Class="WpfDemo.BindingExpressionDemo"xmlns="http://schemas.microsoft.com/winfx/2006/xaml/presentation"xmlns:x="http://schemas.microsoft.com/winfx/2006/xaml"Title="绑定表达式示例" Height="300" Width="450"><Grid Margin="20"><Grid.RowDefinitions><RowDefinition Height="Auto"/><RowDefinition Height="Auto"/><RowDefinition Height="Auto"/><RowDefinition Height="*"/></Grid.RowDefinitions><!-- 标题 --><TextBlock Grid.Row="0" Text="绑定表达式控制" FontWeight="Bold" FontSize="16" Margin="0,0,0,15"/><!-- 输入字段 --><StackPanel Grid.Row="1"><TextBlock Text="姓名:" Margin="0,0,0,5"/><TextBox x:Name="nameTextBox" Padding="5,3"Text="{Binding PersonName, UpdateSourceTrigger=Explicit, ValidatesOnDataErrors=True}"/></StackPanel><!-- 按钮区域 --><StackPanel Grid.Row="2" Orientation="Horizontal" Margin="0,15,0,0"><Button Content="更新源 (UpdateSource)" Width="160" Margin="0,0,10,0"Click="UpdateSourceButton_Click"/><Button Content="更新目标 (UpdateTarget)" Width="160" Margin="0,0,10,0"Click="UpdateTargetButton_Click"/><Button Content="清除错误" Width="80"Click="ClearErrorsButton_Click"/></StackPanel><!-- 信息显示区域 --><Border Grid.Row="3" BorderBrush="LightGray" BorderThickness="1" Margin="0,15,0,0" Padding="10"><StackPanel><TextBlock><Run Text="当前源值: "/><Run Text="{Binding PersonName}" FontWeight="Bold"/></TextBlock><TextBlock Margin="0,10,0,0" Text="操作说明:" FontWeight="Bold"/><TextBlock TextWrapping="Wrap" Margin="0,5,0,0">1. 修改文本框内容 (不会立即更新源值,因为UpdateSourceTrigger=Explicit)<br/>2. 点击"更新源"按钮手动将值更新到数据源<br/>3. 点击"更新目标"按钮从数据源重新加载值到文本框<br/>4. 点击"清除错误"移除验证错误</TextBlock></StackPanel></Border></Grid>
</Window>
绑定表达式的ViewModel实现
using System.Collections.Generic;
using System.ComponentModel;
using System.Runtime.CompilerServices;namespace WpfDemo.ViewModels
{public class BindingExpressionViewModel : INotifyPropertyChanged, IDataErrorInfo{private string _personName;public event PropertyChangedEventHandler PropertyChanged;protected void OnPropertyChanged([CallerMemberName] string propertyName = null){PropertyChanged?.Invoke(this, new PropertyChangedEventArgs(propertyName));}// 人员姓名属性public string PersonName{get => _personName;set{if (_personName != value){_personName = value;OnPropertyChanged();}}}// 构造函数public BindingExpressionViewModel(){_personName = "张三";}// IDataErrorInfo接口实现 - 验证public string Error => null;public string this[string columnName]{get{if (columnName == nameof(PersonName)){if (string.IsNullOrWhiteSpace(PersonName))return "姓名不能为空";if (PersonName.Length < 2)return "姓名长度不能少于2个字符";}return null;}}}
}
总结
在WPF应用程序开发中,掌握高级绑定技术可以大幅提升UI与数据交互的灵活性和性能。本文详细介绍了六种关键的高级绑定技术:
-
多重绑定(MultiBinding):将多个绑定源组合为单一目标值,通过IMultiValueConverter实现复杂的数据转换。
-
优先级绑定(PriorityBinding):按优先级顺序尝试多个绑定源,在长时间操作过程中提供更好的用户体验。
-
异步绑定(Asynchronous Binding):通过IsAsync属性将耗时操作移至后台线程,避免阻塞UI线程。
-
延迟绑定(Delayed Binding):使用Delay属性推迟数据绑定更新,减少频繁输入时的性能开销。
-
绑定群组(BindingGroup):将多个绑定组合在一起进行批量验证和更新,实现事务性数据处理。
-
绑定表达式(Binding Expressions):提供对绑定的底层控制,包括手动触发更新、处理验证错误等。
这些高级绑定技术能够帮助开发者构建更高效、更灵活的WPF应用程序。根据具体的需求场景,选择合适的绑定技术可以显著改善应用程序的性能和用户体验。
学习资源
以下是一些有关WPF高级绑定技术的学习资源,可以帮助您进一步深入了解本文所介绍的概念:
-
Microsoft Docs - 数据绑定概述
-
Microsoft Docs - 绑定声明
-
Microsoft Docs - 多重绑定
-
Microsoft Docs - 异步绑定
-
Microsoft Docs - 绑定群组
-
CodeProject - WPF中的高级数据绑定技术
-
GitHub - WPF绑定示例集合
相关文章:
WPF之高级绑定技术
文章目录 引言多重绑定(MultiBinding)基本概念实现自定义IMultiValueConverterMultiBinding在XAML中的应用示例使用StringFormat简化MultiBinding 优先级绑定(PriorityBinding)基本概念PriorityBinding示例实现PriorityBinding的后…...
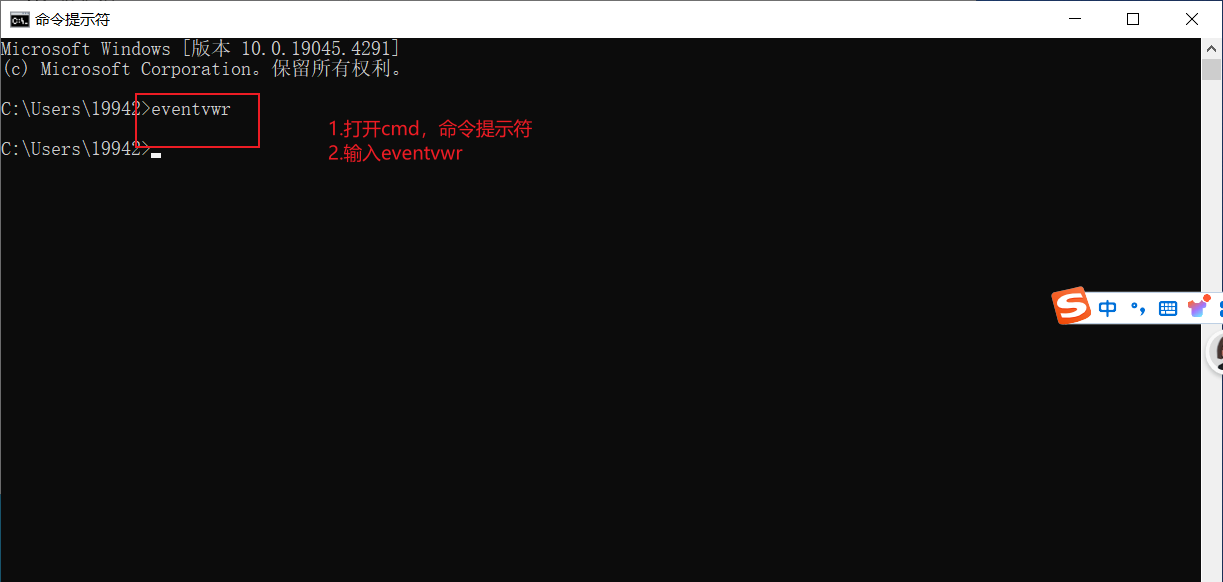
调出事件查看器界面的4种方法
方法1. 方法2. 方法3. 方法4....
使用vite重构vue-cli的vue3项目
一、修改依赖 首先修改 package.json,修改启动方式与相应依赖 移除vue-cli并下载vite相关依赖,注意一些peerDependency如fast-glob需要手动下载 # 移除 vue-cli 相关依赖 npm remove vue/cli-plugin-babel vue/cli-plugin-eslint vue/cli-plugin-rout…...

Go-GJSON 组件,解锁 JSON 读取新姿势
现在的通义灵码不但全面支持 Qwen3,还支持配置自己的 MCP 工具,还没体验过的小伙伴,马上配置起来啦~ https://click.aliyun.com/m/1000403618/ 在 Go 语言开发领域,json 数据处理是极为常见的任务。Go 标准库提供了 encoding/jso…...
:LeetCode 56. 合并区间(Merge Intervals)详解)
Java详解LeetCode 热题 100(14):LeetCode 56. 合并区间(Merge Intervals)详解
文章目录 1. 题目描述2. 理解题目3. 解法一:排序 + 一次遍历法3.1 思路3.2 Java代码实现3.3 代码详解3.4 复杂度分析3.5 适用场景4. 解法二:双指针法4.1 思路4.2 Java代码实现4.3 代码详解4.4 复杂度分析4.5 与解法一的比较5. 解法三:TreeMap法5.1 思路5.2 Java代码实现5.3 …...

将Docker镜像变为可执行文件?体验docker2exe带来的便捷!
在现代软件开发中,容器化技术极大地改变了应用程序部署和管理的方式。Docker,作为领先的容器化平台,已经成为开发者不可或缺的工具。然而,对于不熟悉Docker的用户来说,接触和运行Docker镜像可能会是一个复杂的过程。为了解决这一问题,docker2exe项目应运而生。它提供了一…...

ev_loop_fork函数
libev监视器介绍:libev监视器用法-CSDN博客 libev loop对象介绍:loop对象-CSDN博客 libev ev_loop_fork函数介绍:ev_loop_fork函数-CSDN博客 libev API吐血整理:https://download.csdn.net/download/qq_39466755/90794251?spm1001.2014.3…...
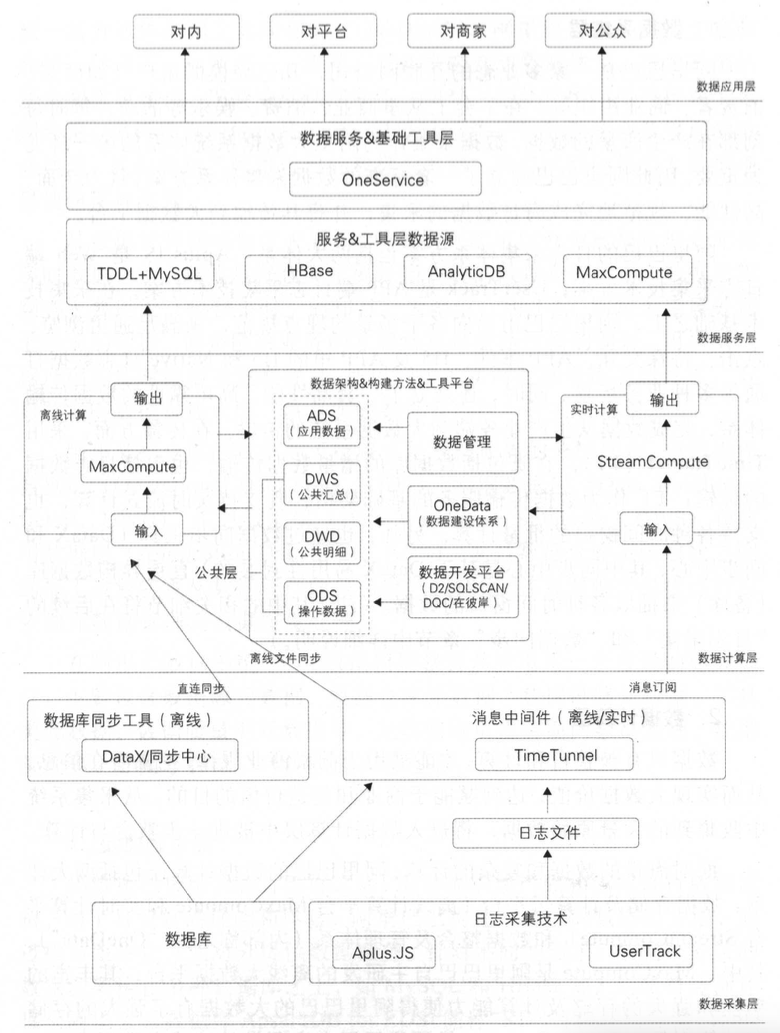
数据治理域——数据治理体系建设
摘要 本文主要介绍了数据治理系统的建设。数据治理对企业至关重要,其动因包括应对数据爆炸增长、提升内部管理效率、支撑复杂业务需求、加强风险防控与合规管理以及实现数字化转型战略。其核心目的是提升数据质量、统一数据标准、优化数据资产管理、支撑业务发展和…...

ES常识7:ES8.X集群允许4个 master 节点吗
在 Elasticsearch(ES)中,4 个 Master 节点的集群可以运行,但存在稳定性风险,且不符合官方推荐的最佳实践。以下从选举机制、故障容错、资源消耗三个维度详细分析: 一、4 个 Master 节点的可行性࿱…...

onGAU:简化的生成式 AI UI界面,一个非常简单的 AI 图像生成器 UI 界面,使用 Dear PyGui 和 Diffusers 构建。
一、软件介绍 文末提供程序和源码下载 onGAU:简化的生成式 AI UI界面开源程序,一个非常简单的 AI 图像生成器 UI 界面,使用 Dear PyGui 和 Diffusers 构建。 二、Installation 安装 文末下载后解压缩 Run install.py with python to setup…...
【第52节】Windows编程必学之从零手写C++调试器下篇(仿ollydbg)
目录 一、引言 二、调试器核心功能设计与实现 三、断点功能 四、高级功能 五、附加功能 六、开发环境与实现概要 七、项目展示及完整代码参考 八、总结 一、引言 在软件开发领域,调试器是开发者不可或缺的工具。它不仅能帮助定位代码中的逻辑错误࿰…...
uni-app学习笔记五--vue3插值表达式的使用
vue3快速上手导航:简介 | Vue.js 模板语法 插值表达式 最基本的数据绑定形式是文本插值,它使用的是“Mustache”语法 (即双大括号): <span>Message: {{ msg }}</span> 双大括号标签会被替换为相应组件实例中 msg 属性的值。同…...
C++类与对象(二):六个默认构造函数(一)
在学C语言时,实现栈和队列时容易忘记初始化和销毁,就会造成内存泄漏。而在C的类中我们忘记写初始化和销毁函数时,编译器会自动生成构造函数和析构函数,对应的初始化和在对象生命周期结束时清理资源。那是什么是默认构造函数呢&…...
操作的一个函数 flip())
OpenCV CUDA 模块中在 GPU 上对图像或矩阵进行 翻转(镜像)操作的一个函数 flip()
操作系统:ubuntu22.04 OpenCV版本:OpenCV4.9 IDE:Visual Studio Code 编程语言:C11 算法描述 cv::cuda::flip 是 OpenCV 的 CUDA 模块中的一个函数,用于在 GPU 上对图像或矩阵进行 翻转(镜像)操作。它类似…...

基于大模型的原发性醛固酮增多症全流程预测与诊疗方案研究
目录 一、引言 1.1 研究背景与意义 1.2 国内外研究现状 1.3 研究目的与方法 二、原发性醛固酮增多症概述 2.1 疾病定义与发病机制 2.2 临床表现与诊断标准 2.3 流行病学特征 三、大模型预测原理与技术 3.1 大模型简介 3.2 预测原理与算法 3.3 数据收集与预处理 四…...
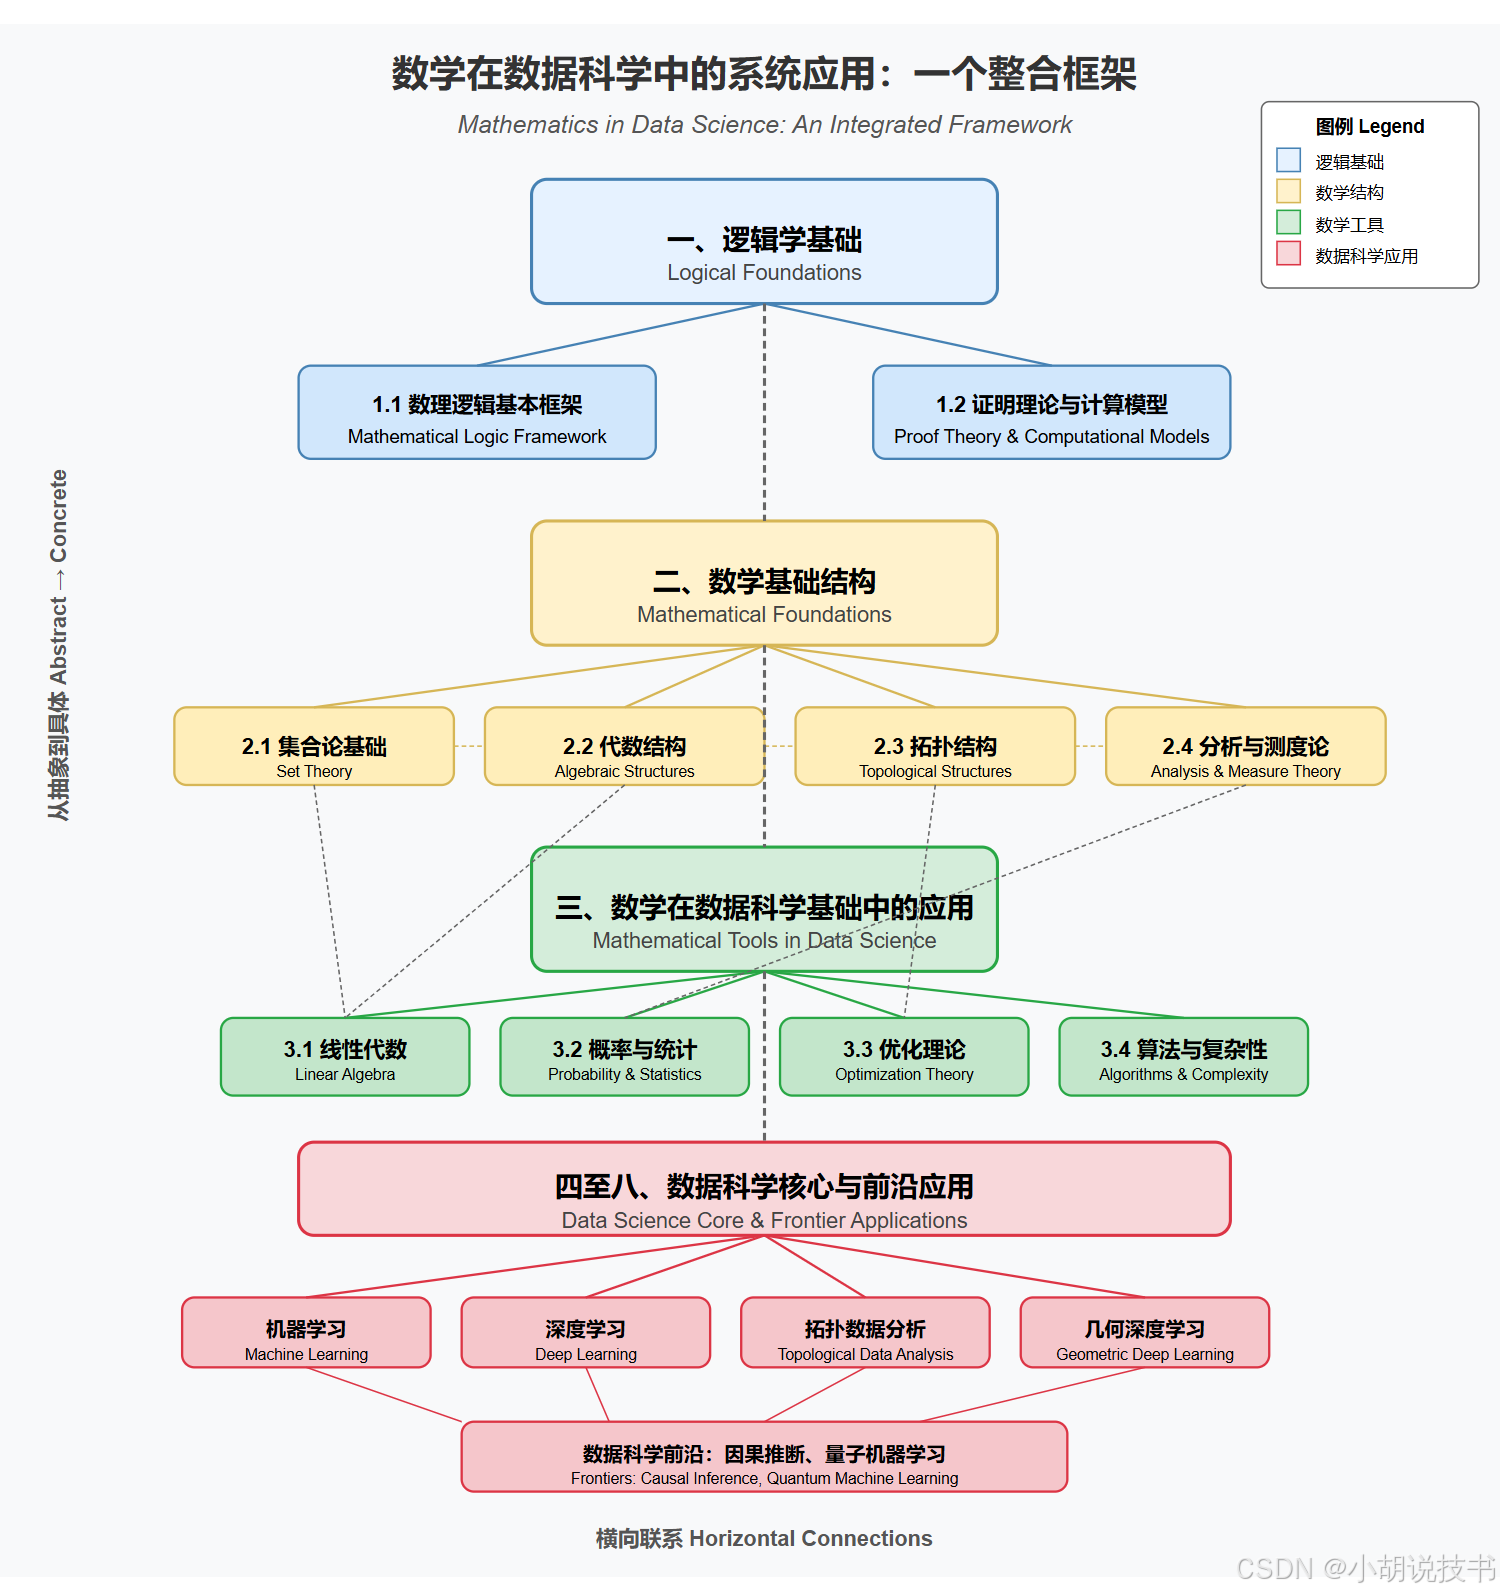
从逻辑学视角探索数学在数据科学中的系统应用:一个整合框架
声明:一家之言,看个乐子就行。 图表采用了两个维度组织知识结构: 垂直维度:从上到下展示了知识的抽象到具体的演进过程,分为四个主要层级: 逻辑学基础 - 包括数理逻辑框架和证明理论数学基础结构 - 涵盖…...
Matplotlib 完全指南:从入门到精通
前言 Matplotlib 是 Python 中最基础、最强大的数据可视化库之一。无论你是数据分析师、数据科学家还是研究人员,掌握 Matplotlib 都是必不可少的技能。本文将带你从零开始学习 Matplotlib,帮助你掌握各种图表的绘制方法和高级技巧。 目录 Matplotli…...
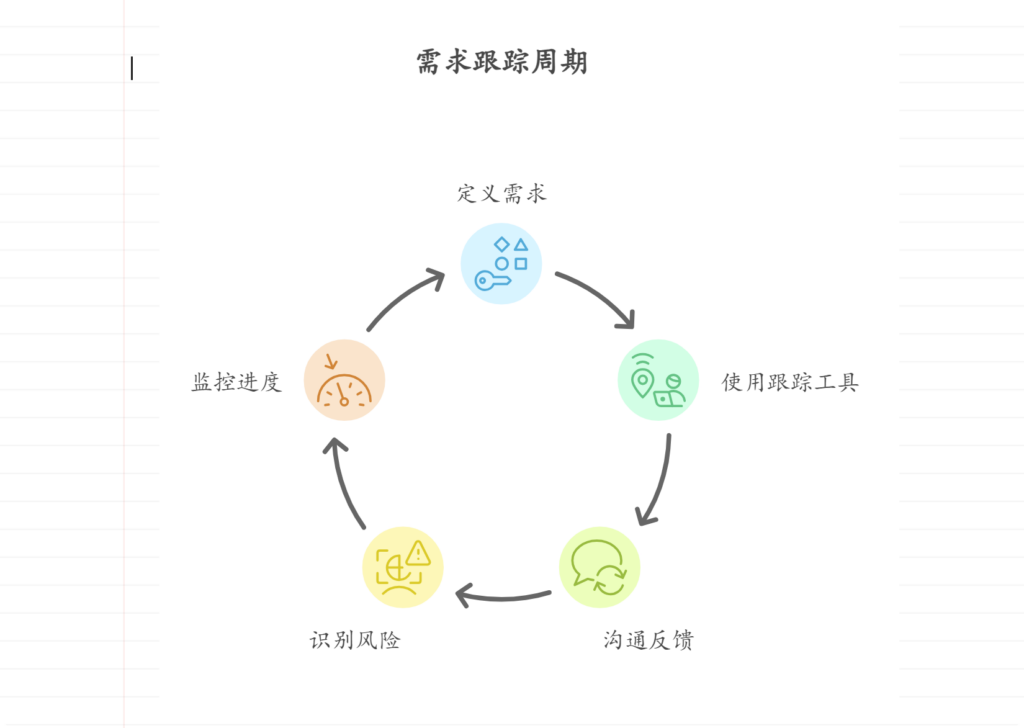
如何有效追踪需求的实现情况
有效追踪需求实现情况,需要清晰的需求定义、高效的需求跟踪工具、持续的沟通反馈机制,其中高效的需求跟踪工具尤为关键。 使用需求跟踪工具能确保需求实现进度可视化、提高团队协作效率,并帮助识别和管理潜在风险。例如,使用专业的…...
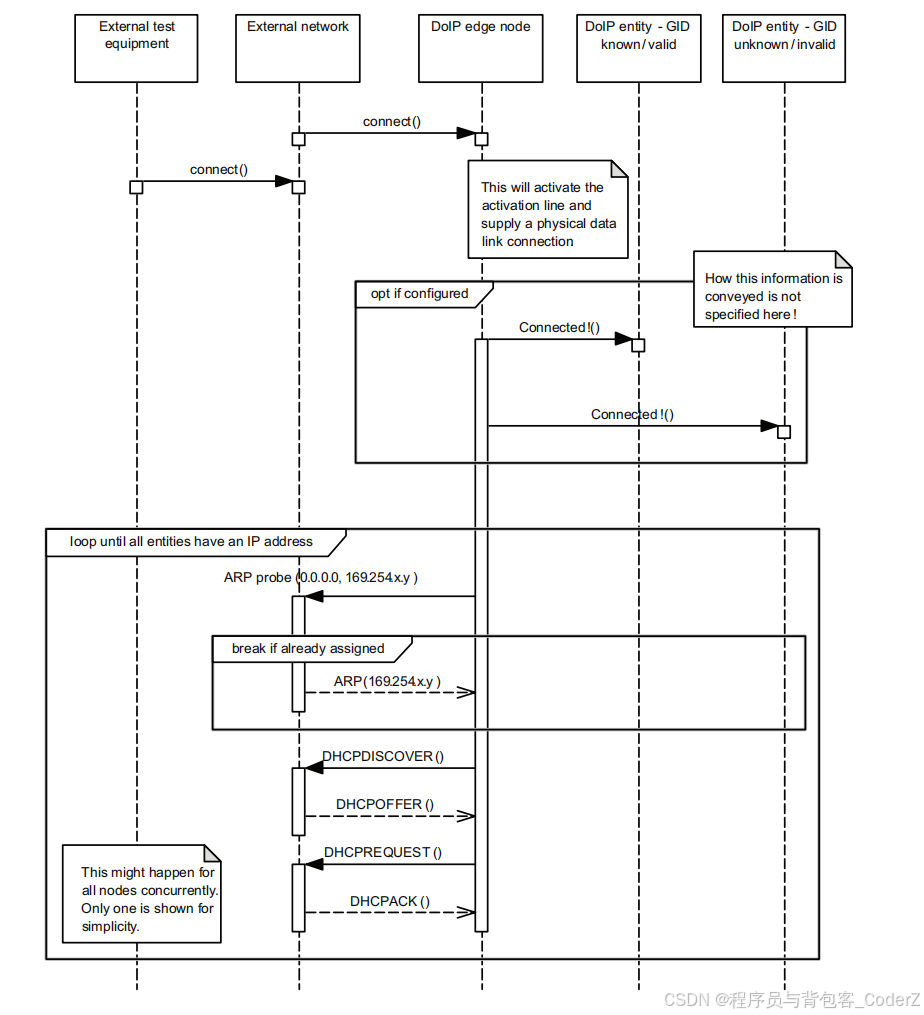
自动驾驶技术栈——DoIP通信协议
一、DoIP协议简介 DoIP,英文全称是Diagnostic communication over Internet Protocol,是一种基于因特网的诊断通信协议。 DoIP协议基于TCP/IP等网络协议实现了车辆电子控制单元(ECU)与诊断应用程序之间的通信,常用于汽车行业的远程诊断、远…...
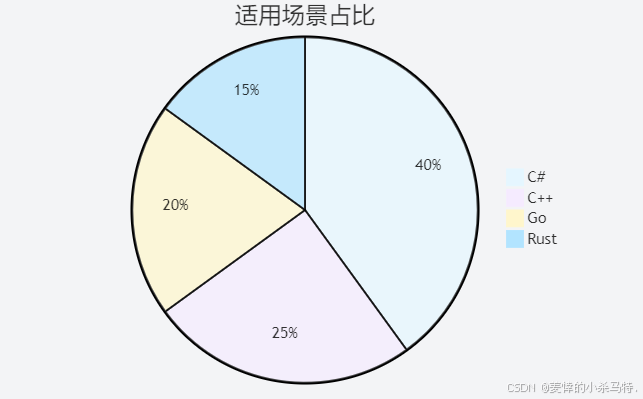
C++ 与 Go、Rust、C#:基于实践场景的语言特性对比
目录 编辑 一、语法特性对比 1.1 变量声明与数据类型 1.2 函数与控制流 1.3 面向对象特性 二、性能表现对比编辑 2.1 基准测试数据 在计算密集型任务(如 10⁷ 次加法运算)中: 在内存分配测试(10⁵ 次对象创建…...

Docker 中的 DNS 解析机制
在 Docker 容器化环境中,网络连接是至关重要的,而 DNS(Domain Name System,域名系统)解析则是网络通信的基础。容器需要能够解析内部服务名称以及外部域名,以便与其他容器或外部世界进行交互。理解 Docker 如何处理 DNS 请求,可以帮助我们更好地配置和排查网络问题。 D…...

数字化工厂中央控制室驾驶舱系统 API接口文档
数字化工厂中央控制室驾驶舱系统 API接口文档 本文档详细描述了数字化工厂中央控制室驾驶舱系统的API接口规范,包括中端服务提供的数据接口和算法接口。 1. 通用规范 1.1 基础URL 后端服务: http://localhost:8000中端服务数据API: http://localhost:8001中端服…...

如何更改默认字体:ONLYOFFICE 协作空间、桌面编辑器、文档测试示例
在处理办公文件时,字体对提升用户体验至关重要。本文将逐步指导您如何在 ONLYOFFICE 协作空间、桌面应用及文档测试示例中自定义默认字体,以满足个性化需求,更好地掌控文档样式。 关于 ONLYOFFICE ONLYOFFICE 是一个国际开源项目,…...
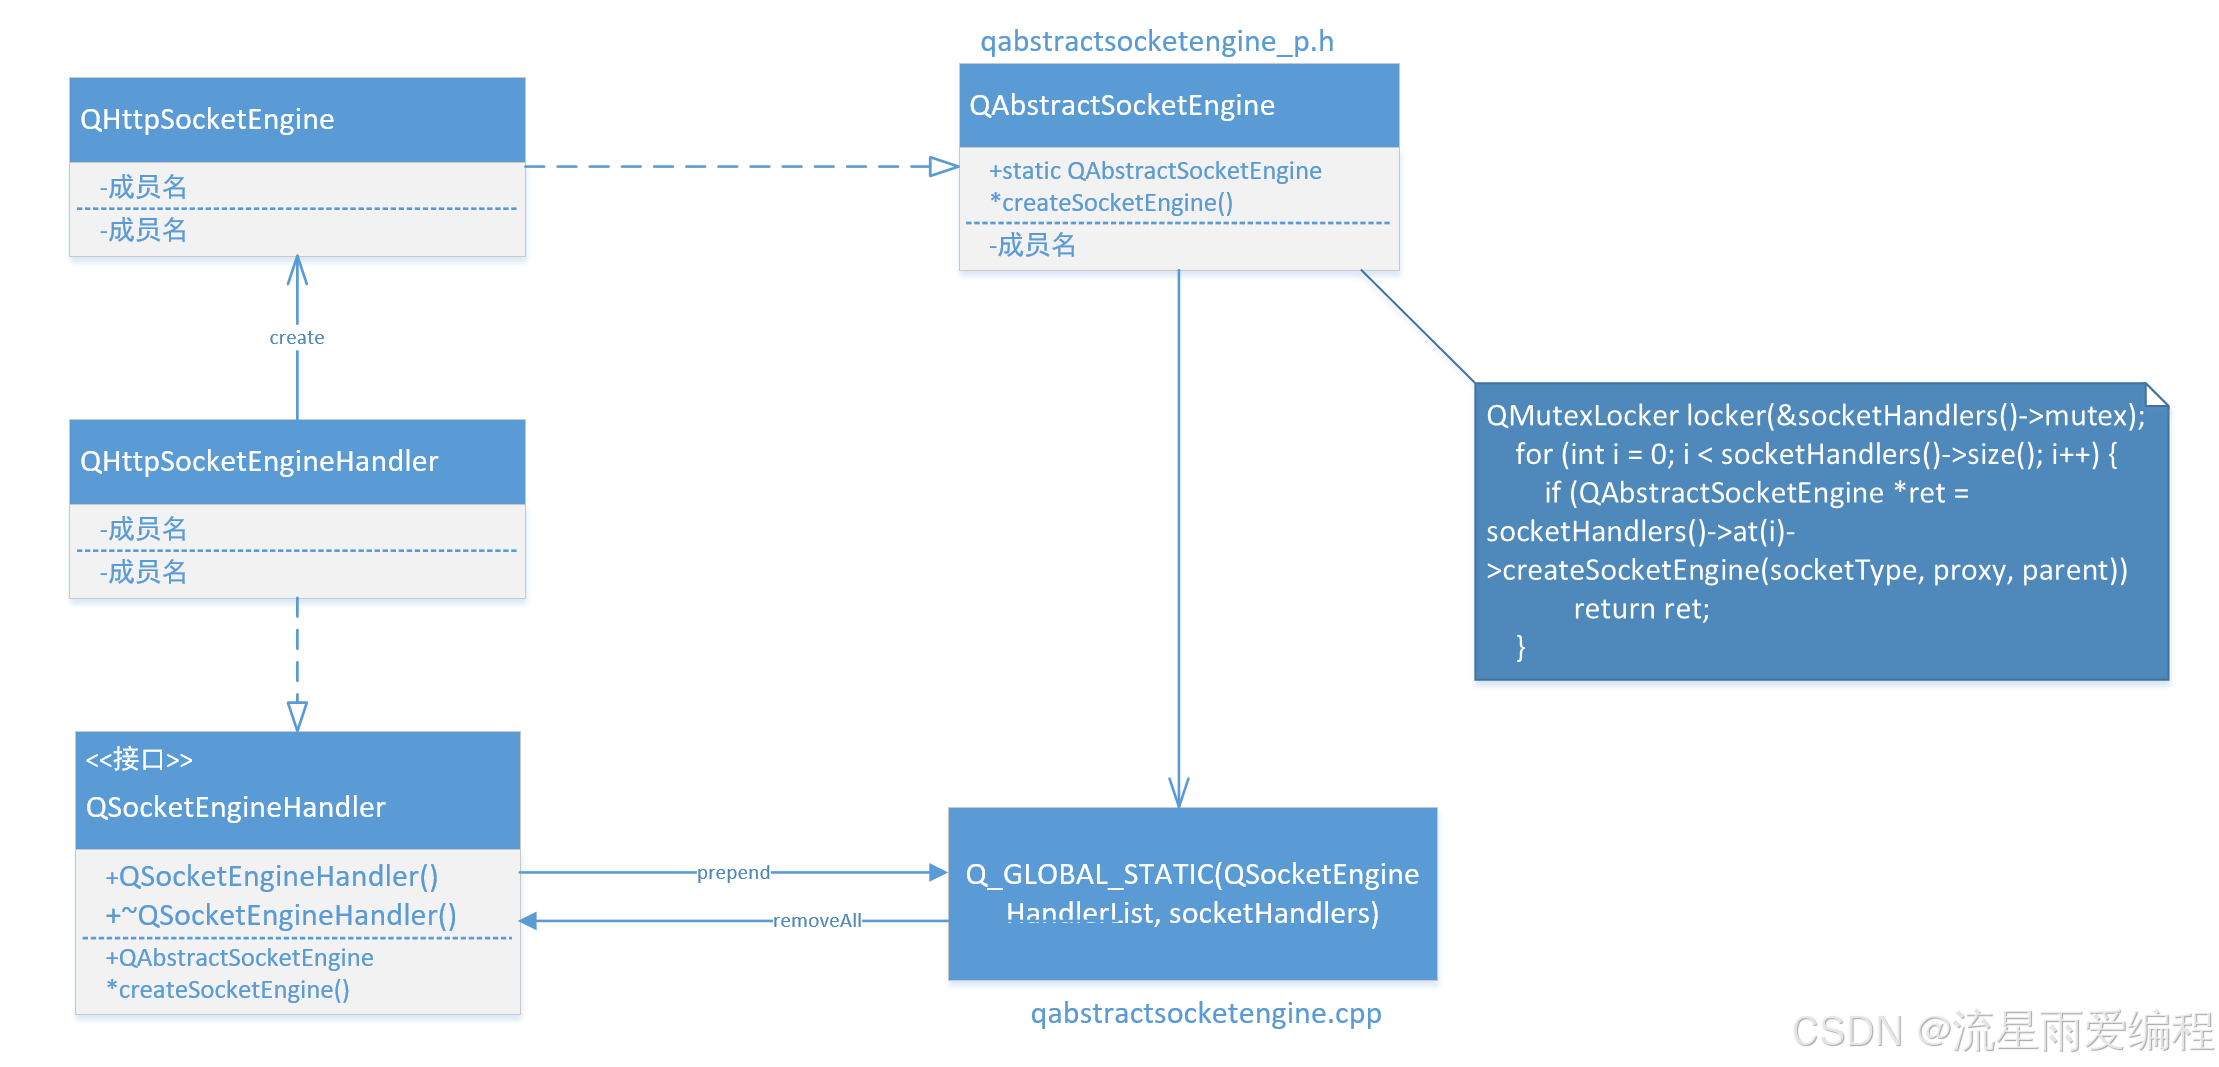
设计模式之工厂模式(二):实际案例
设计模式之工厂模式(一) 在阅读Qt网络部分源码时候,发现在某处运用了工厂模式,而且编程技巧也用的好,于是就想分享出来,供大家参考,理解的不对的地方请多多指点。 以下是我整理出来的类图: 关键说明&#x…...

基于VeRL源码深度拆解字节Seed的DAPO
1. 背景与现状:从PPO到GRPO的技术演进 1.1 PPO算法的基础与局限 Proximal Policy Optimization(PPO)作为当前强化学习领域的主流算法,通过重要性采样比率剪裁机制将策略更新限制在先前策略的近端区域内,构建了稳定的…...
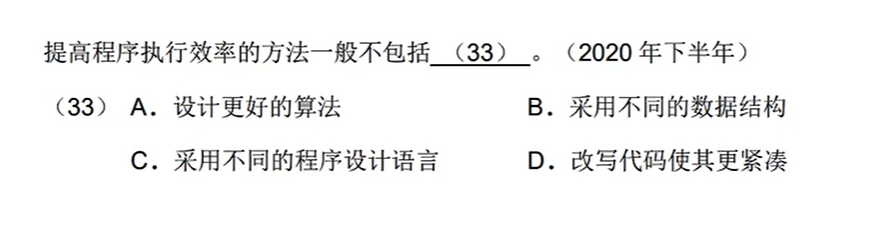
zst-2001 历年真题 软件工程
软件工程 - 第1题 b 软件工程 - 第2题 c 软件工程 - 第3题 c 软件工程 - 第4题 b 软件工程 - 第5题 b 软件工程 - 第6题 0.未完成:未执行未得到目标。1.已执行:输入-输出实现支持2.已管理:过程制度化,项目遵…...

WSL 安装 Debian 12 后,Linux 如何安装 redis ?
在 WSL 的 Debian 12 上安装 Redis 的步骤如下: 1. 更新系统包列表 sudo apt update && sudo apt upgrade -y2. 安装 Redis sudo apt install redis-server -y3. 启动 Redis 服务 sudo systemctl start redis4. 设置开机自启 sudo systemctl enable red…...

在Ubuntu系统下编译OpenCV 4.8源码
编译OpenCV 4.8源码可以为你提供更高的灵活性和优化性能,适合特定的需求。以下是详细的步骤,指导你在Ubuntu系统上编译和安装OpenCV 4.8。 1. 安装必要的依赖 首先,确保你的系统已经安装了所有必要的依赖项。 sudo apt update sudo apt in…...

Arduino快速入门
Arduino快速入门指南 一、硬件准备 选择开发板: 推荐使用 Arduino UNO(兼容性强,适合初学者),其他常见型号包括NANO(体积小)、Mega(接口更多)。准备基础元件:…...

基于WSL用MSVC编译ffmpeg7.1
在windows平台编译FFmpeg,网上的大部分资料都是推荐用msys2mingw进行编译。在win10平台,我们可以采用另一种方式,即wslmsvc 实现window平台的ffmpeg编译。 下面将以vs2022ubuntu22.04 为例,介绍此方法 0、前期准备 安装vs2022 &…...