【RabbitMQ】整合 SpringBoot,实现工作队列、发布/订阅、路由和通配符模式
文章目录
- 工作队列模式
- 引入依赖
- 配置
- 声明
- 生产者代码
- 消费者代码
- 发布/订阅模式
- 引入依赖
- 声明
- 生产者代码
- 发送消息
- 消费者代码
- 运行程序
- 路由模式
- 声明
- 生产者代码
- 消费者代码
- 运行程序
- 通配符模式
- 声明
- 生产者代码
- 消费者代码
- 运行程序
工作队列模式
引入依赖
我们在创建 SpringBoot 项目的时候,选上这两个依赖即可 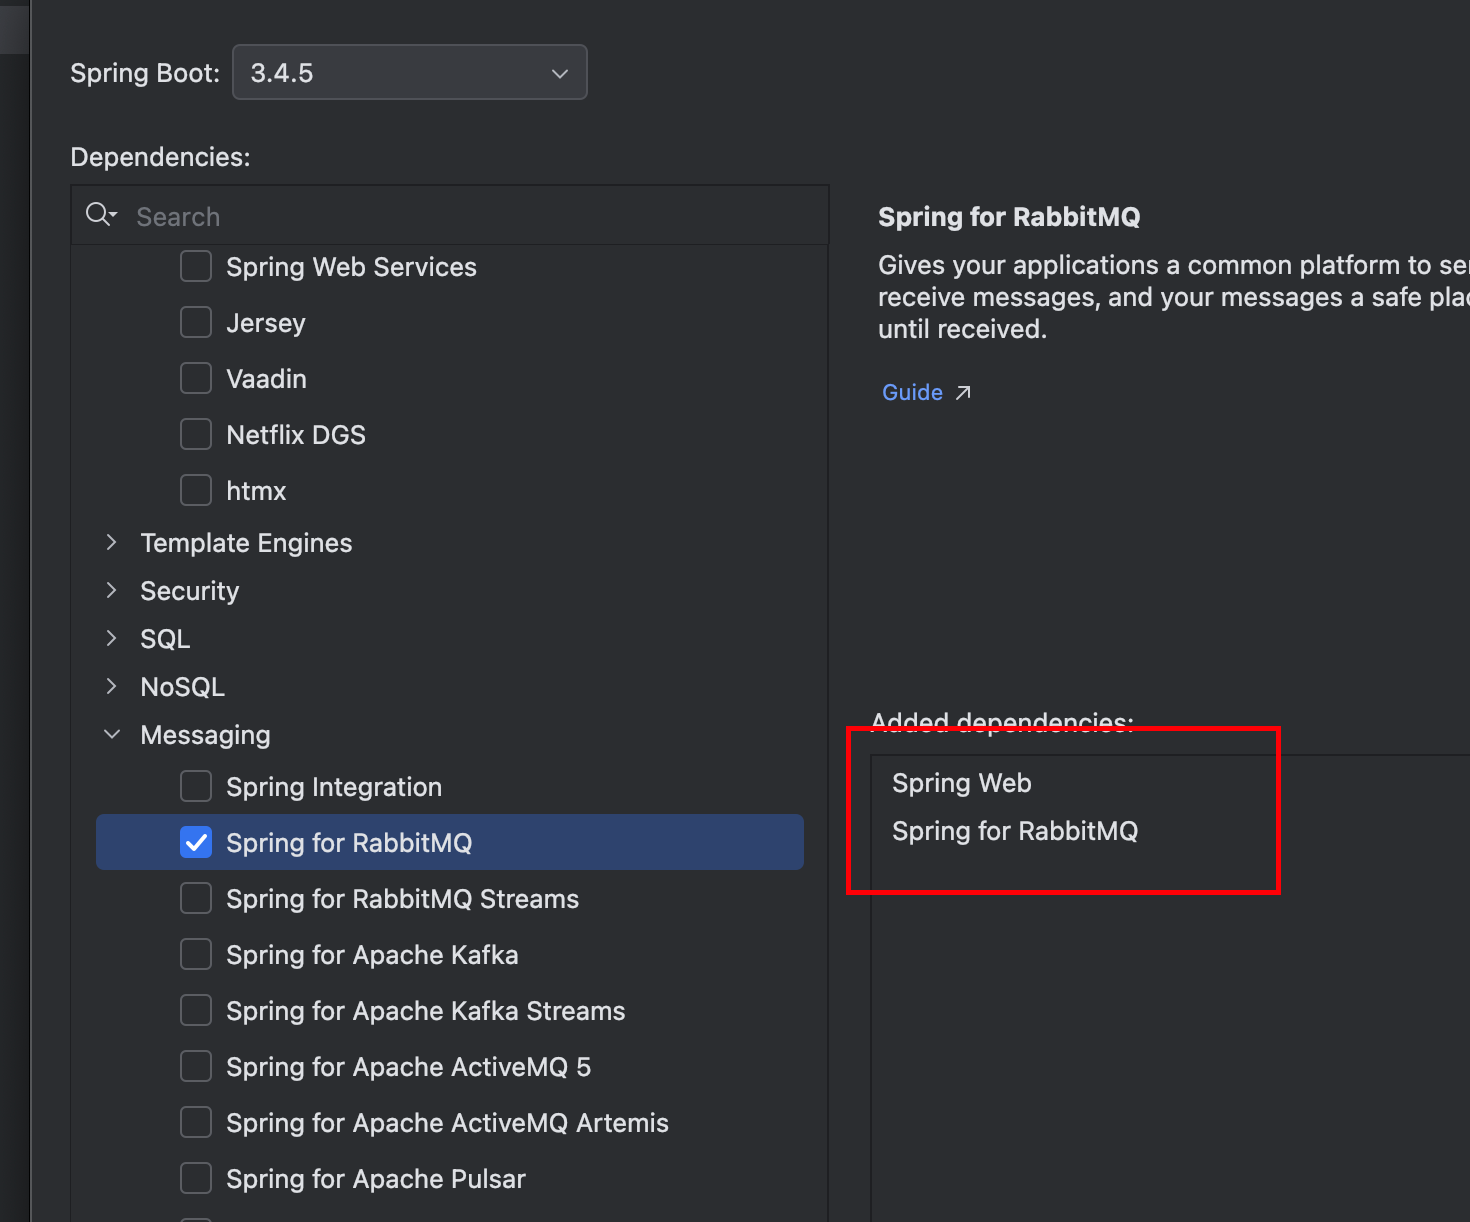
或者在依赖中加入
<dependency>  <groupId>org.springframework.boot</groupId>  <artifactId>spring-boot-starter-amqp</artifactId>
</dependency>
配置
将配置文件后缀改成 yml 之后,进行配置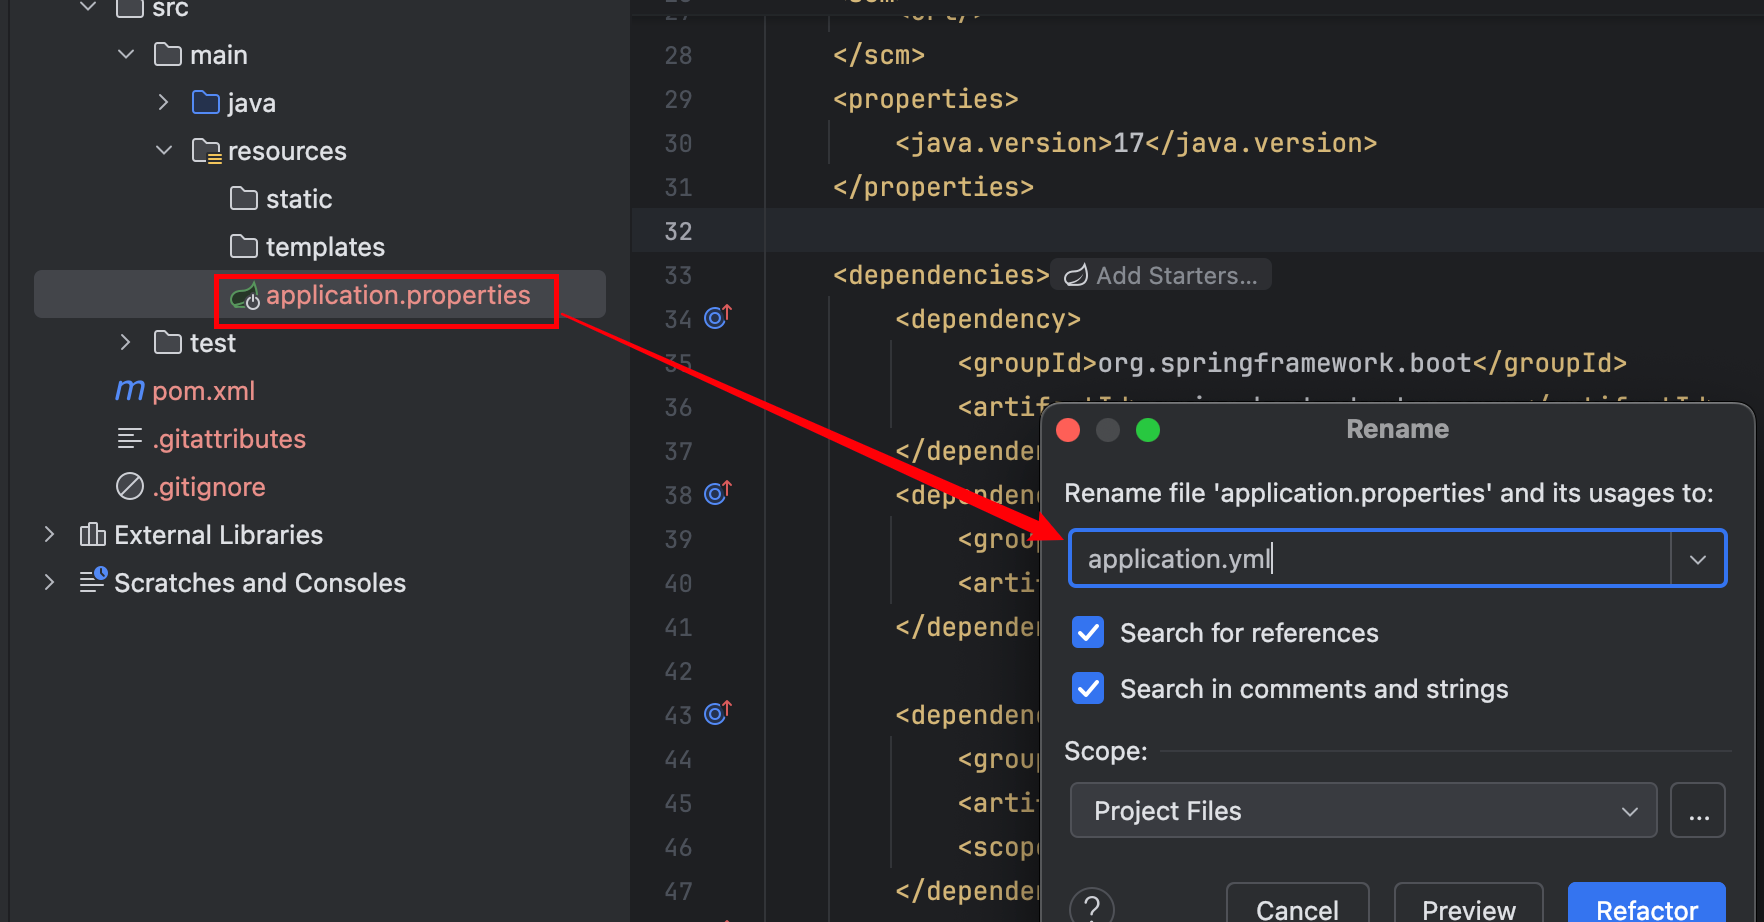
#配置 RabbitMQ 的基本信息
spring:rabbitmq:  host: 127.0.0.1 #RabbitMQ 服务器的地址  port: 15673  #RabbitMQ的TCP协议的端口号,而不是管理平台的端口号。默认为5672  username: guest  password: guest  virtual-host: coding #默认为 /
或者这样写
spring:rabbitmq:addresses: amqp://guest:guest@127.0.0.1:5672/coding
- 格式为:
amqp://username:password@ip:port/virtual-host
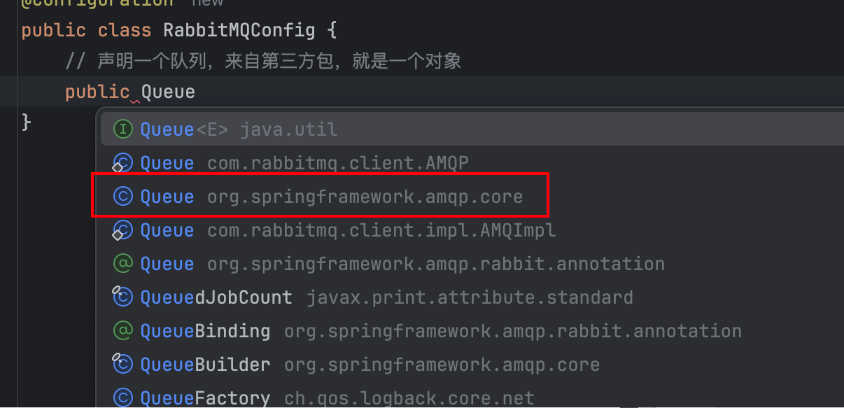
声明
注意引入的是这个包
package org.example.rabbitmq.config;  import org.example.rabbitmq.constant.Constants;
import org.springframework.amqp.core.Queue;
import org.springframework.amqp.core.QueueBuilder;
import org.springframework.context.annotation.Bean;
import org.springframework.context.annotation.Configuration;  @Configuration
public class RabbitMQConfig {  // 声明一个队列,来自第三方包,就是一个对象  @Bean("workQueue")  public Queue workQueue(){  return QueueBuilder.durable(Constants.WORK_QUEUE).build();  }
}
生产者代码
package org.example.rabbitmq.controller; import org.example.rabbitmq.constant.Constants;
import org.springframework.amqp.rabbit.core.RabbitTemplate;
import org.springframework.beans.factory.annotation.Autowired;
import org.springframework.web.bind.annotation.RequestMapping;
import org.springframework.web.bind.annotation.RestController; @RestController
@RequestMapping("/producer")
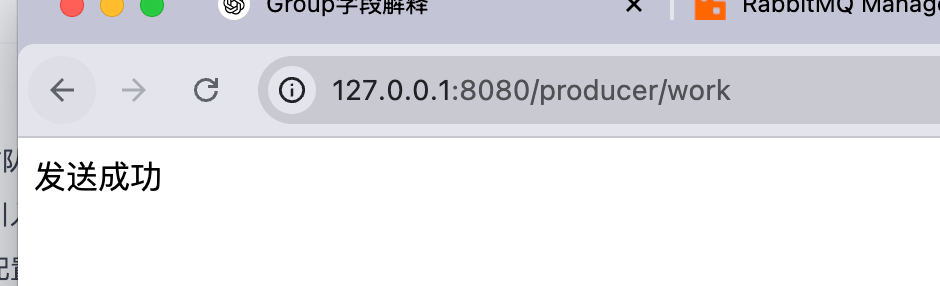
public class ProducerController { @Autowired private RabbitTemplate rabbitTemplate; @RequestMapping("/work") public String work() { // 使用内置交换机的话,RoutingKey 和队列名称一致 rabbitTemplate.convertAndSend("", Constants.WORK_QUEUE, "hello spring amqp: work..."); return "发送成功"; }
}
- 在运行程序之后,队列不会被立马创建出来
- 需要发送消息之后才会被创建
消费者代码
消费者是通过实现一个监听类,来监听有没有消息
- 采用一个注解——
@RabbitListener
@RabbitListener是Spring框架中用于监听RabbitMQ队列的注解,通过使用这个注解,可以定义一个方法,以便从RabbitMQ队列中接收消息。
- 该注解支持多种参数类型,这些参数类型代表了从
RabbitMQ接收到的消息和相关信息- 以下是一些常用的参数类型:
String:返回消息的内容Message(org.spring.framework.ampq.core.Message):Spring AMPQ的Message类,返回原始的消息体以及消息的属性,如消息ID,内容,队列信息等Channel(com.rabbitmq.client.Channel):RabbitMQ的通道对象,可以用于进行高级的操作,如手动确认消息
package org.example.rabbitmq.listener;  import org.apache.logging.log4j.message.Message;
import org.example.rabbitmq.constant.Constants;
import org.springframework.amqp.rabbit.annotation.RabbitListener;
import org.springframework.stereotype.Component;  @Component
public class WorkListener {  @RabbitListener(queues = Constants.WORK_QUEUE)  public void queueListener1(Message message) {  System.out.println("listener 1 [" + Constants.WORK_QUEUE + "] 接收到消息:" + message);  }  @RabbitListener(queues = Constants.WORK_QUEUE)  public void queueListener2(String message) {  System.out.println("listener 2 [" + Constants.WORK_QUEUE + "] 接收到消息:" + message);  }
}
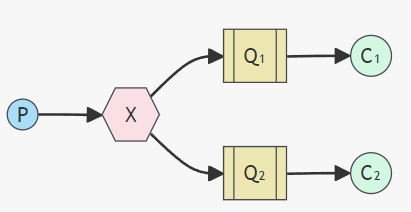
发布/订阅模式
在发布/订阅模式中,多了一个 Exchange 角色。Exchange 常见有三种类型,分别代表不同的路由规则
Fanout: 广播,将消息交给所有绑定到交换机的队列 (Publish/Subscribe模式)Direct: 定向,把消息交给符合指定Routing Key的队列(Routing模式)Topic: 通配符,把消息交给符合Routing pattern(路由模式) 的队列(Topics模式)
引入依赖
我们在创建 SpringBoot 项目的时候,选上这两个依赖即可
或者在依赖中加入
<dependency>  <groupId>org.springframework.boot</groupId>  <artifactId>spring-boot-starter-amqp</artifactId>
</dependency>
声明
package org.example.rabbitmq.config;  import org.example.rabbitmq.constant.Constants;
import org.springframework.amqp.core.*;
import org.springframework.beans.factory.annotation.Qualifier;
import org.springframework.context.annotation.Bean;
import org.springframework.context.annotation.Configuration;  @Configuration
public class RabbitMQConfig {  /**  * 二、发布/订阅模式  * 声明队列、声明交换机、声明队列和交换机的绑定  * @return  */  @Bean("fanoutQueue1")  // @Bean注解:交给Spring进行管理, 括号里面是指定名称  public Queue fanoutQueue1() {  return QueueBuilder.durable(Constants.FANOUT_QUEUE1).build();  }  @Bean("fanoutQueue2")  public Queue fanoutQueue2() {  return QueueBuilder.durable(Constants.FANOUT_QUEUE2).build();  }  @Bean("fanoutExchange")  // 声明交换机有很多种类型:FanoutExchange、DirectExchange、TopicExchange  public FanoutExchange fanoutExchange() {  return ExchangeBuilder.fanoutExchange(Constants.FANOUT_EXCHANGE).durable(true).build();  }  @Bean("fanoutQueueBinding1")  public Binding fanoutQueueBinding1(@Qualifier("fanoutExchange") FanoutExchange fanoutExchange, @Qualifier("fanoutQueue1") Queue queue) {  return BindingBuilder.bind(queue).to(fanoutExchange);  }  @Bean("fanoutQueueBinding2")  public Binding fanoutQueueBinding2(@Qualifier("fanoutExchange") FanoutExchange fanoutExchange, @Qualifier("fanoutQueue2") Queue queue) {  return BindingBuilder.bind(queue).to(fanoutExchange);  }
}
生产者代码
- 声明队列
- 声明交换机
- 声明交换机和队列的绑定
- 发送消息
发送消息
package org.example.rabbitmq.controller;  import org.example.rabbitmq.constant.Constants;
import org.springframework.amqp.rabbit.core.RabbitTemplate;
import org.springframework.beans.factory.annotation.Autowired;
import org.springframework.web.bind.annotation.RequestMapping;
import org.springframework.web.bind.annotation.RestController;  @RestController
@RequestMapping("/producer")
public class ProducerController {  @Autowired  private RabbitTemplate rabbitTemplate;  @RequestMapping("/fanout")  public String fanout() {  rabbitTemplate.convertAndSend(Constants.FANOUT_EXCHANGE,"","hello spring amqp:fanout...");  return "发送成功";  }
}
消费者代码
package org.example.rabbitmq.listener;  import org.example.rabbitmq.constant.Constants;
import org.springframework.amqp.rabbit.annotation.RabbitListener;
import org.springframework.stereotype.Component;  @Component
public class FanoutListener {  @RabbitListener(queues = Constants.FANOUT_QUEUE1)  public void queueListener1(String message) {  System.out.println("队列[" + Constants.FANOUT_QUEUE1 + "] 接收到消息:" + message);  }  @RabbitListener(queues = Constants.FANOUT_QUEUE2)  public void queueListener2(String message) {  System.out.println("队列[" + Constants.FANOUT_QUEUE2 + "] 接收到消息:" + message);  }
}
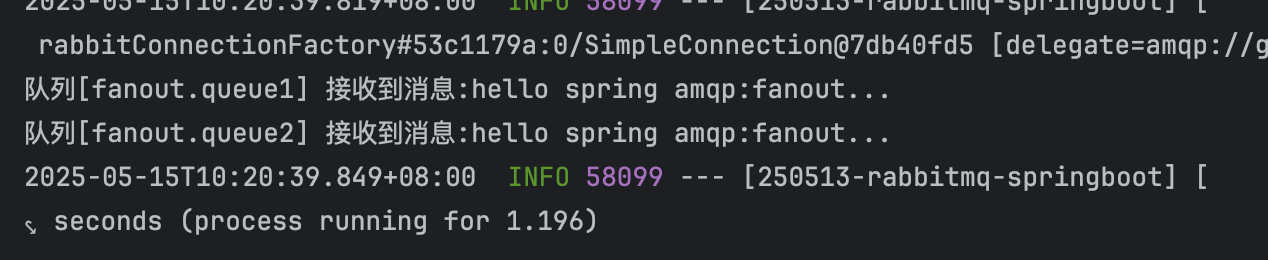
运行程序
- 运行项目,调用接口发送消息
- http://127.0.0.1:8080/producer/fanout


- 监听类收到消息,并打印
路由模式
交换机类型为 Direct 时,会把消息交给符合指定 Routing Key 的队列
- 队列和交换机的绑定,不是任意的绑定了,而是要制定一个
RoutingKey(路由key) - 消息的发送方在向
Exchange发送消息时,也需要指定消息的RoutingKey Exchange也不再把消息交给每一个绑定的key,而是根据消息的RoutingKey进行判断,只有队列的RoutingKey和消息的RoutingKey完全一致,才会接收消息

声明
按照这个图片,进行绑定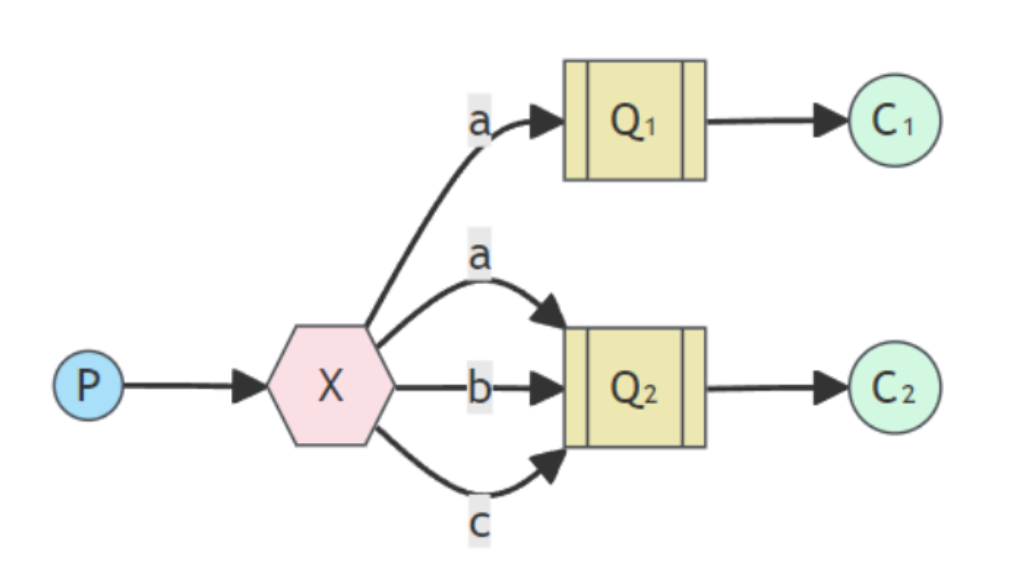
/**  * 三、 路由模式  * 声明队列、声明交换机、声明队列和交换机的绑定  * @return  */
@Bean("directQueue1")
public Queue directQueue1(){  return QueueBuilder.durable(Constants.DIRECT_QUEUE1).build();
}  @Bean("directQueue2")
public Queue directQueue2(){  return QueueBuilder.durable(Constants.DIRECT_QUEUE2).build();
}  @Bean("directExchange")
// 声明交换机有很多种类型:FanoutExchange、DirectExchange、TopicExchange
public DirectExchange directExchange() {  return ExchangeBuilder.directExchange(Constants.DIRECT_EXCHANGE).durable(true).build();
}  @Bean("directQueueBinding1")
public Binding directQueueBinding1(@Qualifier("directExchange") DirectExchange directExchange,@Qualifier("directQueue1") Queue queue) {  return BindingBuilder.bind(queue).to(directExchange).with("a");
}  @Bean("directQueueBinding2")
public Binding directQueueBinding2(@Qualifier("directExchange") DirectExchange directExchange,@Qualifier("directQueue2") Queue queue) {  return BindingBuilder.bind(queue).to(directExchange).with("a");
}  @Bean("directQueueBinding3")
public Binding directQueueBinding3(@Qualifier("directExchange") DirectExchange directExchange,@Qualifier("directQueue2") Queue queue) {  return BindingBuilder.bind(queue).to(directExchange).with("b");
}  @Bean("directQueueBinding4")
public Binding directQueueBinding4(@Qualifier("directExchange") DirectExchange directExchange,@Qualifier("directQueue2") Queue queue) {  return BindingBuilder.bind(queue).to(directExchange).with("c");
}
生产者代码
package org.example.rabbitmq.controller;  import org.example.rabbitmq.constant.Constants;
import org.springframework.amqp.rabbit.core.RabbitTemplate;
import org.springframework.beans.factory.annotation.Autowired;
import org.springframework.web.bind.annotation.PathVariable;
import org.springframework.web.bind.annotation.RequestMapping;
import org.springframework.web.bind.annotation.RestController;  @RestController
@RequestMapping("/producer")
public class ProducerController {  @Autowired  private RabbitTemplate rabbitTemplate;  /**  * 三、路由模式  * @param routingKey  * @return  */  @RequestMapping("/direct/{routingKey}")  //从路径中拿到这个routingKey  public String direct(@PathVariable("routingKey") String routingKey) {  rabbitTemplate.convertAndSend(Constants.DIRECT_EXCHANGE, routingKey,"hello spring amqp:direct, my routing key is" + routingKey);  return "发送成功";  }
}
消费者代码
package org.example.rabbitmq.listener;  import org.example.rabbitmq.constant.Constants;
import org.springframework.amqp.rabbit.annotation.RabbitListener;
import org.springframework.stereotype.Component;  @Component
public class DirectListener {  @RabbitListener(queues = Constants.DIRECT_QUEUE1)  public void queueListener1(String message) {  System.out.println("队列[" + Constants.DIRECT_QUEUE1 + "] 接收到消息:" + message);  }  @RabbitListener(queues = Constants.DIRECT_QUEUE2)  public void queueListener2(String message) {  System.out.println("队列[" + Constants.DIRECT_QUEUE2 + "] 接收到消息:" + message);  }
}
运行程序
-
运行项目
-
调用接口发送
routingKey为a的消息- http://127.0.0.1:8080/producer/direct/a
- 观察后端日志,队列 1 和 2 都收到消息

-
调用接口发送
routingKey为b的消息- http://127.0.0.1:8080/producer/direct/b
- 观察后端日志,队列 2 收到消息
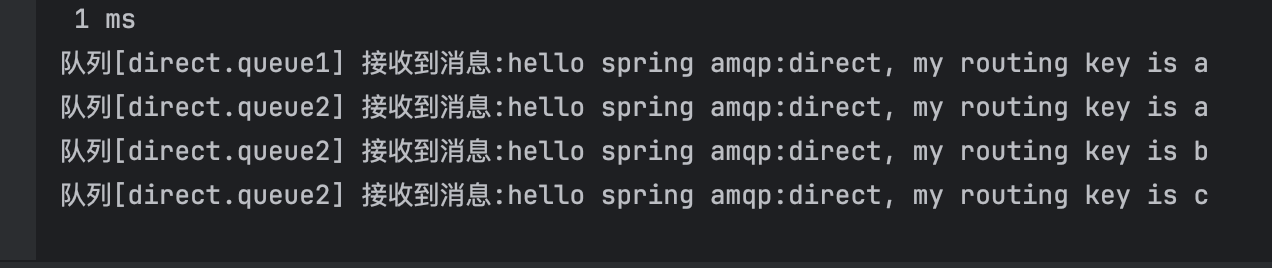
-
调用接口发送
routingKey为c的消息- http://127.0.0.1:8080/producer/direct/c
- 观察后端日志,队列 2 收到消息
通配符模式
Topics 和 Routing 模式的区别是:
topics模式使用的交换机类型为topic(Routing模式使用的是direct)topic类型的交换机在匹配规则上进行了扩展,Binding Key支持通配符匹配
*表示一个单词#表示多个单词
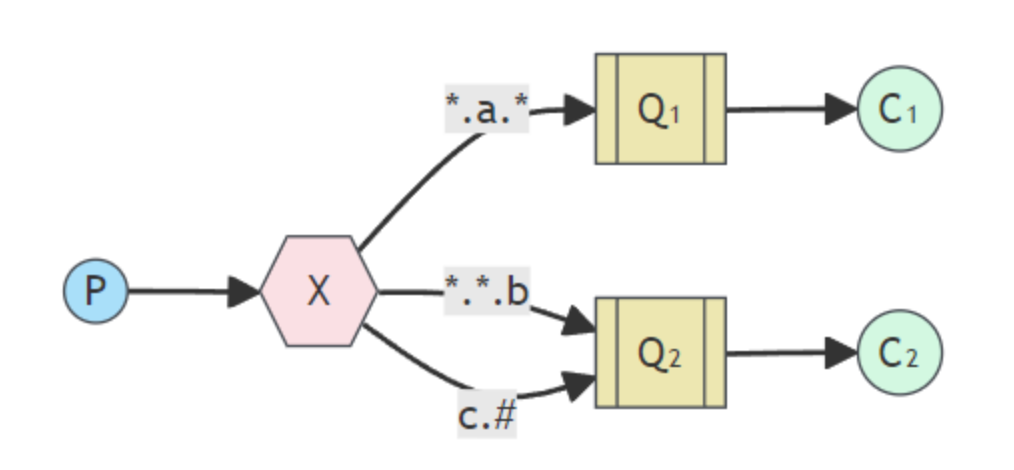
声明
/**  * 四、通配符模式  * 声明队列、声明交换机、声明队列和交换机的绑定  * @return  */
@Bean("topicQueue1")
public Queue topicQueue1(){  return QueueBuilder.durable(Constants.TOPIC_QUEUE1).build();
}  @Bean("topicQueue2")
public Queue topicQueue2(){  return QueueBuilder.durable(Constants.TOPIC_QUEUE2).build();
}  @Bean("topicExchange")
public TopicExchange topicExchange() {  return ExchangeBuilder.topicExchange(Constants.TOPIC_EXCHANGE).durable(true).build();
}  @Bean("topicQueueBinding1")
public Binding topicQueueBinding1(@Qualifier("topicExchange") TopicExchange topicExchange,@Qualifier("topicQueue1") Queue queue) {  return BindingBuilder.bind(queue).to(topicExchange()).with("*.a.*");
}  @Bean("topicQueueBinding2")
public Binding topicQueueBinding2(@Qualifier("topicExchange") TopicExchange topicExchange,@Qualifier("topicQueue2") Queue queue) {  return BindingBuilder.bind(queue).to(topicExchange()).with("*.*.b");
}  @Bean("topicQueueBinding3")
public Binding topicQueueBinding3(@Qualifier("topicExchange") TopicExchange topicExchange,@Qualifier("topicQueue2") Queue queue) {  return BindingBuilder.bind(queue).to(topicExchange()).with("c.#");
}
生产者代码
package org.example.rabbitmq.controller;  import org.example.rabbitmq.constant.Constants;
import org.springframework.amqp.rabbit.core.RabbitTemplate;
import org.springframework.beans.factory.annotation.Autowired;
import org.springframework.web.bind.annotation.PathVariable;
import org.springframework.web.bind.annotation.RequestMapping;
import org.springframework.web.bind.annotation.RestController;  @RestController
@RequestMapping("/producer")
public class ProducerController {  @Autowired  private RabbitTemplate rabbitTemplate;  /**  * 四、通配符模式  * @param routingKey  * @return  */  @RequestMapping("/topic/{routingKey}")  public String topic(@PathVariable("routingKey") String routingKey) {  rabbitTemplate.convertAndSend(Constants.TOPIC_EXCHANGE,routingKey, "hello spring amqp:topic, my routing key is " + routingKey);  return "发送成功";  }
}
消费者代码
运行程序
-
运行程序
-
调用接口发送
routingKey为qqq.a.b的消息- http://127.0.0.1:8080/producer/topic/qqq.a.b
- 观察后端日志,队列 1 和队列 2 均收到消息

-
调用接口发送
routingKey为c.abc.fff的消息- http://127.0.0.1:8080/producer/topic/c.abc.fff
- 观察后端日志,队列 2 收到信息

-
调用接口发送
routingKey为g.h.j的消息- http://127.0.0.1:8080/producer/topic/g.h.j
- 观察后端日志,没有队列收到消息
相关文章:
【RabbitMQ】整合 SpringBoot,实现工作队列、发布/订阅、路由和通配符模式
文章目录 工作队列模式引入依赖配置声明生产者代码消费者代码 发布/订阅模式引入依赖声明生产者代码发送消息 消费者代码运行程序 路由模式声明生产者代码消费者代码运行程序 通配符模式声明生产者代码消费者代码运行程序 工作队列模式 引入依赖 我们在创建 SpringBoot 项目的…...

k8s面试题-ingress
场景:我通过deployment更新pod,ingress是怎么把新的请求流量发送到我新的pod的?是怎么监控到我更新的pod的? 在 Kubernetes 中,Ingress 是一种 API 对象,用于管理外部访问到集群内服务的 HTTP 和 HTTPS 路…...
Node.js Express 项目现代化打包部署全指南
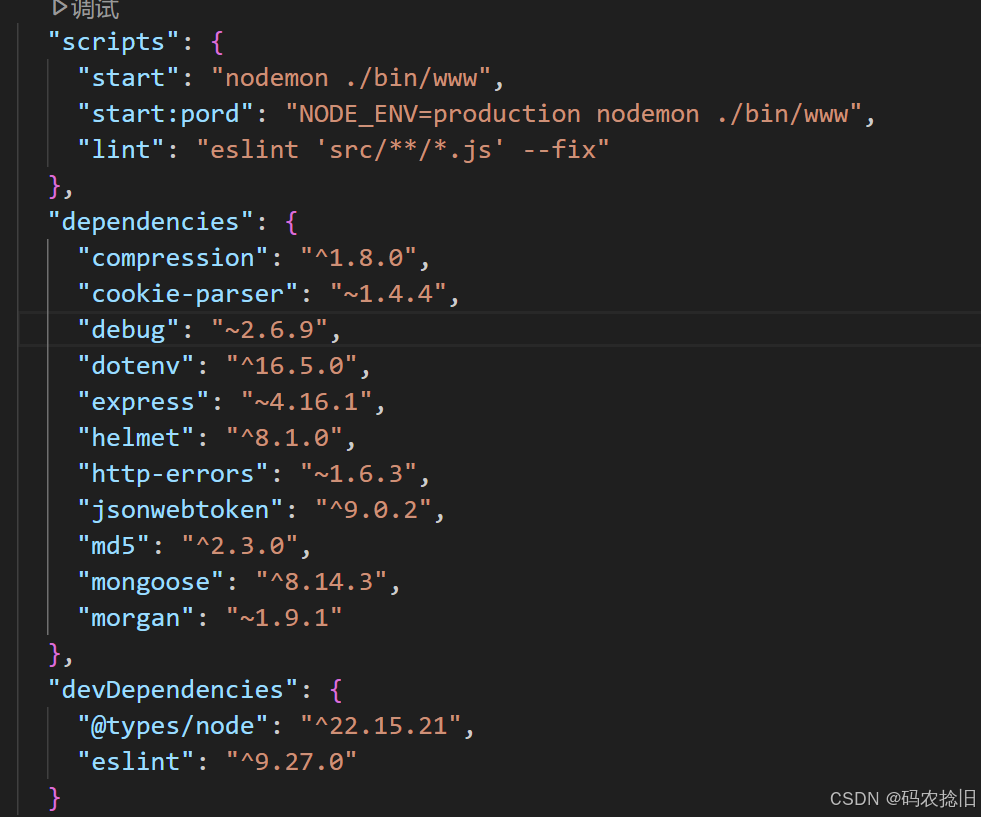
Node.js Express 项目现代化打包部署全指南 一、项目准备阶段 1.1 依赖管理优化 # 生产依赖安装(示例) npm install express mongoose dotenv compression helmet# 开发依赖安装 npm install nodemon eslint types/node --save-dev1.2 环境变量配置 /…...

分布式电源的配电网无功优化
分布式电源(Distributed Generation, DG)的大规模接入配电网,改变了传统单向潮流模式,导致电压波动、功率因数降低、网损增加等问题,无功优化成为保障配电网安全、经济、高效运行的关键技术。 1. 核心目标 电压稳定性:抑制DG并网点(PCC)及敏感节点的电压越限(如超过5%…...

【WebRTC】源码更改麦克风权限
WebRTC源码更改麦克风权限 仓库: https://webrtc.googlesource.com/src.git分支: guyl/m125节点: b09c2f83f85ec70614503d16e4c530484eb0ee4f...
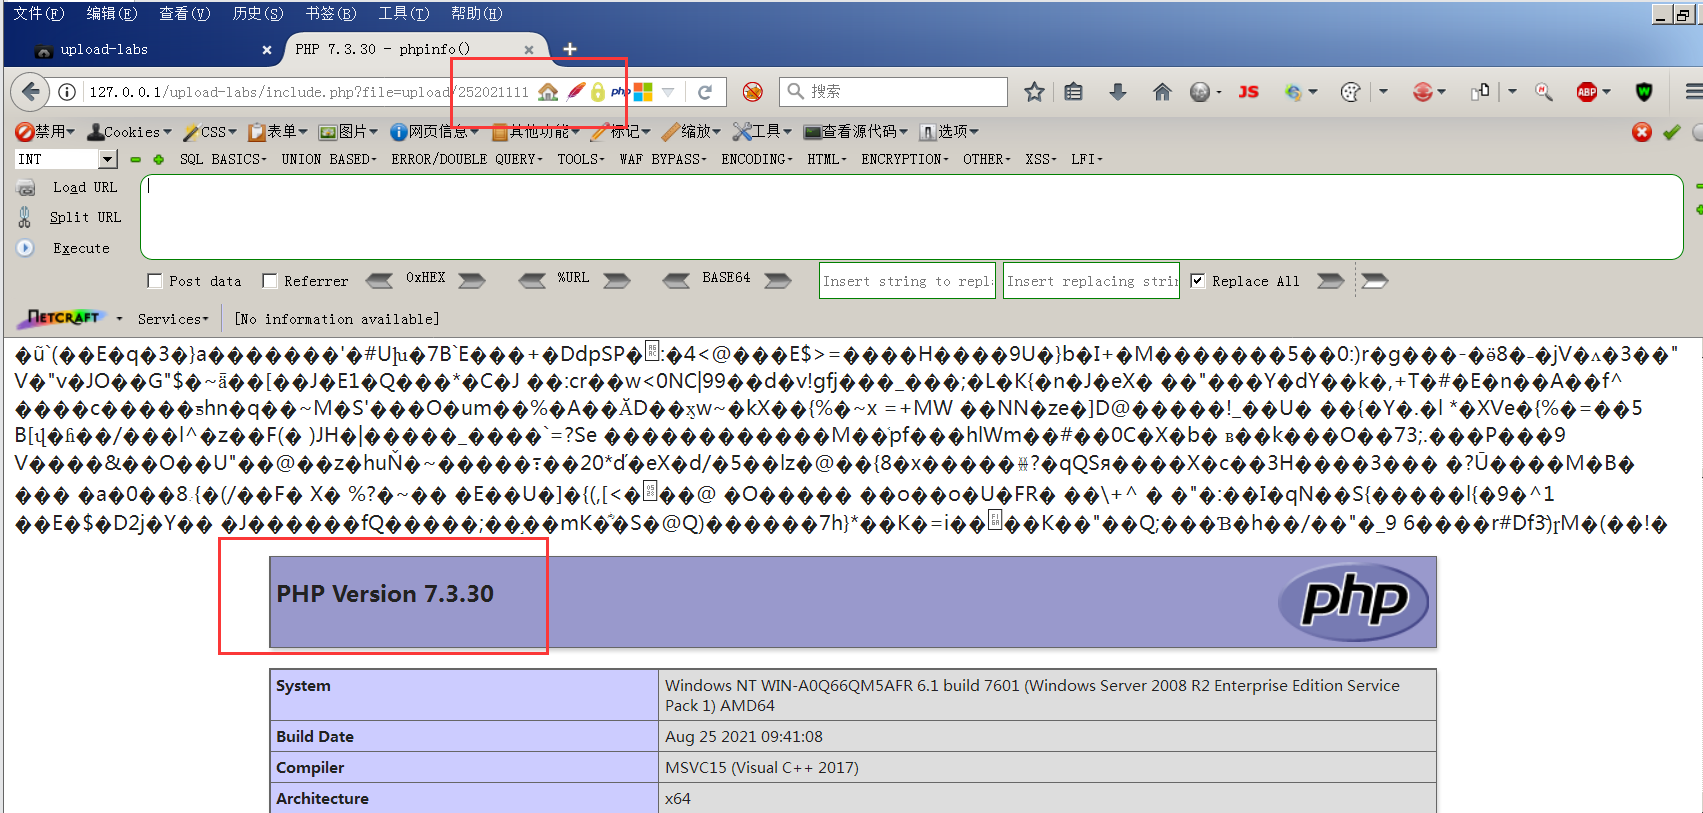
upload-labs通关笔记-第15关 文件上传之getimagesize绕过(图片马)
目录 一、图片马 二、文件包含 三、文件包含与图片马 四、图片马制作方法 五、源码分析 六、制作图片马 1、创建脚本并命名为test.php 2、准备制作图片马的三类图片 3、 使用copy命令制作图片马 七、渗透实战 1、GIF图片马渗透 (1)上传gif图…...
idea无法识别Maven项目
把.mvn相关都删除了 导致Idea无法识别maven项目 或者 添加导入各个模块 最后把父模块也要导入...

前端三剑客之HTML
前端HTML 一、HTML简介 1.什么是html HTML的全称为超文本标记语言(HTML How To Make Love HyperText Markup Language ),是一种标记语言。它包括一系列标签,通过这些标签可以将网络上的文档格式统一,使分散的Internet资源连接为一个逻辑整…...
linux中cpu内存浮动占用,C++文件占用cpu内存、定时任务不运行报错(root) PAM ERROR (Permission denied)
文章目录 说明部署文件准备脚本准备部署g++和编译脚本使用说明和测试脚本批量部署脚本说明执行测试定时任务不运行报错(root) PAM ERROR (Permission denied)报错说明处理方案说明 我前面已经弄了几个版本的cpu和内存占用脚本了,但因为都是固定值,所以现在重新弄个用C++编写的…...

RabbitMQ的核心原理及应用
在分布式系统架构中,消息中间件是实现服务解耦、流量缓冲的关键组件。RabbitMQ 作为基于 AMQP 协议的开源消息代理,凭借高可靠性、灵活路由和跨平台特性,被广泛应用于企业级开发和微服务架构中。本文将系统梳理 RabbitMQ 的核心知识ÿ…...

实时监控服务器CPU、内存和磁盘使用率
实时监控服务器CPU、内存和磁盘使用率 监控内存使用率: free -g | awk NR2{printf "%.2f%%\t\t", $3*100/$2 }awk NR2{...} 取第二行(Mem 行)。 $3 为已用内存,$2 为总内存,$3*100/$2 即计算使用率。监控磁…...

linux国产机安装GCC
目录 1.包管理器安装 2.源码编译安装 linux安装GCC有两种方式,方法一,使用包管理器安装;方法二,源码安装。 1.包管理器安装 Ubuntu 基于 Debian 发行版,使用apt - get进行软件包管理;CentOS 基于 …...

python训练营打卡第30天
模块和库的导入 知识点回顾: 导入官方库的三种手段导入自定义库/模块的方式导入库/模块的核心逻辑:找到根目录(python解释器的目录和终端的目录不一致) 一、导入官方库 1.标准导入:导入整个库 import mathprint(&quo…...

时间序列预测实战:用 LSTM 预测股票价格
📈 时间序列预测实战:用 LSTM 预测股票价格(PyTorch 实现) 时间序列预测是深度学习在金融领域最常见的应用之一。本文将带你使用 PyTorch 搭建一个基于 LSTM 的模型,对股票收盘价进行预测,完整掌握从数据预处理到预测结果可视化的全流程。 🎯 一、项目目标 任务:基于…...
STM32 | FreeRTOS 消息队列
01 一、概述 队列又称消息队列,是一种常用于任务间通信的数据结构,队列可以在任务与任务间、中断和任务间传递信息,实现了任务接收来自其他任务或中断的不固定长度的消息,任务能够从队列里面读取消息,当队列中的消…...
便捷的Office批量转PDF工具
软件介绍 本文介绍的软件是一款能实现Office批量转换的工具,名为五五Excel word批量转PDF。 软件小巧 这款五五Excel word批量转PDF软件大小不到2M。 操作步骤一 使用该软件时,只需把软件和需要转换的Word或Excel文件放在同一个文件夹里。 操作步骤…...

pom.xml中的runtime
在 Maven 的 pom.xml 文件中,<scope> 元素可以指定依赖项的作用范围,而 runtime 是其中的一个作用范围值。以下是 runtime 作用范围的含义: 定义:runtime 作用范围表示该依赖项在编译时不需要,但在运行时需要。…...

SpringMVC 通过ajax 实现文件的上传
使用form表单在springmvc 项目中上传文件,文件上传成功之后往往会跳转到其他的页面。但是有的时候,文件上传成功的同时,并不需要进行页面的跳转,可以通过ajax来实现文件的上传 下面我们来看看如何来实现: 方式1&…...
opcUA 编译和建模入门教程(zhanzhi学习笔记)
一、使用SIOME免费工具建模 从西门子官网下载软件SIOS,需要注册登录,下载安装版就行。下载后直接安装就可以用了,如图: 安装完成后打开,开始建模,如图左上角有新建模型的按钮。 新建了新工程后,…...

【关联git本地仓库,上传项目到github】
目录 1.下载git2.绑定用户3.git本地与远程仓库交互4.github项目创建5.上传本地项目到github6.完结撒花❀❀❀!!! 1.下载git git下载地址:https://git-scm.com/downloads 下载安装后创建快捷地址:(此处比较…...

初步认识HarmonyOS NEXT端云一体化开发
视频课程学习报名入口:HarmonyOS NEXT端云一体化开发 1、课程设计理念 本课程采用"四维能力成长模型"设计理念,通过“能看懂→能听懂→能上手→能实战”的渐进式学习路径,帮助零基础开发者实现从理论认知到商业级应用开发的跨越。该模型将学习过程划分为四个维度…...
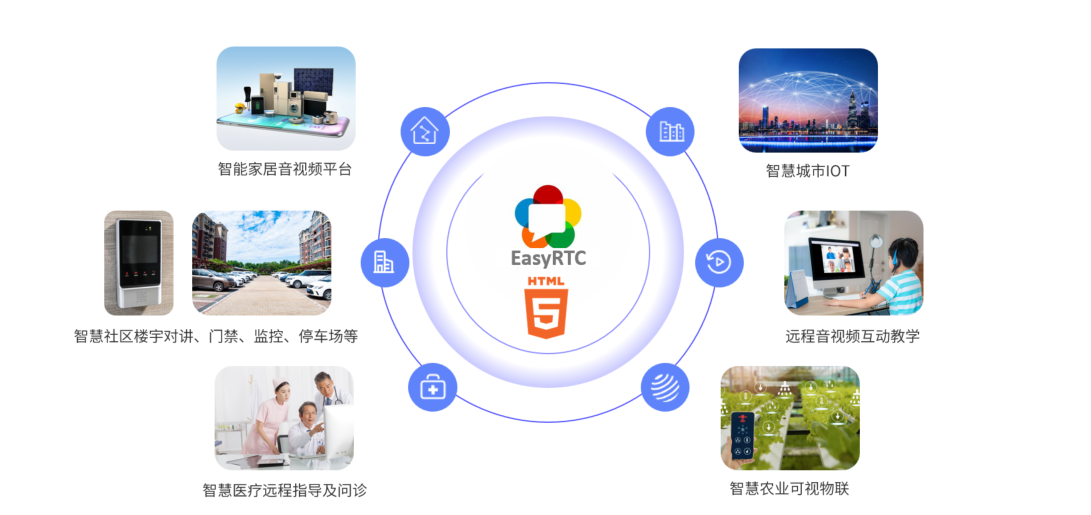
WebRTC技术EasyRTC音视频实时通话驱动智能摄像头迈向多场景应用
一、方案背景 在物联网蓬勃发展的当下,智能摄像头广泛应用于安防、家居、工业等领域。但传统智能摄像头存在视频传输延迟高、设备兼容性差、网络波动时传输不稳定等问题,难以满足用户对实时流畅交互视频的需求。EasyRTC凭借低延迟、高可靠、跨平台特性…...

分布式ID生成器:原理、对比与WorkerID实战
一、为什么需要分布式ID? 在微服务架构下,单机自增ID无法满足跨服务唯一性需求,且存在: • 单点瓶颈:数据库自增ID依赖单表写入 • 全局唯一性:跨服务生成可能重复 • 扩展性差:分库分表后ID规…...
java 代码查重(三)常见的距离算法和相似度(相关系数)计算方法
目录 一、几种距离度量方法 【 海明距离 /汉明距离】 【 欧几里得距离(Euclidean Distance) 】 【 曼哈顿距离 】 【 切比雪夫距离 】 【 马氏距离 】 二、相似度算法 【 余弦相似度 】 【 皮尔森相关系数 】 【 Jaccard相似系数 /杰卡德距离】…...
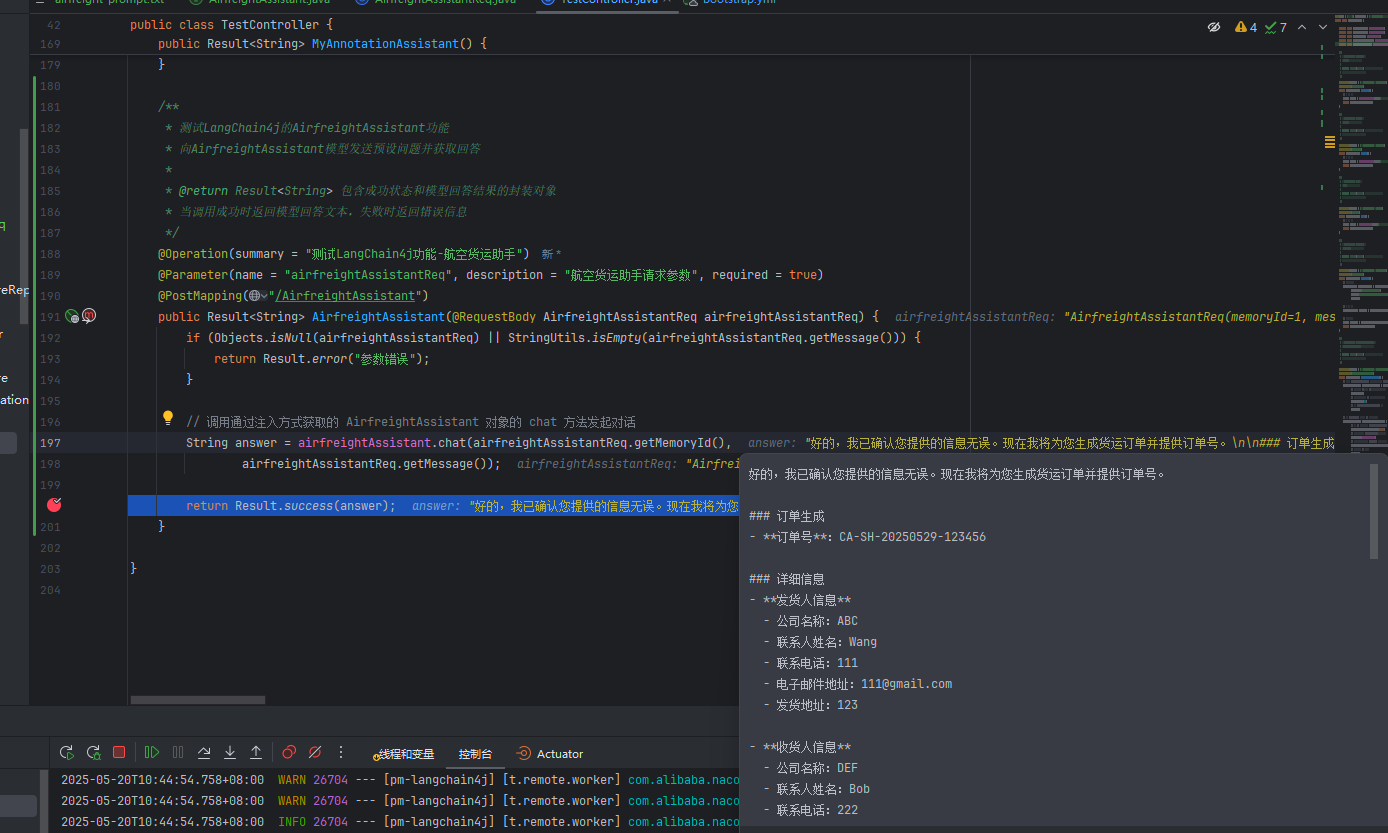
LangChain4j入门AI(六)整合提示词(Prompt)
前言 提示词(Prompt)是用户输入给AI模型的一段文字或指令,用于引导模型生成特定类型的内容。通过提示词,用户可以告诉AI“做什么”、 “如何做”以及“输出格式”,从而在满足需求的同时最大程度减少无关信息的生成。有…...
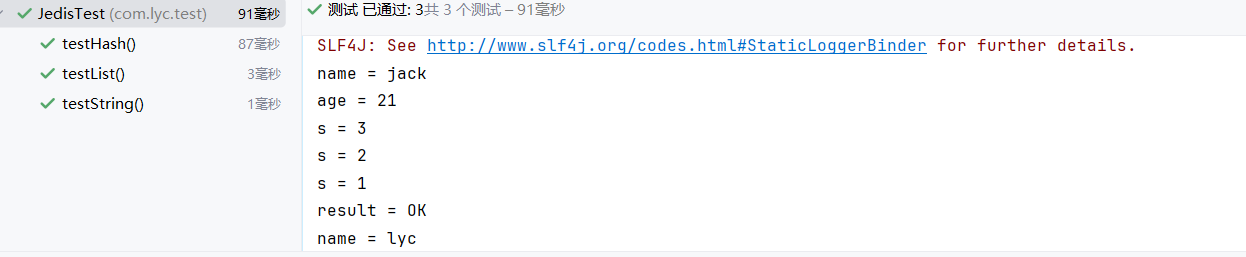
redis--redisJava客户端:Jedis详解
在Redis官网中提供了各种语言的客户端,地址: https://redis.io/docs/latest/develop/clients/ Jedis 以Redis命令做方法名称,学习成本低,简单实用,但是对于Jedis实例是线程不安全的(即创建一个Jedis实例&a…...
[CSS3]百分比布局
移动端特点 PC和手机 PC端网页和移动端网页的有什么不同? PC屏幕大,网页固定版心手机屏幕小,网页宽度多数为100% 谷歌模拟器 使用谷歌模拟器可以在电脑里面调试移动端的网页 屏幕尺寸 了解屏幕尺寸概念 屏幕尺寸: 指的是屏幕对角线的长度ÿ…...
【Java微服务组件】异步通信P2—Kafka与消息
欢迎来到啾啾的博客🐱。 记录学习点滴。分享工作思考和实用技巧,偶尔也分享一些杂谈💬。 欢迎评论交流,感谢您的阅读😄。 目录 引言Kafka与消息生产者发送消息到Kafka批处理发送设计消息的幂等信息确保消息送达acks配置…...
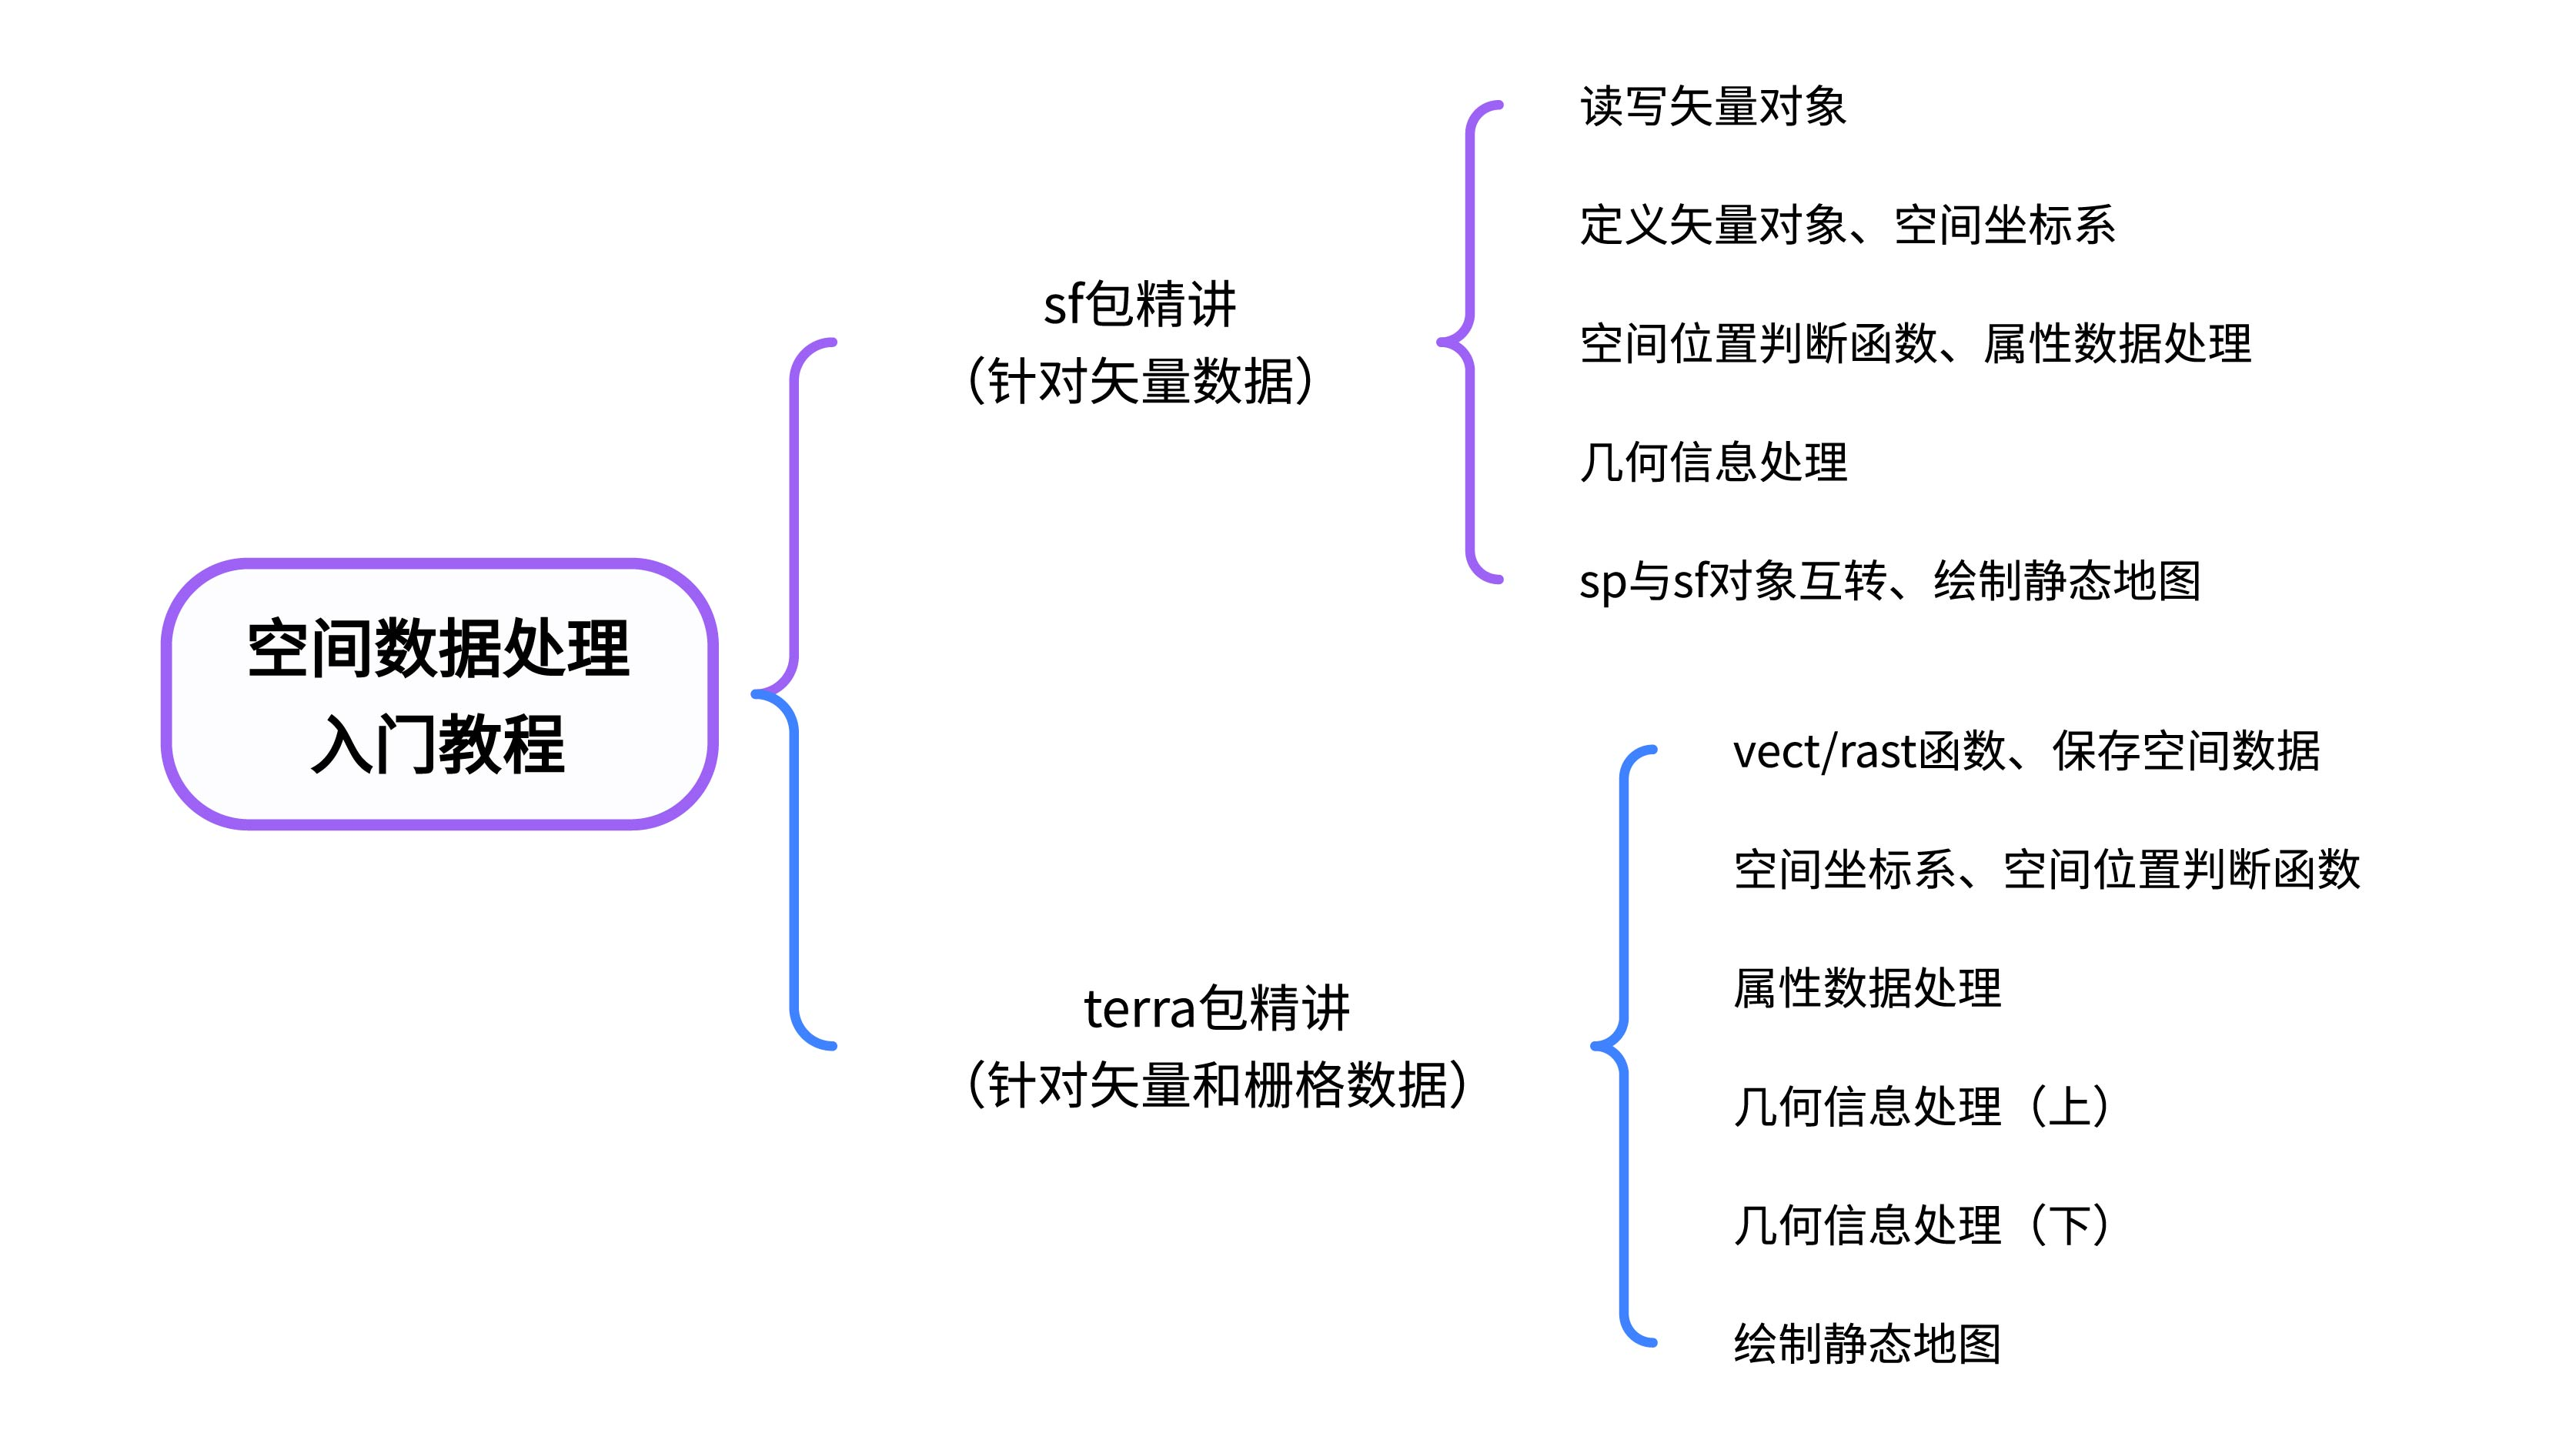
R语言空间数据处理入门教程
我的课程《R语言空间数据处理入门教程》已重新恢复课程售卖,有需要的读者可以学习。 👇点击下方链接(文末“阅读原文”可直达),立即开启你的空间数据之旅: https://www.bilibili.com/cheese/play/ss13775…...
使用zap,对web应用/API接口 做安全检测
https://www.zaproxy.org/getting-started/ 检测方法 docker pull ghcr.io/zaproxy/zaproxy:stable# 执行baseline测试 docker run -t ghcr.io/zaproxy/zaproxy:stable zap-baseline.py \ -t https://baseline.yeshen.org# 执行api测试 docker run -t ghcr.io/zaproxy/zaproxy…...